
Leaderboard


Popular Content
Showing content with the highest reputation on 28/04/21 in all areas
-
A15 Crusader Mk.III 9th Queen's Lancers, 1st Armoured Division. El Alamein 1942. I have to say I have been very impressed by my first Border Models kit. The detail and fit of parts were excellent. Accuracy wise I can't really comment as I don't have any plans to check it against but to my eyes it looks right. Maybe the weld beads on the turret are a little prominent but that's about it. Most of my references show vehicles with the earlier sand shields that have two continuous ridges instead of the three broken ones as provided in the kit but as I don't have a photo of this particular tank I don't know which ones are correct. There is really no need for after market so I feel that the kit is good value for money. Hopefully there is enough interest in the kit to encourage Border to release a few different versions. The model has been painted with MRP paints and weathered with various paints, pigments and oils. A full work in progress can be found HERE. Overall I'm pretty pleased with the way this one has turned out. There are always a few areas that can be approved upon but as usual I didn't spot them until I had done the photography. At some point in the future I intend to build a base and will add some stowage. Wayne20 points
-
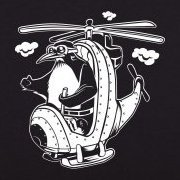
Had a game recovering my Flickr account. So didn't do a WIP for this one. Plus I tend to build pretty slowly now I have a little one. Bought this one from fleabay, was actually 2 kits in the box, as one was missing small bits that the other kit had. So I've got a spare one, albeit missing a Lewis gun a couple of struts and the tail skid. If anyone wants it PM me, you can have it for £2 plus postage. Yes it's got rigging, no I haven't finished the Taube yet 🙄 Not the best photographer or modeler for that matter. Haven't used weathering on this one as the crews generally kept them pretty clean. So here it is. Added twisted wire to replicate the wicker on the seat. Thanks for looking, comments and criticism welcome. 🐧20 points
-
A quick midweek update as work is going to keep me busy enough on a day-to-day basis that headspace for Vixenry will be limited for a while. Thanks Keith: self and Cat sat outside beside a fire watching this beauty rise a couple of evenings back and it defined 'heavenly': If I couldn't smuggle them contraptions past your scrutiny Steve it would have been (actually and metaphorically) back to the drawing-board! Not an unwarranted skepticism; having an old RAF/RN set of Reheat PE seats and fittings for WWII aircraft that are such magnificently detailed creations (too beautiful to ever use on a build of course, might frame them...), I was convinced my pale imitations of more modern fittings would be worth it for the extra sharpness that they'd bring to proceedings at this scale. I know nothing of Reheat or the people/persons behind the company but by God their etch is the best I've ever seen. Their 'soldiers on mescaline' range I'm less sure about however... Is that one of @corsaircorp's ancestors?? 'Memoirs of a Flight Surgeon'.... 🤣 You Italians, it's like you invented style.... 😁 Especially with all the extracted teeth that he'd doubtless have hanging from his ceiling Benedikt... ✊ Ta Bill. Not until starring in Olive Does Dallas. That film changed him utterly... With the cockpit interiors now fully assembled, some valedictory shots of 'bits that will never see the light of day again'.... Followed by some gratuitous cheesecake of Destiny Harper trying out the seats: I've shoved the cockpit innards of XJ481 up the nose section now and fixed it into place, XN708 I'll come to later after completing the Martel aircraft in full first. As the next step will be installing the LAB gear and canopy fittings around the pilot's opening prior to adding the closed canopy, it was time also to get the vacformer to hold it's breath: Natch I managed to slam the plate down a bit hard and knock one of the bucks over, but the other three did Ok. Top left is obvs the version with the older fairing to go onto '481, whilst a test fit of the later canopy earlier showed that it tucks nicely into the more pronounced rain-shedding fairing moulded into the nose of '708. Prudence (dear Prudence...) dictates that more time will be eaten working up some Oramasking for painting inside and out of those canopies - I tremble before them compound curves. That's all folks, have to get back to work now as a queue of calls waiting. Best to all of you from all here, Tony20 points
-
19 points
-
The A350: it's an aircraft I can't work out if I like or not. Maybe the nose is too pointy and pinched... maybe the vertical stabilizer is too small... I can't put my finger on it. But, I think in the Air France livery it looks very smart. This is the Revell kit, which went together beautifully. No issues at all during the build. The instructions show to install the landing gear doors open, when they are closed when the landing gear is down. That was really the only thing I queried during the build. For the first time, I used Humbrol Clearfix to make the cabin windows. The kit comes with clear parts for the windows, but these are installed before painting, and I didn't want to mask all of the windows. I had the Clearfix for a long time, but the goopy texture of it made me think that I was going to make a mess so I never used it. It was actually much easier to apply than I thought, and I was really pleased with the results - which made me look at my other completed airliners, where I had filled the windows with putty, and used decals. I really wish I had had the confidence to use Clearfix on my earlier airliners. But I have many more to build! The Air France decals are from F-DCAL, and went on really well - though the texture of the carrier film meant that the gloss varnish beaded. I managed to buff the beads out, and went over the whole model with Auto Glym super resin varnish. This is F-HTYC, Saint Denis de la Réunion.18 points
-
The Airfix 1/72 Fairey swordfish pretty much oob, a nice kit, builds up well but a bit tricky overall. https://www.britmodeller.com/forums/index.php?/topic/235088996-another-stringbag/15 points
-
Hello,Friends - I apologise for re-posting this build.I’ve familiarised myself with the image sizing and posting,etc.for better viewing. This model is the first 1/32 scale model I’ve built so it was a steep learning curve in many respects. She carries two ‘Sea Eagle’ Anti-Shipping Missiles and wears ‘DXM’Decals. I hope you enjoy viewing. Thank You.15 points
-
Been a while since I posted photos of completed models to the site. It takes me over an hour to edit the photos and move them to Flickr, then post them up. Good thing that I'm retired I guess. Here's my Academy 1/48th F-4J in VF-84 Jolly Rogers markings. It is almost all out of the box, including decals. Only additions were the Furball cockpit decals that fit and look great. Sorry though, no photos. Trust me, they are good. I wasn't overly impressed with the Academy kit compared to the Hasegawa. Some parts are better, some not as much. In the end it looks like an F-4. I ran out of steam on this one before building up the missiles and bombs. Maybe I'll add them later...14 points
-
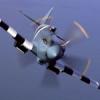
this time something else a Arma Hobby Hurricane. I did a conversion to the PR version used by Polish 318 fighter reconnaissance squadron in it's training time in Palestine, in combat 318 sq. used Spitfire MK.V and IX. From aftermarket I used: Eduard seat belts and Yahu instrument panel, Quickboost propeller and exhaust pipes -both for Hasegawa kit. Decals custom made.13 points
-
Thus speaketh the resin-meister of the OOB Hornet Thanks Mark - I now have an ebook of it for the ridiculous price of £3.99. There’s only a small section/selection of photos on the 4th FG - but welcome. And £3.99! Daft not too. This is an illustration of the plan moving forward. To pick and choose between the best bits of the Eduard PE and any nice resin details that I can neatly separate from the discarded Aires resin sidewalls. I’m gonna glue in at this stage any bits that are cockpit green in colour - like the map case bottom-right in the photo - so they get painted with the cockpit, and reserve the other bits to be added after painting. Hoping for a neater, crisper finish than painting them in-situ.12 points
-
Continuing with my trainer aircraft series this is my RVHP 1/72 Beechcraft TC-12B Huron advance trainer. The C-12 is the military version of Beechcraft's Super King Air and the TC-12B version was used to train Navy multi-engine (future E-2) pilots. This is my first RVHP complete kit and I would rank it as middle of the road as far as quality of casting and fit. Interior detail was descent. The resin transparencies were mostly transparent. The landing gear was made from a stronger black resin. Unfortunately they give it a nose down attitude. The decals were printed on a continuous film so careful trimming was required, but they otherwise caused no trouble. The kit was the UC-12B version but since the TC-12's were converted from the UC-12's this only required a minor tweak to the aircraft data decal. RVHP makes a TC-12 boxing but it has markings for a US Navy Centennial aircraft that had early WW II markings so wasn't useful for my purposes. A couple of notes for anyone else doing this build are first,; the engine exhaust are too big for the holes in the nacelles and will require enlarging, something that will be very difficult once the wings are attached to the fuselage. The main gear doors are much to short for the wheel well openings* and the front gear doors are too thin and flexible to be used, so new ones will need to be made. My biggest disappointment is that despite careful measuring and cutting I still did not get the masking for the white borders around the stars and bars right. Decals with the border would have been really helpful. So here it is: Continuing with trainers next up is Declari's Diamond DA40/T-53 Enjoy *I based this on a review build that I had read. I have since looked at a bunch of pictures and it looks like some of these had shorter doors with the wheel partially exposed when retracted and some had longer door and the wheel completely retracted. So I am not sure what is right.11 points
-
Latest off the bench is the Hasegawa/Revell FGR2 Phantom in the markings of 1435 Flight, Falkland Islands, December 1991. For the price this is excellent value as the kit can be obtained for about £25. However ..... the main wheels are wrong (the American ones are supplied) and there are no Sidewinders. Soooo. Wheels are by CMK, Sidewinders are from a Hobby Boss Hawk kit and the FOD covers by Quickboost, decals by Extra decal). Hope you like. Please feel free to comment etc. Thanks for looking. Dick11 points
-
Here it is the Buildreport to this Car >>>>> And here are the Pics of the finished Thing. A little Wood covered with the typical Reddish Brown Sand and some Elefantgrass. For this i cut a Bristle Brush, nothing special at all. Greetings from Vienna !11 points
-
This is the ICM 1/48 scale A-36 kit converted into the P-51 MkX prototype with Rolls Royce Merlin engine.The nose is the modified part from a Academy Hispano Ha1112 Buchon.This is not a what if. Saluti Giampiero10 points
-
I’ve wanted to make a grey Lightning for a while, and finally got round to doing so. This is the 1/48 Airfix kit, which went together pretty well apart from the left wing being a bit warped, which after some bending, filling, sanding and more bending hopefully doesn’t show too much. All comments and suggestions for improvements welcome! And a huge thank you to @bar side for the extra decals.9 points
-
Hi all. Please see attached some photos of this Focke Wulf I finished some time ago. Built out of the box, bought it partly for the Norway-themed decals. This aircraft was stationed at Herdla outsider of Bergen at some time during the war. Makes me curious about who "Ingeborg" was (or still is), it's a common name in norwegian. The build was straight forward, some irritating issues that I didn't fix, such as thick trailing edges and some strange depresseions on the top side of the flaps, and inspection hatch on both sides of the vertical stab. Finished with mission models rlm paint, which performed beautifully, even for the tiny mottling. Regards, Isak9 points
-
An interesting kit to build and unlike all the usual warships. The part to part fit was ok, only minimum warping of some parts, that were straightened by dipping into hot water and then bent into shape. Due to a lack of metal chain, which would have been better, I used the plastic chain that came attached to the anchors. It was okayish, but not all that lifelike. This kit was my first real go at weathering, ie rust, I think it came out ok but I do need more practise. The PE set from Atlantic Models made all the difference to the railings and the walkway on the light tower. Jon.9 points
-
Czech Zlin 142. Hobby Boss, 1/729 points
-
People were trashing the Italeri Tornado GR4 until it turned out to be a great kit, and so they started trashing it for its price. I'm sure Revell's Sled will be labelled a disappointment by the usual suspects, and even if it isn't, it'll be hammered for being too expensive. This kind of criticism will make it nicer for the rest of us who just want to build one. Sadly I'm no longer shocked by the vitriol generated by 'bad' model kits. There's a small but noisy section of the internet for whom it's not enough just to not like the kit, they have to actively campaign to make sure nobody else likes it either. Well, I'll happily contribute to their ulcers if there's a decent build of a beloved subject involved 😉 Edit: I reserved a kit with Jumblies in Norwich for just a £5 deposit with a sale price of £71.95, top tip @LorenSharp 😉9 points
-
Hi all. Well, as I cannot continue with another model because I am waiting for some decals and I think it will take a long time to arrive, I decided to start the construction of this beautiful plane and great Eduard kit. Except for the base color Gunze RLM 02 in both the cockpit and the landing gear, everything else is painted with Vallejo. Andrés S. To the landing gear I have added the brake wiring with stretched plastic.8 points
-
Hi everyone This is my most recent build, which I finished Sunday afternoon. I love Spitfires, and I think this might be one the only spitfire I have kept for myself. The Eduard spitfire is possibly my favourite model to build, its one of those where you can choose to speed through it and still get a nice result or to detail it till your hearts content. I decided to settle for a middle ground, and finally decided to build a model methodically rather than jumping into it and fixing mistakes I could have avoided. Although its worth mentioning, I thought I could get away with my old bottles of Hataka paint... this turned out to be a horrible decision, in my opinion these paints are worth staying away from. Instead I switched them out for the Vallejo tropical pack, I've been really enjoying using Vallejo paints at the moment and think in future I'll continue to use them where I can. The only one real mistake I made building this was with the Vallejo paints, being that my usual method of two tone RAF schemes where I cut pieces of Frog tape out to mask off the first layer left a step in the paint, thinking I had sanded it down enough I continued and was left with a small step between the two camouflage schemes. Nevermind, its not too obvious. I also found out through an error that these Eduard decals have a carrier film over them, I was trying to mask off a small section on the model and pulled a bit of it off which I feel makes the decals look really realistic. Not too much to say about the build other than that, I kept the weathering minimal in contrast to my previous build. I wanted this Spit to look nimble which I hope is reflected in it being cleaner. I have also just noticed that I forgot to paint the fabric over the machine guns, im not too fussed about fixing this though. Thanks, Ryan8 points
-
Hi All, this was my Christmas Holiday build, it took me a little longer though, finished it in February. It was built more or less from the box using Montex masks and Humbrol enamels. Thanks for dropping in!8 points
-
Latest effort, just finished. This is an old limited-run resin and white metal kit, but accurate and nicely detailed. The contra-rotating propellor came as a solid bit to be glued on the front, but after much work has been made to rotate as two separate props. The vacuform canopy also took a lot of work to carefully cut out and fit - the canopy on the real thing was fully faired and blended with the fuselage. R2496, RAE Farnborough, 1945 (4) w by Philip Pain, on Flickr R2496, RAE Farnborough, 1945 (6) w by Philip Pain, on Flickr R2496, RAE Farnborough, 1945 (9) w by Philip Pain, on Flickr R2496, RAE Farnborough, 1945 (12) w by Philip Pain, on Flickr R2496, RAE Farnborough, 1945 (13) w by Philip Pain, on Flickr R2496, RAE Farnborough, 1945 (17) w by Philip Pain, on Flickr R2496, RAE Farnborough, 1945 (20) w by Philip Pain, on Flickr R2496, RAE Farnborough, 1945 (22) w by Philip Pain, on Flickr I did this model for no other reason than the M.B.5 was a great looker, and during it's brief life from 1944-48 it's qualities were greatly praised by test pilots and mechanics. However it had been too long in the making, and jet fighters were already in advanced development. The M.B.5 was never fitted with armour or guns, which would have somewhat degraded its competitive edge, and the wing aerofoil section dated from 1927, giving it a compressibility issue at high speeds. But with more (and earlier) development it could have become the best British piston fighter of WW2. R2496, RAE Farnborough, 1945 (23) w by Philip Pain, on Flickr R2496, RAE Farnborough, 1945 (27) w by Philip Pain, on Flickr These two photos compare it with a contemporary Supermarine Spiteful F.14, and a standard Spitfire F.14. Also with a P-51D Mustang (the original Airfix Mustang kit) because the M.B.5 was once described "as a Mustang on steroids".8 points
-
Thanks Giorgio I've done the other today… …and painted both using my patent ball painting device: Once that was done I could, gulp, think about closing up. After fitting the ball turret support: I haven't glued the ball so I can remove the masks and it does move. So far. The rear turret has been masked (I noticed the missing bit right at the front when I posted that and stuck it on): All the important bits in, she's closed up:8 points
-
With the meshes for the stacks made...time to fit them all to the rails... Once the glue had set it was time to think about joining the engine and chassis...and hoping that all the planning and test fitting would finally pay off... Have plumbed in all the hoses...which just leaves the electrics. Hope you all agree...not too bad a result... Let me know your thoughts...and any obvious errors. Ron to be continued.......8 points
-
The crispination of the interior of the sub is now complete and I have now been able to move on to more interesting things. The riveting process was an ordeal at times but I had to press on with it as if I had stopped, I knew that I would never get back to it and the model would never get completed. There are just the rivets where the halves of the hull meet to do but that shouldn't take too long. Anyway, I celebrated getting clear of the rivets by treating myself by way of soldering some tiny hand wheels to some equally tiny spindles as part of the valves for the seacocks and ballast transfer pipes; it was possible to pump both the ballast tanks out from either the commander's or the first mate's stations in and emergency. I have tacked these in place for the photographs. while I was on a roll, (I really know how to whoop it up!) I constructed the bellows for the snorkel mechanism. This assembly is also tacked in place for the same reason. The Hunley carried a box compass and I now need to be thinking about how I want go about making this. I think I will have a try at making it out of wood veneer. I also need to fabricate a candle holder, the vessel's sole source of lighting, and the controversial blue lantern which some eyewitnesses on both sides claim to have seen, one of which said he saw a blue light from the spot where the Hunley was eventually discovered,. The lantern was reported to have been unlit when the interior of the submarine was excavated by the archeologists. Strange. There are some references to the deadlights having covers to prevent light giving the sub's position away but I am not so sure about this as lighting was literally one candle for the entire boat and visibility underwater in a very muddy river estuary was next to nothing. The underwater work to prepare the Hunley for raising had to be done mostly by feel. The more observant will have noticed some hatch marks at the rear of the stern cutout on the model. Mrs Martian said it looks a bit dark in that part of the interior so I may extent the cutout to let some more light in. This would also have the advantage of making it easier to line the crankshaft and flywheel up and to fit the drive chain. I still find it hard to believe that actual bog standard chain was used for this purpose but the evidence both pre and post conservation is there for all too see. Good job that I have plenty of fine chain in my ship parts box. Time for some pictures methinks, thanks for looking. Martian 👽8 points
-
Hi, After Shcherbakov I am coming to GB with another vacu by Broplan in 1/72. It is Caproni Ca 111. In "Africa GB" I am staring in parallel a double build of two another Capronis: Ca 101 and Ca 133. Both from Ca 101 kit, the first one OOB, the second as massive scratch conversion. I do hope I will manage... To be continued Regards J-W7 points
-
I have been building this in the background as a wee surprise for a friend who was working at Turnhouse. She was made redundant during the first lockdown but has grown to love Civilian Airlines and is hoping that she will get back there when things return to as near normal as may be possible. This plane arrived for the first time in Edinburgh on her first day and I've been keeping the build quiet from her. Painted with: Tamiya XF-2 Flat White, Colourcoats Roundel Blue/ Oxford Blue Tamiya Metallic Grey, Gun Metal, Flat Green. Tamiya Lacquer Gloss Black Finished with Aqua Gloss With the absence of undercarriage this was a nice simple build and not too much seam work. Thanks for looking, Cheers, Alistair7 points
-
Ki.84 - Hasegawa 1/48 Scale with BrenGun Resin Japanese Fuel Cart ( 1/48 ) The Diorama is made using Green-Line Grass ( highly recommended ) and diorama accessory by Bren Gun . This is an interesting and not often released Japanese aircraft accessory. For you Japanese scale modellers with a Tamiya/Hasegawa Zero, Raiden, George etc in 1/48, this little kit will provide a wonderful addition to your presentation of those aircraft, adding that extra level of interest. I would recommend this to the Japanese air modeller and to anyone wanting a quick, fairly simple build kit even in its own right. The Display Case is made from Acrylic and although costly ( about £ 80 incl shipping ) keeps kids fingers off and dust away7 points
-
I think that over-thick cockpit sides (like over thick canopies) can be noticeable and detract from an otherwise neat finish. With the canopy open the centre section here will be visible in all of it’s clunkiness. And it’s an easy little job just to thin it down somewhat...... Hmm, in close-up view the sides are not quite parallel - guess there’s a bit more work to be done And I’ve finished off the last few structural additions with 0.25mm x 0.5mm strip; just to add a bit more interest to the side of the cockpit door opening and where the windscreen meets the fuselage. Might even be putting paint on soon. How does one do that again?7 points
-
I like SR-71s. I like model kits. I like 1:48 scale. it's a no-brainer really7 points
-
From FM c/o Hobby Search: Gene K EDIT: The red dotted ovals are for the Instrument Panels and the blue dotted oval is for the Refueling Probe - the rest should be self explanatory, I think. The J model intake ECM fairings are not shown in the diagram above, but will be in the kit as an option.7 points
-
I bought a resin kit of Hedi. It seemed Ok compared to pictures. It is clearly based on parts from Emhar's A7V kit wich suits me well. I had seen that there were a couple of things that needed to be fixed. The doors should actually be flush with the hull sides and I could have let it pass but the hinges are placed incorrectly on one side of the body. I was impressed by the handles at the doors though. However, I discovered that the "turrets" in the corners are too low and I felt that it was too much work to trying to fix that. It was time to bring out some plastic card. Coming this far, everything felt wrong. Things do not fit together. Only one thing to do. Tear it apart. New sides are made. I didn't want to make new fronts so I had to splice in plastic instead. Now new roofs must be made. The "guillotine" is a great help in cutting multiple parts for the grilles in the roof. But things still don't fit so everything is torn apart and new fronts has to be made anyway. Now nothing will remain of that first attempt of the build. Time to tear apart the the other end and rebuild it.6 points
-
It's been a while, but here's one completed in the last month or so. It started as a father/son build, but got somewhat overtaken by parental perfectionism and limited interest by 50% of the workforce. (Who knew a Wildcat undercarriage would be too fiddly for a 6-year old?) Anyway, it's an F4F-4 from VF-41, USS Ranger.6 points
-
Hi, I am coming to GB with a resin kit in 1/72 by SBS company. This is a French light transport machine Farman 190 which I want to convert by installing different engine into Farman 192, the machine used in Abyssinia during war with Italy (unarmed, of course - BTW I could join with it into three current GB: the unarmed one, the Africa GB and the Anything but injection...) The replacement engine is the Salmson 9 cylinder one from Academy Fiesler Fi-153 Storch kit. to be continued but for sure not very intensively - I am involved in two other GB with thee models already... Regards J-W6 points
-
This will be my second entry to the group build. It’s a very simple but nice kit only one sprue and a decal sheet so will probably go together very easily. More to follow.6 points
-
Yum! Thanks. I’m still here; still recuperating, with my minimal modelling time taken up with the P-38F. But I’ll be back...6 points
-
Hi everyone Its been a while since I last posted a finished model, even though I finished this one about a month ago now, I hadn't got around to posting any photos. I picked this model up for a really good price and decided that due to price I paid for it, it would become a bit of an experiment with dirtying up my aircraft a bit; seeing that this warbird server in Papa New Guinea I thought it only fair I turned it into a 'jungle weathered machine' which is where I dedicated most my time to throughout this build through pre and post shading panels, mixing paints to get various shades of drab and also venturing into highlighting with oils which was actually quite a good bit of fun (even though it's not a technique I am that great with). The cockpit was detailed quite a bit through scratchbuilding, even though its difficult to notice unless you're close, this is something I was filming with the idea of posting to Youtube for a bit of fun, its safe to say unless people want to watch a 20 minute video of my hands, it'll stay off Youtube 😅. I have always loved Eduard's weekend editions, sometimes I find the Profipack's a bit too much effort for a result im only kind of pleased with and so the weekend edition is usually my go to. This one was no exception, it went together really nicely, all but having to crack a piece of the finished fuselage to get some more weight in a pretty tight space which isn't exactly Eduard's fault but more the fact I rush into things too often. It was a really nice change to try something 'dirty'. I learned a lot from that that I can apply in the future, such as, it's very easy to over chip leading edges and giving off an out of scale look as well as refraining from putting sooooo much mud effects on the wheels. Other than that, I like the result, even though im sure it wont be to everybody's taste. Hope you enjoy guys. All the best, Ryan6 points
-
Mike , You are a Renaissance Man. A true Gentleman and a Scholar and there are very few of us left6 points
-
Finished Cheers Jes6 points
-
The engines and propellers were assembled last night. All rotate freely. The red was touched up on the one spinner where it rubbed off in places. Then the whole Shackleton was given 3 light coats of Humbrol Gloss Cote via my airbrush. A couple of areas have come out overly glossy. I’ll have to get some satin Cote to tone it down a bit. With the exhausts, it occurred to my that although the colour was acceptable (to me anyway), there was too little detail with the exhaust manifold and pipe all the same colour. So I decided to paint the top and front portion of the manifold in IJN Grey to simulate a cowling over the exhaust. My thinking was if it still doesn’t look right, I could completely paint the front section for a complete cowling over the front part of the exhaust. Unfortunately, this is one area where the Gloss Cote is too shiny and will need toning down.6 points
-
I finished this off last night and glued it to the little base I whipped up this morning. Unfortunately the long stripe decal down the side decided to shatter when put into water.....oh well. I knew I should have painted it on. I finished the paint off with a semi gloss coat and held off on the weathering as these aircraft looked pretty clean and well maintained. The decal issue aside I'm still happy with how this 8 dollar model turned out. Thanks for following along, now onto the next build!6 points
-
OK, so first you get one of those big industrial cutting lasers with the warning sign "Intense LASER Radiation Emitted From This Aperture - Do Not Look Into Beam With Remaining Eye" - no wait, that's not right. Just get a big honking razor saw and hack off the horizontal stabilizers (US spelling). Be careful not to cut too close to the fuselage so you don't scrape it all up. You can see that I've left a bit of styrene stumps. The trick here is that the innermost edge of the stabilizer is moulded (UK spelling) as part of the sidewall. Can you see that? We need to leave that little bit there as we remove what's left of the stabilizer. I got out the Dremel (Austrian spelling) with that funky cylindrical sanding paper tool (about 80-100 grit!) and carefully ground the stumps until most was removed. Again, don't damage the sidewall if you can help it. Don't go too high on the RPMs or you'll be treated to that nefarious smell of melting styrene. Next came out the sanding sticks (fine grade, purloined from wifey's handbag) to bring everything in line with the sidewall, followed by 600 grit sandpaper to finish the job. Lather, rinse, repeat. Oops, I meant saw, grind, sand. (And fill the next two sink holes that I found - on the underside of the tiny bit of wing flap Hasegawa moulded as part of the upper fuselage.) The Quickboost resin replacements for the stabilizers have an attachment peg at the pivot point. The holes I have to drill to accept the peg will be located in that tiny bit of the innermost edge of the stabilizer that's left as part of the sidewall. Have I lost you yet? I've lost myself, that's for sure. Hey, that sounds like it could be a good idea for a novel. I'll be back after the upper and lower fuselage parts are joined. I just got the DACO book on the legacy Hornets, so now I can see how I should paint the details in the hell-hole. Those books really are the ultimate walk-arounds. Worth every pfennig. Toodles, Bill6 points
-
Decals, NAGr.6 Magdeburg, March 1945.6 points
-
In Which Jack Harper Completes His Reassignment as Destiny Angel Which Jack did receive some drastic surgery: The Belvedere Belle that he started life as was so ill-formed a moulding that it was perfect as a tabula rasa in this instance. Microsaw to the left arm a wire armature added, with the rest of his carcass tidied up using a 0.3mm drill bit in the Dremel as a fine sculpting tool. In this state he looks like something out of Dr.Who & the Autons... As he's intended to be flying XJ481 out of Boscombe sometime between the late 60s and mid 70s, I felt that I had a certain amount of leeway to interpret his helmet, as some detailed cursory research at the RAF museum seemed to suggest that a number of successive helmet types were in simultaneous use during this period. In the end I plumped for Aircrew Helmet Mk2A as being close enough to the Captain Scarlet vibe of the Sea Vixen: I forgot to take a picture of the intermediate state of Jack's 'changing' with his head and arm encased in Milliput, but trust me he looked like something out of The Quatermass Experiment. After letting it dry overnight I got into carving with scalpel and 0.3mm drill bit to shape the helmet and arm. After paint, he looked a bit ore pilot-ey: The life preserver I actually cut out from layers of washi tape like a tailor cutting suit parts, whilst more out of desperation than anything, I discovered that a great way to to make an oxygen mask at this scale was to drill out the figure's mouth in order to fix a length of wire of the right diameter into it for the hose, then carefully build up the mask part over the face using liquid resin. This forms around the contours of the lower face quite handily to give a nice impression of a mask in situ once painted: Paintwise I used Tamiya acrylics for the base colours, tempera for colour modulation, W&N Galeria varnish to seal, and my favourite oil wash of Payne's Grey to finish, knocked back to decrease the contrast in places once partially dried: I then turned my attention to the various pilot an observer seats, spending a few evenings painting and fitting these out: As done previously with the various cockpit panels and fitting, the black is the raw Alclad primer drybrushed with Valejo steel. Leather work and seat padding was again Tamiya acrylics as the base colour with tempera modulation and Payne's Grey oil wash. I've never got on with bought PE seat harnesses in the past so experimented here with using various grades of washi tape, painted and textured wit hacrylics and temper before applying: Although time-consuming to make and fiddly to apply, ( I had to do about 30 mins WORK then take breaks each time to maintain concentration) they give a decent impression at 1/72 I think of draped webbing/harness. A buckle was finally added to the lap belts from old wine bottle foil that was handily already painted black: Once done with the 'arness work I went looking for a very small shire horse dipped the seats in Galeria to seal and fix everything into place. Although I still need to add the face screen handles at the top and firing handles to the fronts of the pans, that's the seats nearly done now for both aircraft. Shows you how mad the flow of time is at present as I assembled resin and PE parts of the cockpits during the week but couldn't tell you what day or how long it took: Also assembled and painted the front drums for the A!.18 array: @giemme - as you can see I took your suggestion of blue backgrounds to heart. Incredible the difference it makes - thank you so much for the suggestion! Beautiful sunshine here the last couple of days and fantastic batlighting at dusk: "Spectrum Is Green" modellers. Tony6 points
-
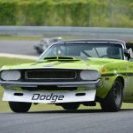
Hello one more Time. Iam sorting my bunch of modellingpics, so i posted several things. This is a Resinkit from Rallyeclassics, the Quality was...😏 Its the privat entered Lada VFTS Safari Rallye 1985. Rudi Stohl/Reinhard Kaufmann managed to the Finishline 19:39 Hours behind the winning Toyota Celica Twincam Turbo with kankunnen on the Wheel. i added a full Rollcage, Rallytypical Dashbord, some other details, Pilotfigures and Selfprinted Decals. Only one Decal i couldnt figure what it was, the blue One on the Backdoors. And iam very lucky to meet Rudi Stohl in Person, a very nice Guy. Told me some Stories and show me a bunch of Pics and the OriginalCar in his Restaurationshop. First a Pic of the Real Thing and thats what i got, the Book was a important help too The finished Car sits on a small Dio >>>>>5 points
-
Hello Folks, this are 3 Bikes from Tamiya, that i build around 20 Years ago. Its the Japanese Version of the Suzuki Katana, the Dakar Winning African Twin, build for my Exwife, and the Yamaha Virago. Build OOB, paint with Tamiya Acrylics. Greetings from Vienna 😉 Bild "honda004qej1a.jpg" anzeigen. Bild "honda003ynkq4.jpg" anzeigen.5 points
-
All done. I'll pop some more photos in Ready For Inspection.5 points
-
As requested, Keith. Senior Management's Mini. Trevor5 points
-
I have been collecting some of the Tamiya 1/48th armor kits to go with my 48th aircraft kits. I finally finished a couple of them. They are a nice break from aircraft since they go together so much easier, I don't have to worry as much about filling seams, and weathering is whatever you feel like doing. There's no such thing as too dirty when it comes to armor. I built the Sherman M4A3E8 first, then the M4A1. These are the first armor kits that I've built in over 40 years. First, the Easy 8, M4A3E8 Here's the M4A1 Why I like 1/48th armor, it's the same scale as my aircraft.5 points


.thumb.jpg.d63052df9f30de247fb49bf44f442289.jpg)


This leaderboard is set to London/GMT+01:00