
Leaderboard


Popular Content
Showing content with the highest reputation on 23/04/21 in all areas
-
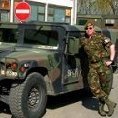
Hi, everybody! Let me present you my next model. Here I use standard techniques, but there is one innovation - dowelled antenna made of mustache of my pet rabbit. The rabbit's tendril fell out by itself, I did not pull it out)).39 points
-
my last built : https://nsa40.casimages.com/img/2021/04/23/210423110143758434.jpg28 points
-
Good afternoon, colleagues! North Amtrican F-82G Twin Mustang, a two-seat long-range fighter. Known as the last piston-engined fighter of the United States Air Force. A model from "Monogram" in 1973 with external stitching and a pleasant convergence of details. With its own advantages and disadvantages. Assembly "izkorobka". The embroidery was not cut. The embroidery that was damaged during the fitting of the parts was imitated with aluminum tape, having previously rolled up the "rivets". Decals from age tried to turn into puzzles, barely collected. The embroidery with a "dry" brush (aluminum) stood out. I smeared it with art oil. Chemistry from valegio. Enjoy your viewing. Sincerely, Mikhail21 points
-
So this is the finished model straight OOB with no after market with the exception of cockpit decals for the dials the rest was painted with a microscope. I black based the model and mottled the grey in layers with browns to get a worn look. Person ally I'm happy with the result it's got to be my best effort to date. I used Flory Models wash for thr panel lines and kit drcals for the markings. I wanted to do an Israeli or Norwegian F-16 but I couldn't get the decals anywhere I looked on Google so I went with the kit decals I'm happy with them even if they are pretty thick. The gloss is Klear floor polish and I didn't do a great job on the Amraams or Harm missiles so I binned them and this is probably a more realistic load out anyway. It's not my favourite aircraft but it's definitely a great kit. Hope you guys like the photos!20 points
-
Here's a build I did over on the 'Africa' GB if you care to have look. It was bit tougher than expected, I really think Airfix should do a re-tool like they did with their excellent B-25, I'm sure it would be a winner as the Hasegawa one seems impossible to obtain and expensive when you can! Lots of mould mark removal, lots of test fitting and lots of sanding was the order of the day. I started to lose interest and perhaps could have spent a bit more time on finishing the joins, etc, but I think I got a reasonable result. I was told about the elevators being too big but didn't bother correcting that, they do look too big compared to photos! GUESS WHO FORGOT TO ADD NOSE WEIGHT! I've done nothing but tail-sitters since getting back into modelling a few years ago and just totally forgot . I added guns out of the spares box and had to scratch-build something for the turret to mount the guns but apart from that it's OOB. Vallejo ModelAir Dark Olive Drab and Dark Earth for the uppers, I didn't have the other Green used for the splotches on the wing leading and trailing edges and what I did use didn't make a good enough definition but it's there! I used Medium Sea Grey for the lower colour as I didn't have Neutral Grey, but looks Ok to me. Decals went on well with Humbrol Decalfix after a coat of 'Klear'. Vallejo Matt varnish was airbrushed to finish. Minimal weathering as usual for me even though photos of (USAAF ones anyway) these aircraft always seem to show an extremely worn finish. Comments and Criticism welcome. Davey.14 points
-
Like many folk, lockdowns signalled a return to modelling for first time in over 20 years. Unlike my teens where I would brush paint everything, I invested in an airbrush and spent time watching YouTube videos and trying to learn how to use it. I initially tried to build a Tamiya Porsche 911 Turbo without much success but used that as a paint mule to practice airbrushing on. I then decided to build a Tamiya F-14A after reading good things about the kit. 6 months or so later and I have finally finished (apart from needing to polish the canopy). Kit was painted with a mix of Tamiya and Mr Hobby Acrylics. Weathering was a mix of Ammo by Mig Dark Grey and Light Grey Panel Washes, and Abteilung 502 Raw Umber, Black and Faded White Oils. Seats are kit seats with Eduard seat belts and decals. I had bought the Brassin seats but couldn't get the hang of folding and attaching the brass parts to the seats. The skunk stripe and the walkway were airbrushed rather than using the decals. The final coat was a 2:1 mix of flat clear and semi-gloss clear. Now for the bad - I knocked off the small aerial that hangs from the nose pod and can't find it. Removing the canopy masking today I discovered a crack on the right hand side of the windshield. 😢 There are areas I know I could have done better but overall I am fairly pleased with how this turned out.13 points
-
Hi all! Rather than go for the usual blue Corsair, I decided to do something a bit different. Here is my FG-1D in El Salvadoran markings. I used PE seat belts, Aztec decals, and MRP paint (camo painted freehand with a Badger Sotar 20/20). Thanks for looking! Rich12 points
-
Thanks Giorgio - and I have the pictures! Thanks KT Cheers Ali Thanks Ian and Pete - I'll look out for the fnaar! Thanks Rob. Ah, the origin of that weird phrase eh? Nine yards in the ammo belt isn't it? Thanks Thom Thanks Tom - no ammo boxes, got it! Nearly there: Slow progress in the last few days due to lunches out and, yesterday, our second jabs. Getting back to normal… ish.12 points
-
Here is my WIP thread for this build: And a few photos comparing the size of the Bandai 1/72 model to this one: Thanks for looking! There are more photos on my Flickr if you're interested: https://flic.kr/s/aHsmVnoojz SB11 points
-
Hi Everyone This is a proper mashup of at least three kits that where otherwise going to end up in the bin. If you know anything about the panther series of tanks you'll also know that this could never exist, I just wanted to have a little fun and and learn how to paint something like this. Thanks for looking, regards Trace11 points
-
#10/2021 My dad´s latest completion. The not that bad Modelsvit kit which is basically the same as the AMG ones, same engineering and parts break down but a bit more detailed. Kit comes with some PE parts, masks for canopy and sharkmouth, although the masks aren´t really usable. My dad painted the red part of the mouth, the teeth are kit decals. Camo done with Gunze Aqueous RLM 70/71/65, brake lines added with plastic rods and lead wire, antenna wires with EZ Line. Build thread here https://www.britmodeller.com/forums/index.php?/topic/235089748-shark-in-the-sky148-messerschmitt-bf109d-1-jgr-176/ Model shows a prewar bird of JGr. 176. DSC_0001 by grimreaper110, auf Flickr DSC_0001 by grimreaper110, auf Flickr DSC_0002 by grimreaper110, auf Flickr DSC_0003 by grimreaper110, auf Flickr DSC_0004 by grimreaper110, auf Flickr DSC_0005 by grimreaper110, auf Flickr DSC_0007 by grimreaper110, auf Flickr DSC_0008 by grimreaper110, auf Flickr DSC_0009 by grimreaper110, auf Flickr DSC_0010 by grimreaper110, auf Flickr DSC_0011 by grimreaper110, auf Flickr DSC_0012 by grimreaper110, auf Flickr DSC_0013 by grimreaper110, auf Flickr DSC_0014 by grimreaper110, auf Flickr DSC_0015 by grimreaper110, auf Flickr DSC_0016 by grimreaper110, auf Flickr DSC_0017 by grimreaper110, auf Flickr DSC_0018 by grimreaper110, auf Flickr DSC_0019 by grimreaper110, auf Flickr DSC_0020 by grimreaper110, auf Flickr DSC_0021 by grimreaper110, auf Flickr DSC_0002 by grimreaper110, auf Flickr DSC_0023 by grimreaper110, auf Flickr11 points
-
Couldn’t agree more. Some fabulous images This one took my eye because, whilst it’s listed as being a Mark Vc - and in any event it has the internal armoured windscreen - it looks to me like it has the old flat sided hood. Just goes to show that all sorts of combinations must hve ended up together in the field. I picked up on those photo’s of BL628 from the link you posted on Stix’s thread - invaluable thanks So whilst I ponder whether to risk trying to do something with the overweight yet flat sided nose - and thinking I probably won’t on this one - I’ve done a bit more with the cockpit. Having removed the cockpit door I had a go at adding some detail to the opening. Fiddly little scribing job: And some thin strip added all around the edges as the opening on the full size one has a thin flange (or whatever it’s called) around it. A little touch that should stand out with dry brushing and add a bit of interest. And I’ve added most of the structure to the cockpit - now need to add the equipment. it is curiously difficult to create a thin strip with evenly spaced holes in it, as was needed for the the middle vertical piece of framework. Much swearing was involved. More this weekend hopefully.11 points
-
Please Enjoy !10 points
-
Hello everyone, This is my last build, M3 Stuart "Honey", of the 5RTR, probably while it was attached to 22AB, sometimes around the time of Battle of Alam el Halfa. Although. I must say that I am not 100% convinced that this was 5RTR tank as Airfix suggested. It might also be 3RTR tank IMO. However, I decided to go with the 5RTR "Connecticut IV" markings that Airfix provided. This is one very interesting kit. It is originally an Academy kit, superbly engineered, but it has many issues with the details. I enjoyed building it very much! I am quite sure that it would not be that much fun if there were no issues to fix. It's like the Academy introduced all those issues on purpose. Anyway, accuracy wise, and regarding dimensions, I didn't bother to do any measurements. It looks fine to my eye and I decided to settle with that. However, there are many details that bothered me. Road wheels are wrong, original sand shields are not looking right, light guards are too thick, stowage mounts attached to the sides are completely wrong for the 5RTR "Connecticut IV" tank (compared to reference photo), many rivets are missing, and many more. Part of the problem is that this is originally Academy kit, which is correct for the marking options offered by Academy, but not to the ones included in the Airfix kit. To help with all these issues, I used some AM parts: Royal Model detailing set (great stuff!), Miniarm road wheels, Accurate Armour carbon fiber aerials, some additional rivets saved from my previous build, Black Dog stowage and some additional spare stowage from other kits. There was some scratch building involved as well: stowage mounts, wiring, etc. Tracks are indy tracks supplied in the kit, and they are great. And some details. Painted with MRP lacquers and Vallejo and Gunze for detail painting and weathered with Mig's nature effects and pigments. This was quick build compared to my usual builds and as I mentioned, I enjoyed it very much. And few on a black background. Here's the real thing: Trying to take a similar angle shot. Thanks for looking, and I apologize for so many photos. Cheers, Nenad9 points
-
While approaching the last stretch of my large Karl diorama, I really needed to do a small project to keep the mojo flowing. Hence I pulled out this MiniArt tractor kit, and together with the MK35 farmer which was gathering dust in the stash, I came to the following story... A famer, transporting two filled buckets of water suddenly sees this big, powerful and somewhat shiny tractor... His jaw drops open while he thinks:"If only I had one of those!!!" Hence the title: Wunschdenken. I found this small (30x24 cm) project very enjoyable and I tried some techniques which turned out out remarkably well... Thanks for watching and enjoy the pictures...9 points
-
One I’ve had on the shelf a while now the airfix vanguard. A somewhat simplistic model (though I think a rather old mould) that came out rather well. No real issues with decals or fit just a few minor adjustments to the paint based on pictures online eg the black outboard nacelle. Well worth adding to your collection if you see it available.9 points
-
Few days ago I finished another "long-term" project. It was my challenge since Apr. 2019. Small diorama with Boeing 747-8F in Cargolux Cutaway special livery on airfield fragment. The kit is mainly Revell, but, due to poor quality of some pcs. I took from Zvezda's 747 all the wheels (Revell's are to small), front landing bay and gear, engine's fans. Then I spent many hours scratching cargo compartment. At the end, to bring more 'life' to the diorama I ordered some, available online, stuff from ROCAST Models, which are superb. Naturally I had to add some photoetched parts - I bought Microdesign 144220, which has some issues, but most parts are ok. As usual, sorry for, probably too many, pictures. Cheers Piotr "Milczący" 🍻9 points
-
I hope these photos display ok this time - using Hobby Photo Host:9 points
-
I have a clever ruler with holes in it Can’t remember where I got it, I’ve had it that long: It’s principal use is to mark-out accurate measurements on plastic card etc. with pencil dots or pinpricks. But It made getting the holes in a straight line bit tolerably straightforward - The bit I had trouble with was then cutting and sanding sufficiently neat narrow strip around the ‘oles.....9 points
-
3D renders in progress Source: https://www.facebook.com/dorawingsofficial/posts/3007866692777221 V.P.9 points
-
Some photos of my Finish Vickers tank, it was small conversion. This model was based on the old 7TP kit. I built this model in the 2006 year.8 points
-
I bin studying the darned bits for many a month and neither does I... I began making the structure for the lower deck seating, more interesting bits Ced? As you can see an ill-advised foray into levelling with PPP has gone very awry, but. Getting there maybe. These crossbeams will all but vanish when the seat slats are in place, one side down. Clear Tamiya X-26 Oranging the white pieces and allowing oversplash to colour the under structure too. "There's Orangey"8 points
-
I'm pretty much on the home straight now, at least as far as the painting goes (still got all the weathering to do). The last major bit of masking/painting was for the green panels along the spine, and the green wing cowls. The first step, after the masking, was to spray the starboard cowl in a mid green using Gunze 524 Hay darkened with a drop of 523 Grass. This is a step that often gets overlooked on Slave 1 builds. The chipping on the two wing cowls isn't the same on each side. The port side has a few chips here and there showing the original base colour underneath, while the starboard cowl has a mottled chipping effect aross the whole surface showing this medium green tone. With that done, I added the masking fluid for the chips and sprayed the main green colour using Gunze 121 RLM81. This was a fairly even coat, but I didn't worry about the odd bit of patchiness in the finish as I'd be adding more panel variation later. This is a more muted green than I used on my old build, which was done mainly with Tamiya Mitsubishi Green, which is the colour called out in the Finemolds painting guide. The green on the studio model is actually more of an olive drab tone though, so I wanted to keep the shade more subtle on this build to better match that look. The green areas on the studio model are a pretty solid flat finish with no real tonal variation apart from the chipping. The new digital model created for The Mandalorian features a lot more paneling effect on the green sections though, and I wanted to bring some of that look on to this model. That was done with various green tones, some darker, some lighter, some more saturated, some less. I sprayed them quite randomly over different panels using post-it notes to create hard edges between the panels. Other areas were done freehand to soften the effect. With all the masking removed, this is how it's currently looking. The only remaining painting is the cockpit coaming, and a couple of little details that would have been decals on the original but I'll need to paint on this one. Once that's done, we'll be on to the weathering. Andy8 points
-
I note from the photos that @k5054nz provided a link to that plywood strips are a lot thinner than my ones, hopefully mine give an “impression” of how the aircraft was made even if its not 100% accurate. The wood decals were left overnight to fully settle down and were then given a coat of Alclad ALC-314 klear kote flat. As a side note I think its worth mentioning that the wood decals are quite glossy when first applied, to my mind they look much better now that they’ve had a plat coat applied. This was left to cure and then various oils, Abteilung ABT510 starship filth and ABT002 sepia were used to try and show some demarcation between the different strips of plywood. They were spotted along the joins… …and then stippled/blended to give a slight discolouration and hopefully show the demarcation of the strips better? The rest of the “wood” was treated to the same effect. Next I’ll be adding the engine cowl and rear wings. until next time as always, any suggestions, criticisms or comments will be gratefully received. rgds John(shortCummins)8 points
-
Here is my latest "creation" - 1:72 BAe Sea Harrier FA.2 ZH803, 800 NAS - as seen on air shows in 2001 (with "dummy" AIM-9s and AIM-120s missiles and fuel tank in DSG). Airfix kit with a huge amount of fixes (really, REALLY huge!) + some scratch + Eduard PE set + Eduard PE UK RBFs + Aires resin nozzles + Aires resin outriggers + Hasegawa AMRAAMs + Pavla resin nose + Pavla resin ejection seat. Painted with Gunze Mr. Color (C series). Decals are mainly from the Airfix box with some adds from the spares. It took a lot of work, but I'm happy with the result. ☺️ And now some photos: Thanks for watching!7 points
-
Always been interested in drones like this (the Jindivik being my personal favourite) so couldn't help having a go at this cute little thing. I built a pair of the Plus Model ones last year but they're really tiny in 72nd scale. Very nicely moulded and goes it together fairly quickly. I'm sure there should be something in the gaping hole where the jet pipe comes out underneath but I guess we'll never know. I did add 4 more little bracing wires around the fuselage tho' as per photos as it wouldn't be physically possible to stay in the launch trolley as ICM show it. Anyway, I look forward to the next one which I believe will be the BQM-34. Thanks for looking. KDA1 KDA2 KDA47 points
-
Not held on with a chain even: just detached (via a fastener hole in its leading edge) and usually placed on to of the wing (sometimes inside the ammo door/step): On aircraft in later Canadian service, the fillet was attached to the door, so that it wasn't forgotten. The wing was slightly modified for this configuration, to ensure a snug fit. This is not applicable to RAF Sabres however:7 points
-
Planet Models Grumman XF-10F Jaguar 1/48 Thanks for stopping by to view. You can find the WIP here7 points
-
Progress, while grindingly slow, is actually happening: The decals are a mix of Airfix's own and Oldsmodels ones. Neither are what you'd call spectacular but they'll do.7 points
-
This was my project for the Panzer III Group Build which also happens to be my first Group Build. This was a lot of fun not only for the building of my project, but also all of the encouragement and camaraderie that is exhibited to say nothing for watching all of the other impressive projects going on. Thanks for making my first GB NOT my last! The newer Dragon Panzer III series kits are quite good and while this was one of the first out and dates back to 2007, it is still state-of-the-art in my book. Now I want to build another Pz III...6 points
-
Morning all, A selection of images from a quite incredible day last weekend. Never did I imagine I'd get the chance to shoot USMC helicopters, and in particular the Super Stallions, anywhere, let alone practically on my doorstep. A truly unforgettable exerience. Sikorsky CH-53E Super Stallion | 163060/23-YS | US Marine Corps | Dartmoor | 18/04/21 by Shaun Schofield, on Flickr Sikorsky CH-53E Super Stallion | 162001/YS-21 | US Marine Corps | Dartmoor | 18/04/21 by Shaun Schofield, on Flickr Sikorsky CH-53E Super Stallion | 163060/YS-23 | US Marine Corps | Dartmoor | 18/04/21 by Shaun Schofield, on Flickr Bell Boeing MV-22B Osprey | 166723/YS-02 | US Marine Corps | Dartmoor | 18/04/21 by Shaun Schofield, on Flickr Bell Boeing MV-22B Osprey | 168653/YS-15 | US Marine Corps | Dartmoor | 18/04/21 by Shaun Schofield, on Flickr Sikorsky CH-53E Super Stallion | 162001/YS-21 | US Marine Corps | Dartmoor | 18/04/21 by Shaun Schofield, on Flickr Bell Boeing MV-22B Osprey | 168666/YS-13 | US Marine Corps | Dartmoor | 18/04/21 by Shaun Schofield, on Flickr Bell Boeing MV-22B Osprey | 168653/YS-15 | US Marine Corps | Dartmoor | 18/04/21 by Shaun Schofield, on Flickr Bell Boeing MV-22B Osprey | 168666/YS-13 | US Marine Corps | Dartmoor | 18/04/21 by Shaun Schofield, on Flickr Sikorsky CH-53E Super Stallion | 163060/23-YS | US Marine Corps | Dartmoor | 18/04/21 by Shaun Schofield, on Flickr Sikorsky CH-53E Super Stallion | 162001/YS-21 | US Marine Corps | Dartmoor | 18/04/21 by Shaun Schofield, on Flickr Bell Boeing MV-22B Osprey | 168653/YS-15 | US Marine Corps | Dartmoor | 18/04/21 by Shaun Schofield, on Flickr Sikorsky CH-53E Super Stallion | 162001/YS-21 | US Marine Corps | Dartmoor | 18/04/21 by Shaun Schofield, on Flickr Bell Boeing MV-22B Osprey | 166723/YS-02 | US Marine Corps | Dartmoor | 18/04/21 by Shaun Schofield, on Flickr Sikorsky CH-53E Super Stallion | 162001/YS-21 | US Marine Corps | Dartmoor | 18/04/21 by Shaun Schofield, on Flickr Sikorsky CH-53E Super Stallion | 163060/23-YS | US Marine Corps | Dartmoor | 18/04/21 by Shaun Schofield, on Flickr Sikorsky CH-53E Super Stallion | 162001/YS-21 | US Marine Corps | Dartmoor | 18/04/21 by Shaun Schofield, on Flickr Bell Boeing MV-22B Osprey | 168666/YS-13 | US Marine Corps | Dartmoor | 18/04/21 by Shaun Schofield, on Flickr Bell Boeing MV-22B Osprey | 168666/YS-13 | US Marine Corps | Dartmoor | 18/04/21 by Shaun Schofield, on Flickr Sikorsky CH-53E Super Stallion | 163060/23-YS | US Marine Corps | Dartmoor | 18/04/21 by Shaun Schofield, on Flickr There's a handful more on my Flickr for those interested Cheers, Shaun6 points
-
Hello all. This is my entry for this GB. AZ Models Spitfire T8 in one of its colour schemes. The decals I had left over from when I built the same but in a different scheme a couple or more years ago. This one.. now sold. Top pic showing the kit. Won't be needing the Dutch decals. Cockpit in progress... .... while wings are readied for the tips to be added. Why AZ chose to make the tips this way that makes it harder to join I'll never know. Coming along. A little filler here and ther. This is going to be a quickish build I feel.6 points
-
Hi all ready for you comments are my my latest biplanes from Edward, really enjoyed these two more than the other builds but I'm putting that down to getting a bit experienced at building then. I'm not really an airplane builder I tend to stick to sci-fi stuff that I can build a paint in what ever colours and shades I like so sticking to the instructions is also a novelty for me. Anyway here are my efforts along with my the complete aircraft experience. Cheers Brian.6 points
-
Crisp, I know that this is not your Ark, but I thought you might like this:6 points
-
Gpm 1/33 card B-17 Not the easiest kits to make especially in card6 points
-
Afternoon chaps Meanwhile in the garage.... I faced a lot of misadventures with 3D printing of the propellers particularly, and the Treadle-vacs too....I will skip the details 🤔 Finally, I've succeeded in getting correct prints and so correct parts. I printed 15 propellers and got at the end only 5, because they are so fragile that several broke when cleaning and sanding them to remove the supports marks. On the 5 that remain, 2 are quite perfect, the others just passable... to my eye indeed. In reality, with the naked eye, one can't see the little defects. A propeller, just after spraying grey primer: And after a black coat, before Alclad Polished aluminium: The treadle-vac, before paint touch ups for details: And the vacuum canister: It remains to add some details on the canister and the Treadle-Vac See you soon for next episode `6 points
-
Alrighty, folks! This will be the final update for this build! Thank you SO much for following along and being patient (life happens, you know?) with me on this. Overall I am very pleased with how it has turned out. There are a few flaws (don't look too close!) that I am VERY aware of, like the back hatch on the fuselage not fitting properly, as well as a few other fit issues here and there. But hopefully you don't see those things when you take it in as a whole, you know? Anyway, here is a teaser image, and I'll post the rest over on RFI: Again, thanks for following along! There are more photos on my Flickr if you're interested: https://flic.kr/s/aHsmVnoojz SB6 points
-
Converted in 1840 to the East India Company service as the 6th Bengal Irregular Cavalry. They were granted an Honorary Standard for service in Sind in 1844, bearing the device of a lion 'passant regardant'. As part of the 1861 reforms it was added to the regular establishment as the 4th Regiment of Bengal Cavalry. The 4th's first battle honour is Afghanistan North-West Frontier 1879-80 for service during the Second Afghan War. They went through four changes of title between 1900 and 1904, initially owing to the regiment being rearmed with the lance. Mine represents the 4th Bengal Lancers around this time.5 points
-
And finally finished! These next three are just to give a sense of how much difference the choice of lens and distance makes to the perceived shape of the car: first the "magazine cover" shot: and now the "telephoto". These compare directly to a lot of the shots you'll find online of the real thing at Le Mans in 1966: And finally, this one was complete accident, but I quite liked the "view behind the curtain" effect: The more observant among you will have noticed something missing. I popped off the windscreen wiper to paint it blue thanks to @Jo NZ, and forgot to put the bloomin' thing back on before the photo-shoot. Now it's back in place, but I'm darned if I'm doing the lot again! I thought this was a really impressive kit. There are nits to pick, to be sure, but it is phenomenally well engineered. Other than one self-inflicted wound (which I could easily have avoided if I'd thought about it or been forewarned -- see WiP!), there is no glue and no filler in this model... best, M.5 points
-
Pierre Clostermann camo model - autumn 1945. Markings and colors of NV724 selected after consultation with modelers from France and Belgium (thanks, gentlemen) Model - profipack from Eduard, almost OOB - added Master barrels.5 points
-
Hello all, I saw one of these built at a model show a few years back and thought how sweet it looked - it went into my mental stash... If you want modelling nostalgia and therapy at the bench - get one! 1974 moulding but you’d never guess, really crisp, fine detail and nice fit too. Takes me right back to a wet and windy afternoon in 1978 sat at the kitchen table covered in glue and Humbrol 😛 I haven’t really added anything, just a little brass for the machine guns, basic seatbelts and that’s about it. Although I did have to ditch the 70’s decals and as I couldn’t find any aftermarket options for the Siskin, I used paint masks based on the original decal sheet. I’ve already bought the Matchbox Hawker Fury and have an Airfix Bulldog to add to this mini inter war collection. I’ve even got my eye on their Seafox. Any other Matchbox gems that spring to mind? I seem to recall a Boeing ‘Peashooter’? Anyway, without further ado - here she is - 29 Sqn, North Weald, 1928. Thanks for looking, Guy 🙂 And alongside the old 50’s Airfix Hawker Demon, who said you need high tech kits and a ton of aftermarket to have fun modelling!5 points
-
Thanks for watch !!!5 points
-
nice pair of... nope, I'm not going to say it. Nice turrets Ced5 points
-
One more kit to join the stash. Scruffy box for a classic Tamiya kit. But inside it looks like new with everything still sealed in their bags. I already have a version of this kit but it was badly painted and the paint seems to have damaged the plastic so I can't get a decent surface finish. This might offer a less frustrating route to a decent finished model. I've also ordered a set of resin Mercedes alloys as I don't like the kit wheels.5 points
-
At the start of the program, I received a letter from the health department telling me that I could have the jab at the GP's or the pharmacy. Went to the GP's and was told that they would definitely NOT be doing the vaccinating. Pharmacies also at the time, were not doing it either. So it was a real surprise to walk into the pharmacy yesterday and be told, yes, we could have it done there, and they have taken our details. So now, just got to wait for the phone call. As and aside, sod's law dictates that when you are waiting for an important phone call, the cold calling increases threefold. It's amazing how many non English speaking people can understand when they are told to go forth and multiply. John.5 points
-
Hi All, A quick update. I started out by cutting out the slot for the drop tank on the MkII. Here's before: And after: Whilst doing this I couldn't help noticing the markings on the inside of the starboard tailplane: Now I've seen some injection mould tool repairs in my time, but that one looks as if it was done on a Friday afternoon. By the apprentice. With a chainsaw. Never mind. Moving on I then occupied myself with priming, and painting mostly interior green, but also a few other colours. Whilst painting the undercarriage I ran into my first dilemma. The conventional wisdom is that the Hellcat undercarriage is painted the same colour as the undersides. There is also a school of thought that says it was painted white. I'd resolved to do the MkI in Sky, and the MkII in white for a bit of contrast. Here's the result: However, the more I looked at the below photos, the more boggled became my mind: Both of these cases could be white or Sky. In the end I think I've resolved to respray the white, as I think it's just the effect of strong sunlight bleaching the colour in these excellent pictures by Etienne du Plessis. These really do show how grotty the BPF Hellcats became in their lengthy deployment. In other completely unrelated news, look what the interweb delivered yesterday: Now that IS a dilemma! Will this build continue apace, or will a new WIP thread start? Watch this space... Thanks for looking, Roger5 points
-
Curiously difficult? Or downright impossible? I generally drill all the holes by lining my drill bit against the side of a ruler to try and get something approaching straight to begin with. Only then do I cut the strip down to the width I need. I usually get something acceptable after 7 or 8 attempts5 points
-
Cunning plan stew, I may pinch it! So you have a specific tool for application of super glue, I didn’t see that coming Ced. Im walking on the shoulders of giants Cunning as a fox Ian! And less plastic waste, saving some turtles there. Mike, that’s a beautiful shot! Love it! cheers all Rob5 points
-
Douglas A-4G Skyhawk N-13 155062, VF-805 HMAS Melbourne. Hasegawa with CTA decals. Thanks for looking. AW5 points
-
Bless you guys for tagging along. It’s much appreciated. The front wheel assembly was next to get constructed. Along with 4X shocks. I do have some oil filled dampers on back order so I’ll fit them when they arrive. Rear shocks fitted. Front shocks fitted. The next step had you tape the receiver and ESC “ElelecrtonicSpeedController” in place. Now. I stuck on the ESC but the receiver I might want to use in other kits. If I have fun enough, so I decided to buy some Velcro strip and attach the receiver with that. I can then pop it in and out of cars without buying new radio gear. (Well that’s the plan😜) Next. Rear wheels. and then front wheels. ooooh getting there. more soon. Johnny5 points


.thumb.jpg.a15df237fd8d56e4265c64c5f8f26d75.jpg)


.thumb.JPG.2ce06c4ff2300a5faba93aaeacbdab25.JPG)
.thumb.jpg.cfc129272ffec824439b15e6013d5952.jpg)


.thumb.JPG.3498f40362ff13ebfc4b2e45abbd545e.JPG)


Wedge-TailedEaglePortraitRaptorDomains.thumb.jpg.41a306d3445a68f0f2df773e01776ea6.jpg)

This leaderboard is set to London/GMT+01:00