
Leaderboard


Popular Content
Showing content with the highest reputation on 12/04/21 in all areas
-
Good morning all. I registered because I follow the post of neil5208 and his Academy B24. I built the L version last December. The Academy model proposes an M version, but it seems easier to represent an L with a rear turret. I discovered that Consolidated A6B turrets had been retrofitted on the L. I wanted this model to wear the colors of a liberator from the Mighty Eight. I found pictures of the 93BG with this version of the B24. I didn't find a specific decoration, so I got part of the baptismal name on the decals sheet provided in the box, and the pin-up comes from a Kits-World board intended for lancasters. On the other hand, the serial number which appears at the top of the fins is compatible with the B24L series! There is no longer a ventral turret on the L series: I upgraded the pilots office, but we can't see anything anymore: I replaced the engines with quickboost aftermarkets: And here is the result: The parking lot comes alive when the crews return from mission: Regards, Eric-Snafu3536 points
-
Recently completed the Eduard Tempest Mk.V series 2. A great kit however the AMS struck so I completed it with some aftermarket; PE flaps from Eduard, wheels, seat, radiator and exhausts from Barracuda studios. The squadron letters and serial are from Dutch Decal to represent the machine of Jan Linzel. This was a "Mayflyer" who managed to escape to the UK and flew with 33 squadron of the RAF. Approved by "Kitty" A fine cockpit OOB but not much can be seen when the fuselage is closed. Full WIP here; https://www.scalemates.com/profiles/mate.php?id=14213&p=albums&album=66781 Thanks for watching Erik35 points
-
1/72 Welsh Models P-8A Poseidon complete. The build consisted of scratch building the weapons bay, weapons mounting points onbthe wings and pylons, many of the ESM and AMS lumps and antennas. I also added various vent blow in doors and the sonobuoy tubes. I reshaped a lot of the kit supplied parts as well. Finally I added Harpoons from a Hasegawa weapons set and Mk48 Torpedoes from a Hasegawa P-3C Orion, they looked close enough to me to replicate the Mk54s the P-8 carries. Decals were from a custom sheet DekLs created by upsizing their 1/200 sheet and it was painted in mainly SMS lacquers. It is a bit rough in some parts but I have spent enough time on it and am calling it finished.32 points
-
Hi all - here's my recently completed Typhoon in 1/48. The kit from Hasegawa is quite good despite it's age (1999) - though the fuselage inserts (allowing either car door or tear drop variants) are a pain to deal with - much sanding and rescribing is required to make the seams disappear. You also get large gaps at the top which require alot work to deal to. Big gaps in the wing roots too! Out side of those problems - the fit is actually pretty good. Eduard reboxed this kit and the fact that this is still probably the best kit in this scale, means that there is a truckload of after market available - so you can really spruce it up if you feel inclined. Speaking of aftermarket... I used: Resin 4 prop spinner from Ultra Cast Eduard Resin Wheels Resin exhaust stacks from Quickboost Resin seat from Quickboost PE interior details from Eduard Metal gun barrels from Master Models Montex Masking set for the markings and canopy All of the after market was pretty good - guns were tricky to install but look so much nicer (imho) than the kit versions. The Prop from Ultracast was top notch - perfect shape and v little clean up was required. The montex masks were quite nice - first time using masks for insignia so was fairly pleased with how they came out - the canopy masks left a sticky residue on the glass which I wasn't able to fully remove so will think twice about using these again. I added some scratch built details in the wheel bays, behind the cockpit, added some rivet details here and there, fuses on the rockets - stretched sprue for the antennae. Painted with Mr Color lacquers except for the Dark Green which was AK Real Color Dark Green which I thought is a nicer version than Mr Colors. Most of the weathering is oils with some enamel washes from Ammo and AK. I really enjoyed this build overall - I love the Typhoon and had great fun painting and weathering the hell out of it. It would be great if Eduard or Tamiya released a new version but I'll make do with the Eduard Tempest that's sitting in the stash. Thanks for looking - Cheers John29 points
-
Hello everyone I'd like to present my latest model, Kit IBG + Master Model+ BitsKrieg painted Hataka a few photos of the finished model: PZL P.11c pilot lt. Stanislaw Skalski enjoy the photos.26 points
-
1:144 scale is just too small, 1:72 is too big, but 1:96 scale is right in the Goldilocks Zone. Why did it go away? A couple of old Frog kits which fit comfortably on my shelves. Vulcan Valiant Mike24 points
-
Hi all, First up, along with many people, I managed to pick up the new Airfix Beaufort early on through Jadlam on preorder. A brilliant kit from Airfix with some superb engineering. Kit is from the box with the exception of Eduard cockpit masks and replacement resin wheels to add a little extra detail. Build went together very well and especially pleased that the included schemes represented examples from St Eval, Cornwall - a location not far from me. Not my best build, I used a new brand of Gloss Varnish for me and ended up going on too thick, resulting in a very high shine and nasty orange peel effect. My own fault, but lessons learnt. In addition, the Airfix Bristol Blenheim Mk.1 was finished sometime back in late January, but due to other commitments I have been away from the modelling bench for 2 months. Also a nice kit from Airfix and despite some trouble around the cockpit glazing, a pleasing result - although the Vallejo Model Air colours used are a little over saturated from the bottole. Displayed alongside the Noys Miniatures hangar and diorama base aswell as the Airfix Bomber Resupply set.22 points
-
When I first went to airshows in the late 70s / early 80s there was a very eye catching bright red Spitfire on show. Spencer Flack’s G-FIRE stood out from the crowd for me & I always wanted to do G-HUNT and G-FIRE in model form. So when Airfix released their Mk.XIV kit with G-FIRE decals I had to have one. Nice enough built too. Great cockpit detail that you can barely see. There is a great thread on here of advice regarding build & colours too. Anyway this is how she looks And this is a picture of her I took at Mildenhall Airfete 82 (I think). Funnily enough I found a better photo from the same show at the same time on Flickr. I think the guy with a better camera was stood behind me when I too this. I was only little at the time! And a few more of the kit Well that is a bit of my childhood recreated. Thanks for looking20 points
-
On the anniversary of the Battle of Britain, I decided to make a model of the Spitfire Mk.I. The model is an Airfix, I enjoyed doing it. Here's the picture.16 points
-
Hi guys, I just finished this longer than usual project. Is the fantastic Fw190 A-4 Eduard 1/48th kit with some aftermarket details. Eduard's Advanced Brassin set which includes: resin engine & fuselage guns, resin wingroot gunbays, resin propeller and PE upgrade set. Master Models gun barrels, HGW Models fabric German fighter seatbelts and decals, Quinta Studio 3D decals cockpit set, and Aires resin inspection panel on the vertical stabilizer. For the colour scheme I wanted to do something different to the usual ones that we see in the Fw190 so I've opted for this very attractive North African camouflage. It was flown by Erich Rudorffer in Tunisia in 1943 Considered by many to be the Luftwaffe’s greatest all-round fighter ace of World War Two, Erich Rudorffer served on every major front, flew all of the classic German fighters and was renowned for his ability to shoot down multiple aircraft in succession. Beginning his campaign with JG2 during the Battle of France, Rudorffer then served in the Battle of Britain alongside top aces such as Helmut Wick and Gunther Seeger. Flying the Bf109E, his aerial victories soon mounted, and he continued to joust with the RAF during the ’Non-stop’ offences of 1941. By the time of the ill-fated Dieppe Raid in 1942, Rudorffer scored his 44th and 45th victories, both Spitfires. His Gruppe was then relocated to northern Africa where the war was going badly for the Axis forces. Now flying the heavily-armed Fw190, he began to demonstrate his skill at downing a number of aircraft on a single sortie. On the 9th February 1943 he claimed eight British aircraft and a short time later scored multiple victories over US-flown fighters. By June of the same year, Erich had moved to the brutal Eastern Front, assuming command of II/JG54, the famous ‘Green Hearts’, and continued to display his remarkable ability. On the 6th November 1943, he tangled with a large force of Soviet aircraft and shot down no fewer than thirteen of them, a record for a single mission. By this time Rudorffer had already been awarded the Knight’s Cross with Oak Leaves and in January 1945 ‘Swords’ were awarded to this decoration after achieving his 212th victory. Shortly after, he was given the command of I/JG7, flying the potent Me262 jet fighter in the defence of Germany. Despite the dreadful war situation, lack of fuel, marauding Allied fighters over the jet airfields and heavily outnumbered in the air, he managed to shoot down a further twelve aircraft with the Me262. By the war’s end, Erich Rudorffer had flown more than 1000 sorties, scored 224 victories and was the seventh-highest Ace in the history of aerial combat. He died at the age of 98, on the 8 of April 2016. Fw 190A4 6.JG2 Yellow 1 Erich Rudorffer, Tunisia 1943 cheers and thanks for looking. Jorge15 points
-
Although I'm not a fan of the Landor British Airways livery I do quite like their Caledonian Airways scheme . I picked up a copy of the Welsh Models Aerocolours decal from a model show many years ago and have finally got around to building it. Paint is Revell 371 for the Pearl Grey and Tamiya X-3 Royal Blue which I think works well for Landor Blue. Halfords Racking Grey was used for the Boeing Grey and Humbrol Metalcote Polished Aluminium for the wing and engine leading edges. Coroguard and white door outlines from the Flying Colors 757 detail decal. I'm not too impressed with the decals as they have silvered a bit possibly due to their age. Had I known this would happen I would have floated them onto a puddle of Future rather than directly onto the paint surface. Hopefully when the Zvezda 757 kit comes out there will be some new Caledonian decals available and I'll remove these and reapply some new ones. Until then here are some pics. Hope you like it and thanks for looking. Any comments and criticisms gratefully received! Cheers, Ian Ps As a bonus please check out this link https://www.britmodeller.com/forums/index.php?/topic/235091968-pushback-and-start-up-approved-caledonian-2357/15 points
-
This was a shocker... I was aware this Revell kit had its issues, but it fought me all the way... despite that quite happy with the final look (from a distance).. despite my ineptitude to get the fuel tank fins on the right way round (too late now to do anything about that).. She's been enhanced with a resin cockpit and a few other bits and bobs off the pylons.15 points
-
Silver Beau,..... another one from the Australia/New Zealand GB,...... this 1/72nd Hasegawa Beaufighter Mk.21 has been built as A8-196, EH-D of 31 Sqn, RAAF, Morotai, 1945 using DK Decals, although the MPM boxing of the Hasegawa kit did include this scheme too. The model was painted using a Tamiya rattle can, the WIP is here; And the model; And here it is with some of my other Aussie Beau`s! Cheers Tony15 points
-
Good evening, This is my build of the Airfix Bristol Bulldog put as an RAAF version, seeing that it is the centenary of the RAAF! It is a great kit but has its issues such as the propeller is completely wrong and needs replacing in this case Kora do a resin propeller or you might get one from the spares box? The decals came from Model Alliance and weren't the best but they were thick and malleable!! I added a Yahu replacement instrument panel, a new seat (poto etched) from the spares box. This is the Red Roo cover but the same aircraft markings as per Model Alliance decals... The kit propeller The replacement resin prop: The RAAF variants had this addition... plus this I have since varnished the prop,, I used Bare Metal Foil for the nose section... The decals for the rudder didn't work out (my fault) so I painted them.. And lost the port side light! It is still a lovely kit with some elbow grease around the three engine parts needed as there are some pretty horrid gaps, but the wings line up quite well! I also based the Nivo on some local reference and not the usual green you see this kit painted incorrectly with.... there that should start a conversation! Regards Simon14 points
-
Here's a link to the WIP build: It was a nightmare from start to finish(both times!) but anyway here is the final result; It looks better in the pics than real life🙄 Finally one next to my recently completed Wyvern, which just shows how humungous the Wyvern must've been😲14 points
-
Eduard Spitfire Mk.XVI Weekend Edition in 1:48 scale. Markings are for an aircraft from the No. 601 Squadron, RAuxAF in 1949. The Spitfire took part in the Cooper Air Races. It was build out of the box. The build went well until i started to fight myself, featuring a bad wash which nearly ruined it and a crushed propeller by my chair during the final assembly. The prop on the kit is a resin replacement.The silver color is a metal shade from Humbrol. Despite the lack of position lights at the wing tips i am calling it done. Hope you like it. Cheers ! Bernd14 points
-
Ok so, a lawyer’s natural prudence counsels caution. So I’ll begin with some caveats.... I start from a position of not knowing terribly much about the Spitfire (an admission I feel a need to apologise for on this forum) ; I haven't done much (alright hardly any) modelling for a couple of years - as a result of busy life syndrome and a Hawk build wallowing in the heavy buffet just short of flicking and spinning – and so a decent result is far from assured . But the chance to contribute a model to the 453rd Bomber Group Museum was an opportunity not to be missed - and so I find myself in possession of a Tamiya 1/48 Spitfire Vb, courtesy of James Clarey (Jim) the proprietor of the Museum; and an enthusiasm build a model that’s been absent for a while (my enthusiasm's been absent I mean…not that the model has been AWOL ). @CedB and @Ex-FAAWAFU and @woody37 have 453rd BG builds under way already – and others are sure to follow To get up to speed on the Spitfire I’ve a modest number of books and of course the world wide web to refer to. I’ve had the kit for a week or so now and have already enjoyed myself reading up on the 4th FG and the Spitfire Vb. There are of course any number of Britmodeller threads containing much accumulated and shared wisdom on the Spitfire – not the least of course from the late Edgar Brooks, but also from many other knowledgeable BM’ers. I’ve also shamelessly searched BM for build threads to crib from and have to give honourable mentions to @PlaStix and @giemme Tamiya 1/48 Vb threads. The Tamiya 1/48 Vb kit dates from as long ago as the mid 90’s so it’s no longer state of the art; and I know there are a few shape issues on close inspection (e.g. short fuselage, wing chord too long and a “square shouldered” look to the engine cowling). But I think it looks more than enough like a Spitfire when it isn’t sat for comparison on a set of accurate plans, so I don’t think I’ll be correcting any of those things. And I’ll just have to keep my effort well away from any accurate plans! Giorgio also pointed out that the wheel wells are too oval – but like him I’ll leave them as they are. It’s only noticeable when looking exactly perpendicular at the underside; at any other angle even perfectly circular wells look oval anyway! As to the 4th FG. Most if not all on BM will know that in late September 1942 the 3 Eagle squadrons (71, 121 and 133) were absorbed in to the USAAF and became respectively the 334th, 335th and 336th Fighter Squadrons and that they kept their Spitfire Vb’s, albeit only until about March 1943 by which time they’d re-equipped with the P47. If I’ve got it right the 334th spitfires kept 71 squadron’s XR aircraft codes, the 335th kept 121 squadron’s AV codes and the 226th kept 133 squadrons MD codes. Jim is sending me some decals (I hope he can get hold of some – I can’t find any Eagle Squadron or 4th FG aircraft decals actually available in the UK at the moment!) and I’ve yet to decide what aircraft to build. More of which below. One of the things I’ve learned about the Spitfire Vb is that at any given time they came in all sorts of different modification states depending on where and when they were built and what had been done to them on the squadrons. Thus any given aircraft may have had (if I’ve got my research right): The old external armoured windscreen or the later internal armoured windscreen. Most but not all of the 4th FG spitfires seem to have been built at the Castle Bromwich Aircraft Factory (CBAF) and to have the old external armoured windscreen. The older flat sided canopy or the later blown sided canopy. The blown sided canopy goes with the internal armoured windscreen; but there are many photographs of Vb’s with the old external armoured windscreen that have been fitted with a blown sided canopy (and I’m sure that any fighter pilot would prefer to have a blown sided canopy fitted if at all possible!). Rotol or DeHavilland propellers. Most Vbs seem to have Rotol propellers and I think that CBAF Vbs were all produced with Rotol propellers. Round or Fishtail exhausts. I’ve seen photographs of both types on 4th FG spitfires. Covered wheel hubs or uncovered 5 spoke wheels. Most photo’s show the latter. For this reason I’m quite keen to build an aircraft that I can find decent photo’s of – so as to get these things correct. However I’m pretty sure that: None of the 4th FG aircraft will have had the over wing stiffeners fitted. Edgar posted that this mod was introduced on the production line from 16/7/42 and so whilst they could be and were retrofitted (viz the IWM Mk 1 having them) I don’t think any of the 4th FG aircraft will have been done in late 42/early 43 (I’ve not seen any photographs definitely showing them). All will have had VHF radios and so had the two wire antennas from the fuselage sides to the tailplane, but no wire from the radio mast to the tailplane. Jim emailed me some colour plates of particular aircraft and I’ve seen one or two on the web; I’ve also seen several photo’s (mostly on the IWM ‘American Air Museum’ website IWM American Air Museum) and the moment amongst the best reference photo’s I’ve seen are the following (all photos from IWM American Air Museum) BM510 (XR-A) of the 334th which I know was flown by Maj. Gregory A 'Gus' Daymond and Capt. Robert Lee ‘Junior” Piser (pictured here): BM240 (MD-L) of the 336th which I know was flown by Maj. Carl H ‘Spike’ Miley. And EN768 (AV-W) of the 335th for which I don’t have a pilot’s name (any idea’s anyone?) Although there are other aircraft/pilot combinations and so I’ll just have to see what further information I can find. And so to the kit. Which probably needs no introduction but which’ll get one anyway. There are only 3 sprues: The cockpit detail was probably excellent for the time but ain’t nothing special by today’s standards. My first thoughts are that the some of the moulded in ribs are useable but the details like the IFF remote contactor, morse key and trim wheels etc. will have to be replaced. Also the characteristic floorless cockpit isn’t captured at all. In truth I’ve had one of these kits in my attic for donkey’s years gathering dust. So at at least I’ve a spare to pinch bits from when it all goes to worms. Also I found some extra’s I had squirreled away and after blowing the dust orf.... Aires cockpit set. I like the IP and will probably use the seat (although it needs modification) and selected bits of the rest. Not going to use the cockpit sides as supplied but might pinch bits from them. Eduard Mk 1 etched set. Shan’t be using them flaps. Spitfire’s weren't routinely parked with the flaps down and that’s just way to fiddly-to-far when it’s not even representative . Crispin is the photo-etch maestro and I aren't interested in competing with him..... Eduard Mk Vb etched set. Might use the odd grill or map case from that. And I’ve just invested in a few goodies: Master brass cannons. Saw Crisp’s ones on his P38 thread and thought gotta see if they have Spitfire VB cannons. They do and they’re awesome. If the rest of the model turns out rubbish - at least the cannons will look good Quickboost door. It’s technically for the Mk IX and for the Eduard kit to boot – but if there’s any difference from the Vb I’m not aware of it and it was so cheap I just had to.... Quickboost mirrors. Again just so cheap. And the sort of silly detail that can really be eye catching (maybe draw attention away from the poorly filled seam lines?) HGW Sutton harness. Ridiculously detailed. So many tiny parts I’m not even sure I’ll be able to put it together successfully. But if I can it’ll look great. Actually this is one thing I’m not going to follow Edgar’s views on. He argued on BM and elsewhere that with the earlier resin and paper seats the ‘Y’ straps would have gone over the back of the seat rather than inside and through the hole in the back of the seat (as the seats were too weak). Others argued otherwise. There doesn't seem to be a definitive answer to the question and so I’m going to go with the visually more attractive ‘inside and through the hole in the back of the seat’ approach. Plus I know from experience just how important it is in a fighter cockpit to be able to bend forward in the seat to look back over your shoulder; and I have to say that I struggle a little in principle to accept Edgar’s view that with the ‘Y’ straps over the back of the seat the ‘Y’ could slide down either side of the seat back to let the pilot bend forward. Of course he may be right. I'm a self confessed Spitfire no-nowt and what do I know at the end of the day? Ok. So. Fair enough, I’ve still not actually started any modelling! But I’m definitely closer to it than any time in the last few years!!! More in a few days’ time. Steve.13 points
-
"Three, Two, One. Now!" -1:144 British Airways Concorde Hi everyone! As a bit of a distraction over Easter, in amongst studying, I thought I would have a go at a Revell 1:144 Concorde. My first encounter with the Revell tooling was a number of years ago, and whilst it built up quite nicely, there were plenty of areas where I felt I could do better. So this time around I brought along some extra "goodies" to help, namely the combined PE/resin set from Metallic Details, and the BraZ resin windscreen. The PE fret was relatively straightforward to get to grips with and some of the detail on it is phenomenal. I did, however, have a bit of trouble with the engine nozzles, intake ramps and gear bays- but most of this is likely due to my own heavy-handedness. The resin engines and intakes were surprisingly fragile, however if you come equipped with a spot of your favourite filler/putty, you'll have no problem! Not much can be said about the BraZ windscreen except that it fit right in and I would suggest it to be essential for any build of the Revell kit. Painting was done with a base coat of Vallejo grey primer, then Halfords white primer and finally Halfords gloss white. It being my first time spraying white, I had my fair share of hiccups, but I think it turned out alright in the end? Plenty of plasticard was used to build up the nose gear, main gears and tail wheel. The base, by the way, is a sheet of foamboard masked, sprayed and brushed with a multitude of Vallejo paints to try and replicate Heathrow's runway 27 Right- I'm very happy with this! Enough waffle, time for the pictures! So there we are then... Overall, I have to say this was one of the most enjoyable builds that I've had a go at. The kit has presented its fair share of problems (see WIP thread), and yet the finished article doesn't look all that bad? I still have plenty of things that I would have done differently: not attempted to do rivets, left some of the nose aerials off, used (or made) decals for the nose windscreen windows, the nose is angled a bit too much I suspect, etc. But for now, that's this build done and dusted. As always, thank you ever so much for having a look! All the best (and see you on the next one), Sam13 points
-
1:48 Eduard Bf109 E-4 Here are some photos of my recently completed Bf109 E-4. As the kit comes with quite a detailed representation of the DB601 engine I thought it would be nice to display it and not fit the cowling panels. As you probably all know the kit is a pleasure to build with no issues I can recall. The only additions being photo etch seat belts, some plumbing to the engine and landing gear and 1.0mm aluminium tubing for the m/c gun barrels. Decals are from the kit and went on without any problems. Paints are Gunze Aqueous and Tamiya acrylics. As an aside, has anybody any experience of the 1:48 ICM Bf109F kits? I would be interested to read any comments. Thanks for looking, Bob.12 points
-
For me, another CAC Boomerang, this time a CA-13. It looks pretty much the same as the CA-19 I posted on Aussie Modeller a few months back, the only noticeable difference is the lack of provision for the fuselage camera. Its pretty much built with the same mods as the previous one - Red Roo enhancement set, Yahu instrument panel, Pavla vac canopy (sliding section only) and some odd additions noted in the previous build. For anyone interested in the build updates - refer to this topic on Aussie Modeller: http://forum.aussiemodeller.com.au/viewtopic.php?f=8&t=16434&p=122234#p122234 Seeing this is pretty much a mirror of the previous build, the only notes will be on the finish. This is A46-199, the last CAC-13 before production switched to the CAC-19 contract. The plane was flown by Jack Archer and is a 4 Sqdn aircraft. Jack Archer shot down a Ki 43 "Oscar" while flying a Wirraway so would have been entitled to add a "Kill" marking to this plane but he didn't. There are a number of discussions here and on Aussie Modeller about this airframe however most of it is regarding the colour of the panel under the starboard side of the cockpit an nd the burning behind the exhaust. I've decided to finish it as plywood - it's a decal with an oil wash over it to darken it. The aircraft is in standard Foliage Green/Earth Brown/Sky Blue finish with a white tail and leading edge. The starboard tailplane looks like a replacement and isn't as heavily coated in white as the rest of the tail. The main experiment I tried with this finish was to fish out an old can of HB2 Humbrol RAF Dark Green to try it out as Foliage Green (A past member of our club Fred Harris once did a test of a real aircraft piece with Foliage Green and painted some HB2 on it and it was a good match). The Earth Brown was a mix of Humbrol 98 Chocolate with some Humbrol 10 Service Brown. This combined the better paint coverage of Hu 98 with the more accurate colour match of Hu 10. The decals are mainly from the kit however I replaced the Squadron Codes with those from PJ Decals. These are Medium Sea Grey codes and match better than the darker kit ones. The PD decals are quite old and Peter Roberts who was the modeller behind the decals recommends using a decal sealer on them. I ended up having to use Testors decal sealer on it after one of the code letters shattered. All in all, I'm quite happy with the appearance of the colour combination but I haven't got much more HB2 left so I'll have to see if the modern Hu 30 which is meant to be its equivalent is the same colour. Cheers Michael12 points
-
Hiya Folks, My second 1/72nd scale Ventura from the Australia/New Zealand GB,..... this aircraft represents a B-34 Lexington/Ventura Mk.IIa from 13 Sqn RAAF, based in Australia during 1942. Now 13 Sqn is better known for operating the later PV-1 Ventura but it also operated some of the 20 B-34`s sent from the USAAF to Australia, all equipped with ASV radar with its Yagi antennae. Here is the subject of the model, SF-J,.... which I have made an educated guess at being A59-11, And some other RAAF B-34`s, to help illustrate the radar etc; A59-4 seen below was being used for trials work; The cockpit interior was scratch built to better represent the early Ventura variants, additional windows for the beam gun positions were cut out and guns added while the other windows were also increased in size, the under wing ASV antenna came from an Academy Catalina, the fuselage side antennae are etched and came from a High Planes Beaufort and the model was brush painted with decals coming from the spares box with codes from Fantasy Prinshop,....., here is the WIP; And here is the model; Thanks to Bill (Navy Bird) for the kit and to Chris (bigbadbadge) for sending me an RAF style canopy,.....cheers fella`s, Tony11 points
-
Thanks Stew They are, they are. There are enough part trees for about three or four normal kits in each one and moving them around is getting tiresome… Thanks Tom Cheers Johnny What have I been doing for the last few days? Tiny, tiny painting: Almost ready for assembly now, once I've applied decal #9 to the seat backs. I just have to find them…11 points
-
Source: https://www.facebook.com/finemolds.co.jp/photos/pcb.3871071836340458/3871071173007191/ - ref. FP43S - McDD F-4J Phantom II - US NAVY - VF-114 "Aardvark" - release August 2021 - ref. FP46S - McDD F-4C Phantom II - Air National Guard - 171st FIS - release August 2021 - ref. FP47S - McDD F-4D Phantom II - USAF - 4th TFW "First MiG Ace" - release September 2021 - ref. 72843 - McDD F-4J Phantom II - US Marines - VMFAT-101 "Marlins" - release September 2021 Schemes: https://www.facebook.com/finemolds.co.jp/posts/3950646681716306 V.P.11 points
-
This is the KP MiG-21MF with SyH@rt Czech AF splinter camo decals, nice easy build and then about 3 hours to apply the decals..... Thanks for looking. Steve10 points
-
thanks chaps so, a weekends work in a few pictures coming up.. ..the radiator under the fuselage is quite a complex structure and now the PE bits I had made have arrived it was time to start.. ..complicated nose with cut-outs and gills.. ..rear with some details to capture.. ..I started by translating drawings & pictures into templates to make a buck for a vacform copy.. the PE included radiator faces which while they can't be seen here have all the honeycomb detail.. ..I started skinning the inside here - later I pulled all this off.. ..it was when I cut the rear & front apertures I removed the inner skinning and redid it once all the cutting was done - here the rear first.. ..the front has cutouts and I had made a PE template to get these right - I also left little tangs of litho around these as they wrap around rods each side that can be seen on the front view above ..also here I have added a fake central skin as I want to skin the front and back before adding a PE skin with all the rivet detail - the radiator on the real thing is one big unit that is a different colour metal so that works quite well.. ..by now the skinning is complete, the rods added and the fake centre panel removed - I made this slightly oversize as there are gaps around the real one.. ..with the centre panel attatched, it's time to start making the 10 cooling gills - the litho in front has been marked & scored on the back and each one was broken off, bent back on itself over a brass pin.. there is a mount in the throat with 10 holes to take them.. ..not finished yet, but nearly there - a bit of work needs doing to get this to gel with the fuselage bottom.. ..until next time TTFN Peter10 points
-
I've recently finished this Authentic Airliners 1/144 Caledonian Airways Boeing 757 and thought it would make a change to display it with my scratchbuilt British Airways Douglas DC10 Tugmaster. It's not a very complex diorama but I quite like it. Figures are from Preiser. Hope you like it and thanks for looking! Cheers, Ian9 points
-
I'm a bit late to the party on this one but planning to start it today. This is me creating some accountability to myself! Probably one of the most famous P-51B's and been done many times, but hopefully I can still make the finish interesting. This is Don Gentile's partner in crime that took him through thick 'n' thin right up to the point that he pranged it at Debden airfield in front of the press shortly before returning to the US for a planned War Bond tour. It's going to be largely OOB other than some cockpit etch. In better times This photo shoes a great opportunity for weathering the surfaces And in need of some serious T-cut, fortunately, it was only his pride that was lost in the accident!9 points
-
Inspired by other builds here on BM I too wanted to build a classic 1/32 scale Airfix car kit, and for me the first choice is of course the Renault Dauphine, first released in 1961, but sadly not issued for a very long time now. Being partly a collector as well as a builder I have a few of them stashed, at least one of which was always destined to be built. I have a long and very fond relation with the Dauphine and I know them inside-out, so I gave the old Airfix kit a little extra help, modifying and detailing along the way, but trying to not stray too far out. This is meant to be an Acton built UK spec standard (R1090) 1960 model, using the lovely Roy Cross artwork of the second Airfix release as inspiration. The build thread can be found here.9 points
-
A quick build for in between as a distraction from my other,bigger,projects. The Hasegawa kits are always easy and fun builds. Long I wanted to build this McDonalds plane,but I couldnt find the 1/144 decals that were once available,anymore. A few weeks ago,I found those 1/200 decals to my surprise.I grabbed them and as I already had a Hasegawa MD-80,started right away with the construction while the decals were on their way. The model was built in a good hour,I just had to make the stabilizers below the cockpit out of plasticard.Hasegawa's MD-80 kits unfortunately lack them. After a little sanding,white primer was applied as a base coat for Revell red 31. 4 thin layers of red were applied to get an even gloss red finish.The leading edges and engine inlets were painted with Testors Chrome,engine outlets with burnt metal from Gunze. 2 layers of Gunze Prenium Gloss prior to decalling. The decals are from "Decales de Guido" ,nicely printed,a bit stiff but with decal softener and patience,they worked. Another 2 layers of Gunze Premium Gloss to seal everything...done. I decided to build it gear up,as the kits landing gear and main gear doors are a bit off,the MD-90s that I buit some time ago,look a bit strange with their landing gears,so i better omitted them here. Some backstory to the real thing,yes...it did exist 1996, Crossair,Hotelplan (a Swiss travel agency) and McDonalds worked together and Crossair painted one of their MD-83s fully red and also the cabin interior was adapted to the McDonalds look. 169 red leather seats were installed as well. The jet was used on holiday charter flights around the typical tourist destinations such as Las Palmas,Rhodos,Korfu and other mediterranean destinations. On board,BigMacs,Hamburgers and french fries had been served and for the kids,a visit in the cockpit was also included. It was a real eyecatcher wherever the "McPlane" called MD-83 appeared. On with the pics Cheers Alex9 points
-
Hi all, This ‘Special Hobby’ (Kit No:SH32064) model represents a Fokker D.II, serial number not known, attached to ‘Kampfeinsitzer Stafflen’ (Kesta) 4b sometime between April 1917 - October 1918 at Royal Bavarian AF, Freiburg. Figures ‘Kellerkind Miniature’ Germane engine crew (54101), ‘Wings Cockpit’ figures - seated LSK pilot (LSK 04A). Decals ‘Aviattic’ WW1 Fokker ‘streaked’ camouflage (ATT32058), ‘Aviattic’ Linen Weave effect (ATT32236) ‘Airscale’ WW1 instrument decals (AS32 WW1), ‘Xtradecal’ Parallel Stripes (Black XPS1) ‘Xtradecal’ Parallel Stripes (White XPS2). Propeller ‘ProperPlane’ Lang type propeller. Weapons ‘GasPatch’ early LMG ‘Spandau’ 08. Rigging accessories (as required) ‘GasPatch Elite Accessories’ Turnbuckles 1/48 scale, ‘Albion Alloy’s’ Micro-tube (Brass or Nickel Silver - various diameters). ‘Steelon’ mono-filament 0.12 mm diameter‘, ‘Stroft’ mono-filament 0.08, 0.12 mm diameter, ‘Maxima’ Chameleon mono-filament 0.12 mm diameter. Grass mat ‘Polak’ Wild Meadow (Variation C - 4703). Paints ‘Tamiya’ acrylics, ‘Mr. Colour’ enamels, ‘Alclad’ clear coats As usual a fully detailed build log, in Adobe PDF format, can be viewed or downloaded from my site (linked in my signature block below). Many thanks, as always, for your kind comments and encouragement throughout this build. Mike9 points
-
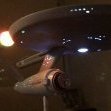
Apologies in advance for my lousy camera skills. I only have my phone to use. It's a pretty simple model. I did some post shading with an airbrush and then a light wash with oils but it's hard to see that in the photos. Three LEDs for the engines and then fibers for a few window lights and the hangar bay. Not a lot to it. Dave ht9 points
-
Here is the Tamiya 1/72 IL-2 Sturmovik. As might be expected from Tamiya, a beautifully engineered kit which goes together well. However there is no margin for error given the tight tolerances of the kit, so careful prep of the parts is essential before applying glue! This is pretty much OOB except a) I decided to open the cockpit canopy with careful cutting, sanding and polishing - always a slightly nerve wracking exercise ... the thinned down canopy is very fragile. Given the detail Tamiya provide inside the cockpit, why on earth don't the offer an open cockpit option? b) gun barrels replaced with brass tube. A necessity since the supplied parts broke off during the build and disappeared. Unfortunately, these need to be added quite early in the construction so potential breakage is something to be aware of. The same applies to the rudder balance, but in this case you can ignore the instructions and add at the end of the build. Colours - as I'm sure you know VVS schemes are a matter of much debate. I wanted the 4 colour scheme so eventually settled on AMT-7 blue undersides with AMT-12 dark grey, AMT-4 Olive green and A.II dark brown topsides. Possibly I should have used black for the grey and A.II Green instead of olive green which would have provided a bit more contrast, but, as someone else said in the context of Soviet colors, prove mine are wrong 😀 I used the excellent Colourcoats paints. Decals - often a let down with Tamiya kits, this one was no exception. Rather thick and unyielding. Liberal applications of Ultimate extra strong decal setting solution was required. Also, looked at closely, the decals are obvious screen prints rather than solid paint. But at normal viewing distance they look ok. Cheers Colin9 points
-
Here's another old classic which made for a quick and happy build. I chose the European option rather than the desert setting depicted on Roy Cross's excellent box art as it was more suited to how the figures were dressed. Thinking about it now, I suppose I should have put the officer in the back of the Kubelwagen! All the best, Ian8 points
-
Here's my Matchbox Norseman, finished as VH-GSE of Ansett-MAL, which operated it in Papua New Guinea in the '60s. Built OOB, decals custom printed. This was built for the Australia and New Zealand Group Build, build thread is here. thanks for looking Julian8 points
-
Got back into modelling a couple of years ago and only done planes. I thought I would give a tank a go. Lovely ,easy kit and my first time using hair spray weathering. Feel free to constructively criticise.8 points
-
Revell EC145 converted to an EC145T2 with Naval Models resin fenestron tail. I also had to extend the skids and add the flotation bags, aerials and cable cutters. The QinetiQ decals are home made, the full-size helicopter is used to support the various ranges used by QinetiQ hence the registration G-RNGS. With some of the 'family' Thanks for looking. Steve8 points
-
This isn't my usual scale, but I am honoured to have built this for a friend who's father flew this aircraft (amongst others). The Tamiya kit is sublime and as usual I have used MRP paints for this. This particular aircraft is depicted as pretty much brand new, on delivery.8 points
-
This GB came around a bit quickly! Good job my entry was sorted and waiting, ready to go. I doubt I'll be able to maintain this level of efficiency throughout, but I'll give it my best shot. Here's the Big Boeing, ready for action. BOAC Decals supplied by Hannants and bought within a day of the kit turning up here. It's a build that's been on my mind for quite a while now. There's also an aftermarket set of Heston Steps for the build. I'll be needing a few passengers to add as I'll be sitting this lot on a hardstanding of some sort. Here's what I'm aiming at... And here's one I did earlier. There's something about those very smart BOAC colours and highly polished metal that keeps drawing me in. Roll on the Kick Off! Tony.7 points
-
Hi all. If 2020 hadn't already been bad enough, Airfix decided to add to my misery by announcing the re-release (in 2021), of their long discontinued Jaguar 420 kit . In an attempt to alleviate lockdown fever, I had spent much of 2020 acquiring old Airfix car kits, some of which were quite expensive. The Jag 420 was a case in point. Overnight, the value of my investment had plummeted It could have been worse. Because I was buying to build (rather than to collect), I was able to keep the cost down by choosing non-perfect examples - and so it was that I came to own this kit. My example is actually an American MPC version of the Airfix kit, but without a box lid and without the 'go faster stripe' decals that these versions had. A few of the original parts were missing, but the vendor had replaced these using old bits salvaged from other kits (you can see some of the yellowed parts in the photo). I thought I should take the opportunity to get some pleasure from this kit before it loses it's rarity value - so here it is in the GB! It'll be next month before I start this build, but I am genuinely looking forward to it . For those who may be interested, here's a link to the missing box art. Cheers7 points
-
'Most senior officers regard as the most vital to our success...the bulldozer, the jeep, the two and a half ton truck, and the C-47'. General Dwight D. Eisenhower - Supreme Commander of the Allied Forces in Europe For this GB I will be building the Airfix Dakota III / C-47 Skytrain using the latest Airfix boxing - Though I will be making Decals to represent an aircraft from 34th or 43rd Troop Carrier Squadron they were part of the 315th Troop Carrier Group based at RAF Spanhoe in Northamptonshire - from there they took part in both operations Overlord and Market Garden , but my build will depict an aircraft from March 1945 when they moved to RAF Boreham in Essex where they carried elements of the 6th Airborne during Operation Varsity, This added another aircraft to my 'Essex based - US aircraft during WW2' The kit and the sprues all nicely wrapped up: The kit even includes a Jeep so I will get 2 of Eisenhower's vital 47 points
-
Ok. Ha! Here's a model of a Fokker DVII... And I knew I had these amazing decals from @Mika Jernfors at Arctic... And there is a discrepancy regards g the colour...I'll let you all choose...I know, the kit doesn't match what Mika designed the decals fr, but I think it will be alright. And Mika has written out this excellent short history of the aircraft, so I'll let him tell you...Thanks @Mika Jernfors And, as he says there are excellent photos on-line--not a lot, but good ones. So I will be streeeeetching the fuselage and making this MAC kit into a two-seater. I could cheat. I have a resin 2-seater from Belgium in the stash somewhere. Maybe I'll build that one too because it's a Sabina aircraft...I'll dig it out tomorrow and see. But for this thread, it's scratch time. And I'll finish some stuff on the bench first! See you all this weekend! --John7 points
-
Dear Colleagues The Royal Navy only called upon nature to inspire the naming of warships with their Flower class corvettes, but for the Japanese all their destroyers were named after poetic natural images. In this case Hatsuharu apparently means 'early spring'. Unusually, the 1931 design genuinely tried to fit the treaty restriction of a sub-2000 t weight (which they later abandoned) and the ship was launched in 1933. However, a drastic redesign was needed in 1935 due to top heavy problems with a super-firing B turret arrangement (later moved to the stern). Hatsuharu lasted until 1944 when sunk by bombing in the Philippines in November 1944. The Aoshima kit has a lovely hull and is one of their better ship kits. As is my way I have added a lot of photo etch apart from the stuff that came with the ship and used brass rods for the masts. Hope you like it Andrew7 points
-
Think it was around the tail end of 2014 when I read this utterly compelling book, "And If I Perish: Frontline U.S. Army Nurses in World War II"; https://www.amazon.co.uk/If-Perish-Frontline-Nurses-World/dp/140003129X/ref=sr_1_1?dchild=1&keywords=And+If+I+Perish%3A+Frontline+U.S.+Army+Nurses+in+World+War+II&qid=1618192447&s=books&sr=1-1 And I knew right away that I wanted to create something to commemorate the courage and fortitude displayed by the US Army Nursing Corps in the ETO during WW2. Looking around for available miniatures in 1:35 scale, I happened upon this excellent resin kit. Unfortunately, I can't recall the Japan-based manufacturer, but I do remember contacting them and ordering two examples so I could include each kit in two different dioramas. One set in WW2 and the other in Korea. Meanwhile, a movie had been released telling the story of a Sherman Easy-Eight crew as the US Army advanced into Germany in April-1945. So I decided to include elements of the tank and crew, but set the timescale and location back to the Battle of the Hurtgen Forest Sep-1944 to Feb-1945. And that's the background as to how this particular diorama came about. (The historical inaccuracies are all mine and I'm calling them "Artistic License". Trouble is, the original photos were lost when I bought a new computer, so I've had to use screenshots from two MP4 slideshows that survived the move to the new electronic abacus, resulting in a loss of quality in the photos. I really must get around to taking some new shots of this and my Korean War dioramas -- I'm just waiting for opportunity and inclination to occur simultaneously...aka...it's laziness...😳 Anyhoo, here ye go... Cheers the Noo7 points
-
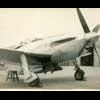
Good evening, dears! It's my next model. The model's main error is a very irregular canopy visor. It's absolutely wrong angle. I grinded down the front of the visor at an angle to 0 to correct the situation a little. There are several mistakes in the instructions. Better to look at photographs and drawings. I separated the landing gear and inserted chrome tubes there. Added some details from stocks. Generally, this is a labor-intensive model in the result.7 points
-
Very similar photo to yesterday, but after some placards & weathering to busy things up. I thought briefly about wiring the radios up, but then thought better of it; the balance of effort vs visibility not worth it. And here with the rear canopy dry fitted (glue tomorrow). At the front end of the cockpit we do have glue; the windscreen is now fitted after some fiddly work with gun sights etc. But if you really want fiddly, then look no further than the HGW belts - of which I understand @Fritag is using the Spitfire equivalent in his build. I’ve never used these before; they look great, but need a steady hand and some patience (& short sessions). Here they are at the start (pre-windscreen fitting): ...and here as at close of play: Once these are done I can fit the seat and button up the cockpit for priming. More soon Crisp7 points
-
A bit more `progression',..... got a watercolour wash onto the models, ready to remove with some kitchen roll; And both Beauforts have had a bit of weathering added,....... seen here with some of the smaller parts comng together,...... I`m trying to sort out some Browning machine guns for the turret,.... using a High Planes turret as a refrerence,... I have some Aeroclub twin Brownings which I can modify. A set of Coastal Craft Vickers K Guns will be used for the beam positions on each aircraft,.... the torpedo and the exhaust rings still need to be painted yet; 22 Sqn RAF; 16 Sqn SAAF; So almost done now,..... time to add the undercarriage, turrets etc, Cheers Tony7 points
-
Aww, thanks! Here's the state of play. The front end is attached, but needs the mudguards and headlamps fitting. The rear end is dry-fitted, pending painting. I have to say, it doesn’t look all that bad. Yes, you can see solder, but it’s mostly not lumps, just a silver coating to the brass. A half-decent paint job will improve matters no end. I have decided to go blue-grey. I have also considered the canvas situation. The kit provides material (in blue and green, so both options are covered) to make the cabin roof and tilt. I’m sure it’s fine, but it will look, well, a little bit flat. Real canvas tends to sag and billow. I’ve used masking tape before, but I’m thinking I may try aluminium foil. I’ve been saving the really thin stuff that is used to seal instant coffee jars, and I think it might be suitable. I’m also thinking the tilt might look nice if the sides have been rolled up and secured, leaving the top and front covered. Some Internet rummaging for prototype images might be worthwhile.7 points
-
The AMX-13/155 SPG is a typical Heller kit of it's time and the only one of its kind produced in the 1/35 scale. While I am still disappointed with some parts of the kit, it really isn't all that bad. With some serious work, it could be turned into a very good model. The little diffusion of the model and the fact that it is difficult to find on the market, makes this kit has a high value as a collector's item., I think . This will be a slow project as I have other models on the workbench (M-47 Patton, Quad Gun Tractor, ASU-57, King Tiger, and others), all in different degrees of assemblies. Well, I decided to start this project and have made some progress on the lower hull and the running gear. The drive sprocket is terrible which was wrongly shaped and not really accurate, the road wheels are not so bad, but very simple. To quickly solve suspension problems I used parts from a donor vehicle, the excellent AMX-13 from Tamiya. Why sacrifice the wheels and suspension parts of a good kit? Because I already used the AMX turret in another project. So I hope be forgiven for this heresy,,, Main parts of the donor vehicle, Tamiya sprue A: Comparison between Heller (green) and Tamiya (yellow) quality and accuracy of injection parts... Drive sprocket: Tools: Here are the first pics of the new suspension in place: That´s all for now...6 points
-
For this GB I have decided to "build" several batches of Milicast 1/76 resin tanks - I say "build" though in reality there is little of that involved and the main work has been painting and adding decs and a bit of "stowage". So here is my first batch of 3 early British Cruiser tanks as used in Operation Compass at the end of 1940. This is the A9 Cruiser Mk I with relatively light armour, a 2 pdr anti tank gun together with a water cooled coaxial Vickers mg in the main turret, and two small turrets at the front also with Vickers . These were of limited value at the best, and were cramped and uncomfortable even in the UK, but in the desert they would be like ovens and so were often just used for extra storage. Although the Caunter camo scheme was just being introduced, this tank from B Squadron 1 Royal Tank Regimnt seems to have retained the previous Light Stone scheme, though some photos suggest it might have had patches of the so called "Dark Sand" brown applied as well. This is the A10 Cruiser MkIIA which dispensed with the sub turrets, replacing them with a Besa mg in the hull front, and in this, the IIA version another Besa replaced the coax Vickers in the turret. Extra armour was added to the front of the hull and turret. This is in the Caunter scheme but with Khaki Green G3 replacing the normal Slate, and is marked as a tank from 6 RTR. Lastly we have the A13 which was originally the Cruiser Mk III, but after the addition of angled armour plates to the turret and various other changes it became the Cruiser Mk IV, and this is a MkIVA where the Vickers coax mg was replaced with a Besa. It is in the "normal" Caunter sceme and the markings of 5 RTR. All 3 tanks carry the rather thick aerial for the Number 9 radio set. Cheers Pete6 points
-
thanks Trevor. When did you last misplace your confidence? It was seriously considered Ian, but since the part was all compound curves with no good way to measure anything and get a good starting point, it would have taken a good number of design, print, test iterations before I got anywhere, so in the end it was back to modeling the old fashioned way. Guess what I've been doing today with the misshapen Vampire? With @Dave Swindell's illuminating revelation earlier concerning the tropical fit, I could forego the attempts at symmetry and bash on ahead. First thing to do was mark out what I currently had for an intake then approximate the new shape with the help of an old fashioned scribing stick. That gave me a rough idea of what I was now trying to achieve. The information on the tropical fit also explained the access panel seen partially behind the fairing. I had wondered about that and despite multiple searches had not come across another Vampire with the same panel. Now it all made sense. Out came my little batch of PE panel templates and confirm my suspicion that I did not have a PE template that matched the Vampire panel, so I bodged one out of styrene. That was taped in place and I scribed around half of it with a sharpened pin. Once half was scribed, tape over the bit that isn't taped, remove the tape on the bit that is taped, then scribe the remaining half. Simple. Okay, it's not perfect, but I think it will work. The worst part is the lower left side - and that will be hidden by the new tropical intake thingy. Out with the razor saw and hack off the front of my carefully crafted intake and replace with a chunka styrene (again). Then out came the heavy duty SIHRSC to start refining the shape. It was obvious very early on that this was going to take some serious work to get right. Thick styrene sheets tend to be very flat whereas fuselages tend not to be Sometime later that day, after some sanding, filing, filling, sanding, filing and a bit more sanding, we have the start of a tropical fit intake fairing. Still a good bit of refining to go yet though. (for 'refining' read: sanding, filling, filing etc.) I also need to taper the fairing into the fuselage as it protrudes forward, quite substantially judging by the photo. I've started the taper but as you can see, there is still quite a gap. Filler just isn't going to cut it here I'm afraid. So, out with some more styrene, filed into a tapered wedge shape, then glued to the intake. This is one of those 'a little bit at a time' jobs where you can only do so much then have to dry fit, shape and repeat as often as necessary before you can carry on. Once the glue had cured I could trim the excess off and I was pleasantly surprised at how well it all fitted. Nowhere near finished yet though. Definitely heading in the right direction. Despite the repetitive nature of this job I felt I was actually moving forward, which is a rare feeling on a CA kit. Once all the heavy lifting was done, there were still a few gaps here and there and this seemed like a good opportunity for some sprue gloop. The gloop was slabbered on the top and bottom side and left for an hour or so During that time, a skin had formed on the surface and it was then safe to press the wing against the fuselage and let the gloop take the form of the fuselage thus eliminating most of the gaps. The squidged out bits can be sanded off later. There will still no doubt be plenty of gap filling opportunities left for me when it comes time to fit the wings but this will go a long way to making the end job easier. With that job accomplished there was little else I could do on the stbd wing until the gloop dries in a few days. I may as well turn my attention back to the port intake. Don't you just love it when you spend about an hour sanding and shaping and then this happens? Thankfully it wasn't too bad and was cyano'd back into place and some micromesh brought it back into line post haste. Now it was on to the final furlong for the port intake - that meant being creative in ways to try and sand the inner faces of the intake back to something approaching smooth. I think the port intake is in a decent place now and any additional fettling will take place once the wing is in place. Which is not as easy as it sounds! Following yet another fettling session I got the top edge of the wing mating surface in a decent place yet there is still a sizeable gap on the underside. Guess what I'll be doing over the next few days then? I'd had enough of this sanding malarkey and decided it was time for something else. Remember that less than enthusiastic rendering of the front undercarriage leg that CA offer? Yes, this one... Obviously, something had to be done about that. Lets be honest here - that is just a monstrosity. Guess what? Yup. Brass. Take a length of brass tube. Find another piece of brass tube that slips over it nicely - thin walled of course. Cut a small length of aforementioned tube. Then find some more brass tube that slips over the first tube nicely, but this time with thicker walls. Cut two thin slices of that tube, sand them as thin as you can get without removing all the skin on your index finger right down to the bone. Slip a thick walled slice over the first tube, followed by the thin walled section, followed by the remaining thick walled slice. I then tinned the main tube and wire-wooled it as smooth as I could get it so the three pieces could slide over the pre-soldered section. I then threw some flux on there and held the iron against the main tube while squeezing the three pieces together with tweezers. (easier written than done) It looks a bit messy here, but solder cleans up very easily with some wire wool This will now form the basis of the new nose undercarriage leg. As luck would have it, I had a length of brass rod that was the perfect diameter for fitting inside the main tube. Then in a moment of madness I decided to try and replicate the small bracket that holds the stay in place. (with apologies for the poor photo) For the bracket, I took a piece of square tube, cut a minuscule piece of that and by making some additional sacrifices to the gods of soldering, I managed to solder that teensy piece of square rod onto the undercarriage leg without it all falling apart. Once that was soldered in place, I simply filed off the 4th side, leaving a 'U' shape and then filed the two sides of the bracket into shape. That will allow me to fit the stay later when the leg gets fitted. You can see in that shot above that I have started cutting the kit part into pieces. What I wasn't expecting was to see just how far out of round the kit parts was. That white line is the styrene spacer I glued in there the other day. It's just as well I was butchering this innit? Anyway, I then took the bottom part of the undercarriage, and (here we go again) after some filing, some sanding, and a little bit of drilling, we have a half decent looking nose undercarriage leg If I'm hones it may be a little light on the diameter, but these were the only tubes I had which telescoped with each other and I wasn't about to start ordering another batch of brass for this job. Undersized or not, it's still better looking than the kit offering and I'm happy with it. By that time I was done for the day as there was really nothing else I could be doing until I get these wings stuck on and it's probably going to be at least a day or so before the gloop hardens enough for me to start attacking it with abrasive implements. Happy sanding folks a good systematic approach and one other BM'ers would be well advised to heed when dealing with CA kits6 points


This leaderboard is set to London/GMT+01:00