
Leaderboard

.thumb.JPG.3498f40362ff13ebfc4b2e45abbd545e.JPG)


Popular Content
Showing content with the highest reputation on 04/04/21 in all areas
-
Here is the AW-101 Merlin under the name SAR Queen as she is known in Norwegian circles. A short preamble begins: Back in July last year I began a double build of the Italeri Apache and their RAF Merlin HC3. Having already built the Merlin HM2 a while back I felt like trying to sort out the Italeri kit's windows which are frankly dire and unrepresentative. Deep recesses into the fuselage and raised rims round them. Dohh! As I was thinking of picking up my trusty Swann-Morton and beginning I spotted the build beginning of Steve's @IV(AC)Plumb Norwegian Merlin in 1/48th scale in which he posted lots of brilliant internal detail shots. As I have already built a Norwegian Sea King resplendent in Redningstjeneste markings I decide to follow up with this ultra modern one. My link to an untidy and over protracted thread. With that out of the way here is the latest helicopter to come off the bench. Excuse fingers. Late afternoon sunlight, because I had begun to forget how nice it is. I hope you like this, my latest Merlin. They are becoming slightly addictive, I've another to play with.26 points
-
Hi Guys Being in the medical sector I can't have much time to model at the moment. But I still found time to make this superb Spitfire from eduard. Hope you like it. Cheers and keep safe. Joel23 points
-
Hello, Here's my last complete build, the Hasegawa, 1/48 Lockheed F-104G of the Raoyal Danish AF, from Esk 726. Been using the !daco set for the wings and their ejection seat improvement. Seat harness from the Eduard Look set for the Kinetic zipper. Paints from the gunze acryl range. hope you'll like her. As usual, feel free to comment and critic Best Stef (#6)22 points
-
Hi Guys- I have just finished what I believe is the best model airplane kit ever. The New Tool Tamiya P-38F/G Kit in 1/48. I still cannot wipe the smile off my face on how this went together. I am no stranger to the Tamiya 'shake and bake' but this one is on a level all its own. This engineering made a complex subject very easy to build and the location of all parts perfect. I am super impressed. This kit was built almost OOB except for Eduard 'Look' Instrument panel and Xtracal Decals for Snooks and Techmod decals for the red rimmed 1943 insignias. I had to use Eduard P38 decal stencils also. My Dad named me 'Bob' after a friend of his who died in a P-38 in North Africa... So I searched for a scheme of a P-38 that was in North Africa and liked this one with the red rimmed decals. Enjoy and I HIGHLY recommend you clear your workbench and build or pickup this rather new kit to build... You will be amazed as I was and its the type of kit that gets your excitement back into the hobby. All I had was a work in progress photo of the underside, but wanted you guys to see the wheel wells. They are magnificent and everything just drops into perfect alignment! There is no filler on this kit.21 points
-
Here's some photo's of one of my latest, an Accurate Miniatures 1/48 Mustang 1a converted into a Mustang Mk 1 at the time of the Dieppe raid. It's AG470, RU*M as flown by F/O Hollis Hills (an American) flying with 414 Sqdn, RCAF when he scored the first Mustang victory over an FW-190. I used the Ultracast resin conversion set, an Ultracast seat and fishtail exhaust, a set of decals produced by IPMS Canada, and some scratch building. It's painted with Tamiya acrylics, and weathered with oils and pastels. Hope you like, Colin Not AG470 (RU*M), no photo's exist to my knowledge, but representative ... Build link here: Mustang Mk 1, 414 Squadron, flown by F/O Hollis Hills at Dieppe - more progress March 19 - Work in Progress - Aircraft - Britmodeller.com Thanks for looking, Colin20 points
-
It's a nice little kit. The kit canopy was way too thick. Luckily I had a Falcon vac replacement originally done for the Heller kit. After some judicial trimming I got it to fit fairly well. To my disappointment the spinner was missing from the kit. In my stash was the old Heller kit and I used the spinner from it. It's a tad oversize but not all that noticeable once attached. The underwing guns are hollow tubing. The gun sight and pitot tube were also replaced with thin metal tube and rod. The kit went together fairly easily. The camo was the challenge. Thanks for looking. -Bert19 points
-
This is an Israeli F-16D Block 30 from the IAF First Fighter Squadron, which acquired its Block 30 F-16s in 1987, before transitioning to the Block 40 in 1992. The base kit here is the Hasegawa F-16D Block 50 with an Airwaves Israeli F-16D spine, Aires cockpit, Master pitot tube, Aviation Workshop 600 Gal tanks and markings from IsraDecal. An Academy F-16C donated its GE jet pipe, while the LANTIRN pod, pylon and GBU-10s are from Hasegawa weapons sets and the AIM-9Ls are Eduard Brassin. I hung the Sidewinders on stations 2 and 8, rather than the more normal wingtip pylons, because that seemed to be the norm for Israeli F-16Ds when carrying a heavy load (2 x 600 gal tanks and 4000lb of LGBs sounds like a heavily load to me!) The Hasegawa F-16 has arguably been surpassed by more recent kits but provides a reasonable basis with a few corrections, like changing the cannon port to the later style. Likewise, the Airwaves spine is a good start point, needing a few fixes: filling the two circular vents on the starboard side; moving the small scoop on the starboard side to the tail fairing, which also gained some detail at the rear face; and a triangular antenna on the spine. I used a Vallejo set for the Israeli scheme, which worked out pretty well. By the way, I made a mistake in the camo scheme in that the sand should extend up the starboard side of the fin on First Fighter Squadron aircraft; what I’ve done would be more common on a Scorpion or Valley Squadron jet; ah well, live and learn.17 points
-
Some more yellow 'planes so get your shades back on.... Heller CL-215 Leading Edge Decals. Refurbed build. A pair of 1/144 scale Canadairs. The 415 still to be finalised and still undecided....after a couple years or so. By the way, A Model kits for these two. Some helos. Italeri Cormorant, ad Kiowa C-139, MACH kit for the S-51. Both these have been here before but included for the yellow theme. Another pair fromA Model CC-115 Buffalo in yellow and A Model DHC-4 Caribou - Not Canadian but still yellow... Sword 1/72nd Beech D.17. till need to add the colours to cowling forward edge. Reworked a few years ago now, the FROG Maggie with Aeroclub spatted undercart, markings from generic decals by Modeldecal. I based this on the full size Maggie I watched at Shoreham back in the '90s being restored. I have pics of it in varying stages . Flies as V1075 but rego is G-AKPF. On left is Dujin resin kit of Cessna C.37 and to te right is KP Piper J-3 Cub. I'll re do the F- reg to something else one day. There are just a couple more to come when I find pics.17 points
-
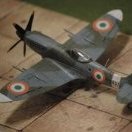
Hi gents Transkit MDC used to transform Tamiya's kit. Unusual camo as it's a captured Rufe and given to French Air Force by ATAIU. Ame-iro following the recipe of Bruce Salmon. Nakajima green with AK real color (Black green). Happy easter16 points
-
New lockdown, new model: life does bring its consolations. After a couple of Hunters and a Vampire last year, I've warmed further to the 50s jets theme. In so doing I became interested in the RAF's brief but successful relationship with the F-86/CL-13 Sabre, just four short years from 1952 to 56. This is the Fujimi kit, rebadged recently as Italeri, and I had a lot of fun with it. Using references here on BM and elsewhere I made a number of changes to turn the F-86F into a Canadair Mark 4. I missed a couple of details but hopefully the errors aren't too visible. I also moved the wing pylons inboard, lengthened and reshaped them a touch, and repositioned the fuel tanks on the pylons slightly to get them looking closer to the look of the real thing. I tinkered a bit with the windscreen to make the central panel longer than the side windows. I used some of the Pavla cockpit set, some Reskit wheels and an etched instrument panel. Altogether it went together well, though the fuselage-wing join needed a bit of work. Paints are mostly Xtracrylix. Decals came from Xtradecal (roundels), Modeldecal (4 Squadron markings), Freightdog (serials) and Superscale and the kit (all those stencils). Hope you like. Here's a nice photo of a sister-ship, taken in summer 1955. Credit to the Jever Steam Laundry website which has plenty more like this. Justin15 points
-
Hi mates, Raspberry Ripple time! This is the Sword kit of the Hawker Harrier T.4 in the scheme used by QinetiQ during some of the VAAC research. When I first saw photos of this aircraft I knew I had to make a model someday. So here she is! I won't go into the story of this research as it's widely available online. Some of it is highly technical (with graphs!) and it was beyond my classically trained brain. As usual, here's my summary: Project: QinetiQ Hawker Harrier T.4 Kit: Sword Kit No. SW72062 Scale: 1:72 Decals: Vingtor sheet 72-118 for Harrier Test & Demonstration Aircraft (thanks Nils!). Some stencils from the kit. Resin: Freightdog FDR72021 Harrier T.2/T.4/GR.3 and FRS.1 dropped door intakes; Pavla U72-118 Exhaust Nozzles Photoetch: Main fret included with kit; some parts from Eduard 73386 Harrier FA.2 Paint: Floquil 110015 Flat Finish; MRP-183 Oxford Blue, MRP-184 Signal Red; Testors Model Master 2143 Semi-gloss White; Hataka Light Admiralty Grey; GSI Creos GX112 UV Cut Gloss, H12 Flat Black, H11 Flat White, H331 Dark Sea Grey, H23 Shine Red, H90 Clear Red, H94 Clear Green, SM203 Super Iron II, SM206 Super Chrome 2; Tamiya XF-69 NATO Black Improvements/Corrections Made two underside instrument pods using drop tank bits Master AM-72-131 Pitot Tube and AOA Probe Added front canopy brace Added canopy retention cables Scratchbuilt front instrument panel coaming Tailplanes, main landing gear strut and tyres, and outriggers are leftovers from Hasegawa Sea Harrier kit WIP can be found here. Now for some pix: Some in-process shots - here is the belly of the beast: Raw materials - ejection seats: After a bit of tarting up: A bit of my famous red filler "here and there": But at the end of the day, she looks pretty good to me. Now it's off to review the stash and agonize for days over what to build next. Cheers, Bill15 points
-
Hi all, I've had this in my stash for a couple for years (I was lucky enough to get it from WNW before they closed and the kits started going for even crazier money!), but was kind of avoiding it as I didn't think I would make a good enough job of it. I eventually bit the bullet, and I should have built it ages ago, it's a lovely kit. The level of detail etc. is very well known, but it's so well engineered and thought out as well, I really enjoyed building it. Of course, it's no accident that my first ever WW1 kit is a monoplane with only one bit of rigging at the undercarriage! It's not perfect, but any issues are definitely my own, and in the end I'm happy enough with how it turned out. There is stunning detail in the cockpit and its enclosure that can't be seen, but I do recommend looking up pictures online to see how that subassembly comes together. @Viking has a great build thread on here that I found really helpful. It took me about 2 and a half months in total, but I didn't get near the bench for a few weeks in the middle of that, so it's a relatively quick build, for me anyhow! Anyhow, here are the pics, any comments etc. are always welcome! Kit: Wingnut Wings Junkers D.1 Scale: 1:32 Paint & Weathering: MRP, Tamiya and AK Interactive paints, Oils and Pastels for weathering Extras: Some wire for the throttle, gun, rudder controls and magnetos.14 points
-
Two for the price of one! Fresh off the bench are both kits from the Eduard 1/72 Hellcat Mk.I and Mk.II Dual Combo. The Eduard boxing comes with plenty of cockpit PE and a masking set, which worked fantastically. Both models were built OOB. I rushed the weathering just to get them finished. I really need to learn to slow down for this final phase, but the longer they stay on the bench the bigger the backlog gets. CC welcome. Thanks,14 points
-
Another from my part finished pile gradually going down since my self imposed ban on making anything new( with an odd exception soon to be revealed). This is the PM kits 1/72nd Beech AT-11 Kansan finished as an aerial mapping aircraft in New Zealand. The actual machine is now on show at the MOTAT Museum collection in Auckland, NZ. I used Old Model Decals for this. The kit has 1001 and faults but I did nothing to correct them except to add the exhausts which are non existant in the kit. Oneof the really bad things about the kit are the upward raked engines that I noticed too late..... The nose logo is still just a tad too big on the decals but the ones used here are better than those I originally received as they were much bigger! A kind note/email to OMD and I got a replacement set. Very nice man down there did his best but I'm not complaining. By the way, I lost the outer undercarriage door on the starboard wing14 points
-
I know its all wrong but some of the kit is wrong too and having bought the kit decided to build it before I got stuck in to the A / NZ GB. But just finished it to use up some old Aviation USK decals that were getting a bit tatty. And, I couldn't justify buying any dedicated decal sets for this kit as none of them have subjects that appealed to me. National markings from generic sets. Nothing wrong with said decal sets but just not for me. As for the kit I used wheels from the 1970s Airfix Mk.1 Spitfire as it has better hub detail than this new kit, a bigger better looking seat added to a slightly modded cockpit insides, tail wheel from same Mk.1 kit because it looked more to scale . Chopped off the outer cannon stubs after gluing the other half of the provided kit parts and used my spare Mk.V prop from the original 1970s Airfix Mk.V which has a better looking prop than this new kit. Anyway I can live with it for now. Spifire Vb of 401 squadron RCAF Redhill, 1942(ish). Unusual mod to regular A pattern camo scheme. Incidentally all the bits I swapped for the older Mk.1 kit were used to finish off said Mk.1 and is in my builds for sale box. Will do a couple pics later.14 points
-
Just finished this one from my box of doomed unfinished builds started in 2018 or there abouts. BPK kit of the Canadair CC-144 Challenger. This last pic shows the little one in company with a bigger one to 1/72nd which, in turn, is the resin kit put out by Leading Edge several years ago. The 1/144 kit is rather cute and the tiny wheels gave me shivers when handling to be fixed to the legs. Fortunately no losses!! The windscreen is so clear you can actually see in to the cockpit!!! The whole fuselage was moulded in clear... and very clear too! here its in company with my recent 789 to show size comparison. The Challenger is a reasonably big aeroplane but look at how big the Boeing is.12 points
-
- This is the first HPH all resin kit I built of this monster.Ithought I had posted it some years ago but I didn't find any cue of it, I'm now working on my resurrected Su-57 this time in W.I.P gives me the idea to show this first.12 points
-
Here's my Milicast 1/76th scale resin Ford WOT3D 30cwt Workshop, doing what it what intended to do - act as set dressing to aircraft models. Planes being prepared for missions, or being maintained or repaired in the field, were often surrounded by a gaggle of vehicles. Petrol bowsers, pickup trucks, bomb trolleys, you name it. I’ve been slowly building up a collection of period vehicles to add some life to the mini dioramas I concoct when photographing the aircraft in my 1940 collection. I don’t plan to photograph the little Dennis. Sadly, the paint finish is not as good as it should be. It will be an adequate model for placing at a distance in shots, though.11 points
-
Before going any further, just one small observation. Why on earth would the artist who did the box art for this kit, think that having marked the Kangaroo as a Canadian vehicle, it would be a good idea to make all the crew members American? Just saying. And why did Italeri include US figures? Originally, I was going to go with a one piece final drive casting, but after looking at a couple of sites with photos of Canadian vehicles with the three piece unit, I decided to go with that. The only one available to me at the time is the one from the Tamiya M4. After checking it out, it seemed as though it would marry up with the Dragon lower hull with some slight adjustment, that being the removal of the strip running along the bottom forward edge and the forward pair of triangular strengtheners. I added a strip of card to give the Tamiya part something to bond to. The eight missing attachment bolts on each side of the forward part of the lower hull were punched out and glued in place. So using a razor saw, I cut the front off of the Tamiya hull, and assembled all of the relevant parts. I added a strip of card running along the top and three more bolt heads. The FDH and the hull glued together. Once the glue had hardened, the gap in the Tamiya FDH was filled with putty, and the slight gap at the back with Milliput. That's as far as I've got so far. Progress will be slow because of my 1/1 scale build. Thanks for looking. John.11 points
-
The ANBO I was the first single-seat aircraft developed in Lithuania by aircraft designer, military pilot and Brigadier General Antanas Gustaitis. The first flight took place in 1925. Ten years later the aircraft was sold to Lithuanian Aviation Museum in Kaunas where it is exhibited today. The first model is finished in style of operation during 1925-193010 points
-
I've not been very active on here recently due to Internet woes but have still been building and painting. This one just finished, a 54mm flat painted in oils.10 points
-
Just a few pics of this lovely kit. It is Eduard's Mirage III CZ SAAF 1982 in 1:48. I used the Profipack version and finished it in the kit decals for nr. 800 2 Eskader/ 2 Squadron of the SAAF Waterkloof 1982. The kit has 4 vices; 1. Poor fit of the wing undersides to the fuselage in particular the ventral gun bays and the overall fit of upper wing to fuselage is ......ambitious lets say. 2. The plane sits too high; chop the nose wheel down by 2-3 mm 3. Fit of the cockpit Instrument panel hood is bad. 4. Loctaion of main undercarriage support arms is esoteric Plane is a tail sitter (not a vice as its stated in the instructions) so don't forget to add weight to the nose. Other than that its a lovely kit and I picked up a few more as Overtrees to use up the Profi Pack decal sheet. If you buy enough overtree kits it justifies the postage. At least that is what I tell my wife. Regards Brian10 points
-
This is my model of the Alfa-Romeo T33/3 which won the BOAC 1000 race at Brands Hatch 1971, the first of three outright victories that year. The kit is by Provence Moulage, which I bought as part-started on eBay. A few parts were missing, most of the rear spoiler, and one of the wheel inserts. These were scratch built, along with a replacement roll hoop. The cockpit was reworked, with new seats, belts, and several minor details. Paint was Humbrol throughout, with the exception of the white nose identification colour which was Revell 04. Decals were mostly from the kit, with Marsh decals for the tyre sidewalls, and Virage race numbers, plus some of the sponsor stickers from the spares box. Unfortunately, the P sticker is slightly out of register, and I had no others at the time. The biggest challenge was the white nose. Trying to mask over the compound curves took several attempts. I eventually resorted to applying a strip of white Xtradecal across the demarcation from the red, masking off the body, and then airbrushing white onto the remainder of the nose. The slightly "wonky" Koni stickers on the sides of the body are deliberately replicating the real car. The radiator and nose intake blanks were made from 10thou plastic card. It was a cold and dull day, so they were presumably there to keep operating temperatures at the correct levels. Thanks for looking. Trevor10 points
-
What a (light) Relief!! This has been a bit of fun and the resulting "models" are somewhat reminscent of "Egg-Plane" or "WWToon" tank models! First, the "Off-Roader" Looking like the offspring of a Suzuki Jimny and an early Toyota Landcruiser, here it is! Phone photos, I'm afraid! She's a little beauty, eh? Moving on, next I tackled an aeroplane in the same style. Again a caricature, and quite nondescript, it has Vee struts on the wings and a representation of a rotary/radial engine, so I concluded that I looked less unlike a Nieuport than anything else, so I found a Nieuport colour scheme and finished it in that! The "build thread" can be found here! Now, where are those paper models? . . .10 points
-
Hello all, Just finished this one after leaving it alone for a month because of a catastrophic liquid glue spill! In truth it nearly went in the bin, but then I decided to use it as a weathering practise piece. The kit is short run injection but has quite a lot of detail which is typical of Amodel, its even got the fuel tanks. It took quite a bit of filler around the bomb bay area to bung up the cracks, but otherwise it wasn’t too stressful a build. (until I flung the glue pot at it anyway) The aircraft depicted is from the 328 AR of the VVS circa 1945. Around 390 of this later version with diesel engines were built from 1944 onwards and became a major part of the bomber wing of the VVS. I thought I’d do this colour option as it had splinter camo which I thought was a bit unusual for a WW2 Russian aircraft. It’s finished with Xtra colours and many different weathering attempts! Incidentally if you have one of these in your stash use decal restorer or replacement stars as the supplied ones won’t come off the backing without disintegrating. So, here it is. Thanks for looking Pete9 points
-
Rigging the crane. Actually, the instructions are fairly clear. I installed the cable that lifted the jib up and down - derricking, I think it is - first, as it seemed the easiest. The stiff nylon twine provided had been so long wrapped around its bit of cardboard it assumed a zigzag pattern. I applied weight and hung it from a shelf for a few days. That helped, but the stuff still never quite wants to conform to the pulley circumference. When you add CA that doesn’t want to set properly, well, mild annoyance comes to mind. Done, but that hook assembly really annoys me. It looks like it’s made of foam or something. The cable should be taught and straight. Still, there’s stuff all I can do about it. I perhaps could have used a different material. Black dressmaking cotton, for example, would have worked, and would have held tension better than the nylon. Cotton wouldn’t have been thick enough to represent the steel cable, though. I could have twisted some thin copper wire together, which would have remained straight where needed. Problems feeding it through the various pulleys would have come up. I guess I could have glued straight sections between the various pulleys and no-one would’ve been any wiser. It's done now. Another one for the background in dioramas. I don’t think I’ll bother with gallery shots. I think that completes this thread. I had already decided not to build the Morris D type I’d posted at the start, so I’m done here. With the big Dennis fire engine also complete, time to kick off more whitemetal mullering in my other WIP thread! Oh, hang on! There’s a Humber, isn’t there! Hmm, yes, right.9 points
-
1/43rd Dennis F8 Pump Tender The Dennis Brothers set up the UK's first car factory in Guildford, Surrey, towards the end of the 19th Century. The company eventually became renowned for building service vehicles of all kinds. You can still see the Dennis name on buses and refuse lorries (I still call the latter "dustcarts", because I am old), though the company as such no longer exists. One of a long line of fire appliances, built to meet British Home Office specifications as well as the specific requirements of various fire services, the Dennis F8 was introduced in 1952. It was a big hit, being a relatively small vehicle which meant it was able to work in narrow streets that larger appliances couldn't necessarily fit into. The pump tender, essentially what most fire appliances are to this day, could be referred to as a "first responder". It carried water in a tank, hoses and rescue equipment in the various lockers along the sides, a 35ft extendable ladder, and a powerful pump, as well as up to five or six firefighters, and was powered by a 4.2 litre 6-cylinder Rolls-Royce diesel engine. The kit was made in the early 2000s. It has a one-piece resin body and cab interior, cast whitemetal chassis and running gear, cast brass detail parts, and PE brass brightwork and ladder. I have made a generic model of an F8, based on various preserved vehicles. I added some extra details to the cabin, as well as scratch building some parts like the windscreen wipers, spot lamp and the door mirrors. I'm really happy how this model turned out, though there are parts I could have done better. The fire station branding is completely fictitious, as is the number plate, but you might like to know Stoughton is the district in Guildford where the Dennis factory was situated. The WIP thread is here:9 points
-
Picture Update: Finally posting better pictures to this build. Calling this done. This is a Fujimi 1/72 Spitfire PR XIX made out of parts and bits and bobs of some discarded FR XIV sprues. I made this based on the color profile of HS701as seen in the book Spitfires in the Sun. This particular aircraft was from the 101 PR Unit of the Indian Air Force based out of Palam AF Base, 1950. Tamiya paints and wash. The only weathering is some light chipping on the leading and trailing edge of the wings. I opened the tail wheel doors and the pilot is from an old Matchbox kit. The canopy is part Airfix XIX and part vacuform. (Note - added a couple of better pics this morning)8 points
-
I'm not a big fan of low-viz grey schemes on modern jets. But when the USN celebrated their 100th anniversary back in 2011, they had the brilliant idea to paint a variety of their current aircraft in retro schemes from throughout their history. TwoBobs issued several decal sheets covering these schemes, and I really took a fancy to the three-tone scheme applied to one of the Hornets of VFA-122 "Flying Eagles." Does this scheme look familiar? It sure does to me, although I couldn't tell you which squadron in WWII used these markings. My brain tries to tell me it was on a Hellcat, but it could have been a Corsair. Or something else, I'm afraid my brain is a bit addled. Looking through my stash, it seems I have enough stuff to model this baby. First, the Hasegawa F/A-18C Hornet: I'm sure you are all familiar with this venerable kit. If not, here are the sprues: The "Chippy Ho" scheme, even though there seems to be an eagle on the tail, is actually on a bird from VFA-195 "Dambusters." It's even a bit too gaudy for me! Now, it wouldn't be a Navy Bird build if I didn't leave well enough alone and try to finagle a bunch of aftermarket stuff into the model. Let's see, I have a resin, photoetch, and film cockpit from Aires: And some highly detailed gear bays, also from Aires (lots of pipes in there!): Quickboost provide new intakes and jet engine faces. Of course, the trunking is nowhere near long enough to properly represent the Hornet's intakes, but it's better than what Hasegawa provide. The real intake trunks have to slither their way around the main gear bays - I probably should try harder to find seamless intakes from XMM, but my initial search was fruitless. Ah, what the heck I have these parts from Quickboost so let's use them. And, of course, the decal sheet from TwoBobs printed by Microscale (hey, I remember those guys! Krasel Industries, anyone?). If I recall correctly, TwoBobs put all of their USN Centennial decal sheets into one package, along with a CD full of photos, so you could make all of these cool retro schemes. Too bad the USN had already retired the Tomcat as I think it would have looked very cool in overall Glossy Sea Blue. Or even better, in Blue Angel regalia. I still need to determine if the vertical tails had the reinforcements and the stiffener plates. I believe I have these in the stash, I just don't know if I need to use them. And there is always the possibility that I may want to pose flaps, slats, and elevators. There may be more resin in my future! I've started removing the resin bits from their casting blocks. I have to remove Hasegawa's gear bays, and getting the nose gear bay out of there looks like it will be a bit tricky. Wish me luck! So that's my new project. Unless someone changes my other mind, then it will be something else. Cheers, Bill8 points
-
It's all done at last ...........a few Aber kits and a Tamiya early production kit no-216 and some scrounging around on the interwebs for info and i finally got there........ Hope you like And now the finished article.......Tiger 100 of the 502nd as seen during the fighting around the Leningrad sector 19428 points
-
A-36A | 1/72 | Condor 524th Fighter Bomber Squadron, 27th Fighter Bomber Group, Sicily 1943 Finished this on 3/28/2021. As 1/72 modelers know, there is no good A-36 (or any P-51A, really) out there. This Condor kit was rated as "adequate" in contemporary reviews. I went into it knowing it wouldn't be easy and it did not disappoint! It fought me every step of the way. Early on I abandoned sandpaper and went to using a file because I had to remove so much plastic to even get it to fit correctly, much less to look close to correct! There was a lot of scratchbuilding, raiding the spares box and even some aftermarket parts involved. There was some early concern about the shape of the fuselage, but after a careful comparison with some good side photos, it turns out that Condor's fuselage shape is very, very close! Everything forward of the exhaust stacks had to be reworked: I had to sand the underside of the fuselage to get the right shape, make an extension to the intake on top of the nose and sand the spinner so that it wasn't so bulbous. The Condor kit doesn't have the "wing kink", but the leading edge at the wing roots was thick enough that I was able to sand a reasonable impression of the wing kink using reference photos. All the details are in my WIP thread. Finishing: Scratch built cockpit, seams filled with CA, spare Hasagawa P-40 bombs. Paint: Mr Color C12 Olive Drab top / Mr. Color C306 Gray bottom / Hataka insignia yellow stripes Aftermarket: SBS P-51 wheels The kit bombs were a very strange shape and not very detailed, so I used some Hasegawa P-40 bombs I had in the spares box. That meant I had to scratch build some sway braces. Turned out fairly well. There was really no cockpit to speak of, so I had to scratch build it: I'm very happy with how this turned out and I'm pretty gratified I was able to make it look decent given how poor fitting the kit was and how inaccurate it was. I'm still hoping someone (Arma????) will do a decent P-51A/A-36 in 1/72 though! I hope you like it. Questions, comments and constructive criticism always welcome.8 points
-
Apart from the base, figure and some of the stowage ....... i think i'ma gonna call this un done.8 points
-
Visby-class stealth corvettes, HMS Visby and HMS Härnösand8 points
-
Hello Stef N. Everything you have heard about CSM kits is true. These kits are good quality and easy to build. Here is a small progress.8 points
-
I don't understand your interest in Dora's models. You are a big fan of RS models. I think they probably do EVERYTHING right and release EVERYTHING you need right away. 😉 Nevertheless, I will answer some questions. Romania marking will be included in set 72018. Other modifications are planned for Lysander as well. The Wallace / Wapiti project has been put on hold (which is true) due to the lack of blueprints from the esteemed John Adams, according to which the model should be made. And further. Only Eduard (and a few other manufacturers) can afford to release the tenth in a row a box of Mustang, Messerschmitt or Spitfire, selling them all. Other manufacturers have to produce other models and alternate them with other models (without missing 10 modifications of one prototype in a row) in order to stay afloat and invest profits in OTHER projects (not BF.109, P-51, etc.).8 points
-
Here is my completed USS Gearing, built from the Dragon 1/350 kit, out of the box apart from railings and some home made improvisations. Little did I know that, when I was gifted this kit by some friends at work (my birthday, 2019) this was going to become my most ambitious project yet. Pretty much from day 1 you have to deal with sub-millimetre pieces (each Oerlikon has to be put together from 9 parts, including a mixture of polystyrene and photoetch). My learning curve became very, very steep (this is only my third ship). The rigging is largely human hair, although for some thicker and thinner parts I used surgical silk and Caenis thread, respectively. I also substituted the jackstaff and the aerials sticking out of the aft stack with metal (hypodermic needle and tungsten wire), since the parts provided in the kit looked unnaturally thick, and kept breaking during the build anyway. There were some problems with the instructions. I have compiled a list of tips to avoid getting into trouble in my web site (address in my signature panel below). Feel free to email me for any questions. I am sorry for the quality of my photos, particularly in comparison with some of the stunning stuff I have seen in this web site. I only have my iPhone for this.7 points
-
My humble offering of the Tamiya 1/35 M3 Grant Mk 1, made OOB. Main issue with this was the tracks supplied but as the replacement Bronco tracks cost more than the kit, I stuck with the kit ones. My first attempt at using an airbrush on this build, using Humbrol Matt 103 as the base coat. Wash using AK Enamel Wash and a mix of Vallejo pigments for the finish. I've gone for a dusty/sand weathering on this one, as I hope the pictures show. Critique/comments from the aficionados out there please! The next build is a complete shift from AFV - trying out a build of the Airfix Bristol Blenheim Mk IV! Steve7 points
-
Finally finished. Italeri van converted to Mk.2 Phase One Extra Long Chassis Cab with Beavertail Bed. Finished to represent a restoration in progress with the cab awaiting a paint job having had some body panels replaced and the previously applied vinyl stripes and paint rubbed down. Work in progress here I've not decided if a vehicle will be strapped to the bed as yet but the Mini gives an idea of fit. Thanks for dropping by for a look see.7 points
-
@tomprobert @bigbadbadge, thanks gents, really appreciate the encouragement! Smartened up the kit cockpit sits this afternoon - I snipped away the block they were sat on and then rebuilt a frame based on the best reference shots I could find. A few more little tweaks needed but the photos below gives the general idea: The Eduard boxing comes with etch seatbelts so I'll add these once they're painted. Here the seats and console aren't glued in place but got it placed together to give a feel for how it's all going to look: And with that I think I'm finally ready to get some paint on. Everything fits well at the moment so I need to remember to put some masking fluid on the mating surfaces and then my plan is to put down a black basecoat followed by aluminium and a coat of varnish. Then I'll spray on some hairspray so I can chip the interior green top coat. Finally there will be plenty of detail to hand paint , plus I'll probably add some washes and shading with oils, wood effect on the table, etc, etc. Fingers crossed it'll look quite smart!7 points
-
A couple of interesting spots over the last few weeks Yes that is a light aircraft fuselage mounted on a car chassis in the background. And also below is a very sorry looking Tatra 603 that was used as a spares car. Unfortunately the good car is at a different premises so never got to see it. These must be fairly unique in the car world or can anyone else think of a vehicle with a rear mounted air cooled V8?7 points
-
Thanks! With the chassis more or less complete now - see below - I’m not sure how much more soldering will be possible. We shall see. The first main stage is now complete. The chassis and running gear are assembled. The axles and exhaust are whitemetal, so the iron was set to 180°C and low melt solder brought in to play. So far, no adhesive of any kind used. The important thing with Flightpath kits, indeed all David J Parkins kits, is to follow the written instructions. To coin a phrase "read them, and understand them". The exploded diagrams are also clear and colour coded for different materials. Sometimes, etch folds are done with the half-etch outside the fold, and the written instructions explain that. Take it easy, step by step. This is a small kit. I’ve built one of Mr P's 1/43rd scale railway coach kits. This kit's instructions are very brief compared to the short novel involved in the coach!7 points
-
🇮🇹😆🇮🇹 Gnnrrh!! 💪🏋️Here’s the full set of x24 done 😤🤜🥊7 points
-
Thanks all! Continuing to chip away at this build. Mark7 points
-
Further progress in the lighting and wiring front! Spent today soldering resistors onto candle effect LEDs and then using a hot glue gun to glue them to be the back of the engine exhausts. The advantage of the hot glue is the abiility as it cool to pull the LED a bit further away from the part so that the light will diffuse a bit more through the hot glue. I've also measure p and soldered the leads and connectors that will power these LEDs from the central source. You can see at the back that these leads have a connector - this is so that I can assemble the engines and attach them to the wings withough have to constantly thread the wires through which would be a pain which will be explained later. The big square cross-section connector did mean that some surgery had to be performed on the engines The circular hole had to be turned into a rectangle and enlarged a bit, this allows the connector to slip inside the engine housing which you can see tested here As I was testing this on the upper wings I discovered that the channel built into the wings for the wiring didn't have a complete opening into the main body - somehow the hole was blocked. This is in a VERY inaccessible location inside the main body so in order to fix I had to drill holes down through the wing like this and then drill sideways from those holes into the main body, trying as best I as I could to align the various holes with each other. It took quite a long time and was a right FAFF! I got it however and here you can see the wires threaded through Now the next bit I experimented with was how to connect power to the model through the stand. As explained before there is a channel built into the underside of the main body that will accept a 5mm diam brass rod. However I tried multiple way to try to arrange a power coupling through this that would fit the hole and be robust enough not to break. It turnee out that most of my robust plugs and sockets are too big for this size hole, even when I enlarged it to take the 6mm plastic tube. I did find a way to use the same connectors as I used on the wing to engine wiring but it ended up looking much too flimsey. What this means is I will need to build the launch gantry to support the model rather than just put it on a stick. Then I can fake up some umbilical cables that would have most likely been used to connect the Starfury to onboard system in B5 and use these as power connectors. So its going to be a case of breaking out the plastic beams, pipes, rods and girders. I'll build it "upside down" in relation to the normal spin of B5 so the Starfury will end up launching "upwards" from the base instead of down/out wards from the spinning space station. This model is too big and heavy to build it up the right way! We're in space - there is no real "up" or "down", it just depends on your orientation More on that tomorrow!7 points
-
P&D Marsh, Brickbuilt plate layers hut, build thread here7 points
-
Hi all. I will try to represent the Emil that Commander Ángel Salas Larrazábal piloted on the Russian front between September 1941 and April 1942 in the so-called "1st Escuadrilla Azul", and who was a contingent of veteran Spanish pilots from the Spanish Civil War who formed the 1st of 5 Escuadrillas of pilots that fought against the Soviet Union integrated in the JG 27. The information I have on the plane is not conclusive except that it was a Bf-109E-7B. I say this because I cannot find documentation that tells me the colors in which these airplanes were painted since they were delivered to the squadron in July 1941 but the order that the German fighter airplanes passed to the RLM 74/75/76 scheme was of June of that year. Logic tells me that these planes were already built when the RLM order was issued and that the cabin was painted in RLM 02 but the rest of the plane I do not know if it was used with the RLM 71/02/65 colors or they were changed to 74/75/76. Well, during the construction process, unless a member of the forum can provide me with information about it, I will make a decision. I only have a profile drawing of the airplane and it does not offer me much guarantee of being correct. As can be seen in said drawing, the distance from the embrema of the staffel to a typical panel acces of the Emil on the engine hood is much greater than that which can be observed in a photo of some Spanish pilots uploaded to that area of the plane, so the placement of the emblem is not correct and that already makes me doubt if the plane was painted in RLM 74/75/76 as it seems to be in the drawing. Okay, but let's start with building the model. I have a habit of never starting with the cabin, so I show what I have done so far. Andrés S.6 points
-
thank you so much everyone - I want you to know you are why I got better at modelling - thats what a WIP on here does for you ..here is the next chapter.. ..this is the nose panel I have been secretly dreading... one, it has to fit with other panels on 3 sides, two it is full of raised rivets despite being curved and needing burnishing into shape, and three - last bu not least, look at those perfect little oval apertures for each exhaust pipe... challenging... ..the first thing to tackle was the ovals - here a suitable brass template was taped over a perfect scale drawing that fits my 3D exhausts and a pin in a pin vise (what else?) used to go round and around until the oval pops out - each row took about 45 mins... ..with those done, other openings were added and a tape template from the model is applied to get some of the borders, plus the panel was polished before anything else.. ..then all the raised rivets were applied and the panel gently shaped to fit at the edges - once a good fit on all the straight edges was achieved the panel was annealed so I could start to gently burnish it to get the imprint of the lower curved edge.. ..at this point I have about 4 hours in this one panel.. ..making the other side - I goofed and over heated a panel when annealing it - it's all distrorted around the ovals - this was a write off of many hours work and the language was most anglo saxon.. ..after a good couple of days work they are done.. ..they still need all the dzus fasteners which are coming in some PE bits i made for the radiator next week and some rivets, but I am vary happy with how they came out.. ..its just resting on the U/C legs - they are not at all at the right angle, but you get the picture.. ..still more details around the nose and a last panel to go, then it will be moving on to the big under fuselage radiator.. TTFN Peter6 points
-
I wanted to see if I could. I’m not a fan of CA when joining fine PE brass. The stuff doesn’t "take", there’s nothing for the adhesive to grab. So, I wondered if I could actually solder the paper thin - literally. I’ve used thicker tissue paper! - brass in the Flightpath Humber. Turns out I can. My Ersa temperature-controlled soldering station set to 390°C ought to just melt the metal, but a dab of the flux I always use and the iron tip loaded with a drop of resin-cored solder touched on the join worked a treat. Lingering for too long will soften and discolour the metal, but what I would usually refer to as a tack solder joint does the job. What started out as bits of etch that could be squashed out of shape by light finger pressure has become a fairly rigid construction. Quite how far I can continue soldering remains to be seen, but I’m encouraged by progress so far. This is good, because I have an upcoming railway commission that involves nearly two dozen railway coaches at 4mm:1ft scale (1/76th). They’re going to need some deft soldering. The British penny, by the way, has been specially trained to stand like that. It’s my go-to scale comparator, and I’ve not used it for ages! Those of you unfamiliar with the things may like to know they measure 20mm across.6 points
-
I stepped away from my classic airliners for a bit to build this Airbus A380. I took some of the models that I made when I was younger from my parents' house, and my mother asked me if I could make a model to replace them. Since it's her birthday coming up, I thought it would be a nice present. This is the standard Revell kit, with no extras. I did cut out out the body dear doors to make a slot so I could position the doors closed around the gear struts, but I didn't modify the gears to pitch them down like I did with my Lufthansa A380 - I'm not sure if my parents will hang it or leave it on its wheels, so I left the landing gear untouched. The decals went on well, but as some of you may have seen, the registration of the silver ink was off, which meant that the frames of the windows aren't aligned with the windows. I sent an email to Revell, who sent an auto-reply that there are long delays because of coronavirus and I should be patient and shouldn't send a follow-up email. I still haven't received a response, so I decided to apply the decals as they were - you can't really tell unless you're up close. I know it's something my dad will point out though... Standard paints: Halford's appliance gloss white, Halford's racking grey, and Halford's Fiat capri blue. These were the same paints that I used on the A319. Humbrol gloss varnish on top, and polished with Auto Glym super resin varnish. One thing I noticed, the vertical stabilizer is slightly warped over to one side - the two trailing edges also didn't exactly align, which I have not had a problem with before. But I'm not sure I want to try correcting it...6 points
-
Hey Altogether, I spent most of this week cutting out the craziest shapes, and getting stressed about fitting these into place. I bounced around a bit with the skin. I also worked on the doors. The crazy shapes to work with........ The doors are doors and not so hard to build. I made the leather stow bags from brown paper grocery bag soaked in water and PVA glue. I used the rod to hold the shape... Then I would go back to work on the cab skin and get thing bent into shape, sort of.... I test fit as I go but I think I got things a bit tight. More struggles ensuing. Then I would go back to the doors......... Making the little latches was about the hardest thing to build for the doors..... And these live here...... So that's about it for this week. I'll cut the windows and detail the outside of the doors and continue to wrap the skin. I might have something in place next time. Thanks All.......6 points


This leaderboard is set to London/GMT+01:00