
Leaderboard


Popular Content
Showing content with the highest reputation on 25/03/21 in all areas
-
Hi! The model represents the Vickers Vimy in October 1918. It is the fourth prototype of this aircraft and the first to have new Rolls-Royce Eagle engines. The tail section is still old, it only has two larger rudders. At the end of October of the same year, it was used in France. The model is made by Eastern Express, very old casting by Frog. There is almost nothing left of the set in the box, used parts are completely processed, all other parts are scratch-built. I show the construction from beginning to end so that at least a part of the work invested in the model can be seen. The model is 1/72 scale. I used Windsock Datafile Special - Vickers Vimy (J M Bruce) and internet resources. Greetings [/quote]59 points
-
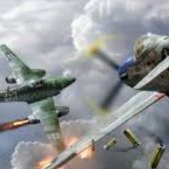
Hi Everyone This is the Revell 1/48 Me 410 B-2 Hornisse. It's a very easy kit to build and the fit is excellent, the only downside is the clear plastic parts which seem to me to be slightly overscale. Kind regards Trace45 points
-
Hello, first time posting. this is my latest built I want to share with you. Hasegawa 1/72, Eduard Photoetch, Quickboost exhausts and gear covers, Barracuda wheels and wheel well details from scratch. hope you like it. Greetings from Guatemala Jose40 points
-
Hi Everyone This is the Mirror Models 1/35 Diamond T 969A Wrecker. It was a slow build I am not going to lie, which took all my patience with its 570 parts. I reckon I dropped most of the parts at some point during the build. Some have been lost forever in the carpet and had to be remade, so if it looks like it’s the wrong shape or size it will be my work not the fault of the kit. The engine is the one supplied in the kit and the cables are just twisted copper wire, I also added the 50 Cal and its mount. The whole thing was a struggle to build but I can’t argue with how the finished kit looks now it’s complete. Kind regards Trace23 points
-
Latest off the bench is the fantastic Tamiya 1/32 Mustang ... but the F-6D variant. I decided to do something a little different by doing French markings (GR 2/33 "Savoie" Colmar 1945. I used Berna Decals for the decals and a GWH set for the seat belts and dingy pack ...far better than the Tamiya offering. It's a real joy to build as you would expect and I feel, worth every penny. Please feel free to comment etc. Thanks for looking Dick17 points
-
The Kinetic model in the Israeli painting from July 1967, when during the Six-Day War, instructors from the Hetzerim school on armed Fougas successfully impersonated close support missions. I invite...17 points
-
This one was finished in the recent 'KUTA XIII' GB but I've only just got around to posting an RFI... The latter stages of the build are here if you want to see it coming together. Work on this model began years ago, long before I joined BM, so the early stages were not recorded. You won't miss much, as it was built to a very basic standard! Normally I would ask for critique on a model, but not this time! This one is full of silly mistakes and areas that could have been built better. Even my recent work, which really should have been to a higher standard, was frequently jinxed by problems. Eventually I lost interest and just wanted to get it finished - my mojo was gone... It is a large beast - the following photos were taken on a standard 18" patio slab and it filled that entirely! Hope you like it and please do not be too harsh with your comments! 😁15 points
-
So this is the kit I chose to build for the Pzr lll GB. A really nice kit from Tamiya with no issues whatsoever infact I may build the same kit again in the future just with a different paint scheme. Painted with a mix of Tamiya, Mig and Lifecolor acrylics and weathered with Vallejo, Mig and Lifecolor products im happy with the final results. Here's a few pic's of the finished build So time to start the next one 🙂. Thanks for looking back soon 🙂👍11 points
-
This is my last P-47D for this year. Built OOB, only decals are from mix: USAAF stars from Microscale leftovers, code and nose art from AJ-Press/Husar Publications book about the 56FG. I have Kits World decals as well but here is the nose art for Tamiya's kit too big and USAAF stars without red outline. Enjoy.11 points
-
..finished the top deck which is where I should have ended yesterdays update11 points
-
Last night I watched the first of 'The Maze Runner' films. Just my sort of thing. Tense though. There was wine. Perhaps that's why I decided to Araldite the rotor head before bed? Mix mix, dob dob: See any problems? No? Good, me neither. On with the top plate then: So off to bed it was… This morning: Looks OK? Well, that was a carefully posed photo. If you look at the first photo you can maybe see that one of the shafts has twisted. Drat. Wish I'd seen that before the Araldite set. I've cheated by moving the damper but that's left the rectangular bit at an angle. Double drat. Can't be bothered to fix it and it won't show, much. Ready to paint so better check the fitting: Ah, it doesn't. Drat drat drat drat! I've had enough of problems for now so this will be put aside: …and I'll see if playing with any of these bits increase my enthusiasm:11 points
-
There have been some great builds of this kit posted, mostly in a Western Desert scheme, but I wanted to do the UK-based 49 RTR option provided by Tamiya. I couldn't find a photo of this particular tank, and there seems to be debate about what the colours should be, but given the date I went for Khaki Green No.3. @diablo rsv mentions this might be so in his stunning and inspirational interpretation of the same vehicle, posted here some time ago. Although the tac markings may have been yellow, I used the red ones as provided by Tamiya. Red can appear very light in b&w photos in certain conditions (something which is illustrated in Dick Taylor's Warpaint No 1 book) so hopefully that's the case here. If not it's too late now! I removed and made good the brackets for the spare fuel tank which weren't usually fitted on Matildas used for training. I used the kit stowage but modified the straps slightly, and put a clear lense in the lamp. Apart from that it's out of the box. I like to have at least one figure in my builds and the subaltern in the turret here comes from the Miniart British armoured car crew set. All in all it's a lovely little kit and being Tamiya makes for a quick and relaxing build. All comments welcome of course, and best wishes to all, Ian10 points
-
Well, guys, everyone who has followed my build in the WIP section don't find hereunder any news. I've tried to make better shots than with my iPhone, using a DSLR camera (Canon EOS 80D), and editing them with Lightroom So, after 9 months of work, sometimes funny, often difficult, to improve the quality and the detailing of this already accurate kit, this is the result, 360° counterclockwise tour And focusing on some details: My techniques improve greatly during this build, it remains though on this car a lot of mistakes, defects, broken parts etc.... so, it's far to be a perfect build, and even to be a correct build, but it's better than the previous one, and, hopefully, the next one will be good. So, stay tuned for the two next builds: - the continuation of the Delahaye 135 - and a new sample of this iconic MB 300 SL gulwing: I'll try to represent the car which was 5th overall in the 1955 edition of the famous Mille Miglia, driven by John Fitch.10 points
-
Good evening to u all, Here is my latest build that i finished this afternoon. Its the second of a series of 8 planes that i am trying to build that were flown by the German ace Adolf Galland; This is the 109E4/N that he flew when he flew with JG26 from Audembert, France, in november 1940. It has 57 kills at that time. It was equipped with a telescopic gun sight. I hope u all like it. The last two pictures there is the first plane of the series, A BF109E-3, that he flew in June of 194010 points
-
Welcome to tonight's Triumph Herald update. Masking tape removed and that's not bad at all. Quick mock-up. I think it needs tidying up around here, but I'll need to look at some real Heralds to see what this bit should look like. The instructions are a bit vague on this part of the car. A little tidying needed around the rear bumper and rear pillar. The bumper also needs painting, the instructions suggest silver but I think they were white on real Heralds. Other side. Getting the engine and prop-shaft installed. The instructions suggest that the back axle is glued in first, with the engine and shaft going in together at a later stage. The problem, as you can see, is the prong on the front end of the prop-shaft is too long and you can't bend it enough to pop it in to the back of the gearbox. The next one I do, I'll drop the engine transmission and back axle into the chassis at the same time. Another test fit, this time to ensure that the engine doesn't push the bonnet up. Bonnet open. And a bit more work on the engine with the air filter and radiator attached. The interior has the seats, gear lever and hand brake. The seats need a little touch up, but it's quite pleasing for a simple interior. Everything in the picture above - apart from the red paint - has been done just with the kit supplied parts, paint and glue. OK so the carpet colour is done by mixing paint but I've not used anything except the things Airfix gives you plus a few basic tools. If I were a beginner I don't think I'd be at all disappointed at this stage. I am beginning to think that AIrfix infuse the plastic with some kind of addictive substance, I'm already thinking about getting one or two more Heralds to do a more detailed build; maybe another ordinary saloon and one as a police-liveried version with blue light (I saw a picture of a police Herald in light blue with white doors, which can't be any more difficult to mask than the red and white two-tone).10 points
-
#6-7/2021 El Salvador FG-1D, made from Academy 1/72 F4U-1D kit. Whole cockpit is Extratech PE set, as well as wheel bay covers and few more bits on tail area. Decals are Printscale. Honduras F4U-5N, made from Italeri 1/72 F4U-4 kit. Main modification was extending of nose area by cutting it and inserting an 5mm plastic block, fixed with Epoxy. Eduard Zoom set is used in cockpit and some external details Decals are Aztec decals. Some antennas on both kits were made from scratch. Painted with Gunze acrylics, and wash/weathering done with artistic oils. El Salvador FG-1D, FAS-219 Honduras F4U-5N, FAH-609 "Duo" portrait Cheers, S.9 points
-
Hey you lot. A Little update tonight. We have paint. 😍 The internal floor section got some colour after a pre shade. As did the wells. Underside. And top/ cockpit floor. Even the bombs got a bit of a pre shade. 💣 Having done this before reading Erwin’s link Im going with the sloshed green. Base coat on the seat too. I have some belts started too. What was that? Pin marks ? Where.... hells bells. I did see them but hoped no one would notice. 🤣 So now you know, and I know, and you know I know, and I know that you know I know. I have done the deed. More soon i is pooped. Thanks for dropping by. See ya’ll on tother side. Johnny.🦈9 points
-
For my second entry in the GB (and possibly the first I'll finish!) I submit this neat little kit from Fantastic Plastic of the Moon Hopper from UFO This is a distant cousin to the hopping vehicle that appeared in Captain Scarlet but thankfully doesn't 'hop'. You can see deign elements here that would resurface in Space:1999 a few years later. The kit is not complicated, construction consists mainly of building the legs and attaching them to the main body The instructions are well detailed and the decals look well printed.8 points
-
I'm really surprised how much I'm enjoying this build. Wheels are on, it definitely feels lie an important part of the build process. Exhaust pipe added, there isn't much to hold it on, but the downpipe lines up with the manifold and the mounting peg lines up with the hole in the sliencer. Loke most of the kit, it's basic but it does the job. I've touched up the tan on the seats and added a bit of black trim around the storage tray on the transmission tunnel. Headlamps, I didn't want to paint the whole thing silver so I'm going for silver rims with white centres. I'll have to contrive a better solution for future builds. Hub caps on the wheels, it's a pity they don't have more of the shape of the actual Herald's wheel trims. I also added a tiny bit more painted detail to the engine and black paint to the end of the chassis where it's visible in the engine bay. I've also added some more detail to the body, so expect another update soon.8 points
-
Thanks hendie Thanks Giorgio A couple of years! Crikey, I'd better start practicing… Before I Araldite the rotor, I'd better check: Phew. First bit secured: Now I can turn it over, insert the shaft (careful) and glue it all up. Gulp.8 points
-
After giving myself serious eye-strain on the Aliens mini figures,I went to the other extreme with a re-paint of my nearly 30 year old T2 figure as he was looking a bit battered and worn,a pretty large figure coming in at about 35cm. Looks like hes back........................................again Cheers.7 points
-
It’s time to dig an old Lightning out of the stash and represent some proper heavy metal from one of best eras of the RAF. Those thunderous take offs and zoom climbs are always worth a watch on YouTube. If only we could still watch them from the fence at Binbrook! During the later years of their career, the RAF Lightnings had a number of interesting colour schemes; some still green/grey camo and some varying shades of grey with different demarcation lines. One of my favourites is the dark sea grey over barley grey, as shown below: This is the aircraft I’ll be aiming to represent, XS933/AJ of 5 Sqn, circa 1986. As an eBay bargain the box was disgusting; ripped and water damaged, so we’ll skip that pic! Plans ok though. Parts still on the sprues and bagged. Some decals unusable but luckily I think the end of the sheet with the ones I’ll need should be ok ...7 points
-
Ciao guys, here some pics of my last creation, a "Mobelwagen" 1/35; I bought this kit 10 years ago when I was working in Belgium amd I visited Bastogne. Stay safe Paolo7 points
-
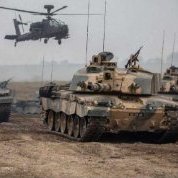
After heavy inspiration from RTR's Ajax Squadrons Urban Camo (Berlin Brigade Reboot), and a sense of right of passage in doing this scheme, here is the WIP thread for this multi-coloured Trumpeter (KFOR Kit) Challenger 2: This is my third model and my second challenger (Please do take the time to check the others out) I have to give a special thanks to @Simon Chong for the best inspiration, @Widow 65 for some brilliant first hand experience and therefore great detail advisor and to @ERK , @Stef N. , @SoftScience , @ivan-o , @vytautas for great encouragement and lots of useful advice and all that good stuff. Special thanks to @diablo rsv for the further inspiration quality wise, with his MK.10 Chieftain in berlin camo, and his help with finding products that made this project what it is. But you are all here to see the RFI final pics so I wont delay further! Please comment feedback and be harsh(!) as I'd like to make progress between this model and the RFM TES which is next! That said positive feedback is also welcome Pictures can be viewed on Pinterest too: https://pin.it/4F1z2267 points
-
I just got all my clocks telling the same time, Each had wandered off and was showing different Then a friend reminds me the clocks change this weekend7 points
-
I present my last two kits from Gladych´s P-47 called Pengie II and Pengie V. Pilot's bio: https://en.wikipedia.org/wiki/Bolesław_Gładych some mistakes, but ok so far. Kits from Tamiya, extras: dash board from Yahu, seat belts Eduard, Pitot tube from Master, for M I used propellor from Quickboost. Decals are mix from AJ-Press/Hussar and Aero Master and Techmod. "Pengie II" "Pengie V" All P-47D/M from Gladych. In future I will make a Spitfire F MK.IXc "Pengie", Gladychs first plane with this nick name.7 points
-
A lady walked in to a Chemists and asked to buy some arsenic. The chemist asks, "Why do you want it?" She says, "To kill my husband." The Chemist says, "Well I am sorry but I can't sell you arsenic." So the lady reaches into her handbag, pulls out a photo of her husband in a compromising situation with the Chemists wife. The Chemist considers this for a moment and says, "Ah, you did not mention that you had a prescription."7 points
-
Hello Small update – foot pegs and levers and pedals on and the bodywork has the first layers of blue. Have to say, I am a fan of these Mr. Colour paints, this is just called Metallic Blue, but it covers amazingly and is not over scale as some metallics can go. It is also pretty close to the original IMO, and with the white go slower strips and name on the tank will look bang on. One nice aspect of this kit is the number of details that are provided for bits that are not seen. For instance, the tank is complete with an underside, the bolt heads on the insides of the frame and body work are there and the seat has a base. Thanks for looking. Tony7 points
-
Hi all my boss bought this for me to do But he wants it done like the one in the workshop.6 points
-
Hi All. Here is another of my completed models this week. It is the Eastern Express Boeing 747SP which went together really well after cleaning up the parts.6 points
-
Hi Folks This is my latest build. Now this may sound like a contradiction, its finished, but not finished. Its finished in that I have done so far what I want to. However I plan doing a diorama in the future and adding lots more (extra eqp, camo net. I also have several other kits with the same idea in mind. The only thing really holding me back is the figure painting (my nemesis). Anyhow here we go Tamiya 1/35 LRDG Command Car Additions to OOB: Head phone cable, Aerial, Vickers MG coolant pipe and ammo box holder, sun dial & BAR rear strap. Paint: Tamiya Acrylics, Humbrol & XTRAcolor enamels, Vallejo & MIG acrylics. Various oils, Flory wash & pigments & Tamiya Panel Line Accent. Thanks for looking and I will post pics when I have my head around figures. Take care all Si6 points
-
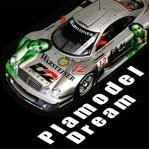
Hi. This is TAMIYA 1/24 CLK-GTR. It is one of my favorite cars. It's been a long time since it was released, but the engine is implemented and the low-lying car feels good. As expected, the assembly fits perfectly like Tamiya. The decal was a bit old, so I had some difficulties, but it's colorful when I put it all on. I made the seat belt with a photo-etching component. The brake cooling pipe on the front wheel It's not reproduced, so I made it into a spring and painted it. I searched the actual car picture and added some wiring. When I combined the front and back body, there was a slight gap because they didn't hold each other. It looks a little sloppy, so I applied magnets between the two bodies so that they can be removable thoroughly. I tried to make it as clean as possible. It's my first time posting, but I'm not sure if it's right to post it like this. Please point out if I made any mistakes. 😅 I'll keep making it. Thank you. Full build video is here;6 points
-
Hiya Folks, One of the models rescued from my recently flooded cellar,...... the submersion in freezing cold and dirty water ruined the paintwork after the water got underneath the paint and bubbled in areas,.... it also made the glue very brittle,...... so I decided to have a go at re building the model, replacing some of the missing parts and re painting it in its original RAAF markings,..... here is the WIP; And here is the finished model; Cheers Tony6 points
-
Hi, There is my last two model from last two weeks when I was able to start and finish these two kits 😉 hope you will like it.6 points
-
I ordered this earlier in the year and had almost given up hope. But wow was it worth the wait! It's an absolute gem and I'd say even better than the best; in terms of finesse and delicate moulding - dare I say it - I think it might even exceed the likes of MFH, Studio 27 and Alpha. The best comparison I'd make is that it's akin to an HPH aircraft kit but in car form. Can't wait to get into it but I shall in the meantime just spend a good amount of time admiring its jewel-like perfection. Very, very highly recommended!6 points
-
Good evening Gentlemen Today is a great day...this long journey is lastly ending 🤔 I've scratch-built an antenna for my beauty. This antenna if made of: - 1/: a 0.5 mm thick washer got from 1,5 mm outer / 1.0 mm inner brass tube, for the base of the antenn - 2/3/4/5: short sections of successively 1,0 mm / 0.8 mm / 0.6 mm / 0.4 mm bras tubes threaded one each other - 6/: A longer section of 0.18 steel piano wire, with at its free end a microscopic drop of UV resin The result is: To install the antenna, I drilled a 1,1 mm diameter hole on the right front fender. The result isn't too bad, imho: This build took me approximately 9 months, as usual, that is the duration of a normal pregnancy I have tho thank all my contributors, all of you guys who commented, criticized, or liked my build since its beginning, particularly @harveyb258, @Bengalensis, @Pouln, @JeroenS, @johnlambert, @Hamden, @Harry Callahan, @PROPELLER, @silver911, @Spiny, @ejboyd5, @Endeavor, @Stickframe, @Alan R, @nick, @Schwarz-Brot, @Toftdale, @Fnick, @airea, @Roy vd M., @NickD, not forgetting @Redstaff, @Brandy, @Mr Mansfield, @rob Lyttle, @PZRGREN, @KonaDawg, @bmwh548, @quieto, @motogpMatt, @chrispisme, @Alpha Juliet, @Paul H, @harti20, @Ghost69, @dannybgoode, @NigeG, @Marco F., @Vanroon, @bbudde, @Peter Roberts, @John_W, @Pascal, @Jochen Barett, @mchernecki, @Mick4350, pfffuuu ! I hope I've not forgotten anyone 🤭 I've now to make some good pictures of the car, in order to open a RFI section thread .... However, this saga isn't really achieved, because it will be continued by the sister-car of this one, and I think I'm going to consider the suggestion of @ejboyd5, so stay tuned. I'm probably going to open a new thread for the MB 300 SL number 417, 1955 Mille Miglia, driven by John Fitch.6 points
-
I hope so! I'm using Alclad and low tack tape - I've not had a problem with this combination before, so I'm assuming it will be OK...🤞 Most of mine intact, but a few are missing... I do have PE replacements, but they are too fiddly for my fingers! I've heard similar tales from that part of the world! 🤯 I have sprayed gloss black onto the engine pods, which are now ready for the aluminium top coat: Painting is going so much better now the temperature has warmed up - I won't make that mistake again...!6 points
-
Hi folks This is my first post here so hello first of all. Since I found this site I’ve learned a ton of stuff and been inspired and intimidated in equal measure. Look forward to hopefully be a bit more of an active contributor as opposed to a lurker Reading around it sounds like I’m not the only one who has picked up a model for the first time in many moons due to the COVID-19 lockdown. I can’t actually remember the last time I built a model plane but it must be at least 45 years ago. I also wasn’t quite sure whether this was the right place to post this (apologies if it isn’t)? If I’d discovered this forum earlier I would have posted some work in progress shots but as it is I’ve nearly finished the plane but I don’t consider it ready for inspection as I want to build a trolley for it. I might even have a go at a diorama but not sure yet. I picked up this kit for a fiver I’ve attached a few pictures of where I’ve got to and would appreciate any critique of the current status and also any suggestions for anything I might have missed. Happy to provide any details about what I’ve done so far too. I made quite a few changes along the way as the kit wasn’t very accurate and I’m reasonably happy with it although it doesn’t stand up to really close inspection. I kept reading about things that I’d never come across before which sounded like a good idea (e.g. using foil to make the plane look like metal) but turned out to be blooming tricky. I only came across rescribing recently at which point I almost decided to bin it and start again but in the end I couldn’t face that and decided to carry on. I don’t think it looks too bad even thought the bodywork isn’t really much like the real thing. As I said though I’m keen to build a trolley next to display the plane and I found the plans for the pavla model which I am going to use but I’m a bit stumped as to how to make the wheels and was looking for some inspiration. I wondered if anyone had any tips for making tires in particular. I’ve worked out how to do the wire spokes but am not happy with my ideas so far for tyres... all tips gratefully appreciated. thanks Daryl P.S. The decals all fell apart when I put those on and I had to slide all the bits around on the surface of the plane and reassemble them all like a jigsaw puzzle. Luckily it’s not too noticeable but it was a real pain. Is there a trick to avoiding this happening? I’m assuming it’s because they were old (I actually used the ones from the airfix kit which someone sold me on eBay)5 points
-
For my third entry - if I get this far(!!!) I'd like to build this kit I've had in the stash for years and keep wanting to build but never seem to get round to. It is of the ground attack/atmospheric fighter/bomber seen briefly in the Babylon 5 TV series as it attack Martian installations. This is the Thunderbolt and this kit, produced by a well know manufacturer of Star Trek kits Alliance. You can still get it from their page on ferderation models site: http://www.federationmodels.com/model_kits/alliance/default.htm (about halfway down) Its got a few big chunks of resin and a neat looking stand! The cockpit look well detailed Very good instructions and paint guides and a lovely set of decals from JBOT Looks like I'm in Babylon 5 mode for this GB... And so it Begins!5 points
-
This went together far quicker than the instructions would suggest. Even with the raft of AM fitted. The cockpit panels are Quinta, seats Legend, fuselage intakes and wingtips Quickboost. Ladders are by LF Models and decals from Caracal . Weapons cane from a Hasegawa weapons set the kit went together with little issue. That said HobbyBoss only allow you to fit the canopies closed. I had to scratchbuild actuators, out of the box, the cockpit side consoles don’t reach to the fuselage sides either, however the Quinta set fixes this thanks for looking Bruce5 points
-
Steel work almost finished. Just a couple more bits to add, and then it’s onto the ceiling. Side wall insulated. Door frame fixed in place. Although this is an interior door, it’s solid oak and cost just over 100euros. Quite pleased with that. Window now in place. It’s allowed a lot more light in, as can be seen in the previous photo. Things have moved on quite a bit since, hence no modelling being done. More updates when I get the time. John.5 points
-
The usual comments being made about what if it had crashed in Helston. Would have improved the town no end if it had.5 points
-
A couple of hours in the shed this morning got quite a bit done. Everything got trial fitted and edges reinforced. Wing and tail parts are now glued and taped. The cockpit area has been removed, canopy trimmed and trial fitted. It fits as good as any injection kit I've done. The camera nose has been removed, bomber nose offered up, and it fits well. Everything is now drying and I'll be back on its case tomorrow. I'm very impressed indeed with the model so far. Here's the white metal parts. They look like good to me.5 points
-
Beautiful build so far, even with the issues! Wish I had never seen this thread though since now I am on a quest for a 1/72 707. Bot my wife will be POed at this one. Wasn't even on my radar (no pun intended) before. I spent 6 days on a Canadian Forces CC-137 flying from Trenton Ontario to Lahr Germany back in '77. Boarded the aircraft in Trenton and it took off and immediately headed west. You don't need to know much about geography to know that west is not the proper direction for Europe from Canada. We stopped at every major city and airbase between Ontario and British Columbia then turned around and did the same thing all the way back to Trenton. THEN we went east and after many other stops eventually made it to Germany. Sooooo ... I would love to build this kit as a CC-137 since I was so intimate with one for so long. I may even still have the travel orders around which will give me the number of the flight and airframe. (which is probably made into soup cans by now). They even make a decal set for 1/72!5 points
-
Are they going to match Stuart5 points
-
First bit of work. Left wing interior pieces and panel cleaned up and glued in place. Landing gear fitted but still needs to have final cleanup. Also a shot of the wing fitted with the main fuselage.5 points
-
Another box of classic kits for my growing collection. Matchbox A-20, Italeri B-25 B/C/D, Airfix Yak-9, Heller F-86E, Matchbox Helldiver Bi-plane, two P-51B’s one monogram and one Hasegawa. Seeing as the only swap meets around here wont be open until 2022 these are my swap meet buys for the year.5 points
-
I really want one, but just like Airfix's recent Vulcan post that weathering puts me off. It looks awful to me. I saw my first B-52 in the air a month ago and it didn't look like that!5 points
-
Well your luck was with me today Pete, landed a dream job.... Head of services for the Sleep Charity. Pleased and privileged is a massive understatement! 😀5 points
-
Honest Guv! Definitely first time in Homes and Gardens Gone with Shabby Chic! I like the worn streaky effect Carpet and curtains next.... It's modelling Jim just not as we know it..... 😉 Kev5 points


.thumb.jpg.cfc129272ffec824439b15e6013d5952.jpg)


.thumb.jpg.8fbcede0fd5bebb48d11cbc790a8a178.jpg)


This leaderboard is set to London/GMT+01:00