
Leaderboard


Popular Content
Showing content with the highest reputation on 18/03/21 in all areas
-
So here is my attempt at Eduards early Spitfire MKI. I wanted to cram as many early features onto the kit as I could. So - 2 blade prop; flash suppressors on guns; external gun camera; "ring pull" entry door opener; no cover over fuel tank behind the engine; un-armoured wind screen; ring/bead gun sight; flat canopy; pole aerial; parachute guard on fin. Probably others. Kit went together beautifully, only my ham-fistedness getting in the way. I modified the decals to PM-H rather than M. I had a profile from an old(!) copy of SAM (yes, I know, probably should not have trusted a profile) but it showed it had the aluminium control surfaces, so it had to be done. The external gun camera was hacked from a spare piece of resin based on what images I could find and a couple of references on this site. Not sure I am a fan of these new decals from Eduard. I did have a go at removing the top layer of varnish. This lead to one of the roundels on the wing being damaged, so had to use a spare to cover it. As these are so thin you can not tell. Pain was my usual mix of Alclad primer for the black and white undersides, humbrol 29 for the brown and colourcoats for the green. Anyway, onto the photos. Camera and PC playing up, so these are not as good as I'd like. Tim24 points
-
Hi all, this is the 1st of two bf 109's which I did but did not finish on time for the mto gb this year. It is the eduard kit, in the kit markings for the aircraft flown by Ten. G. Gianelli of 365 squadriglia, 150 gruppo autonomo, Sciacca, Sicily 1943. The link to the build is below I used a resin cockpit, wheels. Eduard's mg 151 gun pods. Paints used were extra colour for the rlm colours & colourcoats for the Italian colours. Airbrush used was a badger 200 g & sg Thank you for looking, comments and feedback is welcomed. Nick20 points
-
This kit is a cracker. Excellent quality, almost builds itself. I opted for the vinyl tracks. The Caunter colours are mixed to Mike Starmer's specifications (Tamiya acrylics). Cheers for looking.19 points
-
Hope these pics work!19 points
-
This is my Special Hobby Gnat F.1 XN326 RAE Farnborough 1959. The RAF didn’t adopt the F.1, but it saw service overseas with the Indian and Finnish Air Forces in particular. The twin seat derivative was adopted by the RAF as the, by then, Hawker Siddeley Gnat T.1 which became famous as the Red Arrows’ first aircraft type. This was an early trials/demo aircraft and as such I didn’t weather it as I figured it would have been kept fairly clean. I finished it in semi-gloss varnish as I figured the real thing would have been slightly glossy. This was my first use of Alclad paint. I used ALC-101 Aluminium over-sprayed with Tamiya X-35 semi-gloss varnish. I was very happy with the result, although the Alclad black microfilmer primer came out a bit rough. I might try Tamiya XF-1 black as a primer next time. Here it is next to my very old model of a Red Arrows Gnat T.1. You can see that the wing and tail surfaces are all larger on the T.1. It is a very tiny aircraft. Even my Spitfire, which I think of as a small aircraft, dwarfs it. It must have been like wearing a jet-pack. Products used:- Cement, Tamiya Extra Thin. Canopy glue, Formula 560 Canopy Glue. PVA based I think. Primer, Alclad II ALC-309-60 Black Primer and Microfiller. Unthinned, this went on a bit rough. Undersides, Alclad II lacquer. ALC-101 Aluminium. Unthinned. Nice. Upper surface camo, MRP-110 Dark Green BS641 WWII RAF. Unthinned. Perhaps a bit dark. MRP-113 Dark Sea Grey BS638 WWII RAF. Unthinned. Radomes, MRP-005 Black with a touch of Tamiya XF-2 white unthinned. Varnish over the whole model, Tamiya X-35 Semi-gloss thinned with Mr Color Levelling Thinner. Seat belts, Eduard steel Photo Etched belts. Pitot probe made from Albion Alloys tubing. Things I have learnt:- Tamiya Extra thin cement takes a while to dry fully. My fuselage joints sunk a bit over time. Alclad metallic paint is extremely unforgiving of poor surface preparation. Any tiny flaws will not be hidden by the paint. When sprayed onto Alclad primer it was robust enough for masking without any peeling. I used tape lifted at the edges with cotton thread to give a soft edge to the camouflage. It ended up too soft and variable. I used Blu Tack on my previous models which gave a much tighter and more controlled edge. On balance, Bare Metal Foil is better for masking canopies than tape. Possibly. It was a bit tricky to remove. What do you guys think? I found that I could put the kit decals directly onto the Alclad and the MRP paints without the need for a gloss varnish coat. With the use of Microset and Microsol the kit decals went down nicely without silvering. It’s really difficult to avoid dust getting on the paint finish. Gnats are tiny! My BUILD LOG is here. Comments and criticism welcome. Happy modelling, Keith.18 points
-
Hi all, this is the second bf 109 I build for the mto gb this year but did not finish in time. The link to the build is below The kit used was eduard's bf 109 g-2, the kit markings were used. A resin cockpit,& wheels were used. Xtracolor enamels were used for the rlm colours. Badger 200 g & sg fitted with a fine tip. Thank you for looking comments and feedback is welcomed. Nick18 points
-
Hi Everybody, here is my latest build, not my usual scale but a thoroughly enjoyable build. Built entirely out of the box, just the addition of some scratchbuilt harnesses and buckles. Painted with Tamiya and Revell acrylics. A few pictures of the interior before it all gets closed up. I know the buckles are not correct but this was my first attempt at making them. I decided to paint the instrument panel rather than use the decals. Thanks for looking, as usual all comments and criticisms are welcome.17 points
-
Hallo Now I finished my Dolphin. The rigging was unspectacular. One of the holes in the struts to get the struts rigged, vanished due to plastic glue. But in general nice built. See my WIP. Next will be the DH 9a from WNW. Happy modelling16 points
-
Just finished this 1/48 Kitty Hawk SA 356 Dauphin. Though the kit didn't represent the authentic version used by the Irish Air Corps I decided to display her as one anyway. I had to add a few bits from the spares box also.15 points
-
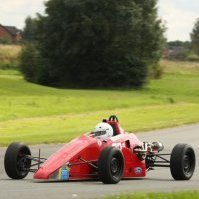
The finished thing! It's from the Sword kit and involved so many 'firsts' for me: first limited-run kit (ouch), first time using an airbrush, first time weathering with oils, first use of MicroSol... it's by no means perfect but given all that, for my amateur level, I'm pretty pleased with it. Paints were Mission Models primer then Hataka Red Line acrylics (the 'Modern RAF' colour set - excellent), followed by Winsor & Newton Galeria varnishes. The matt varnish just wouldn't spray through my 0.2mm nozzle, even when slightly thinned, so it was a final brush coat for that. One annoying decal issue, but I'll not draw attention to it... The selection of pics are from a 'proper' camera and my phone, and a couple of Noy's Miniatures bases/hangar (plus a backdrop model railway scenery of an industrial estate, which certainly looks like RAF buildings to me!). Finally - I'm grateful for the wealth of experience on here, with people ready to freely offer advice and guidance - over the past couple of years I've admired some stunning skill and picked up a few tips along the way. I've a way to go yet, but am loving it...and improving - which is good enough for me! Thanks for looking.14 points
-
No. 249 Squadron, October 1940, piloted by Henry Bouquillard. As usual I used Gunze paints, the decals are from the kit including the serial (applied digit by digit, very relaxing job 😂), just the code letters are from an Xtradecals sheet.13 points
-
Hello from New Zealand. I am not sure why I thought building these two Kittyhawk kits at the same time was a good idea, but here they are. The kits seemed to need plenty of extra work, but I am happy enough with the result overall. They just took ages. I have fond memories of flying around Waiouru and East Timor in the Iroquois years ago. I particularly enjoyed the low level flights while sitting on the edge, legs dangling out with what seemed to be only a flimsy canvas belt holding you in. Fun times! I definitely miss seeing (and hearing) the old majestic Iroquois buzzing around NZ. Excuse the basic phone photos. Thanks for looking. Josh10 points
-
Tamiya's 1972 release, one from their Flintstones era. The bike and sidecar build up cleanly and hold up pretty well. Could do with brake levers and you could always add some cables. The figures? They're OK, but a product of their time, a bit stiff and toylike.10 points
-
Hi fellow modellers This is the 1:35 scale Italeri M1120 HEMTT load handling system with payload, consisting of the Gecko Ammo and Pallet Set and the Gecko ATMP Buggy. The main vehicle is virtually built out-of-the-box but I have added a few extra details such as chains on the front and rear and the spare wheel fastening and there is some slight weathering without going over the top. For the ammo pallets I made some strapping and scratch built some rings with brackets to fix the strapping to the pallets. The pallets were all chained to the load platform and some padding was used on the corners of the ammo boxes to protect them from the chains rubbing. The buggy, again, was built out-of-the-box but I added some accessories such as roll-up sheets, etc. The pallet load consists of boxes of food which have been tied down and then fixed to the buggy. With the securing of the loads I have had some amazing advice from a great friend in the US who was heavily involved with load handling and logistics within the US army while he was serving and this advice has been invaluable. The pallets used are scratch built as I used the kit pallets as templates so now I can make as many as I want for future builds. I hope that viewing these pictures will show what can be achieved with a few idea’s and a little imagination. Thanks for looking and taking an interest. More pictures can be found HERE10 points
-
Morning. Another finished ....good old lock down . This time it's the Hobby Boss version of the Hawk in the markings of 2 Squadron, Zimbabwe Airforce mid 1980's. The bang seats had to be modified as the kit supplied the originals for the early RAF Hawk. Other than that it's OOB. Decals ...Model Alliance. May I thank the many people that helped me with the paint shades on anther thread ...it really helped. Please feel free to comment etc. Thanks for looking Dick10 points
-
This is my interpretation of Hubert Polz's JU-87R-2 Stuka while stationed at Tmimi, Libya in 1941. There are few (4, I believe) photo's of this aircraft, so a lot of the scheme is speculative (even the color of the snake!) This is the Hasegawa B-2/R-2 kit, with Three Guys decals (modified and corrected), wing tanks from the Airfix B-1 (why were they included?), and painted with Tamiya acrylics. Hope you like, Colin Build log here: https://www.britmodeller.com/forums/index.php?/topic/235088834-desert-snake-ju-87r-2-stuka-finally-finished-march-17/ Thanks for looking, Colin9 points
-
I couldn't put them off any longer, I needed to tackle those tracks. First task was to clean up the links including removing those awful ejector pin marks. A few of scrapes with the edge of a scalpel blade did the trick, a some what tedious task but they would be quite visible on the completed track. At this point I decided I was going to cheat a little and not bother with the top run of the tracks as these would be hidden by the sand shields anyway. I also decided to follow the advice in the instructions as I did 'think WORKABLE TRUCK assembly very troublesome' and used the moulded section of track on the run at the bottom of the road wheels. This meant I would only need to assemble 80 or so links instead of the 234 for two complete runs. Border provide a jig to aid assembly, five links at a time, actually you get two gigs so I cut the ends off of one so that I could use it to join the sections of track. Once the links are placed in the jig and the top is put on the pins can be inserted into the holes in the links. I found out quite quickly that it is worth cleaning out the holes with a 0.5mm drill bit as the track pins bend very easily. Inserting the pins is a lot easier if you leave the pins on a small piece of sprue. Once the pins are inserted they can be trimmed off with sprue cutters, single bladed cutters work best. Once I was in a rhythm I didn't find them too bad but I really wouldn't fancy doing the complete runs. After all of the sections were assembled I found that they are quite fragile and I broke them in a couple of places so I decided to make them none workable with some TET. I have been also assembling some Friul Model tracks for my Mk.I Crusader so I thought a comparison would be interesting. Personally I think the Border Model tracks have crisper detail but they are quite fragile, the Friuls are much sturdier and have a nice weight to them plus assembly time is half that of the plastic ones. I don't think the expense of the Friuls would be justified for this kit if you fit the sand shields but without the shields it would be a tough choice. If you did decide to go Friuls one bonus is that the Border jig fits them perfectly cutting down assembly time by quite a bit. Once the glue had had a little time to set I fitted them to that tank. I think they will look absolutely fine once painted and weathered. Just a couple of small details to be added and a little tidying up and it will be ready for some paint. Wayne9 points
-
this time a Chinese Interceptor! not too many out there in modeled form, although Trumpeter did a great job on bringing them along! (I am desperately missing a Spey engined JH-7 Flying Leopard though! ) J-8B Finback 敵 機 PLAAF Famous for unsafely making an EP-3 Spyplane emergency-land at Hainan Island... Trumpeter 1/48 Metal landing gears from Up-Wind models no more aftermaket available.... simple as that! the kit fits great, detail is good! instructions could be a bit better in some areas, the landing gear assembly and some doors are a slight puzzle, as are the pylons and missile/ rocket / tank combinations. not helped by the fact that some of it was done for the J-10 kit and that all parts for the D/F are aslo included. WIP in the very recommendable group build section and the about to finish Interceptors GB: quite a beast! like 2 MiG-21s or one upscaled.... I think it also uses 2 MiG-21/ J-7 type engines... will put her next to some more well known planes for getting an idea.... thanks for your interest and thanks for the great BM GB community! Werner PS: I already wonder what you say about my Chinese (at least I hope that!) characters above8 points
-
I blame @Procopius and @Cookenbacher. And @CedB In what feels like a very different world, c.2 years ago, 2 young(-ish) Americans well known to this community came to visit the UK. They visited a truly epic number of air museums in a short time, met many of us at Telford and/or some of the museums, and generally appeared to have a blast. As far as I am aware there was no direct evidence of their being over-sexed, but they lived admirably up to the example of their ancestors 75 years ago by being over-paid and over here. One of the museums they visited was at Old Buckenham, SW of Norwich, dedicated to the 453rd Bombardment Group USAAF during WW2... and they got talking to the curator, who reckoned he could use some more models. Many emails and 18 months later, several of their BM friends found large parcels arriving; somehow all those years in the Navy and the instinct never to volunteer for anything... wasted. What was I thinking? [All joking aside, it is an honour to pay tribute to those young men so far from home. No, not Edward and Cookie; the proper heroes.] So I find myself building not just one aircraft miles out of my comfort zone... but 3. The idea is the Museum provide the kits; we do the building. You’ll see other BM 453rd-ers appearing in the coming weeks - it’s kind of like a weird group build. I’ll document all 3 of my builds on here, and no doubt others will do the same. Closer to home, though, there are other reasons for this. Many of you already know that completely out of the blue I had a heart attack on 6 March, while out walking the dog on the downs near Salisbury. It was very, very scary, but I managed to avoid meeting that nice Mr Reaper quite yet. 10 days on and I am still pretty weak and lack stamina (quiet in the cheap seats!), but off work for a few weeks. So I need something to do. My Ark build will continue in parallel, but I feel like something self-contained; the plan is for this to be pretty quick, especially by my standards - this is a celebration of still being here! It has to be said that I’ve wangled 3 corkers, all in 1/48 (so at least some of my comfort zone remains intact): the Eduard P-51D, Tamiya P-51B and, up first... the Tamiya P-38F/G. Every review I’ve seen of this kit since it was released in 2019 has positively drooled, so I’m pretty excited about building it. I am by no stretch of the imagination an expert on either the Lightning or the Mustang; if you are and you see me about to make a howler, then feel free to tell me! I have the kit itself, and Jim (the Museum curator) is sending me sone after-market stuff... including the markings, so I cannot yet tell you exactly which airframe this will be...other than that it will be a P-38 of the 479th Fighter Group, based at Wattisham. OK, enough rabbiting on; the kit and the obligatory photos of the box and its contents. Even on initial inspection I can see why everyone raves about it; beautifully moulded, and some really ingenious engineering. ...and the proof that Tamiya engineering is ridiculously good; no tail-sitters here: The game’s afoot. More soon Crisp8 points
-
Well calling this one done it has not turned out as I had planned some mistakes crept in as I lost my inspiration of late. The thought of no shows to display for another year and the loss of some old work mates that had not been retired that long so it has got me thinking of other things and my mind has not been to focused on building models. Maybe I need a break work, eat, sleep repeat is not good for anyone 😱. But did get some good news today for a change our local model club can start up 20th May with limited numbers so something to look forward to. Anyway enough of my mooning on I present my take on this kit I have seen some delightful versions done lately and a BIG thank you to Michal @socjo1 for the mountain of reference he shared with me and the effort he and others have put in trying to keep me on the straight and narrow. WIP below link https://www.britmodeller.com/forums/index.php?/topic/235086089-hms-portchester-castle/ Name it name plate to the rescue again8 points
-
So more progress and a couple of silly mistakes...... first the dumb mistakes......when adding the the gun sleeve pinch bolt holes i didn't measure the spacing correctly ..so had to do a little filling to correct that , not a huge problem but time wasted fixing something that i shouldn't have broke in the first place. Second ..i spent considerable time ensuring the hinges and latches on the new stowage bin were all functional only to mess up when soldering the latch to the box...some solder crept into the mechanism so now the latch won't release and i can't open the lid......big frowny face for that one. I have to say i'm very glad i got back into soldering etch as trying to build these bins with cyano would be near impossible Just have to add the bolt detail to the mounting straps and some weld seams then time to make the second box After the second box is done then i will go back to the mantlet and add the casting batch number... then on to the cupola to do the water drain holes around the circumference8 points
-
Hi, I Just finished this great kit from Hasegawa. Excellent fit, good detail, fantastic selection of weapon configurations etc. I just added the rivets and did some subtle weathering using oil paints. JG74 Luftwaffe RED FLAG ALASKA 122 June 2012 Reference image: cheers and thanks for looking. Jorge7 points
-
This is far from being the perfect Sea Vixen kit but the options are limited until a better one comes along. I modified the nose and printed the serial numbers myself. The real aircraft is now at the FAA Museum Yeovilton and has been fitted with a standard nose. Thanks for looking. Steve7 points
-
Finished at last. Here are my two little Pfalz scouts in 1/144. Little wasps... I'm normally more of an RFC type, but I'm really happy with how they came out. I hope you like them. Here is a link to the work in progress thread for some photos taken along the way:7 points
-
I finally managed to finish off this Tamiya ISU-152 that I've had laying around with just the base color and markings on it for over three years! I added an Aber metal barrel and Friulmodel tracks, but the kit is stock otherwise. It's finished with MRP and Tamiya paints, and Ammo pigments and enamels. If I had built and painted this more recently, I would have masked and painted the markings, but I wasn't comfortable doing stuff like that 3+ years ago. I would also like to add that this is the [lucky number] seventh model that I've completed this year! Comments and criticism welcomed as always!7 points
-
The very good Hobby Boss kit with the improvement of a vac canopy and mask painting but the cartoon. best regards. DSC_0001 by jean Barby, sur Flickr DSC_0002 by jean Barby, sur Flickr DSC_0003 by jean Barby, sur Flickr DSC_0004 by jean Barby, sur Flickr DSC_0005 by jean Barby, sur Flickr DSC_0006 by jean Barby, sur Flickr DSC_0007 by jean Barby, sur Flickr7 points
-
Hi folks! Latest one off the bench for me, Tamiya's venerable P-47D Razorback. Unsurprisingly, this was a pleasure to build and I'm quite happy with the results. No73 OTU, RAF Fayid, Egypt, Autumn 1944 Fully riveted True Details cockpit Ultracast seat Yahu instrument panel Ultracast wheels Ultracast prop Miracle Paint Masks Freightdog decals for the nose art Various scratch details All AK Real Colors paints Anyway, on to the pics! Thanks for looking!7 points
-
Wasn’t this the 28 squadron Vampire that was stolen from Kai-Tak by an infamous female Chinese pirate named Audrey. As I recall, Audrey seduced one of the aircrew, married him and then used her access to the airbase to smuggle one of her (male) pirate band - disguised as a BOAC air hostess - to the flight line. He then used poisoned stiletto heels to kill the crew chief and stole a jet. The intention was to deliver the airframe to communist China for a rich reward, but HMS Belfast, returning to Victoria harbour following a series of tests of a new crane-launched surface to air missile, was alerted to the theft. Belfast used her last remaining test round to damage the aircraft, forcing it to land on a Kowloon Harbour garbage-barge which subsequently delivered it to a popular tourist beach where the RAF reclaimed the airframe. Audrey and the perpetrator were later cornered in the infamous ‘Red Lips’ 👄 bar and killed in a gunfight with heroic 28 squadron ground crew. Due to the embarrassment caused to the Royal Air Force this story remains highly classified but given your long association with the squadron @hendie I’m a bit surprised you haven’t heard at least something about it.7 points
-
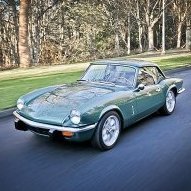
1910 Model T Ford Western Australia Police Force, Perth This is an old 1/32 Airfix kit (originally released in 1959), but updated in a number of areas to make it more representative of this WAPOL police vehicle. The build thread is here and I apologise in advance for the lack of any figures ! Cheers7 points
-
evening ladies back with a little more progress.. started by cutting out the big access door in the fuselage - unlike later metal aircraft, the fit seems quite rudimentary which suits me ..it's just resting in place now, but evn so.. ..then onto the wing roots - thing here is the front of the wing actually goes into the fuselage - there is no fairing until the rear half flares out... so first I made up brass shapes to mirror the wing profile and used these to cut the shape. I also used the spar points to set their actual position so they neatly butt the wing so I could build up the fairing to them.. ..with the templates in place it was a matter of bulking out and stregthening their fitment - as there is a chop into the fuselage I had to add some red dope paint to disguise some places.. ..the ribwork was masked off to stop filler or sanding spoiling it ..& filled with P38.. ..from the bottom.. ..and soon the fillets were complete.. ..also added a rigging wire mount to where the forward U/C mount is and generally cleaned up the U/C fittings.. ..moving to the nose, I noticed the cowl is quite hollow and can be seen behind the spinner.. ..I made sure the nose was flat and true and added a litho disc to ensure a perfect circle - once I had filled to this, I set about removing as much as I could with a dremel burr to cut with.. ..added an internal mount and a spigot that goes right back into a hole in the brass tubular fuselage structure... also cut out the little indentation at the bottom of the cowl.. ..and with a little dry fit, she is starting to look like an aeroplane.. ..nimble little figher - oh wait, it needs another wing... ..now in other news, I became a grandfather yesterday, with the most precious little angel Amber coming into the world.. ..to say I am thrilled, just doesn't do justice to the feeling - I am so proud of my new little family - my daughter has started calling me "papa planes" until next time Peter7 points
-
Hey all, here's my latest build. For some reason, it seems the only American cars I build end up with a patina finish - well, 2 out of 3 anyway. This is the recent reissue of the Revell 1/25 56 Chevy Delray. I wanted to do this as as worn patina finish on the outside with a nice shiny restored interior. The exterior was painted using a salt chipping technique I learned from YouTube. I started with Mr Surfacer Black Primer, then Vallejo Dark Rust, then splotches of Vallejo Light Rust. I masked the white half, brushed the body with water and added coarse and fine salt. I painted on a grey primer and then added more salt and painted a white primer followed by Tamiya Pearl White Lacquer. This gave a nice 2 layer effect to the peeling paint. Once the paint was done, I added all of the trim in Bare Metal Foil and then used some Vallejo Light Rust over the whole body. I also used some Tamiya Panel Liner in the trim and door gaps. I dropped the ride height as low as I could without grinding the frame rails down. I 3D modelled the rims after the Detroit Steel Wheel style and printed them on my Elegoo Mars printer. They were sized to fit the kit tires and hubcaps. All of the chrome except the hubcaps was stripped, sanded smooth and repainted with Alclad Chrome and then weathered with washes and paint. The salt gave some great happy accidents - my favourite one being the bubbling paint effect on the rear quarter panel. The interior was built box stock but with shiny paint finishes to contrast the unrestored exterior. Some more details shots: Thanks for looking, Martin.6 points
-
Hi everybody! My first small scale AFV model painted by airbrush and I used my own products which are homemade while painting and weathering. I hope you like it.6 points
-
1/72 Revell F-101B Voodoo, TDY to 13th Bomb Sqn, Ubon RTAFB, 1970 - Vietnam War My main interest is the Vietnam War and the many aircarft that operated there. Coupled to this I also like to throw in a curve ball every now and again. This Voodoo is one of them! This is the Revell F-101B, airbrushed using Tamiya paints, spare decals and a Flory wash to highlight all the lovely surface detail. A bit of 'History'. In order to further reduce the flow of supplies from the North via the Ho Chi Minh Trail, USAF planners converted a F-101B to be used in the night attack role against ground targets. Using 4 x modified AIM-4H missiles in the air to ground role this unique Voodoo became the very first Tank Plinker. Working alongside the B-57G out of Ubon RTAFB, the Voodoo was moderately successful but ultimately did not impress enough to warrant more airframes being converted. Cheers all, Phil6 points
-
This is Karaya's Vickers COW Gun Fighter, in 1/48. It's a lovely kit, as was the Karaya Martinsyde I built last year, and built entirely OOB.6 points
-
Another HO train model. I used an Athearn Blue Box un decorated and un powered kit to do this. The decals are by Highball Graphics and the paint was Tamiya TS-15. Pan Am was previously known as Guilford Rail System, Maine Central and B&M (Boston&Maine).---John6 points
-
As the last parts the wheels have been fitted and had some weight applied.6 points
-
A short discussion on plating of steel hulls. Firstly, most hulls of this period through to the advent of welding in WW2 were surface (ie raised head) riveted. In particular, once ships used turbine propulsion, the extra power meant that the parasite drag associated with the exposed rivet heads did not adversely impact performance to the extent to warrant the extra expense of flush riveting. Hence if you look at close-up pictures of WW1 destroyers, you will see rivets everywhere, but if you look at 19th century torpedo boats, where speed was everything, you will see they are smooth. Merchant ships were mostly lap riveted with goggled edges, but warships were always butt riveted fore and aft and laid in inner and outer runs vertically (for interest, the outer plate lines require packing pieces to be able to be riveted to the frames). Interestingly, the Denny SGB's (as I showed in my build thread) were lap riveted, I think this is because they were constructed at shipyards more used to merchant ships as the naval yards were all full building destroyers. As ever with rules, there are exceptions. The Flower class corvettes are another class that have lapped plates as they are really more armed whalers than warships as such. By the way, if you are modelling exposed rivets on hulls, remember that all plates were rivetted to each frame they cross and butt joints have at least double rivet lines on each side of the butt, so a minimum of 4 lines per joint. I've seen commercial model hulls where the rivets have been marked only run round the edge of the plate, a ship built that way would fall apart more or less immediately it was launched.... The butt joints are a weakness so the layout of the plates should be done so that each frame spacing only has up to two butt joints. Plates were around 4 ft wide on this size of vessel, probably a lot larger on capital ships. This is to ease handling. Generally the plates were around 8-10 ft long. These are only guidelines, each situation has to be considered based on the plate position. Also, double curvature is avoided as much as possible. It is fascinating (well to me at least) how mostly flat or single curvature plates can form the complex curves needed for a hull. What I had to go on to start this process was a cross section amidships which showed the plate runs with widths and the sequence of inner and outer. If you don't have that, the keel plate is always an inner (logical it comes first...) and the sheerline plate is an outer. So, using these rules, you can set up the layout. Also, not all lines of plating run the full length of the vessel. In particular the lines that cover the bilge section run out to trapezoidal pieces for and aft. So, step one is to lay out the inner plate lines onto the hull using tape as shown on the photograph below. You will see that I'd already marked the location of the frames (actually the lines show every other frame, there are too many frames to show each one), knowing the frame centres is also important. Butt joints cannot occur on frame lines, no way to build that. The butt joints all sit between frames so to work out the shape of each plate, you need to know where the frames sit. Also, the taper to the trapezoidal closing plates doesn't end in a point, it cuts off to a butt joint no less than 2 ft long. Designing a plating layout is a key shipyard skill I don't have, but using this logic, the model can at least have the sense of the real thing in the absence of a shell expansion drawing I was lucky this hull only needs a single inset line so getting the inner lines right wasn't too complex. Here is the run out at the stern, just cut off are the special stern plates Once the inner lines are marked, the butt joints need to be worked out following the rules and reasonable length constraints. This takes some time and trial and error to get a layout that makes sense and follows all the rules Here is the bow with the butt joints marked out in green marker. Remember, the frame lines here are showing every other frame, so the joints are all set at the quarter point of the space between the lines. Also shown in this picture is the brass insert at the break in the forecastle, set in flush and edge filled plus a close up of the bow gun cut out and doors and below is a section amidships, note the way the butt joints march along across the plating lines. If you see a model with plates looking like bricks in a wall, that is not correct, the joints always stagger. That picture in the album behind came from the brass foundry, its not come to light in the move yet, will keep looking because that has details not available on line.... The quality of close up will have shown me where the butt lines were set at the bow, and of course confirmed that she was flush riveted Proceeding from this layout, the aluminium sheeting is attached with impact adhesive, 0.1 mm thick for the inner plates and 0.2 mm for the outer plate lines. Here is a shot taken as I worked my way from the bow to the stern. With no rivets to mark and butt joints, this is really quite a fast process, the sheets are cut with a knife and the finish is flattened with wire wool which also cleans away and stray adhesive. I use an ordinary wallpaper edging roller to get the sheets firmly in place And here is the hull completely plated looking very shiny. It may seem like I fuss over this sort of detail too much, but at this scale, the joints can be seen very clearly and modelling them correctly(ish) adds lightness to the finished model I hope that long text may help others work this sort of detail out for themselves. Many commercial models I've seen really let themselves down in this area imho Cheers Steve6 points
-
Hi all, This is my first post here and I would like to start with the Tamiya 1/48 Mustang III in the colors of the second plane of this type used by S/L Eugenius Horbaczewski. For this build, I've used the True Details cockpit, the Yahu instrument panel, the Rob Taurus vacformed canopy, the Aires horizontal stabilizers and elevators, and the Aires wheel well. I had a hard time fitting the Aires wheel whell in place and ended up with a big step on the wing to fuselage joint. I had to sand and redo the whole area on both sides with Tamiya putty and then rescribe it. Apart from that, the kit assembled without any real problems. Canopy masks were made in Corel Draw and cut in a Kabuki sheet in my trusty Silhouette Portrait. The model was painted with Hataka enamels.. Decals came from the Techmod sheet on the type and from the spare box. Comments are welcome. Cheers, Ivan6 points
-
Windscreen recesses added; bootlid scribing came out OK too!6 points
-
Still plugging away on the BOAC 707. Last night I removed all the masking - always a bit of a traumatic moment when dealing with airliners. On the whole, it turned out not too bad. There are some areas that will need touching up and respraying a bit but I'm fairly happy with the result.6 points
-
Well grinding on down my list, fairings and tunnels and scribing:6 points
-
I thought I had it there for a moment. I did. I really thought I had it. Subject matter with extra added interest. Don’t you feel somehow diminished by all these hordes of modelers who manage to find subject matter with extraordinary background stories, exciting histories, and tales of derring do ? You know who you are mes amigos What do I get? Another mundane, dull, run of the mill, and oh so boring 28 Squadron aircraft. I must have picked the most boring Squadron in the whole of the RAF to choose as my modeling subject matter. Not even a fancy nickname. Boring. Those of you who follow my ramblings may remember some time back that I acquired this little bundle of joys. Two of those have since fallen off the top of the stash, somehow got assembled, and I'm now left with just the CA Vampire (with all its warts and carbuncle's) So anyways, as always, I've been amassing what few photos there are of 28 Squadron Vampires which I can pretty much count on the thumbs of both hands. Yes, 'twas that many. At some point in my google bashing I stumbled across this little beauty That was 2 years before I was born. I probably bought her a drink in Red Lips (which was akin to an initiation rite for those unsuspecting new arrivals destined for Sek Kong back in the 80's) sunk deep in the depths of Tsim Sha Tsui Ah, nostalgia. Enough of that. I won't mention that fact that the aircrew of 28 conned Hot Gossip into making a trip to Sek Kong for a little party when HG were in mid tour back in the early 80's. Just in case you were wondering, us groundcrew types didn't get within 100 meters of Sarah & Co as they were ushered off the pan surrounded by a bunch of salivating green flying suits, never to be seen again. Enough digression and back to the (boring) matter at hand. That one photo of a BOAC stewardess perched precariously atop a small portion of Vampire doesn't quite get the blood rushing to one's head does it? Then I happened across this little snapshot entitled "Sek Kong Vampire and Audrey." with Tai Mo Shan just visible in the background. Okay, we've got an aircraft with a 'Y' on its nose. A little better I suppose, but still not one of those Cor, this is really interesting moments forever carved in the squadrons stone tablets is it? Nope? I thought so. It was then that it happened. The thing. The thing that made me think I had it. Immortality At last. Following breadcrumbs and diving into worm holes I somehow stumbled across this rather intriguing shot That's interesting said I. Or maybe just words to that effect. Or along those lines. My interest was piqued further when I started chasing down the story and found this. Aha! That's not your typical runway I noted observantly. What happened here then? On further investigation I discovered that the pilot flew in from Singapore, somehow missed Hong Kong, ran out of fuel and had to perform an emergency landing on a strip of beach. That beach happened to belong to China. And a bunch of (Chinese) Pirates. It probably wasn't one of his better days, but it was for me as I stumbled across this shot. Wow! That's it!. That's the one. What a shot. Mystery. Intrigue. Tension. Suspense. It has it all. The Army, the Navy, the RAF. Interest in abundance. What an absolutely wonderful diorama that would make. Then I read all about the adventure here It wasn't 28 Sqn after all VG703 was part of the Vampire Trials Unit. Therefore, I'm afraid you are stuck with just another boring 28 boring Sqn boring aircraft, this time a Vampire. Not even Gothic. Gee up folks, it maybe not that bad - it's all relative, right? It begins: In the never ending quest for stash incrementation I appear to have purchased the Flightpath PE set Along with a nicely yellowed Sepia toned canopy from Aeroclub. That should add that nice vintage touch to the finished model. let's look on the bright side. It's not a biplane Plastic has been fettled. More to follow. if I can be interested.5 points
-
I've enjoyed most of this build, although it had its moments. Sometimes the joining of parts was a bit of a fiddle, as they were quite small. The PE that was included in the kit was, on the whole, very good, although the railing were very fine and in places didn't fit too well, so I plumped for the plastic ones. The instructions were good, but did contain a few errors, mostly the wrong numbers, but nothing a bit of close inspection couldn't sort out. So, its not perfect, but I have learnt from this build as I do with every build. Many thanks to my fellow BMer's who gave advice and information along the way. Jon5 points
-
Hi all Just a few pics from my latest build- the 1/48 HobbyBoss KV-1E I love the look of the KV-1 but like it even more with the bolted on armour, a real beast! A simple build with some nice details and a few bits of PE and even a metal wire tow cable and for about half the price of the Tamiya kit, so what's not to like? OoB apart from the tarp and painted with MRP 4BO and pretty much a straight copy of the techniques shown by Nightshift's build on youtube, I make no apologies! This is the first 1/48th armour I've built and this is the way I'm going- my first 3 were all 1/35th but I realised pretty quickly that if I wanted to do any late war tanks then the bases have to be pretty big. By going 1/48 I can have bigger scenes which is probably the main reason I build armour. I've nearly finished the small diorama to go with this which I'll post once I've tackled the figures- I struggled in 1/35th so what 1/48 figures are going to be like only time will tell. No spoilers on this post but I'm made up with the base so far, loads of new things tried and I can't stop looking at it. Hopefully finished in the next week or so if I can stop tinkering with bits. Added the picture of the final base, more pictures in the diorama section here under 'The arrival of General Winter' And that's all, hope you like. Any tips for future builds much appreciated.5 points
-
Another of my lockdown models. This is Trumpeter's 1/35 S-300PMU SA-10 Grumble SAM system. This is a big kit! Typical of Trumpeter's kits there are an awful lot of parts including all the etch needed. No cabling was supplied so this was added using pictures off the net. I used Lifecolor's rain and dust liquid pigment , with MIG powder on the tyres. I think the lifecolor pigments should have been used before the matt varnish was applied as it didn't go as well as I had hoped. Cheers Mick5 points
-
There. fixed it for you. Steve.5 points
-
Some teasers from Marcus Nicholls - https://www.facebook.com/groups/tamiyamodelmagazine/permalink/10158725968004821/ V.P.5 points
-
Started on the turret, I used a metal barrel from Def Model instead of the resin one from Formations, it is a perfect fit for the muzzle break.5 points
-
A couple of interesting things arrived today: The C1 Models transkit to turn an Aoshima MGB into a MGB V8 Coupe Looks very cleanly moulded and straightforward to use. And then there's this: I know these Hornby (Scalextric-derived) kits don't have the greatest reputation, but how else am I going to get a TVR on my shelves that's not a teeny-tiny resin or white metal kit? 😜 best, M.5 points
-
A 1/35 scale vignette of an ANZAC trench at Gallipoli. The figures are from an ICM plastic kit, painted with acrylics, the trench is wood, styrafoam and wood filler.5 points


.thumb.jpg.cfc129272ffec824439b15e6013d5952.jpg)


This leaderboard is set to London/GMT+01:00