
Leaderboard
.thumb.JPG.3498f40362ff13ebfc4b2e45abbd545e.JPG)


Popular Content
Showing content with the highest reputation on 05/03/21 in all areas
-
This is the 48th scale Kitty Hawk Huey, built as one of the SAR aircraft operated by the Brazilian Air Force in the 60's and 70's. The decals, except for the national insignias, were made in Corel Draw and printed using inkjet and laser printers. Masks for the transparencies were also made in Corel Draw and cut on a kabuki sheet using my trusty Silhouette Portrait. Model was painted with Alclad enamels. Cheers, Ivan30 points
-
One of my older builds. Built as a review kit for SAMI. Its now up for sale but before it goes I had to take some pics and share it with you. Special Hobby kit, 1/72nd OOB.25 points
-
I discovered what I thought an unusual fact when reading up on the Hudson. Copied from Wiki; 'Due to the United States' neutrality at that time, early series aircraft were flown to the Canada–US border, landed, then towed across the border into Canada and flown to RCAF airfields where they were dismantled and prepared for deck cargo to be shipped to Liverpool. The Boulton Paul turret was fitted in the Uk' Perhaps others know this but I didn't. On to the kit. This is an 80's boxing of the original 70's kit. Not the easiest of kits I've come across and it nearly flew out of the window on several occasions. The final kicker was when the decals disintegrated under Decalfix. I replaced some of them from the spares box so there are some inaccuracies.23 points
-
Loved this idea. Large scale details kit of just the nose section of the 1/32 Lancaster. Lots of detail on display with no worries about where to store a full size model. Hope they do it with thier B-17 kit too. I brought eduard seatbelts and interior detail set. I also added a lot of detail to the nose section with lead wire and bits from the spares box etc. The most crazy thing I did was creating the cage around the bomb computer in the nose. I Made a little stand for the nose turret to be displayed separately as it is a mini kit in itself. The nose turret on the stand I made, reminds me of the baby robots in 'Batteries not included' I also decided to get the Eduard masking set as there are a lot of windows on this thing. I used the clear fuselage half and carefully masked it up inside and out to get the museum style windows on one side to be able to see the detail on the inside. Luckily the masking matched up on both sides!!. 20210305_181337 by Richard Page, on Flickr 20210305_181405 by Richard Page, on Flickr 20210305_181615 by Richard Page, on Flickr 20210305_181633 by Richard Page, on Flickr 20210305_181718 by Richard Page, on Flickr 20210305_181737 by Richard Page, on Flickr 20210305_181747 by Richard Page, on Flickr 20210305_181814 by Richard Page, on Flickr 20210305_181854 by Richard Page, on Flickr 20210305_181919 by Richard Page, on Flickr 20210305_181934 by Richard Page, on Flickr 20210305_182549 by Richard Page, on Flickr 20210305_182617 by Richard Page, on Flickr 20210305_182634 by Richard Page, on Flickr 20210305_182649 by Richard Page, on Flickr 20210305_183206 by Richard Page, on Flickr 20210305_183220 by Richard Page, on Flickr 20210305_183317 by Richard Page, on Flickr18 points
-
Kit - Zvezda Paint - All Tamiya acylics Decals - Spares Extras - DEF Models kit-specific resin mantlet and aluminium barrel. So here' my first ever Zvezda kit which I started about six weeks ago, and other than some cursing around the link & length tracks which seem a half-link or link too long... it went together very easily in just three sessions. I mixed my own version of 4BO green using various Tamiya greens, yellows and possibly some witchcraft. I gave it two coats of Tamiya Clear, decals, then a third coat of clear and left the whole thing to cure and went on holiday ! When it made-it back to the bench, I decanted some cheap hairspray into my airbrush and applied two medium coats about 20mins apart. Left it again for about 45mins in the New Zealand sunshine and then applied a mottle of Tamiya 'Buff', 'Deck Tan' and Flat White. Another break for around 20mins then started the chipping process especially on the top of the casement and engine deck which would have got a lot of wear from the crew and probably wouldn't have received too much in the way of 'winter white' anyways. The rest of the paint effects are simple Panel / Pin washes, an overall dirty brown wash and finally some streaking, all with Windsor & Newton oils. To finish I mixed a cocktail of various MIG pastels and dark washes to get a rich black brown mud at the lowest points and a lighter but still earthy brown tone higher up. I deliberately left-off the spare tracks usually mounted on the front hull as well as the snow cleats from the right side (all will be used when I build a T34 / 76 later this year). Only stowage is a couple of tarps from lead foil, a rucksack on the aerial pot and a 'liberated' German jack. Love the final look of this project one of those rare times that what you get at the end of the process is precisely what you envisioned when you bought the kit in the first-place. Please feel free to make any comments, ask any questions or hurl any abuse. Have a great weekend, all. Very best from NZ. Ian.18 points
-
This is hardly the best SPAD kit on the market, but it is adequate if you're looking for a relatively straightforward biplane build. Detail is limited, with no cockpit interior, and vague bazooka-like shapes instead of the front machine guns. However, some of the surface detail is reasonably crisp, and the fit of most parts is good. The struts fit into large grooves on the wings, so alignment is easier. Decals are OK, not as thick as some other Academy releases. This SPAD is done up as the mount of Raoul Lufberry, who flew with France's Lafayette Escadrille before transferring as a Major into the US Air Corps, CO of the 94th Aero Squadron. He had 17 victories before he died in combat. The Airfix figures featured were painted in 1981 or so....I kept them and they add some life to the scene.....14 points
-
Since my completion of an Auster in the Aus/NZ GB, I thought you might like to see all my Auster models together. All are 1/72nd and by AZ Models. The camo one I recently modified( and changed the markings) by back dating it to an Auster I from a III which what the kit is. The civvy one 'G-ANHR. is the Mk.V. Left to right: Mk.v G_ANHR,Mk.1, LB312,and A11-36 Mk.III RAAF. In this pic is the interloper, a Piper Super Cub G-AVPT and two Austers. All three depict aircraft I have flown in! All of them together. I'll try and do pics of the models I have of others I have flown in over the coming weeks.13 points
-
Hi Gents. This is the old Classic Airframe CR32 in the markings of Capitano Guiseppe Majone leader of the 24a Squadriglia, XVI Gruppo caccia del'Aviazione Legionaria at Caspe in December 38. The model was done some times ago, not an easy bird to do but still, now under Special Hobby, the only game in town. best regards. 7B48E684-B5F2-4877-8145-9CBD4EFE95B2_1_201_a by jean Barby, sur Flickr D8C87F02-8AC3-4D1F-BCAA-58E47E3A163C_1_201_a by jean Barby, sur Flickr 35765FDD-46D1-4320-AE70-4538BFBD7750_1_201_a by jean Barby, sur Flickr 789A3AB2-D062-4ACF-9A53-BE945DB8BD71 by jean Barby, sur Flickr DB34E9D9-8371-44B9-BE84-5576AD8535F2_1_201_a by jean Barby, sur Flickr 4D20D6B8-4DF4-49A7-839D-3F5C413401AA by jean Barby, sur Flickr C702655F-A557-47A3-A6E7-E47588E6ECDE by jean Barby, sur Flickr10 points
-
Returning to the Japanese section of the stash I give you the, Hasegawa 1/72 Mitsubishi J2M3 'Raiden' #690 - '302nd Flying Group' From Scalemates, it's a 2004 rebox of a 1977 mould (and the only boxing without the lightning bolts painted on the fuselage (doh!)) Eduard etch and harness, Uschi thread, Colorcoats enamels and Tamiya Weathering Powders used The etch was a trial and the limits of my abilities became clear when trying to fix the canopy handles. I also didn't read the instructions when they said to cut away the undercarriage bays and replace with etch. I assumed the etch was simply to be used as a cover to the bare walls of the existing bay and couldn't work out why the pieces didn't fit. Colourcoats Mitsubishi Navy Green was used for the topside, Mitsubishi Grey Green for the underneath and their version of Aotake for the wheel wells. Comments. 1. The bare cockpit needed, and was certainly improved by, the etch 2. The canopy was not a good fit and had to be clamped with careful use of Polystyrene cement for it to stay put. 3. This seems to be the only aircraft that I can recall where the inner undercarriage doors do not sit vertically when it's on the ground but come to rest on the fuel tank at an angle of approx 45 degrees. Ask me how I know after trying to add the fuel tank at the end of the build ( doh!) 4. Aside from that, moulding was good with no flash and engraved detail. Fit was good save for the canopy with minimal filler used and even the decals were good with good registration, no bleed, good colour intensity and no reaction to solvents. On this boxing you also get a range of Japanese ID's to model one of a number of aircraft10 points
-
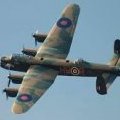
Heinkel He111P-2, G1+AN, 5./KG 55 "Greif", Villacoublay, France, 1940. By the start of World War Two, the Luftwaffe's core bomber strength consisted of the Junkers Ju87 Stuka and Ju88, Dornier Do17Z and the Heinkel He111H and P series. The Heinkel was the most numerous bomber in the fleet, with the H series the most numerous variant, powered by a pair of Junkers Jumo 211 engines. The P series was identical, save for using Daimler-Benz DB601A engines. The history of the Heinkel bomber is fairly well known, so to save me typing it all out again, here's a link to the Wikipedia entry on the type. Many years ago, as my 1940 obsession began to take hold, I struck upon the idea of buying the Airfix Battle of Britain 75th Anniversary gift set. It contained the newest toolings for the Hawker Hurricane, Supermarine Spitfire, Messerschmitt Bf109 and Heinkel He111. The overall cost was probably a bit cheaper than acquiring all the kits separately. Being a bit limited for display space, the three fighters got put together fairly quickly. The Heinkel, however, had to linger on the shelf, shivering in its polythene bag once the large box was gone. Time passed, and I made up my mind it was time to build the kit - and here it is. Built it straight from the poly bag, the box long consigned to recycling, aside from masking tape seat belts, using the original gift set transfers - hence no swathes of stencils and data panels! I also flattened the wheels slightly. Trouble was encountered fitting the gondola transparency, and also aligning the three-part nose transparency. You can see a bit of a step in the latter, but I didn't feel confident enough to file and sand it all down flush. I used a set of Pmask vinyl masks for the clear parts. I'm not a fan of vinyl masks, but these performed adequately. The model was painted with ColourCoats enamels, Humbrol acrylics for detailing, and Winsor & Newton Galleria Acrylic Matt varnish to finish up. My original plan had been to cover the undersurfaces with black distemper, a practice adopted during the Blitz to try and make the aircraft less visible to searchlights while on night operations. Since I had to paint the model in the normal camouflage colours anyway, I elected not to go the distemper route, so the finished aircraft is exactly as Airfix expected when they produced the gift set - plus the swastika marking, of course. The build was pretty enjoyable, aside from the transparency fit issues. It's a well-detailed kit that rewards a little patience, but isn't so complex that the modeller loses the will to live. The Heinkel essentially completes my 1940 Luftwaffe bomber collection, save for Revell's new tool Ju88A-1 and a nice big Trumpeter Fw200 that keeps catching my eye. When I'm feeling brave, I'll get a group photo of the bomber collection. The WIP thread can be found here:9 points
-
Another classic airliner completed. This is the Airfix Boeing 707, which has tooling from 1963, and decals from 2015. There weren't really any issues with this build, other than the way the engines attach to the wing with little notches in the pylons that are designed to hook onto lugs in the wings. These lugs were too large, or the notches in the pylons were too small, but they didn't attach easily. I had to cut out the lugs and slot the pylons into the wings. Also, the wrap-around decals of the nose were difficult to apply because of the tight curvature of the fuselage. It also lacks some details, like fan blades, and the engine exhausts are solid. I need to do some paint touch ups on the engine pylons because the BOAC decals don't fully wrap around the pylons, but I have run out of midnight blue paint. Here it is for now:9 points
-
Not doing anything detailed at present due to hospitalisation next week. Built box stock, as it has fittings for an electric motor, it hasn't got much interior detail, just a dash and steering wheel. Added a few decals as kit decals were poor.9 points
-
So today's update and I've applied some very subtle chipping effects and also a semi gloss coat and a couple of filters to try and bring everything together. A couple of the tools on the left fender have been painted though these will be weathered later so they don't look so clean. Not much for me to do now as I await the arrival of the tracks and decals though I will continue tomorrow with the rest of the tools etc and possibly some further weathering. Here's a few pic's of today's progress So that's all for now but I'm happy with progress so far. Thanks for looking back soon 🙂👍8 points
-
In the days of the Cold War a Soviet spy was dropped by parachute in the Welsh hills with instructions to contact Mr Jones in the small village of Llanfair and give him the coded message: “The tulips are blooming well today.” Arriving at the village he asked a boy where Mr Jones lived and was directed to a small cottage. He knocked on the door and the owner emerged: “Are you Mr Jones?” “I am.” “The tulips are blooming well today.” Mr Jones stared at him in amazement then smiled: “Ah, you must have the wrong house, it's Jones the Spy you want.”8 points
-
Argggghhhhh.. nostalgia overload! lol.. Got im himmel.. i think i was poisoned as a child by the glue from licking GSS and pasting them in to the redemption books. 0.001 p redemption value per stamp.. then they issued the single x 40 stamps. Pasting GSS in to the books was what people did in the 60's and 70's instead for entertainment instead of watching catch up TV shows lol. \green Shield also offered a base model Ford Cortina in 1975.. colour.. GREEN of course! what else? LOL Embassy the tobacco company had coupons in packets of fag. I remember you could also get a Ford Cortina if you collected enough. You would kill yourself with lung cancer getting it though!7 points
-
Good evening, all! I've been pottering around for the last few days, trying to get some of the less glamourous jobs done on the Harrier. I'm sure we all have our favourite jobs, and some we resent. Externally, she doesn't look too different since my last update. Some of the smaller details have been painted, such as the Zeus tusks... ... and more towards the rear, such as the MAWS radome on the stinger, Zeus receiver, and Transmitter aerial. All were painted using a cocktail of acrylics that I couldn't tell you if I tried to remember, with help from the the excellent visual references in the fantastic Fox Two! Book. The Zeus receiver is slightly too large on the kit, so this had been previously been shortened prior to painting. The NDT patches on the rear fuselage and vertical stabilizer were masked and sprayed with a dull silver, then the edges blended in a little with a fine hairy stick. The landing gear was up next - possibly my least favourite part on any build. I always find this part so tedious, yet have seen (and had) many a build let down by a sub-par job on it. Here are the nose and main landing gear. I've added whatever PE Eduard supply to them, and greebled a couple of pipes/tubes where it looks to benefit them - mainly on the main and outrigger gear. I've added placards scrounged from other kits, just to add a little interest. The wheels are Eduard's resin offering, and are as good as ever. Nice, crisp detail and easy to work with. I've noticed that built as-is form the kit, the Hasegawa Harrier sits slightly tall due to the nose landing gear. To remedy this, I've modified the kit part slightly to give the gear a slightly depressed look, getting it to sit a little lower than it would. Just a quick wash of Flory dark dirt wash to bring out the lovely detail of the Eduard wheels. The outrigger wheels benefit from PE, and also with the wheels included in their resin set. They provide a replacement section from the oleo strut down, so the forks aren't moulded into the wheels. It's a very delicate piece of kit, but the final result is far nicer than the kit part. For the Oleos, I got a new toy to play with, in the shape of a Molotow Liquid Chrome pen. I've been meaning to try these out for a long time now, and now I have, I am absolutely astounded with the finish they give. I wish my photography was adequate enough to do them justice, but they really do give off a mirror-chrome finish. Another first for me is using lacquers instead of acrylics; namely the Alclad II range of metallic lacquers. Again - a product I have been wanting to use for a long time, and again - a product I can't see myself going back to not using. For the cold exhausts, I used their Steel, which under a coat of Flory Wash, looks rather effective (clean on the left, Flory dark dirt on the right) I also used Steel on the hot exhausts and heat shields, but with a coat of Pale Burnt Metal on top - again finished with a dirt wash. A light coat of Windsor & Newton Matt varnish sealed in the wash on the heat shields. There's not much more to report for tonight; hopefully soon I'll be able to get a gloss coat down on everything that needs decals and weathering (so... pretty much everything!) In the meantime, I'm sure there's plenty more to keep me occupied until then! Take care, folks! Daryl.7 points
-
Hi Everyone, Started my latest project, been looking forward to this, Meng MkV, Started it Two weeks ago, and following a different format, building more parts into sub assemblies and painting more parts on mass once assembled instead of all individual, seems to be working reasonably well. have only come across some minor fit issues, all with the side sponsons, I should be able to work it out after reading loads of tips in various posts, shame so much of the kit is hidden, just wish I had the skill to open up access panels to do it justice. Very impressed with the detail on the Ricardo engine, shame you will not see most of it. The rest of the engine cradle and drivetrain/clutch is rather nice too. Did no clean up at all on the rollers for the tracks, cut from sprue as close as I could and that’s it, they are totally hidden, added the PE plates on one side, but not on other, You cannot see them is one reason and also I may run some cables through here for the lights I am going to add to the interior, The guns look ace, currently researching correct/best colours for them, added the ally barrels from Aber Engine primed in Stynlrez Black primer, I think it has come out so well there is no point adding Black paint to it, just a little chipping and colour in places. Interior done yesterday, Stynlrez white primer, good enough as I think, then I decided even a new tank not long arrived in theatre probably would not still be white, so added Hataka interior Buff, definitely has right colour for tobacco and other staining, will be adding a bit more suitable grime as well. Got to tidy up engine cradle, should have at least painted that separately in retrospect, probably won’t see it I inside though. Got the idea of the cream colour from a good friend who did the work on the MkV at the IWM in London, then came across the Hataka Buff colour. So there is the progress so far, Cheers Mark6 points
-
Finished a few days ago I've used original Revell GR.4 boxing with some goodies from Eduard, Aires, Quickboost and myself - Eduard PE sets - interier, exterier, gearbays - Eduard brassin seats - Eduard brassin Paveway II bombs and Sidewinders - Eduard BOZ and SkyShadow pods - Eduard decals - Aires cockpit - AIR4800 IDS early modified to GR.1 - Aires exhaust - Quickboost canon barels - Reskit wheels - selfdesigned 3D printed outer wing pylons, fuselage pylons, landing lights a crew ladder - selfdesigned mission marks decal and modified Foxy Killer markings (Eduard one has black outline which I do not like...) - selfdesigned masked and airbrushed sharkmouth Overall paint is a 3:1 mix of MrPaint 243 and 396. Hindenburgs are painted pure 243. Thanks for looking6 points
-
B-24J, Bat Out of Hell, 818th BS, Saipan late 1944. This is one of two American heavy bombers and my first finished builds of 2020. It’s built from the Hase 1/72 kit, and was finished using citadel, humbrol paints and a hairy stick. Weathering was done with some Patel’s but mainly homemade washes and tamiya weathering pallet. the build thread is here if you want to have a look. I’ve tried to improve my photography so hopefully they are better and show up the model better. There are some rough little bits which I need to try and smarten up going forward, but I’m still really pleased with how it’s turned out and that I’ve actually finished a liberator! Anyway here are the pictures! hope you enjoy! Any comments, help or questions welcome! Rob6 points
-
Recently finished,not top standard,but hope you like it...: Marcus6 points
-
4 Weeks in the making, painting, washing and weathering then finally, sealing it all in i have finally completed my M2A2 ODS Bradley! A truly enjoyable build, start to finish but not without its mistakes, which i hope i have learned from. Now i cant wait to push onto the next part of the project, the diorama in which this IFV will be set. [On both sides of the tank, the instructions asked for the decals of the CIP (Combat Identification Panel) to be individually placed, which was tedious and nearly broke me. In the end i used electrical tape which i think, gives it that "tapey" look though again not without fault.] [Honestly have no idea how i managed to mess the "2" up on this one for the decals, but decided to go with it. (Decals can be a pain in the chesticles for me sometimes) [With the Diorama in mind i decided because the scene was going to have dismounted infantry, i weathered the tail gate for the Bradley, my hope is to remove the attention from the fact that there is no interior to this model.]6 points
-
Good morning everyone... The Paint arrived yesterday and I was able to spend a few hours tonight painting the StuG. I know the brown has a weird cast to it but it is an earth tone paint. This will have to go into hiatus now. My budget is strained at the moment so I need to wait to buy a crew and stowage for this. Please feel free to ask questions, post comments or add thoughts. Dennis6 points
-
Molotow pen option: I agree with comments above on it 1) being very fragile and 2) difficult to control without first masking the edges. BMF: a good option if you first practice it on a junk model(s). My experience with BMF is it will not hide a bumpy surface underneath so surface prep is a must. Also, it’s an art to avoid getting kinks/ fold lines when cutting/ handling long pieces. I’m still learning but others here are masters at applying and cutting it. Unlike Molotow or paint, it’s easier to remove and redo if you mess it up. I’ve used it on small parts and bright work on car interiors but haven’t been brave enough yet to run an X-acto knife blade along the edges of painted car bodies. A third (and some might say crazy option) that I’ve been doing is to mask off the stainless trim areas I want to paint, airbrush a base of gloss enamel and, once dry/ hard, airbrush a metalizer such as Alclad chrome or polished aluminum. For my skill level, this method works the best but, like Molotow, is fragile and should not be touched. Photos below are for a Moebius ‘54 Hudson coupe I built last year. I clear coat my car bodies with Tamiya TS-13 before hand and use the green Frog Tspe to avoid tape reacting with the paint. I’ve had problems with all other masking tapes including Tamiya. Hope this helps. Try one or all ideas on a practice model and aim for whatever is the best combination of “fun” and “good enough”!6 points
-
Paint on, touch ups and other colours to go6 points
-
Britmodeller is not the place to put any issues anyone might feel to IPMS, take this up with them direct, you will find them open and receptive to ideas to take the hobby forward. You have to feel for the original poster who just wanted to say thanks. Julien6 points
-
A bit further down the Pom-Pom production line: More soon Crisp6 points
-
Hello friends, these weeks were so snowy, it’s a classic winter: Some progress occurred on the glazing and the fit of these parts was excellent: Also I installed the left engine cover (such a great fit, too): All the landing gear parts were glued (except the wiring on MLG struts) before painting - the model becomes heavy and I’ve never trusted the paint-to-paint joints: An operator’s window is closed, too (It looks great and we’ll see everything through it, as J.M. (@IPMS19) noticed)): The wings were assembled (except some small bits) and I think it’s time for the masking. Stay tuned! 🐈6 points
-
On BM on thread on Il-4 in 1/72 You may find this: and info on preparation of Il-4 kit by Mars Model. This is a great news for all who do WW2 VVS models in 1/72 Regards J-W5 points
-
Hello, my modeler friends! Now that I have finished this long task at last. A vintage Soviet WW2 Bomber Tupolev Tu-2S in 1/48 Scale from a Chinese company called Xuntong Models. I have never heard of this company until I found this kit and bought it. I think this is quite a young company and has only got a handful of aircraft model kits. The Tu-2 is the medium high-speed bomber of the Soviets during the WW2 and had large internal bomb bay. It can also be used as a torpedo bomber and can even match the speed of some single-engined fighters. It played a major role in the final offensive of the Red Army. The build I experienced is a bit challenging and complicated. Includes many details but they are not crisp like the Eduard's Pe-2 or the Dragon's Bf-110 that I built before. I used many PE parts and scratch upgrades. The major modifications are_ riveting the entire aircraft, cutting out the plastic part and installing the PE Landing Flaps, PE and scratch-detailed engines, scratch detailed seat belts and bomb bay. These are my first to experience this much modification of the original plastic kit. So, of course made some mistakes. But at last, although not perfect, it seems beautiful and I feel satisfied. Hope you guys like it. Happy Modeling!5 points
-
Ok Ive been trying to figure out a second build to enter, did want a jet but nothing Ive got will work. Originally was going to finish a N.F.Meteor but turns out its a 14 not the 13 I would need. So Ive got this a 1/72 Hasegawa Wildcat, I will be building a Martlet III of 805 Sq. F.A.A. Mersa Matruh Egypt August 1941. These were originally bound for Greece but Greece fell before they arrived. So were sent to Egypt. Initially in the overall grey USN colors but I will be adding the Mid-Stone upper camouflage to mine. My research says that they never wire dark earth, I presume the decals are wrong. Later they were repainted in the standard F.A.A. T.S.S.. Here are the obligatory sprue shots. Please feel free to ask questions, post comments or add thoughts. Dennis5 points
-
Hiya Folks, Yes I`ve built yet another Airfix Spit Mk.Vc,..... this time representing BR187M G-2 of 603 Sqn which took off from USS Wasp on 20th April 1942 as part of Op Calendar. Like many of the Calendar Spitfire`s this aircraft did not last long as it was crash landed by Sgt J.W. Connell of 601 Sqn on 4th May 1942 and written off on the 6th,...... but during this short time it was flown extensively and was used by Flt. Lt. William Douglas to damage a Bf109 on the 3rd May. After delivery to RAF Abbotsinch in Dark Earth and Dark Green with Sky Blue undersides,.... the camouflage was converted on the airfield by covering the Dark Green sections with Middle Stone, the wing tips were removed and the aircraft transported to Glasgow docks to be loaded aboard the USS Wasp. While sailing for the Med the Spitfire`s below decks were repainted again on the upper surfaces because a blue-grey colour for flying above the blue Mediterranean waters surrounding Malta was preferable to bright desert colours and according to veterans who were aboard the carrier the paint used was the standard US Navy Blue Grey. As the paint teams made their way along the deck (which the US captain stipulated should remain spotlessly clean!) they began to run out of paint and so thinners and also black were added to eke it out,..... so those painted last were quite different to those at the start of the line! Here is a Spitfire Mk.Vb after being tropicalised in the UK, wearing Dark Earth, Dark Green uppers and Sky Blue undersides,.... the same colours applied to Hurricane`s being tropicalised and sent abroad in 1941 and early 1942; Here are Spitfire`s being loaded aboard the USS Wasp in Glasgow, wearing their fresh desert colours after the Temperate Land Scheme was modified at Abbotsinch,..... a few veterans mention a tent being used as a makeshift spray booth into which the Spitfire was wheeled as soon as it landed,..... others that work was also carried out in a hangar; And being stowed away on the hangar deck; Ready for take off,.... now wearing their new Blue Grey colours applied below deck; Note the US Navy Wildcat in the background wearing its own more faded Blue Grey scheme and that the Spitfire serial appears on a rectangle of the underlying desert scheme; Here is a film still of BR187, G-2,.... the model subject,..... on Malta. Other photo` s can be found on page 29 of Steve Nichols excellent Osprey `Malta Aces[ book (Aces 83) and one shows that the outer cannons were later removed, leaving the inner cannons in place,..... although some Spit`s did fly in action with all four cannons fitted; A four cannon equipped Spitfire Mk.Vc inside a Maltese fighter pen; The Model; For this Airfix Spit Vc (my 5th) I elected to represent BR187 still fitted with its 4 gun armament, as provided in the kit,.....but I modified the kit sliding canopy section by sanding the lower edges to make it look more accurate, the spinner was reprofiled to a more sharper shape and a set of wheels left over from an old Tamiya Spit were fitted as the hubs were more accurate looking, with a bit of old etched brass frame cut down to replicate a rear view mirror, which is sadly lacking from the kit. It was painted using old bottles of Aeromaster US Navy Blue Grey (as applied to the USS Wasp`s carrier group including the Wildcat`s which sailed with the 52 Spitfire`s) and Sky Blue was represented using Finnish Light Grey...... the model was brush painted as usual. And here it is with another Airfix Spit Vc wearing 79 Sqn RAAF colours which was built alongside this one; Cheers Tony5 points
-
Thought some of you might enjoy this olde plastic. I'm sure most of you have seen or built this kit from 1967 or so. Mine came to me in a baggy missing the stand and with 2 sets of unusable decals. Although much maligned for being inaccurate, it really is not that far off from drawings and it doesn't seem THAT bad... I wanted to recreate this moment when F/O Collier became the first known pilot to down a V-1 Buzz bomb by tipping it over using his own wing. I had no base with the kit so came up with my own. I roughed in the positions of the two a/c and then finished them up. I have no access to an airbrush so the spitfire was done with spray bomb. The V-1 did get airbrushed during a brief couple of hours in Connecticut. I inked in the panel lines on both a/c with a fine pen. I added a pilot from the Revell set, cut and turned his head, sanded and reshaped the nasty FROG canopy and vac-formed my own. All markings are from aftermarket generic sheets of roundels and RAF code letters. The serial numbers are press-type on clear decal. I thought about staining the wood base but decided not to. I printed a photo of the English countryside from the web and spray mounted that down instead. The flame I made from clear stretched sprue painted in different colors. I'm pleased with how this turned out and glad I didn't have a base with the kit. There is still much life to be had in old kits.5 points
-
Hi, everybody! It's my next bomber.5 points
-
I had a little mishap with a router bit on a Deremel, anyway the hole in the bonnet has been filled and diguised with a rather large decal. The rear subframe has come in for a nip and tuck to allow the wheels to be centralised in the arches. It looks like the inside of the screen needs a clean too before the other glazing gets fitted.5 points
-
Meteor F.8 324 Sqn, Royal Netherlands Air Force, Leeuwarden 1954 Xtrakit 1/72 with Dutch Decals. Wing roundels were from the Revell Hunter F.6 kit Xtracolour High Speed Silver paint + Klear coats A companion to the Dutch F.4 which was finished years ago (Frog kit):5 points
-
OLIVE55 (RC-135V 53-9792) tracking out of Mildenhall at FL300+ to Seaford just now5 points
-
Annnnnd Done! Just shy of 20 hours on the bench since Friday. As I said at the start of this thread this kit was built more as a side project and reference for building a folded Serian being removed from the hanger so it is strictly out of box with a focus on the finish. This means no railings, ech ladders, gun sights etc. Just a shake and bake build. I may break down and add railings to at least the antiaircraft gun decks later if I can find a nice cheap set of generic rails. Will post up a bunch of pics in the Ready For Inspection section but here are some teasers for now. Dull coat tones down all those black blotches nicely. Built it with crane up but it blocked the area I wanted to see the most so stowed it. That's all you get tonight!5 points
-
North American B-25C-NA Mitchell s/n 41-12860 Combat number "19" of 81st Bomb Squadron, 12th Bomb Group "The Earthquakers", 57th Bomb Wing, 9th Air Force Predecing November 1942 part of US Army Middle East Air Force (USAMEAF) Later to be named "Desert Warrior", decorated and participating in a War Bond tour in the US I call her the "Desert Tailsitter" - ignored all the instructions to add weight in her nose... Build depicts her early in-combat appearance late 1942 in Egypt and Libya, e.g. engine cowlings and exhausts are of the original type (well done Airfix to include them in the kit) Links to marvelous period colour USAAF film material of the 12th BG can be found in this GB's Reference thread Excellent Airfix kit A06015 that I can´t recommend enough, get your self at least one and build it! Build thread here No aftermarket plastic parts used/needed, Eduard mask set CX507 of course and decals needed some help in backdating the appearance from the War Bond tour to North Africa Under wing insignia came from MPM A-20B, four identical fin flashes from Blackbird Models Operation Torch Pt.1 All brush painted using mostly Humbrol and some Revell enamel paints (upper surface colour Humbrol #61 Flesh) *better pics to be added/edited when they are taken* but it's now finished . V-P5 points
-
FROG Lockheed PV-1 Ventura G.R.V For anybody who is interested in the history of FROG models I cannot recommend this book highly enough. This is my copy and I have looked up the Ventura kit inside it and what the authors say is that there were 200 mouldings of the kit made in 1977. They also say that there were 40,000 boxes printed !!!! and thousands of transfers sheets printed too. I have found this photo of the intended box top courtesy of oldmodelkits.com The reverse side of the box showing the FROG colour painting guide courtesy of The Unofficial Airfix Modellers Forum.5 points
-
Have been wanting to build the Hobbyboss 1/48th Vought A-7K Corsair (nicknamed the 'Twosair') for some time now, completed this morning. She is marked as A-7K 81-0077 operated by the 124th TFS / 132nd TFW, Iowa ANG out of Des Moines IAP, Iowa, May 1988. A-7K 004 by Ghostbase, on Flickr Model - built OOB. Paints - Vallejo Model Air for main grey colours (airbrushed), Vallejo Model Color for detail colours except Tamiya XF-4 for zinc chromate. White applied by Rust-Oleum surface primer spraycan. Decals - mixture of kit decals and Speed Hunter Graphics 48-008 'USAF SLUFs'. Armament streamers - from leftover Monogram F-15A kit decals. Finish - Humbrol Acrylic Varnish Satin 135. A-7K 003 by Ghostbase, on Flickr The kit went together very well indeed, no problems at all, the wings fitted so well I was able to cement them to the completed fuselage as the final part of the build and there is almost no sign of any join. A-7K 007 by Ghostbase, on Flickr The weapons are also sourced from the kit complete with comprehensive decals, I have to say I was impressed with them. They are an ALQ-119 pod, a GBU-10, a 'LANA' FLIR pod, and three AGM-65 Mavericks. I don't claim that the arrangement of these on the pylons is anything other than my imagination! A-7K 006 by Ghostbase, on Flickr A-7K 001 by Ghostbase, on Flickr A bit more about the paint scheme. I have had a huge amount of problems learning how to apply acrylic paints though an airbrush but this one came through for me, thanks partly to using Vallejo Retarder Medium. I also used Vallejo Liquid Mask to draw the borders between the two greys and it worked really well. The only problem was that it cost me three brushes! My main puzzle is the contrast between the FS26270 and FS26118 greys which is not that great on my A-7K whereas in 'real life' they seem to be more marked; a good example was A-7D 'Scrappy' which was on display at the 1989 Mildenhall Air Fete. A-7K 009 by Ghostbase, on Flickr What would I do differently next time? The cockpit of this model could be so much better! That isn't a criticism of the kit, a year ago I would be happy with this, but now at the very minimum I would purchase a couple of resin ESCAPAC ejection seats, then maybe a cockpit detail set to replace those decals (one disintegrated and I had to improvise!). Am I developing AMS syndrome? 😉 A-7K 002 by Ghostbase, on Flickr Anyway, I am very happy with this build. My problem is that I want to be a perfectionist but my attention span doesn't stretch that far and I have already started my next project. I look at these photos and think "You could have done better on that detail" or whatever but I had got into just-get-it-done itis as I always do. Such is life. Michael A-7K 008 by Ghostbase, on Flickr4 points
-
Another variant announced - ref. 144xx - Myasishchev 3MD "Bison-C": https://www.facebook.com/mikro.mir.dnepr/posts/3977643078980065 V.P.4 points
-
Well, so far, so good :). I managed to cram weights in just about every place. My crude test of balancing the dry-assembled fuselage on a biro at the mainwheel fulcrum point seems to show it is okay. 🤞I then glued the jet pipe in place and used minimal cement to hold the cockpit. All seemed okay alignment-wise. I then chose to cement the cannon bay cover in place on the port side. The reason being that it seems to sit slightly under the level of the fuselage, giving a pronounced lips. Doing it at this stage means that there is plenty of room to manipulate it and get it as flush as possible. Dry fitting the two fuselage halves seems to show that everything is coming together okay. The only slight reservation is about the fit of the upper fuselage around the rear of the cockpit aperture. I think the tight engineering and production of this kit doesn't allow for much paint on the joints. I think that somewhere - not yet discovered - there is a minute excess somewhere. I'll keep looking. The side you see below does not have the cannon cover cemented yet and, therefore, you can see a slight lip. I dont want to count my chickens just yet but I am feeling much bettter about this Airfix kit now. I think it is okay but needs careful handling. Note to self and a lesson learned!!!!! Once these parts have cured I will get the lower fuselage glazing in place, for which I have painted the internal surround black, and then close up the fuselage. That's it for today. I can start my weekend feeling much better about this Martin4 points
-
Day fighter Scheme introduced in August 1941, so Ocean Grey/Dark Green over yellow undersides seems most likely, the photos show the usual reasonably high contrast of the uppers consistent with this. "The nearly complete Martin-Baker MB3 in the summer of 1942 at Martin-Baker’s factory in Denham. The aircraft is not painted, and its six 20 mm cannons are installed. The cannons were removed before flight testing." this shows the yellow underside, compare gear door to circle P Both from https://oldmachinepress.com/2016/06/11/martin-baker-mb3-fighter/ HTH4 points
-
I am in two minds if I should even put this up, but hey ho. My first attempt at a 1/350 kit and I thought 1/72 photoetch was small. This is a resin kit and is so exquisitely cast. I started this last year but managed to lose one of the front diving planes and so it went into the box until I figured out how to cast another. I actually managed to get most of the photoetch on without bending it but managed to clobber some of it during the painting phase. Painted with Colourcast Enamels and Tamiya bronze for the screws. I've learned a fair bit making this and can only hope the next one will be better. Thanks for looking, Cheers, Alistair4 points
-
Before I part with any money for one of these, I'll wait to read an in depth review, with photos of any errors. So far, what I've read is that there is an issue with the wheels, and it doesn't have the side opening hatch on the RHS. For me, the wheels is the biggest problem, as it will require outlay for a new set of resin AM wheels (more money). The side hatch is disappointing, but that problem exists with the Tamiya offering, and can be overcome with a little bit of scratch building. @AntPhillips Have they made the same mistake that Tamiya made with the engine deck, ie; is it an A/B/C deck, or is it the D deck? For now, the two Tamiya Cromwells that I have in the stash will suffice. One last thing. How much were they charging for them? John.4 points
-
Switching back to the F-86's, the forward windscreens faired in nicely. I sprayed the canopy framing on both Sabres in preparation for doing the natural metal finish. I glued the horizontal stabilizers in place, using a template to ensure the dihedral was correct: The Matchbox Sabre has a couple of large holes at the rear, for over-sized fuel dump pieces. These should have been taken care of much earlier, but better late than never! I filled the holes with sprue gloop and will use better parts from my donor kit for the fuel dumps: While the sprue gloop is hardening, I began work on the minor pieces that will eventually find their way on the Sabres. I felt the slats on the Hobbycraft kit were too thick at the trailing edge, so I used a scraper to create more of a knife edge: I also applied a base coat of paint on the smaller pieces (flaps & slats, landing gear doors, pylons, fuel tanks, etc). Most of these got Alclad medium gloss gray, but I sprayed the fuel tanks and slats with Tamiya XF-1 gloss black. I plan to paint those items with Xtreme Metal polished aluminum (vice plain aluminum for the rest of the plane). If they turn out too shiny, I'll tone them down with the plain aluminum. That's it for tonight. Tomorrow I'll get the gloss gray base coat on the two Sabres, and when that's dry I'll apply the first (of what will likely be many) natural metal finish.4 points
-
Not the best photo, but progress on M1917 number 2, using more parts from SBS to add variety and visual interest. My intention is to display this as if it is experiencing mechanical problems, with the bonnet open. Having experimented with wiring on the Ute, I’ve got some ideas how to improve on this one. Second ICM/Revell 1/35 Ambulance by Jon Gwinnett, on Flickr4 points
-
Over the last couple of days I have added a sort of shelf that is situated in front of the forward ballast tank. Studying the website of the people restoring the real submarine, it would appear that this contains the rudder controls: The control linkage to the rudder is going to fun as even Hunley's restorers are unsure about it as most of the mechanism had completely corroded away. They know it was controlled by a tiller situated at the front of the vessel and they know where the control arm exited the hull and how it operated the rudder. What is unknown is what happened in between or even where the mechanism was situated. Avoiding the heads of the crew and the crank mechanism and avoiding fouling the two conning tower hatches, the control runs had to either run underneath the crew's bench or along the starboard upper quadrant of the hull. You pays your money an takes your choice. As things stand at the moment ,I am erring on the side of under the bench, purely on the grounds that I have worked out how it might have worked in that position. This could all change if further information comes to light during my researches. Turning to less complicated matters, I have built up the brackets that hold up the bench for the crew. These were constructed from .10 x .80 'thou plastic strip and are now being left for 24 hours to dry thoroughly before they are trimmed and cleaned up. I thought about doing a paint effect for the actual bench but then remembered that I have some wood veneers. So why not replicate wood with, err. wood? Should be a goer in this scale. Accordingly, I cut the shape required for the bench from .20 'thou plastic card, chose the type of wood I wanted and laminated it to the plastic core. I will give it a coat of gloss varnish before ir is finally glued in place. I am beginning to realise that this is likely to a long build as it is going to be, model a bit, go away and have a long hard think/research the next problem, do a bit more until another hurdle is reached, think/research again etc. Still I thrive on this sort of challenge and we will see how far I get. Thanks for looking. Martian 👽4 points
-
Well time moves on slowly ('til you look and see it's been over a month already) as does fitting sponsons to The Queen Firstly the lengths of the struts had to be determined then new struts sourced to replace the slightly too short ones from the Airfix kit. I took a length of tube and flattened it in my bench vise and slid a drop of Tamiya Green Top inside whilst squeezing The Aeroclub struts are actually too streamlined for this application so a new approach was called for, I didnt fancy filing off the leading/trailing edge aerofoil sections just for three inches of strut. Then I found the best pair of cast sponsons from my selection of assorted pre-moulded ones that I copied when Colin sent me his collection of components for this build, I copied them because another S-61N has been on the horizon for me for a while and I was going to need spares. Flash has flooded the picture but it shows the progress I made. Until yesterday afternoon when I had to address the elephant in the room. They are actually too small. Alan drew some very good plans when he posted this article in Airfix Magazine in September 1971 and as I have believed his dimensions for the build I cannot ignore the dimensions for the sponsons. Of course this effect is magnified when the sponson is fitted with its characteristic tilt So Milliput dashes in to the rescue. One of the 'best' sponsons had its flot gear removed making it symmetrical and undercart bay void underneath filled in. The first layers of Milli were put on yesterday afternoon and after filing to basic shape the second, defining layer added this morning Sitting safely atop my box of nose weights above a layer of polythene it now sits awaiting final filing and sanding to shape. When done I intend to use the sponson as a vac-form buck. I expect this to be useable tomorrow. Adieu mes braves.4 points


.thumb.jpg.8fbcede0fd5bebb48d11cbc790a8a178.jpg)

.thumb.jpg.0bac681e0da8e4ed7557610e98fda908.jpg)


This leaderboard is set to London/GMT+01:00