
Leaderboard


Popular Content
Showing content with the highest reputation on 14/02/21 in all areas
-
Hi, here some pictures of my 1:48 Kinetic F/A-18C. Used Syhart Decals, Eduard PE`s and Quinta Studio 3D decals for the cockpit details.34 points
-
Hi all; Here's the latest off the bench, an Eduard 1/48 Hellcat. The WIP thread can be found here: This was an enjoyable project from both a modelling and an historical aspect. The kit was very easy to build and the journey into knowing the unit to which the reference aircraft belonged was much more interesting than I anticipated when I began. The WIP describes both journeys quite thoroughly but in short, construction was very easy and the fit good enough that I did the final assembly of wings and stabilisers to fuselage after completing all decals, paint and weathering. There were one two problems, the worst of which was Eduard's incorrect decal placement guide meaning that the stencils were a real pain in the rear - the instructions' decal ID's and the decal sheet's ID's were mismatched. Everything else though was self-imposed which is more or less par for the course for me. Here's the pics; Thanks for looking. Cheers; Mark.33 points
-
Hi all. I just completed the build of Kinetic's very nice Sea Harrier FA2 kit. I used a cockpit set from Aires, which is not so nice. To be able to wedge it into the fuselage, you need to remove a LOT of plastic and resin. In my opinion too much work for a bit of improvement. Just add a resin seat and maybe some pe parts and you're fine. I painted the model Mr Hobby H335, Medium Se Gray, over Alclad black primer. Weathering was done with Abteilung 502 oilpaints. Thank you for watching. René30 points
-
256 - Saab AJS 37 Viggen The twelfth and - I promise - last build from me in this GB. This individual was the last Viggen at F 10 wing before converting to Gripen (and a few years later, shutdown). The AJS Version was a converted AJ 37 that also could be used for recce purposes (S=spaning=reconnaissance), while waiting to be replaced by the JAS 39 Gripen. The colour of SwAF first divisions is red, so the last one was painted in this colour. This aircraft is todady preserved at Stenbäcks Aviation Museum in southern Sweden where it is being restored. The ghost was an old symbol for this division, today it is actually used for other quick vehicles, the Koenigsegg Swedish supecars that are built in a factory in the old F 10 area. Close to that, there i a lovely little aviation museum, also worth visiting. This kit is built almost entirely OOB, and I spent less than 10 hours on it, keeping the raised panel lines that I felt looked good on this one, making it look more than the real thing than recesse one would have done. Additions: - Pavla resin seat - Maestro Models pitot tube - Decals from Hasegawa's "Red Viggen" release. WIP thread:25 points
-
Afternoon all, This is the relatively new Airfix 1/72nd B-25 Mitchell built completely OOB as a mojo-restorer. An absolutely superb little kit, crammed with detail and the fit was excellent - paints were Xtracolour enamels with the kit decals used. Highly recommended to anyone wanting a fun, straightforward build of a model that even in this scale, still has some presence. Best wishes to all, Tom24 points
-
First of 2021 is Finished. Very enjoyable build. An excellent model kit from Kineticmodel - The Harrier GR.3 1/48 scale has an awesome fit, nice details, and its an Icon of the Aviation History. Love to have him on my Collection... Paint job with Ammo and Lifecolor acrylics. The aircraft presented is from RAF 4th Squadron, Home Based at RAF Gütersloh, West Germany, 1992.24 points
-
My Constellation build is as done as it's ever going to be for the GB. Not without its problems, there's a fair chance I'll be refinishing it at a later date. It's a three footer due to a few boo boo's that can't really be fixed to allow close up shots. The decals especially won't stand close examination. Pictures were taken on an A1 sized baseboard and it wasn't big enough! Runway edges have been added in photoshop to fill the frames where necessary. Natural daylight used. Build thread here... .22 points
-
This was built as what everyone keeps referring to as a 'mojo restorer'. I did infact find it a lovely kit to work with. It almost fell together. And enjoyed every minute of it. I did also get cracking with some stalled projects. (I'll update those threads soon) So I guess it worked. This is all killer, no filler, first time using an airbrush to make the motteling, next time I think less is more. Scratch built a cockpit. It was at this point I decided to try the 58 years young decals. And they worked! Brush painted canopy with a sore neck under the kitchen lights. Thanks for looking. I'll be updating some stalled threads soon. And a project I've been working on in the background soon. 🐧21 points
-
This will be my 6th and final Gallery entry into this Epic Group Build, the Bücker Bü133 Jungmeister. Thanks to Steve aka @fightersweep for daring me to do an extra build, I thought 5 completed builds and co-hosting this GB with Wez, Heather Dave and Jeroen, was sufficient, but apparently not ! As I haven't built a biplane in years and want people to build more of them, myself included I decided to have a go at rigging it. Fortunately Heller are kind enough to supply all the holes so the rest is up to you, as this one has turned ok out, I would say there is hope for all of us ! Completed pictures below, I hope you like them cheers Pat Work in progress below21 points
-
Hello mates This is my last work, the beautiful CSM Lanchester 4x2 Armoured Car, Royal Navy Armoured Car Division, Galicia 1917. I used CSM kit with homemade brass fenders and accessories from ICM and spare box Painted with Tamiya colors and weathered with Maimeri oils. Comments and suggestions will be highly appreciated.20 points
-
Hi all, here are a few photos of my Nieuport Delage 622. I love these sesquiplanes, but they can be a real challenge to build, unless you have more than two hands! This one was such a challenge and it stumped me for a while, not real sure how to go about getting everything lined up without smashing these fragile legs. Anyway, it gave me great pleasure and I re-learnt things about varnish and aluminium paint that I had forgotten (it was very close to ruin the model...) In all modesty, the French were pretty good at designing nice-looking planes!!! Thank you for your support all along this build. Keep having fun. JR20 points
-
A Dewoitine 510, old old boxing. Beautiful kit, decals were shot and my last 24 hours of the build were as close as I’ve got to binning a kit in the past decade (build thread here). However, all is now forgiven: And a group pic of my four French fighters for this GB: The Vampire was hiding when I was rounding this lot up... For me, this has been the Travelling Wilburys of group builds - thanks for such an educational and fun time in good company! Thanks for looking, Adrian20 points
-
AMX13/75 Echelle 1/35 #784 First of all I like the Heller group build organisers for their positive influence in this build and I also had a lot of joy and inspiration from all of the other builds posted here .. It surely shows that with a little effort you can make almost every Heller kit in a reasonable accurate representation of the real thing! The green old 70’s plastic still works well and don’t become brittle.... This tank was on the list to be sold but than this group build came along and I decided to build this one as a tribute to these nice petite little kits Heller once proudly produced! And after 45 years in the box everything still was as advertised... a true 45 year old virgin as if age didn’t affected it at all as even the decals worked well. This tank is a very nice one and builds into a fine example of a 75 mm AMX13 , it was a very diverse tank as they build it in many variations like the howitzers , ambulance tanks and troopcarriers and even a 105 mm version tank! The only aftermarket addition are the tracks as I really don’t like the rubbery ones as they are a pain to paint and difficult to be placed in such a way that it looks real... The turret mantle is made from scratch and with my own added details and tracks this is almost a 500 parts build which you don’t expect it to be.. The hammer and other tools are on the tank are also in the hull color as this is pretty common as wel.. Weathering is not too heavy as I really don’t like that all , I just added a grey wash and some brown pastel powder. I really had some fun with it and it isn’t perfect but i am still quite happy with the result ... build report here! cheers, Jan20 points
-
HELLER #1 . La premiere maquette originale du Heller au 1957..... La Belle Caravelle! French national pride was up to the Max with the introduction of the SE210 Caravelle jet Airliner. Developed by Sud Este Aviation, the 1st prototype F-WHHH took off in April 1955. From what I can see, this airframe didn't have the big, familiar spine /fin extension we associate with the Caravelle. It was over a year later that the 2nd prototype took to the skies. Several mods had been made and the o-so-typical spine extension was one of them. In that time, Sud Este had merged with Sud-Oeste to become Sud Aviation, but the original SE 210 type no. was always kept. The kit was in the shops in 1957, totally contemporary with these first Airliners. And bearing in mind that it's Heller's very first plastic kit, they must have really moved heaven and earth to achieve the model launch! I should point out, for the sake of the health of those collectors among us, this is not a 1957 original that I've glued together. Heller reissued the kit in probably 2007 for a 50th anniversary and this is an "Exact reproduction in a numbered limited edition, of the first HELLER box produced in 1957" The instructions and decals were also a faithful facsimile of the original, with all the nutty quirks. I've opted for the 2nd prototype aircraft F-BHHI, making use of the kit decals and alternatives as required. Flaps extended and perched on a clear styrene pole, she sweeps gracefully in to land, tyres about to squeal. Due to the pedigree of the kit, for all it's oddities and oldness, it gave me a real sense of connection with the real history of the plane and the time. If I get some better pictures before locking, I ,will swap some of these out for better, but I wouldn't want to miss the line with this one. The build thread is here,20 points
-
Belgian Air Force CF-100 Mk 5 Canuck Kit: Hobbycraft CF-100 All-Weather Fighter (HC1391) Scale: 1/72 Aftermarket: Modeldecal decals and Iroquois Models seats Paints: Hataka Red Line and Vallejo Model Air and Vallejo Metal Color Weathering: Flory Models Wash, Tamiya & MiG weathering products Not a bad kit at all of this little bit more obscure plane. Quite simple cockpit and wheel details but other than that looks like a nice and detailed kit. Added wing extensions from plasticard, the version in the box is Mk.4 and Belgians used Mk.V with the extended wings. Main camo painted with Hataka Red Line acrylics, my first proper paintjob with Hataka paints. Built for Interceptors GB Build thread:18 points
-
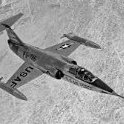
When I was in 6th grade, we were divided into two classes, one all boys and the other all girls. Our boy's class teacher really wanted to be a commercial pilot and wherever he could, he worked flying into our classes. About halfway through the year, he gave us an assignment: build a model airplane, bring it to class, and it would be hung from the ceiling above each of our desks for the rest of the year. I'd never built a model before, never thought of such a thing, in fact. But my mom went shopping the next day and brought home a Lindberg F6F for my homework. I loved that little model. And I was so proud of it hanging up there among the other 30 or so planes and helicopters. It's long since disappeared but when I was building the amazing Eduard 1/72 kit, I thought about that first model a lot, My original kit was a bit smaller than 1/72, but that little kit is shockingly expensive, so I picked up a 1/72 Lindberg kit and drafted markings and printed decals to match the original. This is an oddball build for me, an almost straight-out-of-box assembly of a super-simple kit, tho' this time around I did paint it. This kit came with no missiles, so they came from the Eduard kit, as those were (needlessly) replaced by the Brassin missiles. No filler, and the barest minimum of sanding seams. It could have used a couple coats of clear to blend the decal edges but I'm pretty sure the original build had decal edges, too. The decals match the original, except that I couldn't abide the red bar on the insignia, so I didn't add that. And this time around, they're straight. And you know, I'm fonder of this model than any I've built in years. I don't think I'm going to hang it from the ceiling, or play with it in the driveway, but I'm going to put it somewhere where it's always close. To first models! And to first modellers everywhere!!17 points
-
Here are my latest completed models, Firstly the Su-17 ("P") 1949 https://en.wikipedia.org/wiki/Sukhoi_Su-17_(1949). This is the A&A Models kit finished with Vallejo Metal Color paints namely aluminium and duraluminium. The pitot on the wing was replaced with aluminium tubing. The undercarriage is very delicate and fragile because of the way it is fixed together. This has been sitting on my Shelf of Doom, so glad l have completed it. Next is the Eduard MiG-15, the Weekend edition. Not much to say about the Eduard kit other than it is the best MiG-15 in 1/72. This one helped me to complete the one above. Finished with Vallejo Metal Color and added a FOD guard on the nose intake to cover the extra weight needed to keep it from being a tail sitter. Thanks for looking. Regards Robert17 points
-
Hello Friends This is my just completed Zvezda 1/48 Mi-24 Hind - finished as a Hind W of the Polish Air Force Circa 2002. I've been working on this kit since it landed on my bench. The fit is very good but the detail is quite basic. I used a fair chunk of aftermarket bits and pieces. -Montex Decals -Quinta Studios 3d cockpit decals -Eduard exterior photo etch -Eduard Brassin Resin UB-32 Rocket Pods -Eduard Brasssin resin Wheels -Eduard mask set -Master metal DUAS air probe and nose gun barrels I also added all the rivets and fasteners in a recessed style with my riveting tools, added some lines to the main rotor head from lead wire. Also repositioned some of the items like the flare and the ECM antenna to under the cockpit. Paints are lacquers from the SMS / MRP & Mr Colour ranges. Here's some pics , I hope you like her. That's all for now, I hope you like her. Thanks for looking.16 points
-
Picked this up as a way of getting back to the bench after a long dry period in 2020. Brush painted with Tamiya Acrylics, finished with a brush painted coat of floor polish. Base is an old piece of scrap wood (I think it was from an old chopping board that split) with a couple of coatings of decking oil. Build thread (limited that it is) can be found here. thanks for looking.15 points
-
Hi Guys- I just finished this moments ago and shared the fresh on the workbench finish photos. This is the excellent Zvezda La-5FN kit. It has alot of great engine and gun detail, but I buttoned this model up. The Seat is a Resin La5FN Seat with molded harness, the Decals are excellent Foxbot and really are unique with the black panther. I love the Art on the Russian planes and they make unique additions to the display shelf. The La5FN had lots of wood and so not many panel lines to highlight. I liked how this came out and this is 2 of 4 of my planned Russian build. Thanks for the help on these Russian planes from many of you on this forum...15 points
-
I just stumpled over these old pictures. The model was built soon after release way back in 2006. The pitot is made from injection needles.Colors are Schmincke AeroColor (self mixed).A word about the camo. The Berlin Gatow Museum keeps some original He 162 parts (parts from the rudder, ailerons and more). These are CLEARLY RLM 71 Dunkelgrün. Some details would be solved different today like dampers/oleos on the landing gear legs or the detoriation on the front wheel which is movable.... Andreas Beck14 points
-
Heller Mirage IIIB (High Tech boxing) 1/48 Israeli Airforce ~ 1967 119 Bat Squadron Armycast decals with some parts stolen from elsewhere! WIP: cheers, was great fun! thanks 🇫🇷 🇮🇱13 points
-
The Vickers Wellesley is a striking aeroplane. Its unique appearance arrests the eye. Ungainly as its fuselage may seem, the Wellesley's great spread of wing lends its appearance the air of a sailing bird. A novel construction method which achieved great strength with light weight allowed that wide span, which enabled the Wellesley to carry a similar load of bombs to that of its twin-engined contemporary, the original Whitley with its two Tiger radials, and to do so at higher speed with a quicker rate of climb. Accounts of the Wellesley often emphasize its being predecessor to the famously successful twin-engine Wellington (which was constructed in the same novel manner as the Wellesley). Frequently they include some detail on the Long Range Development Flight's achievements during 1938 with modified Wellesleys (quite impressive achievements, too), and treat the Wellesley's wartime use in the Ethiopian campaigns (both picturesque and valuable) as the one notable passage of its service career. How prominently the Wellesley featured in the opening stages of 'Scheme F', the 1936 Air Ministry program for expanding and re-equipping the Royal Air Force (during which Bomber Command itself was formed), gets little mention. Vickers began work towards the prototype which became the Wellesley in the spring of 1932. The monoplane was built in tandem with a biplane prototype Vickers was building to an Air Ministry contract, intended to meet a recent specification for a new 'general purpose' aeroplane. The rear fuselage of the biplane, and the entire structure of the monoplane, was built of curved aluminum formers arranged in a basket-weave on geodetic lines, a form of construction pioneered by the legendary Barnes Wallis, who had employed it in building an airship, and now had set himself to adapt the technique to aeroplane design. The monoplane prototype first flew in June of 1935, shortly after Vickers had received a production contract for 150 of its new 'general purpose' biplanes. The monoplane's superiority was immediately evident. Using the same engine as the production biplane would use, the monoplane was some thirty percent faster, carried a greater load, and flew better at high altitudes. Throughout the summer Vickers lobbied the Air Ministry to purchase the monoplane instead of the biplane, and in September, the contract for 150 biplanes was changed to one for 96 monoplanes. Vickers faced challenges in fulfilling this contract. The formers with which the prototype Wallis monoplane was constructed had been bent to shape on rudimentary hand-operated machinery, quite inadequate for mass production. The Air Ministry deemed unsuitable for future service use not only the open cockpits provided for the monoplane's crew of two, but also its manually retracted landing gear. While Vickers designed and constructed the powered machinery needed to manufacture the aeroplane in quantity, the existing prototype was fitted out with enclosed accommodation for both pilot and wireless operator, and a hydraulic system for the undercarriage was installed. As Wallis thought it ill-advised to put a gap in his geodetic structures, a streamlined pannier was slung under each wing to carry bombs. In July of 1936, this production standard Wellesley prototype was exhibited to King Edward VIII, along with examples of other new types, in a well publicized event meant to herald what great improvements were coming for England's air power. The Wellesley's entry onto squadron service with No. 76 Squadron was attended by some fanfare. 76 Squadron was an expansion unit, formed from B Flight of 7 Squadron. At the formal establishment of No. 76 on April 12, 1937, a photographer from Vickers recorded the new unit's aircrew lined up before their new modern bombers. Later that year, when the newly coronated King George VI toured aircraft factories for a newsreel, so the public could see that building a larger, fully modern Royal Air Force was solidly underway, the monarch's inspection of Vickers' production line for the Wellesley featured prominently. By year's end, three newly formed squadrons (76, 77, and 148) as well as two standing squadrons (35 and 207) were equipped with the Wellesley, giving it a presence in Bomber Command equal to that of the Blenheim twin-engine bomber, which had entered squadron service shortly before the Wellesley. This parity did not persist. The Wellesley proved to be a poor fit with Bomber Command. When Wellesley production began, the aeroplane had been able to carry a heavy bomber's load at a light bomber's speed. But the twin-engined Blenheim was faster, and so was the new single-engined Fairey Battle. Improvements to the Whitley heavy bomber were increasing the weight of bombs it could carry past what the Wellesley could. Further, three crew members were really required for Bomber Command operations, and since the Wellesley as produced had accommodation for only for a pilot and a wireless operator/gunner, a station had to be improvised in the fuselage between the cockpits for the necessary navigator/bomb-aimer. With Vickers beginning production of the twin-engined Wellington as 1937 drew to a close, it was decided to retire the Wellesley from Bomber Command, and employ it instead in the Near East and East Africa. Between March and November of 1938, four Bomber Command squadrons relinquished their Wellesleys, recieving instead Whitleys or Battles or, in one case, biplane Heyford heavy bombers (this latter as a stop-gap pending arrival of Wellingtons). No. 76 Squadron, the first to be equipped with the Wellesley, carried on with them till April, 1939, when the unit received twin-engine Handley-Page Hampden bombers. RAF units overseas on colonial stations were at the start of 1938 almost exclusively equipped with biplanes. Biplane 'general purpose' types like the older Vickers Vincent and Fairey Gordon were still adequate for the 'Air Control' policing duties which had been the principal business of the RAF since the Great War. They were, however, quite unsuited for operations against a major power's air arm. With Italy established now not just in Libya but Abyssinia as well, the Wellesley represented (as events were to prove) a great increase in the military effectiveness of the RAF in the Near East and East Africa. At the end of November, 1938, 45 Squadron at Helwan in Egypt began exchanging its biplane Vickers Vincents for the new monoplane. 14 Squadron at Amman in Trans-Jordan, equipped with Fairey Gordon biplanes, began receiving Wellesleys early in 1939, while engaged in operations against the Arab Revolt in Mandatory Palestine. By April No. 14 Sqdn was fully equipped with the monoplane. In June, 223 Squadron at Nairobi in Kenya began replacing its Vincents with Wellesleys, and 47 Squadron at Khartoum in the Sudan began to add Wellesleys to its collection of Vincents and Gordons. This last unit received reconditioned Wellesleys retired from Bomber Command, the others received new machines from a second production run of 80 aircraft. During the summer of 1939, No. 45 Squadron re-equipped with Blenheims but the other three squadrons continued operating Wellesleys, frequently in widely detached flights, on 'Air Control' policing duties. 223 Sqdn joined 47 Sqdn in the Sudan, while 14 Sqdn operated in Egypt, over the Nile Delta and the frontier with Libya. Shortly before war with Italy commenced, this latter unit joined the others in the Sudan, to create an aerial striking force that was, by local standards, quite powerful, and would prove extremely useful in the campaigns which defeated Italian forces in Ethiopia. This model represents Wellesley K7718, as it appeared in service with the newly-established No. 76 Squadron in April, 1937. This machine was the sixth Wellesley built, and the fourth to be delivered to an operational unit. It was received before 76 Sqdn was formally established, and so for a space was, on paper, carried as being on charge of B Flight in No. 7 Sqdn. Wellesley K7718 was subsequently employed by 148 Sqdn, from which unit it was retired in November, 1938, when No. 148 went over to twin engine biplane Heyfords in preparation for Wellingtons. When war commenced with Nazi Germany, Wellesley K7718 was part of a shipment of five Wellesleys being dispatched to Egypt aboard the S.S. Rio Clara. The vessel was sunk in the Bay of Biscay on September 6, 1939, by a U-boat. The model is built from the old Matchbox Wellesley in 1/72 scale. As K7718 does not have the bomb panniers fitted in its April 12 photograph, I have omitted them. I made no attempt at detailing in this build, though I did put in the prominent headrest for the pilot. I may have erred by making solid everything behind the pilot --- there may have been an opening there, as there was behind the pilot on the Vincent, for the 'third man' to poke his head up through for some light. I found the Matchbox Wellesley a nice, enjoyable kit. Just about everything fit well, including the joint of the 'service' nose pieces to the fuselage halves. Putting the engine itself on takes a little care. The rear canopy is a poor fit closed, being a hair undersized in consequence of its being able to be set either open or closed. If I had realized this at the start, I would have shimmed in the opening's edges a bit, and saved myself a lot of time and fiddly effort. Kit decals did very well, and it was possible to easily contrive K7718 from the serials of the two possible subjects on the sheet. Wife made the squadron marking decals. The numeral was printed against a background matched to the ModelMaster Dark Green and Dark Earth (cut with Future) that was brushed on for the overall finish, and given a spray of Tamiya matte.12 points
-
Nice to see a project finished from beginning to finish . 1/48 Tamiya F-117 8th FTR squadron The Black Sheep . AftermArket items used was the Royal Resin wheel & Caracal decals . Painted with Mr color paint primer And Tamiya paints. Several different shades of black and Grey mixed was used . I am really happy with this ! Next to finish the 1/48 Meng F-35A 😀 022A71E0-8688-4977-8093-EE863BE865BB by b007scott, on Flickr 637E4CEF-8AC6-4E85-B507-17BF481E423D by b007scott, on Flickr B669F122-188A-4896-AE62-FF1DC015CD14 by b007scott, on Flickr 84E74F7D-80F8-46D3-97DF-A9CDEB4CCDE7 by b007scott, on Flickr DF71B9A8-4618-4F00-B84C-10587D15A8EA by b007scott, on Flickr 57966FD0-A314-437C-9AAC-4727372FFCE0 by b007scott, on Flickr CF6A56D3-AACA-40E1-A91A-0092FA476956 by b007scott, on Flickr AB2DA864-D8CC-4EEF-A00C-A3CC40946F08 by b007scott, on Flickr 4C12B071-AAB8-4E96-A1DD-693FEDF6EE5B by b007scott, on Flickr 572D82E4-1297-457F-AA4C-CF7627694E80 by b007scott, on Flickr 45930507-8E7C-419E-990D-6B54CE7A1E80 by b007scott, on Flickr Brian12 points
-
Hi all, here is my1/72 Airfix Defiant. The target for this model was to try out the stripped paint look. It was done with masking sol and a bit of silver paint after black. I could not produce satisfying results with the hair spray method. The kit was nice except of the turret. The frames were to thick and were sanded down, glass was polished and the frames were just painted on. The canopy in contrast was perfect... The appearance of the wing was improved by riveting. Best wishes12 points
-
P-51D Mustang Tamiya 1:32. As always model straight from the box.12 points
-
Yakovlev Yak-3 No.22 GC 3 Normandie-Niémen Le Bourget, 20 June 1945 Kit and Decals: Heller 250 Build thread: https://www.britmodeller.com/forums/index.php?/topic/235080621-090-bloo-da-ba-dee/ Not quite finished! The exhausts are missing!12 points
-
Les Mureaux 117 No.73 X-071/5 Groupe Aérien D'observation 515 France, 1938 Kit and Decals: Heller 80219 Build thread: https://www.britmodeller.com/forums/index.php?/topic/235080628-095-les-mureaux-117/12 points
-
Morane-Saulnier MS.230 Kit and Decals: Heller 098 Build thread: https://www.britmodeller.com/forums/index.php?/topic/235080627-098-morane-saulnier-ms230/12 points
-
Dewoitine D.510 No.219 R-D49/5, GC 1/8 France, 1938 Kit and Decals: Heller 80219 Build thread: https://www.britmodeller.com/forums/index.php?/topic/235080623-102-dewoitine-d510/12 points
-
SEPECAT Jaguar A No.20 7-HF, EC 1/7 Provence St Dizier, 1976 Kit and Decals: Heller 80263 Build thread: https://www.britmodeller.com/forums/index.php?/topic/235083667-263-french-heavy-metal-part-1-jaguar/12 points
-
Hello folks, In my point of view the “small” Takom's 1/16 Panzer I Ausf. A is an impressive model when finished. Despite its large size, the kit is very simple, has no significant details and unfortunately the model was not planned with an interior in mind…build another one with hundreds of scratch built parts ahead means that I will be completely crazy, , maybe ... maybe ... Highlights: Frontal vision ports and armored glass inserts Armored green glass like in the original vehicle Addition of Aber 1/16 german 1,4 m stabantenna assembly in upright and stowed position More realistic side fenders More realistic tow metal cable Addition of metal chains in the germam smoke candle rack Tools with new clamps and handles Fire extinguisher with additional details Paint: HU67 matt tank grey (base color) - HU94 matt brown yellow (80%) + HU22 white (20%) After the complete application of the weathering effect, the Panzer IA really looks as though it's been through some desert warfare, I think . Pictures of the front plate without the accessories: So, the model complete again: I humbly hope that this work will be able to inspire other modelers...11 points
-
Trumpeter's 1/24th scale Spitfire MkV was an interesting build. Out of the box, there's lots wrong but thankfully Grey Matter provide replacement stabilisers (the kit's are moulded fabric-covered), new exhausts and a new seat (but you have the make the armour plate yourself). I also added a few bits to the engine such as the cowling fasteners, as well as the prominent coolant pipework on the right side of the engine running back from the header tank that's completely missing in the kit. The colours of the decals were well off too, so Techmod came to the rescue here. It's a shame is has so many niggles as it's a kit that goes together really well with no filler needed. Surface details are fairly good, and overall it was a really fun build. I think it probably has the edge over the ancient Airfix kit, but sadly you need to invest a few extra quid if you want an accurate 1/24th Spit. Best wishes to all, Tom11 points
-
Not sure if I ever posted pics of this build I did about 3-4 yerasago. ANyway here it is. Not 100% but enjoyable to do. Nice companion to the Airfix one. Transfers by a company in Poland whose name eludes me now. Very noticeable are the missing underwing roundels. Need to rectify that.11 points
-
279 North American T-28 Fennec. Not quite complete but complete enough to get it in the gallery, this is my first (95%) completed model for decades, build thread is here. Plenty for this old dog to re-learn for his next GB, apologies for the quality of the photos but I'm no photgrapher. Thanks for looking.11 points
-
@TonyW Three more builds would be outstanding! OK people, I'm signing off for now. I've just updated the latest tally, 146 completed which amounts to two thirds of all builds already! Splendid. I'm sure some more will find their way into the gallery in the next couple of hours. Tomorrow, I will start my day with updating the build list for the final time. For those who are still at it, good luck!11 points
-
Dassault Mirage IIIE 2-EH, EC 1/2 Cigognes Nancy-Ochey, 1970 Kit and Decals: Mistercraft E-33 Rebox of Heller 253 Build thread: https://www.britmodeller.com/forums/index.php?/topic/235083710-253-french-heavy-metal-part-3-mirage-iiie/11 points
-
Dassault Mirage F1CT No.260 30-SO, EC 1/30 Alsace Bangui-M'Poko, Central African Republic, 1997 Kit and Decals: Heller 80316 Build thread: https://www.britmodeller.com/forums/index.php?/topic/235083706-258-french-heavy-metal-part-2-mirage-f1/11 points
-
Construction began a few years ago and was completed, with long breaks as usual, in 2020. The willys jepp Academy and the Italeri antitank dodge m-6 were used in 1/72 scale. From figures, I used Revell paratroopers and Hat us tank riders. The inspiration The diorama Elements10 points
-
Hi all, Here is my latest model off the bench, Eduard's 1/48th Mig 21bis. A very nice kit, excellent fit overall with the usual Eduard's stunning surface detail, the only downside I found was that it was slightly complex in places and the instructions were a bit vague. this is partly due to the multiple build options all with slightly differing parts. Painted with Alclads and MRP lacquers, and then an oil wash. The only addition I made was Master pitot tube. Thanks for looking, gazza l10 points
-
A bit of a last minute Banzai rush got another finished here. A long stalled Hawk, my second for the GB, finally got completed with the last couple of jobs done on it less than an hour ago. Here's the model... This shot of the plane still incomplete, sat with five others that did get finished, is what made me get the job done. It was so close at this point, there was no good reason not to complete it!10 points
-
Good afternoon everyone, Here is my recently completed 1/72nd scale Canadair Argus, converted from the Mach 2 Bristol Britannia using the recently-released Aircraft in Miniature conversion set. It was quite a challenging build with the base kit not being the best starting point, but I'm pleased with the end result. Decals came from Belcher and were superb. Regards to all, Rob10 points
-
Thanks you three! Hopefully I can do this fine kit justice. Just today I have gone and added some more framing, as well as one of the kitchen units and the start of one of the bunks. Hopefully tomorrow I can finish and add the other bunk, as well as something of a floor for the rear gunners station. I have 2 photos of the area that I am aiming to match as best as I can. Here is how she looks now: Additionally, work on the top wing and tail has begun. Next up I plan to get started on the bottom wings by cutting out the bomb recesses. That's all for the moment, Tweener10 points
-
evening everyone thank you so much for your kind comments, they really do mean a great deal and inspire me to better myself lets start with some little bits.. I added the coloured raised instrument bezels on the instrument panel in advance of getting the instrument decals at the end of the month.. ..also made up the compass ready for it's dial.. ..and it's bracket & stand.. ..moving onto bigger things, after a long time i had to get the wingtips sorted... I tried litho as seen here as I was struggling to get plastic to comply.. ..in the end this just wasn't suitable - after priming I could clearly see differences in profile and 'look & feel' to the plastic sheet it was next to, plus it marked & dented really easily so back to the drawing board.. ..in the end I tried the same plastic sheet and after redoing the tips at least 5 times, filling some seams at least 20 times, I finally got them done.. ...the gentle fabric effect can't really be seen in the white-out of primer, but it is there.. ..and the bottom faces.. I hope you can't see any seams ..next up the fin and rudder... note the visible tube leading & trailing edges where the fin & rudder meet, also the ribbing effect & rib stitching and the hole in the fin where the stabiliser bracing wires go, so quite a lot to try and capture.. ..I made up the core from card, added a brass hex trailing edge as there seem to be formers giving rise to this shape - here it can be seen with the prepared skin ready to attach. The skin has been lined with a ballpoint, and marked out to set out embossed rib stitching... ..there are also hinge points with tiny holes for pins (2 on each) made from small brass 'U' channel.. ..after skinning, the fin was primed - here the mounting rods can also be seen though masked.... ..onto the rudder, I chose brass sheet to keep a strong but fine trailing edge, this was soldered to the rudder post which had had it's corresponding hinges added - the holes are so I could wire the assembly together while soldering.. ..here the hinges can be seen in more detail - getting four hinges and eight 0.4mm holes to line up was lets say...challenging.. ..starting to take shape, but still lots of fettling & checking.. ..ribs were added & the skin was done in one piece with the scored ribs going right around the rudder post like the original - also seen here is the scalpel blade ground to make a tiny flat tip to make the embossed stitching.. ..before the skin was added, rectangular holes were made for the hinges by scoring with a pin through a template.. ..contact adhesive was used to apply the skin, with CA at the trailing edge and where it fairs into the rudder post.. ..and after priming / dry fitting.. ..starting to take shape.. ..stabilisers next, I am also staring in the face of doing the upper wings which I can't say I am hugely excited about, but I have learned a lot so they should be fine until next time.. TTFN Peter10 points
-
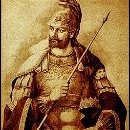
And he can't even have a smoke to help pass the time...9 points
-
Hi all, a thought you might like to see my latest finished project; a Sherman Firefly of A Sqn, the East Riding Yeomanry at some point soon after D-Day. This is the RFM kit with Star decals. Overall I’m pretty happy, the sprockets are wrong but I can live with that. I’ve been back into the hobby since May ish after not touching a kit since I was 17 (which is a while ago). I think my main area to work on is PE application and also slowing down a bit, paying a little more attention to detail in places. The base is temporary, I’m working on a diorama hence the slightly weird angle of the front wheels and the lack of antennae (I don’t want to end up knocking them off whilst fitting it into the dio). Anyway, enjoy.9 points
-
G'day Chums,there seems to have been a bit of a rash of these just lately. I've had this kit for twenty odd years.I started it as a quick build and it was put away,very far away,when I found that one fuselage half was shorter than the other by quite a way and the port wing upper was smaller than its counterpart.It fell into my hand again the other day while I was looking for something else so on the bench it went.The offending starboard fuselage half was cut and shut twice,just ahead of the tailplane and halfway through the wing chord and the port wing upper half was made up with bits of runner.A good slathering of Milliput hid the damage.The raised panel lines were removed after using them as a scribing guide on the wings,I didn't bother on the fuselage. Although he doesn't know it Massimo Tessitori provided the reference for the camouflage pattern here.The paint is Humbrol enamel hairy sticked throughout. The kit decals disintegrated on contact with water,thankfully I was able to rescue them with some Klear,The numbers are from a 1/35 Tamiya Su 85. Enjoy. Thanks for looking in Chums.9 points
-
From the Airfix A8 kit, converted to an early F8 ( which know they do one but I had an A8) bombs from the spares box, racks scratched, finished in Hungarian colours. Build thread here:9 points
-
My take on the Gloster Gladiator. a rush job but got there in the end. im going to have nightmares about getting that top wing on and a bit silly to have put the undercarriage legs around the wrong way. Bugger. Still it looks like a Gladiator. Subject is N3209 of 1401 Met Flight. apart from that wing went together well and started and done in 24 and a bit hours. Thanks everyone.9 points


.thumb.JPG.3498f40362ff13ebfc4b2e45abbd545e.JPG)


.thumb.jpg.3d6eff3e2f6cc042679bca864bcb2b1a.jpg)


This leaderboard is set to London/GMT+01:00