
Leaderboard


Popular Content
Showing content with the highest reputation on 23/01/21 in all areas
-
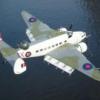
Greetings Brits. Here is a model I just finished... let me know if you can see this. I am trying a new hosting place... ok, I think i got this now working... Enjoy... let me know what you think...27 points
-
Hello everybody, I want to show you my Me 262 C-1a. The Me 262 is one of the most beautiful aircraft designs for me. Construction: The Academy kit, released in 2007, contains a multitude of details and very interesting options, including alternative components for the Me 262 C-1a with a Walther rocket in the rear fuselage. Unfortunately, in my opinion, the nose shape failed completely, so an extensive cosmetic surgery has to be done. I also narrowed the fuselage at the top by approx. 1 mm, which means that the too wide canopy has to be exchanged for a deep-drawn one. An old canopy from a Hasegawa Me 262 served as a deep-drawing stamp. The rear fuselage is also suboptimal. Academy simply suppressed the opening for the Walther rocket and did not bulge the fuselage in this area enough. So this will be changed too. And because it is already work, I add a few details around the plane, for example extended flaps and slats. Original aircraft: My model shows the C-1a V186, as far as I know the only raketen schwalbe (rocket swallow) that has flown. In horizontal flight 934 km/h were achieved with additional thrust, making the V186 the fastest Me 262 ever flown (comparison A-1a: 870 km/h). With Heinz Bär in the cockpit, the aircraft shot down a P-47 that was flying over 8,000 m over Lechfeld airfield after about 3 minutes after start from runway. Source: asisbiz.com Painting: The paintjob was started as standard for me on an Alclad Airframe aluminum primer. After that preshading, three glazing layers per colour, painting scratches with a silver pin, intermediate finish with future, decals, washing, dust, oil paints, chalks etc. Walk around: Bottom view: Details: I hope you like my model. Criticism, notes, and comments are gladly welcome. Kai25 points
-
Good luck to All! 🤠 Let me to post here some pictures of few plastic pieces glued together and bathed in the paint... So, have a fun!24 points
-
I have always found this aircraft very attractive in it`s unpainted state. The history is well known, for those who are interested: https://falkeeins.blogspot.com/2017/11/messerschmitt-me-262-1-wnr-111711-at.html There is also some very good video footage from this aircraft of 1947 in the USA (surprisingly still with swastica on tail): https://www.youtube.com/watch?v=hLk_u7ibSeo Befor I started I considered this an easy project: NMF finish all over with some panels in RLM02 and hand painted 02 over the puttied panel lines. In fact I had huge problems with the look of the NMF, especially of the nose. Furthermore the NMF and the RLM 02 did not contrast as in the pictures of the real thing. I darkened parts of the rear fuselage with thinned black paint and I lightened the darker front around the cannon bays with light grey. I am still not content with the result, but I stopped further changes in order not to ruin the whole thing. So here is what I call final result: Thanks for looking! I am sincerely interested to suggestions and ideas how to do it better. Volker20 points
-
Hello all, Here is my little Heller T-28D, finished as a Royal Thai AF trainer. Although an older kit, this is a pretty nicely detailed model, with delicate raised panel lines and rivets. The air intake on top of the cowling (correct for a French style Fennec but not for a D) was removed and the exhaust pipes drilled out. I also removed the hardwing pylons and added some aftermarket parts and scratched items: - Quickboost resin engine (some ignition wiring was added) - Armory resin wheels - Pavla resin cockpit (this particular aircraft was actually fitted with ejection seats, so I modified the Pavla seats to resemble this) - Scratchbuilt tail fin antenna using stretched sprue - Taurus vacform canopy - Whirlybits resin pylons, rocket launchers and gunpods - SUU-14 dispensers are taken from Academy’s A-37 kit - Bombs from the spares box SEA colours are Gunze paints. The sharkmouth is airbrushed, piece by piece - quite a tedious masking job, but worth the effort I think. Decals are a mixture of Siam Scale national markings, Techmod Black & White numbering, data stencils from the kit and my own artwork decal for the tail badge (actually bits and pieces from various decals puzzled together). Weathering is done by airbrush shading & highlights, followed by oil filters / streaks. I really enjoyed this build: the Heller kit allows for a pretty straightforward construction and is a welcome basis for some add-ons and detailing, I am quite happy how this one turned out. Hope you enjoy the pictures! Comments always welcome, all the best!! Patrick17 points
-
For the same group build were I participated with the V-tail 109 I also build the Classic Airframes Bf 109D, OOB except for the decals. Erik17 points
-
This is the new ICM Tiger Moth built straight from the box. Well, actually, not quite as I've put in some seatbelts and added the missing fuel pipe from the overhead tank to the engine. A fairly simple build but because the struts are very delicate it does make the top win flex a little when handling. This put paid to my initial idea of rigging it with proper streamlined wire (from RB) I just couldn't seem to get it to stay rigid enough and the wires just kept bending. So I bottled it and used some E Z line. I shall certainly be doing another one when there are some aftermarket parts available (the cockpit is quite basic for this scale) and I'm sure SBS will no doubt upgrade their 48th scale rigging set. I like the idea of the separate wing halves so maybe I can incorporate that into plan B somehow. The parts count is fairly low and plastic is the typical ICM soft grey type. Also, unfortunately, I had to use alternative decals for the roundels etc as in my opinion they are the wrong 'aspect' with particularly the top wing ones having the red to large. Of course typically I couldn't find any that matched the shade of red the kit decals have so I just replaced them all to the same shade. Anyway, other than the niggly little problems, as I said I shall certainly do another one when more parts and decals are available. BTW, a great source of reference during the build was the Haynes manual on the Tiger Moth. Highly recommended. Thank for looking. 20210123_161945 20210123_162008 20210123_162024 20210123_162040 20210123_162122 20210123_162220 20210123_16214216 points
-
This started as a "what do I have in the stash that I can do as a simple build to get my mojo back" project. Of course, that's never how it goes... 🙄 Kit is what Airfix list as the E-3, though I'm not entirely convinced whether this particular subject wasn't actually an E-4. Some sources say one thing, some another. If it's an E-3, it's been brought up to E-4 spec with the canopy - which is good, because that's what the kit has. 😁 The aspirations for doing this OOB went out of the window as soon as I saw the moulded belts on the seat. They were sanded off and replaced with some made from Tamiya tape. I also broke one of the wing-mounted guns, and the antenna pylon. The pylon I made from stretched sprue. Barrels are from Master. Canopy opening limiter is made from stretched sprue, and I added the some UvdR line for the antenna. Also added some riveting detail. Thanks for looking.15 points
-
My first build of 2021, and a nice simple one to get back into it. This Special Hobby Vampire is a nice little kit and fits together really well. It does need a lot of nose weight though! I made this one out of the box, including the decals for 601 Sqn.15 points
-
Hi all, Here's my final build in my Hawker series, following the Typhoon, Tempest V, and Tempest II. A nice kit, although I did replace the cowl with the barracuda resin replacement, I also used aftermarket decals from Xtradecal. I wasn't a fan of the oversized rivets on the rudder, so I removed those and left the rudder smooth, which is more accurate. Brush painted with Hataka blue line acrylics and weathered using inks and a bit of pastel for the exhaust. I have slightly fallen for the Sea Fury, in fact, it's knocked the Spitfire XIV off the top spot of my favourite aircraft! The Sea Fury was the bittersweet swansong of propeller aircraft - arguably the best propeller fighter ever built... Certainly the best British propeller fighter. I'm such a fan of the Sea Fury and enjoyed this kit so much, that I have decided to buy another kit and convert it to a T20 - after that, I intend to build SR661 and LA610 (with a Sabre & a Griffon)! Anyway, all of that is to come, here's my build Hawker Sea Fury FB.11, WG629 136/T, 807 NAS, HMS Theseus, Egypt 1952. And because I can't resist showing the family tree... The lineage is so obvious, as an aerospace engineer, it makes me so excited to be able to actually see the greater understanding of aerodynamics, structures and systems all coming together to make an incredibly fine fighter. I've also just bought myself a Hawker Fury (biplane), and I think I'm going to need a Hurricane too, that will give me a lineup of all of Hawker's piston fighters fro the 30's onwards! Thanks for looking! Ben14 points
-
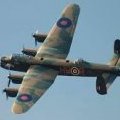
Evening all, Just completed the fine Airfix 1/72 Bristol Beaufighter TF.10, a brilliant mojo build. Finished out of the box using Vallejo Sky Type S for the underside and Tamiya Dark Sea Grey for the top. Weathered with oils and Vallejo Model Washes. I would usually use a dark dirt clay wash, but decided to try and move away from that on this build using a similarly coloured wash to give a subtle effect to the recessed detail, to complement the base colour. Few small details still to add but very happy with the result. Displayed alongside the Airfix Bomber Resupply set and Noy Miniatures diorama bases.12 points
-
Hello fellas! As I was reading the book of Sq. Ld. Jerry Pook and learning more about the almighty mud movers actions during the 'South Atlantic' conflict in 1982, Kinetic released it's long-waited 1/48 Harrier GR.3, so I have no other choice than proceed!! Hahaha... A very very enjoyable kit to build. Definitely -in my opinion- several steps forward on comparison with their previous Harriers. About the ordnance, and discarding the Sidewinders, the RN rocket pods on the outboards pylon and a CBU BL-755 on central pylon appears to be more accurate with some of the Falklands actions. A flight of Harrier GR.3 with rockets made a decisive and fatal blast on the last push on the ground battle for Goose Green. No aftermarkets where used on this kit, but there are only 2 variants to it: the addition of a 1/48 Tamiya pilot (from an old A-10) and a slightly customization of the ADEN 30 mm cannon pods drilling the vent holes. So, enough talking, let the photos show you my tribute to this legend. Next one will be the F-5 Tiger III of the Chilean Air Force (FACH). Best wishes from Chile and happy modelling to all! Cris12 points
-
Hi everyone! I used to do be an air modeler till teenage but now I haven't built anything for about 25 years. So, please, be understanding for imperfections. Recently, I decided to make my modelling dream come true: I built the Monogram B-52 in the SAC 50s livery. The model is built out of the box with just minor adds like the replacement of the rear gun machines with 4 "Mini World" Cal 50 machine gun barrels. The colors used are: Dull aluminium areas: "Tamiya flat aluminium - XF-16", lightly buffed (to reduce the glitter aspect) and then covered with "alclad Klear Kote Matte - ALC313". Shiny metallic areas: gloss black, nicely polished, covered with "Alclad Chrome - ALC107". Anti flash white: "Mr Surfacer 1500 White". I know, this one sounds odd but due to the covid, the Testors colors I ordered took ages to arrive and I just used what I had. I'm anyway quite happy with the final result. Even though it's an old kit, I had fun with it. I hope you enjoy it.11 points
-
Howdy friends hope all are well & back with some more Fury stuff.. wanted to get some stuff done while I wait for the instrument decals so i can start building up the cockpit and ultimately close the fuselage.. ..there were a few bits that lend themselves well to 3D - things like the wheels... ..I nearly got caught out as the few drawings I have are for Danish Nimrods, well it turns out Nimrods have slightly bigger wheels - not sure what the one on K5674 in Duxford was, but the hub pattern is common to period Fury photo's I have seen, so I went for this.. ..fired up Rhino and got to work - wheels are really simple so get a free trial and some Youtube videos on creating shapes and they make a great first try - thats how i learned.. Tim Perry kindly printed them for me (thanks Tim!!) - they came out really well.. ..after one coat of mr surfacer to see what the stiration is like and they only need very minor fettling - I will add brass bolts as they will look cleaner.. ..also 3D printed the top of the leg which I will try and skin in litho - here are the parts on the axle - I will likely replace the strut to make it a nice fit into the upper leg.. ..another part I tried in 3D was the exhausts - you can see here they are regular long ovals, flat at each end, and staggered so the nose ones are shorter than the rear ones (the rear stick out more to go with the cowling contour.. ..I did wonder if my design would ask too much of the print process as they are so thin, but Tim did an ace job.. ..bit of primer and they were good to go.. ..painted with alclad steel and then blended with a mix of steel & copper.. ..the exhaust slots were enlarged on the fuselage as the cowl panel has larger ovals so it can be removed, added a shelf for them to sit on and painted everything matt black.. also cut out other holes in the front end that are visible for various bits and bobs.. ..those holes include these on the upper cowling I noticed from a pic I took at Duxford just before the last lockdown... ..some things can be seen sticking out.. ..I found those things are mounted to pipes by watching a Retrotec youtube video of their Kestrel first run so I made the pipes, fittings and bases for those units.. ..seen here with the exhausts fitted - the bases need painting.. ..coming along... TTFN Peter11 points
-
Hello, I've just finished the a7v from Tauro. It's a 40years old kit with a (fragile) workable suspension and individual links which was pretty advanced for the time. The molding is questionable here and there but I've only paid about 12 pounds for it and at that price I would highly recommend it. Little information is given by Tauro which exact tank is meant so I took inspiration from the 540 which is wrong because it's a different model of a7v with only one hatch on the front. There are different interpretations of the model in terms of patters and colours, especially the roof. Some show camouflage on top and some drawings show a solid green roof with a big white cross on it. Frankly, I don't know. I couldn't find a photograph taken from a bird's eye view. Making this model despite of it's flaws put a smile on my face and it made me appreciate the tight fit of modern kits. Here's two pictures with a younger panzer sibling that almost looks modern by comparison. Thank you for watching, Cheers, Ernst.10 points
-
After spending a considerable amount of time under the workbench this old kit has finally seen the light of day. I had been put off making it for two reasons. The rigging and the non availability of NIVO in acrylic. I finally bit the bullet and using 'Prym' elasticated thread and mixing the paint to as near as I could to NIVO finally finished it. The Heyford was the RAF's main bomber during the 1930s and retired from front line service in 1939 although some were kept into the early 1940s for use as glider tugs and bomber crew training.10 points
-
PORSCHE'S FORGOTTEN JEWEL Hi everyone, I made this model as Le Mans test car. I've added antenna, mirrors, taillights,brake calipers, brake disks, exhausts and wiper for the model. Hope you like it10 points
-
It's been a while since I've done any work on this, but had the wind in my sails the other day so decided to get the engine nacelles finished off. I made some radiators and oil coolers (got carried away and didn't photograph these) and added these to the interior of each nacelle, before adding the 3D-printed engine fronts. A quick lick of filler to blend it all in and some sanding, and job done. Apologies for the poor lighting in the pics - these have been taken in the kitchen on my phone and the light was fading fast - it's too cold outside to set up the camera properly (this thing is so big and can't fit anywhere else other than the patio!) and there's snow forecast here tomorrow so I took my chances... Untitled by Thomas Probert, on Flickr Untitled by Thomas Probert, on Flickr Untitled by Thomas Probert, on Flickr Untitled by Thomas Probert, on Flickr Untitled by Thomas Probert, on Flickr Untitled by Thomas Probert, on Flickr Untitled by Thomas Probert, on Flickr I'm rapidly approaching the point where I can begin adding the surface details - I've been doing a remedial work on the wings and wing roots (as can be seen by the filler) and these areas, as well as the nacelles, will get a fine wet sanding and then a shot of primer before I can commence on a mammoth scribing session. A few more bits and bobs to attend to first though, but the main construction is more or less done now. All the best, Tom10 points
-
Sorry for the delay in posting lately, chaps, I've just been a bit worn down this week. Winston glosscoated his Tempest: I would love to say he did it all himself, but Winston (like his father) is easily frustrated by failure and soon handed it off to me to finish glossing. But modelling is at its heart all about failure, isn't it? Our best model is always our next one, there's always something we can improve. I'd love to think Winston might learn that from building a model, but he is after all only five. Anyway, some work on the seatbelts today. The Finemolds belts are made of very thin plastic, and cost about $5 per set you get in the box, after shipping (it's a box of four): It fits through the armour of the seat if you're not shy about embiggening the hole: I've given the belts a spray with Tamiya Khaki: And as you can see, I've assembled the wings as well.10 points
-
Another Dassault delta, this time Heller's Mirage IVP. No doubt one of the best looking aeroplanes of its era, it's quite a straight forward kit and gows together quite easily. It's finished the markings of L'Armee de L'Air unit 1/91 "Gascogne" based at Mont-de-Marsan in 1995. I used the RAF Dark Sea Grey and Dark Green from Hataka's red range. The decals weren't great, due to age I suspect. Anyway, here it is.9 points
-
1/72 Messerschmitt Bf 109 G6 R6 'Black 8' of 2/JG 302, Helsinki 1944 Heller's Messerschmitt Bf 109 G-2/5/6 Kit, No 230, was a rebox issued in 1980 and the molds go back to their Messerschmitt Bf.109 kit L081 in 1972. Mostly an OOB build, I added Eduard seatbelts and replaced the upper wing wheel well bulges (for the larger wheels of the G6) as the Heller parts were enormous! Markings are from the 1995 Aeromaster Decals; Reich Defense, part IV - Gustavs which worked very well. The kit went together easily with no real dramas. If you want to read more about the build, click here. Painted with Xtracolor gloss enamels RLMs 74/75/76 and airbrushed with an Aerograph Super 63 with a fine tip. Final coat of Winsor and Newton Clear Matt Acrylic varnish. Thanks for looking!9 points
-
Afternoon all......hope we are all well on this wintery day. Good excuse to stay in and build.....😀 Decided to switch to the Sturmmörserwagen. I was planning on going with the airbrushed camo' scheme, but decided in the end to have a go at doing the brush painted version that's seen a lot in archive images. Here's the first pass on the green......two day's of effort. I had to paint each patch of colour about 6 to 8 times with a very thin watered down colour, so as not to have a pronounced brushed edge and brush marks in general. I'm planning on the brown tomorrow.....give myself a break.....off to the Mobelwagen for a bit. Off to check out the forum.....cheers all.. Regards Simon.9 points
-
Schemes & decals - ref. 72073 - Dassault Mirage 2000C Source: https://www.modelsvit-eshop.com/c/aviation-1/mirage-2000c-multirole-jet-fighter-158 V.P.9 points
-
Cheers Guys Mini decal session tonight, adding some of the small details to the kit. looks like the crew commander is a Rodney Gentleman. U.S. stencils that seem to adorn all US kit were from Passion Models, I'd like to see more companies provide these overlooked details. Passion models only give you 4 in the pack which is a real let down. Blast of flat varnish next once dry. Enjoy folks9 points
-
After a nasty bout of Covid I have finally managed to find the energy to get this one finished and photographed. This is the excellent Takom kit with just a few additional details. It was painted with the Ammo Mig Berlin brigade paint set and weathered with pigments and oils. A WIP can be found here. I would also like to thank John @Bullbasket for the very helpful photos and Dan @Dads203, Ivan @ivan-o and @Scimitar F1 for sharing their knowledge. Not forgetting the moody black background shots. Not wishing to bore you all with an overload of photos but a couple more with a grey back ground. Hopefully that isn't too many photos but the different backgrounds do seem to bring out different details. All I have to do now is decide what to start next. Wayne8 points
-
WIP here Thanks for looking Rob8 points
-
🙂 Here is my 1/48 Kinetic Mirage 2000 made as a -D version using the kit decals along with some left over from an Eduard kit. AM used: Renaissance ejector seats, Kinetic cockpit photo etch, Aires jet nozzle, Eduard canopy masks, Topnotch camouflage masks. Build blog is here..... https://www.britmodeller.com/forums/index.php?/topic/235083056-mirage-2000d-kinetic-148/ Thanks for looking! Cheers, Pat8 points
-
So today's update and I finished off building the turret and I've been busy with the airbrush applying some primer and paint. First off mr surfacer 1500 black primer Next up various shades of olive drab applied in certain areas The wheels are also painted so tomorrow I'll deal with the tracks so I can fit everything together and then it's time for some subtle weathering. Thanks for looking back soon 🙂👍8 points
-
Let's see how the starboard side looks huh? Think that counts as nuff's enough for the doors and windies. Tidying up the white framework and the red under nose area nextest.8 points
-
The rear fittings for the long exhaust pipes are done. The whole assembly is now much more precise and rigid. Then the rear pipe was fitted. I scratched a new bracket for the rear fitting I made earlier when the pipe was prepared and glued that to the body. The wiring for the horns and fog light were routed and connected, good to at last get rid of those loose threads sticking out up front. Some bolt and nut detail was also added. Fitting of the mud flaps completes the underside. A little bit of paint touch up remains on the ridges of the three channels, but that will wait until it's all done and will not rest on the bubble wrapped box any more.8 points
-
Thanks, the nacelles were a pita with those seams but got there I think, the seat was OK , could of done better. Thanks @rob85, @giemme, @Pete in Lincs, @AliGauld, @mark.au, @dogsbody and @bbudde. OK, time for some fiddly bits, some P.E. levers and plates? A right pita to be honest, I would of left the moulded ones on if I could but the I.P. would not allow it with out surgery. That gives you an idea of the size of the little bleeders. They are suppose to be curved in profile so after mucking up the first one I went into old school mode. Remembering somewhere back an article on P.E. seat belts and buckles. I bent the levers first then threaded them through the mounting plate before forming the curve on my patented jig. A piece of cocktail stick C/A`d onto a stirrer. Just visible but you can see it better in the reflection . And here they are placed not glued on the I.P. A bit of work to sort them out before tackling the main throttle quadrants. I could be a while with those!!! You all have a great weekend. Stay safe. All comments welcome. Simon.8 points
-
Another one of Miniart’s excellent Grant kits that I recently finished up. This is a non-interior kit, but is heads and shoulders above the other manufacturers’ Grant kits out there. Highly recommended. I finished this one in the desert pink and charcoal grey scheme for late 1942/early 1943. Masterclub tracks were added, which are extremely well done, although the kit tracks, while a little more time consuming, are also quite good.7 points
-
Having just finished reviewing this new kit from Kinetic, which was sent to us by Lucky Model in HK. You can read the review here, and I'm afraid that I caved in last night and began building it I started with the cockpit, expecting to get the seats done before I went in for tea, but I ended up building the cockpit, the sidewalls, and many of the other assemblies glued together so that it will be ready for sanding and painting as appropriate. The cockpit goes together well, with enough parts to make for a detailed rendition, although I would have liked to have seen some decals for the instrument panels, so I'll have to get some of my Airscale decals out to detail that area up with the help of some cockpit refs. Clean-up was made easier by the inclusion of a lot of the sprue gates on the mating surface, so you can just nip them off and give them a light sanding to tidy up. I suspect the instructions show the wrong part numbers on the instrument panels, as the front one appears too wide. Check that before you glue, and there are also a few parts where the numbering has gone awry, but they're easy to guess, and I managed to guess correctly. The seatbelts were a bit of a faff, but that's PE for you I tried to add a little variation between the two seats, which seems to have worked. Looks good, doesn't it? The wings fit together neatly too, and the join under the wings is pretty impressive, which probably won't need any filler. The nacelle fronts go together nicely, hiding the joins along piano-hinges that allow the real cowlings to open for maintenance. I also put together all the other flying surfaces, which were also flawless in construction, with very little clean-up required when the glue is fully cured. I've taped things together for the first photos of the airframe, but it won't be long before I can close up the fuselage, as the cockpit and nose gear bay are the only things withing the space. Neato! The wheels, tanks and pylons just fitted together nicely with no sign of dramas, but I decided to leave off the aft engine nacelle panels so that I could paint the exhausts properly before inserting them. Fit is very good there, and the rear edges of the insert are nice and thin, doing a good job of representing a single sheet of metal. The same goes for the exhaust plugs. They're pretty short, but have false perspective inside, which gives the impression of depth. I might put some Black 3.0 in the very bottom, fading it out to a rusty metallic sheen toward the lip. The next job is to uncover the spray booth, which has become a bit of a dumping ground over the last few weeks7 points
-
Hi, everyone! It's my first model in this year.7 points
-
2nd finish for 2021 is Hasegawa's A1H Douglas Skyraider as Paper Tiger II. On the 4th November 1965 a special device codenamed "Operation Saniflow" was dropped from Paper Tiger II by CDR Clarence ‘Bill’ Stoddard on a target in Vietnam. You can read the full story on line. The Hasegawa kit is the usual, nice detail, fine panel lines but I'm finding that Hasegawa's attention to detail lacks in some places. The box art shows the aircraft fitted with Mk82's and the toilet bomb but actual pictures show what looks like M117 and Mk20's. The toilet bomb is pretty good but is missing a tail cone so this was cut from a Mk81 250lb bomb. The kit builds up nicely with no major issues, just some minor sanding on the fuselage joints,I used Eduard etch in the cockpit for the seat and tub detail. Still find it annoying that Hasegawa doesn't provide any bombs but luckily I had some spares. The kit has the decals for 572 Paper Tiger II and 577 Mig Killer and went down well with Microsol Red. Painted with Tamiya acrylics, Exhaust stains and weathering with MIG Ammo powders. As usual all comments welcome. Box art first with incorrect weapons load.7 points
-
Hi all, Here’s my completed Messerschmitt Bf109B-1. It’s a very nice kit from a period (mid-70s) when the kit-makers made nicely detailed but easy to assemble kits with good quality plastics. Painted in Xtracrylics RLM63 over RLM65, the low bright sunshine shows a nice pale greenish grey, indoors it’s seemed much darker and greyer! The kit decals seemed very Matt but went on fine and despite staying resolutely Matt when glossed, however after the final Matt coat they look fine. As with all rudder decals, the edges are hard to line up and settle round the edges so any more such Spanish crosses will be cut out and put on painted white background. The white parts of the decals had yellowed heavily, but a couple of weeks in my “atelier” window sorted that, even in January. Whether 6-26 arrived with the wooden prop as earlier Condor Berthas did I don’t know, but I used Romsey club mate @rob Lyttle method of aluminium tubes for prop shafts so I can swap the two. So here we are on the airfield at Tablada Spain in the early dawn with newly arrived numero 26. unfortunately the low sun shows I should have fitted the rear canopy more carefully! A few months (days?) later the prop has been changed to a modern variable pitch type to give better performance. The kit provides this prop for the Luftwaffe C-1 option with wing guns but only very early Bs had the wooden prop. Thanks to the hosts for setting up this GB; it gave me the impetus to build my first Heller, but there’s a few others in my stash that I now look forward to building. Cheers Will7 points
-
So there I was on Monday after I'd done the first print of all of those designs and got nothing from the printer whatsoever - my fault entirely, I'd set the supports way too thin - and i was redrawing the supports when I looked at another photo of PUMA from the port quarter and realised that there was a hydraulic crane sitting there that I hadn't spotted before. Back to Fusion and draw one of them. Took a couple of nights but I am reasonably pleased with the results I then added the cranes to the slicing software and went for a second print, this time with some success. The main fairleads, which were the smallest of them all, and one dockyard bollard printed okay, but the rest once again just printed the supports with nothing on the end. For the third attempt I really beefed up the supports but with the fear that the supports would be bigger than the actual pieces which would then be impossible to remove. This time they all printed okay, The problem was not so much getting the small pieces off the supports, but as you can see from the liferafts, getting them to stay attached by one contact point to make them easier to paint. I know the photos aren't great - even using a Canon EOS D-SLR it was getting pretty close to the limit of what the macro function was capable of, but you get the gist. Some close ups: Liferafts Fairleads and one of the dockyard bollards Crane and roller fairleads Thanks for watching7 points
-
Some progress this evening Started on the green over NMF It took a bit longer than I expected, also I found some paint that was close to the original interior colour I'll give this a chance to dry properly then a coat of Klear then black and yellow bits, in case the masking tape accidentally removes my new green paint ! cheers Pat7 points
-
McDonnell Douglas F-4E Phantom II 57th FIS, USAF, Keflavik NAS, Iceland Kit: Hasegawa 1/48 F-4E Decals: kit, Experts Choice and spares box Paint: Xtracrylix, Gunze, Vallejo Thanks for looking. Craig.7 points
-
Thanks Col. There wasnt much the kit is very nicely engineered but some things to fix mainly down to my fitting I think. This is always my least favourite part of any build, I’ve been sanding, filling, and scribing. I’m just not very good or patient at it but I think it’s nearly there now after a coat of primer. The external fuel tanks have took a long time but they are primed now too. I’ll reassess when all the primers dried. The starfighter now has its wings on (and flaps and slats set down, a nice kinetic touch.) The elevators are sorted too. Everything fits so nicely on this kit its very good. So next up a bit more priming and cleaning up, the preshading, yay! Edit: i just noticed that port slat has not seated correctly. I’ll have to sort that.7 points
-
In part 2 of the Tucano in RAF service feature I have raided my slide and digipix collection to bring you the specials worn during the type's long career. In 1990, the first Tucano solo display aircraft - ZF145, had a toucan design (after which the aircraft is names) applied to its tail by 7 FTS at Church Fenton. Seen here at Abingdon BoB display in September. ZF406 - one of two CFS Tucanos painted overall blue for the 1993 display season. In 1994 1 FTS celebrated its 75th anniversary making it the oldest flying training school in existence. To mark the occasion ZF408 received special commemorative markings. For the 1999 display season, 1 FTS gave two of its aircraft – ZF446 and ZF417 - ‘go faster’ yellow fuselage stripes. …And for the 2006 season, a silver/grey stripe, as seen on ZF144 landing at Waddington during its flying display at the International Air Show in June that year. In 2007 72 Sqn marked its 90th anniversary. Tucano ZF448 ‘Basuto’ was to receive these rather elegant special markings. Seen here at Abingdon in May 2007. ZF295 was the 1 FTS mount for the 2007 RAF Tucano display and was given this special scheme as seen at the Waddington IAS in June. For the RAF 90th anniversary in 2008, display Tucano ZF210 received this stylized fuselage flash. It is shown here at Waddington IAS in July. The spare display aircraft was ZF338 that wore a similar scheme. For the 2009 season, 1 FTS gave ZF317 this slightly garish shark scheme. Seen here in the static lineup at RIAT that year. The aircraft chosen for the 2010 Tucano display scheme, which commemorated the 70th anniversary of the Battle of Britain, was ZF317 whose code QJ-F was originally worn on Spitfire R6908, a 92 Sqn aircraft in the Battle. See here arriving for RIAT at RAF Fairford in July. ZF171 LZ-R was the spare 2010 display Tucano and was also given period livery to represent a Spitfire of 66 Sqn that also fought in the BoB. Photographed here at Duxford in September that year. ZF378 in a predominantly high speed silver scheme, was the 1 FTS display aircraft for 2011. It is seen here being displayed at Waddington IAS. 2012 marked the 60th anniversary of Queen Elizabeth II’s accession to the throne. No 1 FTS provided two aircraft in royal markings for the 2012 display season including the very attractive ZF269 seen at RIAT in July that year. ZF374 was the reserve aircraft. Seen here the crown on the fin and ‘E II R’ on the underside. Both images were from RIAT 2012. During the 2013 Tucano display, ZF239/RA-F was painted in a replica MEAF scheme to honour the Spitfires of 72 Squadron which fought 70 years previously in the 1943 WWII Mediterranean campaign. ZF264 was the reserve aircraft for the 2013 display season. It received alternative special markings to recognise the work of the Royal Air Force Association which provides welfare support to the wider RAF family. Shown here arriving at RIAT. In 2014, Tucano ZF244 was marked with poppies to mark the 100th anniversary of the outbreak of World War One. Seen here prior to its flying display at Waddington IAS in July. In 2017 - 72 Sqn’s 100th anniversary, Tucano ZF378 was given the period camouflage and code RN-S "Enniskillen" in recognition of the original ‘Belfast Telegraph’ funded Spitfire which wore the name during World War II, and of 72 Squadron's strong links with Northern Ireland. Both photos were taken at RIAT that year. For the RAF centenary celebrations during, 72 Sqn added the ‘RAF 100’ decal to the fin of ZF290. Seen here on static display at RIAT. Hope these images have been of interest, brought back memories and inspired some of you to model this significant training type. Thanks for looking! Mark6 points
-
The Soviet M1931 was a 203 mm howitzer, firing a 98.5 kg (217 lb) grenade and was a particularly effective weapon when used against fixed targets, such as large buildings used by Germans as defensive positions. Efficient weapon from the Russian arsenal for the type of urban combat, from Stalingrad to Berlin. It is not the model's diorama. I put it here just to show that the model in a scenario, improves more realism .... This kit is from Alan on the 1/35 scale. It was painted in Russian Army Green with acrylics and finished in the usual way, with oils and enamel for Whashing, Drybrushing, Rust .... pigments mixed with sieved sand, were applied to the lower parts of the model to simulate the accumulation of mud and splashes of soil. We must be generous in the application, so as not to overload it too much ... Thanks for watching! Fábio.6 points
-
Couple of quick shots on the bench (paint still wet and its going dark) of the latest build - Airfix’s lovely Meteor FR.9 done as the boxed 2 Squadron option. Extras used include the Eduard cockpit and seatbelt sets and a replacement pitot from Master. I’ve wanted to do this scheme ever since the kit was first released but have hung back mainly due to a lack of references. Luckily I recently stumbled across a paragraph in Roger Lindsay’s three volume masterpiece ‘Cold War Shield’. In it (Volume 1, Meteor FR.9, 2 Sqn chapter) he makes a particular reference to WX978 whilst serving with 2 Squadron noting it seen wearing the ‘old Slate Grey/Medium Sea Grey uppers and PRU Blue’ scheme. He also adds the aircraft was coded X complete with a blue tip to the fin bullet and of particular interest “still fitted with the old style framed canopy”. That swung it, I had to start the build. That’s two models finished in one week. Hope it’s of interest.6 points
-
Greetings As the Republic day of India approach, May I present you a Mig-21 with very special markings. Yes, Many of you might have seen the No.3 squadron the Cobras with Thunderbolt markings with camo on the body but not the grey one with Thunderbolt C2762 . I must thank two-person who help me out one is Ratish and another Mr. Linescriber without him this project would have never happened. The aircraft was built from RV Aircraft, the kit was extremely hard and confusing to built. None the less, it was nice to build a challenging kit once in a while. This particular aircraft on the starboard side has a yellow and blacked checkered marking, however, I omitted the serial number on this side. Thank you for watching cheers.6 points
-
My latest in a series of Dassault deltas. This is Kinetic's Mirage IIIE. Not the easiest kit I've built. By trying to make as many versions available as possible, the kit's engineering is quite complicated, especially in the fuselage/nose/air intake area. Anyway, with some brute force, lots of glue, some filler and a smattering of profanities, it went together. Finished as a Mirage IIIEE of ALA 11 of the Ejercito del Aire, I used Hataka RAF Ocean Grey and RLM 80 Dark green with Vallejo Aluminium undersides.6 points
-
Is it possible to do what I did with my Tiger build, put the wheels, sprockets and idlers onto the axles without any glue, join up the lower track links and lengths and glue them on, when they are dry slide the assembly off the axles and attach the top run of tracks with glue, the assembly can be slid back on the axles to dry. Then you have tracks and wheels as removeable sets until you are ready to finally attach them. I left the idlers loose so I could paint that area of the track better.6 points
-
What the hell was this diagonal cloud up to? Pillar of cloud by day and all that. I see your agreement and raise you some more agreeing CJ! I've got your next anniversary present covered I think then Michael: Mr. Schenck wrote some singularly odd stuff at times and this is up there. (The cover artist a Victor fan obvs.) Nice to have you along btw. Nice to met you Kevin. Ignatius eh? Think I've been in the Irish version of the Night of Joy on more than one occasion in younger days.... Brilliant Bill. It's bordering on a human rights issue to see someone having to give up an MG in my book Bill - have you considered just swapping out power sources at a future date? These guys from Holland have an offshoot down in Co. Cork currently doing a raring trade at present converting petrol/diesel/classic motors into EVs - the going rate for something like a top range BMW saloon is I think about €6k at present (expect prices to fall consistently year-on-year as more open source stuff and cheaper batteries become available). There have to be some equivalent outfits over in the UK; given that things in this neck of the woods tend as a rule to be more expensive here , would imagine that price would be shaved down considerably on your side of the pond. A visually unexciting morning's work under the belt so will only detain you with a single picture of the parts inventory for XN708: About 50% larger in number than XJ481 due to undercarriage and radar &etc. Over the course of the week or so I'll start putting these together with supports in Chitubox and begin printing them out for a test assembly. Lunchtime and bacon sarnies beckon to warm the cockles on this cold day. May you keep warm yourselves and if not, may something warming in bottle or pot be close at hand to assist. Tony6 points
-
We are all our own toughest critics. Learning from mistakes is part of the deal. What doesn't kill you makes you stronger. ...Okay, maybe that's going a bit far6 points
-
Sky was reached for. Going for a 'salty' finish: Looks less patchy IRL but made me wonder what's the difference between 'varied effect' and 'badly painted'.6 points
-
Another week gone in a blur eh? Read somebody on Twitter the other evening saying that they only have two times now - day o'clock and night o'clock - to which I can completely sympathize. Seriously beginning to hate Teams meetings as a poor signal/noise replacement for face-to-face contact. It feels so false pretending bonhomie to a blasted camera lens. It's all been downhill in my opinion since people used to send each other considered monographs on obscure subjects by post coach once a month... Speaking of which! ⤵️ 'The therapist will see you now Mr In Lincs.' They're actually part of the build Giorgio: the model comes with a set of prosthetic fingers to hold it instead of a stand. Thanks CC. Quit moaning you two and put some more coal in the Lada: 😁 That reminds me that I miss being able to go to museums Keith, really miss them... I still occasionally wander over to pick bits up with a sense of wonder that it's now possible to do this stuff at all Adrian Ced. Contrary to appearances I have been carrying on with the resin-Grail quest in free time over the week - having to do a lot of writing for work at the moment means being able to switch to something visual is almost a form of relaxation so it's great to have this hobby psychological condition sometimes. Mainly though it's been the unexciting task of going through the inventory of parts for XN708 and exporting them from Fusion in the kind of printable clusters that will prove most structurally-feasible and time -economical to print - a process retarded somewhat by the fact that in some regions of the aircraft it's been several months since I worked on them and trying to recollect what I'd decided back then about arrangements and orders of assembly has been an uphill struggle at times. Doing the recent [print of XJ481 a while back definitely helped though in terms of focusing the mind on such matters, so one change I'd made from previously was to decide that because of the thinner side walls to the open engine bays on '708, I'm going to print them with the wings roots included in order to avoid a weak butt-join being necessary there: Also added were recesses in the root and just inside of the wing fence to provide mounting points for the jury struts: The actual strut shown here won't be printed as brass tubing is a far better candidate for this part on the kit. A simple mounting hole isn't of course strictly accurate in terms of the real thing but at 1/72, it's simply not feasible to reproduce in a strong enough form the latching points: The position of the jury strut seems to be something a number of builds around the web haven't always got entirely correct in my view so I spent quite a lot for time triangulating from about a dozen different photos showing this arrangement from different angles - famous last words/hostage to fortune and all that... 😁 The tricky job of outputting the wings and fold mechanisms is up next and want to get my teeth into that tomorrow morning. For tonight though, just to say I hope you've all got through the week fine and to leave you with a photo of the scrap metal collection they're making for charity in the village here, turned by moonlinght into something approaching Paul Nash's Totes Meer: (Cameraphone shot so apologies for the noisy image) A friend from up North recently sent me a copy of John Kennedy Toole 's A Confederacy of Dunces as a late Christmas present and how did I never read this horrible delight until now? Tony6 points


.thumb.JPG.2ce06c4ff2300a5faba93aaeacbdab25.JPG)


.thumb.jpg.b4a5069fd2c2dd5708ce1694345c5b11.jpg)


This leaderboard is set to London/GMT+01:00