
Leaderboard


Popular Content
Showing content with the highest reputation on 14/01/21 in all areas
-
Latest build off the bench is the Airfix 1/48 Javelin done as Boscombe Downs FAW.9 XH897 circa 1970 ‘ish’. Pretty rubbish weather today so for now at least its a few quick shots taken in the office. Fairly simple conversation. New nose with pitot, deletion of a few lumps and bumps on the wing leading edges, additional fairing on the port trailing edge and a mixture of kit and Alleycat decals. Seats are from the kit with some Eduard strapping. I also replaced the wing pitots with a set from Master. Toughest job was masking the scheme. Last Javelin in service albeit in a test and evaluation role and a massive regret that I never saw one in the air. 897 is preserved today at Duxford. Thoroughly enjoyed the build though I’ve now realised it’s too big to go in the cabinet. Hope it’s of interest.33 points
-
Suwan Korea 1952, bomb dump. Airman holding a sledgehammer to another airman. “So, the recruiting officer told me I could train to work on nuclear weapons, good pay, I would spend most of my time stateside in school working with the latest technology.” “So I sign up.” “Next thing I know, I am sent here, handed a sledgehammer and told to flatten the bottom of old fuel tanks.” According to my military friends, it was ever thus..... In any case, here is my effort on the old Airfix kit not as good as hoped, but are they ever? I used the Airwaves detail set, a Falcon canopy and LF Models decals. They used old P51 tanks converted into napalm bombs. The tanks came from the spares box, I flattened the bottom on an iron and beat them with 1/72 hammer! One reference stated they were fused with hand grenades, but the only photo’s I could find showed a roughly 6 inch long cylinder using the fuel filler opening. No doubt they were filled just prior to flight, so I just drilled out the filler cap.30 points
-
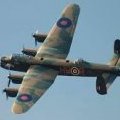
The Panavia Tornado is a family of twin-engine, variable-sweep wing multirole combat aircraft, jointly developed and manufactured by Italy, the United Kingdom and West Germany. There are three primary Tornado variants: the Tornado IDS (interdictor/strike) fighter-bomber, the suppression of enemy air defences Tornado ECR (electronic combat/reconnaissance) and the Tornado ADV (air defence variant) interceptor aircraft. The Tornado was developed and built by Panavia Aircraft GmbH, a tri-national consortium consisting of British Aerospace (previously British Aircraft Corporation), MBB of West Germany, and Aeritalia of Italy. It first flew on 14 August 1974 and was introduced into service in 1979–1980. Due to its multirole design, it was able to replace several different fleets of aircraft in the adopting air forces. The Royal Saudi Air Force (RSAF) became the only export operator of the Tornado in addition to the three original partner nations. A tri-nation training and evaluation unit operating from RAF Cottesmore, the Tri-National Tornado Training Establishment, maintained a level of international co-operation beyond the production stage. The Tornado was operated by the Royal Air Force (RAF), Italian Air Force, and RSAF during the Gulf War of 1991, in which the Tornado conducted many low-altitude penetrating strike missions. The Tornados of various services were also used in The Bosnian War, Kosovo War, Iraq War, in Libya during the 2011 Libyan civil war, as well as smaller roles in Afghanistan, Yemen, and Syria. Including all variants, 990[2] aircraft were built. This is the GR4 “Danger Mouse” ZA452 Operation Teic Iraq 2003 the only additional items used are the Aires ejector seats and seat belts. All painted with Tamyia acrylics Enjoy Mike25 points
-
For the same group build were I participated with the V-tail 109 I also build the Classic Airframes Bf 109D, OOB except for the decals. Erik21 points
-
1/48 Airfix Supermarine Walrus Mk1 (A09183) No.5 CF Royal Australian Air force, Australia and New Guniea, early 1943. This was built OOB apart from p/e belts and was painted using vallejo and lifecolor acrylic paints. DSC_0704 by stuart burn, on Flickr DSC_0707 by stuart burn, on Flickr DSC_0708 by stuart burn, on Flickr DSC_0709 by stuart burn, on Flickr DSC_0710 by stuart burn, on Flickr DSC_0711 by stuart burn, on Flickr DSC_0712 by stuart burn, on Flickr21 points
-
I tried the salt method to weather the hull the way Ark Royal was weathered near the end. It didn't come out perfect, and I learned things I could have done to make it better, but all in all I am pleased with the effect. One thing to note is that using the phone camera washes out the weathering effects. The deck and hull have much more weathering that you can't see in these pictures.21 points
-
Not new model, but I still like it. I know, pink sholud be more white and pale, am I wright? I have added extra gunsight from Quickboost, canopy hood with bubbles from Rob Taurus vacu and scratchbuilded rear mirror. Decals are mix of Pavla (I think letters are too light...) and Xtracolors roundels. Maybe she is too much weathered - but you know the name - "dicing" (with death) is such impressive for add some extra mementos of dogfight's somwhere over Brest ... Anyway, hope you like it. Best regards, Michal.18 points
-
Lockdown has given me time enough to finish two build projects in a year. I have never built kits at this speed! This is a Bronco Jeep kit number 35163. Its a tiny kit but its size does not represent how well detailed it is out of the box. Its trailer might look like just a box on wheels. On the contrary, its full of small details like side hooks in minute photo etch, brake lining, full wooden slatted floor and even a wrench which has its own photo etch stowage! The instruction also has a wiring diagram for routing the brake light wires of the trailer. The kit has so many parts and so much detail that you wont need after market. The bicycle comes from Bronco British Airborne Equipment set AB3567. This is the first time I have ever painted figures. The details were so good, I did not want to leave them out. I have used Vallejo colors to paint the figures. The fender storage box was made from Evergreen strips These colors were used17 points
-
Did I mention I hate working from home? The company is awful but at least the coffee is good. Thank ModelGods for the occasional bit of resin to footer with at lunchtime. Am also getting the hang of the new car to the extent that I've been accidentally Bluetoothing images to it all day from the phone and wondering why they aren't appearing on the laptop. For somebody used to working with technology it also has a terrifying series of settings for adaptive cruise control on the steering column that means I'm one inadvertant windscreen wiper activation away from randomly accelerating through a hedge. On the plus side, at least I'll be able to Bluetooth images of the incident... To mail first. He just loved that job Simon and passed the love on... Am utterly confused Benedikt - you mean you actually know these women? Cheers Mr. B. Not the first time you've taunted me with that spectre CC - it's almost as if you actually want one! 😜 Alan confiscated my crayons Bill. It'll have to be poster paint instead...😁 As you would have expected Alan, there has been some minor differential shrinkage in one or two places that affects some of the interfaces between parts, but nothing that isn't easily remediable. Hard to break the habit of a lifetime... I love that GIF Adrian! It's an utterly singular aircraft isn't it? Meet me by the Ferris wheel in the next film Edward... Payment in unmarked schillings... Kind of you as always Roger - it still staggers me that there's no wholly accurate kit of this available at 1/72 tbh. I consider it a basic social service to bring one forth. Exceptionally generous of you to say so Robert - thank you! Gentleman's Resin Outfitter has a nice old-world ring to it no? 🤦♂️ What's that In Italian Giorgio? 'Operators are standing by to take your call!' 😁 That's actually Birmingham Central Telephone Exchange, in about 1900! (My hard drive is cluttered with such oddities...) In all seriousness, there's still a great deal more that I need to test and resolve about the aircraft in printed form before I'd have the effrontery to offer it to anyone else as a bona fide 'kit' for assembly Bill. With craftsmen such as yourself around I feel duty bound to ensure that it's technically complete as a working entity. Now, this evening's brief update is simultaneously a combination of progress with airframe assembly and brief tutorial about the efficacy of the print resin as both adhesive and filler. To whit, the schnozz is now on: In the interests of full disclosure, shown here without any filling or sanding. That more pronounced gap at the wing/intake junction on the port side worried me at first. It's not there in the actual designs of coutrse and noot so pronounced to stbd, so I think results from a slight 'bowing-out' of the middle wing root on the port side due to suction from the resin whilst printing - I just need to be more careful prior to assembly next time to file it down flat all the way along to avoid it leaving the wing about 0.5mm or so proud of the interface at the front. I grow more and more impressed with use of the printing resin as both glue and filler - the combination of it remaining in a liquid state for as long as you want whilst positioning parts and then an almost instant 'grab' as it hardens under the laser makes it almost my favourite medium at the moment (for similar reasons to liking brass and soldering): As it has the same material qualities as the airframe itself, when used as a filler you can get to work on the hardened resin immediately in terms of blending it in. Here, any excess was trimmed away with a fresh scalpel and then final carving/planing done along the contours of the airframe with a Stanely blade held in the fingers: Even in this unsanded condition, the integration of surfaces is becoming almost invisible. I'll do the booms, exhaust fairing and undersides in similar fashion next, then after adding control surfaces, see how that resin buck holds up in a vacform test for the canopy. Final image tonight of some high altitude clouds over the house during the recent cold snap. I got utterly lost falling upwards into that endless detail: Keep well me dears. Tony16 points
-
256 - Saab SH 37 Viggen (1/72) Number four and next of my Saabs is the mighty Viggen. I decided to go for the perhaps most unknown version, the maritime recce version SH 37 that could carry both cameras and weapons. My example is the commom configuration with two camera pods and one drop tank, but sometimes these also carried anti-ship missiles. This very aircraft played one of the main roles in one of the most dramatic air incidents during the Cold War involving Swedish aircraft when it outmanoueuvred a chasing Soviet Su-15, that splashed into the Baltic Sea tragically killing its pilot. You can read the whole story in the WIP thread, see below. Additions: - Re-scribed panel lines - SKA 24 Long Range Camera and MSK Recce Pod from Maestro Models - Pitot Tube from Maestro Models - Wheels from Maestro Models - Ejection seat from Pavla - Decals from Flying Colors - Some scratch-building including FOD covers And please note that I was NOT cheating using pre-cut masks for the splinter... WIP thread:16 points
-
For a 109 group build with some friends on our modelling WhatsApp group chat and on Scalemates I participated with two 109s. This one is the Gartex(Hasegawa) Bf 109G03 V48. The V48 was the third airframe of the G series and this one was modified with a V-tail in 1943. It proved to be unstable so further development was halted. The Gartex 109 is essentially the Hasegawa Bf 109F kit with some extra resin and metal parts to modify it to represent a early G airframe with the V-tail modification. Kit was OOB except for the decals, since the kit ones were very brittle I used everything from the spare box. Only the Wnr. decal was saved with liquid deal film. erik15 points
-
Robbing the cradle, eh? The resemblance is uncanny! The Wellington came out quite well. For my own sanity, I don't think Winston will be allowed to use the airbrush just yet. I didn't get anything done yesterday, because I was off to pick up a 103-year-old M1917 Enfield rifle, which, if the fates align properly, I'll be procuring some ammunition for and taking shooting tomorrow night. However, I did get some stuff done today! I fixed the spine: Very easy fix. I attached the engine and painted the...whatever the technical term is for the part behind the spinner. I also did some more weathering on the collector ring. My feelings on that are mixed. Lastly, I brush-painted the leather headrest and padding around the cockpit: I used a Lifecolor Italian camouflage brown for it, since Lifecolor has a reputation for brushing well (it certainly airbrushes poorly) and it seemed appropriately leathery. The astute observers that you all are, you've probably spotted that I picked up a new coin for scale: a Polish 1-grosz coin from 1938. Just imagine the world that coin came into, 83 years ago, the world before the war changed everything.15 points
-
I built this in the current Heller GB here on BM, WIP below This build is dedicated to those brave Polish pilots of Polish Warsaw Squadron, the Groupe de Chase Polonaise 1/145 On 18 May 1940, 35 Caudrons were delivered. Despite being ordered not to fly these as they were so underpowered, instead they continued flying a fighter hopelessly outdated compared to the Messerschmitt Bf 109E, the Polish pilots scored 12 confirmed and three unconfirmed victories in three battles between 8 June and 11 June, losing nine in the air and nine more on the ground. Among the aircraft shot down were four Dornier Do 17 bombers, and also three Messerschmitt Bf 109 and five Messerschmitt Bf 110 fighters. Despite looking a bit of an ugly duckling, the design has grown on me during construction. I hope you like it Cheers Pat14 points
-
For inspection today I have the first of 2 Matchbox 1/72 Gladiators. These kits are for the most part lovely little builds, but I found that the exhaust pipes were too fiddly to be worth bothering with, and did not attach them. Originally these were slated to be paired with an aftermarket Microscale sheet, but unfortunately, that whole sheet was prone to intense shattering. The kit decals, easily 15-20 years older, worked a treat. Go figure. In any case, here is the result: Overall, I am quite happy with the build, and especially with the (invisible) extra details I added to the cockpit. I imagine I will build a few more of this kit in the future if I can find them for a reasonable price, as I did for these two. If not, the Heller and Airfix kits are always available as well, and both are more detailed and just as easy to build. The only thing I might change on this one is the addition of a thin wash, which I have surprisingly never tried before. Time will tell. Thanks for checking in everyone, Stay safe, Tweener14 points
-
JMD Miniatures. 65mm. Everything about this figure is sublime, except that pathetically small Lebel rifle. But there was nothing else, so on it went... Donald Sutherland?? Always puts me in mind of the Butte de Vauqouis memorial.13 points
-
Hello all, I have finally finished my Skyline Models 737-300 that I started some point during the first lockdown, I think, been at it on and off but finally put it all together! With the help of Skodadriver's post (I think it was!! I can't find it!) showing a WIP guide, I put the wings and stabilizers on before painting them so I could fill in the horrible gaps, it's the first time I've ever done that as I usually paint the wings and then stick them on once the body had been sprayed. This is my second Jet 2 737, but the first one that is not a scrap version 🤣 The kit looks nice in the box but it's more fiddly than it looks, filler used it the tail, fuselage, wings, wing and stabalizer joins and the engines. But it does look excellent after I must say! I was going to have a go at putting on the 4 probes on the front, but being extremely small, I had a go at putting one in and it wouldn't fit, I couldn't sand it down as it would move and bend just by touching it, so I thought forget it! The Jet 2 decals are quite delicate, but so is the DACO 737 stencil sheet that comes with the box. I was going to paint the leading edge slats on the wings, but I saw there was decals of these on the stencilling sheet, brilliant! Well it looked like a great idea, but after fiddling around trying to get them on and stay there, and look reasonably straight, and not break, I could have painted it quicker! I tried the ones for the stabalizers as well but they ended up breaking apart, so I painted it myself instead. I also had to paint the serial on one of the nose doors as well, as the 'LU' decal went flying off when I got it out of the water. It was still on the decal backing card, but I had hundreds of decal disused cards and cut trimmings all over the table and it got jumbled in amongst all that, so I tried the best I could to write LU on the door!! Note to self - tidy up as you go along!! Anyway I hope you like it, and thanks for looking! James.13 points
-
And some more13 points
-
Wanda, it’s been a pleasure! And your mate Dina the de-Gausser? Yep, her too. This phase is done! That final view because the equivalent view from fine on the starboard bow seemed to strike a chord with people. As I said yesterday, there will now follow an extensive programme of cleaning up - you can see from these close ups how mucky things are, how much stray Gator Thin is about, & how many traces of seam-checking black paint are hanging around. As much as possible needs to go before any new paint goes anywhere near - plus there is still a lot to add, detail-hounds: davits over the boat bays, the WT aerial brackets, and of course all the catwalks. Not to mention the rapidly-approaching time to build the bays themselves and their contents. Some on the starboard side were done ages ago, but I still have to add paravanes, winches, ladders, doors and similar to the port bays before fitting... and of course the boats! The flight deck can’t go on until all the bays are fitted. And many of the catwalks can’t go on until the flight deck is on. So - sorry, Giorgio - there is still a lot to do before the airbrush comes out in earnest. But today is undeniably a milestone. More soon Crisp13 points
-
Hello all Today I would like to present my T34/76 from Tamiya. The model is quite old and simple, but as always with Tamiya it is easy to build out of the box. I added PE grills from Eduard, an aluminium gun barrel and AFV Club tracks. The decals are from Archer. Painting in acrylic and oil paint. I am trying to show that you can build a (hopefully) beautiful model just by painting and that a lot of extra work is not always necessary. A vignette is in progress, therefore the title "Nach Stalingrad 75km". When I'm done with that and the model is placed, I do the final weathering. Have fun!11 points
-
Hi All, Here's another "COVID" build from the spring of 2020, a Revell of Germany F-16A MLu which has been backdated to a Block 10 F-16A of the Michigan Air National Guard, circa 1993. This was a shelf of doom rescue as I had started this model back in 2011, but modeler A.D.D. kicked in and something else grabbed my attention, so it languished for years in a cubby compartment above my desk (it was almost ready for paint at that point). Fast-forward 9 years later and here we are. Most of what is needed to backdate the Revell 1/72 F-16A MLu is included in the kit (though I don't remember off hand if the vertical stabilizer base is included as the only version I recall is the type with the parachute brake housing for the MLu). Additional things added were the squarish threat antenna just ahead of the air intake and six Snake Eye Mk. 82 GP bombs for the weapons pylons (I thought the inert blue color added some nice contrast to the sea of grays). The finish is good ol' fashion Model Master enamels, with Flory Models Dark Dirt panel wash and a Model Master Acryl semi-gloss coat. The decals represent an F-16A in service with the 107th FS, 127th TFW of the Michigan Air National Guard, which came from an old Expert's Choice decal set. These jets carried this particular scheme from 1993 to 1994, when they were withdrawn from service (you can still find them in this scheme at the AMARG boneyard). The last touch was the air intake cover, which was made from the foil of a candy wrapper (because we all know how terrible the seams are to eliminate on just about any F-16 kit, lol). Thanks for looking! Cheers, Albert11 points
-
Latest build 1/144 Hasegawa Mark DSCN3879 (2) by mwsfly9, on Flickr DSCN3880 (2) by mwsfly9, on Flickr DSCN3881 (2) by mwsfly9, on Flickr DSCN3882 (2) by mwsfly9, on Flickr DSCN3883 (2) by mwsfly9, on Flickr DSCN3884 (2) by mwsfly9, on Flickr DSCN3886 (2) by mwsfly9, on Flickr11 points
-
There should be MORE of these on the market. Not least because I want to make a better job of the next one. Romeo Models, I think. Natural tones all intentional here. I always thought that shield emblem would make a nice tattoo. Certainly a pleasure to paint. But another one wouldn't go down well with my wife 😕11 points
-
I realise this type of project is nothing new, but it’s something I’ve fancied doing for a while and has been a refreshing change and a welcome break from the usual kit bashing. The kit was an impulse purchase from Aldi whilst doing the weekly shopping and at less than a fiver for a starter kit I thought it rude to pass up on such a bargain. Anyway, after a minor amount of flash was trimmed off the sprue the airframe was airbrushed using the little paint pots supplied which were diluted with Tamiya X-20A thinners. Everything was then lacquered with Humbrol Gloss prior to applying the decals after which it was given a coat of Humbrol Matt to seal everything in. The deep picture frame was purchased from ‘The Range’ and the back sides of the sprues drilled to accept a few small screws inserted from behind the picture frame back plate to hold everything in place. I must say I found the build(?) very satisfying and am already thinking of making an Me.109E-3 to accompany the Spit.11 points
-
Little car I've painted recently. It's wargames model depicts improvised armored car Kubus constructed during Warsaw Uprising in August/September 1944. 1/56 scale (or 28mm). Really easy to glue together - only one big piece for hull, 4 wheels, armoured plate for MG, PIAT and few details (hull MG, hooks, posts). Model made by Infamous JT. I've decided to paint it in grey shades, no-one is exactly sure what colours were used in 1944 (although it survived II War and can be seen in Warsaw) - could be grey+grey, blue+grey or rusty brown + grey. Painted with Mig Ammo, Vallejo, Kimera, Tamiya and Gunze paints. Weathered with Mig Ammo. Lots of bluetack was used as well ;). Polish flag made from Snickers bar wrapping - perfect excuse to treat yourself :P.10 points
-
FINISHED! Yippee! A few progress pictures first. The canopy masking looks pretty ropey up close. Cameras are very unforgiving! In future I won’t try cutting the tape in situ. My hand-eye coordination isn’t good enough to cut freehand without wandering and it’s very difficult to estimate where the edge of the frames are when the canopy is a bit blobby as this one is. I’ll use little strips applied separately for my next one. Here I’ve sprayed a couple of coats of Tamiya Flat Clear XF-86 thinned with about equal amounts of Mr Leveling thinner. It sprayed very well and I’m very happy with the result. The same for the underside. Miscellaneous bits and pieces also sprayed. And finally, the finished product at last! Thanks for your inputs and thanks for watching. I’ll take some better photos and put them in Ready for Inspection when (if) it stops raining and the clouds clear. Here in the UK even in full daylight by the window it’s too dark in the middle of the day! Roll on summer! Cheers! Keith.10 points
-
Operation Pedestal. Mediterranean Sea, August 1942. Sea Hurricane Mk IB HMS Victorious vs Savoia Marchetti S.79 278th Squadriglia. 1/48 scale, Sea Hurricane is Italeri's built out of the box while S.79 is Trumpeter's with lots of corrections and surgeries to correct everything.9 points
-
Hello all Here is my latest, the Trumpeter kit of the Su-15UM. It was completed using the Pavla replacement resin nose and decals from the Begemot Su-15 sheet. The kit seats were detailed with plastic card and harnesses from an Ace etch set. The paints used were my usual Humbrol 27002/3 metallics. I used Flory washes for the first time and found them easy to use and was very pleased with the result. I really enjoyed this one and can thoroughly recommend the kit, it’s one of Trumpeters best in my view. Hope you like the pics. Cheers Pete Thanks for looking Pete9 points
-
So today's update and the swamp Tiger is moving along nicely. Tomorrow I will add some oil's to the Tiger and hopefully some mud effects to the lower hull but for now i need to leave it alone and let everything dry properly. That's all folks 🙂👍9 points
-
Well I've been playing with my turret and for the time being I'm putting this to one side whilst I start work on the hull 🙂9 points
-
Hi All, Seeing as I didn't see a subforum for models of this type, hopefully this is the proper spot for these 3D metal puzzle aircraft models. This is Metal Earth's Boeing V-22 Osprey. These kits have come such a long ways from the rather crude early Metal Earth kits that loosely looked like what they were trying to represent. Outside of some of the complex shapes that had to be formed, this wasn't too difficult a kit to assemble. Definitely have built fiddlier models from the line up. Cheers, Albert9 points
-
Kovozávody Prostějov (KP) is to release in 2021 a family of 1/72nd Hawker Tempest kits. Source: http://www.modelarovo.cz/novinky-kovozavody-prostejov-na-1-q-2021/ - ref. KPM0219 - Tempest Mk.V - Wing Commanders https://www.aviationmegastore.com/hawker-tempest-mkv-wing-commanders-kovozvody-prostejov-kpm72219-scale-modelling/product/?action=prodinfo&art=175515 - ref. KPM0220 - Tempest Mk.V - Clostermann https://www.aviationmegastore.com/hawker-tempest-mkv-clostermann-kovozvody-prostejov-kpm72220-scale-modelling/product/?action=prodinfo&art=175516 - ref. KPM0221 - Tempest Mk.V - Srs.1 https://www.hannants.co.uk/product/KPM72222 https://www.aviationmegastore.com/hawker-tempest-mkv-srs-1-kovozvody-prostejov-kpm72221-scale-modelling/product/?action=prodinfo&art=177481 - ref. KPM0222 - Tempest Mk.V - 486.(NZ) SQ https://www.aviationmegastore.com/hawker-tempest-mkv-no-486nzsq-kovozvody-prostejov-kpm72222-scale-modelling/product/?action=prodinfo&art=175517 - ref. KPM0226 - Tempest Mk.II - Export - ref. KPM0227 - Tempest Mk.II/F.2 - ref. KPM0228 - Tempest F.2 - Silver Wings V.P.8 points
-
Weirdest car model I've ever made, If I summarize briefly what has been done; The rear wheels have been completely renewed, Fujimi's stock wheels have been placed to the proper depth for this vehicle. I removed the rear wheels a little, for this I cut the case properly. A somersault back bar was made, The windows were in very bad condition, I remade the transparent plastic. Details suitable for the engine were added, Necessary additions (steering box, shock absorber ...) were made to the front suspension, I painted Vallejo orange with Tamiya varnish. 4000 sanding and polishing followed. The rims and bumpers are painted with Alclad Chrome.8 points
-
Calling this finished now AFV Club 1/35 scale gun truck with some extra armour added from plasticard. Decals are from Star (I know, this does not depict the actual Bounty Hunter truck). Figures are from Paracel and are excellent, ordered direct from them in Vietnam and arrived quickly and safely. Paint is Life Color, Tamiya and Vallejo acrylics and weathered using Mig Ammo mud effects pack and oil washes. Base is just made from a drawer front and foam board. All comments welcome8 points
-
I think most aircraft modellers have either built this or have on in their stash. It is the very basic Revell offering which I think originated in the '70s. I bought this very cheaply on eBay for one specific purpose and that was to try my hand at rigging on a relatively easy subject. I've always admired the skill of bi-plane modellers in this respect and now having finished as best I can I admire them even more. It's not for me though. Modelling should be fun and this wasn't. I have a Hereford on the bench now and I think it will be the last bit of rigging I will be attempting. Way too stressful to be enjoyable. For anyone not familiar with the 'Peashooter' it was designed in the '30s and saw service into the 1941 Pacific theatre where remarkably it scored several victories over the A6 Zero. And to compare how quickly technical advances were made, the P-51 was in the skies over Iwo Jima just 3 years after the diminutive P-26 was retired.8 points
-
Good evening and happy new year all, my first finished model of 2021 will be my first ever submission in the site. Otaki models , despite suffering from mainly lack of details and too shallow wheel wells, are quite good in shape and a for sure one of the first model with recessed engraving. The model is covered with kitchen foil, the landing gear is totally scratched, the rest is more or less out of the box. Thanks for looking and take care, as everybody I hope that this year will improve everyone's situation Frederic8 points
-
Panel lines, details and corners done with Afrika Corp wash, once dry a coat of matt before weathering proper... Thats all for now...8 points
-
Now, a little work on the rear end. First off a piece of Lit-Brite peg or red translucent toothbrush handle, is glued into a slot filed into the leading edge of the vertical stabilizer (arrow) "A": Above left, at "X" the flare chute doors need to be glued in and the seams filled. Next, the benefit of building the Hasegawa kit is that a lot of different variant parts are provided, such as the smooth fin tip shown, which was used before all the sensors were added to later variants. While the kit does not offer the exact needed tailcap, I simply chose the simplest one provided to fill and modify "B"). Above right, the red light lens after being sanded and polished a bit. Next, the tail cap is sanded to shape, and a single piece of sprue is glued into place ("X"). I cannot tell from photos whether this is a light, vent, or dump: Above right, the tail-hook on the prototype has a different profile than later version, and a unique prototype fairing has been added, as well as a better view of the tailcap. Below, a much-lightened view of what I'm trying to achieve. Note the shape of the tail hook: Below, the little box on the lower right marked "fair" shows the thick end and and side profiles for the fairing: Above right, all the little "bumps" marked "X" need to be removed, and (arrow), the "blank" pieces from the HAS kit need to be installed here. The optional pieces in the kit are, I believe, the launch bridle hooks, and were not present on the first prototype. Below, after these steps are done: Assembly of the upper and lower rear fuselage/wings begins by aligning the rear exhaust shrouds as carefully as possible, (See arrows). I use Weld-On #3 for my liquid cement, as it's rather "hot" and fast setting. Next, because of the cockpit to lower front fuse alignment problem mentioned earlier, I had more problems at the front fuselage join than I needed to have, had I aligned everything properly at that stage: Caveat modeler! While the putty is drying on the front end, it's back to the rear end. Although not shown here, I primed the metallic areas of the exhaust area of the fuselage, then masked it with strips of tape on the straight edge, and Parafilm "M" everywhere else, plus enough Parafilm to reduce any over-spray. I then spayed a light color of Alclad Dark Aluminum all over, masked off a couple of areas on the upper fuselage and shot the lower part with a darker color, Magnesium. When all that had dried, I used a piece of tape with most of the sticky removed, and placed it along each needed panel line, fore-and-aft, and sprayed a tiny mount of Alclad II jet exhaust lightly along the edge of the tape only, using reduced air pressure, then moved the tape to the next panel line, and so on Above right, the exhaust nozzles were started by being given an overall prime coat of Alclad II Grey Primer, and then a shot of White Aluminum into the nozzles, primarily on the molded in detail on the bottom (lower right), then a couple of disks of paper were cut to the correct diameter, and placed into the nozzles, to mask the White Aluminum. Next, though hard to see i n the photo a darker metal shade was shot around the lower part inside the nozzles, and a much darker shade of exhaust was sprayed near the outer end: Above center, the lower outer part of the nozzles were painted a dark metal color, and when dry, everything on the outside was masked, save the petals, and then rolled-up paper tubes were used to protect the inside from over-spay, while the outer petals were painted another dark metallic color. Above, far right, the final result, after some water-based black wash was applied to all the cracks and crevices, inside and out. Next, a view with all the masking removed, and the nozzles glued into place: I should mention here that I don't try to match any paint colors to the types of metal that might have been used to make any of the actual parts, mostly because I have no idea of which metals they were constructed. Therefore, the effects are mostly artistic, designed to enhance various areas. Secondly, I have found that for me, it's simpler to do the metallic areas on the rear end BEFORE painting the rest of the aircraft, because the masking, etc. is pretty complex back here, often involving several layers at a time. I feel that if I make a mistake, it's just easier to strip or repaint the areas needed, without concern for the rest of the paint. Here again, because of the metallics, and delicacy of masking some areas, PARAFILM "M" IS YOUR FRIEND! Well, enough work for now. Back to thinking about the next steps... Later, Ed8 points
-
Almost exactly two years ago I started building the Merit Ark Royal. I started a related thread (LINK) where I pontificated about hull colors, and intended that to be a build thread. Well, I build slowly due to work and family constraints, and I am often too lazy to post things - so I never added to that thread. I finished the model in September and am finally posting some of the finished pictures. I will post some of the build pictures later in this thread as well. These are just phone pictures so please forgive the quality.7 points
-
Dear fellow Britmodellers, here's my first completed model of the year, the 1/72 AZ Model Bf-109 G-14AS "new tool 2020". No changes have been made to the external shape and dimensions, but the interior parts have been modified for a much better fit. Both the cockpit/fuselage and the wing/fuselage joints are much easier to assemble, literally 'klicking in place'. The boxing of the G-14AS is identical to the contents of a G-10 kit. That means it is not entirely correct, as the G-14AS had two filler caps relocated. Previous boxings of AZ's G-14AS included additional decals for these hatches. Unfortunately this has been omitted on the new release, and I had to plunder one of their older boxings to replace them. As usual three marking options are included, of which I chose "Black 3" of 5./JG27, flown by Lt. Schmitt, in Schwerin-Görres/Germany, April 1945. I slightly diverted from the paint instructions by spraying the underside of the wings in Aluminium, common with late-war Bf-109s. I also added the long-stroke tail wheel (shown on the box art, but not suggested in the instructions). To enhance the 'scale appearance' I replaced the plastic pilot headrest, cooling flaps, Morane mast and antenna with photo-etch parts. The pitot tube is a metal item from Master, DF loop is made from wire. The model was painted with Gunze/Mr.Hobby acrylics and weathered with artists oils. All photographs by Wolfgang Rabel. Thank you for your interest, best greetings from Vienna! Roman7 points
-
Model GWH in 1/48 plus add-ons. Camo Ensign George Gay, the only survivor of the entire VT-8 crew at Midway.7 points
-
No etchings yet so I'm working my way round other things that need deciding, in particular the colour scheme re exactly what is white and what is grey. A lot of models you so have the long vent covers all white (though admittedly, most of the models I can find are S-100 types which may have been different). This picture clearly shows that for some type 38's at least the tops where grey. One further point is that it looks like the torpedo scallop (?) don't know the right term) seems to be grey, continuing the line from the tube roof. I've not seen that painted on any model..... Also, note the white inner line on the starboard navigation light, interesting detail and the rust and other weathering on the nearby vessel It would seem that if the grey represents an attempt to reduce the visibility of the vessel from the air, then leaving distinctive features white sort of defeats the objective, similarly with the hatch covers. Many models have white engine room hatches, doesn't make sense to me, vertical white, horizontal grey is more logical... Anyway, I've fixed the (white primed so far, will be going grey) engine room hatches and started the smoke machines. Here is a shot with the grey primed vent tops Similar logic applies to the top of the ready use locker, seems it should also be grey, why leave distinctive features to be spotted? Also, started work on the duck boards, the one in the open bridge is pretty fiddly but looks Ok now. I've read somewhere that the duck boards were also painted grey, even though every model I've seen seems to leave them natural. I'll be painting mine and then distressing them back to expose the wood in wear places, much easier than painting wood colour, just use actual wood.... Remember, everything is loose still not not perfectly aligned. It cheers me up to keep building the detail before fixing, helps maintain interest. I've also made the radio whip aerial, it has a tiny hole in its base for the cable, to be fitted later, roof still loose at this stage Overall shot of the boat from the side, starting to look the part One piece at a time Steve7 points
-
Update 5....i think So a few small details that are missing from all the Tamiya Tigers...first the deflector in front of the vision slot has no recessed Also missing along with a lot of other weld beads is the one that runs down the centre of the hull roof...again not a big deal to holes for the bolts...and the cutouts on the underside of said part is also missing ...not anymore some careful measurement and scribe the plastic fill with putty add welds with your tool of choice and some of the other missing weld seams most are around the towing extensions and the deflector for the final drives And the towing extensions..also note the flame cut marks are now done...this all took a couple of days scribing and filling but is well worth the effort along with the texturing....a lot of beads were also missing from the rear.7 points
-
Thanks Giorgio The clamping worked and, with a tiny swipe of Vallejo filler, that's one worry out of the way: I want to get the wings ready for a dry fit so I can decide whether to flod or not. I've also finished the seam tidying and stuck in the hook: Wheels have been cleaned and painted: The tyres needed quite a bit of clean up and the locating pins needed reducing to get a closure. Nice though. Now the legs: Now that's just mean. Flash inside the tiny struts. Luckily I invested in some of Vincent's micro-files: It's not very often I have to do what I saw in the promo video - worth the money for this sort of job IMHO.7 points
-
My friend lives out in the country in a tiny subdivision of about 50 houses on decent sized lots. About five years ago his neighbor decided to fly one over his house continuously for about 2-3 days. He asked nicely but said neighbor ignored his requests to go elsewhere. So on the evening of third day my friend had enough and grabbed his 12. Gauge bird gun. Needless to say the drone didn't survive. Out in his parts the sheriff is along the lines of I didn't see it so it didn't happen.7 points
-
Here are some more pics7 points
-
Cheers Guys, More weathering and fine tuning of a few things, added some black oil again heavily thinned to random areas, these were blended with a damp brush, (Mineral Spirits again ) just blended enough to show a slight shadow. I've used some light rust wash on the chipped up areas of the turret open top area, not a lot just a hint. Thinners I use. And the oil paint You can just make out the black oil on the turret counter weights. And the turret roof And played with the washable dust on the front, tying in the front mud guards, beginning to like this stuff now but there is a knack on how to get the best out of it, less is more for sure. Then these chaps get warmed up for paint, Primed just waiting for it to cure off. Halfords finest - I save my Mr Surfacer for full resin figures. Enjoy chaps 🙂7 points
-
I've spent the past couple of days working on my Socata Tampico, but this morning I turned my attention back to the red Bobcat. With the wings assembled, I was ready to add the leading edge lights. For this, I elected to try the method that @lunarhighway recently posted in his T-6 Harvard build: First, I cut away the area in the leading edge where the lights will go and added the lenses for the lights: I'm fond of using this product for lights, and have used it in many of my builds: With the lenses in place, I created the transparent cover using clear cello tape (the thicker kind, used for sealing packages). I trimmed the edges with a sharp scalpel blade: I did say sharp, didn't I? Next, I worked on the engine nacelles. On the actual aircraft, there is a gap between the engine nacelle and cowling, which provides an exit for the engine cooling air: To re-create this gap, I needed to round off the front of the kit engine nacelle. Here's a pic, with the modified nacelle shown on the left: The nacelles fit very nicely to the wing, but did require a bit of cleanup along the edge for the join: You can see that I've closed off the front of the nacelles with plasticard. This serves two purposes. First, it will prevent the "see through" effect when I install the aftermarket engines. More importantly, the plasticard bulkhead will facilitate creating the desired gap when I install the cowlings to the nacelles. I used this same method when I did my L10 Electra, and it was very effective. The wings are now pretty much done, so I moved on to finishing up the fuselage. I installed the instrument panel and interior, then closed up the fuselage. I paid special attention to properly aligning the fin and rudder, where I had thinned down the trailing edge: Everything fit together well, except for the nose join, which needed a little "convincing": I nearly forgot to add the yokes to the IP before closing the fuselage. The yokes are provided on the sprue, but there is no mention of them in KP's instructions! A test fit of the wings to the fuselage revealed some serious gaps: Also, the wing is not as thick as the wing root on the fuselage: I partly, but not completely, corrected this by adding shims between the top & bottom wing pieces: There's a lot of seam work to be done before I'm ready to attach the wings to the fuselage. But, things are coming together and she's shaping up to be a nice looking airplane:6 points
-
Expected in Q1 2021 Sources: http://www.modelarovo.cz/novinky-kovozavody-prostejov-na-1-q-2021/ https://www.hannants.co.uk/product/KPM72231 - ref. KPM0231 - Cessna U-17A Skywagon Box art V.P.6 points
-
My favourite nailbar / hair salon for the discerning gentleman. Hoxton, I believe. Sadly closed at the moment, but a man can dream. [Stonking Stuk-ery, Giorgio, obvs]6 points
-
6 points


.thumb.jpg.3d6eff3e2f6cc042679bca864bcb2b1a.jpg)


This leaderboard is set to London/GMT+01:00