
Leaderboard


Popular Content
Showing content with the highest reputation on 02/01/21 in all areas
-
Happy New Year folks! Well here's the first one for 2021, although I've actually been working on it on and off for a few months. It's the excellent Revell B-17G but backdated to an 'F' using the spare parts contained in the kit. It mostly went together OK although I ran into some confusion with the nose glazing which didn't seem to be correct for an F, but then when I looked at wartime photos there seemed to be lots of variations so it may or may not be totally accurate? I used Mr Hobby 304 for the Olive Drab and Tamiya XF19 for the undersides. The latter may be a bit light but again looking at photos there did seem to be variations. Little bit of panel wash and pastels for the weathering. Decals were from Kits World to portray 'Dragon Lady' from the 385th BG at Great Ashfield in 1943. One of the reasons for choosing this aircraft was that I had the opportunity to visit the remains of this airfield as well as other USAAF stations a couple of years ago, a humbling experience indeed. My small tribute to all those brave young airmen who gave so much for the freedom we enjoy today. Its not perfect and I've made some mistakes, but at least it gets the ball rolling, and the airbrush fired up for the new year. Thanks for looking, comments much appreciated Cheers!34 points
-
Hi Everyone, Happy New Year. Managed to dodge the snow and get some pic`s of my last completion of the infamous 2020 My attempt at AML`s 1/48 Loach kit Which appears to be a Mikr Mir kit with some Eduard Colour Etch added Finished in the markings of the 16th Air Cav`, Vietnam, 1972 Built almost completely OOB With just a door slung M16 rifle opposite side to the minigun and resin gun barrels for the Minigun from the spares box Found quite a few pic`s of them with the roof windows painted over ( to stop the propeller motion distracting the gunner ) and... ...with the tails painted red, which is how I decided to portray it Hope you enjoy, thanks for looking Cheers Russ25 points
-
Happy New Year, dears! Somehow I dug in my deposits and found some reserves of airfield equipment for creating dioramas. I decided to do it.)))25 points
-
Hello to all of you guys and girls.I present you my 2020 finished models.99% of them are 1:72 scale with the occasional 1:48 scale and 1:144 scale models.24 points
-
Gloster Gladiator Mk.I from Airfix, Belgian Air Force, 1938. My last build of 2020. My first biplane build. Used EZ Line for struts. I know they are supposed to be silver or at least grey however EZ Line doesn't make that color and I didn't want to wait to get another product as I wanted to finish it in 2020. Plastic sprue was not an option as I can't make it that thin. I didn't try to paint EZ Line - I thought that wouldn't look good. Tamiya Acrylic paints. I don't like how Aluminium turned out - too grainy, I should work more on that one. Used Matt Olive Drab as per instructions as top color - doesn't look exactly as in the manual however close to Belgian Air Force Gladiators built by fellow modellers. Happy New Year everyone!19 points
-
Hi Folk's and happy new year,I'm kicking of this year with a real oldie 1957 to be correct.My youngest asked what I wanted for Christmas and being a "poor" student this fit the bill they're all over at low prices,anyway it has been a real fun build and minimal rigging too.I used three shades of red to try and give it a bit of depth but ran out of rattle can matt coat had to brush on Humbrol matt which dries more silky I will spray it when the LMS re-opens,final touch was to gloss the cowling and tone down the white with Tamiya smoke.Many thank's for looking in.18 points
-
This is the original issue Matchbox kit from about 1980 which had been in my attic for a number of years. Matchbox trademark multi-coloured plastics and choice of parts for two different versions. Beautiful decal sheet with all roundels in register. I rebuilt the basic cockpit from the kit and built an interior. Both turrets will be removeable allowing the interior to be seen. Matchbox bomb aimer in position with added bomb sight, navigator's seat and cut out in floor for camera, radio operator below the pilot's cockpit, rebuilt engineer's position, wing spar and crew rest bunk. I put a gunner figure in the turret. The original kit's guns are still attached, they are over scale and were replaced later. The port side showing the camera below the navigator's table and the bomb aimer's panel. Five crew populating the forward fuselage, a gunner in the turret, kit's bomb aimer/navigator, Airfix radio operator, kit's pilot padded out, and a standing flight engineer . Fuselage catwalk, block to drill and mount tailwheel to, gunner's rest seat and control panel and removeable rear turret which contains a gunner figure from my spares. I painted the model before attaching the wings, it made it so much easier. I sprayed the underwings and rudders with a Humbrol black spray can, and brushpainted the fuselage black and the camouflage colours with Humbrol enamels. I removed the thick overscale framing from the cockpit and turrets glazing with a file and fine sanding, and then polished with T-Cut car paint restorer. I corrected the kit's incorrect canopy windshield. I used white PVA glue which is water based and dries clear and can be blended to the fuselage with a wet finger. The corrected canopy. I also reduced the amount of taper on the top of the nose with plastic card and filler. FROG Whitley of 10 Squadron in background, the Halifaxes replaced the Whitleys. I made the undercarriage retractable. Undercarriage retracting during take off That has been my latest build, the Matchbox Handley Page Halifax Mk 1 night bomber in the markings of 10 Squadron, RAF Leeming here in North Yorkshire ............. the real one probably flew over Scarborough and may be even over our house back in 1942. regards, adey18 points
-
Hello, First build complete in 2021. In fact, the very last of 2020. It's the Hasegawa kit, a good ol' boy, with no real difficulty. The plane is from the GC II/18 Saintonge, of the french air force, seen late 1945 in France. AK real colors acryl for the top Dark Green and Ocena grey, Tamiya for the underside Medium Sea Grey. And Carpena decals, from a Tamiya limited run of the Mk.V, for french market only. these were awful, as stiff as cardboard, almost not reacting to DACO strong ! 🤨 Here are the piccies. As usual, crits and comments welcome. Best Stef (#6)17 points
-
Hi guys, Here's something a bit different. A vintage kit, Revell No. 03260, which is actually a very old Monogram kit (I think from the 70s'). Fit is surprisingly nice, but kit lacks detail big time, there are parts that are simply not molded at all, etc. However, I wanted this one to be a quick build so I decided to leave it as it is and just cover it with a lot of dirt Painted with Tamiya Olive Drab and details painted with Vallejo. Weathered with AK and MIG pigments and nature effects. I had some trouble with decals, something (decal glue or mark setter/softer) reacted with top coat of Aqueous Premium Clear Semi-Gloss and melted it. Now back to my desert war builds. Happy New Year everyone. Stay safe and healthy! Cheers, Nenad16 points
-
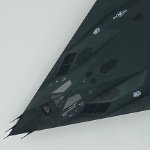
Hi everyone, happy new year! This year I got back into modeling after a 3 year break and overall made it a pretty productive year. Here are some pictures of the models chronologically and at the very end a group photo of them all together, each model I tried to do something new so I left a few comments for each kit. Enjoy! Academy 1/48 F-4B/N My first model in 3 years so just me trying to get back into the swing of things. Hasegawa 1/48 F-4EJ target tow. This kit was inspired by a model online and was the first time I used Mr Hobby paints. I messed up using them here but I think the result is still pretty nice. I now use mostly Mr Hobby paints unless noted otherwise. Here is an image of both of them together, Ive since given these to my father so they are not in the final group photo together. Zvezda 1/48 Mi-24 V/VP. This was my first kit from Zvezda and my first helicopter ever. For the interior I used the Eduard PE set and this kit I really nailed using Mr Hobby paints. This is still one of my favorites and I hope to do more helicopters in the future. Some detail shots Some pictures from the build Kittyhawk 1/48 Su-27UB. I've always wanted to build a two seater Su-27 so I bought this kit as soon as it came out despite its flaws. On this kit I practiced scratch building as I wanted to make the model as close to the real Red 10 aircraft as I could. This involved scratch building the pylons to be the same as my reference images, as well as repairing a massive gap on the engine nacelles. This kit has great surface detail but damn does Kittyhawk need to work on fit and proofreading instructions, the GWH version will for sure be less stress to build if you want to build one of these. Here is a picture of the real deal GWH 1/48 Su-35s in the 901 prototype scheme. After the trouble the KH kit put me through I wanted a build that would go together very nice and this kit for sure was that. This was my first kit using painting mask and aftermarket decals. The masks are from DXM I think and the decals from Begemot. Overall really happy with how this turned out particularly the engines. If I could do it again I would make the tan lighter but oh well. AMK 1/48 F-14D. I'm really happy how this kit turned out and still think it's my best so far. I my focus on this one was to try and make the paint job perfect as well as make it look really dirty. I love how nicely the grays blend together. This is a really amazing kit especially if you want to have everything open. Tamiya 1/48 F-117N. This kit is the first so far to be painted in Tamiya acrylics, mainly NATO black in addition to lots of color modulation. This is also my first go around at an all black aircraft. Im pretty happy how it turned out and it's just such a nice plane to put on the shelf. The decals are aftermarket from Caracal. Hard to beat look Tamiya 1/48 F-16 CJ block 25. This really is a stellar kit with just how much detail and stuff is included. My main focus for this kit was to take it slower and really detail the munitions as much as the plane itself. All the munitions were done before painting the model so I didn't rush them all after the fact. I love how F-16s look like fully loaded so I'm super happy with this one. Only downside to this kit is the decals were pretty bad especially using mr mark setter and softer. Now for something totally different.... Wingnut wings 1/32 DFW C.V Late production. Well I've never built a WW1 aircraft and for some reason I felt like it would be appropriate for the holidays. I found this kit at my local hobby store and figured I had to do a scheme with that amazing purple. The kit is painted with Tamiya paints and I'm really happy how it turned out. The obvious big challenge for me was just the completely different work flow with a biplane and of course rigging. Close up of the engine, propeller, and rigging Here are some pictures of the internal structure. HobbyBoss 1/72 Su-47. This is a quick little kit I finished right before Christmas in a matter of a few days. No real challenge here just a quick build. And finally a group picture of all of them. Despite 2020 being a bad year I found some relief though modeling. This year I am going to try and post more frequently here, currently working on the AMK 1/48 Kfir so I'll post that here for sure. Wishing everyone a happy and healthy 2021! Thanks for taking a look!15 points
-
I even added the stencils. And you know how lazy I am about stencils.15 points
-
Gosh this year went quick, I came very close to completing all my planned builds for the year and I managed to sneak in a couple of outsiders as well. I still have 2 to complete for the 2020 build year, my 1/32nd Tornado ECR for the Tornado STGB, fingers crossed it should be done by next weekend, and my MiG-31BM for the Interceptor GB, I still have plenty of time for that one. So here's the builds, I'm actually very happy with the years work. Nordic GB - 1/35th CB-90 Combat Boat - Tiger Models The year started with a huge bang, the Nordic GB, gosh as Host I really didn't know how huge it would be. As soon as I saw this model I just had to have it, and the scheme was a no brainer for me. Some mods required and of course a crazy masking/paint job. ....and yes the flag has since been corrected. in the Navy GB - 1/48th F/A-18E "Superbug" VF-31 - Hasegawa I didn't get to finish her in time for the GB, but managed to finish her in November....and I just realised I don't have any completed photos for her. So have ruched these, but will post some proper ones sometime during the week. So these are the first seen by anyone of her completed. Lots of mod work/AM bit/s and custom work. Spitfire STGB - 1/48th Spitfire Mk. VIII's RAAF - Eduard Aussie Eight. This wqas a planned build at all, but I needed something simple to clear the mind and mojo, theses where the perfect models, both are OOB. Choppers GB - 1/35th MH-60L Blackhawk "Super 64" - Kitty Hawk I really didn't know what I was getting myself into when I started this one. I though it would have been fairly straightforward but boy was I wrong. The model at first glance is awesome looking....but it's a pig!!! Despite how it so sold/portrayed you cannot build one the Blackhawk's used in the infamous Mogadishu event.....not without a bit of work. I ended up spending more time one researching the build than the actual building part. I the end after a lot of work I think i have something close to the original bird.....I hope it's a fitting tribute to "Super 64" and those involved. Vietnam GB - 1/32 A-1E Skyraider - Fisher Model & Pattern Conversion (Trumpeter A-1J) This was my second hosting job of the year and another case of go large or go home, and another tribute build, Maj. Burnie Fisher MOH. Plus I get to work in my favourite medium, resin! This was a conversion using Fisher Model & Patterns awesome conversion kit. Fisher Model & Pattern...... nothing more to say except the sad reality they are now longer around and if you can find one then it's weight in gold is much cheaper to buy! M1 Assault Breacher Vehicle "Shredder" - 1/35th Rye Field Model Finally a side build that I had going (one of many) that finally saw the light of day this year. An OOB with just some Friulmodel tracks thrown on. A nice model, I have their A1A2 Abrams to start...maybe this year. ...and that's it, not a lot of models but as can be seen I'm starting to move up in scales. This year is another big one, more 1/48th builds, a 1/32nd F-16I and to end the year a 1/32nd SAAB Viggen in full resin!!!14 points
-
Happy New Year everyone! This Eduard's Spitfire mk.VIII is the last model I finished in 2020. Hope you like it. Regards, Ales14 points
-
Hi Here are my 2020 builds in chronological order. 1- 1/32 HobbyBoss Spitfire MkVb 2- 1/32 Hasegawa P-40N-5 Warhawk 3- 1/32 Revell Junkers Ju-88A-1 4- 1/32 Hasegawa P-40N-1 Warhawk 5- 1/32 Hasegawa Spitfire Mk.1 6- 1/32 Tamiya P-51D Mustang 7- 1/32 Hasegawa Focke Wulf Fw-190D9 8- 1/32 Hobbycraft P-51A Mustang 9- 1/32 Hasegawa Bf-109F-2 10- 1/48 Kittyhawk Sepecat Jaguar GR.1 11- 1/32 PCM Spitfire Mk.XIVc 12- 1/32 Hasegawa P-47M 13- 1/32 Trumpeter P-40F Warhawk 14- 1/32 Hasegawa P-40N-5 Warhawk 15- 1/32 Hasegawa Montex Fw 190Aa3 16- 1/48 ICM A-26 Invader 17- 1/32 Dragon Bf 110c-7 18- 1/32 Hasegawa P-47D 25 19- 1/32 Hasegawa Bf 109G 14AS 20- 1/32 Hasegawa P-40M 21- 1/32 Hasegawa Spitfire Mk.1a13 points
-
Hello Dears !! Well, after this shaky 2020, it's time to see what have been done !! For me, it has been an ALMOST year usual... But I've been overflowed by work... To be considered as an essential worker helped a lot to save my income but as Springsteen say " When you're a alone, you're alooone " Some of my colleague choosed to put themselves in safety at home.... But I need my money to pay my mortgage and kids education... So, I elected to stay on the deck... Well enough whinning... Kits now !! Oh Yuk !!! My first RFI was in MARCH ??? Really ??? You lazy CC !! But now she's a sailor's bird I have to thenk my friend @Grey Beema for this one !! Thanks for the tips !! Operation Tungsten birds are 2 now !! Then another cat, but in Pacific this time !! A pic of the cat with her grand mother ?? April is now gone... Already, and no Corsair yet ... Let's get in Korea !! For a looooong protracted build...of a nightmarish kit !! At least !! a colonial in my Korean war serie !! Aaaand here we are in August... Still no finished Corsair in sight.... Let's go in CBI with this one... First earthbound bird... I toyed a lot with the weathering... And believe me Gents... I restrained myself a lot since the real thing was even worst !! August was a good month since I finished 2 Let's go in Italy !! Thanks @tonyot for the tips on this one !! For this one, I have a lot of you to thank !! But the first spark came from @rob Lyttle Rhodesian Training Group !! Aï Caramba !! November is ticking on the clock and then we're back in Korea !! A tribute to the late General Daniel "Chappie" James !! Another thank to @Biggles87 for pics and support !! Let's have a look to the Korean serie now !! We then come back in Europe with one of my longest build... Started in 1988 or so... Aaaaand I finally did it !!! Back in Korea again !! With a sleeples Knight of Ni ! fi Let's have a last pic of a part of my Corsair family !! Well 9 only in 2020 !! I will not start a new kit in 2021... Just finishing a bit of what is on the bench !! Thanks a lot to you all friends @The Spadgent and my cousin @Corsairfoxfouruncle to name a few !! I wish you all a wonderfull 2021, full of joy and happiness and a good health, I hope that our distinguished guest @Martian will fully join us soon The usual suspects pack is waiting for you my friend !! I also hope for SMW 2021.... Sincerely !! CC Still crazy after all these years !!13 points
-
This is the third AFV model I have made. I have got to a sticky patch with the kit I am building at the moment and so have been distracted by this half track. As far as I can see this kit is a 45 year old kit and it is very simple. I have made it straight out of the box with stores. very enjoyable build13 points
-
Hi all I present to you my Airfix 1:48 Javelin FAW.9/9R I finished it back in October but only just got round to posting here It’s in the markings of no 64 Squadron Royal Air Force based at Tengah in Singapore during the 1960’s Aftermarket sets include Eduard cockpit interior and Master replacement pitot tubes Tamiya and Mr Hobby paints used throughout the build A throughly enjoyable build Thanks for looking and happy modelling12 points
-
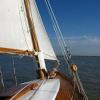
Happy new year to every one and all the best to you and your family. This is 1 of the last 2 works I finished in 2020(actually finished before midnight yesterday!). This full resin kit is released by a Chinese local small brand called Ostritch Model, which their boss sent me as a gift in this summer contest. So I built it with sea sailing scheme which is my very first time. It's really small model but I tried to catch some feeling and restore experience for sea sailing effect. Thanks for watching! Yufei12 points
-
I have a few CORGI diecast model aircraft in my collection from a number of years ago, They gave me quick access to types that interested me but I did not feel up to building a kit of at the time. They also provided quick props for my airfield dioramas. But I cannot leave them alone, so I take them apart, add more detail to them, put them back together and sometimes repaint them. The CORGI Swordfish was one of their better models I think, see what you think ............ Ready to move aircraft out of the hangar. Preparing to rig aircraft for flight. Wings unfolded and locked. Crew aboard. All clear Have a good patrol Clearance to take off from runway controller Carrying something heavier. I added the bombs and racks. Happy hunting Nicely populated cockpit by CORGI That has been my CORGI Fairey Swordfish Mk II. CORGI also did a nice Mk III with ASV radar and in a black colour scheme. regards, adey12 points
-
Starting to make some headway on a scratchbuild of the Norman Fieldmaster in 1/48 scale. Started off with the framing for the fuselage buck... Then the buck almost ready for vacforming. Shown alongside the Valom 1/48 Britten Norman Island for a size comparison... Then after vacforming. Split into front and rear sections for size practicalities. Front fuse moulded left/right halves per convention. Rear fuse moulded top/bottom - which is going to assist with building the interior as we see later... Then here' s the tail in a jig - with fuse under way in the background. Lego has the big advantage of being resiliently 'square' which comes in handy for modelling. And here are he basic component parts dry-fitted. Interior is being installed in the lower half with clear section to go over the top. The big plus of separating front and rear fuse halves (apart from moulding limitations) is that I can basically build the cockpit 'pod' as a hermetically sealed unit - without having to worry about plastic swarf, sanding detritus etc making their way inside and ultimately clinging like limpets to the canopy interior.The wings have separate 'trailing' flaps and ailerons which will add a bit more depth. And here's the scheme I will do - G-NACL on evaluation in Australia 1988 https://www.airliners.net/photo/Untitled/Norman-NAC-6-Fieldmaster/2513794 (a Daniel Tanner copyright photo on Airliners.Net)11 points
-
It's not, by any stretch of the imagination, no. It's more a case of "I'm allowed, and I can, so I will". In terms of practical danger to other human beings, a semi-automatic Sten is a fairly inefficient means of dispensing ruin. But it will go nicely with the Lee-Enfield and the Webley. Having managed to get this far, after like, nine months, I've decided to try and ruin everything so close to the finish line by attempting weathering. It's been so long since I've been modelling that I literally cannot recall what I did with two of my airbrushes (talk about first-world problems!), or even which weathering products I own, so what could go wrong? I used a mix of pre-thinned enamel washes and Tamiya smoke airbrushed very inexpertly from a 0.18mm airbrush. Then I decided the RNFS Hurricane I was probably more beaten up than MacRobert's Reply, so I broke out the pigments, and brushed a thin layer of fixative over the model. Err...okay, well it doesn't look this bad in real life, I promise. I also applied some small dots of a lighter blue oil to the roundels, to try and make them look weathered, but I don't think it took. Well, I tried. Now both models are in my dehydrator hopefully getting ready for a nice overcoat and then final bits and bobs assembly.11 points
-
Thanks Gents. Strangely things haven't been too bad over Christmas, apart from Parcel Farce and/or China Post damaging my main Christmas present. Based on past experience, both personal and in the news on more than one occasion, my money is on the former. Luckily, I was able to repair the kit part (A cracked port hull half on the Trumpeter Graf Zeppelin). Although the kit was very well packed, the parcel looked like someone had stamped on it, Fortunately, everything else seems to be fine, just as well as Mrs Martian had bought me all the accessories that are available for the kit. I start treatment on Monday so I am getting a bit apprehensive as this will be the first time the course has been run remotely. I have been working on some of my real space models and am thinking about getting a thread going. Martian 👽11 points
-
Happy New Year to all!!!!! To steal this growing idea from others, here is my 2020 year of kits produced. I was able to “move” nine from the stash to the display cabinet. Here they are in order................. Special Hobby SMB2 Super Mystere ( January 20 ) Airfix Mig-17 Fresco ( February 17 ) Eduard Mig-21 PFM ( March 24 ) Italeri X-32 “Guppy” ( April 23 ) Hasegawa FB-111A ( May 11 ) Sword F3H-2 Demon ( August 12 ) Hasegawa P2V-7 Neptune ( November 29 ) Arma Hobby Yak-1B ( December 7 ) * Special thanks to Roman Schilhart!!! Eduard Spitfire Mk.XVI ( December 31 ) 2020 “Elephant Walk” / Group shot Here are some of my thoughts of the nine kits............. 1. Best : Eduard Mig-21 PFM 2. Most difficult : Sword F3H-2 Demon 3. Easiest : Italeri X-32 4. Most parts involved : Hasegawa FB-111A 5. Most detailed : Eduard Spitfire Mk.XVI & Mig-21 PFM 6. Most fun : Italeri X-32 7. Most difficult to paint : Airfix Mig-17 8. Most time consuming : Hasegawa FB-111A 9. Least time consuming : Arma Hobby Yak-1B 10. Best decals : Hasegawa P2V-7 Neptune ( Caracal set ) 11. Least satisfied : Airfix Mig-17 12. Most satisfied / favorite : Sword F3H-2 Demon The Sword Demon is my favorite of this group simply due to the effort it required to get it to a presentable state. My overall rating / opinion on a scale of 1-10........... 1. Sword F3H-2 Demon : 5 2. Hasegawa P2V-7 Neptune : 6 3. Airfix Mig-17 : 6 4. Special Hobby SMB2 Super Mystere : 7 5. Hasegawa FB-111A : 7 6. Arma Hobby Yak-1B : 7 7. Italeri X-32 : 8 8. Eduard Spitfire Mk. XVI : 8 9. Eduard Mig-21 PFM 9️⃣ Thank you for all of your feedback throughout the year. With much respect, Mike10 points
-
Some fun with transparencies. This is my technique for sanding and polishing glazing. I don’t claim any of it is original, indeed most has been freely borrowed from more expert folk than me. I tend to polish to a point where I’m happy. It may not be completely gin clear, but I find it adequate for the job. Weapons of choice. Sanding sticks of various grades, from very coarse to very fine. Masking tape, dry marker pen, polishing wheel and compound. Nothing clever or fancy. First, mask around the general area. This is chiefly to prevent accidental damage to moulded details. Using the dry marker, "paint" over the glazing and surround area. The purpose here is to show when sanding has reached the level of the fuselage plastic. I generally reapply the marker pen as I work. Start with the coarsest sanding stick. The aim here is to remove as much material as needed as quickly as possible. The shadows of marker pen show low areas and indicate some sanding still to go. More marker pen, and a slightly less coarse sanding stick. Now I move to the Flex-I-Files, working my way from coarse to X-fine. It sometimes helps to do this with water. The stages remove scratch marks from earlier coarse sanding, and refines things. All that’s left at the end should be marker pen in the tiny recesses round the edges of the glazing. Some time later and things are looking quite good. Not crystal clear, but good enough for me. A purist would go on to the micro mesh sanding stages here, and get things properly "gin clear". I am not a purist, and I am fundamentally lazy. Dremel and polishing wheel, plus polishing compound. Don’t run the machine too fast, and don’t let the wheel linger in one place too long else the plastic will begin to soften and melt. Gentle passes across the area being polished are all that’s needed. A final polish with an old bit of cotton rag - material from an old pair of denims is apparently ideal - or a micro fibre cloth as here. This cleans away the polishing compound residue, and buffs the glazing. At this stage, if you’re unhappy with the clarity, repeat some of the later sanding and polishing stages until you are. I’m happy with this level of clarity. One final job is to run a scriber or blade along the recessed panel lines to clear the crud out and reinstate any minor damage caused by enthusiastic sanding. A wipe with isopropyl alcohol or thinners will clean any final polishing residues away. I’ll apply masking to the relevant panes later. Time to repaint the interior.10 points
-
Thanks Heather, Bill and Crisp - no quenching then, got it Thanks hendie and Alistair Quaffing it is then! What's this? Having commented on Tamiya's 'legendary fit' I noticed a horrible step on the fuselage join, top AND bottom. Scraped with the ninja, marked with a dry wipe and sanded: Note the BluTak in the front wheel well - should have put that in before I started sanding. What's the betting that some scrapings / sandings appear in the clear parts? Primer will tell the whole story You may also have noticed that the Aizu outline has been ripped off. Not bendy enough so I resorted to tape and a #15. Final shot - BluTak on the exhausts:10 points
-
Hello my Friends. This is my latest. The kit came without the nose cone so I bought the one from Maestro models. Had lots of fun with this. All the best. Ralph.9 points
-
A quick update on my Tiger, I managed to get some Mr Surfacer black primer sprayed on, I left the turret roof off so that I could add the spare track brackets, Dragon supply 7 of them but they are missing the half round lever that is pushed down to release the track link, I shall try and add these with some stretched sprue. Lots of spare track links for extra protection.9 points
-
My entry: EE(BAC) Lightning F.6 XR761/A of Wing Commander A.L. (Al) Blakley of No.56 Squadron, RAF Akrotiri, Cyprus, and RAF Wattisham in 1975. Hasegawa 1/72 My WIP9 points
-
G'day Chums, This one has crossed the line despite my manglings and gash hammerings.The build thread is here.My thanks to Col for doing his bit,Enzo for his bit and Troy Smith for the guidance and gen that let me get away with it. Hope you enjoyed,thanks for looking in.9 points
-
Red Bull Mig 17 NX117BR Flown by the late Bill Reesman in the USA airshow circuit. Aircraft is now in the Planes of fame museum, Chino, CA Kit:- Airfix 1:72 Mig 17F Paints:- MRP, Alclad, Humbrol Satin Cote. Decals:- Ebay cottage industry seller. Stars replaced with smaller ones cut on a Silhouette cutter. After market:- Ejection seat and smoke pods from same seller as decals Master models brass pitot & guns Eduard canopy mask.. Scratch build 3D printed nose pitot, under fuselage antenna, under wing antenna, ejection seat firing handle. Brass tube used to replace a lost master models gun. Plastic rod landing gear position indicator pins. Mark9 points
-
Wishing you all a very happy new year, with burgeoning hopes for a massive improvement all round. Let's face it, its hard to imagine how it could be worse. And in the death of last year my postman delivered these folks, my last Christmas present direct from Pete in Lincs. Thank you mate. He was an unexpected bonus Pete thank you. Do you remember in the preamble to this ramble through the deadwood in my mind I mentioned not making wheels with their umpteen part rims, fellies they call 'em. I described removing any plasticard that is not wheel from the sheets. It begins... It is inevitable that waste plastic occurs when using a cutting protractor so these circles are well over sized at the beginning , there's a madness in this reasoning tha' knows. After starting the rims with the protractor I transferred my efforts (and by god it really was an effort working 80 thou polycard) to my little compass cutter. The said compass cutter is incredibly uncomfortable to use on thick plasticard but I got there in the end. These blanks then need the un-rim extracting. This was done by virtue of Britmodeller's legendary generosity, many moons and other planetary movements ago I received an unexpected parcel in the post from Ireland. Perplexed I opened it to find a complete button lathe with ancillaries inside,with a note. "I had two, you didnt have one, please accept this gift as a gift" signed by the main man in Bonnie Ireland. No, not the teeshirt but our mate Tony, a debt I can never repay (except with embarrassment, thanks Tony. You are a true gentleman) So having rim extraction facilities set up in the garage vise I braved the freeeeeze and began extracting. A big enough central hole allowed me to superglue the centres of the rings together and screw a flat headed set screw into a plastic hose held in the chuck of the lathe coupling the pair of wheel blanks into the lathe. Like so. Yes it was vibrating whilst the sheets were still eccentric, that soon settled down as balance was installed. With the outside diameter achieved then I began rim making by cutting away the un-rims, the 2mm chisel I used is sitting in the milled slot in the lathe bed here. Eventually. We have two rear wheel rims. No, sadly I wasnt able to (I tried believe me) get the smaller front wheel rims out of the same pair of blanks. I had to take a tad more than I wanted off the centre piece to get the outers out and didnt think a 1mm chisel would have given me enough control in the trench I was cutting out of the plastic, but who knows? Oh well this morning I shall be heading back into satan's freezer to turn another, smaller pair of rims. Keep warm folks!9 points
-
I have been wanting to start this for some time but having read and watched only one build through to completion, it seems that its quite an undertaking to complete. Because of the issues I thought that I would build the support vehicles first as I probably wouldn't want to build such vehicles if the Lancaster was going to become a bind. However, having virtually completed the AEC 6 x 6 refuelling bowser it time to start the beast . . . . . . and others vehicles completed for the planned diorama I suppose I have had the advantage of hindsight of other builds so I am able to start with the knowledge of what is required. I have attached a list of corrections required of the HK model, a number are personal choice and I dare say to some modeller(s) the kit is acceptable in representing the finest allied heavy bomber. HK Lancaster fault/correction list (in no particular order) Jan. 2021 Cockpit floor removal as to high 👍 Pilots seat height and seat base in-correct 👍 Pilots armour needs replacing/re-shaping Pilots Control column to short Flt. Eng. Panel, remove, shape and thin down kick panel 👍 New flight Eng. seat required Cockpit rail cut back for IP to fit Replacement IP with AM Instrument panel Bomb-aimer bulkhead 7 sink marks 👍 Rear bomb bay bulkhead has 3 viewing windows, Should be 2 👍 ASI position Starboard side fuselage to be eliminated 👍 Dinghy stowage in port wing, upper wing removal 👍 Landing lights in starboard wing beneath removal 👍 Wing tip lights Rearmost Wing tip fitment (5 thou- top) Flap detail missing ‘OOO’ top & bottom sections Flaps additional struts needed Propeller blades need turning Cabin heater openings in front leading edge of inner wings section Exhaust covers (shrouds) to large & need re-sizing 👍 Engine cowlings removal of panel lines 👍 Engine radiator flap opening, personal choice 👍 Engine rad post-war version, needs wartime type 👍 Reshape inner rad vent, square top 👍 Undercarriage to high, needs shortening Undercarriage main legs have 'holes' - need filling 👍 Ailerons and brackets, ribbed and bracket re-shaping Ejector stubs in one-piece main wing Ejector marks in undercarriage doors 👍 Ejector marks in bomb doors 👍 Ejector marks in bomb-bay rack 👍 To many bomb positions front section of bomb-bay 👍 Remove U/C ‘Non-retraction bars’ Rear entry doorstep wrong 👍 Front turret fairing top section broken (at point of delivery) Front turret base Sink marks x 5 👍 Front/Mid-upper/Rear turret casings (drill outs) Mid-upper turret fairing requires ‘blending’ Rear turret doors absent Rear turret front Perspex removal – my choice of aircraft Rear turret centre (gunners feet) personal choice Cockpit framing required ? personal choice Canopy Escape Hatch framing (additional frame removal ?) Main wheel hubs need drilling (Resin type obtained) Tail wheel needs strengthening, personal choice Tail-plane – 2 tops – 2 bottoms split 👍 👍👍👍 indicates issue resolved 60” fuselage roundel . ‘ 47.5mm’ 102” wing roundel . . . .‘80.75 mm’ My choice of aircraft is the last one lost flying out of RAF Station Grimsby in Lincolnshire . . . There have been numerous photos and reviews of the sprues so unless somebody wants to see specific parts i shall just dive in and start the build, not necessarily in the order of the instructions . . . For me personally, this will be the ultimate Lancaster kit and as such I shall endeavour to produce the best I can. It will be time consuming and no doubt there will be little progress at times but please bear with me . . . I am looking forward to putting the plastic together Ian8 points
-
It's been a while since I posted anything on here but as @tonyot and @bigbadbadge have given me some encouragement here goes. I've made a lot of Spitfires in the last couple of years, there are about 50 finished in my loft, three in progress, and an unknown number to be built. Anyway, this thread is about the new Spitfire Vc. I bought seven on release and have done two already. A 185 squadron one: A 91 squadron one: This one may not be an RAF one. I'm tempted by the Italian and Greek ones on the Xtradecal Vc sheet. We'll see. I've made a start on the interior, obviously, photos to follow.8 points
-
Happy new year to every one and all the best to you and your family. This is the second one of the last 2 works I finished in 2020(another one is the HMS Yarmouth). This full resin kit is released by Orange Hobby back to more than 10 years ago. Because of the production aging, my kit had very serious part deformation for the hull and also shrinkage for upper contruction parts. So all PE parts cannot fit properlly which I had to cut them in pieces and combine those pieces one by one. I also used 5 nuts to force the curved hull to stick on the wooden base. Very tiring work over all but well, since it's the only 1/700 scale Type 22 Batch 3 in the town, I had no choice. Based on experience from HMS Yarmouth, this is the second sea sailing effect I made so I hope it may have some improvement. HMS Chatham left a very strong impression to me, when her escorted HMY Britannia withdrawing from Hong Kong on July 1st 1997. So I decided to make the model to memorize that historical moment. I understood some details may differ on the model compared with the real ship back to 1997, but since I did not have too much option parts to select, I decided to leave them as they were. I aso attach some photos when she was in Hong Kong in 1997. Thanks for watching! Yufei8 points
-
Hi all, Actually built this around May in lockdown but never got around to putting it up as it's not much of a looker (first one after 6 years clean of sniffing poly cement). Thought as it's an old and kinda crappy kit I would smash through it without a care but of course got suckered into trying to do panel lines and reshaping the horrible up-turned nose they gave it. Colours are way off but altogether not unhappy with the camo pattern. Decals were horrible, and unfortunately in spite of some lead in the nose she plants that butt hard on the tarmac 😕 Go easy on her8 points
-
Hello, uff, second model finished this year - maybe next year will be better, who knows. Two models are very close to finish, so maybe I will beat the record. I think that it's not the last "four leaf clover" in glass-case - but at first, I need to find TBM-1C kit in 1/72.8 points
-
G'Day All, This one should have been completed a few days ago, but i got slack after Christmas. This is the Dragon Golden Wings 1/72 He-162A-2 Volksjager. The kit includes a small fret of Photoetch. Over all, not a bad little kit - some fit issues with the wheel wells, both front and rear are undersize. You need to add some plastic card to the rear to allow it to seat correctly. The front needs alot of dry fitting to get it to sit correctly, however the side ways don't line up with the undercarriage opening. The engine can be displayed open, but there are not mounting points for the fuselage panels ... Model was painted with Gunze paints. The photo etch are small (tiny) details. lost one part into the air, had to replace it with wire. I think it can do without the photo etch ... anyway, its finished now ...8 points
-
First completion for the year, the Mirage M3 Stuart completed as an Australian example in New Guinea. It’s very small in 1:72 scale! Also an experiment using a new (to me) brand of paint - Mig AMMO acrylic. My local hobby shop is running low on my usual Tamiya paint so I thought I should give this a go. Not entirely convinced - may need to give it another go. It brush painted ok over a coat of Tamiya acrylic as a primer. The kit has a great decal sheet, allowing you to complete the tank as a whole bunch of different examples from the 2/6 th Australian Armoured Regiment in New Guinea in late 1942-early 1943. You can read all about their actions on the ANZAC Steel website here. I completed mine as “Captain Kidd”, of C Squadron, 2/6th Australian Armoured Regiment at Buna, 18 December 1942. This tank was commanded by Cpl Tom Byrnes, but also had on board the squadron commander Captain N Whitehead as it was the command tank for the action at Buna. Captain Whitehead was injured during the attack, and the commanding officer of the regiment, Lt Col Hodgson took over until he was also injured. The tank was subsequently destroyed by a magnetic mine. Of the seven tanks in action on 18 December 1942, three were lost. And finally against an Australian $2 coin for scale (which is similar in size to a British pound coin) Thanks for looking.8 points
-
Hello everyone. Another year, another Messerschmitt... This is the new-tool Bf 109G-14/AS by AZ Models. A kit which gave me a few problems, not least confusion over the specific features for this particular variant. The instructions tell you to attach the large wing bulges for the wider wheels, whereas the artwork and painting instructions show the earlier wing arrangement. Having carried out a bit of research (too late) I think I may have got it wrong, so this could be something of a hybrid! I changed the markings to depict 'Red 2' of 2./JG 300 in 1945, with the later blue-white-blue RVT band. Parts of the undersurfaces were left in bare metal as was fairly common in the final months of production. Best wishes, and a much Happier New Year to all! Ian8 points
-
Good to see a start being made Zack, about time some more builds got underway! Just to prove I've not been idle starting to look something like a Tiger... Insides of hatches have received a base coat of white ready for more detailed painting once the exterior is painted. Drivers glass and surround painted and masked off, the armoured front is held in situ with clear fix until painted and then removed, unmasked and attached permanently. Doubt little will be seen of this but... So far build is pretty much as RFM intended apart from the turret bin, I need to decided upon the fenders and exhaust shrouds...Do I stick with RFM or go Aber? Photo etch is thinner, easier to bend and damage but it's another £12.. Won't need to replace gun barrel, whilst it's not perfect once I make a muzzle dust cover it'll take care of that, still haven't decided upon tracks yet, kit or metal after market..decisions, decisions... Good luck everyone, stay safe.8 points
-
Sorry, probably posted a bit too quickly 😉 Ok, I'll start with the primer. next steps are oil dots, washes, filters and chipping As you can see, the ageing is somewhat exaggerated. After dusting, however, this effect is softened again. Next time I will show the finished model, followed by the vignette.8 points
-
So today's update and more paint, weathering and decals applied 🙂. First job a bit of modulation Next up a gloss coat for decals and further weathering Decals applied now to try and add some interest to a monotone paint scheme Still some more work to do but I'm happy so far. Thanks for looking back soon 🙂👍8 points
-
This is my latest just finished.It is 1/72 Special hobby Dornier Do 27B-2, D-ENTE, Tanzania 1958-59. This zebra striped aircraft was flown by Michael Grzimek, a west German zoologist and filmmaker while he was making documentary films. Sadly on 10 January 1959 the plane collided with a vulture over the Ngorongoro crater causing him to lose control and he was killed in the crash. Anyway hope you like. https://postimg.cc/1fPr0xS6][/url]8 points
-
Granted they're a rum bunch on here Pete, but a trifle strong referring to them as actually 'rank'... 😉 Indisputedly more than Sainsburys.... De Havilland gene sequencing! 😁 'Little did I think when opening the Frog boxing a year ago'.... It most certainly is good that we've all survived Simon; tempered by heartache though for all those in the medical profession, already exhausted in a rising storm. None could be more excited than myself at the prospect Ced - am like a big kid about the magic of 'making shapes' in this way.... Who said Ireland was a tax haven? Consider your name in the pot dear heart. No-one can be keener than I to wave my parts around in front of the assembled throng Bill. 😁 Well observed Ian - I need to go and check as I fear you may indeed be correct and will need to revise the length of that rear fairing slightly as a consequence. 'I wondered when you were going to notice that Wilson' &etc.etc... You too Giorgio! Let's hope that 2021...wait...I don't know what to hope for it's such a weird time. Let's just say I hope for peace in whatever form most pleases the individual concerned. No Vixenry today chaps as I have to spend it outside with the lads and a chain saw coppicing willows down the end of the garden. More from the Vixen Support Group when it happens... Tony8 points
-
Hi All, Flushed with the modest success of spraying the cowlings, I couldn't resist assembling the engines and airscrews to see what they looked like. Here's the result of a couple of hours of very satisfying work: I even painted the distinctive yellow dot which is apparent in some of the photos posted earlier 🤩. I normally hate doing radial engines (particularly multiples thereof), but I've found this strangely satisfying. There is a tenuous personal connection - my first job after university was working at Rolls-Royce in Bristol (which the Bristol Engine Company became). A much younger Dunny could therefore be found wandering the same production and assembly buildings where these amazing pieces of engineering were manufactured - none of these places now exist. Hard to believe that 30-ish years have passed since then - happy days. Enough reminiscing and on with the build! Thanks for looking, Roger8 points
-
Hello all, This is the last kit to make it to the finish line in 2020. It's been a productive year. This is Kinetic's 1/48 F-16B made from the F-16A/B NSAWC Adversary boxing. The decals are from the kit, although I did not like the 'TOPGUN' marking (too wide) so masked and sprayed it. The blues are MRP and the greys are Mr Color. I've really struggled to photograph this one and it's not quite blue enough. The only aftermarket are some Wolfpack resin seats and an Eduard resin nose wheel. The pitot is brass tubing. The kit is a pig that was no fun to build whatsoever. You can read my diatribe at https://jonbryon.com/kinetic-1-48-lockheed-general-dynamics-f-16b-fighting-falcon/ Comments welcome and thanks for looking. Jon7 points
-
Rotor heads detailed and wheels stuck on. I'm calling this finished, apart from a final coat of Aqua Gloss on the windows: EXCEPT the wobbly rotors. I think I need to stick some tube in the nasty holes to try to get the right angle of the dangle. Remember these? The final problem.7 points
-
Hi Guys. This is a mini update. Hans the commander has been given the first lick of paint. More to follow. The turret has been made and zimmed up. And painted as well. Next up, I will weather the turret and put finishing touches. Also, I decided not to put any markings, as I was watching a documentary about the german tank crews and their stories. This made me decide to keep the tiger unmarked and representative of all the tanks and their crews.7 points
-
You’ve answered your own question, Bill: in water-tight terms, the openings are just slots into the hull in which things like boats and paravanes are stowed without sticking out of the side - the water simply flows out again via the scuppers (drains), because the real boundary between wet and dry is the inner wall of the slot. [P.S. just read your post again, and you specifically mention the holes in the nose (bow!) The answer re flowing out again is the same, but this is what we’re talking about (Ark 3) ... and here a couple of examples of it coming out again (Hermes) There is still a fair amount of embellishment to go before I run out! But some paint might not be that far off, at least once the port side of the hull has caught up with starboard. All joking aside, the order in which things are to be done has been exercising my mind a lot recently. The paint scheme is quite complicated, because of the extreme weathering that much of her upperworks showed by 1941 (see sinking photos for evidence) - so it will doubtless involve chipping, oil dots, masking and the like. But there are numerous sticky-out-nesses yet to add - boat davits, W/T aerial brackets (not the aerials themselves), and the like - which are brass and delicate. Add them too soon and damage during handling is almost certain: add them too late and fixing them in place on top of paint will be challenging. The answer will be case by case - but a lot of thinking is going on at Schloss Crisp7 points
-
So with the mojo in full flow I've already chosen my next build 🙂. Having not built a kit from Miniart yet I've decided to tackle the kit below which will get the full monty of weathering treatment infact I've ordered a plethora of pigments, washes etc to have a play with 😉 The worn out whitewash box art look is what I'm hoping to achieve....Happy Days 😊 👍7 points

.thumb.jpg.d17ff607fc7e89ed057e63fcb6f2a888.jpg)


.thumb.jpg.0bac681e0da8e4ed7557610e98fda908.jpg)


This leaderboard is set to London/GMT+01:00