
Leaderboard


Wedge-TailedEaglePortraitRaptorDomains.thumb.jpg.41a306d3445a68f0f2df773e01776ea6.jpg)

Popular Content
Showing content with the highest reputation on 28/12/20 in all areas
-
Here is my 12th completion for the year, 19 Squadron English Electric Lightning, Gutersloh, late 1974. Airfix 1/72 with Barracuda Cast seat and Master pitot. Finished with Hataka acrylics and Vallejo metalcolours. Built for the Interceptors a Group build. Thanks for looking. AW36 points
-
Afternoon all, My latest build, and probably last for 2020, is the Airfix 1/72 Vickers Wellington GR MKIII boxing in Coastal Command colours. Representing an airframe based at RAF Chivenor... Airfix' own instructions state there is some ambiguity in the actual scheme carried, so whilst I'm sure the aerials and deice boots on the front of the wings should be a different colour, I am leaving them as is. Built entirely out of the box, using Tamiya acrylics - I am not and never am happy with how the white has laid down and no combination of thinner, ratio, air pressures etc seem to change this for me. Displayed quite nicely on Noy Minatures WWII hangar base, which is a little too small for a bomber and the Airfix RAF resupply set. I learnt alot from this build, trying out different weathering techniques and home made washes/oils. Now to decide on my next build! Merry Christmas and happy modelling.30 points
-
Hi all, Actually built this around May in lockdown but never got around to putting it up as it's not much of a looker (first one after 6 years clean of sniffing poly cement). Thought as it's an old and kinda crappy kit I would smash through it without a care but of course got suckered into trying to do panel lines and reshaping the horrible up-turned nose they gave it. Colours are way off but altogether not unhappy with the camo pattern. Decals were horrible, and unfortunately in spite of some lead in the nose she plants that butt hard on the tarmac 😕 Go easy on her29 points
-
This is my effort i have no idea how you guys can turn out such fine efforts i build so slowly so heres my tiny SE5a done in the early hours when I could grab a few minutes i drew the line at rigging it. Dave26 points
-
Kit: 1/100 Tamiya MiG-19 Farmer (61609) Paints: Tamiya Acrylic & Testors MM Decals: kit AM: none Kit was built OOB. 2004 repop of a kit originally released in 1968. Stand was modified from a stand included with a 1/72 Tamiya X-1 I built for another Blitzbuild a couple years ago. Hope everyone has had a good holidays. Happy modeling.25 points
-
Hi folk's,Matchbox/Revell Puma,thanks for another great Blitzbuild!24 points
-
Hello to all of you.This will be my last finished model for the year 2020.I made new seatbelts,gunsight and pittotube for this one.The paints I used are ak real colors and the decals are from Hi Decal Line.If you wish to see the full build process follow the youtube link bellow. Happy holidays to all of you and stay safe.23 points
-
Quick project - Airfix 1/72 Hawk T.1, edition A50155 "RAF Benevolent Fund". Nothing special, but I saw XX278 and XX230 in this scheme at NATO Days in Ostrava-Mosnov in September 2012 and just loved it! I`ve started this kit years ago, but had no patience for those decals. Finished today. Thanks for watching!23 points
-
Airfix 1/72 Tiger Moth of No.12 Local Air Supply Unit (LASU) Kiarivu Airfield PNG Aug '45 Started about 10:30 on Sunday 27 Dec and finished about 16:00 on Monday 28 Dec, About 12 ish hours of hands on and waiting for things to dry, a hair dryer helped considerably. No rigging however, I can't do rigging -sorry. Thanks for a good GB, I enjoyed it.23 points
-
My first Blitzen build which I only spotted on the evening of the 27th. 299 mins of modelling later and the kit is complete. It is the venerable 1/72 Heller BF108 kit with some replacement decals, airbrushed with Vallejo ModelAir paints and then hand mottled. The Build link is here : Thanks for organising this. I really enjoyed it.23 points
-
Hi all, Thanks for all the kind comments on my Airfix Tucano so I thought I’d share my Airfix Wellington hot on the heels of it. This was a mammoth build and it took quite a bit longer than I imagined. I have added a detailed build thread contained below. Here is the finished article and what would turn out to be my penultimate brushed model before turning to airbrushing. Thank you for taking the time to look and as always I appreciate and comments and criticisms so I can improve model on model. James22 points
-
Airfix 1/72 PR XIX. Built straight from the box, this is my third attempt at a Blitzenbuild, and the first time I've finished within the allowed time. Thanks for the encouragement, and for hosting such a fun challenge.22 points
-
I think this may be the very first Avro Vulcan in a Britmodeller Blitzbuild, it’s the 1/200 kit by Cyberhobby/Dragon. I built it with a fair few modifications for accuracy reasons and the decals were printed myself with the exception of the lightning bolts as I finished my version of the design too late to print for this group build. As this is a blitzbuild, I have done it as if it were fresh from the paintshop. I will most likely revisit this model in a few weeks and add a wash and some exhaust stains, but for now a clean Vulcan is fine. This is my 5th build of the kit, and I thoroughly recommend it, although a little Vulcan knowledge is necessary to get an accurate model as there are some errors in the kit of varying significance. WIP thread here: An example of the attention to detail on this model:22 points
-
Little H presents, Blitzen the Hurricane. 1/72 Airfix kit, painted with one of her Christmas presents, a new set of acrylic paint.21 points
-
Heller Caudron C.635 Simon, took about eight hours out of the past 26: The kit is brilliant and I thoroughly recommend it in its new release with super decals. The only piece I added was a bit of sprue for a glimpse of an engine cylinder. I made the side windows from glue film, which bit me, so I’ve made six windows for four frames! WIP is here if you are interested. Thanks for a great GB - always good to have an excuse to just get on and build! Regards, Adrian21 points
-
Season's greetings all This is my take on Johannes Steinhoff's Me 262 'white 6', while he was flying with JV 44 at Munchen-Riem towards the end of the war. In April 1945, his aircraft hit a badly-repaired bomb crater on take-off, which damaged his main gear and threw the aircraft off line. In his own words, his aircraft was going 'too slow to get airborne and too fast to abort' and he received severe burns in the subsequent crash, which put him out of the war and in hospital for some time afterwards. He recovered eventually to play a leading role in the new Luftwaffe, as well as within NATO. I was lucky enough to meet him when I was a cub reporter in the mid-1980s. The Hobby boss kit is pretty good, but is designed to be displayed 'open' (canopy, gun bays, etc) and doesn't take kindly to being closed up, so needed a bit of trimming, sanding and filling here and there. As far as I can tell, JV 44's 262s were mostly finished in an overall 'blotchy' RLM82 green, and 'white 6' certainly seems to have been finished in this way, according to pics. I've still had to use a fair bit of licence though, which is not unusual for late-war stuff Hope you like it19 points
-
Thanks for another great Blitzbuild. This is OKB Grigorov's 1/700 Lockheed IX-529 "Sea Shadow". Gunze Lacquer paints and homemade decals. The "sea" is plywood, watercolour paper, acrylic modelling paste, acrylic paints and acrylic gloss gel. The boat needs some details painted and the sea and boat need to be better joined together. Build thread here: www.britmodeller.com/forums/index.php?/topic/235085372-blitzenboat/ Alan19 points
-
One of the two Sea Harrier models I managed to finish this week - 1/72 Airfix BAe Sea Harrier FRS.1 XZ457 "14" of 800. Naval Air Squadron, HMS Hermes Air Group, Falkland Islands, May 1982. Airfix SHAR kit is a total disappointment. If you think that wide panel lines are its biggest drawback, you are wrong - this kit has so many different issues that it could cover 5 other kits with them! Although it's easy to assemble, it takes a lot of work to fix all the bugs and it still won't look as good as the old ESCI! Airfix, it`s time for a new SHAR, at least as good as your GR.9!!!... I`ve used Eduard PE set (poor), Pavla resin air intakes (horrible! - don't buy them EVER) and exhaust nozzles (awful), Pavla resin gunpods (even more awful, horrible and innaccurate), Pavla resin MB.10H ejection seat (poor), Aires Quickboost outriggers for FA.2 (nice) and Master Pitot tube (nice). Decals are from the kit and they are the best part of the whole set. Painted with Gunze Mr.Color (333 EDSG, brightened). A couple of photos taken in daylight: And now a few photos taken in artificial light: Thanks for watching!18 points
-
REVELL 1/144 U-BOAT IIB U-20 BENCH TIME; 11 HOURS18 points
-
So this might seem completely random... and it is... but these are two year's worth of my local club's Group Build models and it somehow made sense for me to combine them into some Frankenstinien kit. So I present a 1/24 scale model of Herbiski the Crush Bug. Its a 2/3rd scale recreation of a Soviet tank on an old construction tractor with a fibreglass Beetle body fitted as the driver's cab. You can see it crushing cars on the fairground circuit all year long, driven by Jordan 'Jesus' Jamerson. Built mostly in a 12 hour shift, most of which was filling my crude cuts to blend the Beetle into the tank. Sprayed and decaled today in the second 12 hour window. I might need more alcohol. Or less. I'm not sure which would be better. https://www.britmodeller.com/forums/index.php?/topic/235085612-herbie-the-crush-bug-124/18 points
-
Evening everyone, This is my first submission to the 'ready for inspection' section. I finished this model just as we moved house in the summer between lockdowns. I've been keenly following everyone else's submissions which has to an extent put me of submitting these pictures, but in the search for some advice/guidance/tips to improve, after a couple of pints of Adnams' Mosaic, have stumped the confidence to submit. A very brief bulid-thread can be found in the work in progress section (Admins, if I need to close, or move the thread instead, apologies.) J A few learning experiences from this and speaking to friends who have got into the hobby this year: - Primer first - Filler for the gaps - Subsequently purchased Vallejo filler, still getting to grips with how much to use. - Attempt model wash after applying lacquer (Haven't managed to get another kit to this stage yet) - Thin paints, or ideally spray. For my next builds, I've ordered humbrol aerosols from The Model Centre, but looking at the number of video tutorials, I'm soon coming to the realisation that airbrush is the way to go. Does anyone have any recommendations for a cost-effective starter kit? - Also ordered decalfix Thanks everyone! Jake17 points
-
I finished this a couple of months ago having started it back in May to fill in between projects! The kit is the Revell boxing of the MPM plastic. It has a certain reputation and this one certainly lived down to it. Quite pleased with how it came out but happier to get it off the bench. The WIP can be found here Thanks for looking17 points
-
Jehlik's Armoured Vehicle 1916 In your, frankly disappointing universe, Jehlik's armoured vehicle didn't progress any further than the filing cabinets of the US patent office, but in mine it went on to a gloriously disastrous career. Why limit yourself to this pretty uninspiring reality when a quick browse through the other more interesting alternatives is significantly more entertaining. Anton J Jehlik was mad. Madder than the maddest mad thing ever to hop though madland, you'd have to be to have designed this: Silly isn't it. Sillier still when you know that the big roller is on the front and the bangy things are pointing backwards. Aaaannnyyyway…. It's generally considered that the Americans were supposed to join the WWI party in 1917. However, in 1916 they got themselves a brand new toy and couldn't wait to play with it. The original idea was for the roller-beast to be built in vast numbers in a shipyard on England’s south coast, before the British government tactfully declined, stating “There's no ******* way we want to be involved with such a studi...”, well... the details aren’t important. The contract went to a ship yard near Boston who built eleven metal monsters before they ran out of steel. The machines went through exhaustive testing to see what they could achieve, and isn't it remarkable how fast a nations jubilation can turn to despair – squashing the marching band during the military parade can sometimes do that. With great fanfare the army held a service-wide competition to pick the crew, and the losers started their training soon afterwards. Jehlik became a national hero… briefly, before changing his name and seeking asylum in Andorra where he lived out the remainder of his days breeding with sheep, sorry I mean breeding sheep. After six of them ended up keeping the Titanic company on the bottom of the Atlantic, the remaining five machines trundled ashore in France. The initial surge of joy from the French was soon extinguished after the fourth village was reduced to rubble in the attempt to get the machines to the front. Their début on the battlefield would have been a great success, but as the existence of the roller beast was difficult to hide, those cowardly Bosch had dug a long pit in front of their trenches which caused the first four behemoths to get their silly rear castors stuck. How unsporting is that? The Americans wrote a very strongly worded letter to the kaiser saying it really wasn't fair as they were looking forward to a damn good squishing. To show the strength of their feeling they even omitted the kisses from the end. The kaiser missed the post that day as he was at the bingo. Here we see the sole survivor, number 7 which also had the official name 'USLS (United Sates Land Ship) Friendly Fire' which became the only one to engage the enemy. Enabling the American to successfully take the German trench after finding the occupants helpless with laughter after seeing the roller-beast get stuck on a tiny muddy mound. The ref later ruled the American move to be off-side and they had to go back to their own hole in the ground, leaving the score nil-nil. And so Jehlik's monster was edited out of history by an embarrassed nation. Aaannnyyyway… This took about six months in total. Thanks for havin a ganders - I hope you like it.16 points
-
Hi This is probably my last finished build for the 2020 year. The kit is little difficult and didn't address to the beginner. This Pembroke was used to spy the border during his travel between RAF - Berlin camera compartiment was added. The kit didn't provide this particulartity of this plane. I added it. I add too some radio in fuselage part behind the cockpit. But this is an "inspiration" I didn't have photos who give a reality of these instruments. A special thank for all who helped me to build this kit by their advice and photos Some other photos in the link bellow Hunting Percival Pembroke16 points
-
Hi everyone, this is my 1/72 Zvezda MI-26 of the Russian Air force. The kit was great quality with lots of detail. The inside was very detailed with lots of structure and the tail rotor drive shaft visible. Fitting everything in the fuselage halves was easier than I expected and was a quick process. The only fitting problems I had was the two engine air intakes which didn’t align properly with the engine covers. The rotor blades had strong joins to the rotor hub and came pre bent. I did accidently break one of the joins to the hub but managed to glue it on correctly. I sprayed it with a dark eggplant grey and air superiority blue on a small bump on the bottom and where the tail rotor gearbox is. The kit came with only two red stars when pictures showed it having a third one on the underside. I found a spare decal and tried to apply it to the underside. Due to what I think is structural support, the decal had difficulty conforming so I had to remove it. I then traced the stars that came with the kit and created a mask. It worked well but there were areas where the red paint had sprayed in to the white. I was going to redo it, but it is barely visible when the model is the correct way up. I bought the Begemot 1/72 Russian Air Force insignia decal set so I could create the aircraft Rf-06801. I took the blue 07 from the 1/72 Zvezda Mi-24 kit, it was a bit bigger than the one on the real aircraft but looked fine. In the pictures where four small red tabs on each wheel which I made from the red border on the decals sheet. In pictures of over MI-26, they had lots of streaks of faded paint. I tried to recreate this by covering the area in thinner and brushing white oil paint onto that are. It turned out well and gave a subtle effect. I finally added the doors and used a drill to spin copper wire together to look like the rope holding the doors. Thanks for looking16 points
-
15 points
-
Kit : F-18B Brand : Hasegawa Scale : 1/72 Decals : Home Made Decals This is my F-18B Hasegawa 1/72. The kit was released in 1991, so I'm not sure if that is classed as old, but the decals did look old and yellow, I fixed the yellowing, but they were all cracked. So, I went with plan 'B' Irish Air Corps. I had already printed the low vis Irish roundels a couple of years ago. I just had to find some numbers and I used some of the smaller kit decals. Ken15 points
-
Hawker Sea Hawk FGA.6 XE375/239-Z, 810 NAS aboard HMS Albion Operation MUSKETEER, November 1956 Kit: Hobby Boss 1/72 87251 Build thread: https://www.britmodeller.com/forums/index.php?/topic/235085505-hawker-sea-hawk-fga6/14 points
-
Matchbox 1:72 Dassault Mystère IV A. Pretty simplistic kit in many ways but still pretty fun build all things considering. Simple weathering/definition with Flory Models Brown Wash. Straight from the box apart from the pitot tube. Painted with a hairy stick using Vallejo Model Colour and Model Air paints. Build thread here:14 points
-
This is IBG's 1/72 Diamond T 972 Dumper, a kit in a lovely series of these little trucks. Lots of parts and well detailed. Build time: 22,5 hours. Painted (mostly brush) with Vallejo paints, weathered with Vallejo pigments and Tamiya weathering powders. Build thread here: Some more pics here.13 points
-
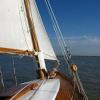
The E-type Jag race version is the 1962 Cuningham entry for le Mans. Heller took a few shortcuts with their standard E-type production car to do this. The tyres and wheels needed widening--the tyre moulding still carried the tag with the title "Citroën 15"! Fuel tank is scratch built in the boot, plus a complete roll cage, and converted to right hand drive. Sliding side windows installed and the back bumper omitted. And some enhanced screen wipers and wash jets etc. Some effort made to keep her down on the springs and looking race ready. A great kit to work with. The fit is good and plenty of scope for a few mods. And a real Looker when you're finished! I forgot that I hadn't put her in the galleries already, and dropped the model off at KB Models to go on the display shelves and he's now locked down! That was before I took some gallery photos 😖. So I'll have to make do with some of the final pictures from the build thread 🏁🌿🇬🇧😎13 points
-
Heller Mirage IVA 1:72. Built OOB... if the box contained plasticard and filler !13 points
-
One of the two Sea Harrier models I managed to finish this week - 1/72 Italeri (ex-ESCI) BAe Sea Harrier FRS.1 ZA177 "77" of 800. Naval Air Squadron, HMS Hermes Air Group, Falkland Islands, June 1982. Old ESCI kit is simple and needs some work, but it's quite accurate. I`ve used Eduard PE set (poor), Pavla resin air intakes (awful) and exhaust nozzles (awful), Pavla resin gunpods (even more awful and innaccurate), Pavla resin MB.10H ejection seat (poor), Airfix AIM-9Ls (good after some work), Master Pitot tube (nice) and DP Casper/Xtradecal/Airfix decals. Painted with Gunze Mr.Color (335 Medium Sea Grey and 334 Barley Grey, brightened). A couple of photos taken in daylight: And now a few photos taken under artificial light: Thanks for watching!12 points
-
It's been a busy year, beginning with the compleete refit of BM HQ, followed by a slight pandemic, and ending with my mum needing triple heart bypass surgery, which she thankfully came through and seems to be making good progress. I started a few projects on the QT, but haven't had much in the way of ability to keep going due to the various demands on my time, including this latest glitch in the matrix that's throwing up seemingly random 500 and 503 errors. Anyway - that's the excuses over with, now for the picture... yes, one picture, mainly because Sputnik-1 is a ball, and balls tend to look similar from all sides. There's a smutty joke in there, but I'm too tired to get it out. After seeing one of our members' ball... Sputnik-1, I decided to treat myself to Red Iron Models cute little Sputnik-1 model in 1:35, which is a very short build that you can see here. It still wasn't OOB though, as I replaced the copper antennae with a more resilient 0.3mm carbon fibre rod, which you can read about in the WIP thread linked above if you're interested. Here's the finished article for your delectation: Although the model is technically finished, I've left the cocktail stick glued to the underside until I can find my self-adhesive felt to finish it off. It was here a minute ago, but seems to have gone into hiding12 points
-
Build log here..... Those of you who followed, know that HMS Berwick arrived as a slight after thought Thanks for looking Rob11 points
-
Hello Britmodellers, here my Merry Christmas to you all! I love the picture i got via SG ETUO. Great Group which wants to make a Flugplatz Museum with mostly british AC. Ca. 1971: Quite fresh XV800 No. 20 Sq from Wildenrath Now on top new pictures of my changed (yesterday) R.A.F.P. corporal with "Snowdrop" cap and black/red R.A.F.P. armband on the left. A happier New Year to you all! Tom11 points
-
Here are some pics of my two most recent efforts. Washes as very much work in progress, but seem to be getting there (clock is ticking...). Some decals omitted (in fact, almost all of them on the Swift as the ones with the kit were dreadful). I left the Tricolor off the Sabre's rudder as it looked likely to spoil the wash effect. That kit (Italeri) came with very good decals - in case of interest. Feedback appreciated. (I know the photography needs attention!) Quite an ugly aircraft, Some use of spare insignia here, to hide errors in the washes. The outboard weapons pods should be white, but I'm lazy (and don't care). A few rough edges to smooth in the technique, but on the whole these two came out ok. I started aircraft modelling as a change of pace from figures and because AFVs had lost their appeal. It's faster and very different from fig-painting, although there are a few overlaps and techniques that can be transferred.11 points
-
Thanks for the great feedback chaps, Track time, so these tracks had a rubber blocks on which the pins went through, trying a few new techniques so give a bit of texture to the rubber. They are only test fitted at this point in time and still have a load more processes to go through. Paints used for the rubber portion are Vallejo Panzer Aces Dark rubber, Light rubber and Vallejo Dark Grey. Primed with Halfords finest grey primer and the first base coat was Mig Ammo Dark Tracks A.MIG-035. I then sprayed freehand with no masking Vallejo Dark rubber on the inside and outer face on the track trying to leave the Dark Track colour on the guide teeth and end connectors. Doesn't have to be precise as you can touch up with a brush later. Main Paints for the rubber sections. The black sponge is another high tech tool used later. Base coat for the entire track I then used the black sponge to to add Vallejo Panzer Aces light rubber, much in the way you use it to chip up paint, I mixed up the dark and light rubber and applied over the top, building up layers. Dark grey Vallejo was also thrown in to give some contrast. You can see here the effect They will get some dust and further grime yet, some work on the inner face and maybe some pigments. Cheers for looking in Dan11 points
-
From Russia With Love. MI-24A HIND. 1/72 by Zvezda. Hello and welcome to a nice relaxing companion build in more ways than one. 😇 It will run alongside two other builds. one mine and the other belonging to @Nikolay Polyakov . If you are following my other Hind build "HERE" you will know that Nikolay very kindly offered to send me some decal rivets for the 1/48 version that were only available in Russia for my build. In exchange I sent him some Flory washes that are tough to get over there. After a few weeks of postal travel we both pretty much received our packages at the same time. Mine however was a LOT bigger than I expected. 😍 Inside were not only the rivets for my 1/48 Hind build but a whole new kit with AM parts to boot!! I was agog!! 😃 Upon receiving my special Christmas gift I contacted Nikolay and he mentioned a back to back or Companion build as he had another MI-24A kit in the wings. I agreed and the cogs started rolling. We waited until now as I was doing some fiddly bits on my other Hind and he was busy at work. I got a Message this morning asking if I would like to start the builds? I looked out of the window I was in for a shock. If there was ever a sign that now was the time to start this was it. 🌨️ So here we go. Nikolay's build can be found "HERE" not sure how we will run it but it'll be fun to watch both come together. I'm not planing on having mine open as I'm doing that with the 1/48 kit. so I will be having a closed up variant and my third Russian beauty. So without further ado here's where it all started a week or so before Christmas. Here is the lovely post card @Nikolay Polyakov sent with the box of snow Goodies. it was titles "from Russia with love" so I though I'd name my thread as this. ♥️ Lets start with the Box. and sprews. clear parts and decals. As mentioned I'll be building the first decal option set up as version 2 ( closed doors and panels ) as a nice juxtapose to my other HIND. I think Nikolay is making his as Version 1 (open) Here are the other bits and bobs that were kindly gifted. This is going to be fun on a @corsaircorp scale. 🙃 Talking about scale, Look at the size difference!!!! 😲 I'll finish this opening post here just in case it goes CraZy on me. I'll fix the links as Nikolay starts his build and make an update to mine too. I do hope you will enjoy these builds if you choose to tag along with us on a most excellent adventure that will lead us into a new and better year. All the best and as always dear Friends. happy Modelling. Johnny. 🤗10 points
-
Seasons greetings all, I guess I should display the cast list to my 2020 Blockbuster 'Modelling with a Mask' Varied scales this year, as articles dictated what I was given mostly, but they were all fun, and kept me safe. Most have been in SAM so apologies for the repeats ( but that's what you get at Christmas!) Aunty A's lovely 1/72 Naval Brick started the year. Decals are from the old Modeldecals sheet. Eduard 1/48 Mirage IIICJ, a test for some new NMF paints, but Mirages have to be silver, don't they? HK Models 1/48 B-17G occupied a lot of time - decals came from various sources. A simple kit for its size, which is no bad thing. Das Werk 1/32 Ju 137 'Starschiff Unternehmungslust' was an interesting bit of speculative whiffery. Nice kit. Modelsvit's Bf-109D in 1/48 was from the early part of Lockdown 1 I think. Really lovely little project; although the fit wasn't as great as others have experienced. Another Modelsvit 1/48- Yak 9D- A shelf of doom save - finished in a spare moment. Special Hobby 1/32 Fiat G.50 in Corpo Aereo Italiano markings of Major Bolzano. This was a fun model, although it did need 'building' Fine Molds lovely little 1/48 Ki-15, with the cockpit's weird sideways folding canopies posed open. KittyHawks 1/48 FJ-2 was much anticipated by me, and got a lot of attention for this build. Clear Prop released this 1/72 Ki-51 Sonia, which was a tiny treat, although the paint job was 'fun'! Very Long Range P-51D courtesy of Eduard in 1/48. Modelling bliss. Swedish J20 Falco from Special Hobby in 1/48. Takes a bit of work but it's a handsome thing when done. Tamiya's 1/48 old F-15C backdated to an early F-15A. A real labour of love and I'm very pleased with the result. Al Deere's Spit Mk.1 in 1/48 from the recent Eduard dual boxing. Another first class model that slips together like a decent single malt. Tempest Mk.1 conversion from the Eduard Mk V kit on 1/48th, with scratch built nose and wing rads. The sexiest Tempest I'd say. There's one more in the wings, that should make it for 2020 but it's still in prog, so will be added later. Cheers all, and may 2021 be a darn sight less 'interesting' too. Keep safe, stay healthy and take care. Jonners10 points
-
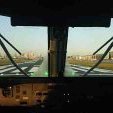
Well, this is my attempt at was has been a very popular topic on BM for the past few months and I'm sure we'll see much better ones than this in the coming weeks... Anyway, pretty much straight from the box and as you can see I've closed everything up. Parts fitted together with the minimum of fuss considering the size of them and the only tiny amount of filler was around the engine nacelles where they join the wings and the modified beaver tail. This was modified simply by using the larger of the tail parts provided and re shaping according to the plans in the Hercules Warpaint. I've always liked the Light Stone and Brown scheme and the choice was made that more simpler thanks to the excellent recently released Two Six decal sheet. I also wanted to build a later scheme with the tactical markings while also incorporating the white 'roof'. As I had some photos of XV302 (which I believe is still extant but used as a fatigue test frame at Marshalls of Cambridge?) this fitted the bill so that's the one I chose. I still can't decide whether or not there should be roundels under the wings but I've put them on for now. Even the underside photo I have it's difficult to see as the wing is in shadow. Anyway, they're easily removable if any conclusive evidence is forthcoming. There's also been some talk of the walkways applicable to these C-130's. After consulting various photos and reading the many associated posts on here I decided to paint them on myself (all 270 of them) I also wanted to show the very matt finish of the walkways compared to the satin finish of the rest of the aircraft so, after various trials I went for some of the MRP HaveGlass special varnish I had recently used on an F-16. It's very matt and has some very faint silver fleck in it which, strictly speaking isn't correct but it does give a somewhat textured finish. So, there we are, one of many to come I'm sure. Thanks for looking and may I wish you all a happy and safe Christmas and a much better 2021. 20201223_201617 20201223_201659 20201223_201742 20201223_201815 20201223_201907 20201223_202043 20201223_20192110 points
-
well that worked. ok here's where I'm at before I venture out into the snow. She starts with a very different office. The scale is such a difference but the detail is just as refined. If you have this kit beware that the instructions are slightly wrong. they ask for parts from a "C" sprew but there is no such sprew. There are two "A" sprews but the instructions ans for items from both. some of the PE has already been added. I think this means "remove" but as @Nikolay Polyakov's English is better than my Russian. ( I can't speak Russian) I'll let him clear that up for me. The struts got added on the rear seat. The main office assembly got a nice flurry of activity. ( the rear fire wall is dry fitted for now ). That is about where we are. I'm headed out into the snow (while it lasts) for a dog walk . "I might be some time" Take care Y'all. Johnny.🥶10 points
-
Cheers Beefy So a tad of washable dust - last time I used this it wasn't very washable so a new bottle acquired and another crack at it. much better now. Enjoy Dan10 points
-
Thanks Bill I have some Strong but use it with care! The i/p is OK as long as I don't zoom in. Just so you know I haven't been slacking: Green bits, shiny tank in and then dry fit so I could glue in the side panel: That Rizla paper in the clip is for the ??? bit that might be a strap/cover? Some Aizu tape painted for the belts: Almost ready - the floor of the test equipment bay needs to be yellow green too: Getting there.10 points
-
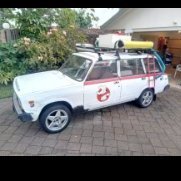
From the build thread here: You come about the van, mate? It's in the lock-up, step inside... Sorry it's a bit gloomy in here, the tube light has blown again. It's seen a few miles has this van, still going though. It was orginally supplied to a groundworks company in South Tyneside but long since de-fleeted and sold off. Of course, the paintwork faded everywhere apart under the old company stickers, so the ghosts of its past are still visible, a good polish might help. Someone fitted a roofrack after it was sold off but it's a useful feature. The beacon might come in handy too. I'll get it backed out and into the daylight for you... That's better, we can see what we're dealing with now. Quite unusual these Combi vans now, not many of them left. Nice houndstooth trim, inertia reel seatbelts, quite a comfortable place to be, by old van standards. Lots of storage in those door pockets, did you want an A-Z of London? One for Sheffield as well. Must have seen a few miles up and down the M1. Still plenty of room in the back, even with the second row of seats. Look, it's even been ply-lined, what more could you want? So, what do you reckon? It's pretty solid, you won't find another one this good in a hurry. Shall we call it £750? It's taxed til the autumn of 1998. Give it 20 years and people will be going mad for these, you mark my words. We got a deal then? You know it makes sense. Anteater (Motors).9 points
-
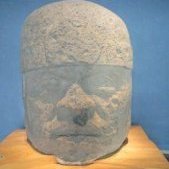
Season Greetings, I had this kit for almost a decade and never had the chance to build it as there was no space in my apartment in Mumbai, back home I have some space so after completing the B-29 Lady Boomerang I decided to give it a go. The built was fairly simply not much fuss just for some clear parts that one has to be little careful, there was one missing part but I can live with it. For painting, I use the Mr.Hobby silver 8 but due to lack of paints here I used black to the silver to give some panel modulation and brown and red for exhaust. The most feared part of the kit was the Decals, these were pre-Catograf decals and I had a rough time so I needed as a solution but I was no were to any decal softener so I used, Vinegar Yes vinegar I used two-three type and settle to a local one which gave some softening effect and when I applied to the aircraft it works quite satisfactory. Head this aircraft was flown by famous aviator of the early day Captain Colin Kelly. thank you The two siblings9 points
-
Hobby Boss A-4M Skyhawk. VMA311, 1977 Paints Vallejo, Mr Hobby and Tamiya. Total build time 22 hours 15 minutes including kip time. Build thread here9 points
-
Hiya Folks and hope you are having a Very Merry Christmas! I have been building this one for over a year,..... it is jinxed,...... beautiful kit by Airfix,...... but this one was cursed!! It has fallen off tables, broken into pieces, had parts go missing,.... the full works,...... but last night I got it over the line and I`ve taken some pics quickly before it has another mishap! Since buying the photos seen below depicting 80 Sqn Gladiators in Egypt in 1939 before war broke out with Italy in 1940,..... I have wanted to build a model of one,.... especially with the change from silver finish to camouflage and the roundels roughly overpainted,... with some of the white ring still showing through; Using this decal sheet; And here is the model..... brush painted as usual,..... using Humbrol paints apart from the white underside half which was done using a rattle can and the A Type fuselage roundel was roughly converted to a B Type using a fine brush and White Ensign Roundel Blue (thanks Ben!), trying to keep the original small red dot visible!. Oh and yes,....I`ve rigged the tail wrong,...doh,....just realised,...thought it looked wrong,...... told you it was jinxed; Cheers everybody and Merry Christmas again,... Airfix have produced another stunning little kit here,....... it would be brilliant in 1/48th too! All the best, Tony9 points
-
Good evening mates and…Merry Christmas, even if a little late!!! Since my last update, I’ve had a busy time modelling and haven’t found the time to load all the pictures on Imgur until now. During the last couple of weeks I’ve been busy painting and masking and painting again,but I’ll start from te beginning. I’ve never been interested in French aircraft, thus my knowledge about them is very poor. Anyway as it often happens to us modellers, I changed mind and I got in love with the French aircrft in the colours of the Republic of Vichy. Recently I bought several Kits in 1/72nd scale : Morane Saulnier 406, Dewoitine 520, Bloch MB152 and, not having any knowledge about the colours used for their camouflage, I bought the set by Hataka in the picture here below. The box art is very attractive, with a few beautiful profiles. Then I went to work with my airbrush. I started by priming the kit… …then I did a pre-shading with black. I masked and painted the white bands to the fuselage and wings. Then I concentrated on the camouflage, starting with the Gris foncé , followed by brun foncé and finally by French Kaki. I gave each clour a bit of light by spraying some areas with the colours slightly lighter and Tamiya “Smoke”, then improved the tail pre-shading by adding some white areas, to increase the contrast with the black ones. I also painted the rudder with the colours of the French flag. For the blue section I used an Enamel by Humbrol, which was a real pleasure to spray! I was quite happy with the end result…then , looking at it…I noticed there was something…wrong with the colours… The French Kaki was too light so, for the first time I…checked the kit insuction and found out the colour suggested by Special Hobby was Gunze Sangyo H80, which I happened to be one on stock!!! By comparing it with the colour used on my firt attempt , it was clear this was a much accurate shade of green than the one supplied by Hataka!!! So I went back to work Once the green sections were overspraied, it was clear the gris foncè was too light!!! So I used the grey I had used for priming the same gray used for F 15s. The camouflade was given a bit of life, by adding a touch of white or black to the three shades. The underside were spayed with gris bleu clair. Yellow on tail and nose was next. A masking session followed and I was ready to spray the red stripes. Once removed the masking tape this was the result: A few touches here and there and I was finally ready for decalling. Here below a couple of pics with the decals on, masking removed from the cockpit and a drytest for engine and propeller. Finally I’ve got a good idea of what she will look like!!! After so much thinking about the colour for the flaps , engine bay and landing gears’ bays, I decided the most likely colour for these areas must have been the same used for the undersides, thus I painted them gris bleu clair. Another layer of Future to fix the decals and I was ready for some washes to enlighten the panel lines,flaps, gears and engine bays. This is how she looks now, after a layer of Xtracrilics matt clear. Landing gears will be next, folowed by the engine, cannon, exhausts and other details around the engine. For now , this is it! Thanks for watching! Ciao Massimo9 points
-
Bandai TIE Fighter converted to one from the Mining Guild from Star Wars Rebels and Darth Vader’s TIE9 points


-01_compress20.thumb.jpg.876237f478e7de3cb420ca2f41976d87.jpg)


.thumb.jpg.b4a5069fd2c2dd5708ce1694345c5b11.jpg)


.thumb.JPG.2ce06c4ff2300a5faba93aaeacbdab25.JPG)


This leaderboard is set to London/GMT+01:00