
Leaderboard


Popular Content
Showing content with the highest reputation on 18/12/20 in all areas
-
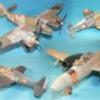
I just finished this today. I admit I was intimidated by the way the lower wing attaches to the fuselage but I managed to get it together- twice, since I knocked it off due to clumsiness shortly after getting it together the first time. I used a set of old Airfix decals and rigged it with >005" Nitinol wire. -Dan48 points
-
50 years now is the mighty and graceful Boeing 747 Jumbo Jet in worldwide service. From airline operations,cargo transport,VIP transport,military use (E4B) Air Force One,or even firefighter,there is almost nothing that the 747 has not done or is still doing. Back in the 60s,Boeing took a huge risk,investing large sums of money,that could have meant bankruptcy,if that plane would not sell,nobody could have imagined that this aircraft would change the art of flying for millions of people for decades to come. In 2019,it marked the 50th anniversary of the first flight. Revell released its almost as old as the original (1974) 747-100 kit with decals for the prototype. The moulds really show their age,lots of flash,excess plastic on almost every part and the fit is also not as good as it once was. But its still the only injection moulded 1/144 scale model kit,that resembles the original pretty well. The Airfix kit is plagued by lots of errors,probably due to the fact that this kit was released in the 747s first flight year (1969),and is based on early drawings. It was a lot of work to get the parts clean and esp. the engines were a pain and needed a tremendous amount of time to achieve a respectable result. I had plans on adding more details to the model and ordered a PE detail set.But upon receival,I realized that this set was for the 747-400 kit,so that detail set was then used for my 747-400F build. In the end,I only corrected the cockpit section and added an APU,made out of a plastictube. For the paints this time,I tried Gunze gloss white No.1 for the fuselage,which worked quite well. The grey on the wingbox and the wings is Testors Voodoo grey,Coroguard panels are Tamyia metallic grey and the the metallic parts are Testors chrome silver,primed with Testors gloss black to enhance the shine. The whole model is sealed with Gunze Aqueous Premium Gloss. Photos showed the prototype on the roll-out day in an all gloss finish,so thats the way I am displaying it. The decals are superbly printed and also include all logos from the airlines who had ordered the 747 until 1969. This is the 12th 747 kit that I had built since late 2019 as part of my 747 anniversary project of building every version of the 747 in 1/144. The -SP is currently under production and the 747-300 is in the planning stage. Shelfspace is getting rare but its kind of an addiction I seem to have with the 747...😉 Cheers Alex25 points
-
Hi all, Here you are my latest buid kit ... It's the MODELSVIT MIRAGE III B Straight from the box except decals from Model Art Decals System et kit. paint Alcad and Vallejo Metal Color. Hope you will like it. I wish you all great end of the year! Cheers Thierry litlle video here on FB https://www.facebook.com/aviapassionmaquette/videos/88682095539971324 points
-
Hi folks Last one of the year from me, this is Revell's big 1/32 Hunter. A nice simple kit with a good level of detail, it goes together easily and has a real presence on the shelf. Such an elegant-looking jet, I've chosen to leave this one nice & glossy with only a minimal amount of weathering. Merry Christmas everyone and a happy, safe and better New Year. Regards J.A.23 points
-
Andy's 2020 'Hanger' - RFIs done since Lockdown Started.. It's been a tough year ! I think that getting back in to making models has in some part kept me sane. I'm exceptionally grateful to everyone who has appreciated my work. Those of you here who have given me encouragement, advice and tips on how to do things better i am indebted to you. Thank You! Also It's been nice to correspond with different people around the World who are interested in the same subjects . To see other modelers interests and work has been interesting, informative and above all - inspiring! Happy Christmas to one and all! Lets hope for a more normal future and soon! Kindest Regards Andy B17-G Little Miss Mischief in 1:72 Scale AEC- Matador Army Truck and Medals display, My Grandfather - 8th Army Desert Rats -1:72 Scale Hobby Boss P-47D 1:48 scale Tamiya P-47 D Bubbletop - 1:48 Scale Airfix Heinkel - He111 H6 - 1:72 Scale Tamiya Beaufighter Mk X 1:48 scale https://flic.kr/p/2jzwyaH Airfix (1970's moulding) B24 -J Liberator -1:72 Scale20 points
-
Just finished this, the new one from Airfix, a very nice kit, decals are from Kangero. Sorry the sign should read "Kampfgeschwader" ☺️ Cheers Jes20 points
-
Hi folks, this is the RS Models kit built in the colors of Finnish Air Force. The DR-196 served till 31.3.1944 when she had to land after the engine failure on the open sea, but the crew was rescued by Tursas steamer. On 23rd June, 1942 this plane also scored a hit on soviet sub SC-406, which eventually escaped damaged. The kit is pretty good and spot on, but all stands and falls with the proper alignment of the struts system. Unfortunately, some struts had not the correct lenghts or attachement points, but eventually I was able to fix them all (somehow:-). During the build the kit has dropped twice on my workbench causing complete disintegrating of the struts and it was very close to be binned, so I'm quite happly I finished it. The markings were airbrushed using custom made masks as I did not like the kit's decals. Painted with Gunze Aqueous, Thanks to Kari Stenman for great help with references! Cheers Libor18 points
-
Afternoon all, Bringing my completions for the year to 25, a subject very close to my heart, the mighty Junglie Sea King. Airfix conveniently supply markings for 'WT' which just so happens to be the cab recently restored to flying condition by Historic Helicopters. I added the Eduard interior etch to ring the cockpit and cabin to life, as well as replacing the the poor intake filter with a resin replacement from Air Graphic. I also used their resin replacement for the cabin step, although this might not have been all that necessary. Paints were Hataka Orange Line as ever, with weathering kept to a minimum, the cab has definitely had a wash since I last saw her in service! Had a slight blip with the decals surrounding the cockpit windows in that one lifted with the tape, thoroughly annoying. I may choose to try and touch it up with paint at some point, but for now I'm calling it done. Airfix 1/72 Westland Sea King HC4 by Shaun Schofield, on Flickr Airfix 1/72 Westland Sea King HC4 by Shaun Schofield, on Flickr Airfix 1/72 Westland Sea King HC4 by Shaun Schofield, on Flickr Airfix 1/72 Westland Sea King HC4 by Shaun Schofield, on Flickr This is possibly the last for the year, though I may squeeze one more in... Thanks for looking, comments welcomed as ever Shaun16 points
-
This is the Dragon Ju188 In 1/48. Not an easy build. Fit of some parts very poor and in some cases the Instructions were of no help. The fuselage needed to be rescribed as the panel lines did not line up. Some panel lines on the wings just faded away. But as with most Dragon kits when built look good. Gunze paints were used through a Paasche H1 and the squiggles done with a Badger 200 with the extra fine head.14 points
-
Hello everyone! There is a locked subject somewhere in dungeons of kampfgruppe144 forum where I enthusiastically begin "quick build" of this kit ....around 2014. Then there was this idea of adding photoetched details to it. No one was doing PE for 1/144 F-117 so I ended up designing it myself. Thus, instead of a quick build it became prototyping tool for one of initial Shelf Oddity releases. Same goes for the decals. Looking at it from perspective - of the two: decals and photoetched - decals have far the more impact on end result. All this inevitably led to material fatigue, and the F-117 was lingering on WIP shelf for quite long. Prototyping aspect of the model can be noted by comparing left and right main undercarriage doors. There are two types of the doors and I am here at my laziest by doing only one of each type. Main u/c wheels have been replaced by res-im bits - the kit wheels are twice the required thickness. This was in my sights: ...and where my journey finished: Thanks for watching!13 points
-
Just finished this one, an old kit but still very good, decals fra Exido of very high quality. Cheers Jes13 points
-
Just finished this one, an older by nice kit, decals fra Excido. Cheers Jes13 points
-
Hi guys, I am mostly into armor modeling and this is my first post in aircraft modeling section and my second aircraft built ever, so I am quite clueless as to what I am doing Anyway, this is Fiat G.55 Centauro "Sottoserie 0", kit No. SH48066, in it's initial Regia Aeronautica colors, built OOB. Kit is not bad, although it required quite a lot of cleaning and I would be happier if there were a bit more details and if fit was better. Although, as this is my second aircraft kit ever, there's not much to compare with. Cockpit details and PE details in general provided with this kit are superb though. It's painted with Gunze Mr. Color lacquers. I kept weathering to a bare minimum because I am sticking to the rule: if you have no idea how to do something, the less the better. Just did some dust, panel lines and general washes with AK enamels. Even though I am new to the aircraft modeling, don't be too gentle with your feedback, I would like to learn something after all Yeah I know, there is a big fingerprint I didn't notice until I saw it on photos Cheers, Nenad12 points
-
It's been a three-month gestation but I've finally given birth to my Zoukei-Mura F-4J Phantom, done up as VF-114 "Aardvarks" The WIP is posted here: I used a fair amount of aftermarket during this build, the most significant being: Aero Bonus ejection seats with crew GT Resin seamless intakes Aires afterburner cans and nozzles Hypersonic Models canopy details and outer wing pylons << excellent products!!! (shameless plug for @JefferyK 🙂 ) ZM resin wheels Eduard photoetch Master Model turned brass pitot and ram air tubes VF-114 markings are from Draw Decal Stenciling is using wet transfers from HGW << another excellent product, and outstanding customer support. Thanks again, Martin! 🙂 🙂 Paints are True North enamels, and are a dream to use Let's get on to the pics! Aero Bonus ejection seats with crew: Hypersonic's F-4 canopy detail set is great! GT Resin's seamless intakes are indeed seamless, on the inside. But, their fit leaves much to be desired: I replaced the kit's position light lenses with clear, UV-activated acrylic gel: I also used the UV-activated gel to create the wingtip lights: Even the AIM-9 Sidewinders got the UV-gel treatment, for their nosetip seeker windows: Bare metal paneling on the tail and stabilizers is using AK Interactive Xtreme Metal enamels, with metallic pigment powders for detailing: Aires afterburner cans and exhaust nozzles: I used Flory wash and oils to dirty-up the Phantom's underside: Speed brakes (kit stock): Auxiliary air inlet. I went to a lot of trouble to add a surrogate engine behind the air inlet, but it's barely visible! Nose gear bay (kit stock) Nose landing gear (details added) Oops! How did this happen? No problem. The Draw Decal sheet includes enough for two aircraft. Good as new: That's it! Be sure to check out my WIP for all the gory details. And, many thanks to everyone who followed my progress and gave encouragement & advice!12 points
-
- From Great wall Hobby 1/48 scale - decals and paint scheme from the box6 -Cockpit from Quinta Studio - Exhaust from Amigo. Akan paint6 - Unusually I add a figure as you ca see I'm not specialist but as it is my last Fulcrum to be built I thaught it was time to make thing a bit different12 points
-
Good day, hobby colleagues! I continue to lay out my builds for you to review. This time - a unique model of the Soviet fighter, who never went into the series, although he managed to fight. Pleasant viewing, thanks for your attention) P.S. I apologize again for the clumsy English. Blame Google Translate12 points
-
After building the Kinetic A-6 Intruder (terrible fit, large gaps and rubbish instructions) this kit lived up to all the hype and l can safely state " no filler was harmed in the making of this model". Brilliantly engineered it mostly clicked together with only a wiff of glue needed and some parts needing none at all. Built up as one of the options in the box, l chose VF101 Grim Reapers because what Farmer doesn't like a sythe! Paints used were Xtracolor plus Tamiya for the tail fins and spine, decals were the only negative as the are quite thick and despite plenty of Set and Sol would not settle into panal lines, so painted as much as l could. Grey flory wash and Humrol satincote to finish. maybe a bit shiney for some tastes but hey-ho l had a ball building her so l'm now a very Jolly Farmer. Stay safe boys and girls, Merry Christmas! F14 by peter crossman, on Flickr F14 by peter crossman, on Flickr F14 tamiya by peter crossman, on Flickr F14 by peter crossman, on Flickr Untitled by peter crossman, on Flick11 points
-
Just finidhed this one, nice kit fit is OK, decals are from the spare box. Cheers Jes11 points
-
Hi to all Another Yak from Yugoslav air force finished, this time in standard VVS colors. Well known model from Hasegawa, with all its faults. After trying to correct most of them, filling wrong panel lines, little correcting of wing shape, adding some rivets and detailing cockpit, finalized with AK Real colors and weathered with Tamiya pastels. Camouflage differs from standard pattern on VVS planes as some of part of fuselage are repainted after repairs. Also white tips are temporary exercise markings Plane is from 116 LAP, September 1949. Hope you like it, regards Djordje10 points
-
Hear ye, hear ye, modelers! Abandon a life of reprehensible modeling sloth! Regain your uselessly spent energy while tempering mind and body! Why build despicable kits that fit with no effort, debilitating spirit, muscles, brain and will? Why just put measly, perfectly formed parts together, with the only help of glue, avoiding the joys of a good challenge, and remaining deaf to the call of the wild modeling nature? Wake up, BM modelers, to a true modeling life! Do as @general melchett did! he eventually developed such eyelid musculature, that he was able to keep his eyes opened for minutes at the time! Imitate @Space Ranger, he once sanded a kit, and now the Space Ladies follow him everywhere! After many years of cracking their respective skulls, sink their economies, and lose a hefty percentage of their citizens -leaving orphans and widows galore as side-effect-, the WWI belligerent countries apparently came to the unexpected conclusion that perhaps using planes as passenger, mail and goods transport was somehow a better idea. Go figure! Thus, many planes were converted to civil use, with greater or lesser success, many times by the simple expedient of slapping a cabin atop the fuselage to give some protection for the no doubt very impressed, but perhaps a bit startled passengers. I have done and posted here quite a few of them, as there is no better use for a weapon than to be at the service of peace, preferably not killing anyone in the process of performing said service. For the purpose, I had acquired yet another vintage 1/72nd vacuformed kit, this time the Sierra Models Friedrichshafen F.F.49c seaplane. It's in line with standard offerings in the same media, also providing a few fairly-cast white metal parts, but no strut material, no decals and an interior that even a Spartan would call Spartan. There are, surprisingly, several options for a civil machine, and I found without much trouble many images on the Net, among them: - Tiedemann's N3 (apparently D-222 F.F.49, Jan. 1920) (I had already built another Tidemann's seaplane, a civil conversion of a Hansa W.33: - T-DABA - DLR W7 And according to the Air History registers: D-41 Friedrichshafen FF.49 DLR D-42 Friedrichshafen FF.49 D-43 Friedrichshafen FF.49 D-44 Friedrichshafen FF.49 DLR Berlin D-45 Friedrichshafen FF.49 DLR >Deutscher Aero Lloyd , Crashed D-49 Friedrichshafen FF.49 1365 Deutscher Aero Lloyd >Severa, Canc 11.33 D-71 Friedrichshafen FF.49 v1 D-85 Friedrichshafen FF.49 1368 Lloyd L.V. Sablatnig >Aero Sport Warnemunde >DVS D-86 Friedrichshafen FF.49 223 Lloyd L.V. Sablatnig >DVS, Destroyed 8.28 D-114 Friedrichshafen FF.49 Sablatnig D-115 Friedrichshafen FF.49 Sablatnig D-132 LFG V.1 'Max' Used by Luft-Fahrzeug-Gesellschaft Stralsund as air taxi Rebuilt Friedrichshafen FF 49 D-133 LFG V.2 'Moritz' Used by Luft-Fahrzeug-Gesellschaft Stralsund as air taxi Rebuilt Friedrichshafen FF 49 D-134 LFG V.4 'Witwe Bolte' Used by Luft-Fahrzeug-Gesellschaft Stralsund as air taxi Rebuilt Friedrichshafen FF 49 D-146 Friedrichshafen FF.49 DLR/Berlin >DVS, Canc 07.28 D-377 Friedrichshafen FF.49 DLR (W8) Canc 28.01.20 D-380 Friedrichshafen FF.49 DLR To Denmark 4.20 D-381 Friedrichshafen FF.49 D-381 DLR To Denmark 4.20 With so much to chose from, of course what is available as original photos should be considered as reference, not to mention the always daunting and sticky task of discerning the colors of the chosen potential subjects. Now, to the molds: Not bad, but not what one would call sharp definition: Restrained rib detail, correct scalloping: The white metal parts (half will go to the bin, as they pertain to the military version): I have to dig deeper into the references, but I think the civil version, especially the conversions by LFG (V.1 to V.4) had an enlarged vertical tail:10 points
-
Zimmerit on the bulk if the turret done ...just the mantlet to do then the track hooks and a few kit parts and bingo.......we are ready for paint.10 points
-
Greetings! Recently completed with lighting and display base. Polar Lights/Round 2 have done an excellent job with this kit. Details of WIP can be found here: https://www.britmodeller.com/forums/index.php?/topic/235081033-star-trek-galileo-shuttle-craft/ Many thanks for having a look, questions and comments always welcome. Cheers, Bill9 points
-
#27/2020 Newest model by my dad. Hasegawa kit, decals from the kit, Kagero and AML, EZ Line for the antenna wire, shortened the too long legs some mm to receive a more realistic look,, plastic rods and lead wire for the brake lines, Eduard seatbelts, painted with MRP RLM 76/75/81/83. Kagero Topcolors #9 and JaPo Messerschmitt 109 of JG52 in Deutsch Brod used as reference. Build thread here https://www.britmodeller.com/forums/index.php?/topic/235082275-end-of-war148-messerschmitt-bf109k-4-iiijg52/ Aircraft flown by Hauptmann Adolf Borchers, III./JG52, Deutsch Brod/Czechoslovakia in May 1945. DSC_0001 by grimreaper110, auf Flickr DSC_0002 by grimreaper110, auf Flickr DSC_0003 by grimreaper110, auf Flickr DSC_0004 by grimreaper110, auf Flickr DSC_0005 by grimreaper110, auf Flickr DSC_0006 by grimreaper110, auf Flickr DSC_0007 by grimreaper110, auf Flickr DSC_0008 by grimreaper110, auf Flickr DSC_0009 by grimreaper110, auf Flickr DSC_0010 by grimreaper110, auf Flickr DSC_0011 by grimreaper110, auf Flickr DSC_0012 by grimreaper110, auf Flickr DSC_0013 by grimreaper110, auf Flickr DSC_0014 by grimreaper110, auf Flickr DSC_0015 by grimreaper110, auf Flickr DSC_0016 by grimreaper110, auf Flickr DSC_0017 by grimreaper110, auf Flickr DSC_0018 by grimreaper110, auf Flickr DSC_0019 by grimreaper110, auf Flickr DSC_0001 by grimreaper110, auf Flickr9 points
-
Two on the trot from me! This time it's my second attempt at a Bloch 152. A type that was new to me prior to the Group Build and a fascinating subject. Slightly strange proportions, with either the wings looking a bit small or the fuselage a bit long. Or both. The offset engine is decidedly odd and it took an effort from me to glue it as the instructions say. Done as a straight forward shake and bake build, nothing extra bar a couple of side windows added with Glue 'n Glaze as the kit ones were a bit chunky. Original kit transfers from 1966 were used along with Humbrol Authentics from the period. Build thread here... Here's the finished model... This shot is of the model sat alongside the later black box issue.9 points
-
If figures are my heroin, then Romans are made from the purest opium. This is probably my only excursion into the 75mm scale. At least in metal; the bugger was HEAVY! Made by Pegaso - my favourites, or one of the best anyway. Did him as a member of the Hispana legion, who were based just up the road from here at Boroughbridge (and York), near where we joined an archaeological dig last year to investigate Roman roads (cue goosebumps ... and people shouting the rugby scores from trenches whilst England played Argentina. I have too many hobbies). One day, I'll take some proper photos of all this stuff.8 points
-
British Aerospace Harrier T.4 XZ145. 3 Squadron, RAF Gutersloh, Federal Republic of Germany, June 1977. She is currently on display in California in Royal Navy colours! I always loved the trainer Harriers with the extra tall tail! This is a conversion of Airfix's original GR3 kit and the ancient, and very basic, Air Conversions trainer parts (designed for the Frog/Hasegawa kit). The drop tanks are from the original Frog Hunter F1. The decals are mostly from the Airfix kit with bits from Modeldecal sheet 74 and homemade serials. I see a few goofs including: the interior windscreen in the scratchbuilt interior is too far forward and the handpainted white canopy frames are wonky. I also just spotted some decal silvering on the spine. I can cut and glue and putty and sand OK but think my painting and finishing skills often let down the result. Oh well, another "don't look from closer than 3 feet" model. Comments and criticisms/advice welcomed. Thanks for looking. David8 points
-
Commercial aircraft are not my usual fayre, but a change is as good as a rest (and the horrors of Eastern Express's original Boing 737 have faded from memory). There must be literally thousands of S and M's Viscount 800 in circulation, and whilst crude in places, they are easily improved and offer a nice canvas for the multitude of aftermarket decals available. This one is adorned with Classic-Airlines offering, a personal nice reminder of 1970s departures from East Midlands Airport for holidays in the Channel Islands and slightly more exotic locations. Nose reshaped with Milliput, over a cruciform plastic card former, which proved far easier to accomplish than I had predicted. Cockpit 'bulge' rounded a little - almost certainly not enough, and wing trailing edges thinned considerably. Other than that, a very straightforward build, everything fitted rather well, though I do worry about the wing to fuselage joints, but there's little that can be done to hide them. The main undercarriage doors are primitive, and were replaced with plastic card version, with their shape being corrected at the same time. The decals were very well behaved, and put up little resistance. However they are very translucent, which meant the division between the natural metal and white had to be accurately defined at the lower edge of the cheat line. They aren't quite right, I think they are slightly too deep, and the lower part of the rear entrance doors isn't quite correct. Still, quite pleased with the overall effect. Jonathan8 points
-
A new update on my T-60, I have fixed the top part of the body and assembled the hatches, lights etc. The wheels are just attached not glued so that I can form the tracks around them later on. The engine cover will need to have hinges put in place in order that it will open and close to view the engine detail. View showing hatches and covers removed, also showing assembled fenders which will be glued into position later on. Last couple of views showing the view of the inside of the tank, should be ok to have a decent view of the inside here. That's pretty much done for the body now, just need to add a grill panel at the back, fix fenders in place then add tools and tow rope etc. Next up will be the turret after I have trimmed, cleaned and assembled the tracks. all the best, thanks for looking in... Ed8 points
-
Test fit of parts... I’m at work now, but shouldn’t be too long.8 points
-
I'm sure many of the BM reguLars know more about this aircraft than I do, but here's a bit of backstory: Spitfire Vb (EN830/NX-X) was captured by the Germans in November 1942. On November 18th P/O Bernard Sheidhauer of the Free French Air force got lost following combat and pancaked in Jersey. He was taken prisoner and ultimately murdered by the Gestapo during the Great Escape mass execution. EN830 survived in reasonable shape and was taken to Echterdingen without guns and ammunition, with the gun ports closed. The radio equipment had been replaced with ballast, but it still had its original Merlin 45 engine. Several flights were made by Daimler-Benz pilots before conversion was attempted. German 24v electrics and instruments were added, as were a carburettor intake and airscrew from a Bf109G. The aircraft preformed very well, showing several aspects of its performance to be better than those of either the Spitfire Vb or the Bf109G in their usual forms. It was said to be a favourite of the German test pilots who evaluated it. Eventually th 8th Air Force destroyed it in a raid. Anyway, the kit was atrocious (see WIP: I got it together eventually but am in no rush to do it again. It was a diverting build but I'm a 1/48 man at heart and the agricultural nature of the kit meant that it was never going to be a thing of beauty. It's an interesting subject and one I'd love to revisit in the future with a better quality kit, should one ever appear. Not too bad for a brush job ( I really must get around to building a spray booth and buying an airbrush). Mig Ammo panel line washes were my friends by the end of this one. Here you can see the slot I cut for the stand; the wheels-up attitude was the only option given the joke which was the undercarriage. I haven't weathered this one much, mainly because it didn't see front-line service with the Luftwaffe. Also I just wanted to get it finished... Comedy-thick front canopy section. The main sliding element was borrowed from an Airfix mk1 Spit. I've just noticed the paint on the port forward edge of it.... The rear section was cut from an Italeri canopy that I had lying around. There has to be a joke in here somewhere about being glad to see the back of it, I guess. I've also now noticed how wonky the elevators are. Sheesh....8 points
-
Roundels and serials painted The instruction let the choice of set the serial on the two wings or only one wing. I choosed to paint the serial only on one wing8 points
-
I must confess that I find buying the easiest part of the hobby, being building the most difficult part. The usual steps pertaining to vac building are performed; first using a permanent black marker to delineate the outline of the parts, then scoring them a few times with successive careful passes of a new blade, then gently bending back and forth until the parts pop out of the backing sheet: And here a very rough draft only to show what it's to be done later properly, the addition of a new engine back fairing associated with the pilot's windshiled, and then the passenger cabin. The latter varied from 3 to 5 passengers, so one has to be chosen later (here -more or less- is the 3 pax cabin): For the purposes of illustrating the point, and what interesting new things can be obtained from an old kit with just a little bit of effort: I have followed similar procedures with many other models, among them the Hawa Hannover (Based on the Airfix kit) of 9 years ago: https://www.britmodeller.com/forums/index.php?/topic/235053010-hawa-f3-cabin-conversion-172-airfix/ And with the Hansa Brandenburg W.29 (Based on the Toko kit) from the same time ago: https://www.britmodeller.com/forums/index.php?/topic/235050562-hansa-seaplane-modified-172-eastern-express-ex-toko/ The Rumpler of not that long ago: https://www.britmodeller.com/forums/index.php?/topic/235052449-rumpler-5a2-limousine-modified-vacuum-formed-joystick-models-172/ The LVG "Kabine" (Based on the KP kit): https://www.britmodeller.com/forums/index.php?/topic/235052739-lvg-cvi-kabine-passenger-conversion-172/ and the Bristol tourer/coupe (Based on the old Airfix kit): https://www.britmodeller.com/forums/index.php?/topic/235056966-bristol-tourer-coupe-conversion-airfix-172nd/7 points
-
Hello everybody... as some of you know Im a fan of Robert Stanford Tuck. Last year I decided to start building collections of aircraft based on my favorite pilots. I started a build for Josef Pips Priller first and recently started the second series of builds dedicated to R.S.Tuck. He for some reason has always struck me as the quintessential RAF pilot. My first build in the series was his Mk.Vb and was built for the recent Spitfire group build. I present to you one of his Mk.I Spitfires coded QJ*Z from 92 Squadron July 1940. To build this I used the 1/72 Airfix Mk.I and aftermarket code letters donated by another member from the Forum. Please feel free to ask questions, post comments, and or add thoughts. Feel free to peruse the build WIP or the Tuck build thread. Dennis7 points
-
Tackled? I wonder if that had the same source as tack for horses? Hmm. Anyway next to be tackled is the arch which gives the building on wheels its inherent strength. This has been a series of "what do I do next, how do I get that radius, why is it that size across?" questions. This arch runs from wall to wall and is common to front and back it seems, as it is the same curve at the front of the bus as at the back. My non-mathematical head was confronted with a question which was pure mathematics, some geometry and possibly logarithmic progresions all of which were out of my comfort zone. The radius of the roof curve must have a fixed * thing? I tried looking at differing radii based on the estimated length of the model's dimension but different radii gave tighter or looser curves, not what I wanted so I worked out there must be a way to scale the curved shape and discovered whatever Euclid and the like discovered thousands of years ago. What I needed was to draw the circle the right way using the angles of the original scaled down, in this case the angle of the roof curve is 29º from its centre of radius. The length of the radius was 4.03" The resultant cutting out is shown here, marked out radiuses for the cut on 0.090" plasticard and after scribing away much of the waste we get. After cutting out the inner and outer radii The arch thus made is tested against its intended home Yeah that should do, now to build a bus. Again. Once the arch is installed on the frame those extra planky bits can be removed. In the front of the bus's floor can be seen some of the coach bolts holding the fifth wheel in position.7 points
-
Can't remember if I've posted this one before, but if I have, apologies. Late one night a burglar broke into a house and while he was sneaking around he heard a voice say, "Jesús is watching you." He looked around and saw nothing. He kept on creeping and again heard, "Jesús is watching you." In a dark corner, he saw a cage with a parrot inside. The burglar asked the parrot, "Was it you who said Jesús is watching me" The parrot replied, "Yes." Relieved, the burglar asked, "What is your name?" The parrot said, "Clarence." The burglar said, "That's a stupid name for a parrot. What idiot named you Clarence?" The parrot answered, "The same idiot that named the Rottweiler Jesús."7 points
-
Also cocktail sticks (toothpicks) cheap readily available and if shaved make great struts. I suppose at your age you don’t get to use it that often anyway (wahey !)7 points
-
Thanks! PPP will be seen soon… Cheers Pete Fnaar indeed! Do let me know if you need anything though… Thanks Bill I'm waiting for the ClearFix to dry then we'll take a view - I can always chop it off later (bit harsh, snurf) In the meantime I've moved on to the top bits: Flashy. The parts, not my bench. One done: Can you see which? No, me neither. It's the one on the right but it still needs more and the other is better, it appears.7 points
-
Thanks Neil - always good to know I'm not alone Thanks hendie - will do Obviously no-one was going near it. Probably wise… Couldn't sleep in, obviously. What's it like? Zoom in at your peril, I still have that hammer. Not too bad, actually, apart from: The reason for my early rising. I'd been lying in bed pondering this. If I fill it there's a risk, or perhaps a certainty, that some filler will blob inside. A shim would need painting internally and might show a bump through the 'glass'. How can I fill a gap, avoiding those problems. Aha I can paint internal grey over that and mask up to the will-then-be-filled line. I hate close-up shots. All that handling has taken its toll… Time to pull another one? I could try the thicker PETg too…7 points
-
Thanks Bill We may be there… almost. Thanks Giorgio I do Tomo, sometimes! You might say that Ian, but I couldn't possibly comment… Could be Terry, could be Thanks Bill - done. Details below Thanks Neil, very kind I got tired of snip, snip, sand, sand so I thought 'What does the kit part look like on?' Oh hardy har har… Lesson #264 make sure the kit part fits before you use it for a mould Anyway, bored with the attempts at fitting I decided to glue it on with Formula: Will that hold it? During masking etc? Nervous. I still need to sort the gap at the bottom (PPP in my future) and I may still pull another with a slightly modified buck. May.7 points
-
Well just got the 607 Sqn marking from DK Decals on tonight...... here it is alongside an Arma Hurricane Mk.IIb wearing 135 Sqn Burma Front markings from earlier in 1942,.... and a Battle of Britain Blenheim! I assumed that the wing walk stencils would have been painted over and not replaced and could not see them on the small number of SEAC Spit Vc photos that I could find;7 points
-
My Dewotine 501 is finally done. Problems with the red trident decal that should sit along the fuselage sides led to a bit of a cheat from me. I've built the model as the plane looked a few minutes before the Tridents were painted on by a local signpainter. The conversation between the two led to the diorama title... "Ils veulent un Trident peint sur les côtés, mon ami" ".Je vais commencer tout de suite monsieur" Which should be French for: " They want a Trident along the sides my friend" " I'll start right away sir" Here's the build thread: And a few shots for the Gallery:7 points
-
Hiya Folks, Been looking forward to this one for ages,.... especially as I submitted and researched both decal options for Airfix and they also asked for my advice on aspects of the kit,..... but I was disappointed upon buying it to discover that my (freely given!) help did not even warrant a credit or thank you,...... ah well! Airfix are not the first in this respect! (EDIT- Airfix have since contacted me and apologised,..... so fair play!). The kit arrived this afternoon and I started it straight away while watching a double backed 1980`s TV fest of `The Professionals' with Bodie & Doyle,..... before I knew it I had painted the interior, assembled it and put the fuselage together,.... the interior is lovely for the scale,.... Here we see the model with the fuselage together and the lower wing fitted with the wheel well interior walls in place and the optional full span or clipped upper wings alongside,..... both have the larger, wider early bulge above the cannon bay. The optional De Havilland or Rotol propellers can also be seen; Next,.... the full span upper wing halves were added along with the taiplane and rudder, the optional Vokes filter and the Rotol propeller was dy fitted,..... note the absence of tape or clamps apart from a small piece to help keep the wings aligned,.... the fit is gorgeous and the fuselage actually clicks together! Optional open or closed canopy hoods are supplied and although I usually opt for an open canopy, I felt that this looked too large and bulky due to the thickness of the plastic, while the closed option looked nice,..... so I went for that instead. I will definitely be buying more and I may opt for a vacuformed hood on some of them; Although both decal options look great, I already have them in 1/48th scale so having recently bought the DK Decals SEAC Spits sheet I dug that out and will do the model in these colours,...... a 607 Sqn AF coded aircraft is looking favourite but I also like the 84 Sqn `snooper', so we`ll see; So that is it for now! This is a lovely little model and I hope that it sells well,..... the Spitfire Mk.Vc has so many possibilities markings wise from Australia, the Middle East, Burma and NW Europe,..... so much scope, Cheers Tony6 points
-
Grumman F4F-3 Wildcat - Hobby Boss 1:48 Extras were Airscale instrument and placard decals, Eduard steel seat belts, vac canopy so I could have it open, plus brass rod to support the wings, brass tube for the guns / blast tubes and plenty of putty and styrene bits to fill the seams. It brightens up the cabinet. Republic P-47D Thunderbolt razorback - Tamiya1:48 This was just great. Extras were Yahu instrument panel and decals from a Barracudacals set. There's a sad story for this one which you can see here: US Airfield Fuel Truck - Tamiya 1:48 While I was working on the Thunderbolt I came across this picture from the IWM. That inspired me to build the Tamiya Fuel Truck with its' figures and to have a go at that scene - without that chap 'relaxing' against the far main wheel! de Havilland Hornet F. Mk3 - Frog 1:72 A really old kit with almost no detail. Reminded me how far this hobby has come - I enjoyed the build though. Airfield Control Tower - Airfix 1:72 I had a lot of fun building this. The kit is originally from 1959, and is sadly almost impossible to find now, but I was lucky and found one second hand. Extras were a p.e. fittings set from Flightpath (mainly to replace doors and windows), the posters, newspapers, noticeboards etc are from Sankey and I got some wooden furniture from a model railway supplier. And a few comfy chairs of course! The figures are from CMK and PJ Productions. There's more pics here: That's all folks. Mark6 points
-
Hi This is my latest finished MV-22,hasegawa kit.6 points
-
6 points
-
Hi all, just got time to pop up a mile stone........the tracks are on. That wasn't easy. ......virtually nowhere to hold the bloody thing......three pieces broken off later, they're on....., and the top wood structure in on. Some weathering on the fabric cover next..........and shackles front and back need rust and partial main colour. The next big hurdle is the spade and crane...when all parts are on, I'll drop a very light dust on running gear etc.....and I hope well on the way for the deadline.... Hope to catch up on all threads and build blogs over the weekend....cheers all..... Regards Simon.6 points
-
Ced, dilute some Formula thingy with a drop of water, then use a brush to let it sick into the gaps. Keep doing that every 5 minutes or so and it will build up nicely. Once that's all set it should hold it no problem. I cannot believe nobody fnaar'd that one!6 points
-
Thanks for the comments bud. After looking at it again I felt the need to add the throttle return spring to top everything off. There....much better....6 points
-
I agree about the forward part of the coverage. However I think it unlikely that the filler would wash out because filler generally doesn't, and even if it did, it is covered by a coat of paint anyway. I can imagine it working loose as the wings flexed in flight and combat. I have seen it written that the crew chiefs had the filler removed in service because of the work in maintaining it, but it would mean additional work removing it all rather than the few bits that had come loose, and just what sort of discipline or pride in work was there in the USAAF anyway? Would there be no-one, on any fighter group, who knew why it was there in the first place? Given the publicity given to the laminar flow wing, and the service manuals, I rather doubt it. That some aircraft flew for some time lacking some part of this filler, is more likely than complete removal. I've also seen it said that no-one noticed any difference, which is easy to believe as natural variation between pilots, aircraft and flight conditions varied considerably, and pilots had better things to do than carry out carefully monitored, measured and analysed performance comparisons. That it made no difference is another matter, although I was taught that laminarity cannot be maintained beyond the first 10-20% of the chord anyway without impractical additional engineering into boundary layer suction. That however is an argument about the abuse of the term "laminar". It doesn't mean that attention to smooth finishes doesn't matter. Possibly small in effect, but superior performance is dependent upon a lot of small items, all of which add up and few of which make any "noticeable" difference in themselves. See the wide variety in rear-view mirrors. It has also been said that this was discontinued on post-war aircraft. Given the run-down nature of the service and the lack of qualified men, anything that reduced maintenance would be seen as desirable, and a one off-task like removing the filler from wartime builds would weigh much less against the expected years of service. And by then who really cared about anything but jets?6 points
-
Final round. Thanks for watching!6 points


.thumb.jpg.2c282efcc138b7cf7f1e1586a9c534d2.jpg)


This leaderboard is set to London/GMT+01:00