
Leaderboard


Popular Content
Showing content with the highest reputation on 19/11/20 in all areas
-
Hi all. Kinetic's AV-8A was released shortly after their Gr.1/3 kit, which is basically the same kit except for a few different parts to be used. The kit was built almost straight from the box. Some rivets were added, as were some details to the cockpit and seat. I used Mr Hobby paints over black primer from Alclad. Washes were made from Abteilung 502 oilpaints. Thank you for watching. René.41 points
-
This is Dayglo Models 1/32nd scale FIAT G-91. It is a limited production resin kit. I have o say it went together very easily for a resin kit. The kit only comes with Luftwaffe markings, but Dayglo do a set of Italian markings. The only aftermarket I used was some Airscale decals in the cockpit Painted with Xtracolor enamels. Thanks for looking Angelo37 points
-
Hello, This is my Corsair, a well known and excellent kit from Tamiya. Everything OOB except for the masks for the canopy. No issues at all and the decals were really good. Hope you enjoy. Cheers!24 points
-
Hi everyone and here's my Tornado F3 built for the 'Tornado Warning' Group Build. The short build thread is here but to recap: Kit: Tamiya (ex Italeri) Tornado F3 Scale: 1/72 Build: Out of box with tape for seatbelts Paints: Halfords plastic primer, Revell acrylics airbrushed, Klear, Flory Models Wash, 4B pencil Decals: XTRADECAL Tornado F.3 229 OCU/65 Sqn "Red Zebra display" scheme Extras: some panel lines rescribed. Notes: This aircraft ZE809 was lost in a non-fatal crash in June 1994 while flying with 111 Squadron. A seal around a high pressure shaft failed leading to an engine explosion and fire. Really enjoyed this one and very happy how the decals turned out - but a little touch up with red paint was needed where they cracked. Tamiya_Tornado_F3_1 (4) by Dermot Moriarty, on Flickr As the Tornado scheme commemorated 50 years since the Battle of Britain, thought I should pose it with a Spitfire from that time - this is an Airfix Mk1a from 602 Squadron, July 1940. Thanks for looking, stay safe and happy modelling. Dermot18 points
-
This started as the very old Contrail Avro Tudor vacform and I added scratchbuilt nacelles for the jet engines, the main wheels are block-treaded Lancaster resin items from CMK and I created home made decals. Lots of work over the last year and whilst I'm pleased it's finished I am happy with it - despite the large size! Steve16 points
-
Hi, Recently joined the forum and thought I would post a few photos of the builds I have done over the last 2 to 3 years since restarting in the hobby. First off, my 1/48 Tamiya Mosquito, my first attempt at a model in many years and the first time using an airbrush and acrylic paints. Then there is my 1/48 Revell Mk IX Spitfire An improvement on the Mosquito as I honed my techniques a bit15 points
-
Hello. Just completed this earlier this afternoon. Built, on an off, between lockdowns etc. From the new rather nice Airfix kit and finished with decals fromthe Aeroclub kit that I recently managed to buy from Jaw here on BM. The rigging was fun... not..... what with my shaky left arm/hand holding the model and my right trying to feed the rigging through drilled through holes... barrel of fun! The strut rigging was done by gluing one end to the cross bar between the main struts and then gluing the struts in place to the top wing followed by feeding through the holes once the top wing was set. I added a fuel feed from the tank to a point by the front fuselage strut with a hole drilled by it made from fine florists wire and bent to shape. It ended up being more bent than I wanted but hey ho. I opted to omit the rudder and elevator runs because a: i couldn't find anything suitable, b: they would run a risk of getting broken once in place and in any case I would have ruined the fuselage paint job in attempting to fix said wires ( especially with my shakes....). And so to the pics During the build I found that the kit version of the pitot was rather chunky( worse part of the kit) , so I cut it off and replaced it with the etched from the Aero club kit.( The fret was one left over from another Aeroclub kit I have already built but didn't use it) The Airfix struts and the etched version by Aeroclub. Note the pitot is already cut from the fret and fixed to the kit part. What I did was to cut away the offending pitot, rendered carefully the leading edge of the strut carefully leaving the moulded mounting bracket unscathed, then with a new pointy knife blade scored a recess at the extreme leading edged of the strut as central and accurately as I could for the etch bit to fit. You might just be able to see the fuel feed I made from fine wire running from the upper wing tank. Here you can see that I opted to have only the rear seat access door dropped. The Aeroclub decals behaved well with Micro Sol. So there you are. I have another in the stash as well as a couple Aeroclub ones too. They will be worked in the future. The only disappointing thing is that no one has yet come up with lots of decals for the kit that are not military! I know of the Xtradecals set but the options don't really appeal. This is why I didn't finish the model earlier this year. So I wish that someone out there in decal printer land would do more 1/72nd AND 1/48th decals for the nice kits available. Cheers and thanks for looking.15 points
-
Nearly there with the hull...just small details to add and the last zimmerit.........then on to the turret.14 points
-
Hi all New member, long time lurker. Sorry I'm not quite sure on the etiquette here so forgive if I get this wrong. So after all my readings, I decided to try a number of weathering techniques in one go (I kept reading less is more and really tried not to get carried away, but its so much fun) Anyway here we have my Revel Corsair F4U and Airfix Mitsubishi A6M2b Zero, I've always loved these two so built them together. I've still a lot of learning to do and there are a few mistakes here, I cracked the cockpit on the F4U and lost/broke bits of the undercarriage flaps on the Zero. Also the Zero seems to have gone really dark green after the first coat of Future? This was also the first time I'd tried hairspray chipping and salt masks, but am generally please how that turned out. I also tried the sprue stretching for the antennas but could not get it to work, they kept snapping, then I had a though, I just extruded some back filament through my 3D printer and kept pulling till it was thin enough Thanks for any tips, I really enjoyed myself. Ps Trying github as a picture host, I think its working?13 points
-
Completing my Thunderbirds collection in 1/48, here is the Hobbyboss F-84F Thunderstreak. Not bad at all, typical of modern kits. Finished with the Warbirds decal sheet which was not without a few bits cracking and failing to adhere well. The decal sheet was designed for the Kinetic kit which meant the fit wasn't perfect in places. Anyway, here it is. z20201117_201044 by Derek N.Ferguson, on Flickr z20201117_201025 by Derek N.Ferguson, on Flickr z20201117_201016 by Derek N.Ferguson, on Flickr z20201117_201004 by Derek N.Ferguson, on Flickr12 points
-
Hey all, Here's my T-72M1 from Tamiya. The kit was built OOB after spending a number of years in the stash. I painted the vehicle using Mr. Colour No.12 Olive Drab (1) and used Humbrol Enamels for the detail parts including the rubber skirts. Weathering was achieved using a mix of Raw Umber and Ochre oil paints thinned down to create a filter, followed by a pin wash using simply thinned raw umber. I used MiG Oil Brushers for more refined oil work. The model was finished using the kits rubber band tracks, which were painted Tamiya Rubber black, washed with thinned burnt sienna and raw umber washes, then finally rubbed with graphite powder to give a metallic look. Thanks for looking guys!! Sam12 points
-
After that I tackled a 1/48 Sepecat Jaguar by Revell. An aircraft I wanted to join the RAF to fly as a boy. My first foray in to aftermarket resin as part of the ejector seat was missing out of the box. The fit of some of the parts was pretty rubbish but overall I'm happy with the final result And last one for now, a 1/72 airfix Sea King. This one went together really nicely, would like to do another in Royal Navy colours. Currently working on a 1/24 Airfix Spitfire Mk Vb. Not nice!! But that's for another post 🙂 Thanks Ed12 points
-
Hi folks, this is the old Eduard kit I recently built. It was not an experience I would like to soon repeat, but at least this kit shows where Eduard have been 18 years ago and where they are now. Built with many scratch built items as canopies, foot steps, FOD's and various antennas. The cockpit comes from CMK set, while the UB-16 rocket blocks are from Eduard. I also used Master pitots and Reskit wheels. Painted with my own mixes of Gunze Aqueous to match (at least to certain degree, of course) the Czech AF colors. These machines were kept clean and the PUR-based paints were quite glossy, even after some years in the operation. Cheers, Libor11 points
-
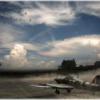
Here you go. Aizu on the nose: Sorry for the blurry shot. SHAR nozzles painted with thin paint on the hot ones:11 points
-
My first submission for this GB, indeed my first GB submission ever: Republic F-47N Thunderbolt of the Puerto Rico Air National Guard, flown by Lieutenant Colonel José Antonio Muñiz, a co-founder of the PRANG, in the late nineteen-forties. Muñiz lost his life on Independence Day, 1960, when the F-86D Sabre he was flying in an air display formation lost power and crashed. PRANG’s home base is named in his honour. This aircraft was restored in 1972 and is now on display at Peterson Air & Space Museum in Colorado. This is the much-maligned P-47N kit first issued in 1974, with aftermarket decals, wheels, cannon, rockets and canopy. I chose this kit mainly because nobody seems to have a good word to say about it (there are a couple of online reviews out there that are almost comical in their indignation). No attempt was made to correct any of the apparent inaccuracies. The weaponry is speculative, even fanciful; there’s no evidence that this particular airframe was ever tooled up like this, but there is a well-known photograph of a P-47 armed to the teeth for the benefit of a press display. Whether a Jug would take all that weight and all that drag into a combat situation is anybody’s guess. I wanted a fairly quick (one month start to finish, quick for me!) and enjoyable build and that’s exactly what I got, it was just what I needed in between all the other stuff I have going on. This is absolutely not one for the rivet counters but if you want a fun kit and rediscover your inner thirteen-year-old I highly recommend it. Thanks to everyone who has shown an interest and offered encouragement, especially @Wez, who provoked me into this!11 points
-
Hello all, let me present a recent builds of Arma Hobby´s Hurricanes. The first one is a Hurricane in Portugal colours and it was really a pleasant OOB build. The second one is a most successful Hurricane of 310 Czechoslovak squadron during the BoB with 6 kills claimed by several pilots. The kit is also a part of small group build with my friends dedicated to Bob adversary. I hope you like it. If you are interested in a bit more details and photos, I would appreciate your visit there on my blog http://72insight.com/en/hawker-hurricane-mk-i-and-mk-iic-1-72-arma-hobby/ Here on the blog you can also find another BoB Hurricane build by my friend Vladimir Kafka. addition of example picture due to the some troubles10 points
-
Hi All, Just finished my first jet and tricycle undercarriage kit. The Airfix Provost T3 for a 4 year old boy whose great grandfather flew them. I didn't do any weathering and made a mistake with the nose weight even though i did the gravity test. Also, i did the usual bad job on the canopy(i can never get that right). I had a lot of trouble with the leading edge decal as it broke up even after Hooke sent me replacements(which was very kind). I ended up using vallejo 71082 as i thought that was the nearest match. Hope it's ok, Cheers, Rodders.10 points
-
Fresh from the Heller Classic Group Build... Republic F-47N Thunderbolt of the Puerto Rico Air National Guard, flown by Lieutenant Colonel José Antonio Muñiz, a co-founder of the PRANG, in the late nineteen-forties. Muñiz lost his life on Independence Day, 1960, when the F-86D Sabre he was flying in an air display formation lost power and crashed. PRANG’s home base is named in his honour. This aircraft was restored in 1972 and is now on display at Peterson Air & Space Museum in Colorado. This is the much-maligned P-47N kit first issued in 1974, with aftermarket decals, wheels, cannon, rockets and canopy. I chose this kit mainly because nobody seems to have a good word to say about it (there are a couple of online reviews out there that are almost comical in their indignation). No attempt was made to correct any of the apparent inaccuracies. The weaponry is speculative, even fanciful; there’s no evidence that this particular airframe was ever tooled up like this, but there is a well-known photograph of a P-47 armed to the teeth for the benefit of a press display. Whether a Jug would take all that weight and all that drag into a combat situation is anybody’s guess. I wanted a fairly quick (one month start to finish, quick for me!) and enjoyable build and that’s exactly what I got, it was just what I needed in between all the other stuff I have going on. This is absolutely not one for the rivet counters but if you want a fun kit and rediscover your inner thirteen-year-old I highly recommend it. Thanks to everyone who has shown an interest and offered encouragement, especially @Wez, who provoked me into this! Thanks for looking!10 points
-
I`ve just finished another model for my Falklands collection - 1/72 IA-58A Pucará, A-532, Grupo 3 de Ataque, Fuerza Aerea Argentina, Falklands War 1982. This particular aircraft is well known from photo taken in Argentina mainland before its departure to Falklands (BAM Malvinas, Port Stanley) on 27 May 1982. It took part in air raids on British units in Darwin/Goose Green area on May 28. It was later damaged in ground collision with Pucará A-514 and captured by British at Port Stanley airfield. Later used as training target and destroyed. I tried to recreate the look of A-532 from the photo. Characteristic is big 300 gal fuel tank under fuselage (not painted) and 2 TERs on underwing pylons. Bright camo with sky blue underside, control surfaces in natural metal. Yellow bands on wings and fin (later overpainted). Special Hobby kit (also reboxed by Airfix without resin and PE parts) is not very well detailed and has some issues, but it`s quite pleasant to build. I`ve changed a strake in front of the fin, enlarged underwing pylons (and added transparent light covers), changed sweep angle of the horizontal tails and added flap fairings. Centerline pylon, fuel tank and TERs are from spares. Decals are from SH kit and DP Casper 72018 set. The rest (except for some self-made details) is OOB. Painted with Hataka C136, 137 and 138 (brightened). PS: Special Hobby announced new-tool 1/72 Pucará kit in 2018, but I still haven`t seen it... 😉10 points
-
H9 points
-
Finish no10 for the year is also the third Harrier but a first gen rather than 2nd gen, I used the Airfix GR1 kit built OOB less the the spine antenna made from plastic card and the CTA decals for the Spanish variant but the kit stencils as they were sharper than the CTA stencils. Painted with Mr Colour acrylics but no weathering as most photos show the aircraft were keep in a clean condition. Just need the RAF GR1, Thai AV8S and Indian Navy FRS1 and that will be the Gen 1 harriers complete. As usual all comments welcome. There are 3 marking which were multipart, each one was made of 4 layers!9 points
-
Oooh, thanks Terry - much better value The Aizu did work well. Look at the black and try to ignore the rest: When that was dry I masked using 0.4mm Washi cut on the Infini board. Stupidly I forgot to take any pictures I think it looked a bit more fragile than the same-sized Aizu but it did its job, allowing me to dot-paint the missing bits: Hate close up shots. Finally I washed the AIMs with very thin black to 'anodise' the AK Aluminium: When that's dry, I can gloss coat everything ready for the transfers. Hooray!9 points
-
Hello nigel, it'd be good to have you look in ,thanks, I've made a start, and got most of the cockpit painted and decaled,I've ordered the areobonus (aires) pilot 480211 in a seat pictured above ,I'll paint him up when he lands, and hopefully he'll slot straight in🤞, I've had a look at a fair few builds , both on this site and youtube , I'm going to build and paint in sections, test fitting of course as i go , and build the prepainted parts at the end , I'll start assembling the intakes next, This is the scheme aircraft I'd like to do the model in although it hinges on whether i can get hold of the bort numbers 902 The office awaits Cheers all Glynn9 points
-
I searched the hobby room looking for the sponson until I realized I'd built it and re-shaped it to make a master to cast parts for my first ATR model (Doh!) Finally locating it in my box of molds I began cleaning it up for use on this model. It's not vital to upgrade (side grade?) the sponson but the kit part sticks out unrealistically. I have pictures of the real plane, specifically the sponson and it is a smooth aerodynamic fairing, mine isn't perfect either but better than the kit part. I still have to scratch together the trailing arm type main gear, remove the shallow cast in wheel bays and build them but, here's where I am now; here's the top of the kit part, the issue is it is too abrupt and juts out too far. my attempt (taped in place) as a comparison I'll open up the landing light openings and A/C air inlets yet. As well as build up a (hopefully) little more realistic main gear Thanks for looking9 points
-
I loved this the moment I saw the Box-ART. This is the Box-Art of the kit Little artistic License with this Photo-color Painted in Gunze Grey and Alclad Metal colors Added Some Photo-Etch Hatch Wheel and some MV Lenses A little Challenge to build .but nothing Horrible. Raised rivets replaced with Archer Rivet Decals. Thanks for Looking Comments Always Welcome Cheers Bill D8 points
-
evening chaps - thank you, very kind so, as I said last time, I started to detail the sidewalls in which there are many bits & bobs that mainly are mini models in their own right.. starting with the R/H wall - here we have a conduit housing on the far left, a big brass ki-gas pump, a sort of pull handle on the top rail and a couple of push switches... ..on the L/H wall a trim wheel made from laminates of 0.5mm ply, some big ratchet handle and a small lever quadrant on the top rail - there is another one on the far side of the rail not shown.. ..and again, it's a matter of constant dry fitting in the jig to make sure everything can co-habit with everything else.. I have to say though, I am really enjoying this build and have started to prepare for the bigger questions it will ask of me - things like vac forming the basic fuselage off a basswood master and looking at the best way to construct the wings following the Alcorn / Lee book anyways, until next time.. TTFN Peter8 points
-
Sd.Kfz.222 15th Panzer Division. Deutsches Afrika Korp. Libya 1942 Built from the excellent ICM 1/48 kit this is my take on the ubiquitous German armoured car, made so well known by it's use by Lieutenant Gruber in Allo Allo! Build thread can be found here; Many thanks for looking in and I hope that you like her. Craig.8 points
-
It’s my wife’s birthday soon and she’s been leaving jewelry catalogues all over the house. She'll be pleased to know I got the hint. I hope she likes her new magazine rack!8 points
-
In the absence of an aftermarket etch or kit decals for the instrument panels I painted them satin black then once dry gently scraped off some of the paint from the raised dials and buttons. The real thing has black dials on a black panel, so I didn't remove too much of the paint, just enough to highlight a bit of detail.8 points
-
Just for @Andy J trying ones best to keep updates coming for ya! Re adjusted R/H track, thought it a little slack, now I've removed a link, might be a touch tight... Anyway Schurzen added, bits and pieces, mainly fragile brackets, refitted that I'd clumsily knocked off and drivers vision port dropped in place all ready for application of camouflage just as soon as I have a suitable block of time. Thanks for looking Darryl7 points
-
Thought better give update on HMS Intrepid,I went away for a week in Nov and took a ship that had sat on the self for over an year,it took that week just to get back into in Yuri Garmin and having done that ,it was time to finish her before getting back to Intrepid,also got side track with a diorama of USS Winston Churchill and HMS Montrose doing a RAS with Wave knight ,it needs to be finished off with crew and rigging on the refuel lines,plus added crew to USCG Bertholf, I used the figures from Black Cat Models 1/350 ,they are excellent,only lost one head and a leg ,which was easily glued back on.7 points
-
Cheers Jes7 points
-
Terrible night's sleep last night. Perhaps it was the Blue Cream Cheese I had in the evening. I don't care, I'm addicted! Replies then… Thanks Giorgio Sounds like a lot of work eh? I did stretch it and used the 'warm it up with your finger' method (fnaar!!) but I didn't gloss. You guessed, didn't you. In my defence I think it crept away from the line I'd planned. Not a fan Thanks Bill - excellent advice Cold jet nozzles sound like an oxymoron (oooh, get me) but look: (With thanks to FalkeEins) One painted, one burnt, as you say. My thoughts too. Nice Hind Mark - snurf! I have that! It's not cheap, as you say. In fact, I'd go so far as to say it's flippin' dear! £4 for a tiny little roll. But wait! Time for a comparison perhaps? Cheers Pete I have to say that, compared to my usual builds, you've not missed much in a week Must try harder. Yes! He's back! A bit. Welcome Steve and do try to keep up. And get back to those Hawks or I won't have an impossible bar to try to reach Awww, thanks Craig, very kind Now if only I can put more paint on the Scooter than I'm scratching off I might get somewhere. Crackers? As if… I have nothing in my diary tomorrow - yes!!! Perhaps something will get done, at last.7 points
-
Having just completed the first of a pair of British Army "Light Tanks" in the form of my Light Tank Mk VI, here is the second AFV now also finished. A Scimitar Reconnaissance vehicle representing the type as used by the British Army in the first Gulf War. The eventual idea is to possibly mount them on a plain desert base together, showing a "two generations of British Army Desert Light Tanks", or something like that! As I'm sure most will be aware the Scimitar was one of a group of vehicles known as the CVR(T) family, being known as FV107. The model is produced by ACE, and is a very nicely moulded AFV in 1/72. The version I used was this boxing, bought for £5 at one of the Tank Museums Model shows a couple of years back: I added some details such as etched grill shroud over the exhaust and some wire to form the wing mirror supports. Paints used were Mission Models "MMP-039 British Sand Yellow Modern AFV" Acrylic for the overall sand, on an undercoat of AK black one shot primer. I find the Mission Models paint airbrushes really well with a little W&N Acrylic flow improver. A couple of lights coats of good old Klear formed a good base for weathering using artists oils thinned with white spirit. One of the surprises in the box was a complete etch fret with a set of vehicle tracks. These have to be folded to produce an extremely lifelike representation of the tracks in this scale: Outer surfaces when track teeth are folded inwards: And inner surfaces showing teeth: I heated the completed track lengths on the hob turning them black brown. This made them much more pliable. I did find them a little tricky to fit, but with perseverance, the result is very satisfying. I managed to use just the two top sections (shorter) and the two lower sections (longer), without resorting to the spare track links provided. I added the very familiar mud guards at the front and rear made from scrap brass sheet, which conveniently hide the tricky track joins! Being brass (or possibly copper?) it is very easy to produce the typical sag on the upper run, although not too much according to photos of the real thing. The close up are quite cruel, but please remember this is very small! And finally, one showing it's real size better. Keen eyed viewers will notice this shot actually has the aerials fitted, which I'd forgotten to put on before all the above pictures were taken! Comments welcome. Thanks for looking. Terry6 points
-
Today I will show you my last build. It was fun to build this vehicle and the digital Camouflage was my first try. I never made a digital camo before.6 points
-
For the benefit of @Vicarage Vee, @Tim R-T-C, @roymattblack and @Windy37 (apologies if I missed anyone) I thought I'd post some of my old F1 photos. All were taken with a very cheap Zenit SLR, which gave results which ranged from 'marginal' on days when it was cloudy, to 'not bad' when the sun was out. So here's the first lot, from the 1985 British GP at Silverstone. Oh to have a digital camera back then! The obligatory Senna shot: Then another young lad who looked bound for greatness: the late, great Stefan Bellof, in one of the last outings for a DFV-derived Cosworth: He's behind you! Niki Lauda getting a lift after his car expired. Eddie Cheever's Alfa going the same way. Parc ferme 1: Tyrrell, Tyrrell, alfa, Ligier, Renault and at the back Arrows, Brabham and Ferrari. Parc Ferme 2: Senna's Lotus. I have some of the 1985 European GP at Brands Hatch which I will sort out and post soon.6 points
-
Cheers chaps, One thing is that I'll never "Out Rust " Longshanks that for sure !! Tonight's progress, still pretty much a works in progress folks and the daylight bulbs are blowing out the colours a tad, Its pretty much looking as I wanted it at this stage, just enough pre-shade coming through and a nice faded OD colour to break up the single colour. Cheers folks Dan6 points
-
Got my first look at one of the new yellow boxings. I have to say the brands new German owners have made a cracking job of repackaging these kits. What you can’t see is SWMBO rolling her eyes at the other end of this table.6 points
-
It's weirdly patchy the way it seem to happen. I'm still talking to Support, but I'm not able to give it my full attention as I'd like to, as there's so much other stuff going on here and back in the real world. I will get it sorted though, but please bear with me6 points
-
Well. Look what arrived today. The Stug is very exciting !! Most of the fighting compartment is there.6 points
-
Some progress.. The cockpit assemblies were put together, the Tamiya seatbelts (decals) were added - not too bad, really, at this scale - and the cockpit was put onto the piece that includes the wing spars (I see what you mean, Phil!). The wings were also completed. Surprisingly, given that this is a Tamiya kit, there were small gaps at the back of the nacelles, where they meet the wings. So out came Mr Surfacer 500, which is now drying, prior to a little sanding.... Then I can close up the fuselage. Nice and quick. Meanwhile, the tyres have gone to the paint shop, for a dark grey (tire black, as they call it) Once these are dry, I will paint the silver wheel hubs, using one of those metal stencils (as my compass cutter won't go small enough for these) and then I can start on the undercarriage assembly. Philip6 points
-
Tracks completed Inc a sweep over with pigment; Along with tracks, wheels refinished and initial weathering done behind them, not that much, if any of it can be seen! Spare track links have been finished to match the main track, next job schurzen then on with the camo.... Thanks for looking Darryl6 points
-
-5 points
-
A few more pics, six months on. Slow is better than no progress at all... ^ Watchtower and radar that goes on the top. Keeping them separate for now because the radar will be a different colour. ^ These parts are for the level beneath the helicopter deck, so they will only be visible behind railings, through a slot about 1cm tall. ^ The bridge, painted. It also has a detailed ceiling, not shown, so it's completely enclosed. Once it's formed into a box it slots into the top of the ship, and two long pieces of PE wrap around the opening. The inner piece has window frames, which are meant to be done in dark brown or black, and the outer piece should have the white paint, leaving the frames showing through cleanly. How to prevent paint going through the windows and ruining the bridge interior - on many an evening that's a problem that has led me to put this back on the shelf and do something else. ^ I think I've figured it out. This is the bridge in place. Before I sealed it up I ran some thin strips of tape around the inside, covering the window openings. I left the ends dangling out of the side doors, and the idea is that it will all stay in place until the ship is fully painted. Then I'll pull on the ends to drag the tape out of there, hopefully without tearing off the bridge instruments while I'm doing it. The piece of PE that's on there now will be painted dark for the window frames. The outer piece, which is resting on top, will have to be painted separately and glued on afterwards. ^ Bonus pic. I found this ship in Microsoft Flight Simulator! Mine will not have trees growing out of it.5 points
-
1/48 monogram Huey Hog, an old kit and an aircraft maybe not the best choice for my first GB. I had plenty of issues to challenge me but it's now ready for it's first combat mission. Dave5 points
-
Hi gents, A little progress, nothing special, but for anyone interested... Best, Nikola5 points
-
Our William is no idiot, military or not. Oh. Idiom. As you were.5 points
-
Hi Guys, Thanks for looking in. Here I have layered different weathering colours. I added salt streaks, Dark streaks, Rust chips, Rust streaking and then Rust wash. I think this side is all done. Just needs a clear coat to seal it and see what all looks like. Then a Flat coat. Chris5 points
-
Someone stole my Microsoft Office and their gonna pay, You have my Word.5 points
-
Thanks Ray!...don't look to closely though!! I've taken some time to add a bit of an interior, I built a basic floor and risers for the seats...loooots of seats!!; the kit instrument panel is undersized and oddly shaped, I used some algebraic math formulas some geometry, trigonometry, a sliding rule and then gave up and used a piece of fine solder to get a copy bend of the fuselage interior to make my own instrument panel (sure hope it fits) I actually did no math, I'm math handicapped...which is why I made 4 seats too many. there are risers on the flight deck floor but are way too low and much too far aft. I made my own risers for the pilots seats but the kit risers interfered with the fit so I hacked them off The kit control yokes; Seats being painted and installed; A mock up test fit; Thanks for looking5 points


.thumb.JPG.3498f40362ff13ebfc4b2e45abbd545e.JPG)


.thumb.jpg.cfc129272ffec824439b15e6013d5952.jpg)


This leaderboard is set to London/GMT+01:00