
Leaderboard


Popular Content
Showing content with the highest reputation on 12/11/20 in all areas
-
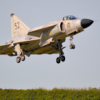
Just completed; Thanks for looking Constructive comments welcome but remember, I strive for mediocrity.37 points
-
Been a while since I built a model after the marathon sesh i had back in Lockdown #1! Unfortunately during the current Mockdown I've been busy as ever at work and not noticed any change from my usual routine Just finished this though - seemed like a really nice and simple kit. I built it as Airfix intended straight from the box - I rarely build 1/72 so this might offend! Was a nice build and might get me to start looking seriously at 1/72 - they certainly look neat and take up way less space! All the best, Alan32 points
-
Hi, Here is a selection of images from my latest completion. This model is based on the 'The first Jet Guardians of Neutrality' boxing of Special Hobby's 1/72 De Havilland Vampire. The airframe depicted is a Mk.1, specifically J-1003 of the Swiss Air Force as included in the kit. This release adds to the previous boxings of this kit with the inclusion of new tail booms and a new tailplane specific to the Mk.1. Also the later variant tailplane and the intakes have been re-tooled to correct errors. In the case of the tailplane its chord has been reduced and in the case of the intake openings they have been reshaped. I am not sure exactly when these modifications were made. Despite Special Hobby fixing these errors there is still a big error which remained untouched, the overly large wing chord. The issue seems to be with the root rather than the tip so I removed a slither of plastic about 1.5mm at the root from the leading edge of the wings leaving the tip as it was. This changed the wing leading edge angle to better match references. This also required the intakes to be moved rearward the same distance to avoid a step and the fuselage parts needed adjusting to match the new intake positions. The trailing edge of the wing remained uncorrected even though I estimated it was about 2mm to far rearward along all its length, the tail booms and control surfaces made it more complicated to fix. Apart from the modifications to the wings the kit was built largely out of the box, except from some scratch built details in the cockpit including a seat harness and other details based on references. Along with a couple of aerials under the port wing noticeable in photos of J-1003. I also drilled out the clear wing tip lights from the inside to create the bulbs. I packed the nose and area behind the cockpit bulkhead with steel balls to try and prevent the model from sitting on its tails, although I ultimately failed in this regard. Once the airframe was assembled it was primed in Ammo One Shot Black primer then overcoated with gloss black in preparation for the High Speed Silver finish. This was replicated using Vallejo Metal Colour White Aluminium. The red wing bars and fins with their white crosses where masked for and then painted, as I thought the red may bleed through the included decals. The model was then gloss coated using AK Interactive Gauzy Shine Enhancer to help protect the paintwork. After applying the numerous decals another coat of Shine Enhancer was airbrushed on. Weathering was achieved with the use of Ammo's panel line washes, Ammo's Starship Filth Oilbrusher and Tamiya's X-19 Smoke. The model was finished with a coat of Vallejo Satin varnish to tone down the shiny metal effect. The undercarriage parts that were previously painted, fitted without any issue along with their doors. The masking was removed from the canopies and the sliding portion was secured with Vallejo Liquid Mask. If you add some to the canopy mating surface and leave it to dry it remains tacky enough to hold the canopy in place once positioned. It can then be repositioned a few times before the stickiness is lost, allowing the canopy to be posed open or closed. Hope you enjoy! Mark.21 points
-
Hi there folks, here are a few photo's of my completed T-55A from Miniart, this has taken quite a while to do but really very interesting at the same time. It's like having 4 seperate models to build in one kit, they are all complete models in their own way, you have the engine, inside the tank body, inside the turret then the whole outside of the model. Never done an interior build before but i've got the bug now and will do another soon. The model is pretty much OTB with the exception of the tow cables which were from Eureka XXL and i made my own grab handles and tie down brackets on the turret plus replacement parts that have ejected into oblivion via my tweezers. I used MIG paints for the main colour and the filters and pin washes were done using burnt umber and black oil paints. that's it, this is the end.... hope you like it Link to WIP https://www.britmodeller.com/forums/index.php?/topic/235074557-miniart-t-55a-early-mod-1965-37016-full-interior/ all the best Ed19 points
-
Yes indeed, an Airfix 109 in 1/72! Built for the recent Battle of Britain 80th GB here on the forum, the build thread is here but to recap: Kit: Airfix 1/72 Messerschmitt Bf109E-4 (new boxing A01008A) finished as an E-3 Build: OOB with masking tape for seat belts Paints: Tamiya & Revell Acrylics. Klear, Flory Model wash; Oil weathering; W&N Matt Varnish Decals: Southern Expo Battle of Britain 70th Anniversary - 'White 2" of 4./JG51 from August 1940 Notes: According to the decal notes, this a/c flown by Ofw. Johann Illner collided with a Spitfire flown by Al Deere on 9 July 1940 but managed to return to France. Illner was later shot down over England in November that year and spent the rest of the war as a POW. Airfix Bf 109E-4_Done by Dermot Moriarty, on Flickr Airfix Bf 109E-4_Done_(3) by Dermot Moriarty, on Flickr Airfix Bf 109E-4_Done_(4) by Dermot Moriarty, on Flickr Airfix Bf 109E-4_Done_(2) by Dermot Moriarty, on Flickr Airfix Bf 109E-4_Done_(14) by Dermot Moriarty, on Flickr Airfix Bf 109E-4_Done_(7) by Dermot Moriarty, on Flickr Thanks for looking, stay safe and happy modelling. All the best, Dermot18 points
-
Dear all - Showing pictures of my latest completed project: ICM's 48th scale I-153 'Chaika' biplane fitted with winter skis. Markings are for a soviet machine from 1940 so I guess this puts it in the Finnish winter war conflict. Great little kit although the extra sprue suppling the parts for the skis were not a good fit so a bit of work was required getting them onto the corresponding aircraft parts. Built OOB and only added the missing control horns for rudder and seat harness cut from Tamiya masking tape. Rigged using fine (flat section) knitting elastic for main wings and Oschi standard elastic thread for rudder cables. Model finished and painted by brush. Regards Dave15 points
-
This build came from one of those flashes of inspiration that results in a sudden urge to start a kit from scratch and see it through to the end in quick order, rather than languishing for a few years as per usual. Browsing through Airframe Extra No.7 'The Suez Crisis', I came upon a photo of a lineup of Meteor FR9s of No 208 Sqn at Hal Far, resplendent in Suez stripes! I had no idea this version wore these markings, only ever seeing them on NF13s before. I'd had this book a few years but never twigged, there's even a small version of the photo on the front cover, hiding in plain sight! Very handily, the photo shows the nearest aircraft's serial clearly (WB121), and I knew immediately that I had to build this aircraft. I was already part way through an Airfix Meteor F8, but straight away started a newly received FR9 to build in parallel. I won't go into detail on the kit itself, other than to say it is generally a joy to build with a small number of fit issues, but nothing major. I built it pretty much straight from the box, and finished it with Xtracolor and Humbrol paints and a mix of kit and aftermarket decals (for the serials and 'W' codes). I hope you like the result as much as I do! Thanks for looking. Mike14 points
-
Hallo This is my MIG-21 SMT, the last in the build of 6 versions of the MIG-21. All, except the F-13 are from Eduard in 1/48. This kits are good, but with many areas where you have to grasp due to inaccurate instructions. This last version took me longer, since I was sick. So if you see some flaws, well I know, it is far from perfect. Now I will take a sidestep and build some highly detailed tanks in 1/35. In this field the instructions of high standard kits like MiniArt, RyeField and Takom are a joy, in opposition to Eduard aircrafts. Happy modelling13 points
-
The really nice Hobby-Boss kit with the tremendous Shipyard set (photoetch and decks), Master DCA '47mm, 13,2 mgs)L'Arsenal Loire 130 and the out of space 3DTurrets and guns from New-Zealand Micro Master. 76DCD7BD-B20C-4345-9D99-ED7994CEB9E7_1_201_a by jean Barby, sur Flickr 097EFDCF-17B9-456B-A817-C5683C3BF3BB_1_201_a by jean Barby, sur Flickr 6A22550D-6AF2-4D95-A071-1935A339E038_1_201_a by jean Barby, sur Flickr 66DDC5C1-00BB-4233-AC98-45A341320E92_1_201_a by jean Barby, sur Flickr 6746B840-5319-4B5B-ADC2-7C3AEE245531_1_201_a by jean Barby, sur Flickr 7891F62D-3C83-446D-8A2B-2FAAF952D8C3 by jean Barby, sur Flickr A97DCCE6-32F6-4BD3-9B20-4DF184B9EA95 by jean Barby, sur Flickr13 points
-
Hi everyone This is Trumpeter's 'US M1A2 Abrams' kit, which I originally built in 2013 to represent an Australian M1A1 with a bit of scratch building. I recently beat it up and placed it on this base. Extras: - Mouse House - Auscam paints, ration boxes and jerry cans - Southern Sky decals - Eduard bustle rack extension - other bits and pieces scrounged from my spares box. Original build with shelf mate13 points
-
This is my long lasting project started back in 2013. As you can see, there hasn't been much done here. But I recently got the fenders on it and figured it's time to get it up on the internet. I don't have the shot of all the stuff I'm using here, but the base kit is Dragon 6301. I won't use Vorpanzer parts and will make it a regular later version Ausf.E. I also have Armorscale fenders and barrel, Lion Roar PE set, Aber PE stowage bin and Modelkasten tracks for this project. I'm also using the interior bits that got left over of Trumpeters Brückenleger build some years ago. So far I have the suspension put together and also most of the drivers compartment. I made a very basic floor around the turret turntable just to fill the huge emptiness around it, but I guess I wont bother myself with the interior much more than the parts that will be directly visible via open hatches. Armoscale fenders were a charm to put together and seem to be very accurately built up. These have the PE parts and resin bolt heads to it in the set and they fit on the plastic very exact. Cheers! Kristjan12 points
-
Hello all from Viet Nam, My latest completion after 10 years since I've opened the box. Trumpeter F-14B is nothing but trouble, yes the details is nice enough if you will to ignore all glaring shape issues, fit issues and those rivet. The completed model take a huge spot from my shelves hence I sold it to a friend of mine and he kindly enough to took these super nice photos. I've used ejection seats from Quickboost, Pitot and gun barells from Master Model and Eduard PE. Comments and criticism are welcome <11 points
-
Evening all, First of all I must thank @Deanflyer for all of his help on this build as without him I would not have been able to reproduce this aircraft. I present to you today the AZ models 1/72 spitfire Tr.9 dressed up in the colours of NH341 Elizabeth. The model is built as a gift for my brother who was lucky enough to have a fly in and fly, for a bit this plane for his 50th birthday. I was originally going to build the brigade conversion but @Deanflyer was happy to let one of his spare AZ ones go to a new home and he also let me have the template for me to print off my own decals for the nose, code, squadron crest and kill score markings, plus some masks for the fuselage letters. Thanks again Dean! The build itself was a little more of a challenge as I'm only used to airfix and revell. There are no locator pins anywhere on the kit and the wing tips and tail elevators are all butt joints. No tabs! Plenty of filling and sanding to be done but enjoyed the build and pleased with how it has turned out. Plus its going to be in a case so most mistakes will be hidden, result!. As always, thanks for looking.11 points
-
Hi My last update, oh, it was long time ago, a year. This project is still alive, but I have no time for updates. Left side wall is ready. Longerons made from soft steel wire, fasteners are photo etched, thank's PART company. Regards Tomasz10 points
-
Renault FT 75 BS FLYHAWK 1/72 Last year I bought the Flyhawk double-pack kit of the Renault FT 75 BS, which some of you may remember from the WIP I did at the time. The second FT that came in the box has been sitting around waiting to be finished since the first was done. As I've got a gap in my schedule at the moment, I thought I'd try and get some old part-finished builds completed before the end of the year, and this one came off the shelf first. There wasn't actually all that much to do, as I'd got the hull together while I was building the first one. A couple of days to finish the assembly, and a few more for paint and weathering, and I could cross this one of the to-do list. No real problems with the build, apart from the decals which silvered quite badly for some reason. The ones on the first build had gone down flawlessly, so maybe these ones had deteriorated slightly in the intervening time. There's not a huge amount of difference between this and the previous build, apart from the camo scheme, but they look good together in the cabinet. Thanks for looking Andy9 points
-
Japan Airlines “Sora wo Tobu” - Boeing 787 Kit : Revell Boeing 787 Scale : 1/144 Decals : DrawDecal I haven’t posted anything on Britmodeller for a couple of years. So, I thought it’s about time I posted something. I built this earlier in the year for a group build we had in IPMS Ireland during the first lockdown. When I started building it, I found out I had run out of primer. I had some white rattle can spray paint, so I used it. All I can say is big mistake. At first it worked great until I started to mask the paint. After finishing painting the silver, I started to peel the masking tape off and the white paint came off as well. This meant I had to spray the white and silver again. So, I can’t say the model is perfect. As it’s so white I tried to weather the wings, but I don’t think it looks good. I only had black wash, a lighter colour wash would have been better, but the shops were closed because of lockdown and I did not have time to order it online. Hope you like it. Regards Ken9 points
-
Very nice Day to All! Breaks between new builds and posts are longer and longer... So posting something small done not long ago. 👀9 points
-
So the latest update on the Sherman and I've fitted the upper hull in place and given it a coat of black primer. I've left off the tools etc so I can paint them easily and fit them to the hull later on. I've started work on the turret and hopefully should have this completed and in position soon. So more steady progress and I'm happy with the results so far. Thanks for looking back soon 🙂👍9 points
-
Good evening everyone. Its been a little while since I finished a model or at least posted one onto here. But here it is. I've had this kit for over three years now sat waiting for me to build it but its always been left for another model as generally i'd never been a huge fan of olive drab models. I loved the box art, which was my main reason for buying it initially and after watching the Mini Series Catch 22 I knew I wanted to build it before the end of the year. My other reason was that I thought it would give me a good chance to use the chipping medium I had just bought. I feel like the model build went pretty well, being an Italeri kit I really thought i'd be fighting with a lot of parts to get a decent fit, but I made sure to do a lot of pre fitting and carefully filling the parts where the fit was still pretty bad to save myself more work than I needed to and to get a nicer overall finish. I think for the past models I have built, this has been my issue; not pre fitting and secondly not filling gaps in a clever way as usually i'd just slap a load of filler on and sand it back. As this was a bit of a learning curve, I spent a while doing these parts to make sure it would pay off. The only parts I neglected to pre fit were the clear parts, specifically the canopy, nose section and landing lights on the wings which didn't fit so well. Another reason I enjoyed building the kit so much was that I think I have found a good balance for kits such as this one where they are fairly cheap and easy to get hold of (I guess its different when they are either expensive kits or rare as I would take more time to get the little things to the best finish I could) and therefore wasn't too fussed if there was a little bit wrong here or there. I think, personally for me, I spend too much time overthinking things with the kits and trying to make them as accurate as possible within my skill set. This is why the landing lights might jut out a bit and the tally decal had to be cut making it inaccurate. I managed to snap the delecate nose wheel gear so purchased some SAC gears, which were nice but I wasnt sure they were worth the £17 I paid for them. I also bought a set of quickboost gun barrels as the kit ones were really lacking, I think this made a good addition to the model. Lastly. there seemed to be a bit of a debate on the colour of the front of the engine cowling, some said it should be drab, some said yellow, as well as white and red. I chose red as I thought it fitted the best to the model and I love seeing a bit of colour on an otherwise dull paint scheme. So overall im happy with the end result, it was a really enjoyable and relaxing build. Hopefully it'll get me in the mood to build my Eduard Spit with all the trimmings. Hope you all enjoy. Also let me know what you think about the red engine cowl! Thanks, Ryan8 points
-
Finished not without a few errors by Airfix & equally by me. But all finished. Laurie http://8 points
-
Evening all This is my attempt at '332700' - a Bf109K-4 of JG27, found unserviceable by the allies at Wunstorf in April 1945, along with many other aircraft types, apparently including 18 other Bf109s, four Fw190s, two Ju88s and an Italian SM75 transport, mostly in various stages of 'dismantlement' - is that a word? The Fujimi kit went together well, using a Montex mask set (the Hakenkreuze are decals) and finished mainly with Vallejo and some Mig acrylics. There is a bit of calculated guesswork on the colours, but I went with the consensus, which seems fairly well documented - either way, the late-war colour variations are all part of the fun. Pics taken outside in low light - as usual for West Wales in November. One day I'll take some decent pics.. Hope you like. Comments welcome.8 points
-
Evening All, My apologies for the lack of updates and my tardiness in responding to your comments. There really is no excuse, however I am going to blame it on work, family and other commitments! Before tonight's meager update I shall deal with the incoming post... Thanks Steve, You're right I am as chuffed as a dog with two wotsits! It's a bit like the theater, the public sees the final performance but not the multitude or rehearsals that went before. For each part you see here there were several failed versions that now reside in a pot at the back of the bench. The Software is pretty straightforward once you get the hang of it, it's all down to breaking an object down into its component shapes. Thanks John, It's one way of practicing with the software and getting used to the printer and the resin. If i change resin the calibration process starts all over again! If anyone is thinking of building a post war scrapyard let me know I have loads of damaged body panels available 😀 Thanks Mancunian, You don't have to produce a set of drawings for the parts, you build it up from basic shapes, a bit like making something out of Lego. Each basic shape can either be a 'solid shape' or a 'hole shape' If I was going to make a mug for example I'd start with a 'solid cylinder' then to hollow it out put another slightly smaller 'hole cylinder' inside it. For the handle you take a ring and cut it in half and then stick that on the outside. You essentially then click a button that says 'export' and the software converts it into a set of instructions the printer understands. It's actually quite easy to pick up, as I say if you can build a basic car out of Lego then you're halfway there. (I must add that I'm still only using Tinkercad and not fusion at this point, that is a whole different kettle of fish! 😱. Not being modest here, just honest 😀 By 'foot pedals' if you mean the square shapes they are supposed to be packets of ciggies! the pedals in the Tilly are circular, as you can see below. OK, correspondence corresponded with now on to the measly amount of progress... As I say I have had other things taking my attention away from the Tilly for the last couple of weeks, (checks date of last update and then looks at Gil Elvgren 😁 calendar) By Eck, its actually been a month, better pull my finger out! After the work so far I decided to try and do something about the interior floor. The load bed didn't need anything other than needing an access hatch above the diff scribing in which i did earlier. It was the passenger compartment that threw up the challenge. the original vehicle has strengthening beads pressed into the floor pan to give it rigidity and stop it from drumming. My dilemma was how to replicate this without it looking like the cat had been chewing on it... This is the sort of thing we are after, I'm not tying to make it 100% accurate as you probably won't see it in the end anyway! Picture borrowed for illustrative purposes only (not mine and I will remove it if requested). Option number one was to try and scribe and sand in the beads as grooves, but a couple of tests on a scrap piece of plastic proved the cat could have done a better job. Option number two involved 3D printing a new floor, now while this could have come out a treat with a favourable wind and if the gods had been on my side and the planets were in alignment and I'd been wearing my lucky socks etc. I decided to rule this out as: A. I wanted to try and keep as much of the original kit as possible (I'm only fixing the bonnet sides remember!) and B. the amount of time it would take would be immeasurable, (do you know how long it took to create a padlock, never mind a full car floor!). Option number three was to laminate a piece of plastic card with holes in over the existing floor to give the impression of the pressed in beads. I ruled this option out as the thinnest plastic I could find was too thick, and I cannot cut out accurate lozenge (is that what they're called?) shapes if my life depended on it. That left option four, the only problem was I didn't have an option number four! So it sat like this for a couple of weeks whilst I gave it a good coat of thinking about. Then one day whilst rooting around in one of my many (and I mean many, SWMBO will confirm this!) modeling supplies drawers for a length of brass rod to fix something else I came across a 3 inch square piece of self adhesive chrome foil. "O look" i thought "a 3 inch square piece of self adhesive chrome foil" and moved it aside to locate the rod I so badly needed. I only remembered the foil the following week when I was plugging in a new web cam and had to move my Silhouette 2D cutter out of the way, the one I use to make masks and such like. At this point I had a rare moment of inspiration and realised that there was an option number four after all... Any way, after having a sit down to recover, I took a photo of the floor pan, uploaded it to the computer and then opened it in the Silhouette software scaling it to size. On top of this I drew the outline of the floor and the various strengthening pressings for the passenger side. This was then copied and mirrored for the drivers side and a couple of changes made for the pedal cut outs. The chrome foil was carefully loaded into the cutter and I clicked 'Send To Cutter' and disappeared off downstairs to make a cuppa. On my return the cutter was silent and on the floor in front (it was on the edge of the desk and I forgot it ejected the sheet after it was done) was a set of nicely cut floor pan laminates. This is what I ended up with after they were parted from the backing and burnished into place on the Tilly... And from a slightly different angle. Quite passable and give the look I was hoping for, even if they are a bit on the big side. The eagle eyed among you will also have noticed that I've installed the pedals as well; another session with the Mars. These will be replaced as since I did this I've printed a better set with more defined rubber grips on them. After looking at the picture of the 1:1 scale floor above I decided that the Tamiya seat mountings (four upright posts with a horizontal one between them on the floor) would not fit the bill either and would have to go, Time to top up the resin in the printer... The picture below shows (not very clearly I admit): Top left the Tamiya versions after removal from the kit floor. Top right my first attempt using copper wire and contrail tube Bottom left my first attempt at 3D printed ones Bottom right the final versions straight off the printer before support removal or curing (I know this bit is not the best picture, the camera keeps focusing on the green seat and not the grey resin. I'll try and take another pic that shows the detail a bit better). That's as far as I've got so far, hopefully I'll have another update soon. Thanks for looking in and the comments, it does motivate me to do more. Cheers Alan.8 points
-
Hi! I'm starting a new build of Takom's fantastic Panther kit. It has a full interior included and very thorough detailwise. I have an ABER set to it, which has all the goodies including aluminum barrel, brass MG barrels, antennas etc. There's also MasterClub tracks, Eduard Panther interior set, Tamiya brass shells and Aber shackles. Some of the aftermarket aren't really necessary, but on the other hand, why the hell not. The details are very crisp and so far the kit goes together really nice. Nothing much has done yet. I'm at the point to get the first paint on it to get the lower hull sides and bottom together. Sorry about the crappy images. We had a rare occasion of sunshine this time of year here and there's a lot of light and shadow on the photos. Cheers! Kristjan7 points
-
A Landing Craft Mechanized Mk.3 from the Normandy Beaches It served with honour and now passes its days in a creek somewhere on the Helford River They shall grow not old, as we that are left grow old: Age shall not weary them, nor the years condemn. At the going down of the sun and in the morning We will remember them. Work in Progress https://www.britmodeller.com/forums/index.php?/topic/235080266-lcm-3-diorama-completed/ Thank you Kev7 points
-
#24/2020 And my dad has finished his next, and for now last, IJ subject. This time the old Hasegawa ex-Mania Nate. The kit isn´t bad, regarding it dates back to 1977. This is a limited edition from around 2005. Decals tended to tear and float around and my dad had to repaint some of the red stripes. Plastic seatbelsts from Fine Molds, EZ Line for the antenna wire, painted with Tamiya XF-14 JA Grey, Gunze H422 RLM82, Tamiya XF-52 Flat Earth and Gunze H54 Navy Blue. There are different interpretations of this aircraft´s camo. Build thread here https://www.britmodeller.com/forums/index.php?/topic/235080678-banzai148-nakajima-ki-27b-type-97-nate-imperial-japanese-army/ Model shows the 2nd Sentai CO´s aircraft on the Philippines in December 1941. DSC_0001 by grimreaper110, auf Flickr DSC_0002 by grimreaper110, auf Flickr DSC_0003 by grimreaper110, auf Flickr DSC_0004 by grimreaper110, auf Flickr DSC_0005 by grimreaper110, auf Flickr DSC_0006 by grimreaper110, auf Flickr DSC_0007 by grimreaper110, auf Flickr DSC_0008 by grimreaper110, auf Flickr DSC_0009 by grimreaper110, auf Flickr DSC_0010 by grimreaper110, auf Flickr DSC_0011 by grimreaper110, auf Flickr DSC_0012 by grimreaper110, auf Flickr DSC_0013 by grimreaper110, auf Flickr DSC_0014 by grimreaper110, auf Flickr DSC_0015 by grimreaper110, auf Flickr DSC_0016 by grimreaper110, auf Flickr DSC_0017 by grimreaper110, auf Flickr DSC_0018 by grimreaper110, auf Flickr DSC_0019 by grimreaper110, auf Flickr DSC_0003 by grimreaper110, auf Flickr DSC_0004 by grimreaper110, auf Flickr7 points
-
My first try on NMF!! Hope you like it, really apppreciate any comments!! First things first, i have to thank a member here in the forums, Duncan a.k.a. ''Sabrejet'', for his valueable help, explaning details, providing info and clarifiying things regarding this beautiful aircraft and my build specifically. Thasnks a lot Duncan, really appreciate!!!! In progress, here... John7 points
-
Thanks Alan The gun has had a little paint, and it is as done as I want it I think these will do to show you It seems that if I can be patient enough my little Olympus camera will handle flashless macro nicely, given the help of octopus the flexistand This lesson bought to me by Ced Octopus Advisor, ta mate I quite like these better than this Flash saturated thing Anyroadup, tara.7 points
-
A small tale regarding our Burmese Marty. He celebrated his 1st birthday the other day & a quick weighing showed him to be 4.6kg, a very solid & fit young man. We (she) tend to be quite protective of him & unaccompanied trips outside are not on the agenda, we live on a busyish road with traffic whipping along it. I had admitted him to the basement where he likes to prowl but then realised my older son would be coming in soon which might have let Marty out, not worth the hassles from She, so I headed down to retrieve him. He had me figured so disappeared in behind some stuff & under an easy chair currently stored there till the day (decade?) I get my office/hobby room/ man cave established. I got down on all fours to peer under the chair to try & locate him & as I did so, became aware of a small furry figure under my chest also peering intently under the chair as though to say, "so, what are we looking for here?" In between fits of laughter, I scooped him up & took him out of harms way. I'm still chuckling about it, the easiest retrieval yet. Curiosity sure did get the cat. Steve.7 points
-
Time for a midweek update. Chrome trim added to the Maserati's body. Cruel close-up. Front view. Almost time to take the masking off the inside of the body. It doesn't look too bad all painted blue... The Humbrol liquid mask is pretty good stuff. Maserati decals turned up, sadly even the smallest ones are too big. No idea what I'll do with the Maybach decals. Maserati metal transfers from the same source. Maserati script and trident badge applied to the boot lid; it should really be a slightly smaller typeface and read "Maserati 3500 GT I" but this seems better than nothing. The dials on the dashbaord needed some Microsol to sit down and I've decided the column swithc has to go. Close-up of the replacement switches. Aftermarket Nardi steering wheel and column stalk in place.7 points
-
This was a fun little painting project as a diversion from Cruiser modelling. The quality of the 3D printed models are just excellent and it was a chance to try out some North Star figures. Paints are Sovereign Colourcoats and Vallejo. The funnel stays were a trial and that was the thinnest stretched sprue I could manage. The B6 (light blue) boat has no rudder as this will be planted in the Berwick dio Thanks for looking Rob6 points
-
I'm going to build my 1/72 Hasegawa F-104J as a JASDF interceptor based at Chitose on Hokkaido. It'll be roughly like this (pic is public domain via wikicommons): I'm going to do an aircraft based on Hokkaido. I really love Hokkaido, having been lucky enough to visit about six times when I lived in Beijing a few years back. Hokkaido is beautiful in winter, summer and autumn - I never got there in spring. It's also way north - the name Hokkaido literally means "north sea prefecture". (Well, the Japanese character in its Chinese root refers to an older form of administrative division, but prefecture is near enough; that's like a state or province in other countries). During the Cold War, the air base at Chitose, near Sapporo, Hokkaido's capital, mostly had to intercept Russian aircraft. Of course, these days, most JASDF interceptions are against Chinese aircraft - in the last decade or so China's air and naval air forces have grown in capacity and confidence. But there are still plenty of Russian intercepts. [If you're interested, these articles (1, 2, and 3) (and many others that google will cough up) spell out how many intercepts the JASDF is doing in current times. For example, in 2016 there were 1,168 scrambles - more than three a day - against 851 Chinese aircraft and the rest mostly Russian. That was the peak year in recent times, but for the fiscal year 2019 (which ended in March this year) there were 675 intercepts against Chinese aircraft, a six per cent increase. I don't know if that's a V shaped or a K shaped curve - haha - but it's interesting anyway. There were 947 total intercepts, down from 999 the previous year. Of the 947, Russians accounted for 268. Of those 947 total intercepts, the Northern air force did 198 of these intercepts flying from the base on Hokkaido.] Today they fly F-15s but it used to be F-104Js... ...which is what I will be building shortly. The Hasegawa F-104 is - as far as I can tell and I am by no means anything more than a lay person on the F-104 or the kits of it - meant to be the best of the 1/72 offerings. I am sure there is plenty that could be improved but I will go with an OOB build except I will try to add the underbelly pylons and a pair of Sidewinders because it's not much use being an interceptor without those. Pics of the kit to follow in a few days.6 points
-
This is actually a Hawker Typhoon FR IB, the photo recon version of the Typhoon. The build was an ongoing process, and was stalled out for nine years due to the fact that I couldn’t find the resin camera insert used in the left wing to make the conversion. That all changed in the summer when I found info that said that, later in life, the camera system had been removed and the area faired over with sheet metal. A cine camera had been added into the inner right barrel and the outer left camera barrel removed to compensate the weight difference. Another oddity that got to me was that the tail section, including the sky fuselage band had been repaint with fresh Dark Green. To accomplish this, I sprayed this area with Tamiya XF-81 RAF Dark Green 2. To tone it down for the rest of the camo, I added a bit of XF-80 Royal Light Grey. The rest of the camo was done in XF-82 RAF Ocean Grey 2 and XF-83 Medium Sea Grey 2. I used the instruction diagrams for templates but haven't figured out how to use them on the fuselage. The sharp eye will notice I screwed up with the demarcation and the "S" code on the right. The mismatch above the left exhaust is intentional. The hardest part of putting the model together was adding the fuselage inserts to both halves. I have yet to read a review where someone has achieved this flawlessly. Add each insert to its corresponding half and glue the fuselage together when the time comes. You will still have to add plastic strip and putty in front of the windscreen. A hole for the pitot tube needs to be added as Hasegawa never did this, at least on my kit. I also had to fiddle with the horizontal stabilizers. They are meant to mesh together inside the fuselage but I couldn’t make it work. I ended up cutting off one of the tabs and it all went together. Other than that, a very nice kit. One other oddity that I noticed when I started to decal was the haphazard way the serial numbers were placed on the left side6 points
-
My Airfix 1/72 De Havilland Vampire T.11 WZ507 flown by Vampire Preservation Group, North Weald, Essex, England 2012. Eduard p/e set also used on this build. vampire11 by stuart burn, on Flickr vampire12 by stuart burn, on Flickr vampire15 by stuart burn, on Flickr vampire13 by stuart burn, on Flickr vampire16 by stuart burn, on Flickr6 points
-
Round three: Airfix BAE HAwk T. Mk1 I’ve seen some glorious builds of the Red Arrow on here and wanted to try and give it a go. Main thing was to try and get that super glossy finish.. Results were less than perfect. Based on the tail sitter experience from the previous model I purchased a bottle of Liquid Gravity and proceeded to fill the space under the cockpit with it, mixed with CA glue (if I’d have put it in the nose wheel well it would have shown up). The gear is not painted properly yet! As I went to attach the wings to the fuselage I noticed a pretty big gap at the wing root, which could be pushed about 1mm each side. I chose the starboard side for the gap and resolved to use putty to sort it out My first experience with Perfect Plastic Putty was a revelation after having been using the revell stuff, it’s brilliant.. Just wiping it off with a damp finger was a heck of a lot better than hours of sanding.. I don’t know if it’s just my terrible skills but this one needed a real heck of a load of putty. I was determined to get the proper shiny streamlined look for this one. I did end up losing the panel lines directly underneath the cockpit but my confidence wasn’t quite up to re-scribing them just yet. One cool thing that I learned was using Parafilm to cover the canopy before using a scalpel to cut out the window panels, worked a treat Half way through I realised I had mislaid one of the ventral fins! So I traced the remaining one onto the thin cardboard from the box the model came in and it served ok as a stand in, once painted. In this photo you can see that I also managed to drop the model and break the front landing gear off (the massive amounts of liquid gravity inside probably exacerbated this). Had to sort that out later. One near disaster I had was that I noticed only after gluing on the flap actuator covers (is that what they’re called?) I realised that the Airfix instructions has them in the wrong order! So I had to remove them, putty and sand down, then reattach and repair I found a wooden chopstick up the tailpipe was super handy for painting and general handling After a coat of halfords plastic primer, showing off the new cardboard ventral fin. More putty and sanding around the intakes, I was obsessed with getting the finish right on these. Flap actuators now reglued in the correct sequence. More sanding and putty on the intakes. Want them to be seamless!! Not the greatest job on the primer coat though, still very coarse, any suggestions on how to get a smoother finish would be appreciated About the third coat of Humbrol Red Arrow red And should have read more build guides—of course, the fins on the bottom get in the way of the decals so they must be chopped up! Applying the decals to the gear doors was tricky, would have been much easier had they been closed but I was determined to do a gears down model Wasn’t happy with my decal chopping job on the underside so decided to mask and paint instead.. Cue many rounds of touch ups Finally not looking too awful but still a way to go.. And the final result, photographed against a fetching backdrop of modelling equipment Verdict: 4/10 Feeling much better about this one. I managed to get hairline cracks in the canopy, totally messed up the cheatline on the nose and didn’t get the fully glossy finish that I had hoped for as can be seen in the above photos, but I was quite pleased with the overall result. Still much learning to do but I wanted to share, I have properly got the bug now and have a number of much more ambitious builds planned (and started) so will be soliciting much advice. I’m honestly looking for criticism here so please don’t hold back I hope this has been enjoyable and apologies for length!!6 points
-
The Boy found a box of Plastic Soldier Quick Build Panzer IIIs while I was sorting through some stuff last month, and asked if he could build them. I didn't have a clue where they'd come from, so I gave the go-ahead, and helped him with a couple of bits of the construction, which weren't a great fit TBH. I guided him through the painting and weathering, but he did all the airbrush wielding himself, using my Mr Hobby P770 for the camo (from Martin @ Aircraft.net). He hand painted the commanders, and I helped him with the decals that were courtesy of @Black Knight's generosity, although we ran out of the white-outlined ones that show up well on the grey, so the rearmost of the three is without markings at time of writing. I've got a few more on the way, so that one should be finished soon too. I've been amazed by his handling of the airbrush, especially the tiger-stripe camo on the Dunkelgelb one at the front. He did all of that himself, and if you look closely he's hidden a smiley face somewhere, with an X somewhere else, just because I suggested something like that. I'm super-proud of this one, although he's had it indoors and got it covered in dog hairs, so I've had to photoshop a few out I have NO idea what that glob is on the shurzen though Things I need to get him to do next are remove seamlines and paint the details. He couldn't be bothered with the pioneer tools or spare track - although they sometimes got sprayed over by lazy squaddies, so it's not all that inaccurate. His airbrush skills are excellent for his age (and mine) though, and he's keen to build a Pershing next, as he was driving one in a game the other day. He's like a butterfly though, so it'll probably be something else, so we shall see6 points
-
Thanks for all the encouragement with this build gents but the cage aerials are really trying my patience so have only been doing small bits at a time and inbetween did some rigging thanks to @grahamwalker for the plans to follow from and Lord nelson did appear with a lower aft mast at the Dardanelles campaign And i also added the rails and roof to the admirals walkway but doing so I lost some of the floor supports but will replace them with thin wire. Stay Safe beefy6 points
-
Bit of a delay since my last update, I blame the lockdown, means the wife isn't going to work and leaving me to get on with the important things in life...modelling! Painted the wheels and tracks, just got to put the metallic edges on the wheels sprockets and idlers, I cannot see any rubbing on the edge of the wheels against the guide horns like there is on the standard wheels. I have put on a first coat of camouflage paint, it's just freehanded working from photos and profiles using Tamiya paints, and I have managed to break off a spare track link hook from each side, good job I have some spare ones. Thanks for looking, any comments are welcome.6 points
-
Oh waily waily, the evil injection-moulded axis is voting out my favourite once again :6 points
-
6 points
-
Touch up with a brush, bit of a buff, good as new.6 points
-
Not much to the cockpit assembly. I'll add some seat belts later. The next bit is tricky. The greenhouse. This will be an unarmed aircraft. I masked all the pieces first. It is a mask set for the Academy kit, so I have had to add a couple of pieces of tape. But it is alright. It is together. A tedious pain to assemble, but I did it. I cannot vouch for clarity. I am leaving the door open on this. It's an option. Fuselage and wing halves went together without a hitch. A test fit this morning of the greenhouse and the fuselage proved almost perfect. There are some gaps and I will use Milliput for those. So this is where I am now. You might think I am going fast, but I have yet to assemble the landing gear. That is 50% of the kit and 75% of the sweat. --John6 points
-
Assembled, to be painted. The disk will be the dial of the instrument:6 points
-
Thanks, gentlemen... we're off. Not had much bench time lately, but given how simple the Citroen is, I can speed along! The interior colour scheme is more usually seen with a pale gold car, but I liked it, and the metallic yellow really belongs on an SM, not a CX2000, but it is a genuine Citroen colour, or something very like it is. Here, it's a Tamiya spray "Pearl Yellow", recently introduced into the range for the Anniversary 370Z re-issue. And this is where I'm at tonight. The seats have had a drybrush for that "velour" effect, and I've started work on the trim on the body... best, M.6 points
-
I have been inspired by the great I-153 on skis posted by Epeeman to post my two Russian aircraft on skis. This is the Accurate Miniatures 1/48 Il-2 Kit #3409 which was originally released in 1997. I probably completed it about 20 years ago and my recollection of the build is that this is one of the better kits I have built. Tricky in places - you have to follow the instructions - but the fit was great. At the time there were few Russian aircraft in 1/48 on the market so this was very welcome. It is snowing today where I live so this seemed perfect for this.5 points
-
As I"ve just pushed the boat out with £9.98 for an ex Frog Canberra, the less than a tenner GB is going to need all the help it can get soon enough😬5 points
-
Hello again Chums, Ol' Scrapiron,thanks old fruit.I've always liked the idea of solid construction and easy methods of doing so,I'm glad you like the idea. A coat of Vallejo Matt Varnish was brushed on overall.Once dry the cockpit masking and side door were removed.The door was fixed in place using self adhesive aluminium foil which takes away the vagaries of a tiny glueing area while allowing the door to hang properly.This had a slathering of cockpit green paint. The exhausts were cut from the frame,the part lines scraped back and the ends hollowed out. A spot of locating and hole drilling later they were mounted and that's when I found out that they are two different lengths.If you don't tell anyone I'm not going to. These were then painted and made to look like they grew there.There was a little touching in around the cockpit area,isn't macro photography cruel. The engine was fitted. If you're wondering what happened to steps 3 to 6,they all happened just not in the suggested sequence.The wheels went on last,needing no fettling at all. Anyway,I'm calling her done.I'm not going to add the wire antenna,I don't have any wire fine enough and it won't survive the current storage method. I've just seen the bent gun barrel.And the wonky bits of rigging.Considering most of it had to be done twice and the amount of handling there's been I don't think it's turned out too bad. Thanks for looking in and commenting Chums,see you on the next one.5 points
-
Hi Folks, I got some great news this morning, a parcel arrived this morning, containing a full set of Canopies for my Fairey Gannet, and they were supplied FREE OF CHARGE from Hannants, they simply asked for my address, and told me one of the Sales Managers had found a set, and they sent them to me, you've no idea just how happy Hannants have made me, and just how relieved my Wife is, THANK YOU HANNANTS5 points
-
The body has now had umpteen coats of gloss white and the yellow section is painted in too. I've started to add some of the new decals but they are a REAL pain being so big. They have a tendency to tuck over or under themselves which is a PITA to sort out. Anyway - moving along slowly among my other projects...5 points
-
Hi all Calling the twin Otter completed, I dropped the ball with the decals in the end with them being the wrong font, color, out of register and not settling in place (I tried 3 different decal solvents, finally settling on Mr Mark Setter) Ok, the font and color were my fault because I didn't have the right decals and didn't notice till too late. Thank you for looking and to all those who offered suggestions and help along the way!5 points
-
Primer applied:5 points


.thumb.jpg.b4a5069fd2c2dd5708ce1694345c5b11.jpg)


This leaderboard is set to London/GMT+01:00