
Leaderboard


Popular Content
Showing content with the highest reputation on 11/11/20 in all areas
-
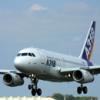
Hello all from Viet Nam, My latest completion after 10 years since I've opened the box. Trumpeter F-14B is nothing but trouble, yes the details is nice enough if you will to ignore all glaring shape issues, fit issues and those rivet. The completed model take a huge spot from my shelves hence I sold it to a friend of mine and he kindly enough to took these super nice photos. I've used ejection seats from Quickboost, Pitot and gun barells from Master Model and Eduard PE. Comments and criticism are welcome <36 points
-
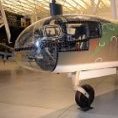
Hi Build in parallele to the Cessna O2 Skymaster, it finished too. The details level is very impressive for the scale. Thanks to the photoetched (for the seat belt and the landing gear cylinder trapdoor) and the hundred decals marks. The kit is a little complicate to build but give you a beautifull plane of this early jet age. Other pics at this address FH-1 Phantom31 points
-
This build came from one of those flashes of inspiration that results in a sudden urge to start a kit from scratch and see it through to the end in quick order, rather than languishing for a few years as per usual. Browsing through Airframe Extra No.7 'The Suez Crisis', I came upon a photo of a lineup of Meteor FR9s of No 208 Sqn at Hal Far, resplendent in Suez stripes! I had no idea this version wore these markings, only ever seeing them on NF13s before. I'd had this book a few years but never twigged, there's even a small version of the photo on the front cover, hiding in plain sight! Very handily, the photo shows the nearest aircraft's serial clearly (WB121), and I knew immediately that I had to build this aircraft. I was already part way through an Airfix Meteor F8, but straight away started a newly received FR9 to build in parallel. I won't go into detail on the kit itself, other than to say it is generally a joy to build with a small number of fit issues, but nothing major. I built it pretty much straight from the box, and finished it with Xtracolor and Humbrol paints and a mix of kit and aftermarket decals (for the serials and 'W' codes). I hope you like the result as much as I do! Thanks for looking. Mike30 points
-
A Landing Craft Mechanized Mk.3 from the Normandy Beaches It served with honour and now passes its days in a creek somewhere on the Helford River They shall grow not old, as we that are left grow old: Age shall not weary them, nor the years condemn. At the going down of the sun and in the morning We will remember them. Work in Progress https://www.britmodeller.com/forums/index.php?/topic/235080266-lcm-3-diorama-completed/ Thank you Kev24 points
-
This is actually a Hawker Typhoon FR IB, the photo recon version of the Typhoon. The build was an ongoing process, and was stalled out for nine years due to the fact that I couldn’t find the resin camera insert used in the left wing to make the conversion. That all changed in the summer when I found info that said that, later in life, the camera system had been removed and the area faired over with sheet metal. A cine camera had been added into the inner right barrel and the outer left camera barrel removed to compensate the weight difference. Another oddity that got to me was that the tail section, including the sky fuselage band had been repaint with fresh Dark Green. To accomplish this, I sprayed this area with Tamiya XF-81 RAF Dark Green 2. To tone it down for the rest of the camo, I added a bit of XF-80 Royal Light Grey. The rest of the camo was done in XF-82 RAF Ocean Grey 2 and XF-83 Medium Sea Grey 2. I used the instruction diagrams for templates but haven't figured out how to use them on the fuselage. The sharp eye will notice I screwed up with the demarcation and the "S" code on the right. The mismatch above the left exhaust is intentional. The hardest part of putting the model together was adding the fuselage inserts to both halves. I have yet to read a review where someone has achieved this flawlessly. Add each insert to its corresponding half and glue the fuselage together when the time comes. You will still have to add plastic strip and putty in front of the windscreen. A hole for the pitot tube needs to be added as Hasegawa never did this, at least on my kit. I also had to fiddle with the horizontal stabilizers. They are meant to mesh together inside the fuselage but I couldn’t make it work. I ended up cutting off one of the tabs and it all went together. Other than that, a very nice kit. One other oddity that I noticed when I started to decal was the haphazard way the serial numbers were placed on the left side20 points
-
Japan Airlines “Sora wo Tobu” - Boeing 787 Kit : Revell Boeing 787 Scale : 1/144 Decals : DrawDecal I haven’t posted anything on Britmodeller for a couple of years. So, I thought it’s about time I posted something. I built this earlier in the year for a group build we had in IPMS Ireland during the first lockdown. When I started building it, I found out I had run out of primer. I had some white rattle can spray paint, so I used it. All I can say is big mistake. At first it worked great until I started to mask the paint. After finishing painting the silver, I started to peel the masking tape off and the white paint came off as well. This meant I had to spray the white and silver again. So, I can’t say the model is perfect. As it’s so white I tried to weather the wings, but I don’t think it looks good. I only had black wash, a lighter colour wash would have been better, but the shops were closed because of lockdown and I did not have time to order it online. Hope you like it. Regards Ken14 points
-
This was a fun little painting project as a diversion from Cruiser modelling. The quality of the 3D printed models are just excellent and it was a chance to try out some North Star figures. Paints are Sovereign Colourcoats and Vallejo. The funnel stays were a trial and that was the thinnest stretched sprue I could manage. The B6 (light blue) boat has no rudder as this will be planted in the Berwick dio Thanks for looking Rob13 points
-
Thanks Craig I removed the hook with a #9 blade: Highly recommended. I dread to think what they're designed for, but the 'wedgy' cutting surface makes them great for knocking bumps (like ejector marks) off otherwise flat things. If you get the angle just right it runs across the flat(ish) surface, slicing off anything in its way. Mojo a bit low this morning what with remembrance and all that. I did get a final coat on the bottom (fnaar!) and the green on the payload:13 points
-
Hi With the finish of FH-1 Phantom, one place got free and I can start a new build. THis time, I exit from my stash an old box from Special Hobby. A "black box" coming from the early age of this kitmaker I choose the "Hunting Percival Pembroke" Why the "Spy who love me" in my title ? Because these planes based on West Germany officialy serve as transport unit but in reality were "Spy plane" My title is a little wink to the "James Bond" movies.12 points
-
Hi all, Just a few pics of my too-late-to-be-included Battle of Britain group build entry. It's a kitbash of the Airfix and Tamiya Supermarine Spitfire Mk1. Both kits are relative compatible in the way things fit thanks to modern accurate measuring and scanning so using bits from different kits isn’t as difficult as it used to be. Essentially, I used the fuselage from the Airfix kit because I feel that it captures the subtleties of the nose best, and the wing and control surfaces from the Tamiya kit – I really like the taping as opposed to the scalloping of the Airfix kit – the undercarriage is also a superb piece of engineering ensuring strong and accurate fitting. The moulding of such things as the navigation lights is just beautiful. The cockpit was built up first. I used Eduard etch for the control panel and harness and their Brassin resin seat was also used. Various bits of wire were used for the most visible piping; holes were drilled out of the frame work supporting the seat and the one behind. I decided to use the backplate and spinner from the Tamiya kit and use the prop blades from Airfix. The Airfix blades are a little chunkier around their base which helped fill out the gaps around them in the spinner which looked more realistic to me. The most time consuming bit was next – mating the wing to the fuselage. It wasn’t difficult but needed a lot of plastic removing from both kits between the trailing edges of the wing-to-fuselage fairings. It also needed a fair amount of patience to remove the leading edge fairing from the Airfix fuselage – it’s moulded on the Tamiya wing. This also had a knock on effect with the front of the lower wing, chin cowling and carburettor intake requiring a lot of dry fitting and fettling. Anyway, I finally finished her last night: For what it's worth, the 'Work in progress thread is here: Thanks for looking. Nick12 points
-
Evening everyone. I am pleased to share my latest work, Tamiya’s awesome P38 as a captured bird in Italian service. This is an absolute gem of a kit. I had so much enjoyment while putting her together. A few photos of the completed article. The model will feature shortly in a large build article for #ScaleModellingNow online magazine. Any comments welcomed 👍12 points
-
I know there have been a few other builds of this kit in these hallowed halls of late but I have wanted to make one of these ever since the kit first came out a few years ago. It was a lovely build for me. Everything seemed to fit very well and I hardly used any filler at all.12 points
-
Camo done on the tanks: Masking mojo now required. Standby.12 points
-
Very nice Day to All! Breaks between new builds and posts are longer and longer... So posting something small done not long ago. 👀11 points
-
Evening all This is my attempt at '332700' - a Bf109K-4 of JG27, found unserviceable by the allies at Wunstorf in April 1945, along with many other aircraft types, apparently including 18 other Bf109s, four Fw190s, two Ju88s and an Italian SM75 transport, mostly in various stages of 'dismantlement' - is that a word? The Fujimi kit went together well, using a Montex mask set (the Hakenkreuze are decals) and finished mainly with Vallejo and some Mig acrylics. There is a bit of calculated guesswork on the colours, but I went with the consensus, which seems fairly well documented - either way, the late-war colour variations are all part of the fun. Pics taken outside in low light - as usual for West Wales in November. One day I'll take some decent pics.. Hope you like. Comments welcome.9 points
-
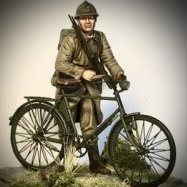
143 - Groupe Mitrailleuses Hotchkiss This is my first group build entry since joining the forum (but not the last) Brought for a fiver off eBay - not bad figures for their age - enjoyed building these 😊 build post is here https://www.britmodeller.com/forums/index.php?/topic/235081133-143-groupe-mitrailleuses-hotchkiss/&tab=comments#comment-38754059 points
-
evening chaps so, only a few pics, but this has been a lot of work... ..the rudder pedals & control assembly seen here in a lovely old ink drawing... notice the pedestal assembly, the star control wheel assembly, the pedals & pistons... all need to be made.. ..started at the bottom with the pedestal - this is just tube and tiny litho bits to look like a casting.. ..then the star wheel assembly with a PE star and some bits - the threaded rod is a watch part.. ..and the pedals and bar - the bar was pretty difficult - you can't see it well here but it is a complex casting I tried to copy in brass & solder... the pedals & hoops are a few PE bits but largely scratched.. ..and the whole lot stacked.. ..starting to get closer to having the main control parts completed.. ..getting this into the fuselage frames and knowing when the right time to put all that together is becoming increasingly hard to determine... until next time.. TTFN Peter9 points
-
Good evening. 😀 more bench time today. I really am just having time off, it’s great. 😍 Here is the pie tin @giemme Vegetarian of course but I’m sure any pie tin will do. 🍃 Most of today was spent enhancing the gunners seat. I need to make a back rest from this. Easy!! 🤩 Now I must apologise. After this I saw another version of the seat with.... well more stuff. 🥰 so I got a bit carried away. I’m positive I took pics but apparently I didn’t. 😔 so the only one I have is this one dry fitted to make sure it still..... fits. 🤪 And here with primer. It’s mostly plastic are with pie tin belts. She’ll paint up lovely. 😍 I have also pre shaded the interior. Left side. Cargo floor. And right side. I’m really loving this at the moment. 😍😇 I have laid down a grey base layer for the floors and side walls and popped on a top coat so I can add the PE tomorrow. Hope you like what’s going on. Thanks for dropping by. Hope week is going as well. 🤩 Johnny.9 points
-
1/72nd De Havilland DH.89a Dragon Rapide No.345 The De Havilland DH.89a Dragon Rapide was a smaller development of the DH.86 Express, a four-engined biplane. Both shared the same straight six-cylinder Gypsy Six engines, as well as some fuselage and wing components. With two engines developing 200hp each, the Rapide was capable of nearly 170mph and could carry six or eight passengers, depending on the cabin fittings. Originally called the Dragon 6, the name was changed to Dragon Rapide, and eventually just to Rapide. The DH.89 was introduced in the summer of 1934, and proved popular with many small airlines in the UK and abroad. Flaps and a nose-fitted landing light were added to the aircraft, becoming the DH.89a. These features were gradually retrofitted to already-built Rapides over time. At the outbreak of the Second World War, Rapides in the UK continued civilian airline duties, but many were impressed into military service. De Havilland continued to build the type, and in military service it was christened Dominie - a Scottish word meaning “teacher” - and used for training, ferry and ambulance duties. 727 Rapides and Dominies of all types were built, and following the end of hostilities in 1945 many were sold on to form the backbone of resurgent civilian airlines across much of Europe and beyond. Eighteen Dominie/Rapide aircraft survive around the world, though not all are in airworthy condition. G-ADBW was impressed into RAF service on 15 July 1940, and given the military serial Z7265. The aircraft had been one of a pair that had been supplied to Jersey Airways Ltd in 1935. All but one of the Jersey Airways’ fleet of De Havilland aircraft had been flown back to the UK mainland from Jersey airport in June 1940 - just before the Channel Islands had been occupied by German forces. It does appear that G-ADBW, although painted in the standard camouflage colours befitting a training aircraft, didn’t carry its military serial and continued to carry the civilian registration. The aircraft was used by an RAF flying school for navigational training. Sadly, barely a month after starting its military career, on 30 August, the plane was involved in an accident at Staverton. I think this refers to what is now Gloucestershire Airport, but which was an RAF training airfield in 1940. The records go quiet at this point, and I haven’t been able to find out if the plane was salvaged and returned to service or not. The records do show it lingered until it was struck off charge on 17 November 1941. I wonder if it ended its days as an instructional airframe, or as a donor for parts. The Heller Dragon Rapide kit was first moulded in 1979. Since then, it has been moulded by various other manufacturers, most notably Tasman Model Products who added extra parts such as vacuum formed transparencies and some metal upgrade parts. The early boxing I used had a choice of three markings, one civilian, one French military and one RAF. I opted for the latter, as it fitted my 1940 obsession. I did question the scheme shown in the instructions. I felt the markings and camouflage depicted in the kit were somewhat fanciful, so I decided to follow what the reference books say was the official layout for the summer of 1940. Aside from masking tape seat belts for the pilot, a radio antenna mast, SBS PE rigging set and a replacement injection-moulded canopy donated by a fellow BMer to replace the cracked one in the box, the kit was assembled out of the box. For its age, it is a very finely moulded kit which assembled with little need for filler or swear words. I elected to brush paint the model using Humbrol acrylics, and markings came from my transfers collection. WIP thread starts here:9 points
-
Hi mates, I have assembled this beautiful kit to make this model: I hope you enjoy my work 🙂 BTW, the WIP can be found here:8 points
-
Hi everyone, This is my effort to improve the Matchbox kit of the Tornado F.3 in 1/72nd scale. It was painted with Humbrol enamels. To make a very long story short, the following works were done: -The cockpit, the front and rear LG bays, the seamless intakes (can't really see them any more) and the airbrakes were scratch built. -The exhausts and the wheels were copied from the Revell kit in resin. -The seats were taken from the Hasegawa kit with a couple more additions. -The landing gear struts were aftermarket additions (white metal I think by SAC) as was the main canopy (vac by Airwaves). -The decals were from XtraDecals. The kit's wide and deep panel lines were filled and they got rescribed. There are quite a few mistakes and omissions but this kit was a test platform for things I have never done before, such as silicon moulds, resin copies, fitting scratch built parts to the main body of the kit, etc. Unfortunately the XtraDecals sheet did not have complete stencils (as a matter of fact had a very few) so I had to find replacements that were not totally correct (e.g wrong colour and size), and on top of that I lost the pilot/copilot names that go to the canopy! Anyway, here is the final result: Thank you all!!! Stay safe and keep modelling!8 points
-
Thanks! I use a kit clear part or scriber guide if possible to cut the tape to size. The tape goes on the outside of the model and I burnish it down once placed with a wood stir stick. I use the backing sheet for Bare Metal Foil to lay the tape on to cut, the tape comes off the foil backing cleanly and easily with no marks or lines. I add the Future (if and where I can) only to seal in the sticky side of the tape so it doesnt collect dust and crud....clear?...as tape??😄 The model finds itself up on floats at the end of work tonight. fiddling with the fit of the struts etc. continues: Thanks for looking8 points
-
A bit of cream on the outrigger may sooth the itch........... And don't apply it too fast.......you'll go blind.........!8 points
-
Hi to all I present the B-25J model MWP (Metal Work Panels) version full aluminum coated (metal tape), customized, detailed & corrected in the following version: North American B-25 J Mitchell "Lady Lil" (correct nose for this version ) Hong Kong Models kit 1/32 scale model - version: 498thBs "Falcons", 345bth Bomber Group " Air Apaches" 5th AF in Philippines, May 1945 for more info & pics: http://www.adventurephotomodels.com Thanks for your attention George7 points
-
Hi Folks. I want introduce my new project completed today. Its Bristol 171 Sycamore from AMP in 48 scale. Best regards.7 points
-
Rather than load my HK Lancaster with bombs I thought I would have them on display to the front of the aircraft. I based the builds on those similar to what the new Airfix Bomber re-supply set provides, one trolley for the 4000Ib and two for the 500Ib bombs. the load could be said to be typical of a Lancaster raid. The 4000Ib bomb was slightly modified to give it a 2nd skin, this provided the front lip seen on many photos, the rear section being just an empty shell for balance. The two crutches were also added to the bomb. The David Brown tractor was also slightly modified to give it a more wartime appearance, the nudge bar was removed and spotlight placed as seen in wartime footage . . . I intend to start the aircraft build in the New Year, the 80th anniversary of the introduction of the Lancaster into squadron service. Thanks for looking in Ian7 points
-
To all who likes to try this!! The Zvezda C-130 hasn’t yet a dedicated flap conversion set and as had the Attack squadron one already in the stash I decided to try this ... At first I was fondling around with the Zvezda plastic and measured the thickness of the wing and after some more measuring I thought it could work out and it did.. First the wing shape at the underside had a concave shape in the wing and at first I thought that would be correct but after some comparisons elsewhere and some looks on the Bring it! resin aftermarket producer Facebook page I came to the conclusion that it was wrong.. The perfect Hercules has flaws😖 The inner flaps need rescribing as they are wrongly shaped.. I also think that the panel lines for the flaps are a little bland and could be more pronounced. The flaps aren’t concave but they should be flat/straight..and there the resin flaps came in as they are pretty correctly shaped.. Nevertheless this Hercules is still to be regarded as the best rendition in my opinion as I had them all. If you leave out the Zvezda kit my second to love Hercules is the Airfix C-130 as it has a much better overall appearance regarding the Italeri....enough kit bashing now 😆 I followed the instructions for the Italeri Hercules cutouts generally only in order to get it fitted I had to thin down the wings considerably and this is not for the faintharded! Not only I had to thin the wings but I also did thinning on the resin as well as it some points it is quite thick. The outboard flaps got a treatment of warm running tap water in order to push out the more concave shape, not much but I did got a better fit in doing that... Now some pictures.. The picture above shows you the incorrect panel linesfor the flaps.. Even the panel lines for the wingroot fairing is way outboard which it shouldn’t be ...it should be nearer to the fuselage.. More reference here https://www.ipms.nl/walkarounds/walkaround-vliegtuigen-props/546-walkaround-c130 Cheers, Jan7 points
-
I thought I threw this up before but does not seems so. Dug this one out of the loft as few month back. Fit as you mostly know is not that great, finished with Humbrol and Alclad Matt Cote. Won't win any prizes but will make some kid happy hanging off his ceiling. Great imposing size though 586_8699 by Georgeconna, on Flickr 586_8698 by Georgeconna, on Flickr 586_8697 by Georgeconna, on Flickr 586_8696 by Georgeconna, on Flickr7 points
-
Hi My last update, oh, it was long time ago, a year. This project is still alive, but I have no time for updates. Left side wall is ready. Longerons made from soft steel wire, fasteners are photo etched, thank's PART company. Regards Tomasz7 points
-
And the Lord said unto John, “Come forth and you shall receive eternal life” But John came fifth and won a toaster.7 points
-
I was having a look through some old pics and found these of miss Dee7 points
-
Hi all, Finished in just two weeks. But that's only because I don't spend much time on internal detail. I only used the US markings. I rarely add codes to my build,unless it's for a certain era and place in a group build.7 points
-
gosh i was just going to have a day off.....and think about how I plan to foil the Secret Service's plans.....but know that poll has to take precedence!!!! Gosh I reckon I need a pardon...and I'm taking down names as well! Arrr have no fear about the Nordic II GB.......we/I have the photo's Enzo has been trying to hide/find for years.......a pink Mankini is not a pleasant look I can tell you!!! Ok bloodshed you wanted, bloodshed you're getting........even if it's a week or so early..........impatient sods!! Control you bloodlust!!!! The cannibalisation of some of the lesser GB's has started! That said it looks like we may have a 2nd confirmed entry for next year just a few votes away........or will the Vampires attack.....will the Garlic Snails be strong enough.........will someone please open a window! Bugga the beer it's bedtime!7 points
-
Schemes Source: https://www.facebook.com/modelsvit/posts/2820138761588490 V.P.7 points
-
Hi Lads, I built one of these in the VF-31 Scheme and sold it regretfully so dug out a second one a few months back and this is how it turned out. Humbrol Paints, Worms for the camo, Cant Remember who I got the Decals from, certainly different to the usual USN Jobbies. It aint not shake a bake Tamiya but only cost about 16 notes so happy with that. 587_8701 by Georgeconna, on Flickr586_8700 by Georgeconna, on Flickr 586_8693 by Georgeconna, on Flickr586_8692 by Georgeconna, on Flickr586_8691 by Georgeconna, on Flickr586_8689 by Georgeconna, on Flickr586_8688 by Georgeconna, on Flickr586_8687 by Georgeconna, on Flickr6 points
-
There are aircraft that are undoubtedly famous ! There are aircraft that are famous because were great designs that had succesful careers. There are aircraft that are famous because played a part in historical events. There aircraft that are famous because set some kind of record, like fastest aircraft or first aircraft to do something. Then there are aircraft that are known mainly because they are the cousin of other famous aircraft and the F-94 is maybe one of these.... The F-94 Starfire roots are in the P-80 (later F-80) Shooting Star. This was not a stellar performer but was the first real jet fighter in US service (the P-59 never really achieved proper operational status). For this reason alone, the F-8' deserves a lot of recognition The F-80 was a decent success and served well in Korea but was not really a legend.. what became a legend was it's two-seater trainer derivative, initially known as TF-80 and later redesignated T-33. This was a huge success, with over 6,500 built, and served in dozens of air forces for many years. The last operational T-33 was retired in July 2017 !!! Then there's the cousin.... the F-94. Developed from the T-33, it was in certain aspects an innovative aircraft, with not only a radar but also an automatic fire control system. The type also featured one of the very first afterburners (first US jet to have one in service). It was in any case a stop-gap type. hastily designed because of the failure of the Curtiss F-87 program. So yes, it was the first USAF jet night fighter, the first US aircraft with an afterburner and yet it's not really a well known type. Production was 855 units of 3 variants and the Starfire did its job, if unspectacularly, in defending the US borders. The type also served in Korea, where scored a few victories, including the first ever jet Vs. jet kill at night. The main job of the Starfire though was trying to stop the slow Po-2 biplanes dropping small bombs during night raids and in this role the type was not really suited. So it is that the Starfire never really became very famous, so much that for a while the only information on the type were in books on the F-80 family. This also meant a relatively small success in the modelling world, although there have been a few kits, with some quite nice. The nicest is probably the 1/48 Kitty Hawk kit of the F-94C (that I also have in the stash) while in 1/72 scale the most detailed is the relatively recent kit from Sword, that will be the subject of this thread. The box is typical of most Czech short-run kit manufacturers, a side opening box with an aggresive sharkmouthed Starfire on its cover (the rear shows the options in the decal sheet) Inside the box are two sprues of grey plastic (one broke but no damage occurred to any of the parts) Several details are sorted by a nice pre-painted PE sheet while the canopy is in two parts, so that it can be posed open... and I will likely show it open. The plastic parts are what I expect from Sword kits of the era: good scribed details and plenty of flash. Internal and external details are not as sharp as in good mainstream kits but are not bad by short-run standards (and are actually better than certain mainstream products...). All parts will likely need some preparation to achieve a good fit... and I already know that I'll need plenty of filler ! Not ideal since all options are in natural metal finish but this is the price to pay to have a detailed F-94B model in the collection. I have read a couple of build reviews of the Sword F-80/T-33/F-94 kits and all point at fit issues in the intake areas and the canopy... reason why this will likely have to be built open. I'm prepared so let's see what happens....6 points
-
Thanks Pete. Indeed it's a very modern design for its vintage. If my memory is correct they first had friction dampers, but the first telescopic shock absorbers were introduced very soon, before the war, 1935 or 36 I think. Thanks Jeroen, I'm happy with the body so far, Soon first surfacer... Thanks, I just hope the wire will glue well. I'll have to do some testing... I discovered two weak points in the body shell construction, where the sides join the roof section just above the fire wall. I glued two reinforcements on the inside where they won't be visible. It seems to fix the problem. The body is sanded and ready for the first surfacer session, after masking off the inside. I have also sprayed the first colour, black, on some sections of the floor part. I will probably sand the top area of the engine bay lightly when dry and come back with a slightly less glossy black coat, or clear.6 points
-
More small progress on the fourth Tomahawk, which I think has brought the interior to its conclusion. Yahu instrument panel fitted, and some etched brass seatbelts added. The latter came from an Arma Hobby Hurricane Mk.I Expert set, so not really correct but I think it looks effective enough: http:// http:// Fuselage halves joined together: http:// http:// And a trial fit of the fuselage to the lower wing: http:// Next up should be permanently fitting the lower wing to the fuselage, following which I'll fit the upper wing panels and tail surfaces..... Cheers for now, Mark6 points
-
Funnily enough my ex used to have a black cat when i met her and always used to guard her broomstick...6 points
-
Thanks John, that looks great I remember you recommending them before, then I thought 'I have a cutter' so didn't buy any. Now I remember I have a cutter and should cut some wavy masks. In fact I think I have a design somewhere. Actually I've just looked at the scheme and it's more of a 'badly painted straight line'. I can manage that! Wow, that low mojo period has really messed up my modelling muscle memory!6 points
-
Ah, but the box itself is a piece of art in it's own right -- Speaking of box art: Auction win - even with postage still less than retail price. And the inside of the box has an extra cover that looks very nice:6 points
-
If you have a couple of different size ' wavy line ' scissors bought from a haberdashery in the UK many years ago which work quite well on 1/48, you might not find anything small enough for 1/72 but it's worth a try. This was done using the bigger of the two: Sorry for the large photo, couldn't work out how to make it smaller. John6 points
-
Just when I though the Arma kit was nice I come across this product. Airfix has done a great job with this P-40. Almost completely out of box except gun sight, Uschi Antenna and Seatbelts. Painted with Vallejo Air colors, Future for Gloss and Testors Dullcoat decanted for Final Finish. Prop was Gloss Black buffed with Uschi Chrome powder. A little Tamiya weathering palates for dust and dirt. Thanks For Looking Comments Always welcome Cheers Bill D6 points
-
The wing is now ready for some spot-puttying and sanding, and eventually for the addition of the rib detail. At this point I can honestly say that, given the not impressive at all quality of this kit, and the work involved in the conversion, one would be much better off with scratchbuilding. Since my son is partial to the float version, I will strive to complete that one, and leave the land version for -may be- another time, as this is a phenomenal waste of time given the starting point. Some of you may know that I have tamed many a dragon, but this is just a bit silly, also considering all the care needed to work with resin.6 points
-
I've not been active on my WIP's for a while, largely due to other projects, one being this little one. This is my S-Model Light Tank MK VI with Dan Taylor Modelworks etched brass add ons, to turret and side skirts. In 1/72 this is very small! The Caunter scheme was applied with lots of masking using AK paints from their Caunter scheme set. The three colours used (from six in the set) are Slate, Portland Stone and Silver Grey. I did find that straight from the bottle, the silver grey was not dissimilar to the Portland stone, so I darkened it slightly with some Russian Cockpit turquoise! Decals are a mixed bag from the spares box. I applied some light washes and weathering with artists oils and various AK and MIG products. The S-Model kits are quite basic but do seem accurate and have a lot of fine detail. Tracks are not separate, being moulded integral with the wheels. And it seems every S-Model 1/72 AFV kit contains two complete kits, so I have a second to build. I fancied an all sand earlier version without the side skirts, or possibly a green/black example from the BEF in France. I have a full size prototype for reference just 20 minutes up the road in Bovington. The Caunter scheme, photographs quite differently in some lights: A couple of shots to show it's size, taken during construction/painting: This one shows S-Model attention to fine detail. And this shot was taken with a same scale Scimitar (by ACE) which is also close to finishing (will do an RFI for that also) And finally these shots show what to me is quite a significant difference between 1/76 and 1/72 scale. My two MB models MK VI's (1/76) with the S-Model (1/72) for comparison. I've heard people suggest that the two scales are so similar, the differences do not matter but to me they do, certainly if they were being displayed together in some sort of diorama. Comments and questions, good, bad or indifferent welcome! Thanks for looking Terry5 points
-
As I've been promising, here is the start of another scratch build, this time the enemy, an S-boot also at 1:48th scale. The s-boot is actually almost the same length as the Fairmile B so the two will make an interesting companion pair when finished. There seem to be basically 5 broad types of s-boots The early war low forecastle boats (Airfix do a kit of this type), a few sub-types The early (really interim) high forecastle type S 30 (or type 26, I'm confused) with an upsweep to the forecastle at the sides of the bridge The mid war type 38 The later war type 38 with the armoured cupola (Kalotte) which evolved from an unarmoured cupola that was often retro-fitted to the type 38's The type 100 at the end of the war which is really the same as the type 38 armoured but with different armament and rear deck layout, build with the armoured cupola from the start Most models you see on line seem to be of the last type, but I rather like the type 38 before they stuck a hat on it so that's what I'm making. This was the main enemy boat in the middle years In my research, I've bought a few books (some I had already). To be honest most simply repeat the same stuff I've also bought every plan I can find Unsurprisingly, none are to 1:48th scale, however, these plans are... Thanks to CAD rescaling and an A1 print and post service. This is the early type 38 unarmoured and the one I will build, but forget the fancy paint job, seems that was mostly using in the Baltic, the channel boats were plain grey from what I've read. The Med boats had cool red and white stripes on the forecastle as did other Italian warships for aircraft recognition, but I think I'll stick with the channel flotillas as that is what the B and SGB would have encountered The various plans have 7, 9, 10 and lastly 20 sections for the lines. I've naturally gone with the 20 section lines per the scan below and re-drawn them This took a surprising amount of time (last 2-3 weeks between interruptions as the lines are really very subtle and lining these up with the other drawings had me redrawing them 3 times. The lines and the large drawing are 1:25 scale and came from Paul Stamm Modellbau in Saarbrucken in Germany. His package of information cost €62 but came with a disk full of drawings and pictures (finding a computer that had a disk drive was interesting...) and the line drawing above is from his drawing scanned and re-scaled. None of the drawings show sections which is a shame, this drawing is a Russian drawing of an early low forecastle type which is not particularly helpful However, in Paul's pack was this blue print which is actually really useful, if a little small So, that's where we begin, lets see how this turns out Steve5 points
-
Hmmm, waiting for dinner to cook so lets have a look at the stash... Less than a tenner - no problem in 144th scale, might try a whole airfield diorama. French Fancy - got an Indochina scene left over from the 'Nam GB and hopefully the new Clearprop Ki-51 kit to add in too. High Wing - just ordered a Shorts 360 kit so hopefully that will be eligable. Unarmed - various civvy planes in the stash. Maybe one of those funny little Let 410s in a Czech regional airport scene. Oz and NZ - not sure on this one, I've fancied a Gallipoli scene after visiting last year. Might try and find some 72nd scale figures. Africa - I've got the complete JBr Decals African MiG collection so piles of MiG-21s and 25s on the way... 90s Warsaw Pact, just picked up the resin conversion to MiG-21R which includes some nice 90s Czech schemes. Anything but Injection - lovely to see this one coming back - I have a London street scene lined up with whitemetal trolleybuses and cardboard buildings that would be great for this. Racers - Dora Wings P63 in racing schemes and their GeeBees will fit nicely. Kit you didn't build as a kid - well I've got several kits in my stash that I bought as a kid and never built, so any of them will be very appropriate. Airfix BAC 111 and Minicraft Catalina come to mind. Double Deckers - got 7 of those Eduard 534s that I need motivation to start trawling through! Yanks Abroad - couldn't find the thread for this one. Bristol Aero - I've got the F2.B from Valom on the way so that should do nicely. BeNeLux - I've got KLM decals for the Revell Embraer 190 Blitzkrieg - for fun value, the Avia 534 painted in Polish colours used in German propaganda films about the Blitzkrieg. Arctic - I do find the Alaska air corridor an interesting topic, I've already made a vignettes of P63 at some remote Canadian airfield but maybe a bigger diorama would be interesting. Might need more Tamiya snow paste. British AFV - I fancy the challenge of painting a 12mm Challenger II into the Berlin style urban camo... Gliders and Tugs - I've got the components for a rural American airstrip with Cessna Bird Dog, L13 Blanik and a Skydiving club Pilatus Porter. Small Wars - lets get this one trending! Got all the African conflicts from the 60s onwards covered but might go for Korean War or something fron the Balkans. V Force - I do like the Victors but a little bit on the big side for my tastes. Unless someone does one in 288th scale? So its almost like I don't need to buy anything at all for next year.... Just don't tell my wife 😏5 points
-
I decided to clean off the matt...Ajax and washing soap... Much better now... And starting the Criquet. Notice the Mureaux 117 on the right. The varnish is drying. It'll be in the gallery by tomorrow! I am very pleased to report: no flash! Very little detail either, but that is alright. Maybe I can augment that a bit. Good looking clear parts. I will try my best not to smudge them up. And we're off! I'll do a bit of research first on the interior...see what I can juke up! --John5 points
-
So not been around as much as i would like recently...and not much done with the Panther ...that's because i really needed a display case for my two finished models plus the many more to come, not liking the frankly ridiculous prices i was seeing for very underwhelming shop bought offerings i decided to modify my work area to include somewhere to put the finished models....something i could expand on if needed ....now it's not finished yet ...still waiting on LED'S and the perspex turned up today for the front to keep the dust out and the inside of the unit will be finished with a light absorbing black cloth ...but i think it's coming together rather well...total cost so far £124 and so much space that i reckon it will take 5-6 years of building before a couple more shelves will be needed.5 points


.thumb.jpg.b4a5069fd2c2dd5708ce1694345c5b11.jpg)


(510x640)-Copy(95x120).thumb.jpg.33073138e01aa81779639a845926753e.jpg)


This leaderboard is set to London/GMT+01:00