
Leaderboard


Popular Content
Showing content with the highest reputation on 10/11/20 in all areas
-
Hi to all I present the B-25J model MWP (Metal Work Panels) version full aluminum coated (metal tape), customized, detailed & corrected in the following version: North American B-25 J Mitchell "Lady Lil" (correct nose for this version ) Hong Kong Models kit 1/32 scale model - version: 498thBs "Falcons", 345bth Bomber Group " Air Apaches" 5th AF in Philippines, May 1945 for more info & pics: http://www.adventurephotomodels.com Thanks for your attention George37 points
-
This is an aircraft I've wanted to build a model of for years so I was pleased to see Dora Wings were going to produce one. In fact (if memory serves me correctly) my very first model over 50 years ago would have been the Frog kit? Was there one? Built pretty much straight from the box except for some of the new 3D seatbelts from Kits World. I thought I'd give them a go. They were OK but I couldn't get them to stay in place very easily so I decided to fix them with some PVA glue. Anyway, the model is very nice and up to Dora Wings usual standard. You get a both of options of canopy styles included and these are nice and clear to show of the quite detailed cockpit. There are a fair few photo etch parts too mainly for the cockpit and the radiator grills. These are quite fiddly to attach but worth it in the end. Anyway, all in all a very nice addition to anyone's RAF collection. Now what about a radial engined Mk.II (I did build a Magna one a few years ago but I'm sure Dora Wings could improve on that.) Roll on their Vengeance!! Thanks for looking. 20201109_203526 20201109_203508 20201109_203540 20201109_20361130 points
-
Just when I though the Arma kit was nice I come across this product. Airfix has done a great job with this P-40. Almost completely out of box except gun sight, Uschi Antenna and Seatbelts. Painted with Vallejo Air colors, Future for Gloss and Testors Dullcoat decanted for Final Finish. Prop was Gloss Black buffed with Uschi Chrome powder. A little Tamiya weathering palates for dust and dirt. Thanks For Looking Comments Always welcome Cheers Bill D25 points
-
Hi everyone, This is my effort to improve the Matchbox kit of the Tornado F.3 in 1/72nd scale. It was painted with Humbrol enamels. To make a very long story short, the following works were done: -The cockpit, the front and rear LG bays, the seamless intakes (can't really see them any more) and the airbrakes were scratch built. -The exhausts and the wheels were copied from the Revell kit in resin. -The seats were taken from the Hasegawa kit with a couple more additions. -The landing gear struts were aftermarket additions (white metal I think by SAC) as was the main canopy (vac by Airwaves). -The decals were from XtraDecals. The kit's wide and deep panel lines were filled and they got rescribed. There are quite a few mistakes and omissions but this kit was a test platform for things I have never done before, such as silicon moulds, resin copies, fitting scratch built parts to the main body of the kit, etc. Unfortunately the XtraDecals sheet did not have complete stencils (as a matter of fact had a very few) so I had to find replacements that were not totally correct (e.g wrong colour and size), and on top of that I lost the pilot/copilot names that go to the canopy! Anyway, here is the final result: Thank you all!!! Stay safe and keep modelling!23 points
-
Hi Folks, Quite like the Italeri Kits, good honest builds. I know there a few bits wrong with them but I am not gonna loose any sleep over the fin and nose shape. In fact everyone that saw it knew it was a Tornado so not too bad going. Again Humbrol Enamels and Alclad Matt code to seal the deal. Think the red is not deep enough on the OEU Jet 568_6812 by Georgeconna, on Flickr568_6813 by Georgeconna, on Flickr568_6811 by Georgeconna, on Flickr568_6814 by Georgeconna, on Flickr568_6815 by Georgeconna, on Flickr568_6816 by Georgeconna, on Flickr568_6817 by Georgeconna, on Flickr568_6818 by Georgeconna, on Flickr19 points
-
Good evening you lot. It’s great to see such interest in my nobbly flying piano. I hope I can keep you all entertained. 🥳🧐 last night I couldn’t resist cutting the first free bits of and doing a bit of construction and planning. The office is first up. The structure is really good but there is a lack of detail for sure. In all honesty though I think even out of box with just the decals it’s really cramped in there and you’ll get something presentable. But that’s not what we’re going for right. 😇 The Zvezda instructions are new to me and some Sub assemblies are done in the left hand margin before they are put together in Ernest. There seems to be no rhyme or reason to it but I think I’m getting the gist. The floor section needs fitting before I could figure out how the office walls slotted in. That was enough to scratch the itch.😜 Today started like this. To the Grotto Robin!!!!! 🦇 🧐 First up here are the resin wheels for @71chally They are really nice. The kit ones are nice too but as these ones are quite prominent I took the plunge. Here’s a side by side. Pretty sweet with some weathering action on top. 🤩 Ok let’s get on. I opened the zoom set and the first thing I have to do is remove the only bit of detail in there. 🤣 typical. 🤪 I can’t add the PE until I paint so I set about red creating the bits I didn’t buy with the larger interior set. The gunner’s floor got some river plasticard and a template was made for the pilots floor. I then used the paper template to cut a tin floor from an old pie case. More detail was added and holes cut for the seat and control sticks. Not bad. Should look the part under a spot of paint. 🤓 Another panel was made using pie tin metal. More cabin structure was made using card. And glued in place with more floor details. Side wall details were added along with electronic boxes and controls. Not too bad. 🤗 The seats need pads and belts but I can fix that. gunner’s. and pilot’s. A spot of primer and we are here. Side wall dry fitted. And the other side. And with naked seats. Super happy with that. 🤗 I can add wires and small details later on. i think I can smell paint. 🤩🤩🤩 More tomorrow. I do need to do my RFIs though. 🤔 Take care y’all. Johnny nothing to do. 🤗🤣🤔🥳🤩19 points
-
Hi Lads, I built one of these in the VF-31 Scheme and sold it regretfully so dug out a second one a few months back and this is how it turned out. Humbrol Paints, Worms for the camo, Cant Remember who I got the Decals from, certainly different to the usual USN Jobbies. It aint not shake a bake Tamiya but only cost about 16 notes so happy with that. 587_8701 by Georgeconna, on Flickr586_8700 by Georgeconna, on Flickr 586_8693 by Georgeconna, on Flickr586_8692 by Georgeconna, on Flickr586_8691 by Georgeconna, on Flickr586_8689 by Georgeconna, on Flickr586_8688 by Georgeconna, on Flickr586_8687 by Georgeconna, on Flickr18 points
-
I thought I threw this up before but does not seems so. Dug this one out of the loft as few month back. Fit as you mostly know is not that great, finished with Humbrol and Alclad Matt Cote. Won't win any prizes but will make some kid happy hanging off his ceiling. Great imposing size though 586_8699 by Georgeconna, on Flickr 586_8698 by Georgeconna, on Flickr 586_8697 by Georgeconna, on Flickr 586_8696 by Georgeconna, on Flickr18 points
-
1/72nd De Havilland DH.89a Dragon Rapide No.345 The De Havilland DH.89a Dragon Rapide was a smaller development of the DH.86 Express, a four-engined biplane. Both shared the same straight six-cylinder Gypsy Six engines, as well as some fuselage and wing components. With two engines developing 200hp each, the Rapide was capable of nearly 170mph and could carry six or eight passengers, depending on the cabin fittings. Originally called the Dragon 6, the name was changed to Dragon Rapide, and eventually just to Rapide. The DH.89 was introduced in the summer of 1934, and proved popular with many small airlines in the UK and abroad. Flaps and a nose-fitted landing light were added to the aircraft, becoming the DH.89a. These features were gradually retrofitted to already-built Rapides over time. At the outbreak of the Second World War, Rapides in the UK continued civilian airline duties, but many were impressed into military service. De Havilland continued to build the type, and in military service it was christened Dominie - a Scottish word meaning “teacher” - and used for training, ferry and ambulance duties. 727 Rapides and Dominies of all types were built, and following the end of hostilities in 1945 many were sold on to form the backbone of resurgent civilian airlines across much of Europe and beyond. Eighteen Dominie/Rapide aircraft survive around the world, though not all are in airworthy condition. G-ADBW was impressed into RAF service on 15 July 1940, and given the military serial Z7265. The aircraft had been one of a pair that had been supplied to Jersey Airways Ltd in 1935. All but one of the Jersey Airways’ fleet of De Havilland aircraft had been flown back to the UK mainland from Jersey airport in June 1940 - just before the Channel Islands had been occupied by German forces. It does appear that G-ADBW, although painted in the standard camouflage colours befitting a training aircraft, didn’t carry its military serial and continued to carry the civilian registration. The aircraft was used by an RAF flying school for navigational training. Sadly, barely a month after starting its military career, on 30 August, the plane was involved in an accident at Staverton. I think this refers to what is now Gloucestershire Airport, but which was an RAF training airfield in 1940. The records go quiet at this point, and I haven’t been able to find out if the plane was salvaged and returned to service or not. The records do show it lingered until it was struck off charge on 17 November 1941. I wonder if it ended its days as an instructional airframe, or as a donor for parts. The Heller Dragon Rapide kit was first moulded in 1979. Since then, it has been moulded by various other manufacturers, most notably Tasman Model Products who added extra parts such as vacuum formed transparencies and some metal upgrade parts. The early boxing I used had a choice of three markings, one civilian, one French military and one RAF. I opted for the latter, as it fitted my 1940 obsession. I did question the scheme shown in the instructions. I felt the markings and camouflage depicted in the kit were somewhat fanciful, so I decided to follow what the reference books say was the official layout for the summer of 1940. Aside from masking tape seat belts for the pilot, a radio antenna mast, SBS PE rigging set and a replacement injection-moulded canopy donated by a fellow BMer to replace the cracked one in the box, the kit was assembled out of the box. For its age, it is a very finely moulded kit which assembled with little need for filler or swear words. I elected to brush paint the model using Humbrol acrylics, and markings came from my transfers collection. WIP thread starts here:17 points
-
Hi Guys !! Hope everyone is staying safe, snd keeping well !! Ready for inspection finally is this Taniya Brummbar, that I finally got a figure finished for. Built OOTB, with no additives... Except for an Alpine figure with a Tamiya arm. Hope y’all enjoy !! Critical observation is welcome !! Lee.16 points
-
I know there have been a few other builds of this kit in these hallowed halls of late but I have wanted to make one of these ever since the kit first came out a few years ago. It was a lovely build for me. Everything seemed to fit very well and I hardly used any filler at all.16 points
-
This is the Delahaye 135. In fact, that name covers a multitude of wonderful stylings by designers and coach-builders, before and after the war. The name refers to the Delahaye chassis upon which the increasingly exotic styles were built. The Paris Motor Show in those days really was THE Fashion Show for cars. So this is the 1938 Coupe by Henri Chapron. Among other things, I got the bonnet hinged and fitted. Boy, that was a laugh! And a set of luggage rails Mais elle est une belle voiture plus classiques, n'est pas?? 😎🇫🇷😇16 points
-
Very nice Day to All! Breaks between new builds and posts are longer and longer... So posting something small done not long ago. 👀15 points
-
Hi all, Just a few pics of my too-late-to-be-included Battle of Britain group build entry. It's a kitbash of the Airfix and Tamiya Supermarine Spitfire Mk1. Both kits are relative compatible in the way things fit thanks to modern accurate measuring and scanning so using bits from different kits isn’t as difficult as it used to be. Essentially, I used the fuselage from the Airfix kit because I feel that it captures the subtleties of the nose best, and the wing and control surfaces from the Tamiya kit – I really like the taping as opposed to the scalloping of the Airfix kit – the undercarriage is also a superb piece of engineering ensuring strong and accurate fitting. The moulding of such things as the navigation lights is just beautiful. The cockpit was built up first. I used Eduard etch for the control panel and harness and their Brassin resin seat was also used. Various bits of wire were used for the most visible piping; holes were drilled out of the frame work supporting the seat and the one behind. I decided to use the backplate and spinner from the Tamiya kit and use the prop blades from Airfix. The Airfix blades are a little chunkier around their base which helped fill out the gaps around them in the spinner which looked more realistic to me. The most time consuming bit was next – mating the wing to the fuselage. It wasn’t difficult but needed a lot of plastic removing from both kits between the trailing edges of the wing-to-fuselage fairings. It also needed a fair amount of patience to remove the leading edge fairing from the Airfix fuselage – it’s moulded on the Tamiya wing. This also had a knock on effect with the front of the lower wing, chin cowling and carburettor intake requiring a lot of dry fitting and fettling. Anyway, I finally finished her last night: For what it's worth, the 'Work in progress thread is here: Thanks for looking. Nick13 points
-
Evening everyone. I am pleased to share my latest work, Tamiya’s awesome P38 as a captured bird in Italian service. This is an absolute gem of a kit. I had so much enjoyment while putting her together. A few photos of the completed article. The model will feature shortly in a large build article for #ScaleModellingNow online magazine. Any comments welcomed 👍13 points
-
Italeri 1/48 Mirage F.1EQ-5. It's built from the F.1CR/CT kit with the following aftermarket items; Pavla cockpit and intakes with the Mk4 seat replaced by a Mk10. This required the Mk10 to be reduced in height as it would otherwise be too tall for the cockpit. Res-IM wheels SAC undercarriage Master pilot. Eduard Brassin Matra Magic I missiles. L'Arsenal Remora ECM pod Matra Super 530F missiles from the Kittyhawk F.1B. The fin extension and Sycomor pod were both scratchbuilt by me. Decals from "Dark Mirages" decal sheet by Albatross, stencils from the above sheet and the kit sheet. Main colours are Mr Paint MRP with additional colours from Tamiya and Lifecolor.13 points
-
S309, Grey Fox was one of the 7 steam gunboats built to the Denny & Sons design. They were intended to counter the S-boot threat in the channel and were the smallest RN vessels equipped with steam turbines. They were 135 ft on the waterline, 23 ft 4 inches in breadth and had a draft of 3 ft 9 inches forward. Displacing 135 tons (initially) they could make 36 knots. Grey Fox was built by Yarrow and launched in September 1941, she survived the war and was sold in 1947 They bristled with guns, of various calibres', really being armed from whatever guns were available at the time. The main armament was a HA 3inch gun of WW1 vintage, originally intended as a land-based anti-aircraft gun. The gun shield sshows was only fitted to this gun when mounted in SGB's. Grey Fox saw action in the channle and was there at D day. The following action report is taken from a thread about Grey Fox on the BMPT forum July 10th 1942. In a furious night encounter, off Etaples, Grey Fox and Grey Wolf engaged 6 German minesweepers. They sank 2 but a 3rd collided with Grey Fox with such force that everyone on her bridge was thrown on their faces and a huge hole was driven in her hull. Grey Fox struggled home, with her bows almost awash. And is backed up by this first hand account of the incident So far as I remember the almost simultaneous result was a sharp heel to starboard as the ship turned, and a burst of gunfire from our own gunners. This was followed by what my mind registered as an explosion on the port side forward. I was thrown violently out of my seat and against the ship's side. As I picked myself up the ship slowly righted itself and I have an indelible picture on my mind of seeing sea water pouring through the open watertight door in the bulkhead between the galley flat and the wardroom passage through which spare ammunition had been passed. At that precise moment there was no one forward of that bulkhead and by good fortune, or perhaps design, the watertight door closed from forward and as I pulled it together the inrush and water pressure behind it helped to shut it making it easy to knock the clips on. We were well down by the bows and I think fear of sinking was uppermost, but our forward gunner was still firing. Some minutes later the First Lieutenant came down and between us we completed shoring up the bulkhead with timbers kept at the far end of the galley flat for that purpose. I then learned from Lieutenant Erskine-Hill that what I had thought was an explosion was the sound of the German R-Boat as it rammed itself through the ship's side into the wardroom and forward messdeck. It shortly afterwards fell away and sank, leaving a large gash in our bows ... The next couple of hours or so were considerably nerve-wracking, sitting on watch with the ship very much down by the bow and wondering, apprehensively, whether the bulkhead against which I sat would hold. The level of water on the other side could clearly be seen by the condensation line which was somewhere near shoulder high, with the deck of the wireless office awash ... We were apparently wavering sluggishly all over the place but heading slowly in the correct general direction and managed to get within sight of Newhaven under our own steam. However, we could not be trusted to keep a straight course to enter harbour unaided and "Grey Wolf" took us in tied alongside. I do not remember ever being so relieved to get off watch! Daylight revealed what a remarkable escape we had had. Lieutenant Erskine-Hill solved the problem of inspecting the damage by the simple expedient of rowing the dinghy through the hole in the ship's side! Following the conclusion of the build tread Grey Fox build, here is the finished vessel in its display case and some detail shots And for a size comparison, here it is next to the Fairmile B I built last year to the same scale Fairmile B build, waterline the same Thanks again to those who followed and provided help and kind comments, Schnellboot thread starting tomorrow Steve11 points
-
Thanks Giorgio! Thanks Bill I even put some gloss on the masking! Good idea Mark, I think that'll work Of course you can alt - I may not have the skills, but I DO have the tools! Thanks Craig and Alistair I do have two - the ones on the left of Alistair's picture - but even they don't have 1.923mm divisions. Trouble is the Oramask wouldn't behave around the hook - it kept curling off, but Tamiya sheet did the job: Fiddly. Once the Aqua Gloss is dry I'll splash some black on.11 points
-
Thanks Mark - laughed did I Right, stripe mask. 25mm, 13 segments: … so that's (2 down carry 1) 1.923mm per segment. I don't have any tape that wide. Silhouette then: All I need to do now is summon the courage to wrap it around the hook and then cut off the relevant segments. And, now I've seen that picture, sand off the flash and repaint the white.11 points
-
Well gents, It is what it is but she's finally RFI! Almost a year since I've started the build. It's been uphill all the way with this oldie (the molds are shot completely combined with my average modelling skills), but worth every effort in the end! I am not satisfied with many aspects, but overall I am happy because I had a lot of fun and learned a lot. She is OOB, except Uschi lines for the antennae and scratch build tarps for the first time. As for the tarps, I used them to cover the problems with the fit between the very bad clear parts and the fuselage (a lot of miss-alignments and gaps), which I didn't want to be fixing forever, so they were more of a necessity than a preferred choice. I think that they are too wrinkly and not matte enough. Anyway, I learned something new so next time I will know better. Comments and criticism are more than welcome. Thanks for looking! Best, Nikola10 points
-
With thanks to @CliffB for donating a spare canopy, this lovely looking plane, although a bit drab in its uniform, has had its photos taken. Gallery entry here:10 points
-
Why is it literally impossible for anyone to announce a new kit without a lot of whining immediately afterwards that they should have done something completely different? If you don't want to buy a newly announced subject, you don't have to buy it. The only people who are owed anything by the manufacturer are those who buy the kit.10 points
-
F-4Es of the 339th Tactical Fighter Squadron, 347th Tactical Fighter Wing, based at Moody AFB participating in the Green Flag 81-3 large force exercise at Nellis AFB, April 1981. 67-0375 67-0398 68-0326 - Funny, she's carrying a baggage pod, while the rest of the line has Mk82 bombs. 68-0387 68-0390 - Wing King's aircraft. Thanks for looking, Sven9 points
-
I've spent the day with a shovel a snow blower and helping stuck neighbors (got about 3 feet of snow overnight) but my gas guzzling 2002 4X4 Dodge Ram (with studded winter tires saw me through my daily tasks) Back in the hobby room with a coffee and some Netflix to relax (don't say chilling!!) I've got a bunch of color on the Otter, you can now see the direction I'm going with this build. There's definitly going to be some touch up work required but the Tamiya lacquers make gloss paint a breeze. Making masks: gloss green: and the light and dark blues; the dark blue is much darker in real life, looks lighter in the pics. Thanks for looking9 points
-
My submission for this GB is going to be the Tasman Models reboxing of the Heller 1/72 DH.89A Dragon Rapide. This upgrade box provides decals for 5 schemes, a white metal instrument panel, vacuformed canopy and some wire for rigging. I will be building this as the RAAF version. There are also detailed instructions for those wishing to improve the model accuracy through scratch-building, as well as a double-sided sheet with over 40 reference photos. Super-detailing is not my within my repertoire, so this model will be primarily OOB. I intend to do full rigging, either with the supplied wire or some EZ-Line, which will be a first for me. Parts have been washed and prepped, just need to find some bench-time later this week to get started! Box contents below. Shiny white plastic: Additional upgrade parts and kit clear components: Example of reference photos:8 points
-
Hey all, Here's my rendition of the new Conqueror kit from Amusing Hobby. I picked this up from a recent pre-covid to the Tank Museum, Bovington after I kinda fell in the love with the real thing... What a beast! The kit is OOB except from the Aber gun barrel, because the original was a bit naff and basic. I also scratchbuilt a canvas mantlet cover out of milliput. I painted her using Tamiya Acrylics, namely XF-58 Olive Green, which may have looked a bit light but after a bit of weathering it created a good scale representiation. Weathering was with oil paints either thinned and used as washes or used as a dot filter. The tracks were plastic and click together, which were nice, but the joins weren't too strong as the tips of the plastic pins that were meant to snap into place snapped off instead. So fitting them to the model were fun... They were weathered with a burnt sienna & raw umber wash mixed 1:1 together. I then crushed up a pencil lead and rubbed it over the high points to create a metallic effect. Thanks for looking, and apologies for the lighting but i'm just settling in with a new photobox and I've yet to adjust the lights in my new setup Sam8 points
-
Hi, Dewoitne 338 was a luxury long range French passenger airplane from late thirties. 31 of them were build. You can read more on this type here: https://www.passionair1940.fr/Armee de l'Air/Appareils/Transport/Dewoitine-D338/EN-Dewoitine-D338.htm and here https://en.wikipedia.org/wiki/Dewoitine_D.338. Few of them were captured by Britts in summer 1941 in Syria & Lebanon campaign and them they were transferred to Free French forces. Together with other civil airplanes they went into LAM (Lignes Aériennes Militaires ) - the FFAF transport service which was flying between Bayreuth and Brazzaville in Congo with base in Bangui (today Central African Republic). Each machine posses individual name. Mine has name "Belfort" (FL-AQB) and was renamed from "Ville de Beyrouth" (F-AQBD). The kit is by Broplan, vacu with small parts done as injection. The building thread within Mediterranean Theater of Operation GB is here: Here she is: (on above photos the khaki hue is reproduced closest to what I see by bare eye, below it goes too much to fresh green for some reasons...) The left engine just started! : An some shots in African sun: So it is already fourth militarized civil French type in my collection, other are Potez 29, Potez 651 and Bloch MB 220: Dewoitine is the largest of them ! This is mine No 19th in this year comments welcome Regards Jerzy-Wojtek8 points
-
Here is my other Eduard 1:144 Mikoyan-Gurevich MiG-21Bis "Fishbed N" which I built back in 2012. It represents "Blue 223", of the People's Air Force of Mozambique, at Beira AB, Mozambique, in 1988. The kit was built OOB and painted with brush except for the final light coat of matt varnish which was airbrushed. The decals came from a Berna Decals sheet. The rocket pods came from an Attack 1:144 MiG-21 kit. I had arranged the pylons so that they would be carried on the inner ones but the undercarriage fouled the fit of the pods so I put them on the outer ones. It seems this machine was used for attacks on FRELIMO guerilla forces. I did some weathering but it isn't noticeable in the photos! Thanks for looking Miguel8 points
-
Slow progress gain this week I'm afraid chaps Had a few issues over the weekend that ruined my bench time so hopefully I'll grab a bit more this week. Bloody ticker playing up again Stowed ammo now in place and more weathering happening, turret ring is now painted Tamiya Lacquer silver and had some Nuln Oil treatment. Enjoy Dan8 points
-
Second picture of the Fairmile B comparison, seems I tried to exceed the number of allowed attachments... Steve8 points
-
Albatros D.V 1:48 Eduard ProfiPACK This is the venerable Eduard Albatros DV/DVa kit Reviewed here back in 2018. I've always liked Otto Kissenberth's black aircraft with the large edelweiss motif on the side, so took the opportunity to build this from one of the kit options. In the review I was not sure about the colours of the lozenge decals, but having applied them over the same black paint as the fuselage, they look pretty good. The model is virtually 'out of the box' except for the slight alteration to the undercarriage legs to lengthen them (see review link). I think the Eduard Albatros sits too low without this mod. On with the photos: The kit supplies the 'fore and aft' rib tapes as decals, but it also needs to be applied around the leading and trailing edges of the wings. I mixed some Tamiya acrylic to match, and hand painted it, which I think was well worth the effort. Thanks for looking, John8 points
-
Woah...Yesterday was a day of crash. I tried to finish Lysander but each time I tried to do sth with it I was breaking sth. When spats disintegrated at one moment I had enough. Today is much better. I've finished this oldie, figures and base can wait. Let's sum it up...I've worked with Matchbox 1/32 Westland Lysander - in original Matchbox box, which is exactly the same as Revell. I bought Eduard seatbelst, Master's barrels and Montex masks. I've rebuild pilot's and observer seats. Elecrical panel was build from scratch as well as map box. I've rebuild MG-s, barrels were removed and changed for Master's ones. Panel lines were made deeper; also position lights were modified. I could's make wheels fit so I had to modify landing lights. Bomb lauynchers were scratchbuild, ones from box looked like something used to shave sheeps . Ammo boxes are left-overs from Legend set. Ammo belts are from Tamiya set. Montex masks for cockpit are usable but usually too big or too small. A lot of work is needed to make transparent parts fit. The worst part was windshiels-fuselage conection. I've mixed Vallejo 331 with acrylic water putty. As a resuld I've got typical RAF interior green. I've puttied seams, after it was dry, I've used white Tamiya putty to get rid of any irregularities. I've painted Lysander with Tamiya, AK and Mr.Hobby range. As a documentation I've used 4+ Publications, Warpaint and Orange series books. In one of them I've read that checkerboards were not identical on both sides, I've assumed that one of them was turned. As kit's bombs were looking like everything but no 20lb bombs I've decided not to mount them Weathering is AMMO fluids and Tamiya pigments. Also I've used watercolor crayons and eveliners for chipping and dirt along with AMMO silver for deepest chips. Wingspan of Lysander is astonishing I'd like to thank Bruce Dickinson and Iron Maiden for making my mojo flow while listening "Book of Souls" album, especially "Empire of the Sky" track8 points
-
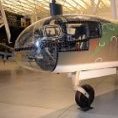
The landing gear itself needed to be shortened by 1/4" or 5/16", taken from the oleo portion between the collars. I was concerned about the flimsiness of the legs after adding a fair bit of weight in extra parts in the fuselage and on the wings. I replaced the main leg with aluminum tubing, and slid a smaller diameter tube in to replace the oleo. The bottom part is white metal taken from the SAC gear set. The scissor links were the kit parts thinned and carefully drilled out, and care was taken to offset the scissors, and hand them left and right. I attempted to build new scissor links from stretched sprue, wire and left over photo-etched parts but that didn't go very well. Once the tires/wheels are attached I will add the brake lines at the bottom. The legs...the kit leg as provided on the left, a completed leg in the middle, and the starboard leg in progress: RCAF Mustangs were equipped with tires that had circumferential tread, which of course were not available in 1/24 scale. I ordered the Grey Matter oval tread wheels/tires, filled the tread with Milliput and Tamiya fine putty, sanded them down and then rescribed the new tread pattern. If I was smart I would have made rubber molds of them so I could cast more for later.8 points
-
The first area to tackle was the wheel wells. I created a spar with double-thick card, and the roof of the wells from thin card on the wing top parts. The ribbing was added with a lot of fettling, and reference to the Tamiya 1/32 kit and photographs. I added detail to top and bottom wing parts, and the result was sandwiched together, and more small details added. The start: Stringers and ribs added: Paint and wiring and plumbing: Almost finished:8 points
-
I've not been active on my WIP's for a while, largely due to other projects, one being this little one. This is my S-Model Light Tank MK VI with Dan Taylor Modelworks etched brass add ons, to turret and side skirts. In 1/72 this is very small! The Caunter scheme was applied with lots of masking using AK paints from their Caunter scheme set. The three colours used (from six in the set) are Slate, Portland Stone and Silver Grey. I did find that straight from the bottle, the silver grey was not dissimilar to the Portland stone, so I darkened it slightly with some Russian Cockpit turquoise! Decals are a mixed bag from the spares box. I applied some light washes and weathering with artists oils and various AK and MIG products. The S-Model kits are quite basic but do seem accurate and have a lot of fine detail. Tracks are not separate, being moulded integral with the wheels. And it seems every S-Model 1/72 AFV kit contains two complete kits, so I have a second to build. I fancied an all sand earlier version without the side skirts, or possibly a green/black example from the BEF in France. I have a full size prototype for reference just 20 minutes up the road in Bovington. The Caunter scheme, photographs quite differently in some lights: A couple of shots to show it's size, taken during construction/painting: This one shows S-Model attention to fine detail. And this shot was taken with a same scale Scimitar (by ACE) which is also close to finishing (will do an RFI for that also) And finally these shots show what to me is quite a significant difference between 1/76 and 1/72 scale. My two MB models MK VI's (1/76) with the S-Model (1/72) for comparison. I've heard people suggest that the two scales are so similar, the differences do not matter but to me they do, certainly if they were being displayed together in some sort of diorama. Comments and questions, good, bad or indifferent welcome! Thanks for looking Terry7 points
-
Rather than load my HK Lancaster with bombs I thought I would have them on display to the front of the aircraft. I based the builds on those similar to what the new Airfix Bomber re-supply set provides, one trolley for the 4000Ib and two for the 500Ib bombs. the load could be said to be typical of a Lancaster raid. The 4000Ib bomb was slightly modified to give it a 2nd skin, this provided the front lip seen on many photos, the rear section being just an empty shell for balance. The two crutches were also added to the bomb. The David Brown tractor was also slightly modified to give it a more wartime appearance, the nudge bar was removed and spotlight placed as seen in wartime footage . . . I intend to start the aircraft build in the New Year, the 80th anniversary of the introduction of the Lancaster into squadron service. Thanks for looking in Ian7 points
-
This build came from one of those flashes of inspiration that results in a sudden urge to start a kit from scratch and see it through to the end in quick order, rather than languishing for a few years as per usual. Browsing through Airframe Extra No.7 'The Suez Crisis', I came upon a photo of a lineup of Meteor FR9s of No 208 Sqn at Hal Far, resplendent in Suez stripes! I had no idea this version wore these markings, only ever seeing them on NF13s before. I'd had this book a few years but never twigged, there's even a small version of the photo on the front cover, hiding in plain sight! Very handily, the photo shows the nearest aircraft's serial clearly (WB121), and I knew immediately that I had to build this aircraft. I was already part way through an Airfix Meteor F8, but straight away started a newly received FR9 to build in parallel. I won't go into detail on the kit itself, other than to say it is generally a joy to build with a small number of fit issues, but nothing major. I built it pretty much straight from the box, and finished it with Xtracolor and Humbrol paints and a mix of kit and aftermarket decals (for the serials and 'W' codes). I hope you like the result as much as I do! Thanks for looking. Mike7 points
-
Wings on. This was a proper pain in the backside!! Just a few small jobs to do and that'll be that! More soon. Dave7 points
-
A heads up for prospective hosts. In previous years, the first GB of the year has never been a popular slot as it has not given much time to prepare. This year I have pushed theat date back as far as I can. The first bunfight GB of the year will start on 23 Jan 2021, giving us more than seven weeks to prepare. The first actual GB will be the Desert Storm GB, commencing on 17 January 2021. However, we've known that is coming for some time. After that there will be one GB commencing almost each month up until September. This means that 2021 GBs won't run too far into 2022. Oh... and yes... I already have dates planned for 2023!7 points
-
Brothers, it is that time again, time for the pilgrimage to the most holiest of coops, where it once was said...... Pink is the word Brother. Gather round fellow disciples of primer of pink, @nimrod54, @Col. @trickyrich, @modelling minion, @Hewy, @Valkyrie, @JeroenS, @Pete in Lincs, For the brightest Reds, Yellows and Orange, prime first with primer on pink Here endeth the lesson, go forth my Brothers and spread the word, holding aloft the blaster of ghetto with Pink by Aerosmith on constant loop. Pink is the word. Pink is the word Brother.7 points
-
Go away, come back, check that Tony’s work is still implausibly impressive. Implausible only in the egocentric sense that it’s waaaay beyond my ken and so must be implausible.....😁 Continuingly awesome, sir.7 points
-
Always is, once he remember to listen to those small quiet voices. Ours. Looking good Ced7 points
-
What? no toilet in this racer? Unbelievable! Then a seat it is: Control horns were only present in the rudder. The elevator had internal ones. The position of the tail struts is drilled: The interior detailing is progressing:7 points
-
The Saab J-21A. Not bad for a second-hand cast-off that someone obviously didn't want to keep, or didn't think worth it. Maybe it was the missing decals? The build thread is here:7 points
-
Evening all This is my attempt at '332700' - a Bf109K-4 of JG27, found unserviceable by the allies at Wunstorf in April 1945, along with many other aircraft types, apparently including 18 other Bf109s, four Fw190s, two Ju88s and an Italian SM75 transport, mostly in various stages of 'dismantlement' - is that a word? The Fujimi kit went together well, using a Montex mask set (the Hakenkreuze are decals) and finished mainly with Vallejo and some Mig acrylics. There is a bit of calculated guesswork on the colours, but I went with the consensus, which seems fairly well documented - either way, the late-war colour variations are all part of the fun. Pics taken outside in low light - as usual for West Wales in November. One day I'll take some decent pics.. Hope you like. Comments welcome.6 points
-
This being a Mach 2 kit I’m sure that despite all you naughty naysayers and critics it will build up VERY nicely indeed and help you produce a very accurate model of a Convair 880 🙂 TT6 points
-
oh dear and there's drama today!!!!!! The "Cheap Bottom" GB has lost a vote!!!! Is this the start of a fatal drop to the abysmal bottom of the poll (It's bound to stay above the creepy stranger!)........... did I put the hoodoo on it by calling it too early............ was the vote rigged to start with............ did I just get the figures wrong.........will it ever recover......will i even get my cocktail from Craig.......will the ice have melted.........does anyone really care........has Donald left the building? .............it's beer o'clock time!6 points
-
Bathing the Llama ? I thought the instructions left said “basting”. That explains the trouble getting it to go back in the oven again afterwards at 180c for 20 minutes6 points
-
So more steady progress today and i decided to prime all the parts for the lower hull separately and then fit it all together. The reason for this was to make sure all the parts received full coverage of the black primer and this was made easier by doing them individually. It was then just a simple case of assembly although the rear idlers have been left loose for altering the track tension later. I then started to add parts to the upper hull although there are quite a few more to fit yet. The upper hull is just loosely fitted for now but the actual fit of the two parts is excellent, infact only minimal amounts of glue will be required. That's it for now I'm back at work tomorrow so that will slow progress a little bit I'm happy with how the Sherman build is going so far. Thanks for looking back soon 🙂👍6 points
-
That reminds me: I need to put a new gastric band on the hamster... 🐹 Ced. I've signally failed to support your endeavours here of late and can only plead poverty of time - great to see these slipping closer to their cloak of paint. *Points leaf blower at spray booth* 'Au contraire Blackadder.'6 points
.thumb.JPG.2ce06c4ff2300a5faba93aaeacbdab25.JPG)


.thumb.jpeg.512869d47e412449d69d30d0295c1ae8.jpeg)


This leaderboard is set to London/GMT+01:00