
Leaderboard


Popular Content
Showing content with the highest reputation on 23/10/20 in Posts
-
1/72 Airfix Bird Dog. Plain and simple build. Enjoy!38 points
-
Hello! Many moons ago I picked up a 1/48 Revell Sea King (Hasegawa re-box) for £18 on eBay with mangled decals and a tatty box. Sometime later if I remeber correctly Crisp @Ex-FAAWAFU send me some spare sponsons and a radome he had. This sat lying around for ages waiting and I thought 'To hell with accuracy, just build it!'. Decals from my spares box, RAF blue grey made by mixing up tamiya acrylics until the got the right hue. The Cab number 57 is completely my own invention, but the underwing serials from a spare Phantom XV575 were about the right size and fitted. So here is my 'on-the-cheap-ghetto-Westland-Sea-King' which will one day no doubt have it's tail rotor up-graded to the correct 6 bladed item and have the missing aerials and lumpy bits added. It was fun, it looks good with my Wessex in my FAA display cupboard. Enjoy.29 points
-
Hello all. This is the excellent little 1/72 Revell Bf 109F-2 (originally from Zvezda). Finished in the markings of the Gruppenkommandeur of II/JG 53 on the Channel Front in 1941. It's the scheme given in the kit, but I used decals from an Xtradecal set. It made for a nice, quick build and it was good to do something other than an Emil or Gustav! It also come with a nice pilot figure, which I wish I'd put in now.28 points
-
Hi Comrades! Here is my Valom's Wellesley. Not a simple kit to build. Additions-resin engine, masks for canopies. All others - scratch built - 4 new small windows in the fuselage, wheel wells structure, interior details aft of pilots headrest etc. The build is here Hope, you like it!26 points
-
The Build log is here https://www.britmodeller.com/forums/index.php?/topic/235070426-1350-hms-kent-county-class-cruiser-1941/ Thanks are due to Richard Dennis @dickrd and Jamie Duff @Jamie @ Sovereign Hobbies for their considerable input into the Colour scheme, which differs substantially from previous interpretations. I've made extensive use of 3 D printed items from https://micromaster.co.nz/ which IMHO have set new standards in small scale detailed realism HMS Berwick, a sister vessel to HMS Kent along soon Thanks for looking Rob25 points
-
This is the fairly ancient Revell (ex-Matchbox) 1/72 DHC-6 Twin Otter in the colorful livery of the now-defunct Manx Airlines, which operated this aircraft -- leased from the UK's Loganair -- between 1983 and 1985. It operated from the Isle of Man Airport...formerly RNAS Ronaldsway, which had been home to a number of Barracuda torpedo-bomber training squadrons during the war. Changes to the kit were relatively minor, adding seat shapes to the completely-blank cabin, reinforcing and adding brake detail to the spindly main landing gear (and a landing light to the nose gear fork), and adding aerials and windscreen-wipers to the exterior. The prop blades were also feathered to the neutral position, a characteristic feature of the 'Twotter' with no engine power supplied. [I keep vowing to myself to one day re-engineer the dodgy windscreen architecture...the kit's most glaring weakness...but with the press of other 'stuff' going on, I decided yet again to take a pass 'this time!' I've got a few more waiting in the stash -- and loads of possible schemes -- so I'll get around to it eventually!] Paints were Tamiya acrylics. Decals were drawn up in MS-Paint and printed on my faithful and long-serving HP inkjet printer. Enjoy!22 points
-
Hi there, Here is my kitbash of an early Spitfire IX and a VIII to make a VII stationed at Culmhead near where I live at the time of D-Day. Air compressor intake on stbd engine cowl made from a cut and filed bit of sprue.19 points
-
Hi everyone This is the Trumpeter Tiger (late) kit with zimmerit. It's my first 1/35 German AFV and I've tried to incorporate a few new weathering and detailing techniques that I have learnt this year. It was painted with lifecolour acrylics and weathered with oils and pigments. I replaced the kit tracks with Dragon DS tracks, which were kindly donated to me by a friend. The plastic tracks that come in the Trumpeter kit have solid guide horns, which are not accurate for a late Tiger. The spare tracks are from the Modelkasten spare tracks set. I have kept the weathering of the wheels and tracks fairly light, as I plan to make a display base and I'm unsure how muddy I'll end up making it. Thanks for looking, and constructive feedback is always welcome. Cheers, Greg18 points
-
After kitbashing my VII (which I was quite pleased with) I reckoned the left overs would make a good MH434. So off I set and intrepidly built the cockpit according to pictures, no armour but a gun sight etc etc. Lovingly tended to all the seams, trimmed and filled and flushed the .50 cal stubs, carefully painted it and then realised the over wing cannon bulges were completely the wrong shape. I used the 'fat' early ones not the slim 'later' ones. Rats. So I then brooded for a bit and thought I always liked the Spitfire Vb with US stars and the Day Fighter scheme, so I'd use the left over Eduard Weekend US markings and build something to look nice which is wildly inaccurate. So here she is! I left the remains of the RAF roundel on the wing tops after I removed the decals because it has a nice painted over look. 'Doris June II' dropped the Doris. But here she is, I like her. Annoyingly it's sometimes the flights of fancy that come out better than the carefully researched projects!18 points
-
Here is my first attempt at the excellent Airfix 1/72 Phantom FGR2. After a lot of iffing and butting, I decided to finish it as XV406/CK of 228 OCU, 64(R) Sqn from RAF Leuchars in 1987. (Mainly as I was going to do a 29 Sqn jet from 1981 but on further investigation I realised the pylons and under wing tanks as well as a few other bits were in the wrong colours and I couldn't be bothered repainting it.) Used the Xtradcal set X72294 with the addition of a Flightpath ladder for a bit of extra detailing but apart from that was built OOB. Used Xtraclor enamels with Vallejo model wash, finished with the usual Humbrol Matt Cote. Canna beat a fully loaded Phantom.18 points
-
Another one finished. Build No.15 for this year, & another excuse to spray another aircraft gloss black. EF-101B Voodoo 101067 414.Sqn "Black Knight" "The last flying Voodoo" Revell 1/72 F-101B, really nicely detailed kit went together with no problems. Microscale CF-101B "Special Schemes" decal sheet. Pavla resin cockpit, good fit with just a little plastic to shave off the top of the nose gear bay. Master brass pitot. Littlecars landing lights. A few extra lumps & bumps were added to match those on the actual aircraft. This one was unique amongst the Canadian Voodoos as it was used for simulating radar signatures of incoming Soviet Bombers & other radar related test work. Tamiya Gloss black & everything else Vallejo with Klear gloss final coat. Now I've got my eyes on building this to park alongside! Thanks for looking! Martin15 points
-
This is my MIG-21 BIS in 1/48 from Eduard. Nothing special on the build. Happy modelling15 points
-
Gear is up! Thanks for watching. Cheers!!!14 points
-
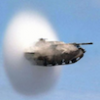
Here's my lvtp-7 from tamiya. It was a fun kit to build but I did experience some fit issues. I filled the vision ports in the little turret with some styrene strip because it looked like a bunker. Merdc is one of my favorite camouflage schemes and I remember the Tamiya cataloges were filled with these schemes. The box art depicts the tropical verdant but I chose the summer verdant because I like the bright green and the contrast it provides. They were airbrushed with vallejo paints. Thank you for watching, Cheers, Ernst.14 points
-
yeah, I was actually looking forward to painting the roundels. Another time I guess. thanks Roger ta Ced thanks Ian. You were right about the decals thanks Bill. I have the cutter here, but the laptop I had the software on died and I couldn't retrieve the licence - and the company has now gone out of business. I'm just too tight-fisted to invest $50 in another piece of software fr something I am going to use so rarely. When I painted the fuselage the other week I did not pay enough attention to the references, and painted the underside PC10 also, Wrong! Time to correct that. Taking no chances for over-spray getting through, I masked the fuselage ready for the CDL. Hey, I'm getting good at this biplane thingamabob - look at me throwing phrases like PC10 and CDL around like I knew what I was talking about. It's impossible to see here, but I used 0.4 mm Aizu tape along the bottom edge to leave a thin PC10 line intact - reference photos show the side "skin" wrapping around the underside slightly. The Aizu worked flawlessly as it always does. That wraparound is also visible on the wing undersides, so Aizu in action again. I find that it works nicely for bends if you just take your time and it's possible to stretch the tape slightly to make it conform to bends such as this. At one point I tried cutting thin strips of Tamiya, but the Aizu must have a stronger adhesive backing as the Tamiya strips just kept on moving whereas the Aizu stays in place nicely. Proof of the pudding. The struts were finally finished off. Each end got a coat of "aged white" which was a nice yellowish color and matched the references very well. I even managed to paint the brass tubes from the pitot on the spar without making too much of a mess. Wheels were masked up (after painting the centers with CDL) by punching out a disc of tape. The punch I had was slightly larger in diameter but that was easily sorted by cutting a rough circle out of the disc center then slicing through the remaining donut. That allowed me to adjust the donut around the circumference of the wheel as the tape was being applied. Fill in the remaining CDL bits with tape scraps Then forget to take a photo of the wheels after they're painted. Idiot! In my naivety, thinking I was approaching something beginning with rigging, I painted the aluminum treadplates on the lower wing - getting aluminum paint on my finger in the process and transferring said splodge onto the wing surface. Being the complete numptie that I am, I grabbed a rag, damped it with IPA and tried to wipe away the aluminum splodge. Needless to say it worked - taking the PC10 with it in the process. I know better. I know I know better, but why I keep doing these things is beyond me. Anyhoos, the offending area was micro-meshed back and resprayed without too much trouble. It would have been much easier not to have done that in the first place though. With all the days drama over, I got out the Lego and made a basic jig, ready to start assembling this weird monster. The undercarriage was the first thing on... very tenderly. I only glued the two top pins as I wanted to get the fuselage in place before I commit to anything, but needed something to hold the undercarriage in place while I was doing that. Then the gods smiled on me. The Decals from Pheon arrived. Not just decals though. Look at all the goodies here.... Clockwise from top left: The actual decal sheet, then three, yes three sheets on good quality card with various schemes. The cards are frame worthy, the quality is that good. Then, bottom right is an adhesive sheet with an assembly jig (for Roden & Eduard F2b's) printed on it, to the left of that, an assembly diagram of the jig, then finally, an 8 page booklet on the F2b and the schemes included. Wow! I was not expecting that. To be honest, when I checked the website and saw the price of the decal sheet, I was a bit peeved - thinking it was somewhat overpriced. There was no mention of all the other stuff that came along for the ride. Had I known that, particularly about the jig, I would have had no hesitation whatsoever in ordering. This is top notch stuff. It really should be mentioned and highlighted on the website. The assembly jig alone is worth buying even if you're not interested in these schemes. A short while later, the sticky sheet stuck on some 1.5 mm styrene and we have the beginnings of a jig Assembled.... Lovely jubbley Still can't get to the rigging just yet. - I keep finding other jobs that need done first, such as the leather padding on the coaming (Aizu again) This time just brush painted with red oxide. I'll semi-gloss it later to give it a more leathery look Then realized that these biplane thingies are very weird - you have to apply transfers before you can assemble the thing. Ah... I should point out that I have changed my intended target. Initially I was going to model H1499, but when I examined the (only) photo I realized that I could not see any code letter present. Contemporary photos show F2b's with code letters, and even other 28 Sqn F2b's were coded, as this shot of J6769 clearly shows. Actually, this shot is from 1923, 3 years later than the shot of H1499, so it looks like code letters were introduced sometime after the shot of H1499 was taken. The main point being, that I thought just having H1499 on the sides would look a bit bland, and that having a code letter adds a bit of interest, and I like A's Transfers begin... The roundels are a bit oversized compared to the pic, but these were the smallest roundels on the sheet - so I used them. The white "A" came from a gift that Bill, @perdu provided some time back for one of my Wessex builds - thanks Bill! In my decal stash I found an Xtradecal sheet of white letters - the font style was very similar, but slightly larger than what was needed, but in the interests of actually finishing a build, I soldiered on and stuck them in place. There's still some decals that I'll need to get made, but this lot will at least let me get to the rigging stage before Xmas. Transfers stuck on the roof. Gallons of micro-stick-thing-down-glop has been added and allowed to saturate the decal. In hindsight I probably should not have separated the ailerons from the wings and this would have been easier. However, I am where I am. I'm going to leave the decals to set overnight then at the next session, I shall take a fresh blade and cut between the ailerons and wings, then microstick the floppy bits down I'm still impressed with that jig. until next time13 points
-
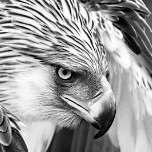
On the September 13, 1987, the soviet Su-27's vertical tail cut one engine of norwegian P-3C while intercepting over the Barents Sea. We can't insure the incident was a "brave pilot with superb skill" or "flight accident caused by pilot negligence". From my point of view, this is a fascinating topic to present. We can find two version of this incident: damage on the left or right vertical fin. After comparing the details of two side, I prefer the latter one. These pictures were released by norwegian military which shooted by P-3C, notice the R-27T fins were in different color The following is my work: Thanks for watching!11 points
-
My build of a Czech Spitfire using the Eduard weekend kit & some Xtra Decals I had in the stash. Enjoy!11 points
-
Incoming bananas ....... rear engine wall almost done list of mods as follows- All guide holes for the standard kit bins filled New storage bin made from lead foil copper sheet and hinge set from Voyager New hanger brackets for the missing bin and the new bin New exhaust brackets with lead punched bolt heads and thread insert mount were the bracket has been torn away from the wall Broken pipe drilled top and bottom undamaged pipe also drilled and both fitted with the separators Jack brackets fitted one bent and broken Still have to do the zimmerit on the rear but there isn't much there so won't take long. The photo of the tracks is showing me capping the pins in so they won't show when fitted How'd you like them nana's11 points
-
Here is my finished model of the Imperial Russian Navy’s monitor Uragan as commissioned in 1865. It is a paper model built from a 1:250-scale kit for the United States Navy monitor Lehigh designed by the late Magnus Mörck and available as a free download from Models n’Moore (www.modelsnmooore.com). Russia purchased the design from the American government for the US Navy’s first production class of monitors (the Passaic class of which Lehigh was a member) and built ten near clones. I made quite a few changes to model the Russian ship which are detailed in my work in progress for this model. I also there describe how I make my sea bases. I also scratch built a small local boat to add to the scene. A good friend in Riga sent me information about the local boats. It is sprit rigged and I have depicted it working as a long line fishing boat. Thanks again for your support - this is a great community! Maurice9 points
-
I greet you again! This time a nice airplane with a serious reputation as a real warrior! The model is nice, but simple, so to speak, a weekend model. Аs most of my models, this one is strictly out of the box. As for the prototype, I took a real plane of the . Well, I love the exotic in my works! Painted with AKAN and Revell, tinted with oil and powder compact. The emphasis in painting was made on shades of the base color, but within exploitation. <Removed airliners.net copyrighted image. Please only link to their pictures in future, as do not like their images posted directly in forums>9 points
-
Hello everybody...Fresh out of the Heller group build. It is the 1/72 Bf.109B/C kit #236 and is done as a 109D flown by Hauptmann Werner Möelders. The only aftermarket used were the AML Decals due to the originals being no good. Please feel free to ask questions, post comments, or visit the build thread. Dennis9 points
-
The earlier version of the MBG from Aoshima, very nice kerbside kit with plenty of detail. Painted with Zero Paints Signal Red. Body stripe and windshield done using Chrome metal foil. And with the late version. Thanks for looking Warren8 points
-
A brand new build from my rather meagre and temporary modelling base (until my new shed arrives in a couple and a half months). Airfix Mk.1 Hurricane with decals supplied by BM member 'vildebeest' (Many Thanks!!). Depicts the 73 Squadron Hurricane of 67 wing, flown by Edgar 'Cobber' Kain of New Zealand, in early half of 1940 over France. He was top scorer up to the time of his unfortunate end with 17 kills to his credit and the first Ace in the RAF at the time. I found no fit problems with the kit at all and no filler used except to change the fabric are behind the gun bay on top side of wing to correctly show the metal area. I know there might be a couple errors such as the prop that could / should be a Watts two blader and the aerial mast more of a straight pole as befits early Hurricanes. But apparently there were field mods and the prop and antenna mast could well have ben changed at the time. I am not certain but willing to correct once I can source a suitable propeller and fashion an early aerial mast. Also the addition of the serial on my model may not be right as on many at the time they were overpainted . I have come across a couple pics of 73 Squadron Hurris with serials showing so a bit of artistic licence on my part. Anyway, here is my model: Not entirely happy with the pics and will re do them and repost here when done. Thanks for looking. NEW photos further down this thread!8 points
-
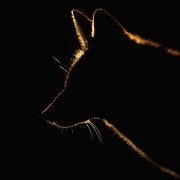
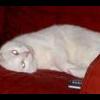
After well over a year without our gorgeous old cats, we've been presented with the opportunity to be ruled by another pair of feline overlords. A friend of ours found a small litter of kittens living in the parking lot at work - her daughter has been claimed by one, and today we'll travel north to be claimed by the other two. We haven't yet met them, so unless they take an instant dislike to us, we'll be bringing them home. We don't know whether they're male, female, or one of each, so no names as yet. What have we let ourselves in for? Here they are from yesterday deciding our friend should not be reading a book:8 points
-
Couple of recent finishes, first up the new tool Airfix Buccaneer, done as an early RAF with a combo of old Airfix (which I misplaced the wing lines and diamond like one thanks to looking at someone else build with the same errors) and Matchbox Decals, painted with Humbrol 164, Vallejo 888 and Xtracrylix Light Aircraft Grey and finished with Winsor and Newton Matt. Second is the first issue of the venerable Corgi diecast, repainted in Xtracrylix Extra Dark Sea Grey to use the decals and spare wing tanks from the Airfix kit. Though spent a lot of time sanding seams and the raised Corgi lettering, also added spare rocket pods from the Airfix Phantom kit. Finished with Winsor and Newton Satin And together7 points
-
The model Kingair is back on the bench, after a break to tinker on some other projects. flat white base coat; just to prove it's not the "other one" both together; masking in progress; gloss white and gloss blue on now Thanks for looking7 points
-
Little update in a rare moment of sleeplessness. 😯 Here are the paints I promised to show @opus999. I didn’t pay that much for them but they are really good to use. I think I might need box one as every time I go to use them I’m missing some vital shades. 😑 Not a huge amount done but I took the pics so it would be rude not to share. Decals. They’re really good and settled down with some micro sol. Underside next. Thanks for dropping by. hope you’re all having a splendid week. Take care and as always. Happy modelling. Johnny7 points
-
Thanks guys, not long to go now Luck Bill, just sheer luck jinkies! I've been rumbled it could be but I can't lay my hands on any virgins around here. how's that floaty tanky thing coming along Steve? Got the tracks made yet? Yes? Good! and now apparently down through the kitchen floor and big stains on the basement ceiling. If it wasn't for bad luck, I'd.... thanks Colin a couple of small modifications to the display case, an elf, and away we go Read on dear Gunzo The last piece of the jigsaw puzzle arrived today. What it is you may well ask? Okay then. It's a mirror. A real glass one, not one of those cheap acrylic plasticky ones. Bloomin' expensive it was too. I searched for days trying to find something cheaper, but twas not to be. In the end, I bit the bullet and just bought it. It should show up the underside of the roof nicely with the added bonus that you can actually see some of the chassis work too. It's just resting in place at the moment. This weekend should see it all finished. I also bought a plaque. I'm not sure if I like the wording but couldn't think of anything else. I also printed off a base for the plaque - which will be sprayed black in due course - if I decide to use it. I may just lay the plaque flat on the case. Thoughts from the hive? Today was a vacation day so spent some time working on the Bristol. I wanted to leave the display case for Pegasus to the weekend so I have plenty of time to clean everything up and make sure it's all hunky dory. Tantalizingly close to the finish line now. I can almost taste the axle grease.7 points
-
Cheers Guys, been a while since I've managed any time at the bench, so another micro update I'm afraid. Started on the tool tie downs, still need to add the axe and pick head straps. Chain for the securing pin on the track adjusting wrench lock. And the headlight dust caps brackets, the lights are removable so these things stored the dust caps for when they are removed. Not much more than that chaps Dan7 points
-
Well after spending some months in the UK, visting Coningsby, Marham and Lakenheath I returned home to Perth to enter 2 weeks quarantine in a Perth Hotel (imprisonment at my expense), anyhow I have done 8 days, 6 to go in a comfortable hotel. I was missing my camera action then heard a racket outside to see the Rescue chopper backing out of the Royal Perth Hospital HLA.6 points
-
Two Sixes from the 49th Fighter Interceptor Squadron out of Griffiss AFB on the transient ramp at Edwards AFB. 59-0076, November 1981 59-0080, March 1983 Thanks for looking, Sven6 points
-
So I was in the middle of building a 1/32 F-14 and I bought a little RC Toyota Hilux truck for my 3 1/2 year old boy. The kit has the snappy title of WPL C24 which gives no hint as to what it will actually resemble. It arrived and I assembled it in a couple of hours and thought it looked a good scale model.....just very plasticy. What it really needed was a quick paint job! I decided that as easy as a pristine truck would be to achieve it really needed to have a well used and abused appearance. And so I set about painting a very rusty battered looking 70's Hilux in period race truck colours. A base of rust was applied using various shades of brown. This was sealed with Klear and then a layer of the cheapest 99p hairspray I could find was applied. Acrylic paint was then applied and as soon as it was touch dry I started to chip away at the paint by softening it with water and then using a stiff bristle brush and cocktail stick. Once happy, the layer was sealed with Klear and the process repeated for subsequent coloured layers. I then made some decals to add a bit more interest. My mate 3D printed off a TOYOTA badge for the tail gate which really finished it off well. I left the head lights, indicators and tail light transparencies off as I thought it suited the appearance. Finally I weathered the chassis and applied a layer of dust to complete the look. The 'quick' paint job was very thereaputic but took 10 days doing a bit each evening. And what did my boy think?..........Meh. He just likes driving it round the house! Now back to the Tomcat.....6 points
-
Continuing with the "Falklands/Malvinas" serie, the Super Etendard was the follow-up to the SHAR. It was my first Kittyhawk kit build. A nice kit in general terms, no big issues, a little bit of puty here and there but nothing terrible. Excellent decals! The main con about the kit was the vague and poor instructions. But with a great deal of patience and time (ohmmm) it worked out OK.6 points
-
So today's update and well.........hmm..I've added a couple of filters a few drops of oil paint here and there and tried adding some wear and tear. Now the pic's may look like I've not touched it since yesterday but believe me I've spent a good few hours trying to create something I'm not familiar with. The overall effect has changed slightly and I like what I see and I think when I give it all a matt coat it will look much better 🤞. The weathering of this kit especially for a first attempt is imo the hardest part of the process so far so here's the pic's of today's progress I've been asked what look I'm going for and the answer is whatever I end up with as I simply have no idea how this will look when finished 🙄. As always thanks for looking back soon 🙂👍6 points
-
Little progress. The LG legs are added, and the tailwheel bay doors are in place:6 points
-
Good evening you lot. Couldn’t sleep so I figured I’d do a quick update. Turret time. 🤩 more tiny PE on the gun after a clean up. The clear parts got masked and I decided to use fluid to meals the insides as it worked so well on the Sioux. The cowls tidied up a treat and they are now ready for paint again. That’s it for the update. Hopefully some time over the weekend. I did do more on the Horton though. 😉 Also this arrived in the post. I had accumulated some vouchers at Jadlam models and this seemed like a bit of a bargain. I’d been watching @Marklo’s build and I just had to build a Hind. I know about the office and the lack of rivets at this scale but the challenge just makes it more fun right. It’s a lovely kit though, not a lot or any one building it that I can find? 🤔 next build I think. 🤤 Thanks for popping in. Hope you’re all keeping well. Johnny. 👻6 points
-
Holes for air brakes drilled During gluing wings I realized that something is wrong... Too much sanding ? Fortunately it was easy to correct Tail was glued without so problems After few layers of Surfacer and some sanding whole thing starts look like glider.6 points
-
This time Lockheed F-104g from Danish Air force from Kinetic.5 points
-
Hi folks, this is the latest Arma Hobby kit build OOB with few add-ons: - brass tubing for outer gun barrels - newly moulded canopy hood - resin exhausts from Quickboost - riveted Painted with Real Colors and Gunze Aqeous paints. Decals from the box depicting the 274.sq machine from Egypt, 1942. Overall, a gorgeous kit, I love especially the subtle yet nicely visible wing surface improvement compared to the previous C wing. Cheers Libor5 points
-
Hi dear colleagues! Letme repreent you another my buil. This time is old and poor KP kit. Sratch build: overall rivettlines, cocpit, wheel bays, hatches out of self agdesive foil, antennas scopes and dischargers. The pilot and armament is from Zvezda's Yak-130 and KH's Su-35.5 points
-
So, Ill start by saying that I really hate these intro posts. I really hate writing about myself as I think I describe myself in the most boring way. I mean, Im not the most interesting person in the world but when I write about myself it comes out even worse. However, its only polite to do them and as I hold good manners in high regard here I go SO, Im a female, 48 (I think, not sure as Covid seems to have thrown everything out), Im a contract Bus Driver currently in Kent, but that changes regular as I pick up contracts throughout the country from time to time. Si, my modelling life I will describe in 4 phases As A Kid So, usual story as a kid. Picked up a few kits, some brushes, paint, slapped in on, made a mess, probably stood on a few and broke them. More than likely had a few chewed up by the dog as she was rather like that. Then got a bit more serious, got better and by the time I hot my teens I focused my efforts more and had a real keen interest in US Naval aircraft. I would rate myself as rather good for a kid with a brush who made "Clean" models ie no weathering. The only area that let me down was white paint which as you can imaging was often an issue doing US Naval aircraft. As I got older and (I hate to say this) more important things got in the way, such as working, paying bills, rasing children etc, making Models became more and more a distant memory 2000`s Around this time I got into miniture wargaming. I was fasinated by the detail on the figures and how to paint them. I was never interested in playing the games but painting the figures was great and also because of the size you didnt need such a large hobby area. Although I dont paint these figures any more there are a few skills I took away with me such as washes, colour variations and so on and so forth. 2010s Probably more like late 2010`s but I started to get into big projects. I pretty much because a "Go big or go home" person. If you are going to do something make it magnificant. Partwork models entered my life and Ill be honest I personally dont think partworks in their basic format are a real subject here. If you are going into modding and weathering then yes, bung it in, but assembling pre painted parts out of the mag with a screwdriver, although producing a great result is a bit different. Im aware that I just ruffled a few feathers there but please note that it was just an opinion and it will tie in with the rest of my post. So, more partworks came, some Im bulding out of the mag, some Im unhappy with. When I get unhappy I do something about it. So, for example, Im really unhappy with the 1:12 spitfire by Hachette so Ive begun to repaint it and weather it. Im now rather happy with it so far and I hope that it will end up with a "used byt not used up" look. By that I mean imagine its in a museum. Its well looked after and preserved well, but at the end of the day it is 80 years old. Now So that takes me to now. I feel that with the basic skills having been learnt a lom time ago, and thankfully retained, with the new skills Ive learnt in the last few years its time to take it up a notch. Also with money not being as free flowing as it used to be its time to do more stuff thats better vaue for money and I see scale models as fitting in well. I see it like this If I buy a £10 kit and complete it in a week then over 12 months Ive spent over £500 on kits However, if I spend £250 on a grand kit and it takes me 12 months to complete then although the initial layout is greater the cost per week is much lower. There are two ways to achieve this. One is to buy better kits that require more work and the other is to go the extra mile, for example, weathering With this in mind, as well as my other projects I have on the go these are my plans * Finish up my partworks * Any future partwork releases Ill research and see if there is an alternative. For example, its rumoured that eaglemoss will release a 1/8 scale willy jeep costing £10 a week over 120 issues. However, Dragon Models do alovely looking jeep in 1/6 scale for less than £200. * Obvioulsy Im building my ships * I want to restart my US Navy aircraft project, Ive already started an SH-60B Seahawk. Terrible kit my Italiari but the extra challenge is there to make it work, so Im happy. * I also want to build every aircraft ever stationed at RAF Lakenheath as thats my birthplace and I feel that airbase has a wonderful story to tell. Plus its a great excuse to build a B-29 LOL * I also have a could of 3D Printed projects on the go, one being a full sized R2D2 but thats on hold at the moment. * Ive also discovered basic electronics and would love to combine that with scale models, for example, arduino controlled motors, lights and sound boards. It has potential but Im too much of a beginer at this precise moment. So, feel free to ask questions. I think thats the better way to introduce yourself, that way I tell you what you want to know rather than fill the interspace with irrelevant rubbish LOL Also, better thank the admins for approving my application, it is appreciated. I know Ill be bugging people a lot in my early days but hopefully, one day, Ill be passing on the knowledge not yet learnt to the new members who are not yet born. O, also, Im aware that my profile may be boring. Thats my next job, get some interest going in the profile page.5 points
-
This is my build of a 1/72 Lockheed P2V-5 Neptune using the Hasegawa P2V-7 kit and the Blackbird P2V-5 conversion set. In addition I also used a combination of the Pavla and Eduard interior sets, . Finally I used the Blackbird P2V-5 decal set along with a couple of bits and pieces of the Caracal Neptune decal sheet. The Pavla and Eduad set are for a -7 and required a little backdating to better reflect a -5. Pavla interior fit the Blackbird nose better then it does the Hasegawa one This was similar to my recent OP-2E build The Blackbird conversion consists of a new nose from the wing forward, tail turret, wing tanks, a new radome and various clear parts. The nose gives you the option of a turret or "observer" nose. I wanted to make as early a Neptune as I could so I did a -5 with the nose turret and no jet engines not the more typical -5F. The nose turret was a clear casting which was unfortunately cast a little too thin and the clear part above the guns had a hole in it. I replace it with a piece of the clear part of the Pavla interior packaging. The other transparencies where a bit cloudy out of the box but a coat of Future really cleared them up. The one on the right is a left over from the OP-2E build and the one on the left is the P2V-5 one after a coat of Future. This canopy fit much better then the one with the OP-2E and only needed a little trimming. From past experience I knew this would be tail heavy so I started out by filling the new radone with #10 lead shot In the end this proved to not be enough and I ended up filling the front of both engine nacelles with more shot to get it to sit on the nose. Here you can see the fuselage after all the surgery and mating of new parts and here is it all assembled with the resin tip tanks. I have to say that the resin castings were excellent with virtually no pinholes even after sanding. On the other hand I found the the instructions almost useless leaving a lot of issues to guess work. One error I now know I made is that the large rear windows should be smaller portholes and while the parts were included the instructions made no mention of them and I missed them. The Blackbird decals were excellent and caused no problems. But enough backstory and without further adieu here is the results. This is my 4th P2V; one out of the box and the other three using Blackbird conversions. Here they are together They are from left to right this P2V-5 the out of the box P2V-7, an OP-2e and an AP-2H. Until someone comes out with a conversion for a P2V-3C it will be my last, at least for a while. Next up is the Revell F4U-4 with some help from Eduard and the Italeri F4U-4B. Enjoy5 points
-
Right, update time...! Fingers crossed the images show as planned.🤞 The locating pins for the engine pylons are almost non-existent and certainly won't help with getting the alignment correct when I try to attach the engines. I've added the arrows to help show the tiny pins: I drilled the pins out and will use little sections of paper clips to secure and align the engine pods: I have also started work on the flap canoes, as you can see above. They need to be slightly higher. Here's a better view: Once these have set, I will trim, fill and shape as required to get them looking better. I will also thin the trailing edges down a bit more!5 points
-
Good morning everyone... This is my second build from the heller classic group build. It is kit #214 Hawk 75. I opted to do it in a prototype camouflage pattern displayed on September 1st 1939 at the Cleveland air races. The whole squadron was painted up in multiple patterns and colors. This is aircraft #67. The kit is out of box and was airbrushed Aluminum first with stars added. Its hard to see them but the stars are still visible through the camouflage. The camouflage was applied by brush just like the original was. Please feel free to ask questions, post comments, or visit the build thread. https://www.britmodeller.com/forums/index.php?/topic/235080677-a-colorful-hawk-kit-214/ Dennis5 points
-
Some paint on the chassis and a bit of a wash ,I'll fit the engine properly and do the exaust next, and I've made a start on the tyres also Cheers all Glynn5 points
-
Got a few decals on today. The decals are nice, but slightly brittle, and also take a while to stick down fully, so careful handling is needed and I'm taking it slowly. more tomorrow Julian5 points
-
My first Group Build 1/72 AZ Models Breda Ba 65. Built out of the box with Vallejo Model Air paints.5 points
-
@RidgeRunner Here’s that shim Martin, still needs a bit of tidying up but you get the idea: And with the canopy. Still not perfect, I may sand a bit away from the bottom but it’s much improved.5 points
-
Hello, All PE parts in place. Dragon forgot something again. A "small" detail at the fenders. These parts are missing, the manual does not show them either and boxart misleads us... Old Tamiya is not inferior to Dragon, especially considering the price.5 points


.thumb.jpg.b4a5069fd2c2dd5708ce1694345c5b11.jpg)


.thumb.JPG.3498f40362ff13ebfc4b2e45abbd545e.JPG)


This leaderboard is set to London/GMT+01:00