
Leaderboard


Popular Content
Showing content with the highest reputation on 22/10/20 in all areas
-
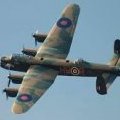
Here is my first attempt at the excellent Airfix 1/72 Phantom FGR2. After a lot of iffing and butting, I decided to finish it as XV406/CK of 228 OCU, 64(R) Sqn from RAF Leuchars in 1987. (Mainly as I was going to do a 29 Sqn jet from 1981 but on further investigation I realised the pylons and under wing tanks as well as a few other bits were in the wrong colours and I couldn't be bothered repainting it.) Used the Xtradcal set X72294 with the addition of a Flightpath ladder for a bit of extra detailing but apart from that was built OOB. Used Xtraclor enamels with Vallejo model wash, finished with the usual Humbrol Matt Cote. Canna beat a fully loaded Phantom.22 points
-
Hello everybody...Fresh out of the Heller group build. It is the 1/72 Bf.109B/C kit #236 and is done as a 109D flown by Hauptmann Werner Möelders. The only aftermarket used were the AML Decals due to the originals being no good. Please feel free to ask questions, post comments, or visit the build thread. Dennis20 points
-
Hello all. This is the excellent little 1/72 Revell Bf 109F-2 (originally from Zvezda). Finished in the markings of the Gruppenkommandeur of II/JG 53 on the Channel Front in 1941. It's the scheme given in the kit, but I used decals from an Xtradecal set. It made for a nice, quick build and it was good to do something other than an Emil or Gustav! It also come with a nice pilot figure, which I wish I'd put in now.19 points
-
What a nice modelling experience Hasegawa kits are, the N1K2 is the last of my trio of Japanese subjects in 1/32 scale and as well as being enjoyable to build I have learned a lot about Japanese WW2 aircraft and learned (or re learned) some modelling techniques. Paints used were mainly Sovereign Colourcoats, the undersides was Xtracolor High Speed Silver and Humbrol was used for the small details. All markings were painted using Montex masks apart from the stencils data plate and kill markings (I'm not that clever !) Seat belts are the amazing but fiddley RB Productions IJN ones. And so here we are, for some reason the aerial wire looks more prominent in the photos than it really is, and yes I messed up the "no step" area on the wing, there are probably more mistakes as well. Build thread is here And on with the photos which are not the best as I took them with my phone. And the flip side And put to bed with the other two builds. Cheers Dennis18 points
-
Not a new build, but never posted here (I'm pretty sure), and a fitting topic in advance of Halloween. The skeletal Field Marshal Rommel and his faithful driver take to the African deserts once again, in the form of Monogram's 2009 1/24 reissue of Tom Daniel's classic '60s “Krazy Kommand Kar” design. This was one of the few Tom Daniel showrods I never actually got to build as a kid, so I wanted to do it more or less stock OOB (with complete original-style decals), with just a few added touches. I dumped the chrome finish on the kit parts in favor of a more regulation heavily-weathered sandgelb finish, then added more accurate command flags and convoy reflectors to the fenders, standard Wehrmacht vehicle plates front and rear, and a rear-view mirror for the driver. I modified the kit aerial (and added a jaunty pennant) and scratchbuilt a command radio so the Generalfeldmarschall could stay in touch with his spectral divisions. The real fun was with the figures. I added ribcages from styrene strip, then made up (suitably tattered) uniforms piece by piece with white-glue-soaked tissue, and regular paper for pockets, belts and such. Insignia and decorations were internet images printed out on paper and decal stock, with a little hand-painting thrown in. I modified the driver's steel helmet to form the more stylish Afrika Korps field cap. My finishing touch was to remove Herr Feldmarschall's molded-on motorcycle-type goggles from his hat, and replace them with tiny scratchbuilt sand goggles of the British design which became part of Rommel's oft-photographed iconic image. An Internet search turned up an image of an actual German military map of the Tobruk area, so I had to shrink it down and print it out. I enlarged the kit's map table, added a few covenient hand grenades as paperweights, and all was done. The ghostly Field Marshal thoughtfully studies his map of Tobruk, deciding strategy and planning his next brilliant against-the-odds attack. His loyal driver smiles for the camera and checks his rear-view mirror for any sign of SAS Commandos or marauding low-flying Hurricanes. Enjoy!17 points
-
Evening folks Thank you for all your kind comments – I will try and live up to them! ..got a little bit done since last time – added the seat height adjuster – an industrial sized lever indeed.. ..also used this and one other photo to try and make up the control column assembly in which the control stick itself goes through a casting which is itself mounted on a rod going fore & aft.. ..you can see the stick as the grey vertical rod in front of the seat, and the transverse black rod below it ..I made the parts from brass and these were just CA’d rather than soldered.. ..and with the torque tubes for the aileron controls (I think..).. whatever it is it mounts to brackets on the fuselage side frames to secure the whole thing.. ..for the control grip, I found a picture of a Fury one in the RAF archive, scaled it and traced it into coreldraw to get an idea of construction.. By this point I had added two small brass ferrules to a bit of thick wire and wrapped it in cotton.. I think it looks a bit overscale, but there were no better options I could think of.. ..the final part has quite a few tiny bits, which I hope captures it.. ..and in place – it still needs the cables from those two thumb controls.. ..and that’s it – still struggling with references so just seeing what I can do while I wait to see if I can climb all over a real one TTFN Peter16 points
-
I greet you again! This time a nice airplane with a serious reputation as a real warrior! The model is nice, but simple, so to speak, a weekend model. Аs most of my models, this one is strictly out of the box. As for the prototype, I took a real plane of the . Well, I love the exotic in my works! Painted with AKAN and Revell, tinted with oil and powder compact. The emphasis in painting was made on shades of the base color, but within exploitation. <Removed airliners.net copyrighted image. Please only link to their pictures in future, as do not like their images posted directly in forums>15 points
-
My first Academy 1/48th F-4B Phantom, I started this kit three years ago however she went on the shelf of suspended doom when I started to get frustrated with airbrushing with acrylic paints. I re-started her a few weeks ago, to be quite honest it was a 'just get it finished' job and it remained that way until I started to apply the decals. Somehow the ugly duckling turned into a swan, or at least something approaching that. This is the end result: 20201018_124319 (2) by Ghostbase, on Flickr This was my first build of the Academy Phantom. I am used to the ESCI/Italeri and Revell/Monogram kits, have also put together a couple of Hasegawa kits over the years, and I was impressed with the Academy offering. I liked the one piece upper body section, the separate rear section, the way the kit went together, and the wide variety of missiles included in the box. Very little filling or sanding was required. Definitely a thumbs up! I do have a couple of the Eduard boxings in the stash and I would love to start one soon to see what difference the additional goodies make 🙂 20201018_124333 (2) by Ghostbase, on Flickr This next photo does show one major problem. I built and painted the rear section aft of the jet exhausts complete with the tail planes/elevators, dry fitted it and all was fine, however it sort of went wrong when I cemented the section on. Not too sure what went wrong! The other side was fine so no harm done I guess. 20201018_124354 (2) by Ghostbase, on Flickr I prepared all the spues with Halfords primer, grey on top and white underside, then rattle-canned Halfords appliance white to the under surfaces as well as the top of the ailerons and the rudder. This went on well. I then applied light gull grey top sides using an acrylic paint 'configured for the air brush' and it was a disaster! The airbrush sprayed for about five seconds, clogged up, then spattered thick drops all over the fuselage and wings. Trust me, it was a very sudden and short journey to the shelf of doom. 😞 It took me a long time to learn how to apply acrylic paint with the airbrush and several coats of light gull grey managed to hide the appalling first coat. The metallic areas were painted using Humbrol metal-cotes which I always find to be reliable. 20201018_124427 (2) by Ghostbase, on Flickr This build was saved by the decals which represent F-4B BuNo 152965 as 'AA-100' operated by VF-11 'Red Rippers' off the USS Forrestal in 1973. These were from the Furball Decals F-4B/N Phantom II Air Wing All Stars Part II set (now OOP). Stencils and standard markings were from the Academy kit. The Furball decals went on really well indeed. Unfortunately I broke one of the red stripes that should have met behind the cockpit canopy so they had to be truncated. 20201018_124457 (2) by Ghostbase, on Flickr One thing I did do reasonably well was the weapons load. I added four AIM-7 Sparrows in the wells under the fuselage, four AIM-9 Sidewinders on the pylons, and three bombs (I can't remember which ones they were) on a TER on each pylon. The kit yellow stripe decals for the bombs refused to settle down so I left them off. I also added three 'gas bags' or fuel tanks. The Academy instructions suggest that this was a valid loadout for a mission but to be honest I am not sure about that. 20201018_124514 (2) by Ghostbase, on Flickr My last photo, which has to be the colourful markings on the tail section of this showy Phantom, so well depicted by the excellent Furball decals. I am glad I decided to persevere with this stalled build, the end result isn't anywhere near perfect but it came out a lot better than I expected and I am happy with that. When can I start the next one? 😉 Michael 20201018_124606 (2) by Ghostbase, on Flickr13 points
-
Hello everyone... I present Heller kit #214, 1/72 Hawk 75. Done as a P-36C of the 27th PS 1st PG. Cleveland Air Races September 1st 1939. Please feel free to ask questions or post comments in my build thread. https://www.britmodeller.com/forums/index.php?/topic/235080677-a-colorful-hawk-kit-214/ Dennis13 points
-
Heller #236 Bf.109B/C Hauptmann Werner Möelders Legion Condor 1938. Please feel free to comment or question in my build thread. https://www.britmodeller.com/forums/index.php?/topic/235080673-a-109-for-mölders-kit-236/&do=getNewComment Dennis13 points
-
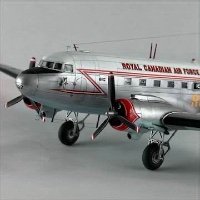
I enjoyed building the Airfix RMS Queen Elizabeth so I decided to continue with another Airfix 1/600 scale ship. The deck color was something that I was hesitant about but I was reasonably happy with how it looked when assembled. I see most France models with either a very bright, or a dark green deck. This was a grey with a green tint. As with my other 1/600 ship I had much difficulty painting the windows. I don't have the talent to paint with a brush, especially in this scale. This was my third complete ship. The only other project I have is the one I am currently working on, a 1/350 RMS Lusitania. The 1/350 scale is a little easier for me to work on as my old eyes at times aren't up to the task of 1/600!!12 points
-
mojo noun informal a quality that makes you successful and full of energy: · He's definitely lost his mojo. · He needs to get his mojo working if he's going to finish that model Well, I lost mine over the last few months in a big way. For many reasons I just lost interest in my Fw190 and so it has been shelved for now. It's one of those inexplicable things, those that remember the 1/24 Tigercat maybe know I have form in this area .. Instead, I have found a new source of mojo which has seen me back at the bench, enjoying my modelling which is what it is all about right? This is new for me, I don’t think I have ever built a biplane, certainly not scratchbuilt so it will be a journey of discovery I hope to share The Hawker Fury needs no introduction from me, all I can do is show you the picture that set me thinking and ultimately on this path… ..look at that beautiful form, the polished metal nose panels, the state of the art in it’s day. I don’t know yet which airframe I will model, but likely it will be a Tangmere bird as that was but a few miles from my childhood home. I gained the confidence to take the plunge from John Alcorn’s books ‘Scratchbuilt’ where various masters show how they achieve the impossible in relation to fabric covered structures such as those shown below – if you don’t have the books, get them, they are superb.. Need fuselage stringers? A few methods are shown.. Wings? Just like the originals.. I started with the Westburg plans, four sheets sourced from a 1970’s RC Model magazine I found as a PDF that my printer scaled for me.. ..these are widely acknowledged as the most accurate out there.. ..and so onto building & making a start.. ..the first element I thought would be a rigid structure that supports both the landing gear and the cabane struts atop the fuselage. This would need to be very strong and so was made of brass parts.. The very first of which is here – the main gear mount.. ..then the transverse rods that link to the main gear trailing arms and the mounts for those mounted on the mainspar tube.. I used (badly) my new Proxxon mini milling machine for those.. ..all the parts were made up over the plans and ultimately soldered together, including spigots for the cabane strut mounts.. ..the firewall looking square is to add rigidity and the hole is the prop datum that will carry forwards into the nose.. ..more of the fuselage framework was constructed of carbon fibre rod – this stuff is super stiff and easy to work with – I used an RC modeller trick in pinning the rods to a scaled plan to get everything lined up.. ..soon I had both halves (at least the bits that can be seen) which will dovetail into the brass frontal assembly.. ..the real airframe is bolted together with some quite rudimentary brackets – that’s good, I can do rudimentary.. ..I should have made these from PE, but such was my renewed enthusiasm I made them by hand with the resultant rudimentary outcome.. ..the structures were primed and painted with black MRP enamel and the assembly plates added.. ..whilst I didn’t take any construction pictures, I did make up the seat based on the few pictures I have (that’s a problem I will come onto later..) …essentially I drew parts as templates and cut them from litho, annealing & shaping them and bordering with fine solder wire.. ..to finish up for now, the work to date dry fitted together… ..now for the appeal – I have zero drawings apart from the plans, I have the one Mushroom book I could find and that is 80% about the Nimrod, not the Fury and about 5 cockpit pictures all from the same angle from the internet.. I have written to both operators of existing Furies in the hope they have drawings they can share, but if anyone out there knows of any good reference, please let me know – drop links in here or PM me perhaps So that’s it – a change in direction, for me the main thing is being motivated to pull up to my bench and enjoy myself and that I am now doing :) ..hopefully this one will see a competition table in a few years TTFN Peter10 points
-
The earlier version of the MBG from Aoshima, very nice kerbside kit with plenty of detail. Painted with Zero Paints Signal Red. Body stripe and windshield done using Chrome metal foil. And with the late version. Thanks for looking Warren10 points
-
My 3' Studio2 modle of UFO's Skydiver is finished. I just have to fit the RC so she can go on patrol in my local boating lake Thanks for looking Angelo.10 points
-
This is my build of a 1/72 Lockheed P2V-5 Neptune using the Hasegawa P2V-7 kit and the Blackbird P2V-5 conversion set. In addition I also used a combination of the Pavla and Eduard interior sets, . Finally I used the Blackbird P2V-5 decal set along with a couple of bits and pieces of the Caracal Neptune decal sheet. The Pavla and Eduad set are for a -7 and required a little backdating to better reflect a -5. Pavla interior fit the Blackbird nose better then it does the Hasegawa one This was similar to my recent OP-2E build The Blackbird conversion consists of a new nose from the wing forward, tail turret, wing tanks, a new radome and various clear parts. The nose gives you the option of a turret or "observer" nose. I wanted to make as early a Neptune as I could so I did a -5 with the nose turret and no jet engines not the more typical -5F. The nose turret was a clear casting which was unfortunately cast a little too thin and the clear part above the guns had a hole in it. I replace it with a piece of the clear part of the Pavla interior packaging. The other transparencies where a bit cloudy out of the box but a coat of Future really cleared them up. The one on the right is a left over from the OP-2E build and the one on the left is the P2V-5 one after a coat of Future. This canopy fit much better then the one with the OP-2E and only needed a little trimming. From past experience I knew this would be tail heavy so I started out by filling the new radone with #10 lead shot In the end this proved to not be enough and I ended up filling the front of both engine nacelles with more shot to get it to sit on the nose. Here you can see the fuselage after all the surgery and mating of new parts and here is it all assembled with the resin tip tanks. I have to say that the resin castings were excellent with virtually no pinholes even after sanding. On the other hand I found the the instructions almost useless leaving a lot of issues to guess work. One error I now know I made is that the large rear windows should be smaller portholes and while the parts were included the instructions made no mention of them and I missed them. The Blackbird decals were excellent and caused no problems. But enough backstory and without further adieu here is the results. This is my 4th P2V; one out of the box and the other three using Blackbird conversions. Here they are together They are from left to right this P2V-5 the out of the box P2V-7, an OP-2e and an AP-2H. Until someone comes out with a conversion for a P2V-3C it will be my last, at least for a while. Next up is the Revell F4U-4 with some help from Eduard and the Italeri F4U-4B. Enjoy10 points
-
It is not the Miniart kit. I combined this GAZ-AA truck with a German campaign kitchen, in an interesting composition, to represent a unit of the Russian Liberation Army (KNOR), which had a small participation in the final days of WW2. This is the 1st Division K.N.O.R or better known in the Wehrmacht as 600.Infantarie-Division (Russich). Consisting of Russian prisoners of war who accepted the "offer" to fight on the German side, most of the division's vehicles were of Russian origin (Beute). Some in German 3-tone Camo, others maintained the 4BO Russian Green paint pattern. The truck is from Zvezda, the Shelter is an easy Scratchbuilding to do; there are many pictures on the web as a reference. In the Tamiya kit, the Goulash Kanone, the wagon wheels were replaced by Russian wheels, to be more in line with the theme of the work.10 points
-
Here I present my recently completed Mustang that was built as part of the P-51 Mustang STGB but first a little detail. 'Thunderbird' was purchased from James M. Stewart for "$1 with other considerations" by Jackie Cochran. This aircraft was made from salvaged parts from other aircraft of the same type and was given a civil registration of NX5528N. Between 1949 and 1953, two more speed records were made and in 1953, 'Thunderbird' was sold back to Jimmy Stewart...for "$1 with other considerations". The build uses the second Mustang from Hasegawa's 'dual' kit and was built primarily OOB. Images showed that this racer had its propeller blades replaced with HS uncuffed 'paddle' blades and these were not included in the kit, so a resin replacement from Quickboost was obtained although the blade tips needed 'rounding off'. The instructions detail what needs to be deleted/ filled for a racer but like most/ all Mustang kits, they omit the requirement to fill the wing panel lines to 40% chord due the laminar wing, so this was also done. After being primed with Halfords Primer, the model was painted using Vallejo and Tamiya Acrylics and finished off with the kit decals. Build log here: Thanks for looking Stay safe. Stuart10 points
-
I have always liked the Defiant and had started this Airfix 1/72 Defiant Mk I and then put it back in the box. Well, now its finished! I added Eduard Zoom to the interior, Quickboost gun barrels, exhaust and pitot/antenna masts. Aires resin for ventral ID light. Clear sprue for wingtip lights and last but not least the excellent Barracuda wheelset. Antenna was rigged with Uschi Superfine thread and model was painted with MRP paints. Weathering was kept to a bare minimum as these were not in the fight for long and my photos suggested little weathering. Markings are from Extradecal and depict a aircraft from 264 Squadron. Great kit with excellent fit!10 points
-
This was my second try. I did not think I would enjoy the smaller 1/600 scale but I found I was wrong. I don't really see anyone building these old kits but I like working on them. Thanks for looking.9 points
-
This is my take on what is really a rather nice little Airfix kit of the Seasprite and still the only option (for the twin engine version) in 1/72. I think this kit was produced just before one of the several Airfix bankruptcies in the 80's (when it was owned by Palitoy?). I don't think Airfix produced any new tools up to this standard for quite some time afterwards. sprite6 The kit goes together very nicely and the only modifications were some scratchbuilt mirrors to replace the clunky kit one, and some modification of the landing gear as most aircraft seem to have the landing gear covers removed and these are rmoulded into the gear legs on the kit. Courtesy of Britmodeller Robert an extra drop tank was also added as this aircraft usually carried two rather than the one provided in the kit. spritea2 All over Gunze Aqueus Engine Grey was used for the colour scheme and the decals for this HSL-33 machine largely came from the Microscale sheet on the Seasprite, again with some modifiication to the code numbers to represent an aircraft of which I could find actual photographic evidence. Getting the striped decals on the tail surfaces was quite traumatic!! spritea9 sprite8 Hope you like!! sprite4 sprite7 spritea1 Pat9 points
-
Hello everyone... this is the second of my two builds for the group-build. It is the 1/48 Hasegawa Macchi C.202 Folgore in the markings of the 153* Gruppo Commanders aircraft. https://it.m.wikipedia.org/wiki/54º_Stormo Please feel free to comment or ask questions in my build thread. https://www.britmodeller.com/forums/index.php?/topic/235079340-a-macchi-for-me-dogfight-duo-1/page/3/&tab=comments#comment-3858311 Dennis9 points
-
Hello everybody... This is my 1/48 AMT P-40K (LT) KittyHawk III from 112 Squadron RAF Italy 1944. Please feel free to post questions or comments in my build thread. Dennis9 points
-
Hi Everyone, Hope you don`t mind me sharing some pic`s of my latest attempt at a `fat faced spad` Built from Revell`s reissue of Matchbox`s 1/48 A-1E kit Every time I build one of these I try to bring it up to something a bit nearer the real thing but always see afterwards all the bits I missed...... ....so hopefully this ones a little bit nearer than the last. Improvements this time include: Tamiya main undercarriage, arrestor hook, main wheels and air force type tailwheel engine and cowl. Monogram propeller, all from some recently `culled` kits. Tried to correct the windscreen by sanding off the incorrect pillars, polishing and adding thin strips of black decal to represent the bonded joints. Embellished the seats, added: gunsight, coaming, brake pipes, steps, vent in the fin leading edge, wing fences, wiper, various aerials...... and boxed in the main undercarriage bays. Decals from Caracal Models CD48046 USAF/VNAF A-1E Skyraider. Oh and went for a simpler weapons load than usual with the centre Navy style drop tank just to be different. Hope you enjoy, thanks for looking Russ8 points
-
The Hasegawa kit is fantastic, fitted together very well with no filler required, just a bit of sanding. I used the Eduard etched cockpit detail, otherwise it's oob. Paints were all Tamiya spray cans; AS-13, AS-14 and AS-27. Thanks to @Mark V for the Spang F-4 info! I still need to add the ECM pod in the left Sparrow recess. All comments and suggestions welcome ...8 points
-
The PZL23 was a 1930s Polish built light bomber which saw service into WW2 and in fact was the first aircraft to attack a target within German territory during the Polish invasion. Suffice to say, it's elderly design was no match for the Luftwaffe and it suffered heavy losses early in the conflict. The Romanian airforce also used them against Russia. It was a nice little kit to build and Heller provided both Polish and Romanian decals. What started out to be a simple paint job using Revell Aqua was almost ruined by a bad reaction to Humbrol matt varnish. I had to sand it back and repaint while trying to preserve the Romanian decals. Anyone else had a problem with Humbrol varnish?8 points
-
Way back in 1977 Revell released kit H-288 which was a 1/48th scale McDonnell-Douglas F-15A Eagle. It could be completed as the record breaking 'Streak Eagle' or a 58th TFTW 'Candy Cane' Eagle out of Luke AFB. I made this kit many years ago and in a fit of nostalgia bought one on eBay for literally pennies and instantly regretted doing so, it really isn't a particularly good kit. When Revell and Monogram merged the way superior former Monogram offering became the 'Revell' F-15A and this kit was quietly dropped from the catalogue. To be honest, I was going to bin it as not worth the effort however it was saved by... A couple of months ago I posted an 'FF' coded early F-15A in air superiority blue, this was the Monogram kit using the Caracal Models F-15 "The Early Years" decals. I really liked several of the other options on the decal sheet so I decided to go for F-15A 71-0283 which was the fourth Eagle built and conducted structural tests. In her later years she was painted overall gloss white with orange/red panels and I thought that this was worth a try on my old Revell kit. I decided to build her OOB, not to spend too much time on her, however this would be my first serious attempt at scribing panel lines. The result is as follows: 20201018_124745 (2) by Ghostbase, on Flickr I painted the white areas with Halfords Appliance White and was happy with the result. I have used this paint before and am comfortable with the technique that should be used. 20201018_124807 (2) by Ghostbase, on Flickr The orange paint was Vallejo 70.910 Orange Red applied with a Badger 200-9 gravity feed airbrush. I have had a nightmare year trying to apply acrylic paints using an airbrush, thanks to advice here and another forum I have got the hang of acrylics and this was my first successful application on a large model. 20201018_124825 by Ghostbase, on Flickr The fit of the kit wasn't good. I had to use filler on the nose cone join, the nose section to the main body, the wings to fuselage, and the air intakes. I did what I had to do so that the model would be presentable from a four foot distance! Such are my high standards... 20201018_124918 by Ghostbase, on Flickr Although it really does not show in these photos I am very pleased with the results of the scribing that I did on this raised panel line kit. I chose the F-15A Eagle because it has so many flat surfaces, I understand that it was nicknamed "The Tennis Court". I used an old dental tool to do the scribing and the old Revell plastic was soft enough to be able to scribe without any problems. My first scribe! 20201018_125030 (2) by Ghostbase, on Flickr The decals are a mixture. The 'F-15' logos and the serial number are from the Caracal Models F-15 "The Early Years" decals set. All the other decals are from the Monogram kit or the spares box. Caracal have covered the F-14, F-15, F-16 and F-18 aircraft so far in their innovative "The Early Years" decals sets and I hope for more aircraft that I remember from my teen years in the early 70's. 20201018_125406 (2) by Ghostbase, on Flickr My final photo is this build with the Monogram F-15A that I completed a short while back using the same decal set. IMGP3988 (2) by Ghostbase, on Flickr For some reason I am very happy with this build. The original kit isn't great to say the least, however with decent paints and excellent decals plus my scribing it earns a place in the display cabinet. I have a couple more old Monogram Eagles so maybe more to come? Michael IMGP3982 (2) by Ghostbase, on Flickr8 points
-
This is the Galaxie 1/25 kit, a challenging but fun one to build. I airbrushed the exterior with Scalefinishes Como Blue and Dove Grey (original chevrolet colors for this period) and Tamiya TS-13 clear gloss over coat. I deviated from the instructions by pre-mounting the front fenders to the body before assembly/ paint and installing the interior directly within the body instead of pre-mounting to the chassis. I had a bear of a time installing both front and rear bumpers which seemed to encounter the short end of the tolerance stack-up on this model - thank goodness for 5 minute epoxy! The “stovebolt” 235 CI straight six engine was my favorite part of this build and made me nostalgic for my second car (a ‘55 Bel Air 4 door with the same engine, bought for $265 USS and driven for 3 years). I love these streamline “futuristic” post-war GM designs and wish Galaxie or Moebius might produce others (‘47 Caddie Series 62 fastback please????). Cheers, John8 points
-
Well, I popped into the LMS for a couple of pots of paint at lunchtime and emerged with this: This is entirely your fault Ced and I hope you're sorry. In fact, so pernicious is your influence that I'm even thinking of building them wheels up and using the included stand. What's wrong with me? I was amused to see, on perusing the instructions, that Airfix have got around the problem of the Mig 17 having no nose to stick ballast in by including an oil drum to prop up the tail. Cunning! Craig.8 points
-
Heller 1/72 T-28 Trojan.8 points
-
Some years ago I came across the concept art by Jakub Rozalski. Some of his work pertains to a re-imagining of the 20s, 30s, and 40s with robots. In my early teenage years I visited the casemate museums at Kornwerderzand several times. These weren't bunkers, I vividly remember the guide telling us on our first visit, but casemates. Kornwerderzand on the western shore end of the Afsluitdijk was one of the rare strongholds that was able to withstand the invasion of Nazi-Germany in May 1940. Nazi-Germany invaded on May the 10th, 1940 and reached Kornwerderzand on Sunday May 12th. The units there held out until the bombing of Rotterdam on May 14th forced the Dutch government to surrender - much to the dismay of the defending units at Kornwerderzand. There was a line of defense to the east ahead of the casemates at Kornwerderzand. It consisted of trenches and dugouts and was known as the "Wons Stelling". This line of defense was no match for the invading army and was quickly overrun on the 12th, with heavy losses on the Dutch side. Lehrgeschwader 2 was one of the units that provided close-air support. This was a unit that wasn't actually a training unit, but a "mixed-formation [unit] tasked with the operational evaluation of new types of aircraft and/or with the development/evaluation of new operational tactics or practices". Messerschmitt 109E-3 "Black 12" was flown by Leutnant Helmut Mertens on the 12th. Presumably, as Mertens made a low pass over the Wons Stelling and his aircraft was hit by small arms fire. (There were no anti-aircraft weapons there). A single bullet hit the fuel line and the engine ground to an immediate halt. Mertens made a successful belly landing just outside of the village of Pingjum. The aircraft was lightly damaged and was sent to the factory in Leipzig for repairs and returned to frontline service by August 1940. Pingjum is used by the German army units as a temporary base and launch various unsuccessful attacks on Kornwerderderzand the next few days - that is, until the capitulation of the Netherlands, officially on May 15th 1940. I'm planning a small diorama and the main feature will be the Airfix 1/48 109E kit. The Airfix kit is relatively cheap and captures the look of the 109 really well (better in my opinion than the competition). You can also build pretty much every E variant from each box, which is good value for money. Detail is a bit sparse and soft, and those panel lines are rather awful - I'm trying to reduce them a bit. I added some parts of Eduard's Zoom cockpit set, as well as a resin seat from SBS and a resin control stick from CMK. I painted the cockpit with Mig Ammo, Vallejo, and Games Workshop acrylics. Read to close up the fuselage I've also started working on the figures: Three are resin and two are from Tamiya's "German Infantry on Maneuvers" set. Thanks for looking - updates will follow...7 points
-
Hello Good people, Latest completion a golden oldie very enjoyable to make. OOB just drilled barrel and added glass front and side windows. Built for my wife really her old dad was in the Royal Artillery during the war, it will sit in the summer house next to a picture of him.7 points
-
Hi dear colleagues! Letme repreent you another my buil. This time is old and poor KP kit. Sratch build: overall rivettlines, cocpit, wheel bays, hatches out of self agdesive foil, antennas scopes and dischargers. The pilot and armament is from Zvezda's Yak-130 and KH's Su-35.7 points
-
Couple of recent finishes, first up the new tool Airfix Buccaneer, done as an early RAF with a combo of old Airfix (which I misplaced the wing lines and diamond like one thanks to looking at someone else build with the same errors) and Matchbox Decals, painted with Humbrol 164, Vallejo 888 and Xtracrylix Light Aircraft Grey and finished with Winsor and Newton Matt. Second is the first issue of the venerable Corgi diecast, repainted in Xtracrylix Extra Dark Sea Grey to use the decals and spare wing tanks from the Airfix kit. Though spent a lot of time sanding seams and the raised Corgi lettering, also added spare rocket pods from the Airfix Phantom kit. Finished with Winsor and Newton Satin And together7 points
-
So today's update and the first job was a gloss coat on the main hull. The lucky varnish performed flawlessly again and here's a pic Next it was time to prime and paint the turret something I've been looking forward to 🙂 A gloss coat was applied to the turret and then I placed the turret in position on the main hull, which is something again I've been looking forward to Next up will be some weathering to these parts followed by a matt coat of lucky varnish, im happy with the results so far 🙂👍 Oh and this turned up today another for the stash Tri coloured camo 🙂 bring it on 😜👍. As always thanks for looking back soon 🙂👍7 points
-
Making Tracks Well folks - it's been a while. Although this post is called 'making tracks' most of it is actually about failing to make tracks. As outlined above, the two things that I thought would be especially challenging about this project were the wheels and the tracks. The wheel production went very smoothly; however, the tracks have been a different story. I"ll take you through a few of the ideas that I tried and then show you the method that I think is actually going to work. My first attempt was a sort of half-hearted experimental attempt at doing something with gridded sheet plastic and strips of textured evergreen card. The result was a fairly precise geometrical shape. Precisely wrong that is... As you are probably aware I have a fairly lax attitude to accuracy but this held no resemblance to anything in the real world, so I put it to one side. Attempt number two was a bit of fairly far-out lateral thinking. About a year ago I picked up a large embroidary grid at a sewing shop in the belief that one day it might make a good grid over the top of a deck opening on a sailing ship. I cut a strip off that was the correct width for some tracks and fiddled around with seeing if I could make it look like a tank track. I couldn't. Especially since no glues really hold to this slippery plastic very well. I then faddled around with some long cable ties, which due to their surface 'ratchet' texture held some feeble promise but again, no cement would hold and besides, they were way too thin. I also tried some of those reinforced plastic strapping things that hold cardboard boxes together when appliance and so-forth are being delivered but no joy. Then I had a brainstorm. If I wanted something to represent flexible tracks why not build something out of a truely flexible material. So I went to bunnings and bought a sheet of roofing lead. Yes - lead... Pb the toxic metal. You know the stuff. I cut two long strips of the stuff and laid them out thus... this was looking promising I thought. See lead is nice and flexible and promises to wrap around the wheels quite nicely. Note the gloves - lead really is quite nasty stuff to get all over your fingers so when playing with this stuff please wear gloves and wash your hands frequently. I then tried sticking some wooden track pads on and started to see the problems. I could probably stick the wood on with two part epoxy but I couldn't help but think that the layer of flexible lead underneath would sooner or later make the glue give way. I tried sort 'embossing' a pattern into the lead by bashing the sharp end of an old screwdriver into the surface but I couldn't get an even pattern for depth or distribution. At this point Bill at the local modelling club was offering to give me some spare 1/35 track from one of those gigantic WW2 Paper panzers. Even though it was 1/35 scale it was about right for width but the track pattern bore no resemblance at all to a modern track so held off; a generous offer though Bill - much appreciated. Then for my birthday I got a brand-new vac-forming machine and thought I would try this. Make a vac-form of the tracks - complete with the sticky-out little knobbly bits that stick out between each link. If I made a few of these I could somehow stick them together and make them all line up and make a set of tracks. Here's the first attempt about to begin. in fact by the time I had got this far I was pretty sure this wasn't going to work and when I found that the only vac-form plastic I had was clear stuff (and not the much easier to form white plastic) I figured correctly that the idea was doomed. Yep! it was.... Stupid... So now it was looking like giving up and 3D printing. But one day during an idle moment I was flicking through my previous posts on this thread and noticed this photo. Complete with a comment about how easy it is to carve plastic. And this got me thinking. What about carving a tread pattern onto a strip of nice thick plastic and then building something from there. Well the actual carving did not work so well but the idea was there - finally - and in the end an old fashioned Olfa cutter came to the rescue. followed by some vigorous but quite careful work with a triangular section file. Here the tracks are upside down - the tread is facing upwards - but you get the idea. Now I made a little cutting jig and cut out about 150 or so little equal lengths of 0.75mm evergreen rod. (Note that in the background you can see my 'proof of concept' piece.) The evergreen rod lengths sit beautifully in two out of every three slots in a strip of textured evergreen plastic glued onto the top of the tread strip, and it just so happens that the slots are spaced at exactly the correct distance to allow the teeth on the drive wheel to engage with the rods - very much like on the real thing. This is not finished yet but I think that I've finally worked out how to do this and should have the tracks sorted fairly soon. Let's say in a month or so. So in the end the answer was fairly straightforward - just carve / file the necessary detail into a strip of plastic and stick bits to it until it looks kinda OK. I'm still not quite sure exactly how I will make this wrap around the drive wheels and so-forth, but I'm confident that I'll work something out. Till then. Stay safe... Bandsaw Steve7 points
-
Thanks, as always, for the very generous comments, especially those whom I consider to be master scratchbuilders! You know who you are... As usual at the moment I've only managed to snatch short stints at the modelling desk, but the rigging is 2/3 complete: I've used EZ Line for convenience. It's a shame that it's black and not grey, but you can't have everything. With luck I'll be able to add the last few rigging lines tomorrow. Jon.7 points
-
Evening folk's,built for the MTO GB is Pegasus Hobbies easy kit.finished as Ina "Macon belle" flown by Lee Archer one of the famous Tuskegee airman,well worth reading his wiki entry.As always many thank's for looking in.https://en.wikipedia.org/wiki/Lee_Archer_(pilot)6 points
-
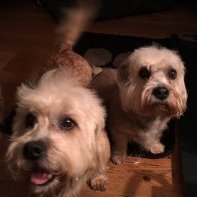
Aren't you a little old for oochie coochie coo?6 points
-
So, when the USN decided to buy the A-3B bomber from Douglas, the USAF decided they wanted some too. Initially they were thinking about a combination of bombers and recce aircraft, and soon identified a need for an Electronic Recce plane which became the RB-66C, Later they realised the need for jamming capability and converted some 13 B-66B bombers to EB-66B, and upgraded the RB-66C to the EB-66C. The C version was the electronic "spy" used to identify enemy radars and radios with limited jamming capability but the handful of EB-66B conversions actually accompanied raids to provide a jamming screen, using the info from the C version to set up the jammers before take off. Later a larger batch of surplus B-66B, probably over 50, were converted to the more capable EB-66E and this is one of them. I had intended to convert the Italeri 1/72 B-66B in my stash to either an EB-66C or EB-66E, but the more I thought about it the harder it looked, so I chickened out and bought a cheap second hand Italeri EB-66E. It is in the markings of 42 TEWS, 388 TFW based at Kotat RTAFB between 1971 and the end of 1972. A colour photo in the Aerofax book on the B-66 confirms that it was one of the very few such planes given a shark mouth, and it may also have had a non standard coulour scheme with not only 2 greens but also 2 browns, but that could just be down to weathering and a partial repaint, so I have used the standard 3 colour SEA upper scheme. By the time the USAF had finished messing about with the spec, the design ended up somewhat different to the A-3B and whether they saved the intended time and money by buying "off the shelf" must be open to debate. The various EB-66 versions did a lot of useful but dangerous work as reflected by their losses, as the North Vietnamese soon realised what they were up to and set up SAM traps and sent their Migs after them. I have enjoyed this GB, and might even add another build if time permits, but now I need to concentrate on another GB, with a further one due to start in a few weeks. Thanks to the organisers for great GB, and thanks for watching. To those still building - good luck! Pete6 points
-
Here is my build of the Hasegawa 1/72 EKA-3B tanker/EW plane, in the markings of Det 1 of VAQ 130 "Zappers" serving on board USS Constellation during her 1971/72 cruise off Vietnam. This particular machine was retired after being replaced by the EA-6B Prowler and converted back to a tanker, and as such remained in service into the 1980's. As you can see, the Light Gull Gray is sensitive to lighting conditions, varying between a slightly brownish/Mushroom shade to a cooler almost bluish colour. The kit has been released several times over the years as an early and late A-3B bomber, a KA-3B tanker, a straight EW version the EA-3B, and this combined EW and Tanker version, and it goes together well with not that many parts. It is well worth building if you can get one. Cheers Pete6 points
-
6 points
-
No! Not the Bowie album 🎼 Six 1940s American young ladies Beryl Monica Sandy Kate Nora Jane5 points
-
This my second RFI since joining Britmodeller back in April. The Esci Dodge WC52 is a nicely detailed kit, especially for its age, but requires some serious modification to get it to sit at the right height. The modifications I needed to do were far more drastic than I was expecting, and it ended up taking longer than I thought it would, but quite pleased with the result. Also added some windscreen "glass". The old decals were useless, but I wanted to do mine in US Eighth Air Force markings, so got a spare set of USAAF Bomber Resupply set decals from Airfix, and chose to finish it in 100th Bomb Group markings. Here's the WIP; And here's the finished item; 20201021_163054 by Dan Hardy, on Flickr 20201021_163113 by Dan Hardy, on Flickr 20201021_163133 by Dan Hardy, on Flickr 20201021_163146 by Dan Hardy, on Flickr 20201021_163206 by Dan Hardy, on Flickr 20201021_163222 by Dan Hardy, on Flickr 20201021_163319 by Dan Hardy, on Flickr5 points
-
Today I want to present last of my finished previously small helis - Mil Mi-2 from Lotnicze Pogotowie Ratunkowe (Air Rescue Service). Mi-2 were for years "workhorses" in Poland. Nowadays all are retired and replaced by EC135. As usually with civilian versions a lot of scratch (especially inside) has to be done Sorry if I've added too many photos, but... I just like this model If anyone is interested in a report "WiP" is available on the Polish forum5 points
-
Hello, colleagues! Excellent kit from Zvezda vith decals rivetts ans PE axterior set/5 points
-
Cheers Guys, been a while since I've managed any time at the bench, so another micro update I'm afraid. Started on the tool tie downs, still need to add the axe and pick head straps. Chain for the securing pin on the track adjusting wrench lock. And the headlight dust caps brackets, the lights are removable so these things stored the dust caps for when they are removed. Not much more than that chaps Dan5 points
-
Been trying out ideas on the Dog House I think this was Mk2/3 Then I thought I'd try the salt technique Used AK chipping colour as a base coat Built up with various shades of mucky white Then worked with the rest of the AK rust range and one for the jury. I noticed on the original pics there was some signs of the original colour. So patches of faded blue and white and for @Martian some streaks of seabird guano (This doesn't mean there will be any trace of their bottoms Martian What does the jury think??? Thanks again for all your kind comments and likes Stay safe and avoid the numpties Kev5 points
-
I am happy to hear that - both about your possible entry in this GB and about the international interest of Swedish aviation! Yes, the fact that this model is still in print, more than 40 years after the first release, is a sign that there must be lots of Tunnan-lovers around the world! And the build is underway now. I started with rescribing panel lines - and couldn't resist trying some riveting. I seldom do riveting, but since not much will be seen through the Congo camouflage. Cockpit is more symbolic... The seat is also simplified, but rather correct. I replaced it with a Pavla seat, and suddenly found myself scratch-building a new cockpit. I really don't know why, since not much will be seen. I think it is just some kind of modeller's disease to do these things... I will use the kit's control stick and instrument panel, although I will use some kind of instrument decals. It seems as if this one will have open canopy, which was nothing that I expected a few days ago.5 points
-
I've got the fuselage together and made the cut to accommodate the roman nose,it fits quite well,as with my other gunship the 119k stinger (in the same scale) the wings will be able to be fitted post paint,which will help no end with the scheme, again it will be a wheels up in flight model, @Corsairfoxfouruncle i believe you like the roman nose 130, not our usual scale though 1/144 The buisness end Test fit of the wings, i sprue glooped the joins down the fuselage and all the joints need tidying, then, camo time Cheers all Glynn5 points
-
Well I promised slow progress. I pretty much exclusively use Alcad micro-filler primer on my bodies and this was no exception. The paint was fairly old so was not as smooth as I hoped, however will some well worn wet and dry this was remedied. After some consideration I have decided to paint the car blue (as per virtually every one😀). But with the twist of adding an offset French Racing Stripe, so first painted it white (Zero paints gloss white) and them using 6mm Tamiya tape to make a stripe. The plan is now to use 2mm tape to add the red and blue sections, wish me luck - Andy5 points


.thumb.jpg.d17ff607fc7e89ed057e63fcb6f2a888.jpg)


This leaderboard is set to London/GMT+01:00