
Leaderboard


Popular Content
Showing content with the highest reputation on 13/10/20 in all areas
-
Hi everyone. This is my first 1/72 Arma Hobby Hurricane. I was keen to have a go at an all-black night-fighter and chose to do an aircraft from Exeter-based No. 247 Squadron using the new Xtradecal sheet. It's a lovely little kit and went together with no problems - I just added some resin exhausts and brass 20mm cannon. I used various shades of grey and black to try and give a worn, scale appearance and pigments for weathering. I'll certainly be doing another one of these, probably the forthcoming Mk IIB 'Hurribomber'. Best wishes, Ian33 points
-
This was my build for the Britmodeller, 2020, Battle of Britain Group Build. The Hurricane is from the Airfix 1/48, Ready for Battle Gift Set. The only things I added extra were the motor - to run the prop, the aerial wire and the pilot figure which is, I think, from the Airfix Seafire kit. I thoroughly enjoyed the build even though the kit has to be carefully assembled due to some tight tolerances. This Gift Set was a birthday present from a colleague at work a few years ago - so I would like to say a big thank you for the very thoughtful gift. Kit: Airfix 1/48 Ready For Battle Gift Set Paints: Humbrol, Revell, Citadel, Vallejo acrylics all applied by paint brush Extras: miniature motor and plasticard for supporting the motor plus a hair for the aerial wire. The WIP can be found HERE The vignette photos can be found HERE Please excuse the electrical wires in these first photos. The wires are for the motor and, as can be seen lower down, they pass through the base under the wheels once the aircraft is in place on the base. These were taken against a white background and without the prop working: [ The next set of photos are of the Hurricane with the prop motor running and with it on my Spitfire display base - which has a photographic sky background: Next a couple of photos of the Hurricane with some of the ground crew and smaller equipment from the set: More photos of the vignette can be found HERE Finally a big thank you must go to the fantastic hosts of the GB and to everyone who took the time to comment or offer advice in my WIP thread. Kind regards, Stix EDIT - 16/10/20: @Troy Smith, in a post further down this page, kindly posted one of my photos alongside a photo of the actual aircraft. The photo of the actual aircraft was this one: Apart from the angle being a little low, the photo of mine was pretty similar - except it was in colour........so: I figured I could also do the same with a similar view but with the ground crew around: ...and while I was about it I did a few others: Kind regards, Stix31 points
-
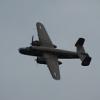
Afternoon all, Number 20 for the year done and dusted, the rather lovely Ju88A-1 by Revell. Been waiting a long time for a Battle of Britain variant in 1/72, but it was worth the wait, a great little kit, if a bit tricky in a couple of areas. Built completely from the box save for some Eduard Seat belts and a handful of markings from Xtradecal, and finished as ever using Hataka Orange Line Lacquers. This build completes by BoB collection for now- I can't face building an Airfix Blenheim, and the wait continues for an early He111H variant that can be done from the box- so I've attached a family pic for posterity. Revell 1/72 Junkers Ju88A-1 by Shaun Schofield, on Flickr Revell 1/72 Junkers Ju88A-1 by Shaun Schofield, on Flickr Revell 1/72 Junkers Ju88A-1 by Shaun Schofield, on Flickr Revell 1/72 Junkers Ju88A-1 by Shaun Schofield, on Flickr Revell 1/72 Junkers Ju88A-1 by Shaun Schofield, on Flickr 1/72 Battle of Britain Collection by Shaun Schofield, on Flickr Thanks for looking, comments welcomed Shaun23 points
-
Hi all, here my latest Kit: the new Mi-24 by Zvezda in 1:48. Built a Mi-35 with Czech AF Tiger Markinges (Eduard Decals), further I add Brassin parts (wheels, pitot, gun and rocket pods) as well as some Eduard PE´s.16 points
-
‘Ready for Battle' Vignette Hurricane P3522 - GZ-V - Biggin Hill, August 1940 With motorised prop Kit: Airfix 1/48 'Ready For Battle' Gift Set Paints: Humbrol, Revell, Citadel, Railmatch and Vallejo acrylics all applied by paint brush Extras: Miniature motor and plasticard (for supporting the motor) plus a hair for the aerial wire. The base uses a Wilkos picture frame and some MDF plus Guagemaster grass mat and Army Painter flower tufts. The WIP can be found HERE The Hurricane RFI photos can be found HERE The vignette photos can be found HERE14 points
-
I'm counting on Grant to do it. Winston will just get power of attorney and take my car. Yes, we're not doing too well here at the moment. So weird that a congenital liar with a total lack of empathy might not be the best choice to shepherd us through this moment of national crisis. In my defense, I'd never used a scope, and the recoil of a full-size cartridge with such a light gun is substantial. I'm telling people I got it saving a virgin from a bear. Yep. It's a Romanian Army issue one from 1952, and came with a bunch of loose Chinese 7.62 Tok ammo for it. I had to replace all of the springs to get it to feed properly and clean off about a pound of Cosmoline. I also have the Browning Hi-Power, a CZ P-07, the Lee-Enfield No4 MkI, an Enfield No2 MkI*, a Webley IV, and (though it lives elsewhere) an AR15, with another in the process of being built. And I've a partial payment on an Eddystone M1917 Enfield, which for those of you who aren't familiar, was the most common bolt-action rifle used by the AEF in WWI, and is effectively a Pattern 1914 Enfield rechambered for 30-06. It's an interesting look into what the SMLE would have become if not for WWI: it has a Mauser-style bolt action, as opposed to the familiar Lee-style, but it's cock on close like the SMLE. It's also a fabulously beautiful rifle, as bolt actions tend to be. But I am very jealous of you getting to fire an SLR. They're rare and expensive over here. That looks really cool and I think I'll need to buy one. It vanished into the ether, but I'm hoping I can fabricate a suitably shoddy looking replacement. It's actually quite lovely; it's a huge upgrade from our old one, and it ought to be, since it cost almost exactly twice as much. It came with two huge flatscreen TVs, so now I have more TVs under one roof than I owned previously in my entire life. I even got our old TV from the last house into the grotto! It has four bedrooms, one on the ground floor for guests (Mrs P, who cannot sleep in her own bed during daylight hours for some inscrutable reason, used it as a nap room during the early months of the pandemic, and a subsequent inspection revealed the closet had been stocked with beer and peanut butter M&Ms), and three upstairs, which means for the first time in five years, I'm not sleeping with one of my bloody children. It has an office in the basement for me to work in, with a locking door, a large grotto area for models and latterly firearms all locked in their cases, and a small, easy to mow yard. Mrs P, who dreams big with regards to gardening but lives small because nobody will do the work for her, was saddened by the small yard. I, who have to mow it, was not. It also has a detached garage that isn't in danger of collapsing, and that we can actually fit our car into. All in all, it's a thoroughly satisfactory house, and a much nicer one than I ever expected to be living in. In fairness, you're building an actual boat, which I trust you will use to rescue me from the USA should things somehow get even worse in 2021. Let me know how many tins of paint I'll need to buy to meet the threshold. I saw a preview of it, and it felt very, very real to me. I'll have to watch the show. She's a teacher, so unfortunately only two children seems like a respite to her. Also, she's used to them pawing at her. I am not, and I don't care for it. You know, I had no idea that Mossberg made anything other than shotguns! Does the 464 top eject like the Winchester? I've always wanted a Winchester, but they're apparently either old and expensive or new and not very good. Pretend it's a Seafire Ib with the cannons removed? Re: Fritag, I have no idea, I assume thwarting evildoers on the Riviera, but as he's a solicitor, he might just be aiding them. Wonderful. Well, the Marines will take them at 16 with a signed note. No word yet on whether they have to want to go. 26! Don't say such awful things, 21+ more years of Winston will flat-out kill me. Today he almost pranced into a crackling fire in the fireplace, which, as ways to get killed go, is only a good one if your burnt to ash so your executors can save on the cost of burial. Re: the 2p coin, in truth, the reason I have it is that the Webley IV (and by extension, the Enfield No2MkI*)'s main takedown screw to remove the cylinder is sized exactly so that a 2p coin works perfectly to unscrew it. I imagine it may have been a different coin pre-decimalisation, but this one works as well. I can substitute a £5 note if it would help? I've felt the same way, but Mrs P seems to think any future children will be either (a) like Grant, or (b), like Winston but bearable because a little girl. Now, I have two sisters and one brother; I'm the oldest. The first time I heard an adult swear was when my mom called my sister Emily a "bitch" (she was not the last person to call her that, Mrs P went to Catholic school with her and last called Emily that about a week ago -- not lovingly), and my youngest sister ran away from home and has been hopefully preparing for my mother to die for the last decade at least. The problem is, we'd all have to live with the consequences (including the considerable financial consequences) of a third child. If it were just Mrs P who'd suffer, it would be almost bearable. 😐 I suspect it will. What I like about 1/48 is that the surface detail looks and seems more realistic than it does on 1/72, especially since last year thanks to Ced I got to see pretty much anything with wings in the UK. That's cool. The problem is the aforementioned embarrassment of greeblies. I like to think I know a fair amount about aircraft, but at 1/48, you get into things like different footpedals or the correct seat lever, and that induces a level of paralytic indecision rarely seen. Magic might be dignifying it a little. I promise much buffoonery. Woof, that's a lot of replying! Now I know how Ced must feel, but a little shorter and less dignified. I actually got a little done on the Spitfire, even! Added the silver (in this case AK EXXXXXXXXXXXXXXXXTREME Dull Aluminium) in the appropriate parts. The Colourcoats I'd sprayed too far back hadn't fully cured, but I was easily able to scrape it off and respray after it crackled a bit. Does anyone have a photo of those air tanks abaft the seat in the Spitfire? I think they're CO2 tanks, not oxygen bottles, but don't quote me on that. In any case, there are two of them, and I wanted to see if the thing linking them together would be better represented by the flat piece of PE in the kit, or a bent bit of lead wire.12 points
-
This vignette was my project for the Britmodeller, 2020, Battle of Britain Group Build. The Hurricane, equipment and figures are from the Airfix 1/48, 'Ready for Battle' Gift Set. On the Hurricane, the only things I added extra were the motor - to run the prop, the aerial wire and the pilot figure - which is, I think, from the Airfix Seafire kit. For the scene I also used the welding gas trolley from Revell. I thoroughly enjoyed the build even though the kit has to be carefully assembled due to some tight tolerances. This Gift Set was a birthday present from a colleague at work a few years ago - so I would like to say a big thank you for the very thoughtful gift. Kit: Airfix 1/48 'Ready For Battle' Gift Set Paints: Humbrol, Revell, Citadel, Railmatch and Vallejo acrylics all applied by paint brush Extras: Miniature motor and plasticard (for supporting the motor) plus a hair for the aerial wire. The base uses a Wilkos picture frame and some MDF plus Guagemaster grass mat and Army Painter flower tufts. The WIP can be found HERE The Hurricane RFI photos can be found HERE The first set of photos show the Hurricane with the prop spinning and they were taken with it on my Spitfire display base which has a sky photo backdrop: A few closer views without the prop working: A few photos against a white background as I think you can see the spinning prop effect better: A few showing it in its own display frame: More photos of the Hurricane itself can be found HERE Finally a big thank you must go to the fantastic hosts of the GB and to everyone who took the time to comment or offer advice in my WIP thread. Kind regards, Stix EDIT - I edited some of the photos into B&W for my Hurricane RFI thread but forgot to post them here - so:11 points
-
This is Tamiya's Churchill Mk VII as it might have appeared in the winter of '44-'45, the figure in the pixie suit is from Resicast. I've tried to replicate the field applied look so used white guache, brush painted. I rubbed it off with a damp toothbrush. Weathering is oils, Mig pigments & hand dug up, oven dried, hand ground finest Mancunian soil & Humbrol decal fix. Any comments, criticisms & observations welcome. Pete Thanks for looking.11 points
-
Interior being assembled: What you see separated is the kit's firewall/inst.pan. part. Not sure if I will use it, or just add the ones I scratched: And the bucket is added, in case of need:11 points
-
VFA-125 "Rough Raiders" NAS Fallon Las Vegas, Nevada 1998 Latest build, Mark DSCN3833 (3) by mwsfly9, on Flickr DSCN3834 (2) by mwsfly9, on Flickr DSCN3835 (2) by mwsfly9, on Flickr DSCN3836 (2) by mwsfly9, on Flickr DSCN3837 (2) by mwsfly9, on Flickr DSCN3838 (2) by mwsfly9, on Flickr DSCN3839 (2) by mwsfly9, on Flickr DSCN3840 (2) by mwsfly9, on Flickr DSCN3843 (2) by mwsfly9, on Flickr10 points
-
hello, just finished!10 points
-
Thanks John Ah, now I have an admission to make - I'd forgotten the seat pads! Now fitted (see below) Who are you and what have you done with our Craig? I now realise your earlier question about using the starter pots should have been more like 'You're not going to use the pots are you?' As Magnus would say, I've started so I'll (maybe) finish… Check the calendar. Is there a 'z' in the month? No? Fine for a mince pie then! (Snigger… he said 'bum'!) Thanks Keith - glad to hear your mojo's recovering too! The seat pads cover it too: The pilot's showing off his moulded surgical modifications - gosh, those pilots certainly were dedicated eh? Or were they selected for the flat bottoms do you think? You can imagine it can't you… 'Hey Marv, have you seen Johnson's bottom? Looks like a Scooter candidate to me'. Well, maybe not. Anyhow, the pilots got a dirty wash: Then the SHAR pilot was inserted: OK, perhaps hendie's prediction will not come true… "No, wait" shouted Archie "my feet are twisted together a bit. Try prising them apart and let me have another go." Sure enough, with a bit of help, in he went: Scalpels away chaps. In with the Scooter pilot: Not bad eh? You can see how the chunks missing from his arms fit over the console. I had trouble fitting his joystick (oooer Missus) so he came out temporarily while that was located and then back he went. Fits in the fuselage too - note that the bottom of the 'pit forms the front wheel bay: Quick interior shot: Then it was time to separate the fuselage halves from the trees. Had to take care not to chop off the pitot thingie: …and this gate is NASTY: …on both sides. This will need cleaning up: Still, progress!10 points
-
The inspiration for this vignette came from this sketch by concept artist, Guy Warley. I originally planned to have the figures to be backpackers or maybe having a picnic, unaware they were sitting upon the site of an ancient extraterrestrial ruin. Then I could call the piece, “Picnic at the Ruins of ARK Polaris”, or some such. I also thought it would be funny to have one of the figures have a metal detector, but I’ve been unable, as yet, to find an HO scale detectorist figure. The ship hull was printed in polystyrene. I made the ship a bit more organic than the one in the drawing, as I thought it would look cool if the engines were nestled in recesses. After some minor body work with sandpaper and Tamiya putty: The engines themselves were designed in the free version of Fusion 360 cad software and printed. I also added some kit part details between the engines, but I think this will be largely invisible in the finished piece. Here are things mocked up. I bulked out the ship with some styrene insulation. I think the overall base will need to be slightly bigger, but overall I’m pleased with how it’s turning out. That’s all for now. Thanks for looking.9 points
-
Hi everybody; here's my latest off the bench, after a lengthy build (what with COVID and lockdown and all? Incidentally, I got sick with it, albeit mildly, in mid march). Here's a summary of this project: KIT: Sword LIGHTNING T4/T5 AIRFRAME: EE Lightning T4, XM992, based at RAF Wattisham in the early 1960s MARKINGS: mostly kit decals, which are very thin and fragile. In fact, the yellow fin bands lost some fragments after I had applied and gloss coated them. Attempts to fix them with paint failed miserably, and I had to repaint the whole fin and rudder. Fellow BMers came to the rescue, namely Bill @perdu and Silvano @phantom61 who kindly donated Xtradecals stickers to complete the job (and save the build). Bill's provision is actually enough to build more shiny Lightnings, so one day ... PAINTS: Tamiya Gloss Aluminium, decanted from a rattle can and airbrushed, for most of the fuselage; other metallic hues from the AK Interactive Extreme Metal range (Steel and Chrome) and Model Master Metallizers; Tamiya Flat and Gloss Black for the upper fuselage, and various Lifecolor and Italeri acrylics for the interiors and the little diorama WEATHERING: usual black tempera wash and some Tamiya Smoke AFTERMARKETS: apart form the already mentioned Xtradecals stickers, the boarding ladders and FOD cover are from the dedicated FLIGHTPATH PE set, while the pilots and crews are PJ Productions, again kindly donated by @phantom61 SCRATCHBUILDING: ok let's see: - the kit contains a PE fret to detail the interiors and the outside too. The box is supposed to be for both a T4 and a T5 version, but the provided PE for the IP is only good for the latter, so I had to modify it to suit a T4. This was done by adding a few holes for the round style gauges rather than the digital indicators featured on the T5 - the two antennae right aft of the cockpit and the Venturi sensor, from steel rod, brass sheet and brass pipe - piping and lights inside the canopy, using various copper and solder wires, and thermoformed styrene sheet - canopy opening arm, from steel rod - main gears brake lines, again with copper wire - IP coaming, from brass sheet (the kit part was too narrow), and aiming devices (P.A.S.) from styrene and clear acetate - pitot pipe, from brass pipes, and its mount, from an Airfix Harrier refueling probe. This last part wasn't necessary, but it became so after I launched the almost completed model in a dive against my basement concrete floor ... - rudder position, by cutting it through the top and bottom lines and bending it slightly offset, to give a more dynamic look - the radome tip was reshaped, using some CA+flour mix - some of the NACA ducts, by scratch building a punch tool shaped accordingly, punching the shape into plastic sheet and blending it in the corresponding fuselage locations - diorama base, from an Ikea frame and some MDF wood - PEC connectors for the pilots, from brass pipe, copper wire and styrene sheet - chocks, from sprue and cotton thread The kit is a good short run type, without any mounting pegs and tabs and sporting some nice details, plus a complementary PE fret and resin seats and exhausts; it has a few fit issues, and some weak points like the non perfectly round air intake and the joint between the tail and the resin exhausts. Not an easy build (my first short run kit ever, anyway), but it was fun nontheless The WIP thread is here, in case anyone is interested: I cannot thank enough everyone who followed the build, gave advice, support and contributed with parts and valuable insights - this was a typical BM team build I wish tot thank in particular @perdu for the decals, @phantom61 for the PE ladders, the decals and the figures, @Biggles87 and @keefr22 for the hints on the pilots' uniforms, @71chally for the heads up on the airframe details ... I'm sure I'm missing someone, my apologies for that - you guys are a great bunch! On with the pics: Scratchbuilt NACA duct detail chocks and main gear I had to use the flash to photograph the cockpit details Exhausts (these are resin supplied with the kit) Some pics without the base The resin seats were also supplied with the kit Last one, the whole thing from the top All comments welcome Ciao9 points
-
Hello All, Thought I'd post some pictures of my completed 1/48 Monogram F-4C. This kit dates back I think to 1979, this is the most recent Revell boxing. It looks every bit the Phantom to me. I did not do much to it at all really...but being an older kit that brings it's own challenges. The paint I used is Tamiya acrylic as a primer as it adheres very well to washed plastic and the the colors are Vallejo Vietnam set. I really like this combination of paints. The gloss coat is Pledge (formerly Future) and the Matt is Vallejo. The exhaust area is Vallejo metallic which look really good over a Tamiya gloss black. The decals are Furball Gunfighter Phantoms Part 2. They worked great as did the kit decals. In any case I hope you enjoy the pictures. Any comments or questions are appreciated. All the Best! Don9 points
-
Been a very very long time since I last posted anything on here. Mainly due to work and time curtailing any modelling activity. However, one has managed to be completed which I present to you here. Now, as a kid, I found that Airfix kit quality decreased a lot to become quite poor. However, they have now improved greatly. But, it now seems to be REVELL's turn to decrease in quality and some are downright shocking. This model is their Boeing PT-17 Kaydet/Stearman. It is painted in a fictional livery along with a British Civil Registration as I like the idea of creating a historic aircraft collection that could exist in the real world but is purely fictional. I have added some 3rd party decals for the instrument panels and for the first time, I tried rigging. I am quite pleased with the end result. Anyway, here are the photos. The last photo shows my airfield diorama which also doubles as a fictional bus depot. If anyone wants to know, the hangar is a kit from Poland of a second world war style construction (card kit). Again, I like the end result. Thanks for viewing and reading.9 points
-
Details are added to the cockpit:9 points
-
Hi guys, I put some pics about my Tamiya Chevrolet LRDG, sooner or later I will arrive to the end :))) Paolo8 points
-
This was a birthday gift from my wife. Possibly a record in recent times for getting built within two months of acquisition and not suffering a diversion into the stash! On opening the box I was surprised and pleased to see the decals were for un-PC Rothmans rather than the boxart “Racing”. The real car is just down the road at Beaulieu if you want to go and see what its supposed to look like. . The kit itself is somewhat ancient, originally by Esci and having been reboxed by both Revell and Italeri over the years. Now I love cars with massive flared arches as much as the next child growing up in the 70s, but these seem to have been tooled by someone from the Matchbox or HotWheels design studio after plenty of wacky baccy! Whether to do anything about it was the issue, as they stand they don’t look anything like those from the RS Parts ads in the Motoring News we’d avidly read at school in the 70s. In the end I decided not to bother, as carpaint is a lot less forgiving than painting the filler-fest of some older aircraft kits! So after a few coats of Halfords Appliance White and the application of the excellent (best part of the kit) decals, I brushed on a couple of coats of Klear to get a reasonable period shine. The kit itself is OOB, I thought several times about the arches but they would need a lot of correcting, so I just stuck M3 washers from the hardware shop as wheel spacers to get the wheels a bit further outboard. I also suspect the mid-joint in a propshaft is unlikely, and whilst I opened up some lap-belt holes in the side of the seats, I ignored the need for the decal belts to stretch to the back of the car (somewhere); this seems a common failing of decal seatbelts. Anyway, for all its severely compromised accuracy, in this livery the kit looks quite striking and worth the effort. But any future cars will be Tamiya, Aoshima or Fujimi kits… Cheers Will8 points
-
Mehbe. Oi! I'm a good boy i am, honestly occifer Eject! On cocktail sticks. These defence cutbacks are a … Yep, feeling a bit more mojo'd now Johnny and hope yours and mine lasts! Worry ye not Craig Although it doesn't look promising from the outside: Once you've cut the hinge (to stop it tipping on the bench) and given it a good stir it does appear to be paint: I was going to say I think Humbrol put an effort into the starter sets, given that they are supposed to be the first time you try their products, but then… The master speaks! You can see from this no-you're-not-getting-close-up pictures that the Hu33 isn't very matt: Maybe I didn't mix it enough. I'll go over it later. Just the odd irritating pins inside the Scooter seat: Now chopped off. No I'm not going to fill the gap in the seat. This is a mojo restarting OOB build and if Airfix think there should be a huge seam down the seat, so be it! I've sloshed some paint on the internal bits and, when that's dry, can apply the transfers: Bits are coming together (fnaar!) I must say this forum update is a bit Curate's egg… I like the way it collapses long quote posts (with an expand button) when you're reading but it's a pain when you're replying. IMHO. Maybe I just need to get used to it.8 points
-
Last years Christmas present finished! 1/48 Eduard Hawker Tempest of No. 3 Sqn RAF flown by Sqn Ldr Charles H. Macfie, late 1947, Germany. Thanks for looking7 points
-
My entry to the GB, hopefully I will get time to complete this one. I am going to be moving house again soon, but I will aim to get the bulk of construction done before the move, then paint once thats done and I set up the model room! The now old Dragon Panther Ausf A late production 'premium edition' with additional Eduard etch zimmerit.. Untitled by Sam Wilson, on Flickr7 points
-
When this kit came out I speculated that Saudia just had to order it! Wrong! Well I had a decal sheet for a Saudi 747 so what else could I do . I will not be completing this as is because obviously it is not accurate. It will be refurbished as British Airways first A380 which coincidentally was based at my local airfield Manston for a week of crew training before entering service. Hope you like it.7 points
-
Technically, this isn't a new build, I built this back when it was initially issued in the '90s. I was never very happy with the paint scheme, I went off some incorrect info about the colors and so it was tucked away in a corner, out of sight. I finally came to the point that I simply couldn't bear to gaze upon it, if only occasionally and decided to repaint it. I still had the kit decal sheet (it came with two choices of markings) and that is what I used on it. They went on very well, though they were impervious to Micro-Sol. Paints used were Model Master enamels. The markings represent a/c 284071/B of the 27th FG, 522nd FS, Italy, Spring of 1944. I chose not to use all the mission markings, there were another 32 hash marks that extended to just under the horizontal stabilizer. I'm not sure that I'm entirely happy with the exhaust staining, although the actual aircraft was rather heavily weathered. Also, it's an effect of the flash that makes the blue of the national insignia look lighter and brighter than it actually is. Still, it looks better than the first attempt and I'm not quite embarrassed to look at it now.7 points
-
This is Eduard's FAA Hellcat Mk II in the markings of Sub Lieutenant Oscar Lorenzo, an Argentinian pilot. Out of the box, it's from the good value Dual Combo boxing. Any comments, criticisms or observations welcome. Pete7 points
-
Hiya Folks,..... another Defiant,.... but this time a Battle of Britain aircraft which I have been planning to build for some time,..... as usual it is brush painted and I used the excellent kit decals,.... this has to be one of Airfix`s best kits ever to build,..... the design work and detail is superb. The model represents L7021, PS-H of 264 Sqn based at RAF Hornchurch on 25th August 1940 with its large A Type roundel converted to A1 Type with the addition of a narrow yellow ring. When studying photos of 264 Sqn Defiant`s I noticed that the demarcation between the black and Sky on the propeller spinner could be quite raggedto say the least,..... so I attempted to replicate this,..... but not too much! Here is the real thing, L7021, PS-H seen on the 25th August 1940 at RAF Hornchurch. The previous evening it had been flown by Pilot Officer `Bull' Whiteley when it downed a Ju88 but `Bull' was killed on the 28th and L7021 was to fall in battle on the same day too taking Pilot Officers PL Kenner & CE Johnson to their deaths,...... RIP; And here is the model; Cheers Tony7 points
-
Damaged racks can just be seen ...still have the exposed wiring loom to do will be there by the morning....also gonna rough the edges of the burst lower sponson to look like split weld seam and finish the penetration point with some putty. Location points for the schurzen brackets are done made with lead foil. Next finish anything that needs to go into the upper hull from the underside then join the two halves.....then the bit i'm not looking forward to mapping the zimmerit.7 points
-
Update #1 - A somewhat slow start. Now that my BoB Hurricane is all finished and ‘Galleried’ it’s time to put some serious modelling effort into this huge GB... Wow, I could not believe that this thread was forth from the very bottom and well and truly stuck on the last page! OK.. time to revive it a little. This Heller kit is quite fiddly, however an overall nice product that we’ve come to expect from this era of Heller kits. Whilst performing the usual Dry Run inspections, it seemed a little confusing where the cockpit floor and rear bulkhead should be glued and positioned. I tried a few different ways, but the best way by far was to glue both fuselage parts first, then slide the cockpit floor in place and attach the rear bulkhead after that. Prior to gluing, I added a few sections of plastic strip to busy the Cockpit area up a little... (My interpretation only). As I’m building Heller’s Heinkel He 112 as well, it made sense to assemble and paint both cockpits at the same time, so excuse the similar photos that I’ll be initially posting in each of these threads. A few coats of Model Masters RLM 02 where applied, some fabric seat belts added and a odd looking Instrument panel decal applied that might need to be touched up with black paint to tone it down a little. I’m hoping I can get this one to the paint stage rather quickly and may rely on a good mate across the Tasman to come to my aid with some homemade decals! ... thanks in advance @Greg Law. Cheers.. Dave7 points
-
More work is done on the parts:7 points
-
Not my usual kind of subject (no propeller...), but I joined an F-16 group build of my regional model club. I'm not very interested in the 50 shades of grey that normally adorn modern jet fighters, so I opted for an aircraft in the SEAC colours of the Venezuelan Air Force, with the bright commemorative markings for the 25th anniversary of the 'Dragones'. The kit is from Revell, that I kindly acquired from a fellow modeller from Denmark, through the Scalemates network. The decals are from Aztec, and using the 'strong' version of Daco decal setting solution they confirmed beautifully on the tail. I hope you like it. Peter6 points
-
A kit I bought with no box or decals, but does have destructions. I've some AT-6/Harvard Carpena decals but sadly the Belgian roundels are slightly out of register, the only ones like that on the sheet. Most of my spares are similar, maybe the result of being a 4 colour marking. Thankfully I've some DK decals for the Congo campaigns & I'll likely use those. Sprues & decals. Sorry about the yellow kit against the varnish desk. Steve.6 points
-
I'm keen to have a go at this. The story of Sonderkommando Blaich & their attack with a single He 111 on Fort Lamy in early 1942 has long fascinated me. The Taifun was not part of the actual operation but it appears that this aircraft was in Nth Africa at the time of the raid. That appears to be the SB He 111 behind it, an aircraft the latest Italeri boxing includes marking for & I've just bought but I think that is a step too far for this GB, there is no promise I'll get this one done. Here is the box & sprues, still bagged. Steve6 points
-
Hi all, Just finished this for the Rotary Wing/Vertical Lift GB here on the forum. The full build thread is here but to recap: Kit: Dream Model SA-565 Panther built as a SA-365 Dauphin 2, Irish Air Corps, S/N 248. Paints: Halfords Primer, Revell Acrylics with airbrush. Klear, Flory Models Wash, satin W&N varnish. Decals: Max Decals for Irish Air Corps Extras: Cut open left door, added seats & details to rear cabin. Scratchbuilt winch & searchlight. 301 Squadron badge kindly donated by a good friend. Dauphin 248, callsign 'Rescue 111' was tragically lost along with its crew on the night of 1st/2nd July, 1999 at Tramore, Co Waterford following a successful SAR mission.. Built as a tribute to the crew. Dream Model_Irish_Air_Corps_SA365_Dauphin (2) rs by Dermot Moriarty, on Flickr Dream Model_Irish_Air_Corps_SA365_Dauphin (8) rs by Dermot Moriarty, on Flickr Dream Model_Irish_Air_Corps_SA365_Dauphin (5) rs by Dermot Moriarty, on Flickr Dream Model_Irish_Air_Corps_SA365_Dauphin (3) rs by Dermot Moriarty, on Flickr The 301 Squadron badge is the Celtic cross of St. Brendan the Navigator with the North Star overhead. Dream Model_Irish_Air_Corps_SA365_Dauphin (14) rs by Dermot Moriarty, on Flickr And the memorial window in the chapel at the Irish Air Corps HQ at Baldonnel, Dublin. Baldonnel base church window by Dermot Moriarty, on Flickr Church dedication by Dermot Moriarty, on Flickr Thanks for looking and stay safe. All the best, Dermot6 points
-
This one is for Rabbit Leader (David). My kit has arrived and by Thursday I will have finished my 1/144 Vac Atalanta and will start my TV Reconnaissance build thread.6 points
-
I’ve been working on a Das Werk Ausf A, just to lighten my mood. Not starting a thread on it as I feel a little bad about stopping the G. Anyway. Wiking Ausf A at the Kovel breakthrough.6 points
-
It was the easy option seeing as I had the photos to work from and the decals, why make things difficult for myself? Today I have put the rest of the extra track links onto the turret and started adding parts to the upper hull and back plate, I want to get some paint onto the lower hull and wheels so that I can get started on the weathering. I want to use oil paint to represent the mud that was on the hull and wheels, and we know how long that takes to dry. Here's todays update. Thanks for looking, any comments are welcome.6 points
-
Hi @janneman36 @Ozzy @giemme @wimbledon99 @Johnson @GREG DESTEC & @Peter Roberts Thank you to everyone for your very kind comments. Nigel - thank you for your thoughts on the Outlook email issue. Unfortunately nothing from BM via Microsoft is turning up on any of my devices - not even in Junk. Mike is trying to work with Microsoft to resolve the issue. Once more I must apologise for the length between my update posts plus my lack of commenting in other people's threads. This is not like me at all. I love BM GBs because of the shared experiences of building models in a 'theme'. Time seems to get away from me at the moment. As I have said before - I'm not complaining - I am lucky enough to still have a job but I am either really busy at work or knackered after work!! Doesn't take much for me to fall asleep on the sofa mid evening at the moment! Over last weekend I decided to drag this one over the finish line. I was originally going to build everything that came in the 'Ready for Battle' set but - at the moment - it would mean this project would not have been finished before the end of the GB. So there are photos in the Gallery which can be found HERE There are lots of photos of the Hurricane itself which can be found in the Aircraft RFI section HERE And more photos of the final scene can be found HERE A few photos here of the finished scene: Thank you to the hosts of this superb GB and to everyone who kindly took the time to comment or offer suggestions in this thread. If you are still building your project.....good luck!! Comments and suggestions always welcome. Kind regards, Stix6 points
-
Blown out wiring done....... not an exact copy but a good representation i thought6 points
-
Additional work is performed on the parts:6 points
-
Evening folk's yes she's a size! wings and tail assembled and drying as you can see by the Spitfire how big she is.6 points
-
Here are a few of my last Battle of Britain completions (Italian model on Order but I'll run out of Time) Fujimi 1/72nd Bf 110 Finished in Gunze RLM 70 /RLM 71 / RLM 65 and Extradecal 72-118 A Bit of scratch-building to help the interior and a few Eduard Seatbelts. Final Finish was Mr Hobby Matt and Semi-Gloss decanted and mixed. Thanks for Looking Comments Welcome Cheers Bill6 points
-
Hi all! The third and final part of my Sarfice trio of aircraft is finally done and rolled out – North American AT-6D “C” joins my AD-4N “TR-KMP” and Fouga Magister “TR-KFJ” in celebration of the flying career of Jacques Borne. Those of you who have seen my previous RFIs on these will know the background and so I won’t bore you with that here. 😉. I intend to mount these three on a presentation board in the future. Globally the last military operator to put the Harvard in to service, the GAP operated a fleet of six AT-6D/Harvards for many years. They arrived in Libreville in this dark blue paint scheme and then, over a number of years, they progressed through natural metal to a sand camouflage scheme. These were ex-SAAF. The construction number of this machine was 88-14876 which, I believe, was registered “TR-KFC” in Gabonese service. She was formerly 41-33904, EX931 (RAF – received?) and “7491” (SAAF), being delivered to the GAP on 15th December 1970. The fleet was retired in the 1980s. The base kit needed to be converted from T-6G configuration. The means by which I did this was to adopt a Yale canopy (thanks @Graham Boak for the steer) and upper rear fuselage. It almost fits! 😉 She also needed a blanked off single machine gun housing on the upper nose, which also had a groove running forward along the top of the cowling. The other major difference was the two Browning MGs in the wings. The fitment of these MGs meant the scribing of the access panels on the upper wings. I also added a few lumps and bumps here and there that were features of South African T-6s and removed the Rudder nav lights. Each of the Gabonese Harvards seemed to have different antenna fits. “C” had a simple pole to the rear of the canopy. They were pretty scruffy. You can see from the few available images that the blue came away readily. I’ve therefore used a fair bit of “modeller’s licence” to get dirt and scratches on her. For all of this work I was robustly supported by Wez @Wez, Geoff Timms at The Harvard Club of South Africa and Fred Borne. What did I do/use? Well: 1. Kit – Academy/Squadron T-6G Texan (Double Set) 1/72 and RS Models NA-64 Yale (92208) 1/72. I used the Yale cockpit and rear fuselage fairing. 2. Aftermarket – 0.5mm brass rod, Master Browning .30 calibre Machine guns (M1919), aerial from our kitchen broom! I planned to use Radial Engines and Wheels P&W R-1340 (72001) but despite a lot of scraping and sanding I couldn’t get it to fit in the Academy cowling. I also intended to use the Pavla cockpit set (72021) but in the end I used only the seats. I also intended to use the CMK Harvard conversion set but I have an aversion to vac form canopies and, in any case, it split on me! The exhaust in the set was not what I needed either. 3. Decals – Arctic Decals drawn and printed, Techmod white “C” in USAF Amarillo font. 4. Paints – Colourcoats USN Glossy Sea Blue (Post war) ACUS36) plus numerous Humbrols for various small parts 5. Weathering and washes – Flory Sand and Tamiya Weathering Powders. Prismacolor silver pencil I hope you like her as much as I do 😊 Martin5 points
-
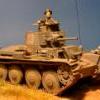
This is my Trumpeter 1/35 Scale T-62. Not a bad kit but not a great kit either. It fell together easy enough out the box but lacks some detail. The crew are from Valkyrie Miniatures and couldn't fault them. Lovely resin figures and was a joy to paint. Thanks for looking.5 points
-
This is a model built 3 years ago, that I did not post. It will become relevant for another model that I will be (likely) building, hence this late posting. I am not particularly proud of this model, as I really struggled with the kit's quality, but here it is anyway. I converted the "normal" G.III into a civil plane, with enclosed cockpit. A page on the plane was found in Les Ailes #436, 10/24/1929, thanks to the wonderful Gallica archives. From that Gallica/Les Alies page: You may find a post here at the Passion Pour L'aviation blog: http://www.passionpourlaviation.fr/2016/04/23/cudron-giii-a-cabine-fermee/ The Chroszy kit provides a starting point, and it helps, but it has some shortcomings you may not like (I did not). A biplane is always a challenge at many levels, and this is no exception. The rigging on this one is quite a task, and the open twin booms uniting front and tail are especially tricky in more than one way too. My thanks to Mika Jernfors of Arctic Decals from whom I commissioned the simple images this one needed, being civil-registered. First the good: a detailed resin kit, mostly well molded (but with many parts not well molded, unfortunately) with reasonable scale thicknesses, with a nice photo-etched fret, and things bagged separately in an attempt (futile) to protect the contents. A piece of clear plastic was in the box too. The not so good: Quite so-so instructions, which seems to be the norm with so many kits, too small, and with the P.E. parts not differentiated from the resin ones. The parts of course do no have identification numbers, and there is no part diagram, so you will be left to guess in many instances, and trust me, you won't like it. As with other kits from this manufacturer, some parts arrived already broken, which really pisses me off. Choroszy could use those "ears" or sidebars that other resin manufacturers use to protect the parts in the casting blocks. The wingtip was broken, and I found (after much looking around) the fragment to glue it back, but one of the landing gear skis had its front broken, and no fragment was there. The way some parts are united to their casting blocks (like the seats) makes them prone to breakage in separating them. In any case, spares seem to be provided (difficult to asses since there is no part numbers or diagram). The too thick throttles come as resin parts, but they should have doubtlessly been included with the P.E. parts. My kit did not have the decals that according to the lid should have come in there. No worries, since I did not use them anyway, but heck! This kit in general is overoptimistic in the sense that part of the detail will have to be replaced by wire or very thin styrene rod. The fragile and in some spots uneven resin parts that depict the trusses are quite a bit of wishful thinking too. In general, the sense I got from this kit is an attempt to replicate a fragile structure that fell quite short, had poor mechanical strength, and molding that left much to be desired. Unclean casts, failed parts, and parts confetti upon arrival. Not to mention asymmetries regarding wing strut placement, that will make your delight once you realize it, hopefully not too late in construction. Not a happy camper I was with this kit. I had built before a Church Midwing racer from the same manufacturer, that was in general AFAICR a better experience, but with incomplete and bad decals:5 points
-
I mentioned in the post above that I will be covering up the hull detail. This vehicle was probably covered in zimmerit. I will be usuaing the Eduard etched set, which I neglected to take a photo of before I started to use it... First job was to build the lower hull. As usual, I added some ballast. It's not necessary but I like my tank models to have a bit of physical presence. Zimmerit etches applied to the rear panel. And to the upper hull. Some work still needed on the machine gun mounting Rear panel of the turret And work continues on the zimmerit. I am now the Man With The Golden Tank5 points
-
John don't knock it, that is me sliding down into my Midget...5 points
-
Thank you Chewy, you are very kind, but I suspect that my efforts will soon be eclipsed, don't forget we have Andrewa, Crispin and Bootneck beavering away with RN flat tops, all of which are looking extremely good ! Another quick update on “the project”, one way of measuring progress is, I suppose, the weight of the beast, and it’s definitely getting heavier. I have been concentrating on the port side and the complex geometry of the flight deck overhang, one thing that I hadn’t appreciated until recently is that the break in the line midway down the ship in plan view (where the deck starts to taper towards the stern) does not correspond with the change in surface in side elevation (where the underside surface kicks up towards the stern). Took me a while to figure it out after spotting a distinct kink in the depth of the vertical surface on the edges of the overhang in the photo on page 29 of the “Anatomy of the Ship” book. Managed to get it to all work out with the sections and added some hefty bits of 3mm material to make sure, (I hope !) it doesn’t go anywhere. One thing I am trying to do is to make sure that where I have a crisp change in plane that the intersection is supported on both sides and properly defined, I want to try and get nice clean lines that stay in the right place without too much filler. I’ve been adding extra sections in the bow area to make sure that the skin will be properly supported, I reckon if I keep on going like this it won't need skinning, but will need a small engine hoist to move it ! There are some interesting little problem areas on the bow, one of which is the twisting surface which forms the sides of the flight deck at the bow and also incorporates an emergency conning position, the tricky bit though is the lower curving (in two planes) intersection with the bow flare, not quite there yet but getting close. I have obtained paternal permission to post some of the family “line book” pictures that were so familiar to my younger self and no doubt responsible for my current madness, firstly, the man himself, my father next to an HAS 7 very much the crunchy Naval aviator, and looking remarkably like my younger brother, which is obviously where all the “crunchy Naval aviator” genes went. A couple of nice shots of Battle class HMS Dunkirk (I believe) with Victorious behind. Victorious in Capetown 1961 Thanks for looking and the all encouraging comments (numpties being actively avoided) Cheers David5 points
-
Thanks Simon.....I still have two further shades to get on yet. Hopefully Thursday or Friday and I can start the other parts like the engine and transmission. Hi Paul Yes, I thought so....plenty of detail to be overwhelmed by . From my research, there's two routes.......... 1 - The MIG colour layout.. ........Or this from a model blog I came across. He did research on an existing Bergepanther in Germany, under renovation I think....... in that he looked at paint residue etc.. I'm leaning to towards the MIG one, purely out of visual interest and lighter areas to weather and chip. Yes Harry, I was contemplating a method like that mate. Either hairspray or salt.......hand chipping would be a long haul for something that would be heavily worn with use. Might try some experiments and see which way to go. I've tried neither before, so will add to the learning curve on this one. Cheers all for taking a look......5 points
-
Test build of the model.5 points
-
The fenders are in place, so the overall shape is done and the first round of the PE parts is waiting for its turn.5 points


.thumb.jpg.0cb281983c298f55509ab7d9a06994bd.jpg)


This leaderboard is set to London/GMT+01:00