
Leaderboard


Popular Content
Showing content with the highest reputation on 05/09/20 in Posts
-
Good evening, This has to be my best completed kit to date. Italeri's 1/72 Short Stirling Mk.1, purchased for 30£ a few years back from a hardware store in Cornwall. A kit I've wanted to completed for some time but slightly deterred by it's complex appearance in the box. Finished out of the box, using Tamiya Acylic paints, I have tried to replicate the build as best as possible using the limited information available on this aircraft type and in an appearance that represents a well worn and used example. An extra few coats of Halfords Primer were applied in order to reduce the heavy panel line detailing, and aside from the obvious mistake of failing to paint the edge on either side of the canopy the corresponding color, the fit was generally good. I attempted to install the engines to the cowlings after paint, but ended up butchering the engines in order to fit, which has also resulted in some of the photo etch bending. The instructions on the kit is also missing placement locations for some photo etch and part numbers. Faults aside, this is a brilliant kit of an aircraft sadly no longer in existence, yet played an equally valuable role along side it's better known successors of the Halifax, Lancaster etc...33 points
-
I’ve been a big fan of this unique aircraft for decades. So you can easily imagine my enthusiasm when Tarangus released their new 1/48 scale kit roughly a year ago. Finnish Air Force purchased two second hand examples in 1959 from a Swedish company called Svensk Flygtjänst AB. It was a private company that provided target towing services for Swedish armed forces. During the post war years FINAF used few war-weary Bristol Blenheims and Fokker C.X.s for target towing. Imagine yourself in the cockpit of a Folland Gnat F.1 fighter in a shallow dive and ready to shoot the target sleeve towed by a biplane originating from the 30s! When the last Fokker crashed FINAF was left without a target tug. The air force wanted something like a Canberra or a Sea Fury to replace the old Fokkers and Blenheims, but there was only one slight problem: money. So two SAABs were purchased instead. They were given serials SH-1 and SH-2 (SH for SAAB Hinauskone, SAAB target tug). SH-2 arrived in Finland in early 1960 and was written off in August the same year; after only six months of service. SH-1 wasn’t much luckier as it was destroyed in May 1961. This photo clearly shows the scratch built fairings covering the Type B Mark II winch and the small, four bladed propeller driving the winch. The winch was modified in Sweden. The brake was enhanced and the diameter of the propeller decreased. Note also the cable outlet, opened cowl flaps and new surface details on the rear fuselage. The details I'm most pleased with: the cowl flaps (from a Monogram P-61), the tread pattern of the tires and the propeller hub and spinner, all scratch built items. I also had to create my own decals, as there isn't any commercial ones available. Printed with HP 8600 inkjet and then Microscale Liquid Decal solution applied with a soft Leonard brush. I decided to represent all latches with home made decals. Over 20 of them were needed, but they really add interest in the model. A scratch built ADF teardrop antenna was attached on the belly. All panel lines were re-scribed using photos as a reference, as the kit wasn't especially accurate in this area. The dirt was created with Caran D'Ache crayons; first grinded into powder and then applied with a cotton swab. A small chisel and great nerves were needed when I carved the tread pattern. It is very prominent in photographs and a visible feature of the tires made by Trelleborg rubber company. The ribs inside the spats were made of Plasticard and brake lines out of thin copper wire. Here are my B17s: a Marivox 1/72 scale model built in the 1990s and the Tarangus model. Shape wise the Tarangus kit is far more accurate. All modifications now complete the model is ready for some paint. One nasty thing is the nose which was out of shape. Luckily the plastic was very thick so I was able to sand the top side into right shape. However after that the cowling was too large and Milliput had to be applied on the lower fuselage to make the cowling fit. Small details were added into the pilot's cockpit, like throttle, compressor gear and mixture levers. Instruments came from Airscale sheet. In the early 1990s I worked together with three senior FINAF pilots and of course interviewed them, as they had all flown SAAB 17s. I asked about the cockpit colour and one of the guys said that he thinks it was green (Tarangus gives aluminium). This is all there is left of the two planes. A close examination showed some green paint on the inner surfaces of the canopy framing. I was able to identify the green as NCS S7010-G70Y. A mix of Humbrol 75, 92 and 100 gave me an exact match. The yellow is NCS S2070-Y10R and as such very close to Humbrol 24. I only had to add a few drops of chocolate brown to get an exact match. The fuselage interiors nearly complete. All military equipment removed and a scratch built winch added. And finally, the winch, painted with bright grey-green (Eau de Nil, perhaps). I used the cockpit of a Hurricane at the Air Force Museum for colour comparison to get an exact match. Enjoy the pictures and Stay Safe🙂 Cheers, Antti29 points
-
Good evening, Here this time with a duo. Built out of the box with the addition of aerials from mig rigging and decals from xtradecals. Painted with xtracrylics dark earth and the rest in Tamiya. I also added some wing tip lights to the Hurricane with a bit of clear sprue. The stands are from some diecast planes my dad picked up for me some years ago and thought I'd put something a bit fresh on them. I would like to hear if anyone has any ideas on how to eliminate the sandpaper look where the wing roots are as I seem to get this all the time I spray. Here they are and thanks for looking.26 points
-
Here's a recent Blitzbuild dropout that I managed to finish within the week (a Drizzlebuild?). The decals for this were "interesting", but we got there in the end. Build thread is here. Anyway, pics: There is an ICM kit out there, which is apparently much better, but it wasn't in my stash! Thanks for looking, Adrian25 points
-
Hi everyone, this is my second lock down build (interrupted by a house move) and depicts the pilot of Hurricane Mk.1 P3707 of 310 Czech Squadron based at RAF Duxford in 1940 returning home to his faithful hound. The kit is the 1/72 Airfix Mk.1 Hurricane painted with Tamiya XF-81 dark green and XF-52 dark earth with Tamiya sky used on the underside. The model has some Airwaves additions such as the seat belts, rear view mirror, boarding stirup and canopy handles. I made a mess of painting the kit canopy so invested in some masks from Peewit and a couple of replacement units from Squadron. The decals come from Xtradecal's wonderful Battle of Britain set (X72117) that provides markings for 3 Hurricanes, 4 Spitfires, 1 Gladiator, 1 Defiant and a Blenheim. The pilot and his companion come from the Armory 'Friends' set stocked by Hannants and the grass and base were purchased a couple of years ago at Telford. I gave is a very small wash and added some paint chipping using a tooth pick. The only thing wrong with this build is my photography that doesn't do the kit justice, I really am happy with how it turned out and think it's a great tribute to The Few in this 80th anniversary year. Masters Return by tony_inkster, on Flickr Masters Return by tony_inkster, on Flickr Masters Return by tony_inkster, on Flickr Masters Return by tony_inkster, on Flickr Masters Return by tony_inkster, on Flickr Masters Return by tony_inkster, on Flickr23 points
-
Kit - Tamiya Paint - All acrylics Decals - Star 35-876 Extras - JR turned aluminium barrel, Tamiya kit-specific 'Detail-up' etch set. PzKpfw V Panther Ausf D Pz.Abt 52, Late Summer 1943. Wanted this kit since it was first announced - my favourite German WWII vehicle by a country mile. Kit build is 'typically Tamiya' the usual perfect fit and engineering, did struggle with the kit supplied rubber tracks but that's because I think I glued the idler axles too far to the rear thus over-stressing the tracks, or I did something else wrong, who can say. Paint is Mig's Dunkelgelb modulation set with Tamiya Red Brown and Field Grey 'squiggles' - I diluted the Tamiya colours about 70% with their lacquer thinner and it sprayed perfectly. The paint effects are the usual cocktail of sponge chipping, toothpick scratches, an enamel filter (home brewed) and oil-dot filter - In 1943 this would have been a relatively new vehicle so didn't want to fade the paintwork too much, or rust-up the exhausts. Dirt is all Mig pigments, European Earth, European Dust and City Dirt. I took my time and applied it (using clean turps as a fixer), just one facet at a time and I'm really pleased with the final result. Only my third ever German WWII armour build and really enjoyed it. Best from NZ. Ian.17 points
-
Here is the third of a trio of Sweet 1:144 "BoB Aces" Hawker Hurricane Mk.Is built back in 2009. It represents P2798/LK-A, flown by Flt Lt Ian R. Gleed, "A" Flight Commander, No. 87 Sqn, RAF, Exeter, September 1940. The kit was fully painted with brush except for the final matt varnish which was airbrushed. Thanks for looking Miguel14 points
-
Hi everyone, first time poster here. This is my 1:35 Super Sherman from Tamiya. Done with Testors olive drab, weathered with an acrylic wash and Tamiya pigments.14 points
-
Good evening from castle Spadgent. 🌩 hope you are all ready for the weekend. 🤩 I attempted to glue some bit together on this little wonder. There Aren’t many fixing points on this one so it’s a bit of guess work that’s needed. @CedB I see what you mean about the fit. 🤨 initially I popped the main shaft on like this. But trying to fit that assembly in place was a non starter so I popped it off and went about trying to get the top section inside the main tail structure. This seemed to be the only way. I squeezed one but in and added some TET then lightly sanded the bits that wouldn’t fit and squeezed them in as each bit dried. Eventually I got here. Which looks rather good. 🤩 and straight. the new light turned up too. 😇💡💡💡 The canopy or “bubble” was the next bit to get some stick. ( sorry ) Gators grip is just the best thing ever for clear bits. I then glued the two parts. The huge chunk of wood sticking out of the main frame is a cocktail stick tip. Keeping the engine straight while I glue the top frame work. I did manage to snap the skids. 😣 but fixed with some strip. I’ll sand and fix that up later. They got popped on too. I think I’ll start the bat copter after this as the bench, although I tried to do a bit of one then put that away and a bit of another I seem to have all four out at once. It’s not bad just a little hectic. I kind of get to a point where all the kits need the spray booth. Then set it up and do that, then move on. Fun and a little scary. Any hop that’s about it for this one. I need to scratch some panels and make a single fuel tank next. 🤩 not sure how I’m going to do the decals as I didn’t get decal paper. 🤔 I have some letters and numbers so it might have to be a bit home brew and makeshift. 😱🤗🤭😳🥳 Thanks for popping by. Hope you’re enjoying the build or maybe all four. 😱😱😱😱. Take care gentle modelling folk. Johnny.14 points
-
Some mojo this morning so I eased myself back into some transfer application: All six of them. It's a start! Thanks Bill and Troy for the discussions on hurricanes - always pleased to see knowledge being shared; and absorbed. Simon ( @Beard ) thanks for the offer of the transfers. But I have a plan (of sorts) that I've been pondering. hendie I'm back, if only for a short spurt (careful!) Adrian I have an aversion to painting at the moment so I'm desperately trying to find an excuse to keep the scheme. A plan may emerge! And yes John, it may be Eau de Nil (aka Sky in my head, although I know that's not right). Johnny, Keith and CC - Tilly was delivered back yesterday (a trip to Tewkesbury where they had the flags out) and Mols is now resting after the busy 'parenting week'. All's well thanks and Mols says Woof 🐾 So, what's the plan? In my small Bob group on the ceiling I have Ian Gleed's LKoA that I built back in 2015: Deserves a wingman don't you think? Although I initially ignored the metal wing comments then I did, eventually, give in and order another kit. Now I'm dithering about the plan… Perhaps I'll take Keith's advice and just plough on through the storm with the kit transfers12 points
-
Westland Whirlwind Mk.1 - 263 Squadron RAF - 1941 Classic Airframes model with EduardPE (for Trumpeter), some scratch in whellbays, cockpit, full riveting. Invite...11 points
-
Here is my latest. Eduard`s old version of the 1/48 Fw190 with engine and gunbays. I additionally used their PE set 48556 for the engine and especially for the open cowling. As it turned out a lot of effort on the engine is wasted because nearly all of it is invisible. But I still prefer their old 190 to the new one. Fit of the parts including the engine is great, very little filler is required. I will keep one more of these in the stash, also the PE set 48556. This will not be the last 190 with its engine exposed. All comments welcome! Volker11 points
-
Undercarriage done: All done:11 points
-
I was asked to build this by Airfix Model World for this Octobers issue. A subject I wouldn't have chosen, but one I came to love and enjoy researching and building with the challenge of fixing a prototype plug and play system by Magic Scale Modelling. I'm happy with how it went and I hope you enjoy looking at it too. I won't spoil the article about the build... suffice to say it was very interesting to put together! Bravo to ICM for a cracking kit and Magic Scale Modelling for thier technology.10 points
-
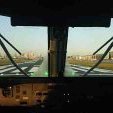
Lunchtime, though you wouldn't know it from the unvarying light levels outside. Supposed to be hedge-trimming but each time I stick my head out the back door, it starts to spit tiny bits of the Atlantic onto your head. Oh well, better stay inside for a bit longer and post this instead.... Mailbag first: I must admit that with professional retirement still over a decade away, the vast wealth that comes from running a small model company becomes an ever more desirable way to escape the rat-race Benedikt. I worry though that the cosmopolitan glamour of it all would change me as a person....😁 Obliged to you for that endorsement Crisp & Giorgio! (I figure if I can smuggle my mauled shapes past the the assembled expertise on here then it's in the ball-park accuracy wise...) Thanks Pete - and for the explanation that saves my blushes in not having to admit that I hadn't a clue what a donk was... I can't promise a T-shirt Bill but a err, 'donk' will certainly find its way into your clutches in due course. I'll have the Avon lady call to Streetly when it's ready! Mrs B has so far coldly rebuffed any suggestions that a coat of Alclad would transform the humble Avon into desirable costume jewellery.... Kind of you Alan. Might have to compromise and meet them halfway? Cheers Chris! I'd like to take a lot of credit for the rendering quality but the truth is that Fusion is set up so well in terms of basic materials design that designing the 'look' for a certain piece is really very easy indeed. With all the fastenings taken care of over the course of the week I wanted to get started today on adding the items of external equipment around the engine- much of it clustered around the compressor casing and outlet section immediately behind it. As on many occasions in this build I've had occasion to consult the excellent set of walkaround shots up on the Thunder & Lightnings site, such as this one from a series showing the engine in situ from above: Image credit: Damien Burke Particularly important about this sequence of shots is the way that they show you all the sundry pipework connections remaining in place as, despite the irreplaceable nature of the Navy Wings documentation for this build also, the lads in the hangar there are mad divils for a stripdown and have often pulled their pipes off before a camera appears. With one on either side, today's task was to start shaping-out the valves and outlets for the anti-icing system - those two silver mechanisms sitting out on top of the engine at the 11 and 1 o'clock positions, just in front of that arcing framework which divides the front and rear doors of the engine bay. The pipework for the port one supplies an anti-icing feed into the front engine manifold which (as James has already eruditely pointed out) in turn feeds the air into the system of vanes immediately in front of the compressor blades: this still from a Navy Wings' video rather nicely shows where the pipework feeds into the manifold (as well as directly below it the connection for the air starter feed): The corresponding pipework from the starboard valve can be seen in Damien's photo above to run across to port before turning parallel to the manifold feed and subsequenbtly entering the forward firewall in order to supply anti-icing and cabin pressurization into the forward section of the aircraft. Here then is my initial design for the port valve and actuator: Regrettably (due to their small size - 0.1mm⌀ or less - in terms of printing at this scale) I've had to leave off a lot of the bolts that detail the casings for these mechanisms. Despite their diminutive size, these parts took some considerable time to get right due the the variety of shapes and orientations regarding their placement upon curved surfaces and in relation to the pipework needing to run forwards at the correct angles in relation to surrounding structural elements. Eventually I was happy enough that this was as much as I'd get away with emerging from the print process for this mechanism, so the port version was mirrored over to form the starboard counterpart: I still have to keep reminding myself not to lose sight of the fact that in the case of regions like this engine (which clocks in from exhaust outlet to front lip at 45mm in length) there is a clear distinction between the amount of detail I can discern from reference images and that which will reproduce due to the pixel-based limit of the printing process. Before adding in the pipework for these sections, a number of other encrustations remain to be added around the circumference in various locations: oil cooler bleed valve igniter units fuel pump generator mounting That should keep me busy for the forseeable... Ordered a copy of this earlier from one of my favourite booksellers over in York: The papers included appear to be a series of immediately-postwar reflections upon design decisions in direct relation to operational and strategic need; that process whereby OR gives rise to actual 'things' in the world has long fascinated me and this looks set to be a learned 'dive' into naval concerns. If anyone ever discovers a book that examines in detail how and why camouflage colours are picked for various aircraft and vessels, please let me know! (Plenty of literature agreeing/disagreeing on what actual colours were used and brief paragraphs on development in various publications, but as far as I can find out, no critical historical survey of the processes and methodologies used in various countries to arrive at such distinct variations on the basis of OR and experiment has been published). And airships, I want to know what it was like walking inside the length of an airship during flight through a storm. What did it sound/feel/smell like? What does lunar regolith taste li-10 points
-
Slightly better pictures in RFI... Thanks for looking in, Adrian10 points
-
9 points
-
Hi Folks, This is the Trumpeter Fairey Firefly MkI, of 1770 Sqn, HMS Indefatigable, August 1945. I’ll give a rough rundown and provide some more thoughts below the photos. Airbrushed with Colourcoats it has resin wheel wells, wheels, radiator, prop and spinner and seat. Rockets and the fixings are from the Special Hobby Kit as are the decals. This represents the aircraft flown by Sub-Lt Maclaren and his observer W. Richard who carried out strikes over Honshu, in August 1945. On one particular flight they had a dust up with some flak causing large damage to the aircraft but they still made it back. Maclaren earned the DSC from this. The kit quite frankly is not worth the full price that some are charging for it. As I have said, I have replaced a lot with resin but there are still many things to be corrected: The kit comes with incorrect style of rockets, cannons, wheels are terrible, basic cockpit, incorrect rear cockpit, ghastly nose with a lack of intakes on the top. This gives the nose a long look which I sanded back a bit. No pitot, no mirrors, incorrect locstion of aerial mast, horrible riveting, canopy cannot be portrayed open, the elevators are bizarre and a pilot would be unable to use them if they were like that in real life. It needs the elevator horn attached to it as I have done. The rudder is portrayed as metal which is wrong and there is a lack of a trim tab. The addition of flaps is quite nice, however the Firefly has four flap settings and it would have been nice to have the landing flap setting which allows the flap to drop down and backwards providing a much larger wing area. I'm sure that people will know of many other faults in there. The long and the short of it is, go for Special Hobby and get one of their Fireflies. If you can get Trumpeters dirt cheap then give it a go, maybe! As an aside, I’d love to know what people make of the difference in TSS between the two kits. The SH firefly I did in Xtracrylics, compared to the Trumpeter in Colourcoats. Thanks for looking Nick9 points
-
Soko G2 GALEB 1/72 by AIR CAST & LIFT HERE - Resin SFR Yugoslavia , late 1980's, AF Academy. Stay Safe9 points
-
As promised a few minutes ago and to pacify a certain Member for Australia, here is what I have been up to today. I decided that, as this is an aircraft we are building, it ought to have some wings of some sort. I looked in the box and, lo and behold there were some wingy looking parts in it. I began by cementing the parts for the wheel bays in place. Interestingly enough, these parts were quite well detailed and although we will be adding a lot more detail to them, all they needed for now was for a few lightening holes to be drilled in them before they could be glued into the lower wing parts. The wing halves were then glued together. I then asked myself if I wanted tohave the flaps displayed in the lowered position or not and after a few minutes came to the obvious and predictable conclusion "Don't be silly Martian, of course you do". The Airfix representation of the structure of the rear part of the wings where the flaps hang from is woeful to say the least and this was duly eliminated. I have one set of Eduard etched flaps and may well use it on the TT18 but the sets are quite expensive and I decided to see what I might be able to do with a bit of elbow grease and some plastic card. As you can see, a start has been made on them and I am thinking that what has been done so far doesn't look too shabby. Making the riblets is a bit of a time consuming task so it might be a while before this area of the model is completed to my satisfaction. Watch this space as they say. Thanks for looking. Martian 👽 PS:Whatever happened to @NAVY870's Sea Venom build? 1/32 or 1/1 scale, either, or preferably both, will do.9 points
-
MIG 21 BIS - 1/48 Eduard - SFR Yugoslavia AF , 1980's , Željava/Bihać underground air base. Lift Here and custom laser printed decals. Stay safe.9 points
-
This is one of many aircraft developed during WW II that if the war had lasted longer may have gone onto glory, but as it was flew into obscurity. The F2G was a Corsair powered by an R-4360 engine replacing the R-2800 and with a bubble canopy. The R-4360 gave it a phenomenal rate of climb making it an ideal interceptor. Hundreds were ordered but only 10 were built. This was not a good kit and is a case of the good, the bad and the ugly. The good: It came with a very nice resin interior that fit perfect;y The decals were great and a pleasure to work with The bad: Fit was generally bad with a huge wing to fuselage gap The casting was rather crude with much flash, huge pores and large towers where the separator pins were. The wheel wells were separate resin pars that required a lot of grinding to remove the excess pores and to get then to fit. The kit comes with a very nice resin R-2800! This is strange since the whole reason for being of the F2G was the R-4360. And you can't really fake it because the R-2800 was 2 rows of 9 while the R-4360 was 4 rows of 7 cylinders. After much searching I was able to find the OOP Engines and Things R-4360. The ugly: The vac canopy. For a vac canopy the detail was good and it had clear lines where to cut that made removing it from the sheet easy, and there were 2 of them. But they were badly yellowed I was able to get replacement ones made by Kevin Martin over at Hyperscale But because of the process of duplication they lost a lot of detail, including the cutting guides. He gave me 4 which was good because it took my that many to get one that was usable. I am hoping this kit was not indicative of other Special Hobby kit because I still have several more in the stash. So after all that, here it is Next up is the newly released Sword TBM-2S2 Enjoy8 points
-
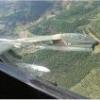
As threatened...when Dennis excellently proposed his ANZAC GB a while back...here is a sort of 'appetizer,' Glencoe's (ex-Hawk) 1/96 Vickers Viscount 720, in what has to be my all-time-favorite airline livery, the famous 'Flying Roo' of Trans Australia Airlines (TAA). TAA was the first non-European operator of the Viscount, introducing the revolutionary turbo-prop design into service -- to wide acclaim -- in 1954. 'My' aircraft, which was acquired new by the airline in 1955, is shown as in 1967...newly repainted after being returned to the line following a long-term lease to 'rival' airline Ansett-ANA. This second stint with TAA would last only six months, before the now-aging airframe would be sold on to a broker and returned to the UK. The old moldings have held up quite well, showing overall excellent fit and little flash. Interior is non-existent...so since I intended to display mine with the aft passenger door open, I did a minimal interior of cabin floor, seat shapes (HO scale model RR seats, cut in sections as necessary), and a few bulkheads to suggest cloakroom space and a loo. Externally, the build was OOB except for a few cosmetic additions: wing-tip nav lights, fuselage aerial fit, and wipers and a de-icer nozzle for the windscreen. Decals were drawn up in MS-Paint, sized in Open Office, and printed out on my trusty (and long-serving) HP inkjet printer. And now, our lovely stewardess Sheila...in period-correct white gloves, no less [when was the last time you saw those on a flight attendant?]...stands ready to assist you in boarding. Enjoy your flight! A whimsical side-note: The kit included the boarding-stairs and (4) figures: captain and stewardess, and one male and one female passenger. 'Our lovely stewardess Sheila' is either a fine strapping lass of truly Amazonian proportions -- seemingly unlikely, especially for '50s-'60s flight crew -- or somewhat out-of-scale: positioned at the top of the stairs...where I originally had her stationed for her photo-op...she was literally head-and-shoulders above the top of the passenger door: But with a little 'change of perspective'...you hardly even notice.8 points
-
Although tanks and crawler armored vehicles can move well on any terrain, but on civil roads, the tracks of tanks can cause major road damage. In addition, letting the tank move on its own over long distances causes unnecessary fuel consumption. And of course, with tanks that cannot move on their own due to malfunction, a means of transport is necessary. Therefore, using a tank tank is the best solution. Maz 537 was built in the 1960s by the truck company MAZ, is the oldest tanker still operating widely in the world. Although built for a long time, it is still capable of transporting modern main battle tanks of Russia. In Viet Nam. Maz 537 is also a standard tank tanker of the Vietnam Army. About the model, This Trumpeter's kit is good quality, snug fit and have many very detailed PE parts Thanks for watch !8 points
-
More struttery, using brass stock slotted into deep recesses in the hollow top wing and resting in shallower slots in the solid lower wing, secured with small amounts of CA gel. First one side: ...and then the other: The joints will need a bit of a cleanup and I'll probably use dots of Formula 560 to fill the gaps where the slots are very slightly larger than the strut. For now, though, I don't mind admitting that I'm quietly chuffed with how this is looking! Jon8 points
-
Well, some plastic worrying has been taking place. Indeed, in just under seven weeks, not only have we covered much of the model in white styrene but had lengthy debates on such weighty matters as sheep rustling/worrying, how many Australians became Australians, the genealogy of many Britmodellers and the recipe for Baldrick's punch. Good value for such a short time methinks. Polymath of Mars 👽8 points
-
The slot in the cabin floor is just a device to clear the tongue of the stand atavism: If you are not using it (does anyone ever?) you may fill it and restore the surface:8 points
-
Hi All, Here's the ancient Tamiya kit which is pretty cheap but as is often the case it's not that cheap when you've had to add gun barrels and PE Kit which i did. It probably also needs resin wheels and aftermarket tracks but then its not a cheap kit anymore... The ammo trailer was good value though with 2 in the kit for about £10. Everybody builds this with the sides down so i thought I'd show it in transit rather than fighting. Easy to build with a couple of screws and metal axles to add to the fun. Usual C&C welcome Cheers David7 points
-
The only way to pull off a lockdown afternoon 'quickie' with their 8-year-old son in the flat was to send him out on the balcony with a Mars Bar and tell him to report on all the street activities. He began his commentary as his parents put their plan into operation: 'There's a car being towed from the car park,' he shouted. 'An ambulance just drove by!' 'Looks like the Andersons have company,' he called out. 'Matt's out on his bike and his mum is telling him off' 'Looks as if the Sanders are going into full isolation!' 'Jason has had his skate board taken off him!' After a few moments he announced, 'The Coopers are having sex!!' Startled, his mum and dad shot up in bed! Dad cautiously called out, 'How do you know they're having sex?' 'Jimmy Cooper is standing on his balcony with a Mars Bar.'7 points
-
Don't come just yet, guys. Our borders are closed and we haven't had a case for over 100 days. We are living in a bubble of normality here. When you do come the museum kettle is always on!7 points
-
A recent completion is Sava-M Models' 1/72nd scale Gulfstream 500 "J-Star" which is used by the USAF as a surveillance platform. Quite a nice kit, built straight from the box. Xtracolor enamels used throughout. Regards, Rob7 points
-
Hi mates, Let's see, this year I've built one resin model and I'm soon to finish another. So why not grab a third resin kit from the stash and stick to my theme? After all, 2020 is a goofy year no matter how you slice it, so I might as well swear off injection moulded styrene - resin rules! And maybe, just maybe, all that resin dust will nuke the bioaerosols floating around from that coronavirus thing. So here is what I found lurking in one of my cabinets: the S.B.S Model kit of the de Havilland DH.88 Comet in glorious teeny tiny scale (1:72). I don't know much about this aircraft, but I'm sure you folks will educate me. Now, way back when this kit came out, @general melchett mentioned that it had some of the finest resin castings he had seen, and darn if he's not right. This is a sweet little kit. As can be seen on the box, you have two choices for the paint and marking scheme - red (G-ACSS) or green (G-ACSR). Both of these flew in the 1934 MacRobertson UK to Australia Race, and I seem to recall there was a black one as well. I rather fancy the red one myself, it being the winner of the race and all. Although the green one reminds me of a Lotus, and it has the Union Jack on the tail... The parts breakdown is conventional, and the detail is exquisite. This is 1:72, so the fuselage is a mere 4.5 inches long or so. The engine nacelles and wings are one piece castings. The fuselage-wing fairing is a separate piece, which is a feature that I really like. The Aki Products Sea Fury that I built last year is engineered this same way. The remainder of the parts are all nicely cast and detailed, although there aren't a lot of them. In addition, S.B.S provide a small photoetch fret with the usual seat harnesses and instrument panel (with film instruments) and white metal landing gear struts. The canopy is cast in clear resin, and the model has provision for mounting it open (it's hinged on the starboard side in real life). The other clear resin part in the photo is the tip of the nose. I'm guessing this was a light? Well, that's all there is to it. At my current rate of completion it should only take me about a year to build it! Luckily, this aircraft still exists so there are lots of photos out on the Interweb thing. The last I read it was part of the Shuttleworth Collection, and I think that's reason enough for me to return to Old Blighty for additional research. I'll need @CedB as my chauffeur again, otherwise I may not be able to find which pubs have Doom Bar on draught. I think he has them all committed to memory. Cheers, Bill PS. I wonder if I can find a 1:72 scale typewriter somewhere...6 points
-
Good evening guys, new summer, different work place, a bit difficult times with this new virus. Well i try to overcome with my favourite hobby with new subject, this time a jet one from the cold era, the very good revell 1/48th scale F-86D. First of all ihave to thank a member here in the forums, Duncan a.k.a. ''Sabrejet''. for his valueable help, explaning details, providing info and clarifiying things regarding this beautiful aircraft and my build specifically. I was going to build this model OOB in order to test an approach to Bare Metal Finish, but...... Here is the profile i want to build, is one provided with the kit... which in fact is a F-86D-35. Revell provides an instrument panel correct only for models D-1 to D-5. So i turned to eduard and i was lucky enough to find the aftermarket Also i needed new wheels, different rim pattern on my profile for the nose wheel and of course better detailed...eduard again... And i always prefer the resin seats to the plastic ones, so i got a true details one... So much for the OOB build, hahahaha Anyway, cockpit first...be aware that the kit provides the seat frame with the catapult triggers up, in fact untill D-35 models there was only one trigger to the right. That means that the seat has entered into the ejection sequence which is wrong. A minor detail of course, only for rivet counters hahaha. I added some levers and painted the cockpit carefully and it really turned out very beautiful i think. Good thing that eduard provides the instrument panel unpainted, i never liked the painted ones, bad thing that it does not provide a painted film for the instruments. Instead it provides a printed one, so i added a thin transparent film to the sandwich! I added some stencils, as you can see, to the fuselage sides and i glued the two halves. I am happy to report that if you are careful with the gluing procedure you are going to need no filler!! I cut off the plastic portion of the dashbord and added a PE one from eduard. Here i painted from the inside the anticollision light, added chrome and i glued it on the fuselage as, according to Duncan, this is a clear panel!! Here i dealt with the wheels and the rocket launcer I glued the wings, flaps, slats, pylons and masked and painted the wheel wells... and last for this post, the canopy, i tried to enhance it masked and painted inside... Thats all for now lads, hope you like it, open to any comment, remark etc!! John6 points
-
Apparently not a lot.... Good tip. I've used the the AK rust effect colors throughout. The Tamiya bud proved useful on the light rust staining. Like minds..... I've increased the small stains along the hull and used further colours on the existing stains. Anchors added to give context to bow area staining. Oil tide mark (collected in port) added to the waterline. For those not of a nautical disposition the patches of red in the peeled areas is red lead a popular primer, not rust. Looking at this the rust patch back from the anchor needs reworking Last view from a U boat?? Any further rust/staining will be left until the deck is in place so I can see where the natural run offs are Stay safe Kev6 points
-
i think this is where I stop for now. The cement holding the wings and stabs needs to set nice and hard before I tackle filling and sanding. I remembered the fin aerial pole, which is a bit of 0.5mm brass wire which just needs trimming to length once the glue has set. It probably makes sense to now turn my attention to the Fulmar.6 points
-
Hi friends, before finish the paint on the T29, i prefere to finish the figs6 points
-
That's a truth well told !! I woncer if @general melchett 's ancestors, or even himself have'nt discovered the way to travel in time... As I find this... Easy to become a Dux Bellorum with such tools... Poor orange moving hedges... CC6 points
-
That is in fact progress for a Martian thread Steve.6 points
-
I'm concerned that this thread may be unable to progress. It appears few of the participants have both oars in the water 😈6 points
-
The cockpit was given seat belts and an additional small panel on the console with three instruments seen in photos, most likely engine instruments. Work on the nacelles continues as more detail is added following photos. The white channels are the shrouds the exhausts need for this variant, made of course of split thinned tube. There were sets of louvers at the back that will be added after painting in the form of Archer printed resin decals:6 points
-
I suspect that A familly history of the Melchett line would be one of the most interesting books of our time. However, I also suspect that it would also become one of the most quickly banned of our time to avoid mass public trauma. They were lucky, the usual penalty for treason was to be hanged until you were half dead, revived, your bowels removed from you while still living and you body quartered, the four quaters to be publicly displayed at the monarch's pleasure. I think that being Visigoths might be considered by many to have been a bad start! Now that is definitely an own goal! I had not considered Mach2 kits as part of the punishment regime. Trouble is that you colonial types would start complaining and quote your constitution that it was a "cruel and unusual" punishment. Martian 👽6 points
-
This will be my project. It will be 1/48 based on the ICM kit.5 points
-
Some road cars from our favourite Fiat subsidiary. Dino 246 GT, not a "real" Ferrari I know, but when a car looks this good, who cares what the badge says. This was built from an AMR kit, it was a birthday present for my dad, hence the base and plaque. 288 GTO, the first of the mad modern Ferraris and the ancestor of the F40, the kit was an old HiFi models and it was a pig to build, none of the vac forms fitted at all. 360 CS - the lightened, track focused version of the Modena, from a BBR kit with all the ease of assembly you'd expect from them. Finally an F430, built from an M.R. kit, part of their open and close range with hinged doors, bonnet and boot a little tricky to assemble, but beautifully engineered, it's a real shame that they don't sell these any more. Not pictured, the 2 F40s, 250 GTO, Dino 246 GTS and Enzo still languishing in the stash. Plenty more to come, but I don't want to be the guy who floods the forum with posts in his first 2 days. Thanks for looking, hope you like the photos. Rab.5 points
-
Well, the stickers were a bust. Too big for the panels, thick, not very sticky and quite pixelated. I painted the panels in hull red, sky grey and desert yellow with a tiny brush and much holding of breath. Also, the cockpit windows and the view windows top and bottom centre were painted. Weathering next... Dean5 points
-
5 points
-
New Block looks OK Next set batched up, I'm going for the things I haven't printed before, like injectors and corrected plenums I've learnt to modify the drawing for print, for example, the plenums I've added an inset .2mm sacrificial step so when I get elephant foot on the bottom layer I can just sand it away and the step gives me the correct amount to remove. That's the theory anyway, I'll tell you if it worked in about 3 hours! Regards, Nick5 points
-
I bought this kit more than fifteen years ago, and finally I started it this summer - and managed to finish it too! This is a strange kit. It is based on the old - but still very good - FB.VI. from 1977, with new body, upper wings, engines and canopy added in the 90s or early 00s. This is not a sprue shot, but the parts that were left over after the build... Most is OOB, since very little would be seen through the thick canopy, I did not spend a lot of work on the interior. Fit was acceptable - not like the Tamiya Mossie, but still rather OK. Propellers and spinners are from a Tamiya kit, and all decals (apart from a few stencils) are from my spares box. I used Xtracrylics PRU Blue. I must say that the old 70s parts (like the wheels and landing gear below) were better than those from the 90s (engines below). The latter were more crude and had a bit too deep panel lines. I didn't do too much weathering, the PR.XVI's I have seen on pictures didn't seem to be too weathered. Of course, the model had its shortcomings. But still, a fun build, and the beautiful Mosquito looks great in this colour scheme! Thanks for watching!5 points
-
More painting and touch-ups ensue:5 points
-
Hi Greg, There is one big difference. You have multiple builds ongoing and I am exercising my normal principle of just working on one at a time. I am getting close to starting the Eduard Spitfire. Up early this morning and put on a few decals. Cartograf, heavy base large coffee mug (Ikea), warm water, Mr Mark Setter and Mr Mark Softer. Sucking down nicely. Ray5 points
-
I managed to find some time to do some more on this build today. I began work on building up the detail on the parts of the fuselage that were fabric covered. The method of building up the stringers is essentially the same as that used for the ribs on the flying surfaces. We are now at the stage where I am waiting for the glue to set before rubbing the stringers back. I will then paint another coat of liquid cement over them to seal things in. Thanks for looking. Martian 👽5 points


This leaderboard is set to London/GMT+01:00