
Leaderboard


Popular Content
Showing content with the highest reputation on 23/08/20 in all areas
-
Hello all, after putting my Tu-126 Moss up for viewing some members kindly said they would like to see some more of my big Russian builds. So, thanks and here goes. This is my 1/72 Amodel Tu-134 built as a military SH(Ш) variant. I’ve always liked the look of this aircraft and when I came across the scheme with the big red star on the tail it just had to be done, The majority of the build was from the box, plus a few changes to make it into a crew trainer. The larger radome was made from Milliput filled and sanded to shape on the fuselage. The sensors on the top rear were also Milliput with Little Lenses on top. The bomb racks were from the spares box and their mounts were scratch built. All the stripes are sprayed with the stars and numbers from the Begamot sheet and spares stash. Hope you like it. Cheers Pete The Inspiration Thanks for looking, Pete37 points
-
Here are some shots of the final product. Photos are not the best, but I did what I could with the resources I had!29 points
-
FW-190F-8 | Airfix | 1/72 SG 10, Luftwaffe, Ceske Budejovice, Czechoslovakia, May 1945 I finished this on 8/21/2020. It was really a manic-depressive build! I purchased the Airfix FW-190A-8 kit after a string of delightful experiences with Airfix kits (including the F-86, Typhoon and P-40C). The scheme they included didn't thrill me, and then I read later about the difficulties with this kit (which I won't go into here). Consequently, I lost interest and it was pushed to the back of the stash closet, likely never to be built. Recently, I was thinking it would be nice to have a A-8 in the display case and thought that maybe a late war A-8 with an RLM 81/82/76 scheme would be nice. A quick internet search led me to Aeromaster's "Defending the Reich Part 3" decals which had a scheme that I just loved: black 6 of SG 10 (Although Aeromaster said it was "Wr. Nr. and unit unknown") . Internet searching turned up no pictures, profiles or models of such an FW-190A-8 (more on that later), so I went my merry way. Everything went well until painting. Hataka (whose paints I've really loved so far) had renditions of RLM 81 and 82 that were lime green and purple resulting in an airplane that looked like something the Joker from Batman would fly! So, I asked for some help in this thread: The thread resulted in a lively discussion which taught me a lot and allowed me to fix the colors to something more believable. It was in this thread that some very helpful folks found pictures of my Black 6 -- the reason why I couldn't find information on it is because it was an F-8, not an A-8! Once I used those search terms I found quite a bit of information, including that Revell released a model of Black 6 not long ago. The other problem is that the paint scheme on the a/c in the picture was clearly not what Aeromaster had in their profile! I did some soul-searching because I hate doing things wrong when I have evidence in hand. I wanted to keep the paint job because it looked great. I decided to at least convert it to an F-8, so at least that part would be correct. I dug most of the parts I needed out of an Eduard FW-190A-5 in the stash and ordered AML models resin ETC50 bomb racks. At this point I started an WIP. @SafetyDad recognized I was struggling with the authenticity of my build and suggest that I do "Black 9", which there is no documentation of, but could've existed and would be representative of the kinds of paint schemes being applied at the unit level at the time (the pictures of the SG 10 aircraft showed they all had different paint schemes). So this was the approach I took. I really have to thank a number of folks that helped me out, both with the paint and the build: @SafetyDad, @Werdna, @dogsbody, @Wulfman, @Jamie @ Sovereign Hobbies, @Tail-Dragon, @klr and hopefully I didn't leave anyone off. Sorry for the long-winded RFI, but it was such a saga and I had to share... Paint: 1 part Hataka RLM 81 (Braunviolett) to 1 part Hataka RLM 79b (Medium brown) / 2 parts Hataka RLM 82 (light green) to 1 part Hataka RLM 79b (Medium Brown) uppers > Hataka RLM 76 Decals: Stencils from Airfix kit > other decals from Aeromaster's "Defending the Reich Part 3" Aftermarket: True Details wheels > AML Resin ETC 50 Bomb racks Other: Centerline bomb rack and bomb, armored headrest support, and loop antenna from Eduard FW-190A-5 kit. Although I found German bombs to go on these racks, the detail was so incredible, I decided to leave them empty. I broke off and lost 2 sway braces that I fabricated some replacements for. The exterior detail of the Airfix kit is quite nice with the exception of the wheels. The wheel detail is terribly soft and I highly recommend replacement wheels. I used the True Details wheels and they are beautiful! Plus, they are weighted! Thanks for looking! Questions, comments and constructive criticism always welcome!24 points
-
Morning folk's after a couple of years now building mostly golden oldie's I thought it time to get out the airbrush and embark on a series of build's with more modern offering's covering my favourite US Navy aircraft in the classic Gray/White period of their service.First up is Airfix's Skyhawk a cracking little kit it is too,I broke up the upper surface gray a little with a few passes of the airbrush in a lighter then ran a dark gray wash into the panel's,this first one a practice piece for what's to follow which will be the Panther,Cougar,Fury,Prowler and Intruder and hopefully Tiger.As always many thanks for looking in.21 points
-
In the year 1982 to mark the golden jubilee of the Indian air force nine hawker hunter from the 20th Squadron was painted in special paint dark blue and white, which look like thunderbolts. The aerobatic team didn't last very long and retired in the 1990s and hunter retired from IAF a few years later. For my project I use Revell Hawker hunter, good kit but I almost give up midway as the front canopy while masking fell down from my finger and took forever to find it, only to very closed to you and me looking at the wrong place, masking was a tedious work two days to do it, however, am quite happy with the final results, so here it is. Thank you for looking, cheers.18 points
-
Another model has reached escape velocity from my project thread The Fairey Delta 3 or Fairey Large was a proposal which came fairly close to being ordered as an interceptor for the RAF to the F.155 requirement but sadly wasn’t to be. Drawn up in Fusion 360. 3D printed (FDM printed in PLA plastic on a Creality Ender 3 Pro) and finished as per a normal kit plane with conventional fillers, paints and decals. Not as nice a finish as you’d get from a resin printer but good enough to get a sense of the size and shape of it. I’ll refine this and do another better version in due course.17 points
-
I finished my kitbash of Hasegawa's B-24D and Minicraft's B-24M to build B-24H 42-7650 which made a crash landing in the occupied Netherlands on November 13th, 1943. Build thread here: Apart from a few accuracy issues the Hasegawa kit is great. Minicraft is a bit more crude, but not so much worse to justify the price difference in my opinion so if you want to build a B-24D or J the older and cheaper Minicraft kit is a very good option. The Minicraft nose does fit the Hasegawa fuselage - but modifications are necessary. The Minicraft nose is slimmer than the Hasegawa fuselage at the bottom, so after attaching it I needed to sand down the Hasegawa fuselage sides a bit to make the nose flush. What I'm most happy about is that I now have a fairly rare and fairly accurate B-24H. Aftermarket used: Eduard PE sets, Eduard resin wheels, turbo super chargers, and bomb bay doors, brass barrels. Painted with Mig Ammo acrylics. Kept the weathering to a minimum because the aircraft was new when it was lost. Figures are old Airfix USAAF crew and the ambulance is from Academy. Comments and feedback is welcome as always. Thanks for looking!17 points
-
Originally designed as a half scale model of a planned jet airliner it became apparent during the design phase that the layout was unsuitable and but it continued as research a/c for investigating the characteristics of swept wings. Three were built. The first used a Vampire front fuselage and was used for low speed research. It crashed after spinning at low altitude. The second was used for high speed work but crashed whist practising for an attempt on the world speed record. The third, modelled here, had a modified fuselage having a more pointed nose and a lowered, more streamlined, canopy. It first flew in July 1947 and in September 1948 became the first British a/c to exceed the speed of sound, although completely out of control at the time! It was passed to the RAE in November 1949 for further research but crashed in September 1950 for reasons unknown but believed to be pilot incapacitation due to lack of oxygen. I once heard Eric Brown describe it as the most dangerous aircraft that he had flown. This resin kit was produced by Planet models and went together fairly easily. There are three basic components, the upper and lower halves of the wing/fuselage and the rudder, all nicely moulded and free from pinholes. The most notable problem being the fit of the upper front fuselage – it doesn’t and requires filler to correct a large gap between the front portions ahead of the canopy. I realised later that I should have spent some time thinning the rear sections of the wing to produce a sharper trailing edge. The kit is supplied with two vacform canopies. Unfortunately there is a flaw in that the frame which runs down the centre of the forward section is not quite in the centre. I had to trim the top of the pilot's seat to stop it fouling the canopy.. Not a big deal as it is hardly visible. One final problem appeared whilst fitting the u/c. The a/c sits slightly nose up and the model does not. It is partly due to the mainwheels being oversize, compared to Barrie Hygates drawing, and something else which I could not work out. I ended up shortening the legs to get it to look right. In fact the original legs looked far too long to retract into the wells whereas the shorter legs look to be about the right length. The finish is Alclad Airframe Aluminium over gloss black enamel followed by a light coat of Alclad Aluminium to reduce the shine. John Whilst putting it in the display cabinet I was reminded that I had seen that wing planform before... I had always thought of the 108 as being small but, as a half-scale model of the proposed DH 106 it had a span of 39ft (about 12m) Compare it with its American equivalent the Northrop X-416 points
-
The markings are for "The Carolina Belle," flow by Cpt. Ernie Harris of the 8th FS/49th FG. Cpt. Harris was a rare breed in that he was one of the few double aces in the P-40, having 10 confirmed victories and an additional unconfirmed one. He was also highly thought of as the squadron commander. Remains of this aircraft were recovered in 1997 at Finschhafen Airfield in New Guinea, after it had been stripped of usable parts and bulldozed in the earth during the war. Sadly, the plane survived longer that its pilot, Cpt. Harris being killed in a jet fighter crash while serving in Germany in 1949. For anyone interested, some semblance of a build thread can be found here: http://www.p40warhawk.com/smf/index.php?topic=376.0 As always, thanks for looking and comments and constructive criticism are welcome. Cheers, Mark15 points
-
Hi all, Originally destined for commission into RAF service as a Fortress Mk.II of Coastal Command (to compliment my Mk.III build) and having already purchased a Kit World decal sheet for the privilege, the build didn't quite go as planned. Having rectified the dihedral issue with the Academy tool and subsequently using a large amount of filler on the fuselage, I regrettably decided that the finish was not pristine enough for a white base coat, which in my experience is a difficult enough challenge to get right as it is... so built out of the box using kit decals and unmodified. After a number of other issues which varied from wrong fuselage colours, frosting of the gloss coat and further frosting of Tamiya Flat Clear (never happened before) which almost resulted on the model being binned countless times, I decided with an impending career change and likely one of my last builds for a while, that I had spent too long on it to give up; it ended up as a decent result. There are 2 things that I dislike about this build. The first is a soft white edge around the glazing when the masks are removed which is Halfords Primer. I don't understand why this is left over as the glazing is sprayed black before primer and then followed by a base coat on top? Also with the excessive sanding, some of the windows have filler dust on the insides which can be seen on the 3rd picture on the top windows. Displayed below on a Noys Minatures 1/72 WWII airfield base from Hannants, some items from the Airfix Bomber Resupply set and IBG's very nice Scammel Heavy Recovery vehicle to add a touch of American. As always, thanks for looking.15 points
-
Morning all, After a little break I've been back at the bench recently and have completed build number 17 for the year, Tamiya's superb 1/72 F4U-1D Corsair, finished as a Royal Navy Mk IV using markings from an Xtradecal sheet. Paints as usual are Hataka Orange Line. Made a bit of a mess of the canopy, and it may not be 100% accurate for a FAA Corsair, but it was at least good practice in clipping the wings for future FAA builds. Tamiya 1/72 Vought Corsair IV by Shaun Schofield, on Flickr Tamiya 1/72 Vought Corsair IV by Shaun Schofield, on Flickr Tamiya 1/72 Vought Corsair IV by Shaun Schofield, on Flickr Tamiya 1/72 Vought Corsair IV by Shaun Schofield, on Flickr Thanks for looking, comments welcomed as ever Shaun14 points
-
A 1/48th Monogram F-15A Eagle painted in the very early and short lived air superiority blue colour scheme. Humbrol enamel paints applied with an airbrush, decals by Caracal models. The kit dates back to 1979. I have always wanted to build an F-15 in this scheme and despite a few small mistakes I am very happy with the result. 20200819_141334 by Ghostbase, on Flickr The story behind this bird is interesting. She was F-15A serial 71-0284 and she was the fifth full scale development Eagle. She was used for armament development including the rotary cannon and when her test career ended she became an instructional airframe. She was photographed in these markings at an airshow (possibly Sheppard AFB, TX, date unknown) with "City of Iowa Park" nose art. Her FF code stands for 'First Fighter' for the then 1st Tactical Fighter Wing based at Langley. How she kept her blue colour scheme is unknown but it was very unusual and it certainly adds some interest to this model. 20200819_141449 by Ghostbase, on Flickr I used Humbrol 47 which is enamel gloss sea blue as that looked to me to be the nearest to air superiority blue in their range. I would say that it is just a tad darker and 'richer' than FS35450 however for some reason the camera on my phone has processed the photos to a lighter shade! I do have the Hataka acrylic Air Superiority Blue (HTK-A155) in my paint stash but I am really struggling with acrylics at the moment and just wanted an easy paint without my airbrush clogging up after 60 seconds. This coat went on well and just one application too. 20200819_141509 by Ghostbase, on Flickr I must also mention how impressed I was with the kit. It was first released in 1979 and it went together very well, I only needed a little filler where the nose section slots into the main fuselage. I did like the detail around the cockpit and also the radar as well as the open air brake and I think they really add to the model. Yes, it is raised panel lines and for this build I was comfortable with that. 20200819_141756 by Ghostbase, on Flickr This is the first time that I have used Caracal decals and I am very impressed, they were really easy to apply and they make an average model look good! These were from their F-15 "The Early Years" set and I am building a second F-15A using this set as well. 20200819_141808 by Ghostbase, on Flickr Apologies for the rather makeshift photo studio but these were taken at my alternate man cave! 😊 This build really has helped get my mojo back. Michael13 points
-
Here a few photos of my home-conversion of the proposed Naval variant of Lockheed’s F-117. The kit is based on the old and not so correct 1/72 kit from Revell. The build progress is shared here: https://www.britmodeller.com/forums/index.php?/topic/235073231-f-117n/ I finished the model in a hypothetical colour scheme based on the current F-35. The concept drawings show the aircraft in the US Naval typical Ghost Grey schemes, but I felt a darker tone is more appropriate for the Nighthawk. The squadron I chose for the aircraft was the now defunct Intruder squadron, VA-185 “Nighthawks”… Comments and criticism welcome J R11 points
-
Here for your viewing pleasure is my attempt at the Olimp Avro 707A. After trials in the UK, during which the original straight wing was modified to have a kinked leading edge, WD280 was shipped to Australia to undertake low speed airflow trials. To visualise the airflow, it appears she had her port wing painted black, and then a white coating was applied which would wash off with when a liquid was released at the leading edge. This is my second Olimp 707, the other being the B version. Both kits are quite nice in shape (to my eye) and the fit is not too bad. However, they have an incorrect main undercarriage leg shape which meant I had to fabricate my own, which I did using metal rod/tube. I also partially replaced the nose leg in the same way. To finish, I scratch-built some intake guards to disguise the rather shallow ducting provided. Thanks for looking! Mike11 points
-
Good Afternoon. My lastest completed model. The kit goes together very well (typical Tamiya). Decided to try and save display space by getting the Aires wingfold Photo etch Set. This meant I started the building by cutting the wings in half (this could have meant that the start of the build was also the end, but luckily it worked out well) I added a resin seat which was very nice and a resin canopy mechanism cover from Quickboost which can be seen through the sliding canopy. I was worried about the decals as they were quite old and I have not had much luck with Tamiya decals in the past. They went down a treat and I was very pleased with the result. I made a mistake putting the wrong aircraft codes on the top wing. By the point I realised, I couldnt remove the decal without damaging the paint finish. Figured as it was folded, it might not be too obvious. My favourite skyraider colour scheme. 20200823_170140 by Richard Page, on Flickr 20200823_170209 by Richard Page, on Flickr 20200823_170230 by Richard Page, on Flickr 20200823_165126 by Richard Page, on Flickr 20200823_165213 by Richard Page, on Flickr 20200823_165313 by Richard Page, on Flickr 20200823_165332 by Richard Page, on Flickr 20200823_165342 by Richard Page, on Flickr 20200823_165353 by Richard Page, on Flickr 20200823_165408 by Richard Page, on Flickr 20200823_165414 by Richard Page, on Flickr 20200823_170339 by Richard Page, on Flickr 20200823_170423 by Richard Page, on Flickr11 points
-
May I present my latest build, Tamiya's new tool Spitfire Mk.1 displayed as N3290 as piloted by F/O John Gillies. This aircraft was shot down near Boulogne on the 23rd May 1940 with Gillies being captured alongside S/L Roger Bushell who was also shot down in the engagement. As plenty of others have mentioned the fit of the kit was very good, I only had a slight issue when attaching the front part of the canopy which had a slight overhang on the starboard side. I also struggled to attach the armoured windscreen cleanly which unfortunately has a smear mark where you can see the Kristel Clear. Apart from that an enjoyable build. All painted with Tamiya paints, I used Marty Sandford's dark earth mix 4:XF-52, 2:XF-3, 1:XF-51, 1:XF-2. and dark green straight out of the pot. I had done some pre-shading and mottling but this has largely been hidden, so after the flory wash I used oils to add shading and some slight weathering. I also got carried away with my masking and painted an extra walk line on the starboard wing so sorry to you Spit enthusiasts! I also wasn't sure if the underside of the stabilisers should have been aluminium or black and white- my brief research seemed a bit inconclusive so I went for the black and white. Really pleased with how its turned out, I especially like the style of the fuselage roundels with the small red circle which really makes the white part jump. Looks the part next to the 109 and Hurricane. Eduards Fw-109 A4 next. And a bit of fun:11 points
-
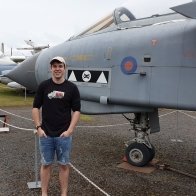
This is the Kitty Hawk 1/48 Jaguar GR1. The kit has a bit of a reputation for being a hand full. It has plenty of detail and in my opinion it is the best Jaguar in 1/48 scale. It doesn't come easy though! It is certainly buildable, however it does need a fair bit of work. To start with the instructions aren't great. I had whole sections missing, wrong part numbers and generally pretty difficult to follow. The fit can be poor in areas, there is a good bit of filler all over this one. A a lot of the panels needed work to get them to line up. Locating holes were the wrong size and had to be drilled out, parts were the wrong size and didn't fit and the weapons were quite simply just wrong. It didn't come with wing fences so I had to scratch build them. Even with all these things to tackle it actually wasn't too bad a build. I really wanted a Jag in the collection, maybe that's what carried me through. I wouldn't recommend attempting it if you are just new to the hobby, however if you want a bit of a challenge and a build which may take a bit longer than the usual Airfix or Tamiya then give it a bash. Thanks for looking and please leave any comments or questions that you may have!11 points
-
Thanks folks & good afternoon 😊 It’s been a while since an update, simply because I have had to reconfigure our house and move my office / workshop to a smaller room to give what I had snagged as the biggest room in the house as a family room as my eldest daughter is expecting and I am to be a Grandad! They don’t live with us (thank God!), but we will need more space for entertaining so I moved lock, stock & barrel into the old Lounge – also bought a display cabinet I had my eye on as part of the bribe… ..but I have now picked up the tools again, and actually reskinned the wings once I got more accurate images on the patterns from Arthur Bentley… like this one.. ..this meant lots of work in coreldraw to interpret these into scale drawings I could use… ..from these drawings I can create the panels.. Here the printout is stuck to litho and an awl used to make each rivet – coreldraw tells me there are 3712 in the wing so far, so it is tedious stuff.. ..next, the panel is cleaned and burnished flat.. ..then broken away and cleaned up.. ..things don’t always go well… here I was about 300 rivets into a panel before I went straight through it as I went over the edge of the cutting board.. ..I thought that panel may overlap others like some of the other panels, but it seems it is flush where it meets the leading edge.. ..and the wing skinning so far.. ..slowly getting there.. TTFN Peter11 points
-
Hey guys. Not much model time this week but what there was has been spent here. I had planned on starting the Batcopter but I decided to carry on with the Mash one for now. Paving the way as it were. It seems like there are a few changes to the kit in the mash one and although the bat copter has massive bat wings the changes are in fact fewer. 🤪 Shall we begin?🤩 there were some pin marks in the rear of the office I had missed so they got fixed. Next up, the skids. “Skids”? There are two sets? One is curved and not called for on any of the builds. Not even the bat copter. 😯 Any way. They are a bit tricky to say the least to glue but I found this was a good way. Blu tac to the rescue. I found that I could Jimmy the tac around and get a good fit then dot a little TET in place and voila. 🤩 I’m going to try and focus on my inner @perdu while I scratch build the stretchers. 😇 Can you smell paint? the base bits got put on sticks. And primed. While that dried I had a 1:1 scale model of a shed to construct in the garden. It was donated for free by a friend. 🤩 a blast with a pressure washer. (My new favourite thing) and here are the parts. If only all kits were this easy. 🤣 It’s just a utility shed popped in the corner. That’s where the veg patch was over lockdown. Shed number two will arrive in November. 😯 Ok do dry paint means I can move on. pre shade. I know she’s small but what the hell I have a process. The seats. I’ll add belts later. lap belts? And the frame work. All the other bits got attention but the engine block got a full black coat as it was mostly going to be metallic and black. oh I drilled out the pipes too. Here are all the bits. Colour got added to the frame. The ip. this got partly constructed as this part was mostly black. And the seats. I added a little yellow to the green. All this got a gloss coat ready for phase one weathering. This is phased as the office will get closed up soon enough. and the Engine gets closed away but visible. Engine before dry brush steel. And after. I will pick out specific black/metal parts later on. I’m however happy with that. 😇 The seat got a bit of weathering powders added. I’ll do more after the belts are added. Some re purposed decals from the spares box and a bit of powder on the main controls. Then construction and more weathering. So tiny. But I’m really happy with that. More later on. Thanks for dropping by. These builds will periodically move on and halt as is the nature of multi builds but it’s great fun so far. Take care and as always. Happy modelling. Johnny11 points
-
I can't remember exactly when I bought this kit, but it could easily be fifteen to twenty years ago. Thanks to a messed up paint job it ended up being shoved into storage but I found it when sorting out my loft during lock down and decided it was high time for one last rescue attempt. Thanks to people on here for tips on stripping and repainting and for replacement decals. This is the thread covering the rebuild. I started it so long ago there are no photos of the early stage of the build. Anyway, I set up my "photo studio" to take some pretty pictures. A little bit of overspray from the interior and a little slip of the chrome pen. Headlamp eyebrows have flaked a bit, panel wash is a bit uneven. Slightly wonky ALPINE script Decals are a bit uneven and the wrong way around. For some reason that's all the photos I can upload at the moment but there are a few more to come.10 points
-
Another jet to join my NATO Tiger fleet. Czech Air Force Saab JAS-39C Gripen 9241 "WildCat" 211.Tactical Squadron NATO Tiger Meet 2017 1/72 Revell Saab JAS-39C Gripen Model-CZ Decals & masked stripes painted in gunship grey using Hataka acrylics. Only other aftermarket used were Master brass pitot's. I also added the blade aerials which are located on the tail fin which aren't present on the kit. Other people might be more aware to the provenance of the stores pylons in the kit as they aren't representative of the rails used by current operational Gripens, discovered that they were too short in length & wrong shape. There's probably aftermarket pylons available somewhere. Cheers & thanks for looking! Martin10 points
-
My kids want a cat for Christmas... Normally we do Turkey, but if it makes them happy...10 points
-
Right- back from holiday so some updates. I've spent a lot of time getting the glazing on. I should probably have put the forward fuselage and relevant glazing on each side first rather than adding them on at the end. It took a lot of fettling and sanding before I was happy, and you can see I had to add a replacement frame from white plastic strip sanded right down before application. There was a moment where I thought it was going to end up in the great bin in the sky, but perseverance paid off and things are back on track, You can see in the second picture that I have built up the cowl as recommended by another contributor on the forum, with a view to putting the engine in to that rather than building the cowling around the engine. A bit more sanding and it'll be ready for first coat of AK Eau de Nil for the undersides.10 points
-
thanks for the nod Ced, I'll look into thos it's becoming an addition. I need my regular intake of dust these days you could say it's the apex of my career.. or am I pitching too high? So you think I'm as crazy as Ced does then? thanks Heather. you reminded me to look at getting some new pin vises as one of mine is decidedly wonky there are many faculties that I do not possess according to my wife thanks Colin This week was a bit busy so I did not get as much time on Pegasus as I had hoped, however, I managed to lock myself away today and get some work accomplished - it's getting Sssoooooooo close I can taste it. I wanted to get the interior done before I started adding greeblies to the outside as it was a certainty that if greeblies were on the outside, I was going to knock them off as I worked on the ceiling panels. First order of the day was to fit the chrome down-lights in the bar - easy job for once They were followed by three more down-lights in the ceiling panel, in turn followed by two brass vents and the PA speaker By this point things are moving fairly quickly as there's no real "work" to be done - just measuring a location and sticking something on there. More vents, another PA speaker and the six double lamps. Can't get more straightforward than that can we/ Lastly, the dinette ceiling got a PA speaker and it's own brass vent Overall view of the internal gubbinses. That's all fine and well, but its all much of a muchness - too much white and there's nothing that really draws the eye (is that a bad thing?). I had anticipated this and had a sort of plan. I wasn't sure it was going to work or not but I knew I needed to do something to break up all that white area. I opted for adding the structure that would have been attached to these panels had the roof actually been fitted. For example, red oxide strips where the side frame would have been, and wooden strips where the partitions would have been located. Now things got a bit more complicated and I actually had to measure and cut with reasonable accuracy to make this thing work and not look plain sloppy. For the "side-frame" I'm using the very last of my 1/32" ply - the very last! I had to scrabble around to find enough to do the job as I really didn't want to have to place another order of this stuff just to finish off the last few inches of roof. Once I had found all I could, I cut it into 3 mm strips and painted red oxide. That seems to break things up nicely. Kitchen & Corridor end finished off Then Bathroom, corridor and dinette area finished. I then realized that I also needed to add framework for the entrance doors and vestibule area... 20 minutes later it's done Close up shot for no other reason that I took the photo Then the other end and the interior of the roof is FINISHED at long last. Only 4 years behind schedule but its done. Now onto the very very very last area of work (I think) The roof exterior. First job on the exterior was to cap the ends so that you couldn't see in behind the paneling. To be honest I'm not that enthralled by how this turned out and I know it's not 100% accurate, but I really don't see any other way of doing it. I think once it's all painted it won't look as cludgy - I guess I'll find out later (oops spoiler alert - you can see the rest of the roof here) again, this went very quickly as it was just sticking bits into the holes. Starting at the kitchen end... center portion Lastly, the dinette end The only thing left to go onto the roof now are the tread-plates at either end. I didn't fit them at this point because it would have been impossible to paint inside the supports so they will get added once the roof has received a good coat of white paint. All things going well, I may even get to throw some white paint on it tomorrow10 points
-
Those trousers giving trouble again Ian? o We all hope so too Ced. May you be energized and carried swiftly from the doldrums that strike us all from time-to-time.10 points
-
Latest off the bench is the Italeri /Accurate Miniature's B-25 Mitchell in the markings of 320 Squadron. Decals by Dutch Decals The kit is showing it's age a little and is bit of a beast size wise. Now real problems .... quite a bit of filler ...fits where it touches in some places. I did put the specified amount of nose weight in.... but still it drags it's bum. Hey ho. Please feel free to comment etc. Thanks for looking Dick9 points
-
Good afternoon guys So this is the kit finally finished and im pretty glad its done. I started it around the beginning of July as it was given to me for my birthday and slowly worked on it until realising I'll be away from home starting on Monday till the end of the week and wanted it done before then. The kit was fairly straighforward in most places and went together pretty easily which was pretty suprising to me; i've been used to building Italeri kits and reboxes of their kits and had a lot of fit issues. This isn't to say the kit doesn't have these kinds of issues but they seemed a little bit less severe than what im used to with their kits. Most notably with the construction was the narcelle fit which although taking a bit of time, was quite an easy fix by just sanding and cutting until it was a little more flush and filling after; and also the canopy fit ( I feel like the canopy fit may have been an issue I created due to sanding and then filling which I am not that happy with the end result). The other issue I had, and was the biggest pain in my opinion were the decals, the tail and wing tip decals were completely out of scale! Even putting them up against the kit before I placed them it was apparent, I tried to make the best of them which I feel went alright but for anyone who has seen photos of the real plane would be able to tell the decal art doesn't match up with it. The mis- scaled decals really proved an issue on the vibrant tail, with the raised sections and the decals that were meant to fit over it not playing ball any way I tried to place them. I opted to leave the decals over the raised section off and just have the Willow green showing through, which I think was for the best. As I mentioned, for the most part I worked on this kit quite slowly, and up until after decalling the kit I was really happy with the result. It was looking really clean, and glossy which was exactly what I wanted to go for. My next step was to coat the whole model in some Klear to lock it all in, it was pretty warm and windy on the evening I did it so I had the window open which is directly in front of where I paint my kits, when I had come back the next morning, the model had loads of little imperfections which im guessing is where the wind had blown dust onto the model whilst the Klear was still drying (kind of a reflection on the cleanliness of my bench, which is getting a complete clean up today before I start a new kit). I sanded it back the best I could but I felt it didn't look all that great after that so left the kit for about a week before coming back to it. I think this might have also been part of the problem for the next issue I had finishing this kit... I did the usual Ammo panel line was I use and decided to brush on a light layer of it, allow it to dry and wipe it off after which i've never had too many issues with. However, I think where I had sanded most of the Klear from the model, the wash stuck to the model in a lot of places and left it looking pretty unrealistically dirty. Right up until this morning I had been trying to correct this the best I could but it is by no means perfect. Overall this model has been a bit of a pain, and went from being a really fun and different build and turned into a slog to get it finished. (Oh and my attempt at a tinted windscreen has left it completely blacked out, this is a mistake I can live with and is something I can learn from though). I still like the end result, but this was a kit I really wanted to be perfect, and from a lot of error's I could have prevented it turned out not as great as I had hoped for. Anyway from the shelf it looks alright, when you look up close you can see the issues, it's all stuff I can learn from for my next build though so not the end of the world. Hope you can enjoy, despite the issues on the finished kit. I realised just as I posted the photos I have forgot to paint a tiny part but i'll sort that later. Thanks, Ryan9 points
-
- ref. 70042 - hawker Hurricane Mk II b/c Expert Set "“Hurribomber” and “Intruder” Source: https://www.armahobby.com/70042-hurricane-mk-ii-b-c-expert-set.html Model of the British Hurricane Mk IIb/c fighter aeroplane fitted with bombs or fuel tanks. Expert set with accessories for advanced modeller. Set also contains new, clear parts sprue (thinner canopy). It is a new tool made after previous one broken. Box contents: Two plastic sprues plus clear parts Photoetched parts Canopy and wheel masks Six markings options (3xMk IIb and 3xMk IIc) Hurricane Mk. IIb “Hurribomber”, BE682/XP-R, “Mauritius VII”, 174 Squadron RAF, Manston, Summer 1942. Hurricane Mk. IIb, Z3675/WX-B, 302 Squadron PAF, Church Stanton, August 1941. Hurricane Mk. IIb trop „Hurribomber”, HL795/V, 274 Squadron RAF, Sidi Haneish (Egipt) i Sidi-Bu Amud (Libia), November 1942. Hurricane Mk. IIc “Night Intruder”, BE581/JX-E, 1 Squadron RAF, Tangmere, May 1942, pilot F/L Karel Kuttelwascher. Hurricane Mk. IIc, MW367/DR-B, “Jessie”, 1697 Flight, Air Despatch Letter Service, Northolt, June 1944. Hurricane Mk. IIc trop “Hurribomber”, LB792/C, 34 Squadron RAF/SEAC, Dergaon (Assam) i Imphal (Manipur), Spring 1944, pilot S/Ldr C.P.N. Newman. V.P.9 points
-
I have learned from the starboard version of this that the best way to approach it is to sand off almost everything (DG coil, scuttles, weld seams etc) & start again - last time I ended up doing this but only after trying to keep stuff, which made it three times as difficult. So at present most of this is rather unexciting & unphotogenic removal of Merit’s stuff to provide a blank canvas. But I have found time to build (dry fitted here) Tetra’s replacement stern 44” Searchlight platform - 3 pieces of brass plus a small section of Merit’s styrene to plug the slot in the hull & help align it More soon Crisp9 points
-
Thanks John! In line with the advice from @Black Knight I added some strips to the canopy sills. The front of the canopy is still too narrow, so I sanded off the triangles under the windscreen and added my own triangles. A picture is worth a thousand words here:9 points
-
I usually can't resist when I see a kit of a vehicle that's just a little bit different. It was the same in this case. It's ICM's ZiL 131, with an "emergency" unit on the back which comes with full workshop interior. So you can go somewhere really urgently and fix something. I went and got Balaton Modell's resin wheels for it, which are a huge improvement over the kit wheels which I feel are lacking. The kit tyres have no detail on the sides and a huge mould line down the center. The resin wheels cost me half as much as the kit itself but they were worth it. Otherwise the kit is built OOB, except for the cable I fed into the winch. It proved to be a very fun build, the kit builds well, no issues with fit. A couple of parts were damaged (not moulded completely), and one or two sprues with smaller parts were a bit misalligned so some cleanup was needed. You can build two version from the box, the one on the box art and an all yellow version with red doors. I rather liked that one so I went with it. I tried for a "dirty and used but still in one piece" look, with dark mud and such. I kept the roof removable to be able to show the interior, and I left one of the back doors open by modifying the hinges. Here's the WIP: So, pictures! I was lucky, just when I finished it the sun started shining again following a rainy afternoon so I quickly went outside. I still have only one 1/35 scale backdrop so it will look familiar to some 🙂 How people actually get into the unit is anyone's guess. The steps help but it's still way up there 🙂 And some shots of the interior. Full album (yes, there are more pics I'm afraid) here. Thanks for watching!8 points
-
Hi guys, I finally finished this build. It's HobbyBoss Panzer I Ausf. A, kit No. 80145, superb kit, with great details and quite well engineered. There were few frustrating bits, like super small photo-etched parts (and when I say super small, I mean SUPER small), quite a lot of cleanup of indy track links, but it's worth the fun. You can find more about this build in the WIP section here. I decided to build DAK version, Vehicle number 833 from the Regiment 5, the one of vehicles that arrived with the first batch of DAK units and that participated in the first actions until it was probably lost sometime around first fights around Tobruk or soon thereafter. There were quite a lot of research involved and this was the most fun part of this build, because information about Pz Is present in NA theater is quite obscure. The biggest dilemmas I had were which version of Pz I was this and how to paint it. I figured out with quite certainty that this was Serie 3 vehicle, but with many modifications. And regarding the paint, the safe bet would be to leave it painted in RAL 7021, but most of the initial vehicles from the Reg. 5 received a very light "mysterious" paint, early in the campaign, so I decided that it would be more fun to go in this direction. There is no definite answer which paint it was (the only fact that is quite certain is that it's not RAL 8000), but there's a big chance that it was Italian paint, so I decided to go with Giallo Sabbia Chiaro. This paint was used at the time and there is a good chance that stocks were present around Tripoli at the time when Reg. 5 arrived. Here's some pictures: And on the white background: And some details: And finally interior, before I sealed it. I must say that this kit provides really nice interior. Cheers and have a great weekend! Nenad8 points
-
Decided to renovate my old approx 1/700 scale scratchbuilt Cloudbase, built in days of yore - in days of film! More photographic reference of the studio model is now available which proved I got a few things wrong, some of which I could fix. Airfix Angel interceptors reduced for the flight deck and scratchbuilt Spectrum Helicopter from a few years ago. Backdrops rendered in Terragen. Keith8 points
-
I'm eight days in self-isolation and it's very upsetting to see my wife standing at the window, gazing aimlessly into space, tears rolling down her cheeks. It breaks my heart to see her like this. I have even considered letting her in, but rules are rules...8 points
-
Well, it’s tea-time so I’m stopping for the day: Retro modelling is very enjoyable. I’m going to go with the Airfix colour scheme because I’ve already painted the propeller!8 points
-
From the looks of things, so far at least, nobody's doing anything modern or civvie so I'll be bucking the trend! I'm going to build an A320 in VietJet colours, with a big 'Vietnam' logo on the forward fuselage (seems appropriate!), using the Zvezda kit and Lima November decals. I'll just leave this here for now - need to make more progress on my three builds in the helicopters GB before I can contemplate cluttering up the bench with a fourth build, and haven't dug the kit out of the stash yet, but here's a photo I took in Hanoi 5 years ago to show you what I have in mind: Back to masking that Swedish camouflage... Julian7 points
-
I have just taken delivery of a 3' model of Skydiver from Gerry Anderson's UFO. It is made of resin & fibreglass. It has come with a pair of water jets fitted so with some radio control gubbins added it will be patrolling my local boating lake in case of an alien attack. Stay tuned! Angelo7 points
-
I know they're not rigged and that the paint could have been better thought out for a clear demarcation between silver doped linen and highly polished aluminium panels but these are the first five of around 55 interwar kits I'm going to be concentrating on. I'll be building several more of each of these in different Sqn markings as I love the bright colours etc. Mostly simple builds but one or two fought me all the way (Bulldog and Demon) and I learnt a lot from each kit so hopefully each one more I build will pick up on the mistakes of the first. Finally I apologise for the pictures, I'm no photographer and haven't got the snazzy studio stuff that some have so these are taken in my garden on our patio table. All kits are built OOB and finished using a combination of Halfords and Citadel rattle cans, MRP & Vallejo airbrush ready and Revell/Citadel brush paints. Next up will be the Fairey Swordfish, Bristol 138, De Havilland Gypsy Moth, Vickers Vimy and the Blackburn Shark. All old Frog/Novo/Matchbox kits but still nice subjects and definitely kits I wanted to get done before moving onto the AModel/AZ Model/Kora/Aeroclub etc kits that were more expensive. As always all comments, questions, suggestions, queries and complaints are most welcome.7 points
-
Just starting my trip into this GB, but still wondering which Defiant to depict, as I have four 264 Squadron options and three from 141 Squadron. Or the one Defiant that flew with 264 on 29th May 1940 when the squadron claimed 37 enemy aircraft and later served in the Battle of Britain with 141. Choices, eh? Base kit will be the 1/48 Airfix offering, to which I may add a Barracuda wheel set to. So, I'm off to clear the bench and build something for the first time in 28 months.7 points
-
Slow progress with modelling (real life intervenes) but I’ve broken the workbench and tools out today Fairey Delta 3 gets a stand (nicked from the Revell 1/144 747 & Space Shuttle set) and a bit of surface filling & sanding and then a coat of grey primer to see where we’re at7 points
-
Tonight I masked the Wellington and painted the camouflage. The paint was Revell Aqua Colour Dark Earth and Dark Green. Once masked, the dark earth was airbrushed on first and once that was dry, I further masked the camouflage using an image of Wellington Mk1A mask. I scaled the image using an app called Print To Size, then applied masking tape to my cutting mat and laid the printed image on top and cut through both with a craft knife. Using an image of the placement guide, I detacked the tape by sticking to the back of my hand and placing them on the model. The only problem area was the port engine where the masks didn’t line up, so I trimmed them to shape. Once that little lot was on, I airbrushed the Dark Green and gave it about 20 minutes to dry off - the paint dried quickly - and then removed the masks to stop the tape adhering too much and risk removing the dark earth paint. The tape came off almost perfectly, just one very tiny dot under the wing and a small line on the centre seam just in front of the tail fin. I touched it in with a brush. It’s currently sat in the display cabinet to dry completely before I spray it with my usual varnish prior to decalling.7 points
-
Well, I think I can achieve the masking required after playing with thin widths of Tamiya tape but not just now. After doing a @Moa and really studying images of the canopy, I found that the front 4 frames lost definition, depending on the viewing angle. Why's this I thought? I conclude that the forward frames are not metal but plexiglass. In this pic, the for forward frames look an off-white on the nearside and clear on the far side. The only metal on the canopy is on the removable part, two horizontal hinges and the outside edges that interface with the fuselage. And this is my effort to produce those four plexiglass frames. I located some thin clear plastic from some packaging and cut a strip out that was about 0.3mm wide and attached them with Formula 560 canopy glue that dries clear. The canopy needs a little clean up but I'm happy with that. Stuart7 points
-
Thnx on all counts Simon! Tomorrow's forecast is for rain later in the morning so I've no excuse for getting back out into the garden first-thing to finish dragging fallen boughs up against the hedge... 🌳🌳🌳 Cheers Benedikt - hope you don't get too strong a wind over there! 🌬️ Thought you'd be pleased Terry! 😁 (Did you get that handsome MTB finished BTW? I'm sorry if I've missed updates.) My brain is rather slow these days otherwise I might have hit upon that somewhat economical method much sooner! My own take is that anything involving mind and matter is always art AND science. Is your son taking you down the Fusion route Terry, or a different package? 😆 Between Brendan (roofing), Seamus (mechanic), Paddy (tractor & trailer hire), Kevin (hardware supplies) and Fergal (tyres), house and car are pretty much covered these days, and all within a five mile radius! Anything beyond that and living in the country has made us pretty self-sufficient skills-wise over the last couple of decades. One job I have to do is this week is 3D print a couple of ends for the greenhouse guttering in order to collect water in a butt via a hose - a case of ancient meets modern? Thanks Crisp - no long term harm done and could have been worse. Kind as always Bill. TBH it was nice to get back to to the smaller controlled environment of the Vixen this morning after grappling with Nature at 1:1 the last couple of days! Thanks Ced: A couple of the fallen trees were willows down the end of the garden that we'd been growing for biomass to feed the stove with anyway, so this simply hastened their demise. That perennial dilemma of when to jump eh Ced? Does my head in sometimes with changing technology and the same issue we have with upgrading camera tech at work: what constitutes a good time to buy? The factor defining resolution on the likes of the Elegoo and similar models currently is always going to be the pixel size of the display screens used to expose the resin- the new Elegoo for example simply prints to a larger size and more quickly, but the level of detail remains the same as the older version myself and Alan use. Until pixel dimensions get smaller, this is a fixed limit that lets you print down to about 0.2mm. Unless you need to print big sections or scratch-design complete aircraft, my penn'orth would be to suggest playing around with Fusion to get comfortable designing the kind of AM parts you want to be able to add to your kits, and get a resin printer of the size of the Elegoo Mars. This gives you the ability to turn out parts to augment builds to your satisfaction without sacrificing the pleasure you get from still making kits. You've got to love the lower middle classes haven't you: (I'm currently reading a 19th century dictionary of street slang and the richness of the language is compelling.) Night all.7 points
-
Good evening Today I placed the rudder , the elevators and the wings to the fuselage and the radiator under the fuselage Patrice7 points
-
I have decided to give this a go I try to stay clear of aircraft due to the high quality finish required but I'd like to be able to build confidently. So to that end here goes I do like flying boats/seaplanes and have a Catalina and Sunderland waiting so this one (being the cheapest) gets to go first. Dave6 points
-
Over the last week I have airbrushed several light coats of Vallejo Prussian blue. This isn't from the model air range so needs extra thinners as it is rather gloopy. It settled well and evenly. I then moved onto airbrushing the red section on the cowling. It took quite a few coats as you would expect with red but looked pretty good once the masking was off. Then having sealed the paintwork in with Quick shine I began work on the decals. There are not many decals to apply really, and were pretty good quality. I used micro sol as usual which helps the decals soften into place. Today, I have built the landing gear. The doors on the front need to be cut down to look accurate, but the instructions are really clear and it is easy to achieve with your craft knife. The locating pins on all of the landing gear fit nicely and it all feels pretty secure once in place. All that is left to do now is give the build a coat of Vallejo satin varnish and attach the antenna and canopy.6 points
-
... and so to the mottling. As I said earlier this is going to be 'representative' rather than 'actual, partly because I don't know of a single photograph that is definitely of 'Black 11' but mostly because the best reference picture I have is the profile in the Kagero book by Janusz Swiatlon which is beautifully done and gives a view of both sides of the aircraft. However it is also significantly beyond my capabilities and patience to reproduce the scheme as shown. From the two photographs on the Asisbiz website it looks like the mottle was a layer of diffuse RLM02 blotches with a more widely-spaced layer of more compact mottles of RLM71 - this is as good as I could get it. First the RLM02: It's quite hard to make it out due to the low contrast between RLM65 and RLM02; here's a closer look: Then the RLM71 blotches were applied. The port side: ... and starboard: It didn't come out quite as well as I'd hoped, but it's done. Now I need to not look at it for a while, hopefully when I do look at it again it will be better than my memory of it. I also cling to the knowledge that a mottled scheme always looks a bit less than I might have wanted but improves when the decals are applied, which I think is my next step. Cheers, Stew6 points
-
Morning guys hope you’re having a lovely weekend? small progress. She’s ready for paint. ❤️ She’s too tiny for the clips so I used cocktail sticks only usually employed for wheels. primer!! 🙌😯 And I know I’m mad but dare I say. pre-shade. Just trying to get some variation. I think it’s worked. 🙌 not sure of the colour as there are actually no call out so the instructions???? What the? Here’s the prop. I’ll have a look for schemes. any ideas? Motelling will be frowned upon. 🤣 thanks for dropping by. all the best and Happy Modelling. Johnny6 points
-
I must admit, I too was really dubious about the Wildcat carrying bombs, and also thought that any bomb in that thing would have to be so teeny-tiny as to be useless! Then I got to thinking, maybe F4Fs could be used to engage submarines - were F4Fs ever used as long range scouts like the SBDs? If so, I s'pose it makes sense that they'd have to practice with something. I must admit, despite having been in the USN, my knowledge of pre-WW2 USN fighter ops is really sketchy (but then, I flew ASW, which is real work...). There is this piccie (from https://inchhighguy.wordpress.com/2019/08/14/grumman-f4f-wildcat-in-color-part-i/), the caption for which reads: Three U.S. Marine F4F-3 Wildcats of VMF-111 pose for the photographer. They wear the overall Light Gray scheme. The temporary red cross markings denote the Red Force for the 1941 Louisiana War Games, which dates the photograph as being taken during August or September of that year. The devices mounted under the wings on the national insignia are practice bomb dispensers. Is this the one you were talking about, 72modeler? In Jackson Duvalier's post, the link has some pictures of the bomb - it really is tiny! I have indeed learned something new today - thanks all, the team works!6 points
-
I was thinking more along the lines of camouflage for Buster Gonad, but that's just the way my mind works I'm afraid! Ian6 points


This leaderboard is set to London/GMT+01:00