
Leaderboard


Popular Content
Showing content with the highest reputation on 30/07/20 in all areas
-
This is the 1/72 Sharkit resin-and-vacuform kit of the Edgley Optica. It's a pretty basic kit, and even to build the yellow G-BGMW prototype (which is what the kit is intended for) it would benefit from some detailing inside the cockpit and at the rear of the ducted fan nacelle. But I wanted to reproduce the Optica that flew in the cult-but-dire movie Slipstream (1989). This needed some modification of the prototype version: an extension to the upper nacelle and elevator trim tab, shrouds on the undercarriage, an overhead control box and wider instrument panel in the cockpit, flow directors on the upper wing surfaces ... in addition to the necessary pitot tube, sundry aerials, landing lights, a stone guard on the front wheel, control columns and rudder pedals, and rear support struts for the engine. And some other bits and bobs. In addition, I printed up decal sheets to reproduce, as best as I could, the feathered patterns on wings and nacelle, and the odd symbol on the tail. Build log is here: It's a resolute tail-sitter, with no room for added weight in the very open and thin-floored cockpit. I've made no effort to photographically conceal the short transparent rod that props up the back of the nacelle. Edited to add: here are a few views on the Coastal Kits "Abandoned Airfield" display base, which arrived in the post today.30 points
-
Hi, everybody! This is my next model from the latest stock in 72nd scale.27 points
-
This is the Hasegawa A6M5 1/48 kit with some Eduard etch seat belts with the decals from Rising Decals Dying Sun sets. The kit itself was rescued from the shelf of doom, I can't remember why it was put there as the model itself isn't bad. The decals are also top notch. ATAIU-SEA stands for Allied Technical Air Intelligence Unit -South East Asia and a number of Japanese aircraft wore these markings post war while being the subject of evaluation by the RAF. I believe that the centre section of this aircraft is now in the Imperial War Museum and the only section of the ATAIU's aircraft to survive.26 points
-
You may want a coffee or a beer for this one!!🤣🤣 This is my B-24J Liberator from the old tooling from the ‘Blueprint’ era boxing. I originally had the same kit but it was in the 1975 box Along with the other models it had suffered storage and house moving with guns, propellers, tail planes and one main gear broken. When it was originally built, only the vertical stabilisers were painted and box art decals applied - that mouth one was a right P.I.T.A.!! - both side broke up into 4-5 pieces applying them - I dint know about setting solution then! I decided It needed a revamp to took it apart - again the polystyrene cement broke apart easily and I cleaned up the parts where possible. Most of the windows had excess glue on them and were bin fodder. One of the tail plane elevators were missing as was one wheel/tyre (don’t know how as I still had the broken landing strut!) I decided to look for replacement windows on eBay with no success at first - then I lucked out completely!! Somebody was selling the blueprint box which actually had 2 kits in it although they couldn’t be certain that there were enough bits to build 2 Liberators. I managed to win the bid thinking I would use the parts I needed and sell the kit(s) on again. Upon closer inspection of my original wings and fuselage, I found damaged spots so I decided to make a chart 3 columns wide and tick off what parts were available out of the three kits against a printed off copy of the instructions. There definitely was one complete kit, the second was mostly there and the third was fit for the odd part only. I made sure the complete kit would go in the box along with the third kit(my original). I re-listed it and got about the same as I had paid for it in the first place. I then built this one only having to scratch build the turret guns and repair the propellers (I had 2 complete and found the broken off blades in the spares tub which was in the same box as the models were kept in. I used an old cd case fo the flat windows (which were clearer than the originals) and replaced the square plastic waist gun ports (never liked them anyway). I was going to paint it silver but that mouth decal put me off so I painted it Tamiya olive drab. Only thing was the olive drab looked too dark so I added some white to lighten it up a bit and resprayed it. Only one set of decals were in the box so I scanned them and printed my own (for the first time). They came out ok bit I need to work a bit on my cutting out. I was looking at it and decided it needed nose art. I found ‘Bomb Toting Mama’ but the pictures were black and white and I couldn’t successfully colourise it. I then saw ‘Diamond Lil’ on a B-24D?. I thought ‘Well - it’s still a Liberator and I little artistic license wont hurt’ so I printed it out - on clear sheet first which looked okay until I put it on and it almost disappeared. While speaking with a friend on Xbox who’s in the printing trade, he pointed me in the right direction saying it needs to be printed on white decal paper, so I reprinted it and the tail numbers with a green background and applied them. I’m happy with the result even though it looks factory fresh. I hope you like it23 points
-
Finally completed: Jackie Cochran's Northrop Gamma with its P&W Twin Wasp engine. Unfortunately she had to drop from the 1935 Bendix, encountering rough weather that forced her to return to the origin point. The plane was later on leased to Howard Hughes, who re-engined it and used it for his record flights. The step-by-step building article with the modifications needed for this specific version can be visited here: The old and venerable Williams Bros kit was modified to obtain this version. This is one those gifts that keeps on giving: I had previously built the Conqueror Gamma, also flown by Cochran: And the Experimental Overweather Laboratory (yes, @Martian, laboratory, not lavatory, so don't get confused, we know what happens when you do ) Besides this very old build: https://1.bp.blogspot.com/-Vb4vjFCwMeU/XyCvQ9AroFI/AAAAAAAAxWw/0gO3Z1-bebUr-GpXww1-xFjFh9I0900VwCLcBGAsYHQ/s650/01.jpg A set from Arctic Decals was commissioned for this model, and it delivered the usual quality and precision, even including masks for the tail. A word about the different schemes. Under Cochran's ownership, photos show the plane in different schemes. The one chosen here has those curved motifs on the cowl, an X registration -letter that was applied on a white patch that covered the NR one-, on tail and wings, and a line on the fuselage sides ending in an arrow at the front, and with a running hare in the middle on a rhomboidal shape. The regs. on the wing are not perpendicular to the fuselage, but parallel to the leading edge. There were other schemes, again still under Cochran's ownership: -At the race (that the plane did not complete) a number 55 was applied to the airframe, and the reg. is preceded by NR. -During what seems like the original trials, again the reg. numbers are preceded by X, and no other decoration is visible anywhere on the plane. I leave you know to dream of unending skies and open landscapes, speed and elegance, and some remarkable woman.22 points
-
I'm calling this finished, tho' it's actually not! As there are a few detail appendages that need adding including the wing fences - neither the Welsh Models or the Amodel kit include the wing fences. I have a companion build (all will be revealed in due course) to the Comet and I'll complete the detailing of both at the same time, as that is how I work. But, given I don't know when that will be I thought I might as well post images of a 99% completed Comet. I have always liked the 'classic' Olympic livery, not only is it one of classiest to adorn an aeroplane, it suits Comet to a tee. It also conjours up glamourous images of the mid '60s jet set, particularly as the airline was owned by the flamboyant Onassis family with all their glitz and associations to the wealthy and famous. Comet had a relatively short service life with Olympic from 1961/62 - 1969/70 being replaced by B.707-320C, however, it was long enough to two have two livery variations to adorn it, the model depicts the later one from around 1965 onwards. The airframes at the end of their Olympic service were shunted off to Channel Airways as well being used for spares. The Olympic Comets were a joint venture/partnership between Olympic and BEA (hence the BEA 'red square' logo in the Olympic cheatline) it was therefore not unusual to have BEA crews operating Olympic machines and vice versa. Its a pity that Olympic don't exist as such any more and are just an imprint of Agean without a distinct identity. The base kit was the Welsh Models vac and resin one with a few bits and bats from both the Airfix and Amodel kits. It was finished in Tamyia acyrlics, the decals are laser decals courtesy of Ray at the ever excellent 26decals. The fundamental Welsh kit is accurate, the main shortcoming is the underside of the mid-centre section of the fuselage where the wings join it, which is devoid of detail and the underside profile is not so much wrong, as missing. But, given all the 1/144 Comets currently available have noticeable shortcomings of one sort or an other and when sitting on its u/c its not noticeable - I can therefore live with it. I was going to use different shades of bare metal finish to give a more realistic finish, but once the Tamyia bare metal silver was applied it gave a surprisingly realistic appearance including the appearance of tonal differences, so I left it. I would imagine in a larger scale one would have to consider applying different tones to avoid having a monotone finish. I'm generally very happy with the results, if one does not look too closely, the biggest niggle is, I didn't bring the base white far enough down the fuselage sides. I didn't realise that the white has to finish virtually lined up with the bottom edge of the cheat line to get the best from the laser decals. That is quite hard to achieve but I could have done had I realised at the time - but, its not too much of a distraction. Tommo.20 points
-
https://flic.kr/p/2jrc44S20 points
-
Evening all, A very enjoyable, if not complex build of a WWII legend, the Boeing B17G, or lesser known as the RAF variant of the Fortress Mk.III. I am not normally a fan of building "non UK built" WWII aircraft, but as my current theme is along the lines of Coastal Command, I couldn't overlook this airframe. Finished out of the box using Tamiya and Vallejo paints, some gun barrels were replaced with Quickboost versions. The base is by Noys Minatures from Hannants and the ground vehicles is Airfix's wonderful Bomber Supply Set. Model was built with the wings detachable in order to allow for better storage.17 points
-
Thanks Heather and Ben for the kind wishes Thanks Mark, Don and John too and I certainly will be off to the Doc's if it's not cleared up tomorrow. It is a reflux / acid thing I've had before and Gaviscom seems to have helped this time. I do keep a careful watch on it though - my Dad and his Dad both died of stomach cancer so I'm careful but not worried. Thanks to hendie and Tony for the kind gifts Something to do while I'm resting up. Thanks Trevor I think you'll like the kit and thanks for the update on the Polish colonies. Hendie's mojo helped a bit this morning and I got another done: Just the Airfix now…16 points
-
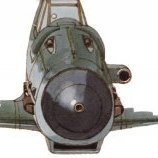
Hallo, this is my latest Jet built during Lockdown times. The old kit is still worth to build! Added some parts like Aires nozzle and PE parts in the cockpit. Also added complete rivets wich is hard to see. Decals were from Airdoc and colours came from AK Real colours wich appears quite dark, so that I light them up a little bit. Please enjoy the pic’s! Cheers Andy15 points
-
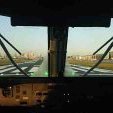
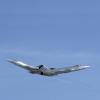
Summer appeared for a day here in the UK so we went for a 2.5 hour drive down to Marham in Norfolk. I took a number of F-35 photos from quite a few different angles to create a portfolio detailed enough to reinforce my opinion its the ugliest goddam jet I have ever seen. I remember a SAAB rep describing the F-35 as the fat kid with a magic cloak, it is true.... that rear fuselage looks like a dunny roll tube and the shape of the fuselage in the dust bin lid area is just awful. Something else to note, my god it is REALLY REALLY LOUD! Anyhoos I'll put a few pics in as a taster, go to the photostream to see the whole schmozzle. Amazingly the missus thinks it is the best plane she has ever seen (she likes things tidy without missiles, pods and fuel tanks hanging off them)13 points
-
Hi everybody; sorry for the lack of updates, but what with this heat, and me going again for a quick trip to the seaside last Sunday and all... Anyway, here's what I managed: ladder #1 ready quickly followed by ladder #2 and a FOD intake guard Now, I do not intend to place the FOD cover on the intake, I'm trying to decide if I want it laying on the ground or held by some crew, in the process of being removed (or placed ...?) Here's an attempt at a little scene, with pilots and crew (kindly donated by @phantom61) Maybe the pilots need to stay a little closer From the top I have more crew I bought myself, trying to decide if they are needed or not. Any thought on the layout would be much appreciated. On a different subject, I made myself a birthday present Ciao11 points
-
This is the moment of trepidation, putting ones work up for the eagle eyes to spot all errors, flaws and defects but this is a journey where ever model is a step improvement on the last. I am ever on awe of the quality of models that the members here present and learn something from every thread I read. 16 months with a 9 month break in the middle and I am happy to declare this finally finished. The build log is here for anyone who wants to have a laugh https://www.britmodeller.com/forums/index.php?/topic/235053927-rn-faa-odyssey-1-airfix-sea-vixen-faw2/page/4/ This is a special model for me as my father was met officer on HMS Eagle on her final round the world trip in 1972 and this aircraft would have flow off her then. Great aircraft, lovely lines and I have enjoyed 'nearly' every minute of the build. Edit to add in details of aftermarket parts: wolfpack resin wingfold kit Pavla resin airbrake CMK resin wheel set Quickboost resin ejector seats Quickboost resin air I takes Eduard photoetched cockpit.10 points
-
Latest finished build, 1/48 Hobbyboss KA-27 Helix. Really good kit to build. Quickboost seats Brengun exterior photoetch Begemot decals UMP black primer Mr hobby & tamiya paints UMP and AK washes Uschi rigging wire10 points
-
Morning, Just to prove I haven’t given up on the Demon. I’m waiting on replacement cabane struts (which were broken) from Airfix. Normally this is very quick but with the crisis I guess they’re taking a bit longer! The main issue for me was how to represent the chromed cowlings as I think they’re key to the look of the Hart family. I contemplated using bare metal foil. I haven’t used it before but in the end I couldn’t see how I could get it to conform with such a curved surface (although I didn’t try either), but settled on Mr Paint Super Stainless Steel over a black, glossy base. Looks the part I think? I’m always wary of masking high shine finishes from previous experience, so that creates other issues. I mixed the flat silver main colour. It looks a bit too grey if I’m honest, and it’s exacerbated by the the photos, but I wanted a contrast to the chrome which it certainly is. But here’s where I’m at, still waiting for parts! Guy10 points
-
It has been a while since I got to do some more on this but recently I have not had enough time to do all I want to. Mostly down to a severe shortage of MVS Coxswains who are available or willing to do patrols in the current environment. As of this evening when injury and sickness are taken into account, the Head of Unit has me to chose from. This means that I will be out all weekend and will probably be spending my down time dead to the world again. Still, if you sign up to the responsibility, you can't complain when your number is called. I just wish there were a few more numbers in the hat! Anyhow and more to the point, I have got most of the cockpits scratch built. There was a nasty moment or three when I realised that some of the detail parts that I had looked out for the build, including some gifted to the thread by John Aero had gone walk about. Yes, you've guessed it, I committed that cardinal sin of putting them in a "safe place" so I wouldn't lose them! Plonker! Fortunately they were eventually located along with the flying surfaces that had also been subjected to the same careful treatment. One thing you may come across on some of the older vacforms out there is that panel lines may be more like shallow U shaped trenches and much of my time has been spent eradicating these and starting to replace them. While this has been going quite well, It has exposed one or two areas there the kit plastic is on the thin side and has worn away with the work being undertaken. It is no big deal if this happens. In this case I just backed the worn through area with a scrap of plastic card and applied a coat or two of CA to both sides and sanded it all back smooth on the exterior. It takes but a few minutes. I still have to do the fabric covered parts of the fuselage and will do this in a very similar manner to the flying surfaces. At least I will when my order of .10 thou' plastic rod arrives from Slaters. Thanks for looking. Martian 👽10 points
-
This was a nice little project depicting the ride of P/O Handyside.9 points
-
Hello all! Although I love to build the new, super-duper kits that are extremely well detailed and fall together well(Ish), I do have a hankering for the 'older nostalgia' type models. I have built quite a few over the last couple of years, and that has taken me back to my childhood (too many years ago now!). Well, one model I remember from 1969 was this one, the Airfix Ford Tri-motor. I cannot claim this will be a nostalgia build, in view of the fact that I never had one, but one of my friends in Singapore showed me one when I was building a Boeing Clipper in 1969, and I thought I should have a go. It is now some years later, and finally I got one (not that I tried very hard during that time) from good ol' KingKit. The version I got was the Red Stripe boxing, which I think was the first: The contents were excellent, barely any flash on the parts, which reinforces the 'early' thought - here are a few: One very odd point I have noticed is that some parts have numbers on the runners, others do not! I thought that was a little odd, until I realised that most of the numbered parts are those that could cause confusion as they are port/starboard options. Now, as this is a tri-motor, it has a lovely build feature, in that it was corrugated. Airfix have captured that well to my eyes: Another good thing is that it comes with an excellent descriptive instruction sheet, so you know what the parts represent as you build! There was a hitch though! For the life of me, I could not figure out in some places what went where! I searched the web for a more modern instruction guide (ATF, Scalemates, suggestions on the BM 'Instructions wanted' page, Google etc) but had no luck, then I popped a request on good old Britmodeller, and @dogsbody came to the rescue with some pictorial guides: Thanks for that! They helped me out no end, especially for the interior fitting, and, I suspect, later on for the outer engine fittings and undercarriage. With the written instructions, no matter how I looked and read them, they made no sense. This is not necessarily a problem with them, I do sometimes get that when I am just reading a book! I look at the page and nothing sinks in. I hope it is not a sign of things to come... I intend to build it as this: It comes from a very colourful sheet by Blue Rider: Naturally, I chose the least colourful of the lot, and will only use four transfers - the serials and the Ford logos. The upside is that I will not have to try and get too many markings down on the corrugations, and all four are on the same part which can be fitted when painted and decalled. I will leave it at that for the introduction. Take care all, Ray9 points
-
Here's something from author Carl Vincent: " At the risk of being overly specific I attach five photos showing what appears to be the prototype installation in the nose of an RAF Coastal Command Liberator GR III. Although I copied them from an RCAF file 46 years ago, they are RAF photos supplied to the RCAF as references for the nose set-up in that service’ s Liberator GR V (Can.)’s. Hopefully, they may be of some use or, at least, interest. " Chris9 points
-
I keep forgetting to post my finished builds in this section, so thought i should start getting into the habit. This is Academy's Warrior IFV converted into an FV 511 Command vehilce. I use an Accurate Armour conversion set as well as there drivers hatch with 3 vision blocks and bowman antenna's to replace the Clansman ones. I also added an RB metal barrel, Fruil tracks and various other bits and pieces. The kit was very nice, my only issue being that the right hand side wheel stations are the wrong way round. I had to do a bit of conversion work myself as AA missed out the front right corner. I made the vehicle call sign's myself and put the licence plate together from spares. I have built this how it looked in the summer of 2006 while on pre deployment training before going to Iraq in Nov on Op Telic 9. This is the vehicle of the Company 2i/c. I drove this vehicle for 6 years so it was a very personal build. Thanks for looking.8 points
-
I have just finished this one from MPM, build out of box, a flying tourchlight 😁😁 Cheers Jes8 points
-
Tamiya 1/100th scale Il-28 Beagle John8 points
-
Ps forgot to post an earlier picture before painting... Guy8 points
-
Although usually a 1/72 builder, as a 109 fan I couldn't resist the draw of Eduard's excellent 1/48 kit. This is the second time I have been tempted up a scale to capture this great but tiny aircraft in a way that has more "presence", and it won't be the last. I picked a G-2 mostly because it's one of my favourite sub-variants, but also because it's one that's a bit neglected by kits and in 1/72 there isn't really a good one. I wanted to do an Eastern Front Experte and eventually settled on this machine flown by Gunther Rall. A huge "thank you" to @G.R.Morrison for helping me with research that led to this build decision, and a lot of extra information that helped me pin down details of this particular aircraft. It was a bit of a challenge scaling up my painting techniques and I lost some of the fine surface detailing in a few places, most notably the yellow markings defeated me. I've also tried to step up my photography for this post but I apologise for the lighting inconsistencies between different pictures. Eduard 1/48 Bf 109G-2 Weekend edition Peddinghaus decals (Rall specific markings only) Brush painted with Xtracrylix No masking tape was harmed in the making of this model (the canopy mask was already cut when I got it 😉) Thank you for looking and constructive comments welcome.7 points
-
OOB with just Ultracast seat. MRP paints, decals are a mix of Aeromaster and Skymodels decals.7 points
-
First a bit about the history of the Hawker Hurricane in the Kingdom of Yugoslavia, even though it has been discussed here on BM several times. The Royal Yugoslav Air Force negotiated the import of the Hawker Hurricane with the British government April-May 1938. The first batch of 12 Hurricanes was delivered from December 1938 to April 1939. They were early Hurricane with fabric wings, 2-bladed propellers and no armored protection for the pilot. The second batch of 12 was delivered in March 1940 and they were the late type with metal wings, 3-blade propeller and armor for the pilot. Meanwhile, licensing rights for production in Yugoslavia were granted by Britain. The first plan to produce 100 aircraft in 2 factories (60 by ZMAJ and 40 by ROGOZARSKI) was soon reduced to 48 (24 each factory). It was also negotiated with Rolls-Royce to supply 60 engines. Yugoslav-built hurricanes were like British early, but with Merlin III and 3-blade propellers. Due to the imminent danger for Britain, delivery of the engines was stopped before the contract was completed. Because of this, Zmaj managed to complete 16 aircraft before the war, another 6 during the German attack and the last 2 just before the capitulation. Rogozarski had completed 90% of the ordered aircraft, but without the engines, due to the canceled delivery. To fix that problem, the plan was to pair the Hurricane frame with the DB601 engine from the Bf 109E-3a because Yugoslavia had a lot of spare engines for Messerschmitt. The first Hurricane delivered to Yugoslavia was used as a test aircraft and the DB 601 was installed. It is noted that the performance with the new engine was excellent, and it was planned to start series production. Everything stopped because of the German attack on the Balkans. The prototype was destroyed by the crews. To this day, there is no known image of this very interesting aircraft. The model is a Hawker Hurricane from the second batch delivered from Britain, with metal wings. Camouflage was British from the period: DG, DE and silver undersurfaces with black and white wings. The aircraft served with the 3rd pilot school at Mostar. 3rd pilot school with 4 Hurricanes and 3 Bf 109E-3 actually experienced a lot of air combat: -April 6, over Korčula, Hurricanes and Bf109 led by KIk Zlatko Stipčić attacked 11 Cant Z1007 bis bombers from 35 Stormo / 47 Stormo, followed by 12 Macchi C200 from 370 Squadriglia, and damaged two bombers, Sgt Milan Marjanović shot down two Macchi's , while k2k Danilo Grbić and sgt.Milan Delić separate the formation, and according to Delic's statement, they shoot down a plane. On the same day, two Bf109 (kIk Stipčić and sgt.Grujić) and Hurricane (k2k Grbić) attacked 5 Cant1007 bombers, Stipčić and Grbić injured one each while Grujić shot down one. An hour later Stipčić attacked with Bf109 and Grbić with Hurricane, a group of 18 Ju88 and 8 Bf110, and in a different match Grbić was badly injured, jumped out, but died due to heavy blood loss. Lt.Djordje Vasojevic in Hurricane reported the shooting of a He111 the same day. -April 8 lt Ivan Rubčić meets a Z1007 in Hurricane and claims to have shot him down. -On April 12, Lt. Franc Godec chased a Ju88 (III / KG51), but his plane was damaged and he jumped out of the burning plane. I can recommend reading on the topic: http://leadenskybooks.com/hawker-the-yugoslav-story6 points
-
Hi folk's just been "culling" some old and broken kits but this one I kept mainly as it's one of the only ship kit's I actually finished and I like how she turned out,just imagine the North sea hasn't taken it's toll on her yet.Of course it's the old Revell North sea trawler come Russian spyship and I've seen a boxing with the Findus logo on the front built a good few years ago now just had a dusting.6 points
-
A quick build for me, arriving just a few days before Christmas last year. Thanks are due to @canberra kid and others who answered my pleas for help along the way. It's probably as finished as it's going to get although there's one aspect I'm not happy with - see below. The only way to build a 1/72 RB-57D currently available is the High Planes kit, accurate and with nice surface detail but distinctly low tech mouldings and using some of their standard parts which leads to the phrase "Adjustment of parts and filling required" being printed on the box top! The instructions contain phrases like "trim the canopies at an early stage and test fit them before gluing. In this way the width of the fuselage can be easily adjusted". and "To fit the wings properly some plastic needs to be removed from the cutouts". I didn't do a WIP thread so here is how I got seam free intakes - removing the front of the nacelle from the lower wing after sanding the mating surfaces (a long job). Having overcome these issues and managed to create a fuselage from two half bananas I was feeling the kit wasn't too bad, even though I missed the instruction to shorten the exhausts. The wavy edge to the paint scheme was done by enlarging and printing the side view in the instructions and using that as a template to cut masking tape. The kit decals seemed to go on well, until the last few which silvered horrendously but settled down with repeated doses of Micro Sol over a 24 hour period. It was complete, painted and decalled before I fitted the undercarriage. Now I have a much lower opinion as the sit is completely wrong, even having shortened the main legs as much as practicable it is still all wrong, too much nose down and too high off the ground. Maybe the undercarriage was moulded in the no-load position? It's not helped by a complete lack of positive location for the main legs which were drilled and bits of paper clip inserted. Anyway, here it is while I wonder if I can live with the sit or if I need to do something really drastic...………….. Certainly I'll need to buy a new bottle of Talisker before tackling my other High Planes Canberra. For a clue what's next...……………………….. an even bigger Canberra!6 points
-
Hi, This is 1/32 Hobbycraft P-51A Mustang with the markings of 43-6189 1st Air Commando Group in India ,1944. Cockpit modified by Vector resin set Main wheels are from Barracudacast Exhaust stacks replaced with Hasegawa s P-40E parts Underwing drop tanks are from Tamiya spare parts. Pointed shape kit's spinner replaced with home made corrected spinner from a friend Paints are Gunze Sangyo acrylics. Happy modelling6 points
-
I was very impressed with the Italeri kit, nice detail and apart from the radome it fitted together really well. Colours all from Tamiya rattle cans; AS-7, AS-26 and AS-27. I made the Sidewinder training rounds simply by cutting off the fins and sanding the stumps down. It's definitely made me want to make more F-16s!6 points
-
SBS cockpit and Eduard undercarriage bay. MRP paint. Mix of decals from various sheets.6 points
-
Greetings Virus Lockdown continues to force me into the man-Cave. We Suffer so. Completed a couple days ago. Added some Seatbelts and a little cockpit enhancements just for effect. I used Uschi Metal powders for the exhaust portions. Also added a Master Brass Pitot. Always astounded at the finesse of Master Products. So I really like the photos and the Black background allowed my to keep the scale in my Pocket. One American Dime for scale effects. This is the Revell 1/144 Tornado and this was a really nice model to build. I do have to say the 90+ decals were a pain ,however they settled and aligned perfectly...Well Done Revell Thanks for looking Comments are Always Welcome Cheers Bill6 points
-
I’ve been trying to overcome my airbrush phobia. As the camo pattern on most French planes of the period was randomly sprayed, I thought I’d have a bash at some freehand airbrush work. With nothing to lose, if it all went south I could just blatt a base colour over it and go back to the hairy stick. Well, it needs refining, but I’m pretty pleased. I’ll give it a proper look in the daylight, but for a first go I’m quite chuffed.6 points
-
Thanks Steve, to late, i should have read the instructions too as it was on the colour illustration that comes with the kit, I've brushed painted over my mishap hopefully with a wash over it. It won't look that bad. Thanks Johnson, @SimonT has added a link, I shall have a read this afternoon. Thanks Simon, i shall all have a read this afternoon, just with the title sounds an intresting read. Thanks Craig, well maybe not an active aircraft builder, just looking at my shelf situation next year I may switch to hone my aircraft modelling skills. having seen a number of pictures of shot down aircraft, they all looked to be peppered with bullet holes hopefully I recreated the peppering ok. Both the insignia and paint masks for the spitfire were from a fellow volunteer from Models For Heroes, he did make masks for a living before he retired. He had a dig about and found me these, as i struggled to find any Spitfire 1/48 insignia paint masks. today I've done a bit of chipping and dirtying, I've not applying any varnish of a wash yet.6 points
-
It would be wonderful if everything was just plane sailing, but of course it ain'tn't. Window holes need to look right, mine didn't. I opened the holes just a 'bigtad' too much in places trying to get the glazing to fit flush so added body was needed to take the cut down glazing panels. I used a strip of Slater's square strip to add narrowness then enticed it and the window to meet and greet each other. Phew, they like each other... Two out of the three window glazings are in and the oversize correction is in place, being worked on number three. (No, I still dont know why I opened them up to suit although the second one along was cut into a blank wall) Further work upon the upholstery has been ensuing at a slow pace this week. Feet on and the bases are being made up. Colour options now being explored. The fabric fronts are a lighter version of an air force blue than the seat backs and bodies and this mix of Vallejo and Badger colours seems very close to it. NAutilus Blue from the Minitaire range supplied by Badger gets a tad of Vallejo Sky Blue / Azul Cielo 70.961 and a body colour of USAF Medium Gray 71.275. Gives me a shade I am happy with, I can work on the seat faces now and the make the darker body colour later. Laters ...6 points
-
Well today has been a great evening, really got into my groove again, and my ingenuity was back again. I had my ear bud in, my easy listening play list on Spotify, and enthusiasm). I primed the plane, gear components, and prop, and then got the colour on. Impressed myself with my use of the spoon handle tips (from the spoons in post #57, don't like waste), which I blu-tacked to the masking tape, making some feet so I could paint it all in one go and still put it down Then the nerve racking job of removing all the masking tape with out scratching the paint, and seeing the black and yellow stripes for the first time. All went well, and I'm really pleased with the result. I'm really happy I painted the markings instead of using the decals6 points
-
I was going to wait until I had got the cockpit and cabin to the same level as the T4 build but Tim the Impatient, aka @Fishbed can't wait (for some strange reason I'm not surprised!), so here us where we are at this evening. A time consuming bit on the B(I) 8/12 is working out what parts of the fuselage structure will not be covered by the re-orientated radio and navigation gear. In addition to this, I wanted to depart from the kit order of assembly so I can detail and paint the cabin and cockpit more easily and this work has involved a good deal of head scratching and careful modelling to ensure that the fuselage top part will still fit properly. It does. Adding missing details of the layout of the cockpit and cabin area has also added to the work needing to be undertaken. I still have most of the starboard side fuselage structure to do but am close to getting this build on level playing terms with the T4. When we can get on to some of the finer detail work. I have also replaced the somewhat anemic bomb aimer's couch with a more robust item from scratch. I will get some more pictures posted in a few days when I have this stage of the build where I want it to be. Tim; I had a word with Gill and she says you can sail as ship's Baldrick for the coming weekend along with @perdu who seemed keen to help out as well. Report to the Harbour Master's pontoon at Poole lifting bridge at 11.30H on Saturday and Sunday coming. I'm too good to you two, I really am! Thanks for looking. Martian6 points
-
Made a start on the interior paintwork this evening, just the base colours down initially then I'll build up the detail from there. I used MRP black primer and Super Silver. Our young @general melchett recommended them to me but it's the first time I've used the paint and have to say, he's right as usual! There's more bits painted but still on the sprues so haven't been captured here. It's nice to be building a straight forwards kit with plenty of detail included for a change instead of scratch building!6 points
-
Enough of other builds I needs to get the venom over the line first. UC flappage next. you can just see the wheels together and the doors are drying in place. 🤩 held up with blu tac. wheels assembled and in place. Other ice doors got added after hinges were made. What seems to be a camera? Thing was added. I drilled a hole added some diver foil and popped some Krystal Klear on it. Next in line was to add the rockets. two on first. While they dried I added extra hinges to the flaps and the actuators. Not 100 accurate but good enough for me. And tother side. Rockets, rockets everywhere. 🙌 im really happy with those now. aerials were also added. Not the extra ones yet. Wing ones. Arrestor hook added. And there she sits. Lovely. I have started adding the scratch belts to the seats. I can foresee a bit of tweezer action In my future. 🤪 I’ll have a go at getting that lot done tonight. Thanks for all the help and kindness. See y’all laterzzzzz. Johnny. 🦈6 points
-
Hi folks, Just finished off some more Aeronautica Imperialis models - these are the smaller T'au Barracuda fighters. I have the larger Tiger Shark bombers painted and decalled but haven't done the panel lines and finishing on them yet. They were supposed to be done in a day or two, but I've been short on modelling time and to be honest painting the fiddly bits took a lot longer than anticipated. So many panels and grilles and things! The main colour is insignia white over hellblau (Tamiya lacquers) with the fins in a mix of bright red and hull red. Everything else is Citadel, although I did use a Tamiya enamel wash for the panels. I sealed everything with brushed Klear, but with all the detail it tends to bubble and it's hard to find and remove them all, particularly in recesses. Less obvious under a matt coat. I do wonder if using acrylic washes might be a goer as well, since the enamel makes everything sticky and turns it into a dust trap while the thinner is damp. I took some pictures of the undersides but despite all the detail they weren't very satisfying. So it's just the tops for now. The undersides are similar but blue-er. I'll try and get the Tiger Sharks done to a similar standard but in less time Then I'll have a painted force! Cheers, Will5 points
-
Hi folk's after the soft skin photos as promised some of the heavy armour in the collection.All to1/35 scale.5 points
-
Hi all, my latest offering to the modelling gods! A bit of a struggle all round, not helped by the many trials and tribulations thrown up by Real Life during 2020... Anyway that aside, for the most part it was a fun build - the headaches were, as is my habit, almost entirely self-created. The WIP thread, for anyone interested, can be found here. Aircraft of this type were the mainstay of the RFC training units in Canada during WW1. The markings depict an aircraft of 'C' Flight, 88 Canadian Training Squadron, 44 Wing based at Armour Heights Field, Toronto, during 1917/18. One of several very interesting photos I found on-line was of this very aircraft, in flight over Central Ontario: (Image in the public domain) Hawk-eyed individuals will note, perhaps with the same level of incredulity as I did, the presence of the trainer on the wing adjacent to the trainee's cockpit whilst approximately one thousand feet above the ground - no doubt explaining to his pupil, in words of one syllable, the fundamentals of flight! So without further delay, here are a set of photos of the finished article: Thanks to everyone who looked in, commented etc on the build, your interest was much appreciated. Comments and criticisms, as ever, welcome5 points
-
I have made a start with this Tri-motor. It had some of the easier transparencies I have had to mask. They also fitted extremely well into their openings and, when dry-fitted, they were hard to get back out so that bodes well for later. The small circular window (presumably the lav or galley?) will be 'Kristal-Kleared' when the time comes. The interior looks quite busy. I have only added lap belts for the pilots, I do not think they used shoulder straps. The seats aft are only dry-fitted at the moment. The markings guide suggested the aircraft I will do was still registered in the US and was helping support the Bolivian Army as a transport. I wonder if it was a troop transport or a cargo one? I will need to do a bit of research on that. I am quite minded to take out the seats and just skin the floor and have it as a cargo transport. I have shut the starboard aft door, so I cannot see in anyway! But those side transparencies are quite clear. One thing I will have to do is change the pitch of the props, the concave part is forward, I think it should be aft. One or two online reviews suggest just cutting off the attachment spigot and reversing them, that sounds plausible: One thing I think would be useful, and that is to be a @Martian with numerous tentacles, as I will need about four to six hands when I put the four-part fuselage and interior together. More soon, with luck! All the best everyone, Ray5 points
-
Thanks to Ventora3300's generous offer of the missing clear sprue, we can get on and take a serious look at this classic kit. There's quite an impressive lever of interior detail for an Airfix kit of this era (1965) with a full-length floor, bulkheads and seats: There are also a couple of "high altitude" crew members, who more usually turned up in the big bombers. The bottom of the floor has has a couple of representative cameras moulded in, which is neat: There are a couple of moulding flaws on the sides of the cowlings, but nothing serious: Nick Millman has an excellent article on Dinah colours on his Aviation of Japan blog: http://www.aviationofjapan.com/2010/04/ki-46-colours.html John5 points
-
Cockpit done. This will be out od the box and following instructions. I have not found pictures of the subject, but several profiles - which differ slightly, but more on that later. This colour is what Vallejo calls RLM02, but appears darker than what many seem to call RLM02. The light is bad here ao it appears darker than to the eye. I am not at home with German colours, so I can’t judge. Belts are tape. The panel has structure, which painted looks ok - certainly better than the flat surface and decal offered by Airfix. I forgot I have AM gunsights and added the kit version... Behind a canopy you’ll barely see it anyway. Maybe I should add a wee bit more colour.5 points
-
Call me crazy but can I add B-58 and RA-5C to your list?5 points
-
I went to my copy of Steve Ginter's Naval Fighters series Brewster Buffalo book. I was looking for photos of the airplanes during the period they were in colorful squadron livery. I didn't find one picture from that period of an airplane that was truly dirty. In fairness, I did find a picture of a camouflage US Navy Buffalo and it was dirty (wartime photo from what I could tell). I bring this up because your plastic work is excellent; the model is very detailed. The base colors (which are very pleasing) look very good; excellent application of paint (yellow can be a bear as we all know). Excellent application of the decals. The weathering, while well intended, takes away from what is otherwise a gorgeous replication of a classic Navy fighter.5 points
-
In for a penny, they may end up slightly thicker than the kits transfers.5 points
-
Thanks everyone, Follow away. I’m sure I can show you some schoolboy errors... On to the cockpit. The usual empty space from that modelling era. Just a bench for the pilot figure to sit upon. I’m more of a generic kind of modeller, so I’ve just added some framework and seats from plastic card/ rod to add interest. Airfix have, however, gone all 21st century and given you a decal for the instrument panel. Guy ps finished sanding down the wings etc and despite taking a bit more effort than I thought it would, they look a lot better. Once done it’s surprising how much more modern the kit looks.5 points


.thumb.jpg.ba34a9f6ddce411193946dbdcc7b5fe8.jpg)


This leaderboard is set to London/GMT+01:00