
Leaderboard


Popular Content
Showing content with the highest reputation on 18/07/20 in all areas
-
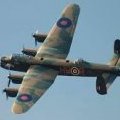
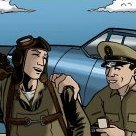
Hi mates, This is my little presentation of my latest diorama in 1/32. the Revell kit is easy to build , the MPM resin parts are mostly scrap, except the engine. I added some cables and tubes to the engine. The b/w photography was the reference. hope you like it.. have a nice weekend 🍻🍻🍻🍻 Andy .35 points
-
Afternoon folk's,yes more ancient plastic in the form of Matchbox's Shar, done in what is my opinion the best of the few scheme's they wore,picked up for a fiver and original decal's used,white was sprayed but brushed on the rest.As usual many thank's for looking in.25 points
-
Hello modelers. I'm posting an image for the 1st time here. Hope it works.22 points
-
This is the Tamiya Skyray, pretty much from the box with just a few tweaks and markings from Starfighter Decals “Forgotten Fords” set to depict an airframe from VMF(AW)-542 Gray Ghosts, in what the Warpaint book (No 117) describes as probably a one-off scheme for that unit. The AIM-9Bs are robbed from a Hobbyboss F-5E, because they are nicer than the ones in the Tamiya kit. This really is a great kit to build (no filler here!) and I would thoroughly recommend it.22 points
-
Took a few tries, but got it to work. Anyway, this is the Academy 1/72 kit. Quite nice but still needed some work. I had to chop about 1mm off the legs to get it to the correct stand, too much tail up. I corrected the intake. It's got sharp end edges, and should be round. I used round plastic rods around the intake opening and sand and blended in. Also used Eduard photo etch for the FOD wire door. Decals are the insignia from the AOA Bird Dog sheet, and the numbers took from an old Decal Carpena sheet. Tamiya paint used21 points
-
Hello, my modeler friends! Now that I have finished this long task at last. A vintage Soviet WW2 Bomber Tupolev Tu-2S in 1/48 Scale from a Chinese company called Xuntong Models. I have never heard of this company until I found this kit and bought it. I think this is quite a young company and has only got a handful of aircraft model kits. The Tu-2 is the medium high-speed bomber of the Soviets during the WW2 and had large internal bomb bay. It can also be used as a torpedo bomber and can even match the speed of some single-engined fighters. It played a major role in the final offensive of the Red Army. The build I experienced is a bit challenging and complicated. Includes many details but they are not crisp like the Eduard's Pe-2 or the Dragon's Bf-110 that I built before. I used many PE parts and scratch upgrades. The major modifications are_ riveting the entire aircraft, cutting out the plastic part and installing the PE Landing Flaps, PE and scratch-detailed engines, scratch detailed seat belts and bomb bay. These are my first to experience this much modification of the original plastic kit. So, of course made some mistakes. But at last, although not perfect, it seems beautiful and I feel satisfied. Hope you guys like it. Happy Modeling!19 points
-
Been ages since I posted anything here so will try to make amends! This is the S&M Models Bristol Sycamore kit as XL829 based in Aden in the SAR role in the early '60s. syca9 The S&M Sycamore is a lovely little kit - its fairly simple but critically the fit of the glazing is excellent. The one criticism I has was that after fiddling with the undercarriage and being unable to get it to resemble the sit of the real thing, it dawned on me that the main wheels were too large. I replaced these with some from the Airfix Bird Dog and instantly I thought it made a big improvement. syca8 Kit comes with both flat and bulged doors in order that a number of variants can be made. The decals in my boxing were for a 202 Sqd aircraft complete with "mallard" insignia but 202 never flew the Sycamore and I think this may have been painted up for a display rather than an operational aircraft. As I wanted to build a Sycamore as it would have looked in operation I sourced most of the decals from the spares box with the tail warning being sprayed first in red, and then individual white lettering and white decal strip edging being applied (as the kit tail warning was wrong for the aircraft I was modelling). Paint was all over Xtracrylic RAF Rescue Yellow. syca4 I also added some detail to the stirrup steps up to the cockpit and the nose aerials were made form bits of strip and stretched sprue. syca1 Hope you like! syca5 syca6 Pat19 points
-
Tamiya kit, I've built Mosquitos before but it's always hard to make them look interesting, as being made from wood there's little in the way of panel lines and rivets. So this time I decided to draw lines on it to replicate the wooden panels, I've seen a top modeller do this before, although his approach was different. I found a few photos that seem to show a similar effect. It's artistic licence for sure, but I'm trying to step up my game, Cheers, Owen19 points
-
This time 1:48 scale The GWH model, and unfortunately in my opinion it is the weakest GWH model I have had in the workshop. Model, as always, made straight from the box + Two Bobs decals18 points
-
Interesting build. I was ready to give up on this typically 'fiddly' Eduard kit a few days ago, as nothing seemed to be going right. But here's the completed build of 'Weiss 4', an NJG 11 'Mosquito Hunter', supposedly based at Kothen in April 1945. I say 'supposedly', because there are no useful pics of this aircraft available, only a couple which purport to show it, but taken from the front - which is not very helpful in terms of confirming its ID or appearance. So all I had to go on was this colour profile from Hannants (which may or may nor be accurate), below. But I liked the look of it anyway, so why not.18 points
-
Well, this is my first ever RFI post and I’m a little nervous! To see others build quality on here is definitely humbling. Here’s my attempt at Airfix’s 1/48 Boulton Paul Defiant Mk 1 of 264 Squadron, completely OOB and brush painted. It was a good build, everything fit together but I had to trim the instrument panel a bit to get the fuselage halves to close the gap. I’m quite proud of this build, and it only took me until I’m 27 to try and use wash on panel lines. I was fairly happy with them (my wife even said she liked them! Wow!). Hope you enjoy it! Jeff15 points
-
#15/2020 My dad wanted to build the good old Fujimi 110 now for a while. It can´t keep up with the newer Eduard and Dragon offerings but still makes a nice model. Decided to do an exotic scheme. Used parts from a True Details resin cockpit, EZ Line for the antenna wires and brake lines, decals from LF Models, nose MGs from the sparesbox, camo done with Gunze H67 RLM65, Tamiya XF-60 Dark Yellow, XF-64 Red Brown and XF-58 Olive Green. Build thread here https://www.britmodeller.com/forums/index.php?/topic/235073364-under-new-management148-messerschmitt-bf110c-4-royal-yugoslav-airforce/ On April 1st 1941 a German Bf110C4 flew from Vienna, via Hungary with intended destination in Romania. Due to a navigation error, the aircraft landed at Kraljevo airfield in central Serbia. The crew,Lt. Hans Diehter,Uoff.Wilhelm Pries and mechanic Eugen Schaufelle, was interned, the plane overpainted and a few days later transferred to Belgrade and later to the temporary airfield Veliki Radinci where it was destroyed on April 12th 1941 so that it didn´t fall back into German hands after Yugoslavia was invaded on April 6th 1941. DSC_0001 by grimreaper110, auf Flickr DSC_0002 by grimreaper110, auf Flickr DSC_0003 by grimreaper110, auf Flickr DSC_0004 by grimreaper110, auf Flickr DSC_0005 by grimreaper110, auf Flickr DSC_0006 by grimreaper110, auf Flickr DSC_0007 by grimreaper110, auf Flickr DSC_0008 by grimreaper110, auf Flickr DSC_0009 by grimreaper110, auf Flickr DSC_0010 by grimreaper110, auf Flickr DSC_0011 by grimreaper110, auf Flickr DSC_0012 by grimreaper110, auf Flickr DSC_0013 by grimreaper110, auf Flickr DSC_0014 by grimreaper110, auf Flickr DSC_0015 by grimreaper110, auf Flickr DSC_0016 by grimreaper110, auf Flickr DSC_0017 by grimreaper110, auf Flickr DSC_0018 by grimreaper110, auf Flickr DSC_0019 by grimreaper110, auf Flickr DSC_0020 by grimreaper110, auf Flickr DSC_0003 by grimreaper110, auf Flickr DSC_0004 by grimreaper110, auf Flickr DSC_0007 by grimreaper110, auf Flickr DSC_0004 by grimreaper110, auf Flickr15 points
-
Hi, Have finished this Academy F-14. Done as BuNo 161417, VF-142 "Ghostriders", USS Dwight D Eisenhower, US Navy, circa 1985. Finished using a mix of in box decals and squadron ones from the old Italeri kit. Kit went together nicely in most parts, and gives you a good variety of options. Annoyingly, i noticed (after a couple coats of clear) that the left hand wing "205" is in the wrong location. Not sure how i manged that one!! Also, on removing the canopy masking the canopy lifted off (never had that happen before) so the lines don't match up perfectly any more on the black paint around the canopy on the left side 🥵 It should also have a thin yellow line along the edge of lack lines, but thats a bit too much for my poor eyes 🤣 Anyway, until someone brings out some new decals for the Ghostriders, this'll have to do!! Academy 1.72 F-14A 161417-9 by Jonathan Francis, on Flickr Academy 1.72 F-14A 161417-13 by Jonathan Francis, on Flickr Academy 1.72 F-14A 161417-11 by Jonathan Francis, on Flickr Academy 1.72 F-14A 161417-1 by Jonathan Francis, on Flickr Academy 1.72 F-14A 161417-3 by Jonathan Francis, on Flickr Academy 1.72 F-14A 161417-18 by Jonathan Francis, on Flickr Academy 1.72 F-14A 161417-4 by Jonathan Francis, on Flickr Academy 1.72 F-14A 161417-16 by Jonathan Francis, on Flickr My growing collection, also a Revell, Hobbyboss and Hasegawa one...... maybe ill get one right one day???!!!! Academy 1.72 F-14A 161417-17 by Jonathan Francis, on Flickr Many thanks to Tony Oliver for his help and advice 👍 Thanks for looking Jon15 points
-
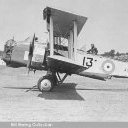
Hi all, RS models, limited run model, few fit issues, but a nice subject! Colourful scheme - Aerobatic aircraft at Upavon 1937. Decals and masks from LF Models. Thanks for looking in. Guy15 points
-
I've been struggling with my mojo to the extent that I put away my current scratch-build as all I could see were future problems. Time for something completely different. Since returning to the modelling fold I've stuck with 1/48 (except for one brief dalliance with a 1/72 which is best forgotten) this time I went with 1/72 for reasons that will become obvious at a later date. It was like being a kid again – gluing all the bits together as fast as possible before any thoughts about paint. Very enjoyable. The kit doesn't have any decals and only shows one paint option. Which was very, very boring. If I'd gone down the all over brown route I could have completed the model in two, possibly three days and even though I got the kit very cheaply (£7.95 from @Duncan B at Black Mike Models – A fine purveyor of phenomenal plastic paraphernalia since 1862 (I made the last bit up) he's still got some 'Gaza' ones left when I last looked if your interested) I can't afford to build models that quickly. I needed something to slow me down. For once I didn't choose the most complicated camouflage, the prize for which has to go to Ernest Percyval Tudor-Hart for his zigzag camouflage. I couldn't find a decent colour photo of it online so: (Incidentally, if you do attempt this scheme in 1/72 I'll promise to visit you in your cell at the secure accommodation - although only when you stop chewing the carpet). I went for the Solomon paint scheme which was tried on some of the early tanks. Yes I know that they gave up using camouflage on these things quite early (because they just got covered in mud anyway so why bother?) so it's unlikely that any type II would have sported this snazzy design but you don't expect me to do the expected do you? I could have done some research but those naps don't take themselves you know. I can assure you that will be the least of the factual inaccuracies I've got lined up for the eventual diorama. For once I actually enjoyed the process of painting so if you don't like my alternate reality – tough! I like it a lot. Thanks for having a look.14 points
-
It's hard to imagine just how heartbroken the Woods-Scawen family must have been on the night of 2nd September 1940. Having already been informed that their eldest son Patrick was missing in action the previous day, they had now been notified that his younger brother, Tony, had been killed in action. War can be unbelievably cruel. Patrick flew with No. 85 Squadron and had been with them since 1938, fighting in France a part of the BEF and shooting down six enemy aircraft, though he was himself forced to take to his parachute but rejoined his unit afterwards. Patrick's eyesight was apparently notoriously poor, earning him the nickname "Wombat". One of his squadron mates described him as "as brave as a lion and as blind as a bat." His actions in the Battle Of France earned him a DFC, with which he was Gazetted on 25th June. Patrick and No. 85 Squadron were heavily committed in the Battle Of Britain and he claimed another four destroyed before his death. On 1st September, whilst flying Hurricane P3150, No. 85 Squadron sent eleven Hurricanes to intercept a raid heading for airfields south of London. Five of the eleven Hurricanes were shot down during the dogfight, with two pilots uninjured, one being injured and one later dying of his injuries. Patrick's Hurricane did not return. His aircraft was found the next day, unmanned, so they knew he must have managed to bale out. He was posted as Missing In Action and it was hoped that he might be found alive, wounded or unconscious. Charles Anthony "Tony" Woods-Scawen had joined the RAF several months after his elder brother and was posted to No. 43 Squadron. He saw action over Dunkirk, scoring his first confirmed kill on 7th June, this being a Bf 109E, though was himself shot down and took to his parachute, walking through enemy held territory and evacuating from Cherbourg. He was awarded the DFC for his efforts to get back to the fight. He claimed another seven destroyed during the BoB, though he was shot down again on 16th August, being slightly injured. Tony did not know his brother was missing when he took off from Tangmere, flying Hurricane V7420, to intercept a raid near Maidstone. During the melee, Tony's Hurricane was hit and caught fire. He apparently tried to get the burning aircraft on the ground but ended up having to bale out, too low for his parachute to deploy. He was killed instantly. Tony's funeral was three days later and it wasn't until the next day, 6th September, that Patrick's body was found in an overgrown garden in Kenley. Tragically, he had also baled out too low for his parachute to open. I first became aware of the story of the Woods-Scawen brothers whilst reading Alfred Price's The Hardest Day. It was difficult not to be moved by the tale and I resolved then that I would one day build models of both Hurricanes as a small tribute. Much like many of the aircraft I decide to build, little information is readily to hand at the time and it was only recently that an online search revealed some new information. A post on Facebook by a group called Cammfollowers revealed that P3150 was coded VY@Z and also had a small representation of a painting by Barry Weekley that depicted the brothers' Hurricanes, with V7420 shown as FT@B. Another website, aviationsafety.net, has V7420 as FT@D. I'm not sure what to go with as yet, but it shouldn't be too difficult to modify a B to a D or vice-versa. Whilst I usually like to have a photo to work from, sometimes a "best educated guess" is the best one can hope for. So far, I have the following written down as a guide: P3150/VY@Z. Built by Gloster as part of the first batch of 500, this batch being completed in April 1940. B scheme, with BS 381C No. 1 Sky Blue undersides (this colour has been noted on remains of a No. 85 Sqn Hurricane from this period) painted over the original night/white. Bright roundel & fin flash colours for the upper wing and fuselage, with dull colours for the undersides. Fuselage roundel modified from type A to A1 by adding a yellow ring. Exhaust shields fitted. V7420/FT@B or D. Built by Hawker with batch deliveries from 02/07/40. Sky undersides and dull roundel/flash colours throughout. B scheme. If anyone sees any errors or can add to what I have, I'd be eternally grateful. I'll go with the Rotol prop with these, but it would be easy enough to swap over to a DH unit if need be. I'll be using another two Arma 1/72 Mk Is for this build, as I feel that they are by far the best representation of the Hurricane in this scale and are nicely detailed and good value. Some of you may have noticed that I have already started an Arma Hurricane in another entry for this groupbuild, but hopefully you won't get bored of Hurricanes just yet! Here's the boxes: I'm using the Junior boxing this time, so I;ll have to obtain some paint masks from elsewhere. The sprues look like this: The keen-eyed amongst you may have noticed that the wheel well parts (top left in the bottom pic) have suffered some damage in transit, being somewhat bent out of shape. The other kit was fine. The paints needed for the two kits. All Colourcoats except for an ancient tin of Humbrol No. 78 for the interior Grey Green. I ended up with over ten tins of it in an eBay lot several years ago and I think they'll last me a while yet! As I already had made a start on another Arma Hurricane, I thought I'd dive right in and try to get them at a similar stage so that I could get a mini production line going. I removed most of the parts from the sprues, started to clean up the bits I would need first and got spraying as soon as possible. The extra bits are from the other Hurricane in a separate entry. I got the wheel well assemblies together and primed them. You might just be able to make out the one that was bent, but I think it won't show once the wings are joined. Incidentally, I found that the parts go together much better if you use the following sequence: Attach the rear of the gear bay assembly (part 20) to the upper wing first and allow the glue to set. Remove the locating tabs on the front of the gear bay assembly (part 21- they're too big and won't fit anyway) and fit the small cylinder (part 22). Then attach to the upper wing/rear gear bay assembly. For some reason, doing it this way means that the two bracing strut (?) parts (23 and 24) fit much better than if you follow the instructions. I managed to get a bit more done after these photos were taken, so the gear bays are now painted aluminium (Humbrol Metalcote) and will be coated with Klear tomorrow, as I think it looks more like aluminium paint that way. Thanks for looking and cheers, Mark.12 points
-
This rather unorthodox looking aircraft was designed and built by Saab for the Swedish Air force who were concerned about being dragged into WW2. The 'pusher' design allowed the pilot maximum combat visibility and the ability to mount heavy armament in the nose. To increase the pilot's chances of survival during a bail out the J21 became one of the first service aircraft to be equipped with an ejector seat. The air-frame was later adapted to accommodate a jet engine. Despite being a 1980s kit, everything fitted quite well although the u/c legs and the three part canopy were a bit fiddly. It is a tail sitter but fortunately there is plenty of space in the nose cone to add weight.12 points
-
"Museum replica" Thank you all for looking.12 points
-
Hello, the model depicts an aircraft from 105Squadron around 1941. I used a lot of aftermarket sets,such as: -Aires and Eduard parts for the cockpit. -Ultracast resin wheels,exhausts covers and mud pliers. -Cutting Edge moving surfaces. -CMK Merlin engine. -Aires wheel bays. -Code numbers and serial numbers from Xtradecal. -Aviaeology stencils.12 points
-
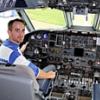
Had a chance to farewell our (Qantas’) last 747 at work on Wednesday. Sad to she her go, however from a maintenance perspective she was getting very costly and labour intensive. Like most airlines the Jumbo served us well and will be long remembered as the aircraft that shrunk the world and made air travel affordable to many people. Here’s a few snaps of OJU under glorious Brisbane winter skies and one of some fellow that should have been back at his desk! Three big cheers to the Jet Queen of the skies.. Dave12 points
-
This is Academy's 1/72 scale SB2C Helldiver, from their `Operation Iceberg' special edition boxing (which included photoetch dive brakes and Cartograph decals). The livery is that of a Helldiver from the USS Randolph, and was painted with AK Real Colors and Tamiya acrylics. There's some more photos here. Overall, the plastic matched previous experiences with Academy kits - well detailed and very good fit. The photoetched dive brakes weren't as painful to assemble as anticipated, and the Cartograph decals of course were top notch - for instance, white stripes on the vertical stabilizer (late war USN geometric markings for the USS Randolph) were from the decals, not painted. It was nice to not have to deal with Academy-printed decals... I also added an AN/APS-4 radar from the spares box (from a Cyber Hobby F6F-3 kit) since I found a photo of this specific Helldiver (or at least, one on the USS Randolph with suspiciously similar markings) with one of those hanging off the starboard wing.11 points
-
Hi chaps, Here's another launch vehicle I built last year for AMW magazine's 'Real Space Special' (specially posted for Norman). This time it's the ancient (1971) MPC Titan IIIc Heavy Lift launch vehicle. Though a little basic by today's standards it's not a bad kit for its time...lends itself perfectly to a little scratch building. I decided to add ribbing to the inner faces of the upper portion of the first and second stages using plastic strip and card as well as adding missing details to the engines and their shroud. Thankfully this reissue included a quality decal sheet which was a considerable improvement over the original. I've included a few build images along with the final model. A little history: The Titan IIIc (SLV5-C) was an expendable heavy-launch system used by the United States Air Force from 1965 until 1982 with the first successful launch made from Cape Canaveral on June 18th 1965. The vehicle consisted of a three-stage core vehicle with two solid propellant ’Stage Zero’’ strap-on boosters attached on either side. The Common-Core Vehicle consists of two stages evolved from the Titan II with a new propulsion vehicle, the Transtage, as a third stage. All three liquid propellant stages used storable propellants, which can remain on the vehicle for extended periods. The fuel is a 50/50 mixture of hydrazine and UDHM (unsymmetrical dimethyl hydrazine) with nitrogen tetroxide used as an oxidizer. These propellants are hypergolic, meaning that they burn spontaneously upon contact with each other. Titan IIIc developed into a highly successful launch vehicle while serving with the USAF, before being replaced by the even more capable Titan IV series. I wish a few more of the mainstream companies would pay attention to these early launch vehicles, it would be nice to see more Titans, particularly the IV in its various guises, along with Thor Deltas, Protons and UK Black Knight and Blue Streak. Hope you approve and thanks for looking. Melchie Some build images; The two LR87-AJ9 main engines prior to fitting the wiring and plumbing. Interior ribbing details were added using Evergreen card, strip and rod. Reworked interstage section, prior to wiring detail. Core-stage almost finished, just need to add the two small box fairings that were fitted to the checkerboard sections of the transtage outer cover. There was a fair bit of masking involved. The missing strengthening strips were also added to the SRM nozzles using 1mm plastic strip. The completed SRM boosters.10 points
-
afternoon my friends Something arrived in the post this week which has meant I could crack on with my favourite part of any build.. ..this stack are the custom decals for the 190 that I had in the corner of a layout sheet for an airscale restock. The good thing is they are super high quality decals, the bad thing is I have 75 copies as that was the sheet order size for one of the layouts… I only need one of any decal on the sheet as I have so many copies and it keeps the sheet size down, plus there are a few bits on there for friends ..anyways, I don’t have any WIP shots, but I have been busy – this is the V15 cockpit I am basing the V18 on.. ..and my version.. ..upper panel.. panel in front of the control stick.. lower panel.. ..and sort of how they go together.. ..and that’s that – favourite bit done, it’s all downhill from here 😜 TTFN Peter10 points
-
Hi all, Not done much at the bench recently due to 1/1 stuff that needed doing. This has been sat on the bench for about 3 weeks with just the canopy to mask so I got it done today. Nice little kit. OOB except for seatbelt and gun sights which came from an etch set. Thanks for looking Neil9 points
-
Pegasus, the only rail car with integral social distancing! his pal can join him now Les as far as I can remember Pete, the chairs went on just before the windows were put in Thanks Ced Thanks Heather. I'm sure yours is the best tasting rubber chicken there is! you mean these glasses Pouln? I have a bunch of them made, just not absolutely sure I want to include them or not Thanks Noel. You hit the nail right on the head there. I have to have some kind of connection, no matter how tenuous, to whatever I'm building. Without that connection I don't feel I can do any build justice, and I think the mojo would depart very quickly. Thanks Tony Thanks Bill. Now, where were we? Ah... Billy nae pals (Billy is Scottish). During lunch times this week, I managed to nip downstairs and add the remaining tables and chairs. It was a nice feeling seeing it all come together. The very last items were the 4 brass lamps in the dinette, which was a bit of an anti-climax really. (and I forgot to take a photo of that) Take your seats ladies and gentlemen... View from one end of the dining area Then from the other. I'd hate to be the person sitting in that seat next to the doorway at the end - you'd have to balance your plate on your knee It took me a long time to source that material for the mirrors, but I'm glad I persevered with the search. I think the mirrors really add another dimension and a little touch of reality to the overall scene A quick view from outside and that's about it folks. Pretty boring stuff really. All that's left is to stick the carlines on top and it's done. I know I still have the additional roof to make but I'm treating that as a separate project. Parts are being printed as I type and I hope to be able to get started on that project later today. Just a few finishing touches and a final clean up is all that remains. Getting rid of all the dust and cobwebs is going to take some serious effort - I think I'll wait until the display case arrives otherwise more dust will just accumulate. 6 years in the making, it's kind of hard to believe that there's no more Pegasus bits to be made. I'll be honest - I am very pleased with the outcome, and even more pleased that I managed to get this far. Had I known the challenges that were going to present themselves during this build I probably never would have started it. I think I thought it was going to take me around 2 years to construct this The decals were an item I never would have imagined causing so much delay and frustration, however, once I managed to source them things started moving a lot quicker. - and thank heavens for 3D printing - a technology that snuck it's head in the door at some point through this build. Purchasing that printer was one of the best investments I've made - it really opened up the door to what's possible for the model maker and without it I really would have been struggling to make some of the components such as door handles and lamps etc. 6 years. Hard to believe.9 points
-
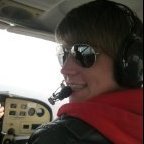
Desperately sad news, but it's been a while coming I sense. To cut a long story short, I used to have a horrendous fear of flying, and heights- ironic for an aviation-nut. In August of last year I had the opportunity to spend a bit of time in Honduras, so I said "in for a penny, in for a pound!" (I ended up catching 7 flights in total) My first flight, therefore, was actually on a BA 747 from LHR to JFK! When I was boarding I mentioned it being my first flight to the crew and they asked me where I was sitting and helped me to find it. We left the gate in the fading light of the evening but ended up sitting on the tarmac for a few hours while they changed a pressurisation valve of some sort. But once that was done, we set off into the night, and onto New York! The acceleration was quite something, but when we got airborne I didn't feel worried at all, it seemed relatively smooth for the vast majority of the journey. Just prior to the descent into JFK one of the stewards popped round and spent some time talking to me, thanking me for flying with them, and handing over a card (which I didn't open until later). With that, we started the approach into JFK... Flaps down, gear down, and as we pierced through a scattering of cloud 30 seconds prior to touching down it suddenly felt like the bottom of the aircraft just dropped, Yelp! But we touched down safe and sound. As we were heading to the front of the aircraft to leave, I noticed the first officer standing by the stairs leading to the upper deck. I couldn't help but blurt out "Thanks for the flight! Would I be able to have a look at the cockpit?". So that happened... 😊 After the taxi ride to LaGuardia for the next flight in the early morning, I sat down with breakfast and opened the card.... I have nothing but praise for the crew that served on her, maintained her, and the aircraft itself. She'll always have a special place in my heart. Best wishes, Sam P.s. I might have just bought a 747-400 kit + BA decals9 points
-
Hey Guys, Long time no post! Looking back at my last post, it was the Tamiya Aston DBS! Anyway, back into it now after a house move and my own man cave, chose the Tamiya Nissan GTR. Managed to get a hold of the photo etched detail up parts aswell which are rare as hell! Stuck pretty much exactly to the paint instructions, including the black edition of the model which has some red trim on the interior. Only thing I changed was the alloys which I did gloss black. I left the front number plate off too as I reckon it looks better without. Ford GT next.8 points
-
Started this kit ten years ago made a muck of it so shelved it. However with lockdown i dug it out and finished it ---finally8 points
-
Here are a pair of Eduard 1:144 Mikoyan-Gurevich MiG-21MF "Fishbed J" I built back in 2012. Both were built OOB. The rocket pods on one came from spares though. Both were fully painted with brush except for the final matt varnish which was airbrushed. Firstly: Mikoyan-Gurevich MiG-21MF "Fishbed J" 7713, of 4th Flight, Slovak Air Force, Sliac, Slovakia, 1999. Secondly: Mikoyan-Gurevich MiG-21SM "Yellow 127", of 812th UAP, Kharkov Higher Military Academy, based at Kupyansk Airfield, Soviet Union, in August 1991. Thanks for looking. Miguel8 points
-
Car complete prior to final assembly8 points
-
The decals are on, without too much hassle. I'm trying to get some sort of match for the appearance of the Optica in the movie "Slipstream". Unfortunately, on account of being a really bad film, it has only ever been released as a 4:3 pan-and-scan DVD. (Well, OK, there's a widescreen Japanese laser disc with burned-in subtitles, too.) Here are what passes for reference images, then: And here's my effort: I'm not hugely happy with the nacelle markings--in retrospect another row of dark feathers would have been better, but I had some sort of failure of visualization when I was sketching out the decals. Next up, fit the cockpit and engine to the nacelle, and start adding some more bits and pieces of detail.8 points
-
The wheels are ready, and the wings too, but the locations of masts and struts for the structure -under and on it- still need drilling. All the "metal" parts were painted gloss black in preparation for the Alclad hues that correspond them:8 points
-
I was going to save the post on the kit bomb doors until I had completed them but a new member, @Eivind Lunde was interested in some of the uses of a Dremel type tool in model making. Therefore, I am posting what I have got done over the last twenty four hours. The kit doors are of a thickness that vies with many battleship's armor plating and need thinning down and new detail adding to the insides. This would take an age to do with a chisel and sandpaper but took about fifteen minutes to get each door to the thickness needed with the Dremel and maybe the same again to sand them smooth. Hope that helps Eivind. I will naturally post some more pictures of the doors when I have finished them. Thanks for looking Martian 👽8 points
-
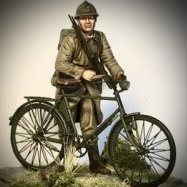
Finished - basic base as I didn’t want to overwhelm the figure7 points
-
Custom mixed PPG lacquer, DuPont urethane clear coat. Minimal wiring and plumbing. Wood veneered instrument panel, scratched seat belts.7 points
-
Pete - thanks for your comments. Most kind! Thanks Jeroen! Now... Bonus post! (or penalty post depending upon your viewpoint!) Today turned out nice so I though I should take Pegasus outside for some shots in natural lighting. She's (He's?) been locked in my dungeon of a basement for the last six years and never seen the light of day until now. Caveat - I am no photographer and the camera really isn't up to much - but those are the tools I have to hand so it is what it is. This was one of the very last acts of contrition... sorry, construction on Pegasus, the fitting of the door between the bar and the dining area. Once it was in place I decided that I needed to show hinges. The "hinges" were in fact some parts I photo etched for Pegasus a few years ago but never used. They were intended to be the escutcheon plates for the door handles but looked the part for masquerading as hinges when placed side by side. I won't bore you with any more details and just post a bunch of photos from Pegasus' outing this morning. (commentary only when necessary) should really have taken this shot from the sunny side and not from the shaded side glad to have had you along for the ride.7 points
-
...and the second one...7 points
-
I nearly forgot to post my two Spitfires! Anyway...7 points
-
This is the result of my first build of an ICM kit, even though it was purchased when it first appeared back in 2014 I never got round to building it till now. So armed with the kit, Eduard's interior, exterior, bomb bay p/e sheets and masks, Quickboost's resin spinner/props and exhausts, finally Xtradecals sheet the build commenced. I had read the reviews and builds by others and was left with mixed feelings about ICM 1/48 kits especially the Do215, but plunged in anyway!! It was certainly not one of the easiest kits I've built and took me far longer to complete than I expected, at times I nearly gave up the whole project but in the end persisted hopefully the end result is a reasonable replica of this machine. There were an awful lot of ejector pin marks to remove which would have been visible on the finished kit, a problem I've noticed on the other ICM kits in my stash. Which led me to purchasing a fibre glass pencil which is a great way to remove these marks. I found the instructions a little confusing at times (when I used them!!!) usually for placing certain items in the cockpit. The Eduard etch caused me some problems especially in the u/c bays where a Dremel was used to sand down some of the parts attached to the u/c bay walls. This was to try to get the engine nacelles to fit reasonably to the wings. When it came to fitting the wing to the fuselage the join was terrible and required much sanding and filling. I have since come to the conclusion the bulkheads in the bomb bay need some trimming down to allow a reasonable wing to fuselage join. I also added strips of card to lower wing to fuselage join to alleviate the poor fit. I added some extra detail to the cockpit ( which I painted dark grey rather than RLM02???). I also decided to glue the cowlings closed even though replicas of the engines are supplied which I found to be rather simplified. One of the faults with this kit is the rear fuselage which does not have the bulged fairing over the tailplane, this has been rectified by an aftermarket resin product which as it costs half the price of the kit I decided not to purchase!! I did however modify the fuselage to show this feature, reasonably successfully I hope? The tailwheel fairing is one moulding including the tailwheel its self, I managed to hollow out the fairing leaving the tailwheel to look like a separate item. As it is a recce. machine I added a resin camera to the entry hatch/camera fairing from my spares box. I used AK True Colours to paint the kit and Xtradecals sheet for the Do215, I was rather disappointed with these decals as they seemed to be a lot thicker than I'm used to and took quite a lot of solvent to get them to look reasonable! This machine was from 1.(F)124 Stavanger, Norway April 1940 (couldn't resist the undersurface mottle!!!!!) Now then where's that ICM Do17Z-10 😱 Cheers, Andy7 points
-
Go figure Well it's been a while - for various reasons - since the last time I posted here. But things have not completely stagnated on this project. Firstly, I have made a firm decision that this gun will be mounted on a suitable scenic base, probably something resembling a firebase in Afghanistan. Here's the gun sitting on an A3 sized picture frame that might suit my purposes. At this point it occurred to me that this model was going to look pretty boring all buttoned-up and with no people either in it or around it. Generally speaking, when these guns are moving the driver's hatch is open and he sticks his head out and looks about. When the guns are firing the rear doors are generally open and soldiers scurry about replenishing ammunition and so forth. So this model needs people. Unfortunately 1:24 scale Modern NATO gunners are not easily obtained, so I decided to try something I've never done before. I decided to try sculpting some figures. Just their heads and shoulders however, since both figures will be seated in the vehicle and I only need to model the bits that sick out. I expected abject failure. 👎 My elder daughter is a very keen artist and specialises in painting people, so I grabbed one of her text books and drew up a schematic of a 1:24 scale human being using the 'correct' artistic proportions. Then I made an armature out of floral arranging wire and promptly threw it away because it was rubbish. I figured that making a plastic armature must be easier, and I was right. Once the armature was firmly cemented and nice and rigid, I started slathering milli-putt all over it. Fantastic stuff this milli-putt! 🙂 Ohhh - look. about 20 minutes later and I had surprised myself. This almost looks humanish. I threaded some floral arranging wire though the hollow tube that made up this guys shoulders and fashioned some arms. Then added milli-putt. His arm are a touch heavy and his hands are like penguin flippers but I don't think that matters too much as this guy is the driver and really only his head and shoulders will be visible once he's in the driving position. Let's give him some driving goggles and a scrim scarf. All soldiers like wearing scrim scarfs, they keep your neck warm. Afghanistan I hear can get very cold in winter. Now I decided my gun needed a commander. I wanted some dude sitting in the command position in the turret with his head sticking out and looking through binoculars. That sounded like a somewhat more tricky armature to make and I was vacillating about how to do it when - entirely by chance - I found these four little guys in the local $2.00 shop. Although they aren't any particular scale they are all about 70mm tall - which makes them reasonable for 1:24. Excitingly, the green dude is looking through binoculars! So all I had to do was cut off all the silly stuff (like the parachute and the big ring on his head) and start adding milli-putt... Make a more convincing set of binoculars out of sprue and scrap plastic card... Chop the guy’s legs off and add a scarf to hide his not very convincing face. Look at the lovely texture on this guy's scarf. That was just done using the fine file you can see in the background. This sculpting business is really fun and milli-putt is a brilliant, highly forgiving medium to work in. Here are my two dudes after a coat of spray-on 'Mr Hobby' primer. And here they are after a bit of preliminary paint work. There's still a bit of work to go on these guys - oil paint on the driver's face and perhaps some camouflage patterns on the uniforms for example - but I'm really happy with the result so far. I think that they will look good when complete and bedded down inside their PZH. So that's it. My first ever attempt at sculpting figures. Definitely not perfect but I'm happy with this result and am starting to think that I might even get a bit more serious about some figure work in future. I've already dreamed up one or two possible figure sculpting scratch-builds to have a crack at one day. If I do I think they will be in 1/12 scale. You never know, one day I might just 'go figure'. 🤔 Bandsaw Steve7 points
-
Thanks for your comments guys, but don't hesitate to point out stuffs also. I think it should be also welcome. Anyway, here is the Tweety's buddy. Built in 2003. I actually refurbished it when I built the recent one. I wanted to just replace the fuselage bands. But ended up stripped and repainted it. Just about every manufacturers got that red/white hashes wrong. I also added the Eduard photo etch wire FOD screen, along with the fuel tank caps on the wings, and fixed the intake opening like the new build. After: Before:7 points
-
Many thanks for the comments. The information supplied by @MattG will come in very useful, as I will likely add the other Hurricanes at a later date. I appreciate the help, Matt! I have progressed a bit with the Hurricane, combining the build with two other Hurricanes from a separate entry for speed. Despite my better judgement, I decided to use a few of the etched brass parts: I found Arma's brass a bit easier to use, the cockpit sidewall conforming perfectly with no fuss. That's a first for me! I also managed to get a bit of painting done: I began removing some of the Do 215 parts from their sprues and immediately noticed a horrible, oily residue which will have to be thoroughly cleaned off. There's quite a lot of detail in the cockpit, but it all looks very fragile and I can't imagine me not breaking something. Interestingly, the crew seats (minus the pilot) are all moulded flat, the instructions suggesting that the seat backs are bent into shape. Yeah, that'll work, he said, sarcastically. I think I'll carefully cut the seat backs off and glue them, Having looked at the fuselage parts and how they go together, I suspect that will be an experience I won't forget in a hurry. It's definitely got that 3D puzzle vibe about it. This won't be a kit that goes together quickly, I'm sure of that! Cheers, Mark.7 points
-
3rd crewman repaint, decided to strip and repaint the last crewbod, changing the way that I painted the Flecktarn to the same way as the commander, he's not finished yet as I need to paint up his pants. But in the hatch you don't see them so for a quick photo op here he is. More hopefully over the weekend Dan7 points
-
I'm going to have a go at this GB (can't let a BoB GB get away!) I'll be building the Pegasus Hobbies "EZ Snapz" 1/48 Hawker Hurricane. Now, before anyone dismisses this kit as a toy, or as not a proper model, read Brett Green's review on Hyperscale here. Here are the obligatory ID shots: I won't be using the kit decals, the instructions give no clue as to the identity of the machine featured, other than a serial P3901. I know that a little bit of GoogleFu could find it, but it's just as easy to open a pack of aftermarket decals and finish it as a different machine that I can identify from the start. I'll probably be building P2923/VY-R of no.85 Sqn. I'm actually trying to kickstart my modelling mojo with this. Me Mojo's gorn AWOL . . .6 points
-
Good evening, dears. It's my next model from exellent Tamiya's kit.6 points
-
B-57B, 53-3888, 13th BS, 405th TFW ADVON 1, Bien Hoa AB, South Vietnam, 1965. The first American Jet Bomber to drop ordnance in combat. Piloted by Maj. O'Neal and Navigator Maj. Chandler. Loaded with four 750lb M117 bombs under the wings and nine 500lb 'box fin' GP bombs in the bomb bay. They were expended on the 19th February 1965 in an attack on a VC position near Bien Gia, just East of Saigon. 1/72 Italeri B-57B, using a mix of the kit decals and from the Airfix B-57 kit. Added PE belts to the seats. I really couldn't face painting 13 yellow bands on the bombs so left them as is, you can barely see them anyway....!! Cheers all, Phil6 points
-
Ok so some more progress today mainly spraying the orange paint onto the chassis and some interior parts. I thought this would be a marathon spraying session but the whole lot only took 30 minutes which is very surprising. Please take into consideration the fact that the paint has no clear coat yet this is just the basecoat finish from the airbrush I'm actually planning on giving these parts a semi gloss finish as I feel the 2k finish is not required on these parts. I still have the interior of the chassis to paint but today was all about spraying a much larger area than I'm used to and I'm happy with the results. Here's a few pics of today's work Ignore the harder and steenbeck infinity in the last pic I never use it I just forgot to move it out of shot. So I'm happy with progress made today who knows I might actually get to fix some parts to the chassis this year after all 🙂. Thanks for looking back soon.6 points
-
Hi everybody, my latest completion: a Spitfire VIII, 417 Sqn RCAF in Italy. The kit is the Eduard Weekend-edition (although it took me much longer than a weekend). The kit is gorgeous and a pleasure to build, but I guess you know this already. There are not even expensive nowadays (in Euro at least). The decals are from various Xtradecal sheets. I had wanted to built AN-M ever since I first saw a picture of it literally decades ago in "Spitfire at War". The gun barrels are after-market brass items, but I don't think they make a big difference. The plastic parts from the kit are probably just as good. Thanks for looking!6 points
-
Thanks Gents A little bit further on, needed to do surgery, I had to take about a mil off the lower part of the exhaust fairings to make the wings fit in the right place. Ended up with a large gap on the underside of the wing/fuselage join. The radome housing is an appalling fit as are the finlets on the tail planes. Being a mainstream offering I would have expected better quality of fit. Oh well, onwards and upwards The site of surgery. Gaps filled (various fillers) and sanded Tail units on awaiting more filler round the finlets. The exhaust deflectors had to be cut down because they impinge on the trailing edge of the wing inside the exhaust fairing. not a pretty sight6 points
-
The Canadian plane had metal cap spinners, thus masks need to be created to paint that:6 points


This leaderboard is set to London/GMT+01:00