
Leaderboard


Popular Content
Showing content with the highest reputation on 12/07/20 in all areas
-
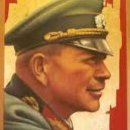
Here's my rendition of Revell's newer tool Halifax BI/II. Representing a series 1 aircraft, L9613 of 138 Sqn was used for Special Operations, parachuting agents and supplies behind enemy lines. On 28th of December an operation was mounted to drop 3 groups of para-troop's, one of which was 'Anthropoid', a group whose mission was to assassinate the Deputy Reich Protector of Bohemia and Moravia, Reinhard Heydrich. The story of this is easily found on the 'net if you wish to find out the results. The kit went together really well, the only problem I found at the end was the front turret would not fit it's hole! I had to dismantle it and take off all the bottom structure and put the back, bottom with guns and the front, all in separately. I used the AML update set which had the resin radiators, propellers, wheels, tail-wheel guards and intakes. Also decals for this aircraft and BB340 NF-D of the same squadron. As I write this I have realised I haven't attached the PE base-plate and printed Crest below the port side cockpit canopy 🙄 Paints were my usual Airbrushed Vallejo ModelAir, the Black was 'Ultimate' Black Primer, gloss coat was 'Klear' with Winsor and Newton Galeria Matt varnish airbrushed on. I used the AML camouflage masks for the first time, not bad but are vinyl, so can lift on curves and hard to press into the panel lines resulting in bleed. Saved lots of time masking though. The AML decals went on well, annoyingly I got a bit of silvering in places, worse on the serial codes, despite using my tried and trusted method apllying using 'Klear'. Just restrained weathering, I'm always reluctant to go over the top. A dry-brush with Dark Slate Grey with a large brush over the black, and airbrushed the exhaust stains. Davey.27 points
-
Hello, I present the model of the training transport aircraft Aero C-3A. The model is made of the Special Hobby set. In the box, the model looks very good, great interior details, very nice surface of the fuselage and wings. During construction, it turns out that the model in many places is underdeveloped and gluing it becomes very problematic. This applies above all to glazing, wings and engines. And one more thing, it's best to use CA glue for gluing. The whole construction process can be seen here. Nice watch. A few photos from the building process.18 points
-
G'Day All Im usually an aircraft modeller, but I do have a few armour kits in the stash, so recently I thoughT i would break one out as I seemed to be struggling to get an aircraft finished. Here is my completed AFV Club 1/35 M60A2, "starship" although I believe they were never referred to be this name whilst in service I found the AFV Club kit, quite fussy, with just about all of the parts needing a fine mould seam removed, which, well, became tedious! Anyway, here she is. I added a brass barrel to the M85, the antenna bases are also brass from Voyager, and the tracks were an aftermarket set from AFV Club also, although I dont think I will be using their separate tracks again. They had ejector pin marks on each link. Im not really happy with how the weathering came out as I think the mud tones are wrong, I was aiming more for a dark Europe mud tone, what Ive ended up with looks like my tank was in Vietnam! Thanks for looking Bruce16 points
-
Well it was bound to happen sooner or later : I finished another kit! Thanks to two group builds on BM this year I've managed to finish three kits in 6 months. That unusual... So let me present my latest then. This is the Eduard Velveta Limited edition kit, containing some 6 different Israeli Spitfires. I choose to make the desert painted IXe from 105:th Tajaset, Ramat David Air Base, September 1953 It was built straight from the box, no extras was used, I even failed to use the Barracuda Top cowl... Painted using Gunze colors, weathered with oils, pigments, and assorted stuff. On to the pictures: The build log can be found here I did cut a few corners on this one which has lessened the final appearance. For instance, one shall not cheat with the gloss coat before decaling, since one really needs the to protect the paint from the decal solutions like Micro Sol16 points
-
Latest off the bench is the Accurate Miniatures Avenger converted with the MDC AS-6 conversion. Went together OK but the vac form canopy ....well it fitted where it touched...enough said. Decals from the spares box. There should be a cartoon motive on the nose but one was not available. Something a bit different. Hope you like. Please feel free to comment etc. Thanks for looking Dick16 points
-
Hello everybody, Here is another Project from pandemic isolation days. This is 1/32 Hasegawa Spitfire Mk.1a with the markings of N3200 from Squadron 19. This aircraft was based at RAF Hornchurch and was detailed to patrol the Dunkirk area. This Mk.1a was shot down over Dunkirk on 26-05-1940 and forced to belly land on the beach west of Calais. Cockpit enhanced by Eduard zoom set, Barracudacast seat and Barracudacast cockpit upgrade set. Other modifications are as follows: Archer fine transfer for fasteners on engine cowling. Masterdetails horizontal surfaces Eagle part Mk1 oil cooler Barracudacast cockpit door Quickboost exhaust set Quickboost propeller set Barracudacast wheels Scale Aircraft Conversion Metal landing gear legs Happy modelling15 points
-
Airfix 1/72 Heinkel He.177A-5 'Greif' 6N+HN of 5./KG 100 1943 Here is another ceiling holding pattern nostalgia build from the 'Kit I built as a kid' Group Build, a kit originally released by Airfix in 1967 which I must have built around the mid 70s. I have built it mainly out of the box with the exception of some scratched extra detail in the typical for the time spartan interior plus a couple of additional parts around the rest of the model. All in all great fun to build and I really enjoyed having a go at mottling for the first time and creating my own masks for the markings (bar the '6N' and the tail marking), I had only a couple of dodgy reference photos and one profile to go on....yes I know never trust a profile! but for the purposes of this GB I was content enough to risk the wrath of the RLM posse. The build thread can be found below: Thanks for looking and as always comments and observations are welcome. Cheers, Mark.15 points
-
Hello. Here is my depiction of the very first Ark Royal. I based the model on Airfix's Revenge kit and painted her with acrylics, Vallejo mainly. The scale is 1/144 and length of the model is a little under 45 cm. They say that a change is as good as a break. I was asked to provide a model of this ship by a local museum. I decided to have a try myself, even though I started out knowing next to nothing about the subject. Over the 1-year duration I have learnt an enormous amount, and a large part of that has come from folks on Britmodeller who have given generously of their time and expertise to steer me on the right course. There are many to thank, but I would like to praise @Black Knight and @mdesaxe especially. Please do have a browse through the build thread as there are some interesting topics discussed there. Link to build thread...... https://www.britmodeller.com/forums/index.php?/topic/235057536-ark-royal-circa-1587/ If you find your modelling mojo ebbing or want to try something fresh or to turn your skills acquired in painting wood effects on your Wingnut Wings to something new, then I recommend a galleon. You will have fun, face new challenges, learn new skills and some fascinating history. The end result will look great in your display case. The model will be wall mounted for display and viewed downwards on one side. I chose to support the model on brass rods that pass through gun ports on the blind side of the ship, so the supports will be out of view. Some photos show this arrangement, others show the model on a stand I made for working on the model. Thank you once again to all you folks on Britmodeller who made this project such a worthwhile and fun experience for me. Many thanks for viewing. Why not build one yourself? Pat14 points
-
Hi folks, I show this beautiful kit I finisehd a few minutes ago. I hope you like it. Regards, Pablo14 points
-
Hi, finished this after a good few months work. My first post as well so please be gentle. In short a fun and challenging build that generated every emotion known to man along the way.😀🤯😫 I find it best with these kits to complete sub assemblies before attempting to assemble the main parts as there is always a lot of dry fitting and sanding to be done. Also because of the size it all becomes a bit unwieldy in the old shed! It was re scribed where necessary to give the lining wash a bit more purchase. The rear windows are Crystal Clear. Landing lights are Little Lenses sealed in flush with Crystal Clear on the sides of the nose. The undercarriage was drilled and pinned with brass. Some aerials are photo etch and its finished in shades of my trusty Humbrol 27002 / 27003. Incidentally there's half a church roofs worth of lead in the front end to keep the nose down. Alas as I already have a Bear, Il-20 Coot and Madge completed with a Candid to do, I fear I may need a bigger shed. Hope you like it Cheers Pete To show the size of the beast13 points
-
Hello Here is my recently finished 1/72 SNCASE SE 535 Mistral. After SNCASE built DH 100 Vampire under license they developped another version SE 532/535 with a Rolls Royce Nene engine. The air intakes were modified and the fuselage was deepened. The SE 535 were equipped with ejection seats but the SE 532 were later retroffited. My kit is a Mistral from 7ème Escadre de Chasse in Algeria in 1958. I cut and dropped the flaps as they always were in that position on the ground. The upper fuselage and the new air intakes are specific pieces added from the Special Hobby Vampire kit. Patrick13 points
-
Hi there Here is my model of Puff the Magic Dragon in its original colour scheme of white over natural metal. The decals came from from an old Microscale sheet for Vietnam Gunships. The NMF was Alclad. Regards Toby12 points
-
Hello everyone... Last of the five models I finished in the last week. Its the 2nd of my three builds from the Corsair STGB, it represents Major Gregory “Pappy” Boyingtons ‘883. Vella LaVella December 1943. Please feel free to ask questions, post comments, and or add thoughts. Here is a link to the build if anyone would like to read through it. https://www.britmodeller.com/forums/index.php?/topic/235074015-“pappy’s-bird”/ Dennis12 points
-
Morning you lot. Afternoon BBQ planned so I’ll get this update in the bag before I open cider. 🤩 Don’t worry no Cous Cous Will be harmed during the process of This update. 🤪 Ok drum roll please!!!! First ever shark mouth Ever. 🤩🦈 Panic mode initiated. Will it fit? Will it buckle? Will I need tonnes of micro sol and cutting? 😰🤔😐😨😰🤨 Apparently not. 🤩 the modelling gods were smiling. So while the wind was blowing in my favour I did this. Looking gooooood. 🥳😇 That had to settle after I did in fact add a little micro sol. The UC needed it’s work doing. The plan is to remove the chrome part so her stance will be correct. Path of least resistance and all that. Chopped off we have a cross over. Going to have to sort that. Holes drilled to accept the....wait for it.......brass. 😍🎺🎷 stupidly I didn’t take a pic of the bass rod in place but trust me it’s there. Holes drilled in both ends and glued in place. This will give me a 3 to 4 mill drop. Should be enough to give me the look I’m after. The arm got Chopped and re-instated. 😀 Now for the other side. PING!😇 That feels solid enough. quick dry fit before bed. Aaaand one more. happy with that. 😇 Right then the shopping has just turned up ready for later. Gotta fly. Have a lovely weekend. Johnny. 🦈12 points
-
Hiya Folks,.... another update,....... Well I`ve painted the props and beaching trolley and test fitted them along with the floats,...... BUT,...... the filler along one of the wing roots cracked,.....bummer! So I`ve taped it off and applied more filler,.....lets see how it goes eh? I have also cut out a B Type roundel and the grey codes FV-X,.....I just cannot decide whether to apply them on one side or not? Cheers Tony11 points
-
This is the latest project I finished. It is an ambulance jeep conversion, based on Italeri's jeep. The driver is a Tamiya figure and the Nursing Sister is a conversion, based on a Masterbox figure. Stretcher are from Tamiya's Land Rover, the gear from the sparesbox and the frame is evergreen. Screen cover is a plastic bag, real thread for the rope and the pennant is umbrella cloth. The painting of the figures was a real issue, since I could not really see what I was actually painting anymore. I also used crappy, cheap brushes, so I must invest in proper ones and some new glasses as well.10 points
-
Hi there, so my latest finished build and I thoroughly enjoyed this one. There is a wip for this build on the forum I tried to link it to here but alas I'm totally useless with technology and gave up 🙄. I'm happy with the end result and have learned that a little bit of extra detailing can make all the difference. Here are some pics of the finished build I'm going to concentrate on 1/12 scale builds for a while now so the 1/24 kits are now on ice. Thanks for looking back in a while 🙂10 points
-
Since I am new on this forum, I thought it might be a good idea to show my latest finished projects, so people get to know a bit of what I do. The kit in question: Officer, 2nd Bn. Durham Light Infantry Hobb's Farm, Houplines, Flanders 1915 1/15th scale 120mm by Jon Smith Modellbau. It, and the trench section, had been sitting on my shelves for more then a decade. The sandbags are fabric teabags, cut in hald and filled with a mixture or fine gravel and pva glue. Barbed wire is netting, like the one garlic is sold in, cut to length and the stanchions are homemade out of wire.10 points
-
Hi all. Here goes my latest build. A JF-17 in Pakistani colors (or lack of it 🤪) . The kit is Trumpeter in 1/72. Good details and some PE for seat belts and exhaust nozzle, which i found to difficult to mount, so i decided o use the plastic one and some internal parts only. There is some problem joining the lower and the upper fuselage one around the air intakes and the lerx but its minimum. Brothers: Thats all for now. Thank you all. Regards.10 points
-
Well I'm calling this one done, I have to say I made really pleased with how it has turn out, certainly not show standard but a blooming lot better than my original one ! Thanks again to @Jinxman for the homemade decals, without which this kit would still be residing in the stash, more pictures later Cheers Pat10 points
-
I made some further progress on the G.50 during the evening. As luck would have it, the seat tub can be inveigled into the fuselage from below. That was lucky, because if I’d glued it in prior to joining the fuselage together I’d have been quite cross. You see, I found, after dry fitting, I’d glued the seat too far forward. To be fair, I’d followed the vague instructions, and used the moulded block on the floor, but the poor old pilot would’ve had his knees under his chin and been head-butting the coaming. The rather odd large opening on top of the fuselage is plugged by a separate part - and it looks like some clever thinking by the kit maker: it allows for the later closed canopy version of the G.50 without needing a whole new fuselage mould. Neat. I still haven’t done seat belts, but would it fair to say they’ll never be seen if I do? The belts form part of a leather back brace affair, apparently common to single-seaters in Italy, and it’s beyond my ken quite how to fabricate something that will look reasonable. Still puzzled as to why the parts weren’t etched, when there’s at least three PE parts that aren’t accounted for in the instructions. The IP. I used the printed instrument sheet, but didn’t bother with the transparency. It looks quite good. That grey blob in the foreground fits somehow into the slot at the top of the IP. No idea how far it’s supposed to stick forward of the panel, and I have to still make the reflector… you’re ahead of me already there, aren’t you! This morning's fun will be to install the IP and seat tub, then fit the rear decking and fair it all in. Oh, by the way, unusually for a short run kit, have you spotted the location holes for the tailplane parts?10 points
-
Thanks Keith She seems to be better but you know what dogs are like… Glad to hear you're keeping up Steve Anti-skid bumping? The mind boggles…well, mine does anyway. Thanks Chris Another day gone… I really want to get this sorted out but, as we know from our 'new tool Airfix' experiences, an error earlier in the build can have a knock-on effect. I think I cleaned everything up but there was still some fouling of the i/p on the 'other side frame'. Once I'd realised that and eased it in (titter) I got this far: I found it better to bring the two fuselage halves together at the top and 'at an angle' and then sort of roll the pieces together. I'm calling that 'just acceptable' and may be able to improve it by flooding the i/p join with TET later. Next dry fit is the seat: The instructions aren't very helpful I'm afraid with a vague arrow for the seat location. The back of the part has a 'shoulder': …which is obviously designed to close the gap in the fuselage halves but what's the angle? It goes here somewhere: …but, as you can see from the multiple glue points in the paint, does it go behind the frame, on it or inside it? PC's seemed to go in without drama. I shall fiddle later. I did check that the bits on the wing go in - they do with care: That said you can probably see from the photo, as I did, that the PE on the right side of the frame had been bent, presumably during dry fit closures. I've now pulled it off (fnaar!) and moved it inboard a bit.10 points
-
Hi all, It's been a weekend of doing lots of little bits and pieces so things are progressing slowly but steadily. First I installed the wing spars and undercarriage struts. No issues there, but there were a few seams on the struts to clean up. I've also progressed a little with the fuselage, with some of the Eduard photo-etch interior in place. There's more PE to install but it's a start. And much of it won't be seen again with the canopy on (I know that from my previous attempt) but "I'll know it's there"! Next I'll be adding some more PE to the cockpit and undercarriage, but having stayed up a bit to watch England v West Indies and then got up at 5am to do the RAF Benevolent Fund quiz, I'd prefer to tackle the fiddly bits when I've had a bit more sleep!!! Comments and feedback are most welcome. Thanks for looking! Matt10 points
-
Finally! Model with many hurdles mainly due to faulty decals. Only smallest decals were working, everything else I had to paint. Almost everything as I couldn't go over two yellow chevrons on the rear fuselage...9 points
-
Afternoon gentlemen Some Fw190 bobbins for your entertainment.. ..I painted the layers of PE for the instrument panel – there is a backplate (not shown), a layer with just the bezel surrounds and the blanked instrument in black, and the detail layer in RLM66.. The lower panel has some colour coding (thanks Roger) for the instruments that are on their way and should be here next week.. ..also made the ‘Ausgleichsgefäss’ that sits under the main panel from many punched discs (the 3D print didn’t really work..) ..and the artificial horizon, now just awaiting instruments & placard decals… ..while waiting I have been readying all the PE I will need for the gear wells and a load of other bits – using lots of pictures like this to map it all out.. Notice the dimples and the raised ribbed panel next to them.. ..after many hours of work, here you can see the mainspar, wheelwell roof and some of the wing ribs printed out, stuck to litho and being test fitted.. ..I wanted to start with the roof as these won’t be PE anyway, the drawings are just to give me working templates.. ..here printed, stuck to a sheet of Perspex and all the centres of all the dimples being marked.. ..and my first ever use of my new mini Proxxon milling machine to machine the depressions.. ..added the sidewalls and some filler to fair them in as the pressing is curved at the sides and primed to make sure all was well.. ..starting to work annealed litho into the female mould… the completed one you can see at the front is the first version I did in a video episode on my Patreon build after which I realised I had made the depressions too big (& therefore the dimples..) ..re-adding a template so I can see the panel outline and start cutting it to shape.. ..and the completed parts… ..the ribbed panel was approached in a similar way, just reversed so instead of dimples it makes raised strengthening ribs.. ..sticking templates down to mark out where the ribs go.. ..ribs added and a wash of thin CA.. ..cleaned up, rounded edges and primed.. ..litho being worked into shape.. ..and the finished panels with the rivets etc added.. ..a day’s work… ..and checking for fit.. ..happy with how they turned out, and don’t forget, if you want to see how parts like this are made and join me in the ups and downs of this build, please join my Patreon TTFN Peter9 points
-
So the final update and the GT40 is finished 🙂 Joining the chassis and the body together was a bit of a battle mainly down to the fact I only have one fully functional hand due to an accident many moons ago which means I have no feeling or sense of touch in the majority of my left hand . So I called in international rescue ( my son ) and between us we finally got the parts together 🙂. The rest of the finishing touches went fine and here's a pic of the final result More pics to follow in the rfi which I will post up shortly. Many thanks to everyone who followed, commented and came up with suggestions for improvement along the way I really do appreciate the interest 🙂9 points
-
...here you go: ...some of them at least. The self-adhesive chrome window frames that came with the decals are awesome - really great idea. This won't be the last time I use Arctic Decals products. The SBS PE rigging was also worth it - much better than I'd have achieved without it, a bit fiddly to apply (of course) but much easier than doing it myself. The SBS set doesn't include rigging for the tail though - I'll have to do that myself. thanks for looking Julian9 points
-
Here we go! The obligatory unboxing. And here's the Techmod profile I also have the Hurricane Mk.I (A05127) instructions to guide me.9 points
-
Hello everyone I will welcome you with the b-2 bomber model. A gluing, or rather a sculpturing, took me half a year. At the time when I stuck it, it was the only 1/72 scale model on the market. Tests are not impressive with quality, it is a model from the "gniot" series. The patches date 1991, convex lines, wyppaczane items, there are many shrinkage pits, you need to improve a lot and even more earn. I collected probably the majority of photos, videos and reports from the model building available on the Internet. Unfortunately, very few photos of B-2 details are still available today. For the construction I used Eduard's plaques and airesa armchairs, the only elements available on the market for this model, and still are not perfect. Cockpit, bomb chamber, chassis recesses, engines, leaning rudders and many other things done from scratch, engraved lines. I have not used so much putty in my life, even on Mach 2 models. Model painted mr. Color C (FS36118), H. The presentation of this copy (21066) took place on November 22, 1988 at the Palmdale Air Force Base, California. The first flight took place on July 17, 1989 from the Palmdale base to the Edwards base. greetings ,,,,,8 points
-
In the churchyard of St Edmunds or St James, Blunham, Bedfordshire, is a heavily worn gravestone. These days it is barely legible but back in 2005, it was much easier to read. We were hosting an American friend in November of that year and she was eager to take some photos in the churchyard. She got to one gravestone and said, "Oh, he died in the war!" I looked, and amongst the many names on the stone was a Pilot Officer Alan Dunn Hopkin, who died on the 10th July 1940. I have to confess that it was several years later when I thought of the young man whose name was carved into the gravestone. I remembered the date. The first day of the Battle Of Britain. I wondered how he was lost. Research revealed that he was with No. 59 Squadron, flying Bristol Blenheims from Thorney Island, West Sussex. At 22.20 hrs on the night of the 9th July 1940, Hopkin, along with Sgt T.J Rowles (observer) and Sgt J.W. Falconer (WAG) took off on a Hach patrol (anti-invasion reconnaissance) to Cherbourg. Another Blenheim, R3881 left for a separate patrol a couple of hours later. For some reason, both aircraft appeared to get lost on the return journey, both being plotted by RDF but neither acknowledging the calls from the plotters. At 3am R3637 exploded over Cardiff. None of the bodies were recovered. It has been suggested that Hopkin and his crew may have been the victims of friendly AA fire. The other Blenheim, R3881, flew into an electricity pylon near Cleehill, Shropshire, with the loss of all on board. These six men must have been among the first to lose their lives during the Battle Of Britain. I decided that I had to build Hopkin's aircraft as a way of commemorating one of my Village's fallen sons. I had the serial number, but precious little else. It took several years of digging before I finally found the individual aircraft letter on the 59 Squadron website. Photos of contemporary 59 Sqn machines gave me a good idea of how the aircraft would most likely have looked like and study of photos revealed that R3637 almost certainly would have worn the B scheme. I chose the new Airfix 1/72 kit to represent R3637. Mine was the bomber boxing and this was moulded in the UK. Although the plastic "felt" a little strange, it was much, much nicer to work with than the awful, soft but still brittle, made in India plastic and the fit was markedly better than I anticipated. It was only the bomb bay area that really let the kit down. Otherwise, the build was straightforward. Paints were Colourcoats and Humbrol, whilst decals were a mixture of Xtradecal, Modeldecal and Aeromaster, plus a few of the kit's stencils. The code letters were from an Aeromaster sheet and were the only ones in my stash that replicated the style seen on other 59 Sqn machines at the time. I also used some Peewit paint masks for the glazed areas. While they were a bit cheaper than the equivalent Eduard product, I felt that they weren't as precise as the Eduard masks I've used so far and the edges curled up after a relatively short amount of time, meaning a fair bit of overspray had to be removed. The retracted turret option was only used as the extended one was ropey to say the least, covered in deep gouges and having several moulding flaws. I'm sure I have heard others report that they encountered the same issue. I have to apologise for the quality of the photos but I only just finished the model in time. I am actually away from home at the moment and had to take the photos last Friday, the night before I left. My SLR is unserviceable at the moment, so I had to make do with my phone camera. So, my first completed build in years. I say completed, but it isn't *quite*. There's a not quite finished decal repair on the starboard side (hence no photos) and I haven't added the wireless aerial as yet either. Once done, I'll try to take some better pictures but otherwise, thanks for looking. Cheers, Mark. This model is humbly dedicated to P/O Hopkin, Sgt Rowles and Sgt Falconer.8 points
-
This is my build of the 1/72 Sword kit of the Douglas AD-4W. I consider Sword to be one of the high end limited run manufacturers and the only real fit issue was the radome to fuselage fit. Also the main gear is a bit fiddly. I still have the problem with the decals sticking for dear life to the first place you put them. I found that if I can lift them up and replace then they will be movable for a while, but still the placement is difficult and I think some of them might look like they were painted on by a sailor just back from a long shore leave. I don't know if I am doing something wrong or if everyone has this issue. I am placing them directly over Humbrol Gloss #15 that has had 48 hours to dry. On the plus side they seem to be resistant to silvering and snuggle down well. Anyway here it is: Next up is the Planet Model XTB2D-1 SkyPirate. Enjoy.8 points
-
I've just finished this pair, the Hasegawa Ki-46 Dinah, representing two aircraft of the 18th Dokuritsu Hiko Chutai based in China in 1943 and 1944 respectively. The kit was quite a straightforward build and I don't recall having any particular issues with it - a rambling build thread is here if you need a step-by-step account. Additional bits and pieces used were Eduard's microfabric seatbelts and canopy masks, Maketar Hinomaru/Meatball masks for the national markings and a bit of EZ-line for the antenna wire on the Ki-46-II. Paints used were Sovereign Colourcoats for all the main colours (they are listed in detail in the build thread) and various acrylics for the detail painting. The varnish coat was Windsor and Newton Galeria matt varnish cut with IPA. The kit transfers provided the tiger markings for the tails and functioned satisfactorily though not brilliantly; the legendary qualities of Hasegawa decals were one of the motivators for using the Maketar masks to paint the national markings. I'd like to record once more my gratitude to Nick Millman who in addition to the information provided on his blog patiently answered my questions and without whose suggestions and advice I would not be as happy with the end result as I am now. Speaking of which - and enough speaking - here they are, first the Ki-46-II: ... and the Ki-46-III Thanks for your indulgence gents Cheers, Stew8 points
-
Hi all, I finally bit the bullet and thanks to the National Archives where I managed to get copies of 79 and 34 Sqn's ORB's and diaries for the time my dad was with them I now have the serial numbers for all but one of his Thunderbolts, as a matter of interest the one that is missing is the last Thunderbolt he flew in Burma, which was a delivery flight from Burma to a MU in India, the aircraft letter was B so if anyone knows that would be fabulous! So back to the build as it stands I only intend building one from 79 and 34 Sqn's so I had to pick ones that had a story to them so the first out of the blocks is KJ252 EG-Y this is the aircraft he was flying when VJ day was declared. As I said earlier on in this thread my dad always said the T-Bolts he flew were Green and Grey, but after seeing the fantastic colour film of the 79 Sqn machines, which I think was filmed around the time he was there? I am now thinking he miss remembered it, evidence of this is from something else he said 'I never flew a silver Thunderbolt' but one of the 79 Sqn aircraft he flew was KL338 NV-Z an all silver P.47! So this will be my 79 Sqn build. So here it is, 1/48 Tamiya brush painted, which was a challenge getting the faded brown over grey look, any why this is it, So any thoughts? John8 points
-
Interior painting is done. The cockpit is a combination of the Hasegawa and Minicraft kit parts, and PE from the Eduard set for the B-24D and B-24J. Painted wine bottle foil masquerading for canvas lining hides the lead for the nose weight: Doesn't look too bad! I opted for the D-style yokes - these are from the Eduard detail set for the Hasegawa kit. The instruments panel is from Eduard's detail set for the Academy J and comes with a lovely old fashioned bit of film with instruments. On the front bulkhead I painted shadows in an attempt to create an optical illusion of the piece not being solid. I am betting however little if anything can be seen in the nose compartment. Ready to assemble the fuselage! Thanks for looking!8 points
-
Thanks a lot, it's pretty much finished now; 10 years later... Thanks a lot, glad you like the work. Thanks a lot, I'm continuing with the three older ones now, hoping to get them through as well. Time will tell. So there are only the wheels left to fit. Not much to dwell on. Alignment while the epoxy cures. After the glue had fully cured I put some weight into the tyres as usual, and this is what it looks like in the end. I thought about some weathering but nothing is decided yet, I will continue with the older quattros and see what I feel like later. No, I don't know why this had to wait 10 years... 🙄 I will sort some more photos for the RFI-section a little later.8 points
-
Thanks for following along, although - fair warning - this will not be a historic rally build. More like what would happen if someone took an old rally car and modified it for street/trail use. Anyway, progress has been made. First thing I wanted to do was to adjust the ride height up a bit and increase the track slightly. I used some clamping blocks from my milling machine to prop the car up to set the height where I wanted it: Position the wheels for a quick check: Then I used a piece of sheet styrene on the back of the brake pieces to capture the little nylon bushing and to provide a smooth surface to glue to the hubs. I usually file the hubs down a bit to adjust to the width I want and then glue the wheel to the hub. Once dry, I can remove the wheel out of the bushing so I can paint and detail them. Using the clamping blocks again to hold the chassis at the height I want and to align the wheels to keep all four of them straight and on the ground at the same time: And once dry, a check of height and position: Not a huge change. Maybe 2mm higher and 2mm wider overall. Next up was a front bush bar to sit in front of the bumper. I used 1.5mm styrene rod and careful application of a candle flame to bend the rod into shape so that it sticks out in front of the bumper and mounts into the existing skid plate from the kit. I'm going to try to use the same technique to build a roof rack next.8 points
-
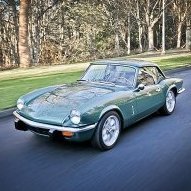
Here it is, some fancy photos of my Airfix 1:32 Jaguar E-Type Open Two Seater. I was going to build it as it came from the box but had to change the wheels and add a few extra details. The colour scheme is inspired by Jaguar E-Type registration 77RW, which is the first OTS E-Type although this isn't quite an exact replica. Added bits are: Mitoos Classic treaded 20x6mm tyres and 16.5x6mm wire wheels supplied by Pendle Slot Racing (very happy with their customer service). Nickel silver wire gear lever, hand brake lever, windscreen stay and windscreen wipers. Plus a rear-view mirror from a bit of sprue and a whole lot of styrene sheet underneath to close off the under bonnet area and cabin. Link to the WIP thread here. This it the first build that I've both started and finished since joining the forum. Enough chat, enjoy some photos. The backdrop for some of the photos is a picture of the British Motor Museum Collections Centre taken from the builder's website and the car is sitting on a sheet of wet and dry paper as the roadway.7 points
-
Here is another Sweet 1:144 early Hurricane Mk.I I built back in 2009. It represents H-22 of 2nd Escadrille (Les Chardons), 1st Group, 2nd Regiment, Royal Belgian Air Force, at Schaffen, in May 1940. The kit was built OOB and fully painted and varnished with brush. Thanks for looking Miguel7 points
-
Hi all, This is my first post in britmodeler Here is 1/48 Kittyhawk Sepecat Jaguar GR.1 with the markings of XX743 in Coltishall-England 1975. This is built OOB except for Master pitot tube and Kitsworld decals. Happy modelling7 points
-
This is my attempt at recreating Eduard Ritter von Sleich and Johann Czermak's early Roland CII using the Eduard kit. I had to remove most of the engine vents, scratch built the instrument panel since it is different from the later model, added some missing instruments in the cockpit, made the Lewis gun mount and the fishy anemometer and modified the kit decals to get the gloomy looking fish face (?). Build thread is here.7 points
-
This small early French airliner is now completed, it was among the firsts to provide restroom facilities for its passengers. It serviced a line that went from France to North Africa stopping on the way in Spain. It shows that undeniable charm of these pioneers, a bit ungainly but well-proportioned, that make them so attractive. Typical of many designs of the time, the cockpit (and pilot) are located in the aft fuselage exposed to the elements, while passengers traveled in relative comfort in an enclosed and fairly well-appointed cabin. It provided service for a time, but did not reach the popularity or production of other later Latécoère designs that will make themselves and their pilots famous, most notably in South America. Nevertheless, and considering that this was 1921, it its no doubt among the harbingers of the typical small airliner designs that would follow. The WiP can be visited here:7 points
-
Airfix's iconic B-17G Flying Fortress "A Bit of Lace" a compulsory addition to every schoolboys bedroom ceiling at the time. This kit dates from 1975, and I can still remember riding home on my bike as fast as I could so I could start on it. This has to be one of the best box tops ever so I think it will have to be kept alongside the completed model. A big thank you to Scott aka @Jinxman for making the decals without which this would never have been built, and @Danskfor hosting this brilliant GB, pictures below, I hope you like it. Cheers Pat7 points
-
I was determined to finish a Revell Halifax I've had on the go for ages now, so with that now done and dusted cracking on with these. As I've done 3 Spitfires, a Seafire and a Sea Hurricane recently I thought I'd kick off with the Luftwaffe side of this build. The cockpit parts of both kits fit well, although there is rather a lot of flash on the 109, disappointed Airfix! I cut the pilot of the 109 off to re-position him trying to see who the heck is knocking holes into his steed! The bulkheads fit nicely in the HE-111, especially if you put them in the right place 🙄. Assembled as much as I could before painting, so here we are with the priming and RLM 02 done. Davey. The wings seem to fit nice on the 109. Not glued together yet, still got all the painting to do in the cockpits.7 points
-
You'll never going to be able to join a motorcycle gang with that attitude Pete. Most generous of you - as always Giorgio. It's merely an unfortunate coincidence hat I've always coveted one of those full-length leather coats as well James.... Good to know! I hadn't realized that there was in fact an earlier version of the pylons but now I look back over some of the shots showing '481 and '486 in the same frame as well.... Also good to know about that bracing on the inboard ones - I wasn't sure were these a later museum repair, but can see it readily on early contemporary shots of 481. 3D printing you some horns there Beelzebub the Enticer... And you as well.... Exactement Alan - however I need to consider those who are not Friends of the Golden Alloy in their building (dreadful I know to even contemplate that there are such devils in our midst) and don't want to have to hand-cut a whole load of gear for the Ministry of de Fence. You have convinced me and the Deflected Control Surface lobby have now been catered for (see below) 😁 Well worth your time if you ever get the chance. There's a small aerodrome near Birr as well so flying in clandestinely in a Lizzie is an option. 'Ced bin in?' 😁 The Regulars! How could I forget? 🤦♂️ That and 'The Yobs' (Dog-lovers look away now...): Is there any other kind? 😀 Thank you on both counts you kind man Chris. As per Alan's suggestification I have made it possible for patrons to deflectify the ailerons if required, via insertion of a 0.6mm Ø bendy length of their choice: A mounting mechanism also added for the wing fence in the form of a 0.3mm wide slot for the brass part to fit into later: I want to limit adding too many such slots and opening if I can help it in order to avoid to much clean-up after printing, however in terms of assembly, a certain number are going to be unavoidable. Today is also the day when the wings of both aircraft head in separate directions. XJ481s intact versions with all sundry bumps etc. now goes to it's own component, whilst XN708's has now officially had the chop between ribs 4 & 4a: The axis of rotation there isn't quite right in the above shot as the wing is angled beack to wards the rear of the aircraft more in reality with very little gap between the two halves at the rear. A frontal view with this corrected: The reverse-angle: A stbd 3/4 with ailerons deflected as per @hendie's advice: That's me out of breath, out of time and out of words. Off to continue reading John Stubbs' biography of the poet John Donne, in which there is considerable discussion over the lax morals of London lawyers at Lincoln's Inn and their propensity for streetfighting with Apprentices. This is quite frankly disgraceful @Fritag and I trust does not reflect current Yorkshire legal practices.... Tony7 points
-
1/48 Seafire FR.47, 804 Squadron, HMS Ocean, Lee on Solent 1949. Grand Phoenix reboxing of Airfix kit, with Aires resin and etched brass cockpit and engine, and Aeromaster decals. Rob Taurus vacform canopy added. Main colours are White Ensign enamels, with additional Humbrol and Xtracolor enamels. Thanks so much for organising this GB - it's really given me an incentive to get this kit out of the stash, and I've enjoyed building it.7 points
-
Ah the good old days of big locating pegs, moving parts and glue all over the model… nostalgia's not what it used to be eh? Thanks Mark - Mols says woof 🐾 PE eh? Sometimes, if it goes well, it really enhances the model. Other times it's a pain in the [insert acceptable forum phrase here] I've learned from this build that the resultant part mustn't be bigger than the plastic it replaces. Hopefully I'll remember… Well it's ben a few days but I was this morning struck by the bleedin' obvious - the seat goes ON the frame: I know, I know… where else would it go? Dangling from the ceiling? Stuck to the fabric side? I am an idiot… That's the last 'never to be seen again cockpit shot and you'll notice I've dry fitted that side to the wing. Nice. Eventually. Some of you may be wondering why I haven't fitted the belts. Well, I like pilots in my models flying on the ceiling. Will a pilot fit? We shall see… With all that done we get this: …and with a bit of wiggling the top of the fuselage has been glued: I want a bit of wiggle on the bottom for the wing fit. Who doesn't?7 points
-
Hi everyone, Just getting into AFV modelling. Lots to learn but here is my recent Tamiya 1/48 Jagdpanther.7 points
-
Well I made the mistake recently of mentioning that Im sporting a Mohawk to a few members. Probably not the wisest thing to do on a U.K. Forum, where punk pretty much began. @fatfingers, @Bullbasket, & @Pete in Lincs asked me to post a photo, I finally got around to it. Im sorry its kind of mushy and leaning but I'm out if good hair product currently to really get it to stand up all the way. It looks shorter here because of the mushiness but its pretty long actually. Dennis7 points
-
The tape is off and the fuselage halves seem to have bonded well. I cut a slot on the upper port nose and glued a piece of plastic tube into it, then sanded it flush to form a gun trough. It needs a lot of fettling, but after one dose of filler and subsequent sanding it looks like this: I intend to make two male half moulds for the main float, then vacform it in the same manner as the fuselage. I started by making an identical pair of profiles from 40 thou plastic card (useful stuff, that), using the aircraft profile very handily included in the Aeroplane Monthly article as my reference. I then used dividers to mark out where the keel meets the upper part of the float at defined points along the length of the float. The AM 3-view did not include a plan view of the amphibian, so I sketched out an 'imagineered' plan that looked about right and again marked out those dimensions using a pair of dividers. Using those measurements I cut some plastic card formers and cemented them into place on each float profile. Once they have set I'll start on shaping their curves. They'll eventually have a strengthening plastic framework and be filled with P38 to make the moulds: So, this is where I've got to, with a plank made from pieces of 40 thou and 60 thou plastic card laminated together with plenty of liquid poly to make solid lower wings. If you sit quietly and watch carefully, you might get lucky and see a Gurnard: Jon7 points
-
Airfix 1/72 Heinkel He.177A-5 'Greif' 6N+HN of 5./KG 100 1943 Here is my second build for the GB a kit originally released by Airfix in 1967. I have built it mainly out of the box with the exception of some scratched extra detail in the typical for the time spartan interior plus a couple of additional parts around the rest of the model. All in all great fun to build and I really enjoyed having a go at mottling for the first time and creating my own masks for the major aircraft markings. The build thread can be found below: Cheers, Mark.7 points


.thumb.jpg.158e2e086d45b8f96b7d93b8bee8dc21.jpg)


This leaderboard is set to London/GMT+01:00