
Leaderboard


Popular Content
Showing content with the highest reputation on 07/07/20 in all areas
-
Hiyas, Back with another freehand cammo, this time it is an Asia Minor scheme on an Imperial Iranian Sabre. When I saw that High Decal was releasing decals for a cammo Sabre I just had to do it! Converted a japanese Sabre with the long wings and dropped the slats with a set from Kasl other than that I threw in a cockpit from Aires and wheel wells from CMK. Here's some pics Cheers!36 points
-
I just put the finishing touches on this (such as it is) in the way of the shredded rudder on Charlies Boeing and the 109's antenna wire (courtesy of my wife's long blonde hair and black jiffy marker) I took pics in my garage because of the large size base/ models not fitting anywhere else to get a shot and it being too windy today to take the scene outside. I'll try for better pictures with sky behind another day. The base is a large piece of Douglass Fir painted with aerosols. The Boeing is (of course) HK Models E/F and the 109 is Revell with a few upgrades. Build thread can be seen (I think?) over on Modelers Alliance...somewhere Please excuse the poor photography, bad lighting, cruddy backdrop etc. etc.35 points
-
Hi ! Another buid done in 2016, Eduard's "Vietnam scooter" edition of the old but still perfect hasegawa kit Complete buid here : http://fighters.forumactif.com/t79987-a-4e-skyhawk-nam-68-va-153-uss-coral-sea And with his A4-F brother from Haseg made in 2002 See you Fabrice https://www.facebook.com/Fabrice-Simon-10451814131630626 points
-
Whilst I had the lightbox out I thought I would take some pictures of one of my last few builds, he He219 UHU. This was an absolute dream to build (as most of tamiya's stuff is) which allowed me to build it up in sub-assemblies to ease painting before it all came together for the camo. This was my first time doing such a complex camo scheme, and enjoyed and dreaded it with equal measure!! I think it came together fairly well in the end, few splotches as i was getting use to the airbrush and thinning ration for the paint, but it is nice to stretch oneself out the comfort zone every now and then and learn a few new skills. Working with the airbrush at this level certainly helped me when it came to mottling the Bf109, but that is for another thread. Oh well onwards to the pictures, hope you enjoy. Matt26 points
-
So for anyone attempting to actually build this kit, good luck! The fit in places is horrendous, the instructions are missing whole sections and have the wrong part numbers. Add to that missing parts that when contacting the manufacturer suggest if i buy another kit from them they will put the missing bits in with the new kit! overall I'm happy with the result, but far too much time dry fitting and reshaping bits that just do not line up. n other areas its an excellent kit, the pylons are incorrect fro a UK Jaguar and thanks to @TedAntonopoulos I managed to get a resin replacement set inc phimat, 2 x correct shape tanks and the ALE 10126 points
-
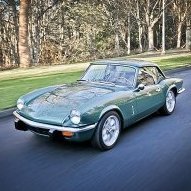
Well not really! It’s actually Eastern Airlines 5th TriStar that was used for the 1972 summer world tour by the Lockheed Aircraft Company of California. The aircraft came to the U.K. to be demonstrated to the two British customers for the TriStar- Courtline Aviation, and BEA. Arriving at Luton airport the headquarters of Courtline, 305 was adorned with Court titles and logos in preparation for promo flights around various U.K. airports, ending with a flight to Palma, on the island of Mallorca-a typical destination for the airline. The next stop for 305 would be a short hop down to London Heathrow, where BEA titles and tail markings were hastily applied in preparation for further publicity flights and a residency at the ‘Farnborough 72’ trade show. Onto the model, this is the venerable but still very accurate Hasegawa example first rolled around 1980! Sadly these models are becoming rarer all the time and commanding extortionate prices on auction sites. The only mods I made were to add the early type thrust reverser jacks to the RB-211’s made out of plastic Rod, and the extendable tail skid (courtesy of a pin!) Paints used were Halfords appliance white, Xtracolour light aircraft grey, and Humbrol chrome silver from a rattle can. The only problem I encountered with the build was with the Classic Airlines decals. Although beautifully printed they did not seem to match the Hasegawa model, and required some trimming and touching up. One place where this is really noticeable is the Courtline titles on the aircrafts belly which do not represent how they appeared on the actual aircraft-and after referencing and re-referencing numerous photos of 305, it is not my painting skills at fault(!) Overall though I’m pleased with the finished result in this unusual hybrid livery. Any comments or feedback is much appreciated-Thanks for looking.25 points
-
This one sat on the corner of the bench for at least a year semi completed. So after building the old Airfix AC47 and posting here someone noticed this one sitting forlornly in the background so as promised I decided to finish it off.23 points
-
Hi ! I had promised you informations on my friend Basket... I take advantage of the opening of this topic to keep my word This dear friend lives therefore a small mediterranean village called Marseille. Rémy (his real name) is indeed a true anglophile, but of an anglophilia which makes useless the existence of the worst anglophobes. Let me explain 🤓 This excellent friend draws most of his knowledge of England from the repeated vision of "Little Britain" and has identified himself surprisingly with Miss Howard (the Emily Howard her/himself), a curious and unique case of pathological bovarianism (this partly explaining its acute suceptibility). So he scrupulously adapted his lifestyle to his favorite character... The true problem is that, despite a much sought after outfit, his appearance is closer to that of a trans rugby player than that of a victorian lady and anyone who has suffered the spectacle of the dear Rémy bicycling down the narrow main street of his village (the Cannebière), screaming hysterically in a high-pitched voice “I am an English lady, yes, a real lady” will understand what I am talking about... But let get back to modelling with one of my last build, a M113 ACAV from AFV Club. The figurines are from Bravo6 and the water-buffalo from Mininature. The kit is a gem and an excellent base for detailling. I’ve scratched some internal details which remain visible when closed (so it’s not an exhaustive redetailling of the interior). The project and work in progress The pics below will show you stuffs i added on the interior. AFV done And the final result Complete buid here : http://fighters.forumactif.com/t94091-gb-vietnam-buffaloes-encounter-m113-acav-1st-squadron-10th-cavalry-4th-inf-division See you! Fabrice https://www.facebook.com/Fabrice-Simon-10451814131630619 points
-
My last bird, done during the lockdown. A one month project, according to this péculiar period, with limited scratch an corrections. The challenge was to paint it red and avoid a "toy" effect, Hope you’ll like it Complete buid here : http://fighters.forumactif.com/t93313-gb-oursin-vorace-f-104-starfighter-eiko-eduard-profipack-148 Fabrice https://www.facebook.com/Fabrice-Simon-10451814131630619 points
-
Good day friends! I'd like to present to you my latest complete project - the belgium F-16 MLU in colorfull and very exciting anniversary livery. The kit is the Revell's, well known to many of you. It appear on the market in 2000 and up to now have 16 different issues, most of them in colorfull camouflages, like tigermeet airplanes and etc. The current livery is most exciting livery for my own. It was created by the Happy Design Studio for the 100tg anniversary of 1st squadron "Stingers". More for the kit and the plane you can read here: F-16 MLU kit and plane The painting process you can watch here: F-16 MLU painting Beutifully aranged colors and shapes and huge and pretty Scottish thistle on the fin. And their moto "Nemo me impune lacessit" (No one provokes me with impunity) on the external fuel tanks. The decals in the kit represent the color stripes and all painting on the fin very well, but from my own opinion the colors of the stripes are wrong. The original colors are actualy the standard F-16 camouflage colors. Compared with them, the Revell decals look darker and wrong. Ecpecially the yellow stripes are in difeerend, more warmer tone than the original. You can see the bright, lemon yellow in the video. Therefore I have decided to make the camo on my own using paints. After cockpit assembly, some rescribing and riveting to improve the panel lines I started with the yellow areas. After drying of the paint it was sanded down to remove sharp borders between colors and to blend it with the surounding surface. At the end the yellow was polished. The horizontal stabilizers were also painted, sanded and polished: After that with templates based on the original decals, I have positioned masks and covered the yellow zone. The front yellow stripes are masked with 0.7mm wide masking stripe. The all model was painted with undersurface color light gray. And then started with masking for the second middle gray color. And after painting with middle gray, masked for the black: I have used the great semi-gloss black of Mr. Hobby. From here on all remaing thing was easy. I have changed the original AIM-120 rockets with Eduard's resin ones. The fin decals are just perfectly sized and shaped. The just laid without any problem. The whole decals design work is stunning! Here is the result: Details: . As you can see all stripes are perfectly aligned. The yellow stripes on the horizontal stabilezers are aligned with the feuselage stripes. And few more pictures:19 points
-
back to planes ! I am initially an airplane kit builder. When I resumed modeling 4 years ago, it was with this F4 C and i discovered the forums and their members who are not ultimately that big perverts ... (apart from Basket, whom i met then, but I would have the opportunity to come back to it) Anyway, time for pics : the entire montage, wich took me five months (a lot of scratch was done), is here :http://fighters.forumactif.com/t78359-f-4c-phantom-ii-nam-1968-557th-tfs-12th-tfw-cam-rahn-bay-air-base See you! Fabrice18 points
-
Morning all, Just completed a fun build of the Hobbyboss Mi-4, in Aeroflot colours: An excellent kit, and highly recommended. Very well engineered, particularly the way the complex 2 storey interior fits together. I also used a bit of etch from Dream Model, but quite a bit of it was unusable and I would recommend going Eduard instead. I meant to make this a simple OOB build, but I went off on one and made an Mi-4P to justify the civilian scheme, this meant making square windows, civilianising the interior and making spatted wheels. The markings are not authentic. The decals are from a simple but well made sheet by C3D, these markings are actually for a medevac helicopter but are similar to this photo: This was my first helicopter and I take my hat off to rotary wing specialists, it can be challenging! I haven’t got the hang of blade droop, in fact I trashed the kit rotors trying to bend them with hot water and had to bodge from there. Also the undercarriage is very delicate, and I would advise only adding the front wheels at the very last moment. But hopefully the next heli will be a step up. The Lada is probably anachronistic being a 70s model, but I couldn’t resist! Thanks for stopping by, Harry18 points
-
It would look pretty cool surrounded by rocks, seaweed, and weird looking fishes swimming in and out of out wouldn't it? but NO! I'm sure the citizens of that fair town would take umbrage to that statement... or raise a glass to it I'm no good at puzzles Initial thought are for that to work, the roof will need to be at least 6 or 7 inches above the car to prevent the roof blocking the view. I may model it up to see how it looks. Thanks Ian. something beginning with..... ? As far as I am aware, Pegasus was leased to the VSOE. I've no idea how many bar cars are on the VSOE but the bar in Pegasus is pretty unique so if you don't remember it, it must have been a different car? duly noted Paul, thanks As I get closer and closer to the finish line with this penance, I keep spotting more bits that need added. As I was zooming about photos during the week I spotted a small reddish thing mounted on the wall. Upon zooming in further, I discovered it was one of these... an emergency hammer to break the window in event of having to get out quickly. There were 4 of them in total. For the first time in what seems like ages, I resorted to scratch building - Shock! Horror! What - no 3D printing? Well, I did consider it but it was actually easier just to go ahead and scratch 4 of these little blighters and paint them up. According to my references, they are mounted directly to the wall, though I'm sure there's some kind of bracket there - I just can't see it due to the resolution of the photo. I did carry on with some easy things though. The roof structure got fitted over the bar area -then remembered somehow I have to set up a few bottles and glasses in there later. Gulp. Brass lamps got fitted to the dining area with chromed lamps being fitted to the bar area. After that there was pretty much no easy things left - at least nothing that can be done now. It was time to start the colossal task of upholstering the chairs. This was not a task that I had been looking forward to. For one - I hate doing decals, transfers whatever you want to call them. I hate 'em almost as much as I hate painting... Two... I wasn't even sure this was going to work. Just to make things easy - I have no copy of the original swatches that were used to specify the fabric. All I have to go on is a few photos of the interior showing the blue fabric covered chairs. After searching online for some time I found something that seemed as if it would work - though it was the wrong color. That would have been too easy wouldn't it? I sampled the color on a Pegasus chair then replaced the original color in the print to match. I then scaled it and mirrored/repeated it over and over a few times. Unfortunately it was not a seamless pattern I had used so it ended up looking a bit regimented and geometric. This was what I was aiming for. It's more stylized than the pattern I have but what the heck - lets give it a go and see what happens I had a sort of plan though. Due to the shape of the chairs there was no way I could cover a chair with just one piece of decal. I was gong to have to cut individually shaped pieces of decal for different areas of the chair. I was hoping that this chopping and rearranging would break up the pattern. Each chair took 12 individual sections of decal. Some of the template pieces shown here were reversed to provide right and left handed versions. Rather than bore you with gazillions of individual photos showing the process I stitched a few together to try and lessen the pain for you. From left to right, top then bottom.... (I was trying to do it clockwise but apparently I'm not good at getting things in a clockwise order!) The first wing goes on, followed by it's opposite number on the other side. The seat back (lower) piece was slapped into place, then the lower side panel Lower side panel on opposite side, followed by the small front section. The seat pan was a real pig to fit though not as troublesome as those arm rests. I couldn't believe how bloody awkward they were to fit. After that, the head rest area was added, and finally the back piece was slid into place. That was one of those tasks I never ever want to repeat. EVER. That effort took me two full days of nothing but cutting and slicing decals and fitting them, over, and over, and over. 16 chairs with 12 separately cut sections of decal = 192 pieces of torment They're not perfect by any means but I did my best and its a result I think I can live with. After all that, the decals were gloss coated to seal them, followed by a matt coat to remove the shininess and to try and make them look more like fabric. Italian Dark Brown was used to simulate the wooden legs - they'll get a satin coat later Now just for the hell-of-it. Here's a chair, just cos I took the photo Then no sooner had I believed I had finished than I turned around and there on one of my drying blocks at the back of the bench was these two sitting there, grinning at me... AAAaaarghhhhhhhhhhhhhhhhhh Shoot me now. Please! I did try and take a photo of a few chairs in place with tables etc, but broke off one of the luggage racks while trying to fit the table. That decided it - I was calling it a night. That can wait for another day I'm off for a beer!17 points
-
Hi all Here's my latest completion- I only count the build fully complete when its been posted here . After my Bf 109 I turned next to something British, which turned out to be Airfix's offering of the Hawker Hurricane Mk1. It went together pretty well although a fair bit of sanding went into the thinning the leading edges and removing the poor join of the front part of the wing to the lower fuselage. Its all out of the box apart from a somewhat shoddy attempt at a diy harness made from kitchen foil and some spare PE from other builds: I ended up going for V6665 which was flow by Sgt. Tadeusz Andruszkow of 303 (Polish) Squadron who was sadly shot down and killed whilst on patrol over Horsham on the 27/09/40. I used masking putty for the camo and masked the red fuselage band instead of using the decal. I actually ended up painting this three times as I wasn't happy with the dark earth colour- I eventually settled on an 85% XF49/15%XF52 mix and then added a couple drops of yellow which I was happy with. I almost finished the model thinking it was my best to date and then disaster happened. I was removing the canopy masking only to realise that I hadn't masked the two side panels on the front piece- i'd masked the insides and must have taken a break and then forgotten to mask the front for some reason, but it looked masked because of the inside sheets! What a tool! I've scratched off the paint but the result is two scratched and foggy panes Anyway here are the pics:16 points
-
I don't normally build bisplanes as I hate rigging them. I sometimes make an exception and a set of etched rigging from SBS and a fabulous model posted hear earlier by Jenko enabled me to finish this stalled build. I finished it as an aircraft of the New Zealand Division of the Royal Navy in 1936-38 attached to HMNZS Achilles, using a set of Print Scale decals. Four Walruses( Walrii?) were part of that establishment coded Z! to Z4, though the machine I represented, K5774, was landed back in the UK in mid 1938. Walrus K5774 4 The kit is a joy to build, everything fits nicely and I used very little filler. I did use a set of Eduard Brassin wheels with spoked hubs, Walrus K5774 2 The decals were nice and thin , conformed with very little help and were nicely opaque. Walrus K5774 1 by I'm not sure I will build another, as I have already nailed together a SMER kit of another RNZAF machine, but I would recommend it to anyone. I omitted the radio aeriaL wires as a practicality as this model will hopefully go to a number of shows Covid permitting. Walrus K5447 3 Thank you for looking16 points
-
Hello my friends; I finished my last model in this weekend. It's is a new simple Airfix mold. I did modifications including a lot of adds: - CMK engine; - Seat, wheels, control surfaces, exhaust by resins Aires and Quickboost; - PE interior and flaps by Brengun; - Master Pl cannons and; - Tail wheel scratched. I built a simple base too. I had doubt about the insignias diameters (upper wing surfaces), but even so I ended up using the Airfix decals. I had no options here. The mark is No. 266 Squadron, 2nd Tactical Air Force, Holland and Germany April/May 1944. Cheers;14 points
-
Hiya Folks, I have always wanted to add a Sunderland Mk.5 to my collection and thanks to Special Hobby,..... I have finally got one and I am very happy with it! My model represents PP117, 4X-W of 230 Sqn around the time of the Berlin Airlift, 1948-49,.... while it still wore its basic wartime scheme of White and Exta Dark Sea Grey and before the upper surfaces were re painted in Medium Sea Grey with D Type roundels on the fuselage, as depicted in the kit. For the white I used Rattle Can spray but the rest was brush painted with Pigment Powders and with a fine brush. Here is the aircraft wearing the earlier scheme; And with what looks like the later D Type roundel maybe? Here is the WIP; And here is the finished model; So I`ve finally got a Mk.V/5 and I have another to build, possibly as a Korean War aircraft and I am looking forward to the release of the Mk.III too,...... it is a challenging build in places but the surface detail is much superior to the Italeri kit and where else will you get a decent Mk.V these days? Here is some film of 230 Sqn Sunderland`s flying from the Havel Lake, Berlin during the Berlin Airlift; All the best Tony14 points
-
Hi folks Eric from Aircorps Aviation who restored the real Lopes Hope 3rd has been in touch asking for some pictures for the current owner – I thought as I had them, I might share them as I haven’t done an RFI post It’s not actually finished yet as I am waiting for the display case to be built so it can go in there dust free and safe, but there are only a few things to do like aerials, fix the canopy parts properly & detail them, and the drop tanks & mounts The final pic is with a US aircraft compass to give a sense of scale TTFN Peter13 points
-
Very nice kit out of the box, but that V12 deserves a bit of TLC in the shape of detailing, wires, hoses etc to reproduce the fiendishly complicated real thing! best, M.11 points
-
Hi Folks, This is the Trumpeter Fairey Firefly MkI, of 1770 Sqn, HMS Indefatigable, August 1945. I’ll give a rough rundown and provide some more thoughts below the photos. Airbrushed with Colourcoats it has resin wheel wells, wheels, radiator, prop and spinner and seat. Rockets and the fixings are from the Special Hobby Kit as are the decals. This represents the aircraft flown by Sub-Lt Maclaren and his observer W. Richard who carried out strikes over Honshu, in August 1945. On one particular flight they had a dust up with some flak causing large damage to the aircraft but they still made it back. Maclaren earned the DSC from this. The kit quite frankly is not worth the full price that some are charging for it. As I have said, I have replaced a lot with resin but there are still many things to be corrected: The kit comes with incorrect style of rockets, cannons, wheels are terrible, basic cockpit, incorrect rear cockpit, ghastly nose with a lack of intakes on the top. This gives the nose a long look which I sanded back a bit. No pitot, no mirrors, incorrect locstion of aerial mast, horrible riveting, canopy cannot be portrayed open, the elevators are bizarre and a pilot would be unable to use them if they were like that in real life. It needs the elevator horn attached to it as I have done. The rudder is portrayed as metal which is wrong and there is a lack of a trim tab. The addition of flaps is quite nice, however the Firefly has four flap settings and it would have been nice to have the landing flap setting which allows the flap to drop down and backwards providing a much larger wing area. I'm sure that people will know of many other faults in there. The long and the short of it is, go for Special Hobby and get one of their Fireflies. If you can get Trumpeters dirt cheap then give it a go, maybe! As an aside, I’d love to know what people make of the difference in TSS between the two kits. The SH firefly I did in Xtracrylics, compared to the Trumpeter in Colourcoats. Thanks for looking Nick11 points
-
So today's short session after work was all about the decals in particular the replacement shunko decals. I think it was Spiny who mentioned that these decals are thick and he wasn't kidding. Anyway I've managed to apply them to the shell and I think they look ok infact now I can see a GT40 coming together 🙂 I will let them settle down now for 24 hrs and then get the clear coat applied The 2k clear should cover them nicely and help blend everything together. Thanks for looking back soon 🙂11 points
-
Good evening mates, Today I finished this Spit, started years ago. Not much to say - painting done with Gunze acryllics, wash with artistic oils, and weathering with MIG pigments. Chipping of tail section was done with hairspray technique. Navigation belly light is made from Kristal Klear. Details... My famous "reference object" Cheers, Srđan11 points
-
Hi all, only me with another build I finished recently, featured in last months issue of Airfix Model World. This time it's the soon to be reissued 1/48th Defiant Mk.1 by Airfix which really only combines the earlier Mk.1 and NF.1 kits with new decals including markings for one of each type, nothing else has changed in the box. Unfortunately the new decals weren't ready in time so I opted to use the earlier NF.1 markings for the sharmouthed N3328 of 151 squadron which, to be honest, looks more interesting than those of the newer offering (264 squadrons N1801, 'Coimbatore II') It's a lovely little kit in its own right but as is often the case with Airfix, a tad basic when it comes to surface detail. I decided to fill most of the overly heavy panel lines, (especially those on the tail planes and fin) and lightly rescribed them to a more respectable level. At the same time I decided to rivet sections of the thing too which was pretty straightforward using SBS's neat 1/72nd rivetting tool. A fair bit of aftermarket was thrown at it, including CMK's resin Merlin III engine (with exhaust stacks and replacement engine covers), their resin cockpit and replacement Mk2D powered turret along with Eduard's PE cockpit interior, landing gear bay and landing flap set. The resin cockpit set was mixed with the pre-painted PE parts to produce a rather decent Defiant cockpit and the same went for the turret. The model was sprayed using MRP lacquer paints and weathered using a combination of AK, AMMO MIG and Wilder washes and pigment products and staining came courtesy of Abteilung 502 oils thinned using their Matt Effect Thinner. All in all, a quick fun build. Airfix did a pretty good job with this one at a very fair price although personally I would have liked to have seen more restrained panel lines and a bit more surface detail. Thanks for looking and hope you like it. Melchie10 points
-
North American F-51D Mustang Korean War 1/48 Special Hobby 48102 Supermarine Seafire Mk.II Torch & Avalanche 1/4810 points
-
Well, I think I'm done with this one. I know it needs rigging but to be honest at this point in time my skills are not up to that level, so I would probably ruin it in the process. In doubt, leave it out, as the actress said to the bishop. Let me therefore present to you: my interpretation of the Thom(p)son Tiger Moth from the Tintin album The Black Island: Certainly not perfect, but I trust it made a better landing than the real thing:10 points
-
That stencil is attached to the sides of each Jesus nut but to be honest it just does not photograph well at all Mike. Some other stuff got looked at: The Cargo Release Hook (AP47654321765321 refers) has been scratch built. Three times in receding order, the first little thing ended up looking mahoosive, the next iteration was OK-ish if a tad bulky looking And got reduced again to make this one Too much flash Not enough 'focussed' Beggarit! Blimey how hard can it be to show a small unit with a wash (a first for me at 72½...) Looks like the first one was best after all The lifeboat castings need straps and a stencil for ditched squaddies to read before they deploy the dinghy pack in a hurry Yeah like... They will have some of the applique wash wiped away of course but that hook unit is so small I would run the risk of it diving into a carpet. Which would be a good trick on a laminate floor It is said that somewhere in the West Country sits a guru who has detached hisself from our plane transcendentally A: I wish he hadn't and B: he is supposed to take the pee out of this A fifth feeble attempt at the access ladder coming along by way of several detours off the planet by way of a kick up the karzee Ladder 5 Ciao gang10 points
-
Hiya Folks,..... Well its is finished! Thanks for all your encouragement along the way and I hope you like the finished model, Cheers and all the best, Tony PS,...Here is the RFI;10 points
-
Hi All. Here my RaupenSchlepperOst (RSO) from Italeri converted in ambulance. It was an hard job as Italeri kit was nice but terrible to work! The rear compartment was completely built from Evergreen plastic foils. Interior cab was scratched using some kit parts and Eduard pe. Tracks from Friul, side red cross are decals while top red cross was painted with airbrush and stencils. Anyway, I'm happy for results. I'd like to built another RSO using Dragon kit but its cost is absolutely too high (+/- 50 GBpounds)!😟 Hope you like. Ciao Filippo9 points
-
More engine & wing stuff. Two oil tanks: Main gear doors: And then some interior added to the main gear bays: And the generator and oil cooler intakes, plus some filling...(again). Then finally mounted onto the wings. I did toy with wondering what they'd look mounted on the top surfaces: quite cool actually. And the passengers would have had an awesome view. One for the "What If?" pile... I also made cooler flaps (brass sheet) and put those on too. Then yet more filler. This isn't the final location for the oil tank, but close enough to sort-of show how it will look: Just visible is one of two holes in the top of the gear bay for mounting the main landing gear. There is another one aft, and once I've finished sanding and filling, that will be the next job. Hope you like it so far9 points
-
Some news of my 1/400 test, half the size I had planned. It's not perfect in terms of printing, but the result is encouraging. I have a lamination effect because I didn't put enough reinforcements, it also deformed the outer hull at the reinforcements level. It's at the takeoff from the bottom of the tank that it happens. So I have to reinforce all this or do something else... As much as I'd like to keep a little deformation at the torques, it's more realistic, a steel ship's hull is not smooth. I still have a bit of putty to put on the bow line. The bulwark came out clean, at 1/400 it's a sheet of cigarette paper, I damaged it when I sanded the putty which allowed me to make up for the defects, it's glued again. It should be better at 1/200. because the thickness of the bulwark is designed for this scale. I left the anchors for printing. I put some rough filler and sand the hull, this bow is only a test. So I could also test the Lifecolor US Navy light gray 5L ( UA620 ) paint. https://www.shipcamouflage.com/ships2_3_43_measure23.htm 5L, it's more of a grey with a hint of green, it seems.9 points
-
My next build is the 1/48 Airfix Hurricane Mk1. I have some P Maks and decals for serial/Sqn Codes to model 249 Sqn Hurricane P3616 GN-F I read the book 'Gun Button to Fire' by Tom 'Ginger' Neil, who was a Pilot Officer and flew with 249 Sqn during the battle. He loved his Hurricane, P3616 coded GN-F. Whilst on a days leave, it was flown by another pilot, Pilot Officer Martyn Aurel King. Sadly he was shot down and killed, having bailed out but suffering a collapsed parachute. PO Martyn Aurel King He is buried in All Saints' churchyard, Fawley, Hampshire For his actions during this engagement in which PO King was KIA, Fl Lt Nicholson of 249 Sqn was to be gazetted for the only VC awarded to aircrew for actions in the battle. http://ww2today.com/16th-august-1940-flight-lieutenant-nicolson-wins-v-c Fl Lt Nicholson VC So I looked into the history, to find an interesting link. PO King was born in West Mersea, 15 minutes down the road from where I live in Colchester. Looking further into it, it became apparent that it is likely that PO King was the youngest serving RAF pilot in the battle and almost certainly the youngest to lose his life. It appears an admin error recorded him as being 19, but his birth certificate would show him to in fact be 18. The CWGC looked into this and apparently agreed to change the record on his grave stone. I is still generally reported that Geoffrey Wellum was the youngest RAF pilot in the battle - interestingly I saw a post on here about a spitfire build, describing him as the youngest spitfire pilot, rather than youngest. Some articles if interested: http://www.bbm.org.uk/airmen/KingMA.htm https://www.gazette-news.co.uk/news/16884592.youngest-of-the-few-was-an-18-year-old-from-mersea-island/ https://249squadron.wordpress.com/2016/05/25/in-memory-of-pilot-officer-m-a-king-249-squadron/ https://www.essexlifemag.co.uk/people/youngest-battle-of-britain-pilot-1-6086942 So I thought I would model Neil's beloved P3616/GN-F, but reflecting on the young man who gave his life flying the that Hurricane fighting for his country.... I joined the Army at the age of 16 1/2, joined a frontline unit at 17 1/2 (I would not have been allowed to deploy on operations until I was 18, which I did. This was a throwback to 2 young soldiers from my unit who were KIA at the age of 17 along with another who died on his 18th birthday during the Falklands war....the rules then said they could not deploy to Northern Ireland, but did not count outside that theatre). I also commanded young 18 year old soldiers on operations; so I do feel I have an understanding as to what things were like for these young men, serving at a young age. However, they were forced into the ultimate battle, where losing would mean the end for Britain as they knew its amazing how quickly these airmen became Sqn Leaders and Wing Comds at such young ages.... Our armed forces still deploy young men and women, willing to put their young lives on the line, firstly for their mates, then for their nation..... Pte Damian Jackson, KIA, Helmand Afghanistan, 5th July 2006, aged 19. I must admit I did have misgivings looking at my younger soldiers at the start of that tour in 2006, thinking 'bloody Playstation generation', will they up to it, etc - but they all stood up to the plate and performed.... I just felt the local link, youngest RAF pilot in the battle deserved to be a subject in this GB...... P3616 'GN-F', Hurricane I, 249 Squadron, RAF Boscombe Down. The Hawker Hurricane was the primary air defence fighter of the Battle of Britain and was flown by Pilot Officer Tom 'Ginger' Neil of No 249 Squadron based at RAF Boscombe Down, part of No 10 Group. Hurricane Mk I, P3616 was his preferred mount but on 16 August 1940, when he was on a well-earned 24 hours leave, it was allocated to Pilot Officer Martyn King. That day, Flight Lieutenant James (Nick) Nicolson was leading Red Section, which consisted of P/O King in 'F for Freddie' and the supernumerary Squadron Leader Eric King (no relation). The Section was ordered to a patrol-line Salisbury to Ringwood but it was not long before it was vectored to a raid attacking Lee-on-Solent. During the engagement with Messerschmitt Bf 110 escorts, P/O King was shot down and died when his parachute collapsed and Sqn Ldr King was so badly shot up that he barely limped back to Boscombe Down. The leader, Flt Lt Nicolson was severely wounded in the side and leg, and was about to abandon his burning Hurricane when the attacking Messerschmitt overshot, at which point Nicolson gallantly returned to his controls and shot down his attacker. Badly burnt, he finally took to his parachute but shot on the way down by a watching British Army NCO. For this action, Nicolson was awarded the Victoria Cross the following November. Pilot Officer Neil returned from leave to find his beloved P3616 had been destroyed but when No 249 moved to RAF North Weald on 1 September, he arranged for its replacement, V7313 to be marked 'F for Freddie'. During the continuing Battle, Neil flew 62 times in V7313 before it too was lost on 10 October, and a total of 141 times against the Luftwaffe, by which time he had been credited with 13 confirmed victories. A replica of Hurricane V7313 now stands as 'Gate Guardian' at North Weald airfield. Words © Paul Beaver. Thanks for looking.8 points
-
I had a whole stack prepared, but I’ve mislaid them on the attic. At least I found this one, the Arma Hobby Hurricane Mk. I which has gotten so much praise. The box shows a No 303 squadron plane, which I well may end up building. The other option is from No 1 Squadron RCAF, which also may be eligible. Correction: V6605 of No 1 is definitely eligible; it flew during the whole Battle, both while borrowed to 303rd and again while in Canadian hands whoclaimed two EA, one Me-110 on Oct 5th and one Dornier on Sep 15th. It later crashed in September 1941, killing pilot Edward Locke during training. Edit: I am building the Canadian AC. I also dug up some gunsights, not sure yet if they are appropriate, but I certainly hope so because they been collecting plenty of dust till now.8 points
-
As soon as I saw this, I knew I wanted in, but what to go with? Usually a no brainer as I would go with the victors champion, a magnificent Hurricane! Fast forward to last Saturday when I realised my mediocre build would be lost amongst a myriad of other fantastic Hurri builds. so what to do? 💡Then it came to me! Tucked away in the South West, but not really seeing much action but still deserving an honourable mention - the Gloster Gladiator. 247 squadron doing there best to defend the vitally important naval base. I think they deserve to be here so rummaging on the shelf to find the tatty boxed Roden offering, I made a start: Most of the kit parts that will be used in the build: The kit has options for wheels or skis, and also the relevant 247 sqn markings. I've also treated the kit to a couple of extras. Building started with the usual detail painting: The basic cockpit is just about done, seat belts will be added later: There's also a pile of painted engine bits awaiting assembly: And that's where we are at the moment, probably get more done later but right now it's my turn to make dinner as I'm starved! Laters.....8 points
-
I found this interesting,...... hope you do too; EDIT,......Another film showing more footage including the rear of the aircraft; 3d model; https://dykkepedia.com/images/b/b6/Short_Sunderland_model.mp4 Info about the aircraft, Short Sunderland Mk. V EJ138 WH-Y of 330 Sqn RNorAF is here; https://dykkepedia.com/wiki/Short_Sunderland8 points
-
Hi, everybody! I present you my next model.8 points
-
The fuselage parts are the same in all the Tamiya Beaufighters, so it'll be the same issue if it bothers you, and equally the fix is valid also should you fancy a go A little progress to report. I kinda need to start painting engines, undercarriage legs and all that sort of stuff. I need the Lockheed tailwheel for this particular airframe. Most of the Dallachy Beaufighters showed evidence of fabric patches on the cannons, the wing fillets etc stuck on with red dope so I should study the Avieology photographs to see if any are visible on RD136. I've been a bit heavy handed with the clay wash (by Flory) which I've tried for the first time. I'll have to do more to make that stand out less...8 points
-
Well G; it's been worth being distracted and otherwise engaged for a month or several to get to read this thread to date. Typically great modelling and problem solving. Glad the crash ended up as a Cat 1 or cat 2 repair and she wasn't Cat 5 Some good Lightning stories here too. How can you not love the Lightening? Like Ian I wanted to fly it from when I was a nipper; and like him I never got the chance neither.... As some here already know tho', I did get quite close I thought you might find this amusing G,.....The (very slim) Lightning ground school documentation!; rescued from the attic. (I wern't a Flt Lt then as it happens - just a 20yr old Fg Off I could have done with the extra pay tho' - bar bills being what they were...) And the whole ground school took just 1 week I think the ground school for the Lightning II might just be a bit longer.....and might require just a few more documents..... Added by Edit. There weren’t many being sent to the Lightning by this time. As you can see there were only 3 of us on this LTF course and of these I was the only ab-initio student; the other 2 were returnees to the Lightning after ground or instructional tours. I never got to fly the thing in the end - but I can at least remember the exhilaration I felt at the end of the TWU course on being told I was going to fly it Cheers Steve8 points
-
Shoulda gone camping...8 points
-
Engine and cowl on, and decaling starts:8 points
-
Hi! Little fast project on the side. Completly no problem build - 100% OOB. Model was painted with AK RC, Tamiya and Gunze paints, small details with Vallejo and Model Master. Weathering I made with oil paints for artists.8 points
-
I've finished up another Hasegawa kit and I really think they do a fantastic job of capturing the proportions and detail of their subjects. This kit has some shortcomings in terms of interior detail but overall it builds well. I wanted to do something more along the lines of a restomod instead of a factory 2002 Turbo and if this was a full-size car, I would probably build it around a later 2002 with a bodykit as opposed to hacking up an actual Turbo car. Colorwise, I wanted a bit more of the early 2002 vibe so I went with a light grey - kind of like the Bristol Grey but without worrying about it being an exact match. The biggest changes to the kit were the rebarrelling of the stock wheels to 16". The centres are the 13" wheels that come with the kit while the barrels were cut out from the 16" wheels in the Tamiya Porsche 911 Turbo kit. Tires are 14" Aoshima tires stretched over the larger wheels. Ride height and track was also adjusted to set the overall stance. I had to remove some of the fender behind the flare to achieve this. I cut down the turbo stripes from the kit into this flag on the door - not sure about it yet so it's only on one side. I added an aluminum tailpipe, but it's a bit too big - it was the only size I had on hand, but I'll probably replace it down the road. I love the metal transfer decals that Hasegawa puts in some of their kits - the effect is so much more realistic than decals. Just noticed I forgot the A-pillar antenna on the driver's side - oops. One of my only real complaints about the kit are to do with the chrome trim around the beltline. It's very fine and the mounting tabs on the sprue leave marks that are difficult to hide. The trim looks good from this completely horizontal angle but from above it starts to look a bit ragged. If I was to do another (a stock, round light tii would be cool) I would probably strip the chrome, sand it all smooth and add it to the body before paint and then Bare Metal Foil it after polishing. You can see a bit of the chrome trim issues here: There was a fine hair in the chrome on one piece and the trunk piece on this side arrived cracked but still barely hanging together. Tailpipe is definitely too big! My only other complaint is that the interior door cards have zero detail on them - no handles, arm rest, window crank, nothing. I know Ukranian Scale Cars Production does a door panel, seat and engine kit for this model which would really take it to the next level. The rest of the interior paints up nicely though and the overall impact is pretty good. A couple more shots: Thanks for looking! Martin.7 points
-
Here inscribed the names of friends we knew, Young men with whom we often flew. Scrambled to many angels high, They knew that they or friends might die. Many were very scarcely trained, And many badly burnt or maimed. Behind each name a story lies Of bravery in summer skies; Though many brave unwritten tales Were simply told in vapour trails. Many now lie in sacred graves And many rest beneath the waves. Outnumbered every day they flew, Remembered here as just 'The Few'. ’Our Wall’ by Battle of Britain pilot, Flt Lt William Walker, inscribed on the Memorial Wall at Capel-Le-Ferne. What it may lack in lyrical quality compared to, say, High Flight, it makes up for in brutal honesty. This then, is my tribute to the men memorialised in that poem, and on that wall, for they truly were ‘our wall’ in 1940. Nothing remarkable in my choice, although friends may cavil at the choice of scale, the relatively recent Tamiya tooling of the icon of the Battle, the Spitfire. Spitfire by Tamiya by Jon Gwinnett, on Flickr7 points
-
The Bloch MB-200 was a French built bomber which went into service in the 1930s with the French, Czechoslovakian and the Spanish Republican airforces. It didn't fare well in the Spanish civil war and by the end of hostilities their entire complement of 32 aircraft had been destroyed. Despite this, it saw service with the Vichy French up to 1941 where it was used against Allied forces in the middle east. I found the kit quite challenging in terms of fit, quality and probably my own ineptitude, but it did come from my 'last century collection'. I think I used more filler on this model than any other and had to buy a new set of modelling files to finish the job. Good investment btw. Made by Draper £6.00 from Amazon. The clear parts were truly awful, especially the fuselage windows. Too thick and cloudy and impossible to get to sit neatly. I finished up poking them out and using 'Glue & Glaze'. Not ideal, but better than the original perspex. Finished with the box supplied Czechoslovakian Air force decals and painted with Revell Aqua. Thanks for looking, Vince7 points
-
This one was another eBay purchase. It arrived in a flat white box with just the kit and A4 photocopied instructions. No decals. While looking for some inspiration as to whether to paint it grey or camouflage. I looked at a couple of forum threads and noted the seat oob is too far reclined. I made a platform out of plastic and to resolve this (could have gone a bit higher as it turns out). Found an aerial shot of the subject Lightning with another banking away. Bought the decals off eBay.` The build went ok. Only added some over the top riveting to the wheel well (must get a riveting tool). Tamiya paints used. Not overly happy with the crosses raised detail on the wings but it is what it is.7 points
-
Tks ! I continue the Hornet, I am on the lighting of the front part of the hangar, soldering, wiring, it's tedious and not very interesting to present here for the moment, work on the line, more than 100 leds to equip:7 points
-
Little H’s Biggest Spitfire Ever. Painted Rattle can Silver ((with some help) after hearing about Tom Neil’s Silver Spitfire) and decals for the 80sqn bird all by herself.7 points
-
Oooh, a new tool? If you find one Bill let me know Ladder? Take it one step at a time would be my advice…7 points
-
Dont flat coat it, they were surprisingly shiny Nice new FAW.53's 808 Squadron RAN7 points
-
Checked my refs and found I had to add some more antennas First primer coat7 points
-
Started this about a year ago, simple build in theory, but became a battle, replacement canopies, home printed replacement decals, a nose shape issue only noted post decals that was a pain to fix and indeed had painted red numbers (as my white decal paper has gone AWOL) in the end but I persisted. Painted with a mixed Revell light grey, xtracrylix blue, Vallejo medium grey and blue. Finished with Winsor and Newton Matt7 points


.thumb.jpg.cfc129272ffec824439b15e6013d5952.jpg)


This leaderboard is set to London/GMT+01:00