
Leaderboard


Popular Content
Showing content with the highest reputation on 29/06/20 in all areas
-
So lets just start by saying I remember one of my very first kits way back c.1977 being a Matchbox Lysander, and I've loved the aircraft ever since. Now that I build almost exclusively 1/48 it was only a matter of time before I sprung for Eduard's Lysander Mk.III Profipack. In the box the kit looks nice enough with a few bits of resin and some nice PE, mostly for the cockpit. With a fairly low parts count (most parts seem to go in the cockpit), I decided to give it a shot about a week ago. A few days later I was ready to chuck the damned thing in the bin. It really is not a great kit. The are zero alignment pins anywhere on the kit. And while detail is nice, especially in the cockpit, but it just wanted to fight me at every step. Once it came time to fit the 5-piece greenhouse canopy/windshield affair and the associated wing carry through I decided it was time to pack it back up and find a less stressful hobby. But after a few days at the coast I decided to power on through and see what I could do with it without putting in too much frustration. So here she is. Kit decals for a 161 Sqn machine in 1942 were used, because I like the SOE machines, but didn't want to do the all over black scheme also included. I masked the grey/green with Silly Putty for a hard edge and if I'd been in a better mood with it would have done the same for the black, but the example hanging in the main hall at the Smithsonian Udvar Hazy Air and Space Museum Annex seems to have a softer edge on the black, so masking was skipped and I freehanded it. It's not my best build ever but I am glad I followed through and now have a good "4-footer" of one of my favorite WW2 aircraft on the shelf.29 points
-
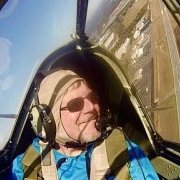
Hi There, This kit was given to me by my latest trainee at work after he passed out as a thank-you. This is the first time in over 30 years that this has happened to me and I was very touched by it. Undercoat - Ultimate Primer Grey Paints - Colourcoats Interior Grey Green, Colourcoats PRU Blue, Tamiya Rubber and Nato Blacks and Vallejo Model Air Aluminium. Final Coat Windsor and Newton Galeria Satin Varnish. Aftermarket - Eduard photoetch, canopy mask set and Uschi Van Der Rosten Rigging for aerials. On with the pictures As always, Thanks for looking and all comments and criticism welcome. Cheers, Alistair29 points
-
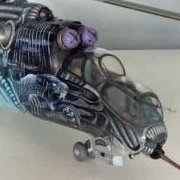
Hi there Let me present my model of a helicopter that flies over my house a few days a week. This is the latest Airfix Seaking made with the addition of the fantastic Whirlybirds conversion set. This set includes all the resin and brass parts as well as the Vingtor Seaking decal sheet needed to make either and early, or present day Seaking. The Whirlybirds set instructions cover 4 sides of A4 and are very complete. The special Norwegian Seaking parts include: SARBE beacon Liferafts Large radome on the back. This needs a bit of fettling to get it to sit right Twin winches. The winch units are resin and the supports are PE. These need ar but of shortening to get them both in the right place. FLIR on the port nose Nose radome The Vingtor decals are superb, there must be around 80 stencils and the placement guide is perfect. The helicopter was painted with enamels. Humbrol 192 was used for the dayglo in seceral thin layers. Some differential weathering using thin white overspray was done to match how these look in real life. Some diluted Tamiya Smoke was used for the exhoust marks. The Airfix set comes with the option of folded blades. The centre 3 blades were OK but the outer pair needed to be cut off at the root to get the correct angle. Here are the pictures. And here is my normal view of the real thing. Regards Toby25 points
-
Hi all, some pics of my new built Revell A400M. Built it OOB with German AF markings.23 points
-
This is the first time I've built an F-RSIN kit and, having read several things about their models both good and not so good, I approached this with a certain amount of caution. That was a wise move - this is not a kit for the faint-of-heart; it doesn't fall together like today's Zvezda or Revell kits that we've maybe got used to. Couple that with the fact that I wanted to model this unique aircraft in Heavylift markings as EI-BND rather than the Transmeridian markings that come with the kit, I was soon to discover further problems on the way. For me, the easy bit is the fact that F-RSIN has got the shape of this aircraft dead right; the bulging upper fuselage, nose profile and somewhat squashed-up fin look excellent (in my eyes, but I'm not a Britannia / CL-44 expert). Where it starts to get tricky is with the plastic itself: all the parts are on one sprue and everything has a load of flash and a bumpy, irregular feel. There are no locator pins for any of the parts, and the whole things lacks any finesse that would be demanded in a mainstream kit release these days. This isn't a mainstream kit, however, so work needs to be done - a lot of work; approach it as if it were a vac-form with the pieces already cut out (or mostly so). Nothing fits well, so have the putty handy! There were a couple of actual faults in the mould; one of the wing halves had an irregular trailing edge, the bulge in the centre of the bottom fuselage behind the wing was cut short on one side, and one of the fuselage halves was about 2mm longer than the other. Irksome, but easy enough to deal with. I decided to strengthen the fuselage halves with pillars made from scrap sprue, which really helped with the alignment and integrity when putting the two halves together. Freeing some of the smaller parts from the sprue was akin to an archaeological expedition to get past the bedrock of flash - particularly the propellers and wheels - but to be honest, that's been part of the fun with this kit and the sense of achievement when I got all 4 propellers free without losing a single blade was immense. The instructions consist of a single underside 3/4 diagram of the exploded parts with lines indicating their intended position. As I said, I wanted to model this kit as the Heavylift EI-BND incarnation of this unique aircraft, and I found a company that did them: Airline Decals, a cottage decal outfit based in the USA. However, I bought these a little too hastily as on the website, although a nice photo of EI-BND is used to promote the sheet; the sheet itself is for CL-44J EI-BRP, not the Guppy (grrr). This meant I had to do some resizing of the fin decal and print out my own EI-BND serials. Anyhow, in the end I'm happy with the results. I couldn't find any photos of the tops of the wings, so I've played around with artistic license here as the info sheet that came with the decals was no help whatsoever, nor were the F-RSIN instructions. The model was initially sprayed with white primer, then base silver (both rattle cans). The various metal tones and the pale grey underside were then hand painted, polished and dry-brushed, weathered and so on.21 points
-
Good day, ladies and gentlemen! Let me present you my next model. The model is noteworthy in that it exists in a single genus, because these side numbers and logo are individually designed. This board performed reconnaissance flights over Baku (Azerbaijan) during the WWII.17 points
-
Here’s one I made earlier. Westland Lysander Mk IIIA S.C.W (Special Contract Westland). V9674 was one of a number of aircraft specially converted from MkIIIA airframes for covert operations. Modifications included extra fuel and oil tanks, and stripping out of armament and armour. The aircraft carries the standard Lysander S.D.(Special Duties) camouflage of medium sea grey and dark green with night black under surfaces. Code letters were MA-K in standard dull red. This particular aircraft was flown from time to time by Squadron Leader Lewis (Bob) Hodges on SOE operations to France while with 161 squadron RAF. The aircraft’s final flight was on the night of December 16/17 1943 when F/Lt Stephen Alers Hankey and two agents Albert Kohan and Jacques Tayar all perished when the aircraft crashed into a hillside near Ford airfield due to fog. They were returning from an SOE pickup in France Operation DIABLE. All are buried in St George Churchyard Crowhurst Sussex. I decided to show the flaps and slats deployed as they were automatic and rarely seen in pictures closed up while the aircraft is on the ground.17 points
-
Hola Amigos !!! I share my last Spit with you, after several months of having delayed it. 1/48 Spitfire Mk VIII ICM with Eduar accessories (Zoom) I must confess to you that my list of pending models to finish is long as a boa conscriptor. Best regards Critics are always welcome16 points
-
Ready for inspection is my Airfix 1:72 Handley Page Victor. This is a straight from the box build, using Vallejo acrylics in place of the suggested Humbrol. The kit is fantastic to build, fits together smoothly, and has a lovely amount of detailing. This has to be one of my favourite builds. Thanks for looking.15 points
-
I've finally had the opportunity today to add a splash of colour to the flap bays. Trouble is, this beast is a little too large to fit in a spray booth: IMG_0277 by Thomas Probert, on Flickr Equally, finding a place for it to dry off is equally problematic: IMG_0280 by Thomas Probert, on Flickr Anyway, size issues aside, Xtracolor's Zinc Chromate has brought this area to life: IMG_0285 by Thomas Probert, on Flickr I've also given the out-rigger bays another spraying as I felt the Humbrol Chromate Yellow was too brownish: IMG_0282 by Thomas Probert, on Flickr IMG_0283 by Thomas Probert, on Flickr IMG_0288 by Thomas Probert, on Flickr IMG_0290 by Thomas Probert, on Flickr Pretty happy with the outcome Regards to all, Tom15 points
-
Hi Guys, This is Tamiya reboxing of Italeri kit, the kit has some problems and I need to scratch-built some parts which were not there on the kit. It was not an easy kit to build, there were gaps and need to dry-fit a couple of time. I didn't like kit decals so I had a spare microscale pukin dogs VFA-143 which i used the decals were a little stiff and would crack and you need to be careful about it. I added a pair of GBU-10 and kept most of the weapon pylons empty. Will keep it short, so here it is Thank you for looking and any feedback is welcome.14 points
-
Hello everyone It's been a two year build, off and on (mostly off), but at last I've finished my Airfix Blenheim. I started it in April 2018, got distracted, returned in March 2019, got completely fed up with it, then finally steeled myself into completing it this April. It's been a frustrating exercise, partly down to the way Airfix designed it, partly down to me not thinking it through properly or understanding fully what needed doing to overcome the kit's idiosyncrasies, and partly through Blenheims of 226 Sqn being a bit of an enigma, reference-wise, but hopefully worth it. W.i.P. thread here: Anyway, it's all done. The back story to begin with: Blenheim IV Z7271 MQ-K of 226 Squadron as flown by Sgt. Jack Onions D.F.M. and Bar, from Middlesbrough, who won his Bar for his actions on on July 19th 1941. From the ORB Form 541: Wattisham July 19th 1941 Blenheim IV Z7271 K Up: 13.30 Down: 17.56 to 18.10 Sgt. John Onions - Pilot F/Sgt Philip Warmington - Observer F/Sgt J F L Morton – A/G Convoy N.W. of NORDERNEY, 7 M/v’s escorted by flak ships were bombed at 15.32. Vessel of 8000 tons, grey, unladen, bombed and machine gunned, hits scored. Large column of white smoke seen. Aircraft hit by cannon shells, through nose and starboard wing trailing edge. A.G. wounded in foot. Hydraulics U/S. pilot made belly landing. 4 x 250 lb bombs, 480 rounds rear gun. And the pics. Aftermarket props, intakes, wheels and Eduard etch for the interior and exterior, new turret interior plus a base done in Photoshop: I'm pretty happy with the way it came out (eventually!), and I reckon that if/when Airfix bring out a 1/48 version of their Blenheim IV it'll be a cracker. Now, time to crack on with the Airfix Beau... Cheers Simon14 points
-
Revell's all new P51 D in 1/32nd scale is a lovely, straightforward kit with no vices. I added a set of etched seat belts, and the rest was out of the box. Painted with Humbrol enamels. Thanks for looking Angelo.13 points
-
One of the most interesting airplanes for people who like strong weathering. F-4E Phantom II Hellenic Air Force Tamiya 1:32, model made of course straight from the box so it may not be an ideal reproduction of the F-4E HAF. The Tamiya set is probably well known to everyone. In short it's realy good set. Greek planes can be very heavily exploited, which makes them a great material for modelers.13 points
-
I've managed to finish the first of my British Commonwealth Air Training Plan (BCATP) aircraft in my RCAF "Yellow Air Force" collection. This is the Fairchild PT-26 Cornell from Planet Model. The kit is molded in a yellow resin with excellent detail; panel lines and fasteners are all well defined and overall the fit is very good. I added numerous extra details to the cockpit in terms of extra tubular frame and stringers, compass in the front cockpit and battery in the back (all of which you can't see when the nicely molded vacform canopy is installed in the closed position. I did have a bit of a challenge mating the fuselage halves together, but CA glue, a small degree of perseverance, one 4-letter expletive and a small amount of Tamiya putty got me to where I needed to be, The wing itself is finely molded and in one piece, which mates perfectly at the wing root with only some Mr. Surfacer 1000 at the wing fillet. The PT-26B Cornell II was based on the Fairchild PT-19. In 1942 a license agreement between the Fairchild Engine Airplane Corporation and the Canadian Government saw Fleet Aircraft of Fort Erie, Ontario as th chosen contractor to produce the PT-26 in Canada. Over 470 revisions to the basic PT-19 airframe were required to meet RCAF specifications (we Canadians always have to be different...), which became the PT-26B Cornell II. Differences from the PT-19 included a sliding hood, 200hp in-line 6-cylinder inverted Ranger engine (vs. the 175hp version on the PT-19), engine-driven generator, electric starter, US instruments, wingtip navigation lights, etc. Cornells were an ab initio trainer intended to provide additional training aircraft to support the influx of aircrew candidates to the BCATP alongside the Fleet 16B Finch and DeHavilland DH.82C Tiger Moths already in service. The Planet Model kit offers three marking schemes: the yellow RCAF trainer, a Royal Norweigian Air Force version (also based in Muskoka, Ontario, Canada), and an Indian Air Force version with SEAC roundels. I finished the kit in an overall covering of Tamiya Flat Yellow to which was added about 15-20 drops of flat white to tone down the brightness and get the colour more in line with a slightly faded RCAF Titanine Yellow. Metal access panels, cowlings, canopy frame and fabric flying surfaces were masked and sprayed various other shades of yellow (Medium Yellow,. IJA Chrome Yellow) to represent different levels of fading on a well-used aircraft. I used the kit decals which were excellently produced with almost zero carrier film. Unfortunately, they were so thin that once you slid them onto the kit, any movemen resulted in them disintegrating or tearing - hence why the serial codes have yet to get put on to the fuselage sides as I am waiting for my Kodiak Supplies decal film to arrive via Amazon so I can print up new serials. Additions to the kit exterior included drilling out the septum intakes on the cowl, adding copper wire brake lines to the landing gear, wingtip navigation lights, dorsal identification light, and handles made of brass wire. The kit was given a subtle wash with Flory dark grime and sand washes, and a final overcoat of AeroMaster Clear Matte. Now back to this Avro Anson Mk.II conversion and Airspeed Oxford already in progress...13 points
-
HI everyone, just finished this one oob with no issues at all and a very enjoyable build, decals are from liveries unlimited and AA for the windows .The decals have been sitting in my folder for best part of twenty years so thought it was time to use them. DSC01777 by michael hobday, on Flickr://flic.kr/p/2jg8UAX]DSC01776[/url] by DSC01778 by michael hobday, on Flickr://DSC01779 by michael hobday, on Flickr/photos/152DSC01784 by michael hobday, on Flickr029354@N02/]michael hobday[/url], on Flickr13 points
-
That has been the most daunting kit I have ever made, the PE included is the finest (in both senses) I have ever seen and the detail on the resin deck vents has to be seen to be believed and helpfully is pretty much invisible until you paint it! This took nearly two months to build and I would not have got this done to anything like the standard it ended up without Britmodeller so thank you all very much! I would like to give special mentions in particular to @smyfe, @Jamie @ Sovereign Hobbies and @Gisbod. It was built out of the box with the only additions being rigging, Eduard crew figures and a wooden deck. 20200628_194654_Film2 by OutcastJoel, on Flickr 20200628_194615_Film2 by OutcastJoel, on Flickr 20200628_194815_Film2 by OutcastJoel, on Flickr 20200628_194854_Film2 by OutcastJoel, on Flickr 20200628_194912_Film2 by OutcastJoel, on Flickr 20200628_194951_Film2 by OutcastJoel, on Flickr 20200628_213813_Film2 by OutcastJoel, on Flickr 20200628_213732_Film2 by OutcastJoel, on Flickr 20200609_195102_Film2 by OutcastJoel, on Flickr 20200628_200328_Film2 by OutcastJoel, on Flickr12 points
-
I had to play, at least this time I wasn't doing hummywoppa-ing noises Quite pleased with the droop stop counterweights, equally pleased I didn't miss proof reading that sentence just a minute ago. The interior dust is a thing of the past it seems, let's hope it stays that enigmatic and hidden from view huh I have decided that XG453 shall be the role model for this model I have found several pictures of her in service, all show varying states of warning labelling so I intend to be fairly generic with the placards A terrible screen shot via my camera shows one of several style of serial lettering too, it has been weird tracing the 'one look' for her. This shot seems to show a more general style of lettering, luckily several types are available on the Xtradecals reshoot of the White RAF Post War Serial Letters and Numbers sheet, including the squarer style Gs and 3s I wanted. No problem is a problem that doesn't exist, phew OK round the airframe with serials and as many placards as didnt break my will to live (and survive to go back to the pub in a weeks or so's time) and this is it unless YOU can persuade me that the doppalpingerator fluid placard is missing and needs to be instated... a: b: c : d: By my calculations, sucking of my hollow tooth and hanging a dried cat in the wind to see which direction the pieces drop off in I have the job of adding clip/clamps to the filter casings. Further calculations indicates a possible mismake of the jet exhausts on the kit I judge a slight mismatch of fitting place will need retribution and then the final window fittings will be available Where did I leave those wheels?12 points
-
Heck of a long job and I don't intend doing every single one A few more tomorrow Night all.12 points
-
Having made a restart with aircraft modelling I was busily trawling the Internet for ideas and inspiration, when I saw to my delight that there are decals to model some of the aircraft featuring in the classic Tintin comic albums by Herge. I have always been a huge fan of his work so now I just have to build some of these. I got myself a set of decals for two aircraft, one of which is the Tiger Moth used (or rather, abused) by the detectives Thomson and Thompson to pursue Tintin on the way to Scotland in the album The Black Island. For those unfamiliar with Tintin, these two guys bring comical slapstick to the stories. They invariably get the wrong end of the stick and mess up everything they do. In this case, they commandeer an aircraft but only find out once airborne that their involuntary pilot is not, in fact, a pilot at all but a ground mechanic. The result is some spectacular stunts ending in an almighty crash (they always walk away from their disasters, though). Just like my upcoming build, then To set the scene here are some frames from the album (in Dutch, from my own collection), copyright Casterman (I hope this is ok under the fair use rules). This is where they set off on their doomed voyage: I got myself the decals: The Tiger Moth is finished in plain yellow overall with just a few civilian markings. This suits me just fine right now (for better understanding, see my Gladiator wrestling on another thread). When inspecting the kit I found out that the helpful temporary braces on the struts have gone all wrong in the molding. This won't make the build any easier. I have emailed Airfix support but I suspect that a replacement may be a long time coming, if ever. In the meantime I have made a start with painting the interior. Herge was pretty meticulous in his drawings of aircraft (and cars as well). In the following frames you can just about make out that this Tiger Moth has the modified rear fuselage with the extrusions (I don't know what those things are called). Airfix provide this option, you have to cut away parts of the fuselage and insert the optional parts. So, out came the Hobby knife and the fuselage halves were duly mutilated. Dry fitting revealed that this will leave some gaps. I then cemented the bits in place and have used some filler. Next steps are to complete the interior and stick the fuselage halves together. More on this later.11 points
-
Thanks Richie, much appreciated! There's a song in there somewhere, or am I thinking of Basil Brush? Bays done, see below! Thanks P! Cheers Ced, much appreciated! I mentioned in the previous post about planning ahead and using one hole for ore than one wire. Another reason for planning, and constant checking, is to ensure that the wires don't foul each other. For instance, it's never possible in this scale to get holes perfectly aligned, so with the flying wires fitted I needed to make sure that the landing wires didn't pull them crooked when they were tightened. Dry runs are essential. For most of the landing wires it worked perfectly and the wire runs between the two flying wires without fouling. A couple had to be run behind the flying wires or they would have been pulled apart by the landing wire. The same applied when doing the drag lines yesterday, ensuring a straight run (does it go over or under the crossing wire?) is essential. Of course before any of the threading can begin, the holes also need planning. I try to make the fewest number possible, both to aid cleanup, and also because there's not much room! I prefer to drill blind holes in the lower wing, but sometimes that isn't possible. eg for the lower drag wires, they are fixed into the fuselage sides so the only way to tighten them is by pulling them through the wing. The other reason I have so many holes going through on this is simply that the wings are very thin - they weren't intended to go through! Work out in advance which end of each wire will be fixed first and which end/hole needs to be a through hole and/or a shared hole. Sometimes a through hole helps as it enables one wire to be run for two purposes. eg on my Sopwith Tabloid build, the landing gear bracing wires ran through the skids, became drag wires to the lower wing, then ran up through the lower wings and became landing wires too! If anyone wants further explanation please shout, I'll be happy to go into more detail What that all means is that all the wires are now attached, taut, and secured! Next job then is to tidy up all the ends and repair the wing surfaces. Thanks for looking in, and stay safe! Ian11 points
-
Hi, Please find my latest build the Kinetic Starfighter converted to a CF-104 used by AETE and in early 1970's markings. Probably the most challenging build I have ever done. I made some unnecessary errors along the way, which are described in detail in a WIP thread that I did over the past few weeks. So for anyone interested in my blunders....🤣 Thankfully I received a lot of information from our Canadian Britmodelers, some who had worked in the RCAF/CAF and some who worked on the actual CF-104's. Thanks again, for your help. I did make a few compromises here and there, all described in the WIP, but now that it is finished...... Am reasonably happy with it. Aftermarket I used: Belcher weapons set Master-model pitot (Changed it last minute) Master casters CF-104 wheel set Belcher decals Mini magnets for bombs and pylons attachment Paints: AK xtreme metal Some Alclad for individual panels (applied last) Mr Color super Italian red (Tail) Tamiya XF-12 J.N. grey (for the underside of the wings) Flory dark brown wash The kit does actually allow you to build a CF-104, also the later versions with the sensors under the nose and tail. It's all there ready on the sprues, just not mentioned in the manual. Anyway, hope you like it: The model was based on below photograph. I also thought it nice to accompany it with the shown weapon load out. I always thought of the Starfighter as a fast interceptor, but some countries used it for the tactical/nuclear role as I found out. The wing tanks are converted to house camera's and also visible is a detachable orange camera pod behind the nose gear. I tried to incorporate these details as well. Courtesy of my wife's mirrored cake stand; By the way, not sure if I have the centre pylon the right way around........but then again........ it's attached with 2 magnets, so can flip it around👍 That's all, thanks for watching...... Regards, Rob10 points
-
Hi! This is my last completed build before my summer Scout Camp which starts on Friday (I will have a modeller break for almost a month...) Coments were made in the building thread here: I really enjoyed the fast build, even though it was a resin model kit. I've got one more piece fron the family tree - Be.50 Beta Minor by KORA models, so we'll see when it'll be it's turn. Thanks for looking and have a nice week! Andrew S. Details:10 points
-
"Temptress of Tabuk" Foxy Killer Tornado GR.1 ZA465 Hi everyone! Me again, with yet another Tornado build, I'm afraid. I'll save the preamble as "Foxy Killer" is certainly one of the more eye-catching Tornado schemes, serving with 16 Sqn in the 1991 Gulf War from Tabuk in Saudi Arabia. Let's get on with it! Kit: Eduard "Desert Babes" 1:48 Tornado kit (Revell tooling- I'm sure people are familiar with this) (Eduard resin seats/wheels + PE cockpit bits and bobs- no complaints here, all very worthwhile additions). Sidewinders and 1000 lbs bombs were sourced from the stash, I wasn't convinced by the kit's AIM-9s. Also, the gear bays were somewhat sparse, so i populated them with an abundance of wire and plasticard. Decals: Now, I tried to use the Eduard decals, and for the most part succeeded, but they're unbelievably thin and fragile. After a few breakages I bought a Kits World sheet and finished it off with that. The Eduard decals are of a superior print quality but their fragility lets them down immensely. Paint: Vallejo Model Air as always, along with some Tamiya clear green for the various lights. Weathering: I couldn't resist weathering this one up fairly heavily! A base coat of "US Desert Sand", followed by patches of a custom darker brown mix were applied. I tried to clean up a few errors and accidentally created small splodges of excessively dark brown, but this worked to my advantage and they were worked into the scheme . Panel line wash was courtesy of UMP's Earth wash. Not satisfied there, I dry-brushed on various shades of brown all over, and used black to represent areas of heavy weathering. More pictures, I say! Well there we are then, another project draws to a close! Would I recommend this kit? Absolutely, but if you're using the kit decals then you'll want to soak them for longer and bathe them in your favourite decal solution, to prevent ripping. Thanks for dropping by again Best wishes, Sam10 points
-
After James' perfectly-timed posting of drawings last evening I had no excuse for taking some time off this morning in order to correct the innacuracies in my designs yesterday. Brother there's a symmetry then when I'm reading your threads! 🤜🤛 Harry 'Snapper' Organs: the name makes me laugh like a drain every time! Great link Pete! I appreaciate your support as always Chris. Hope all is well at your end. Firstly then I took one of James' trove into Illustrator in order to colour-code the differences of width between the door sections: I'm not sure how distinct some of those separations will turn out to be at 1/72 but as always, worth a punt to see how far along we can push processes. From here, it was then back to the original sketch in Fusion and dimensioning out the modified widths/lengths: Thence turned back into doors: I've noted that - as with the different lighting arrangements - XJ481 in Martel-era livery does not seem to have the more pronounced diamond-like angled corners to that forward large door that you see in some shots eg. as she appears today at Yeovilton, so will instead reproduce the version that you see in the manual drawing above. I've no reason at this stage to suppose that XN708 differed in this respect. Revised door arrangement: Locating points added inside well for pivots mountings: Ensemble effect with wheel and Microcells: The keen-eyed will notice that - in the above shot especially, the design lacks the space between between the large forward door and front of the well opening that you can see on the actual aircraft (allowing the door to rotate in place); in this instance my hand being forced here by the need to make the doors thick enough (about 0.4mm) to print successful without subsequently warping. If I don't like the visual result after the print test, I may as noted previously resort to some thinner brass equivalents for the doors instead. Not helped of course by Beaker hiding in there: Tony10 points
-
Thanks Adrian Citadel? I'd forgotten I'd bought these as well so added to the test set: Pool envy here Giorgio, but as the temperature's dropped today, maybe not! Thanks John - in the test! Sorry for the tool display (fnaar!) but I can't promise to stop… Hu78 Cockpit Green to the ready. Airfix: Arma 'Kit': Top of bulkheads also done on both. 'Expert' lumps removed: …and painted: Aluminium tests later.10 points
-
Evening you lot. Hope you have had a lovely weekend. More progress on the shark this morning. Looking at last nights shot of the wheel and today’s comments I think my only option is this. I will cut away the lowered detail To the right and remake with lead. The scissors can be detached and re-attached at a better angle and I’ll chop out the middle chrome section. This compression of a good few mm will give me angle I’m after. Weak legs you say? 🦵 not with new improved brass power. 💪🤣 we shall see. Once again I feel like I’m in a @perdu build but not as good. I love thinking what you guys would do if you were in my shoes. 😇 Any way back to ze progress eh. This morning a added the last few details. Some nose well plumbing I forgot to photo😭 flap wires. I noticed a gap in the canopy join, as there would be really so I filled it with PPP. And cleared away with a damp bud. Right then. primed and ready for Ze booth. 💪 She squeezed in....Just!!! As you’ll see I had to flap it open a bit to allow rotation. I’m starting with some preshading. I’m going to do my usual pick out of edges and corners but as this one has not to much in the way of panel lines. She does however have other lovely lines that I’m going to accentuate . I’m adding variation with my new stencils. I was planning on using these with the actual top coat but not swing that much variation up to I have decided to use them underneath so I can wipe away as much as I like to get the effect I’m after. I have done this effect before by hand but these are brilliant. you really get some nice variation going on. Here’s the under side. I’m loving that! Really looking forward to getting the top coat on. I went a bit snap happy so I apologise for the extra pics. I think she looks great like this. Proper paint in progress.❤️❤️ The finished effect will be very subtle but it’ll add a lot. ❤️ And that is where she sits to dry. I promised I wouldn’t buy any more kits over lockdown but stupidly I am following two I think, @Chewbacca and I believe @hendie Have old wasp conversions going on, not forgetting our @perdu’s ace model on a beer mat. I did have the scout kit then sold it in a moment of madness. 🤪 guess what dropped on the doormat?🙄🤣 Not even opened. It was like opening the ark at the end of Indiana Jones. all the bumf is in there and as it appears the seller was a smoker the whole package comes with the comforting smell only an ex smoker can appreciate. Not dirty but like a whiff of Gandalf’s pipe. The decals are really good and the kit itself seems better that my old green one. The plastic is “crisp” and dare I say it, well moulded. Not sure when this will begin but at least I know it’s there. Paid about the same price I sold it for so there’s a thing. 😍 oh aaand before signing off we visited Croome National trust this afternoon. look what I see poking over the trees. is that a tail fin? Boom!!! Look at that canopy! ❤️ I’ll leave you with that. Thanks for all your help. Take care and I hope you all have a great and safe week. Johnny. 🦈10 points
-
Now for something different! Always liked the shark-like properties of the 262, almost looks like it's from a comic book. Nothing fancy was done to this kit, a few interior details but otherwise OOB. As always freehand painted cammo and some weathering. I tried black basing and I wasn't that found of it, I use it for cockpits and bays and such but the air frame I prefer starting off a grey base. Here a few pics Cheers!9 points
-
A Whif needs a story as to why it should exist; The Swedish Air Force bought several jets from the UK. They bought some Folland Gnats for primary ground attack training. They designated them SK36 'Geting' (Wasp)9 points
-
Airfix 1/48 Defiant NF1, I really enjoyed this build, like all the "new" Airfix I've built, everything fitted together well with very little filler required. As I was going to build it with the canopy open I splashed out on a set of Eduard seat belts and as the was a lot of clear stuff to be painted a set of Eduard masks as well. These fitted really well but tended to "leak" a little where two pieces overlapped, ultimately this was not a problem as 5 mins with a cocktail stick tidied everything up. As always painted with Vallejo air paints with just a little weathering to break up the overall black and to make things a little more "interesting"9 points
-
nothing worse than a hot box in the summer heat is there ? #swampass Thanks Pete. Us old buffers just keep rolling don't we? for "brave" read petrified Ced! It could so easily have ended in tears but luck was with me that day. Tell Mrs B thanks Yup, styrene. It comes in useful every now and then Crisp. ta Bigdave! glad it meets with your approval. yeah, I'm certainly going to try. My camera seems to be playing up and I can't get a decent photo out of it these days - the shots in this update are terrible ta Bill okay, that had me going for a while. Brandy? Then I saw your moniker at the end and had to do a bit of searching to confirm it was you. Someone somewhere sometime asked a question about what I intended to do with the vents. There are some cool looking features on the roof and I kind of wanted to show where the vents came through into the various compartments. I did a quick mock up with one of the rotating vents to see what it would look like if I just had a small section of roof where the vent was situated I really didn't like it - It takes away from the overall appearance of the car when there's just a small section like that and I think it's way too obtrusive. So that's made me have a rethink on how I am going to approach the separate roof. Initially I was just going to do the outer skin with roof fittings and have it mounted at an angle inside the display case. I'm now thinking that I may add a mirror underneath the separate roof and include all the vents and lights etc inside the roof now. I think it was Tony who suggested a mirror - that would work for seeing under the roof into the ceiling recess. I'll need to mull that over. In between times, the corridor/dining area door was fitted - what a palaver that was! The corridor/bar area door was fitted - a lot easier this time around. The dining area/bar area door is still to be fitted but I want to get the chairs and tables fitted first. The display cabinet in the bar was fitted Then I got around to the lights again. I decided to reprint them - this time in a different orientation. The last time I printed them I had them lying on their backs and what should have been a cavity between the back plate and the 'glass' was mostly filled as the resin had no clear path for draining. This time I stood the lamps on end so that the opening to the cavity was pointing directly down during the printing process. In this shot you can see the lack of a distinct cavity in the original lamps (held by tweezers) and the row of lamps in front of that has a nice clearly defined cavity Happy with that result I painted the lamps. I accidentally left the lamps for longer than I wanted under the UV lamp and the resin started to yellow, but I caught it just in time. The photo makes it look yellower than it does to the MkI eyeball. The last sections of roof are printing off as I type - then all that's left is the chairs. I went to paint them yesterday and opened up the paint I had earmarked as the base color - only to find that it had evaporated and all that was left was a hard lump of pigment in the bottom of the jar. Sods law in action. More paint ordered and should be here this week sometime.9 points
-
Hello everyone, after reading Bob Brulle's account on flying Thunderbolts in the ETO, I got even more interested in this bad boy - my N version became just a tryout... Even I couldn't really make big mistakes with Tamiya's kit. Not modeled after a historic original but as I liked. Again (as always), all colours were applicated using my trusted paintbrushes. About 5 layers... Those were the only real pita on the kit - the invasion stripe decals. I used some very colourful language... colour border from the time before I knew about masking tape I got the kit (which I had in my sights for some weeks and months) for Christmas from my then-not-yet-wife, so I just had to put her name on it. A ficticious jug belonging to the 389th fighter squadron. aaand its younger, bigger, longer-range brother which already was presented here. As always, have fun with another of these workhorses and don't spare me if necessary - or be charming if not. Be reading you!8 points
-
Hi All This is my latest completion. 1/48 Tamiya F-14D Tomcat as "Bullet 103" from VF-2 in OIF 2003. What hasn't already been said about this kit isn't worth saying. A real joy to build. The model is mostly box stock but I did add the following: Master Models turned brass nose probe Wheeliant resin wheels Fightertown Decals 48086 Tomcats at war Pt 3. Fightertown Decals 48087 Tomcat data and weapons decals. The model is painted in MRP Lacquers FS36375 / FS36320 / FS 35237 - USN TPS scheme, and weathered with Tamiya panel line wash, Tamiya weathering sets and AK weathering pencils. Here's a few pics, I hope you like it. Thanks for looking, have a great day & stay safe.8 points
-
Hi all. I’m in need of a few solid hours to get the topside colours onto the Tempest so in the meantime I’ve cracked out the 1/48th Airfix P-51D Mustang. Much has been said about the kit that I don’t need to repeat here, most of it favourable. A group of us have been catching up via video conference for our virtual modelling session while COVID has been around. One of the group members suggested the kit for a single type group build which turns out a good choice as the kit is readily available for a good price here in Oz. I’ve been working on the various sub assemblies over the last week and I’ve managed to get it buttoned up and close to being ready for paint. Though the assembly has been all over the place, I’ll try and sort the photos as if you were following along with the instruction. The kit I’m building is the fillet less version of the P-51. It offers the two styles of filleted tail which was handy as neither of the box options took my interest. My subject needs the filleted tail so I was good to go with this one. I’ve also got a bit of resin aftermarket to replace the kit prop and exhausts. The latter being far superior to what was provided in the kit. Standard box pic. Cockpit tub with base desert yellow and oils to simulate the ply floor. The side walls primed with black and the Interior green applied. Followed by a wash and then flat coat + detail painting. The seat and final assembly of the tub plus. The worn black was achieved with the hairspray method. Some light tan pigments have been applied over the black. The sidewall stencils are supplied in the kit and dress the area up nicely. the assembly fits positively into the side walls. It looks good once buttoned up. The kit decal was used for the instrument panel with clear gloss used for the instrument faces. Probably the fiddliest area to clean up is the radiator inlet/outlet ducting. It looks like a Mustang. Don't forget to install the tail wheel and wheel well when joining the fuselage. It'll be a fiddly correction to make if you miss doing this. The main wheel well is nicely appointed. I used the Eduard instructions as guidance for the Chromate Yellow and silver areas. The fit is excellent. The fuselage and wing mated well and the insert for the underside of the cowl and the inner leading edge fitted well. The only real gap of the build so far has been on panel line on the cowl underside. Easily fixed though. The pieces for the rudder, tailplanes and topside of the cowl fit very well. Just about ready for paint. I'll install the windshield tonight as well the as assembly for the nose and oil cooler scoop. I think I'll need to remove a small amount of material from the outside edge of the IP as test fitting it revealed that it was sitting proud a tiny amount. Cheers for now. Mick8 points
-
So when Hobbycraft had a black Friday sale I picked up the Revell Spit for £15. Rude not to. So come lock down out she comes. Tamiya it aint, but for £15 it's going to go one of two ways. Bought a set of seat belts.... then had this idea. (Not good at my age) This is the end result. Decals from the spares box. Not perfect as the invasion stripes are a bit to far forward. Yes it's basic and fit is.... Revell ...enough said. The pink was a mix up of a jar of Tamiya white and a drop of red ...should have used half a drop. It's different. Hope you like. Please feel free to comment etc. Thanks for looking Dick8 points
-
- Another Fitter, from Hobby-Boss this time. Not as good as the Kitty-Hawk one with some parts to be replaced as the nose probes for instance, but interesting to built8 points
-
Certainly, I've been called much, much worse! I did do a Dan Air 4C a couple of years ago based on the Airfix kit. I did it 'in flight' to show the beautiful lines of the Comet. Pictures are here. This one will be an RAF machine, I am formulating a cunning plan! Got to agree with you there Chris, I've had a go at it. Looks a bit rough in this photo! I decided to reduce the 'crown' on top, to make it slope down towards the glazing a little more. I think the kit has too much of an abrupt change from constant section fuselage to sloping down. The drawings I obtained from Skippiebg were a great help in determining this. I also think the tip of the nose is too pointy, so I filled it out with milliput and blended it in to produce a fatter, blunter shape. To secure the milliput I razor sawed a cross into the nose tip to give it something to grab on to. Better? but you can see that the plastic is getting thin, I think I'll stop here. As for the wings, I have them all blended in. the starboard wing 'dished' slightly, hence the uneven line of filler. See if you can follow my train of thought here. Given that the Authentic Airliners resin kit has wonderfully accurate wings. I used them as a pattern for mine. By placing one above my kit wings...... .... I can look from above an see that mine match so closely that only a bit of wing tank is visible..... ......and placing it underneath shows the same very close match. I'm happy with that, but I'd also say that the intake area is a shade undersized compared to the AA wing. The funny thing is, I thought that this would be a simple build as there are so few parts to assemble. I still have a few bits and bobs to fit, like little wing fences, and the fuel dump pipes. and then I can shoot a coat of primer over it, and see what horrors might be revealed! Thanks for looking John8 points
-
So, last update... I've added the cable cutters to the wing leading edges - two inboard of the engines, and three outbaord. Extremely fiddly as they're about 0.5 mm wide... And finally the replacment props were added: Pretty much all done and dusted. I've also done a specially-made base for it to sit on: And here it is in all its glory: More pics in the RFI section here: Cheers Simon8 points
-
How do the wings look? Despite both kits having tiny locating pins the leading edges are slightly misaligned: Pretty usual I guess and they've all been sanded now. The Armas have much thinner and nicer trailing edges though: …although the fit on the Airfix required sanding anyway. On to the internals. I'm going to follow the instructions (for once) but please feel free to comment. In the old days I used to buy a kit AND required paint from my LMS and I assume my tin of Hu156 was for this. It's not kept well: Similarly the tin of Hu 70: Time to try the nail varnish shaker with a couple of AK steel balls in each tin: Not blurred, it's shaking! Impressive: Not so good when applied though, should have shaken the grey for longer: I quite like the effect from the brown though. Backgammon this morning so that'll get a chance to dry. And stop smelling, although that smell does take me back…8 points
-
My latest work... Special hobby Mirage F.1 EQ7 points
-
This is my build of the Octopus/Pavla 1/72 Grumman F7F-3N Tigercat. I acquired this kit from @Creepy Pete(thanks again) 2 years ago and promised to build it last year. And a year late, here it is. This is my first Octopus build and I have to say I was not impressed and would rank them in the lower tier of injection moulded plastic kits. One step above Mach 2 which is in a class by itself. I have 2 other of their kits in my pile and I shudder to think about building them. The kit is mostly plastic with a few resin parts, vac canopies, a Pavla interior, and decals. The vac canopies were actually pretty good with good demarcation of where to cut and window framing. The Pavla interior, like all the other Pavla interiors I have used, almost, but not quite fit the fuselage halve and the same can be said for the rest of the kit. It also had and eclectic set of parts not included with instructions to scratch build them. This kit required filling the entire large nose with #10 shot to get it to stand on the nose. I was able to find one review of this kit on the net (https://model-scale.com/grumman-f7f-tigercat) and I agree with everything he says including "The Octopus decals were far too thin; brittle; unable to be moved over the surface of the model to their correct position, and simply did not react at all to setting solutions!" I tried giving them a coat of Microscale Micro Superfilm and this appeared to solve most of the problem. That is until they dried when there was massive silvering on an unprecedented scale and after using copious amounts of Micro Sol I was forced to remove them and cobble together most of the markings from my spares. Missing are the "VMF(N)-542" and the data block that goes under the tail. Starfighter made an F7F-3N decal sheet (72-120) but it is discontinued and impossible to find. It will have the pieces I am missing and if it is ever reissued I will grab one up and add them. Well thanks to the generosity of @philp I was able to get the Starfighter sheet and I have updated the model: So if I haven't tired you out complaining here are the pictures: Next up will be the Sword AD-4W which should be a much more pleasant build. Enjoy7 points
-
My first entry to this group build is the Westland Dragonfly HR3 from Whirlybird kits. The Dragonfly was a licence built Sikorsky R/H5 and was used by the FAA and RAF from the early 1950's for about ten years. The Navy machines were used as communication aircraft and for plane guard duties on carriers and wore a variety of colour schemes which are catered for by the kit. The kit itself is a combination of the vacform fuselage parts from the old Britavia kit combined with new resin and etched parts, these looking to be of a high standard and well cast or etched. Very full instructions are given with some nice photos and drawings of the real thing. some of the undercarriage and rotor parts are cast in a hard resin , which a good idea. The vacform fuselage appears to use a sheet styrene rather than acetate as it is very rigid and a little brittle and responds to adhesives like Tamiya Extra thin, which may make life a little easier. Once the fuselage halves are cut out and sanded down that is the vacform bit dealt with apart from removing some of the intake detail to replace them with much better resin pieces. Here are some pics of the box and what is inside it. I have cut the fuselage halves out from the sheet and rubbed them down. the material is quite hard, but behaves like styrene or Perspex and is very clear, Looking forward to building this.7 points
-
Here's an entry I did in the 'They also serve 2020' GB, which was what I would be building in the 'What you wouldn't want to go to war in' GB. Briefly, the Botha was built to the same specification as the Beaufort, a combined spec of a shore based torpedo bomber and land based general reconnaissance bomber. Despite passing Torpedo and mine-laying trials the Botha was a very difficult aircraft to fly and like most early war RAF types, underpowered. Despite this nearly 600 were built, most ending up in training units where losses mounted, due mainly to the poor all round vision it seems. I wanted to build one of these as I'm often attracted to lesser known types and obtained this PH resin kit from Hannants, it is currently still available. The build thread is shown on the link but generally it wasn't as bad as I thought it would be. Not for the beginner of course, and there is a lot of fettling to the parts required but the only things I added were carb intakes modified from an Airfix Beaufighter (the kit included two pairs of Volkes filters, used by some units near beaches), a lorenz beam antenna from the spares box and scratch built most of the cockpit. The undercarriage legs were moulded with steel rod inserts so are quite strong. You have to scratch build everything else and there is no positive location for them, they are made too long though. I don't know what the layout is like in the wheel bays so my twin hydraulic ram set-up is entirely fictitcious! The markings are for an aircraft based up the road from me at Tranwell airfield, RAF Morpeth. Used by 4 AGS training mainly Poles, they were soon exchanged for Avro Anson's due to the mentioned often fatal accidents. They were just knocked up and modified from the decal stash so aren't entirely spot-on, but when looking at photo's of Botha's they varied a lot in the style of roundels and codes. Critique and comment welcome. Davey.7 points
-
Almost ready: The incompletely-filled canopy: The affected area is excised following the frames: Beaching wheels ready. And fortunately, I found some more strut material that fits the bill sent to me long ago by @John Aero (thanks!) The exhausts are different in both models than the kit's offering, so their ends are cut off and re-done with stretched and hollowed sprue: The other model:7 points
-
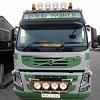
I built the military version of this sometime ago and really enjoyed it so I was keen to build the civil version too. An exquisite model full of very fine detail thoughout. Some of which does require some extra care during assembly but worth it in the end. I thought it looked a little sparse without some kind of load so I managed to track down some 1/35th bags of coal moulded in resin complete with real coal you just sprinkle into the tops of the sacks and secure with watered down PVA glue. These came from a company in France I personally had never heard of called Drakkar Models. Very nice they are too. Also, the shovel and fork etc are white metal from HLT minatures in Somerset I also thought as yellow paint and coal don't really stay clean very long I gave the model a somewhat weathered look. The only thing I'd like to confirm tho' is the colour scheme based on a real vehicle or is it fictitious? That also goes for the other 2 schemes in the kit. I even emailed MiniArt to ask but the guy who answered didn't know either and they haven't got back to me yet....Over to you?? Anyway, thanks for looking. 20200628_213255 20200628_213855 20200628_213344 20200628_214117 20200628_214147 20200628_2132396 points
-
CAD by Muppet labs. What could go wrong?6 points
-
Hi there, so today's update is totally different to what I had planned yesterday. The reason being when I checked my supply of 2k clear I found I didn't have enough to spray the shell 🙄. However I've ordered a re stock which should arrive via DPD sometime tomorrow so alls well on that front. Usually I would have started work on my next build but as that kit hasn't arrived yet that was a non starter. So I thought I may as well put the rolling chassis together which in fairness due to the low parts count didn't take long. The tyres were scuffed up a bit decals added and fitted to the wheels. The interior bits and pieces were fitted along with the seat and roll cage and that was more or less it. There is a piece of equipment in the interior that sits opposite the driver's seat that looks like an upside down pedal bin any chance someone could tell me what it is please? It's plain to see in the pic's below One thing I noticed was the difference in how the rear wheels sit in there final position one seems much further out than the other? This gave me the excuse I needed to drop the shell loosely onto the chassis to check all is well. Thankfully although the shell is not fully fitted in its correct position it was enough to allow me to see that it will all go together ok when the two parts finally come together. So 2k tomorrow though part of me thinks it's not really required but it will add protection for the decals. Thanks again for looking and I'll be back soon 🙂6 points
-
Dear Fellow Modellers The cut down later Spitfires with bubble canopies have a potent and beautiful look all of their own. This is Eduard's elegant post-war MkXVI with their markings for 501 Squadron at Filton (Bristol). Nice that they somehow held onto their sky European theatre band! I opted for the easy life with their one piece resin cowling and Barracuda resin pilot door. I think being based at Filton does qualify for it being placed in my usual hanger setting! Figures are from Gunthwaite if I remember correctly Hope you like it? Regards Andrew6 points
-
Cheers Chaps, One track down and one to go Added the crew back soon they will get painted up, the parts left to do is low so I'm now starting to think about the planning of the painting stage. Enjoy Dan6 points
-
Working on the throttles. MikroMir provides a plastic body and PE levers. I decided to remake both. For the body, I cut 5 rectangles, 2 of which had a punch for the levers. Gluing them together provided a block with 2 slots. Some work with #4 and #6 files produced the bodies. The throttle levers started out as 15 mill brass rod. I cut a short piece and flattened it in smooth-jawed pliers with a nubbin left at the end. I started assembling the cockpit, and the sticks looked more like structural members than controls. Some Albion tubing made a good replacement stick and handle. I sawed the stick off the base and drilled a hole for the replacement tubing; I'll adjust the height post assembly. And here's the cockpit6 points


_svg.thumb.png.0da3a58936fe4aa877af22b21e779c39.png)


.thumb.JPG.2ce06c4ff2300a5faba93aaeacbdab25.JPG)


This leaderboard is set to London/GMT+01:00