
Leaderboard


Popular Content
Showing content with the highest reputation on 29/05/20 in all areas
-
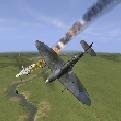
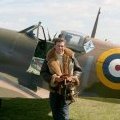
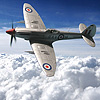
Nearing the end of a Battle of Britain fighters collection in 1/48, I picked up Airfix’s new tool Hurricane but could only get hold of the Tropical version. The kit allows you to build a Mk.1 but needed custom decals so bought an Xtradecals sheet. I chose VY-R from 85 Squadron as seen during the early phases of the Battle of Britain. Xtradecals had the scheme wrong and upon doing some research, the underside Sky colour should extend up the engine cowling further than usual, as well as up the wing leading edges. After consulting the internet greybeards and doing some colour sampling myself in greyscale, it appears the spinner should be red with white stripes rather than black with light green. In any case, I made both but the red is the correct one IMHO. The IWM photo is slightly later in August 1940 when the squadron codes and main roundel had been made thicker whereas the ones used were on 85 Sqn aircraft until early July. The new tool Airfix Hurri is a lovely kit in most respects and goes together well enough, it’s just a shame about having to add the rivets myself. If Eduard can do it so well and cheaply, why can’t Airfix and Tamiya? Video build here: --www.youtube.com/watch?v=1VSjDotV87A--46 points
-
Here's my first COVID lockdown build 😷🤒. I have a peculiar affinity for the Whitley (perhaps I am a lumbering, oddly-shaped, relatively mediocre performer myself?) and was absolutely over the moon when Airfix brought out their kit a few years back - it knocks the Frog and Fly efforts out of the park and generally goes together very nicely with few fit problems. There is a bit of a step in the fuselage sides above the wing if you follow Airfix's complicated recommended assembly sequence - but as I discovered it is possible to construct the fuselage in its entirety before attaching to the wing/centre section, which makes it much easier to eliminate the step by clamping the sides as they dry (or inserting a spacer if you prefer). This is my attempt at representing my all-time favourite individual Whitley subject: T4131 EY-W of 78 Squadron, RAF based at Middleton St George in 1941. Aftermarket additions include the Eduard Zoom interior set (I know it's there...), resin 500lb bombs from CMK (I was feeling lazy), and the Xtradecals set. From the latter set I replaced the serials (the digit styles were not quite right), and the upperwing roundels, as I am led to believe that the supplied 75-inch variety are only correct for early Whitley Vs which came off the production line at Baginton with four-colour Type A1 roundels, which were then overpainted to Type B. I replaced with 84 inch roundels which better matches archive photos of later Whitleys. I am aware that T4131 had a non-standard proportion A1 type roundel on the fuselage (narrower yellow ring) - I would normally replicate this by overlaying different sizes of Type A and A1 but I couldn't think of how to do so while replicating the dulled-down grey centres, so I left it as is. I have literally just noticed that the real aircraft had the bomb tally in a continuous line not in groups of five bombs as Xtradecal would have it! Grrrrr.... I added a fair bit of internal scratchbuilding to the turrets, both to replicate extra details and to allow training and elevation of the guns. This is mostly because I am a 12-year old modeller trapped in a 30 year old modeller's body 🙃, but it turns out to have a valuable practical application - the Whitley fits inside my display cabinet with a gnat's hair to spare - but only with the rear turret trained sideways! I also added a few minor bits of external scratchbuilding which Airfix missed (two small vents/scoops on the port nacelle, a pole aerial under the rear fuselage and a vent on the spine aft of the DF loop acorn. Paint is Humbrol 33 from a rattlecan (although largely overpainted with Revell Aqua due to a varnish near-disaster), with an eye-balled mix for the leading edge de-icer paste (it's called "Kilfrost! How wonderful is that?!) I have attempted an artist's impression of the heavy exhaust staining seen on this machine but I have erred on the side of caution rather than overdo it. My thanks to @dogsbody for finding conclusive photographic evidence for black wheel bays and bomb bays, to @vildebeest for info on the roundel sizes, and @Rabbit Leader, @Graham Boak, @72modeler (among others) for entertaining discussion on the colour of Kilfrost here. Photos!29 points
-
Good day, colleagues! So, finally, I finished my "Black Cat". Carried with her for 3 months, I wanted to slightly improve and diversify the interior, then more and more. By the way, to simulate walkie-talkies, electrical panels and other equipment I tried to use all kinds of SMD components from the old computer motherboard (engineers at work helped). They just fit in size and shape. You can experiment endlessly. I put lead in the nose for stability, but when I put it together, it turned out that the tail was still heavier. In general, the heavy construction came out, so I had to put it on a stand. Separately painted the wing and fuselage. First, in Tamiya aluminum, it blew matte black from above, then, with a wet nulevka, polished black in places to visible “metal”. Well, then I took up oil with white spirit. Top coated with matte varnishes, on the sides matte + glossy (mixture). The junction of the "glass" with the body paved with strips of aluminum self-adhesive, pre-knurling. Redid a lot, not much. Some errors came out on a macro shot. He painted as usual with paints Mr.Hobby, Valejio, art oil from the times of the USSR. The latest photos show the stages of work. Enjoy watching! Sincerely, Mikhail.25 points
-
Hello, here some pics of my quick built Airfix Tiger Moth in 1:48. Brand new kit with fine details. Built it OOB, only the decals are from Xtradecal (48205).22 points
-
Afternoon all, This is a build from about 10 years ago - the Aircraft in Miniature vacuform Boeing 747-300. I had it out of the loft today as it needed some repairs and I thought I'd take some up to date pictures that hadn't been sabotaged by the Photobucket debacle. This is a vacuform model that comes as a basic shell - it was fully scribed and wheel bays scratch-built. The decals were from DrawDecal and paints were from Halfords. I had the KLM blue custom-mixed to match the crown on the tail. The kit provides white metal landing gear as well as resin intakes and exhaust cones which makes life a lot easier. I think it took about 4 months from start to finish and was pretty straightforward, apart from the size. I finished it as one of KLM's 747-306 Combis from the mid-1990s. S1030348 by Thomas Probert, on Flickr S1030350 by Thomas Probert, on Flickr S1030351 by Thomas Probert, on Flickr S1030355 by Thomas Probert, on Flickr S1030357 by Thomas Probert, on Flickr S1030359 by Thomas Probert, on Flickr S1030362 by Thomas Probert, on Flickr S1030367 by Thomas Probert, on Flickr S1030369 by Thomas Probert, on Flickr S1030371 by Thomas Probert, on Flickr S1030375 by Thomas Probert, on Flickr S1030381 by Thomas Probert, on Flickr In this picture you can see I've placed a 12"/30cm rule to show the size... it's HUGE. S1030383 by Thomas Probert, on Flickr Regards to all, Tom21 points
-
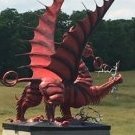
(Of course, he actually had a few at one time or another....) Sorting through some old files, not a new build but one I don't believe I ever posted here. Roden's good-but-basic 1/32 Dreidecker release, built essentially to confirm that my long-stored Gunsight Graphics Fokker 'streak' decals were still viable. (They were, with bells on!) This particular scheme was always my favorite among those the Baron flew...and the one which, if memory serves, actually survived the war to be displayed in one of the Berlin museums...only to be destroyed by Allied bombing during WW2. Only real 'fix' to the kit was learned about from online reviews...clipping the gear struts slightly so it didn't sit quite so nose-high. Added cockpit detail was part-scratchbuilt, part various etch bits and pieces from Eduard and Part from Poland. Paints were Tamiya acrylics, rigging from EZ-Line. Decals other than the streaking were mostly the kit's, plus a few spares to change a/c number and such. Upper wing crosses had the whites overpainted in a thin glaze to simulate the same, painted-out and weathered, on the real a/c. Since it was the Rittmeister's mount, I presumed weathering would have been minimal...though I should probably have added a few streaks around the engine and muddied up the tires a bit. Oh well.... Hope you enjoy!20 points
-
Just completed a remarkably quick build - for me! This is the old Heller 1/72 Mirage III E/R/5BA kit. Belgian Air force Mirage 5BA BA-33 No.1 Sqn 1987 No.1 Sqn 70th Anniversary scheme. I used the Pavla cockpit set, which fit perfectly but the canopy despite being clearer than the kit canopy wasn't used as I didn't regard it as a perfect fit. Decals are from the Modeldecal sheet 92 which is now 33 years old. The decals were a nightmare as all the adhesive backing to the decals has gone off, so when you soften them in water, I had to clean white scum off each decal as it would have shown on the model. I guess this is what happens to old decals? Anyone else had similar experiences with the old Modeldecal sheets? I've now got quite a colection with some more subjects to use up & hope I don't get the same experience again! I rescibed most of the prominent fuselage & wing panel lines & added a piece of brass rod for the nose pitot tube. Airbrushed Tamiya X1 gloss black which went on really nicely. Many thanks for looking! 🙂18 points
-
Another Vertol Sea Knight in US Navy, Airfix decals used, and scratch build winch, all done with Airbrush18 points
-
Had a bit of an airshow outside this morning: Whooshes were to be heard of course, accompanied a small dance of pleasure at finally having something physical to show you after all thse months. 🕺🛩️ This is what it started out as last evening: As with many things on this build, this is in essence an experiment in the practicalities of printing components (n terms of what works regarding size, orientation on the printer) and trying to avoid having support marks all over curved surfaces. Parrt of the endeavour included adding some location lugs to help fit the parts together: I stupidly made these lugs far too large as they caused all sorts of problems in setting supports into place where needed and were a considerable PITA in cleaning off said supports after the print. Much smaller and judiciously-placed next time. The tight clustering of the parts like this was simply to find out if it were in fact possible to print the aircraft in a single go, which it is - just! After 8 hours of stewing in the UV, this is what emerged like dripping from the vat at 7am this morning: Initial results? Everything printed well down to razor fine edges, though not without a couple of issues that need accounting for next time around: The trailing edges of the fin/rudder areas are impracticably thin at this scale (due in part to the overall cross section of these components) and look eroded in places - not sure yet whether to thicken the trailing edges slightly or to add a sacrificial strip to augment them during printing that can be sanded down later. I need to weigh-up the pros and cons first before taking that decision. At the sharp apexes of the wing roots there's a slight fall-away due - I think - to me not having aedquate supports in the corners.* This is not complicated to correct. *I didn't use the Photon validating software on the supports this time around as the complexity of this design gave it a nervous breakdown - I wonder does it have some kind of memory-buffer limit to how extensive a set of shapes it can analyze? After cleaning up in 99% IPA followed by warm-water & detergent, I trimmed away any remaining support stubs and began some solar-powered gluing (the resin as an adhesive & sunlight to set): As I've done previously, the print hasn't been tidied-up in any way. Also, with this being a test-run to critique proportional appearances, the parts are only tacked together temporarily with resin for these following shots. Any visible gaps are because I haven't bothered sanding away the residues of the support structures and not the result of any distortions introduced by the printing process - the purpose of this test print being solely to gexamine accuracy of shape and how the printer handles them at this scale. Back to Raymond Baxter's commentary then... The combination of high thin cirrus and sun made for rather gorgeous diffuse lighting conditions. Vixen to the Skies! Tony18 points
-
Another Vertol Sea Knight in Swedish Splinter Camo, aftermarket decals used, and scratch build winch, all done with Airbrush [url=https://flic.kr/p/2j6zfnR18 points
-
Here at the North Wales Home for Retired Rock n Roll Maniacs there isn't much to do except pinch the nurse's bottom... And he's getting fed up with it so I built a few models. Rather than give each one a dedicated slot I figured I'd only knock one deserving guy off the front page instead of three. First out of the box was an Italeri F 100. As I remember not a terribly interesting kit to build but enough to keep me amused for a while. Everything straight out of the box, paint colours carefully selected from a brand called "What I had kicking about". Decals were a bit on the thick side. The yellow one round the intake gave me no end of aggro. If I remember correctly the dangly bits were a bit of a bear to align... And I'm not sure why an Air Force plane would have a tailhook but the plan said put it on so I put it on. Anyway, there she is, for better or worse. Next up we have a creaky old British classic, the Hunter. A plane dear to my heart as it was the first fast jet I ever saw at an air show when my dad took me to Biggin Hill in 1962. This was Revell and an enjoyable build. Plenty of cheat pins in all the right places so I could get things aligned nicely. I love their big, glossy, detailed instruction booklets, too. I've just remembered I didn't install the pitot yet. For the final painting and decalling it was already a minefield of sticky-outy bits and I knew an inch of needle-thin plastic poking out of a wingtip had no chance of surviving the ordeal. Once again the paint was carefully selected from the set of what I had and the subset of what I think would make it look proper 'ard. Third up was a rather disappointing kit. Can't remember the brand but it wasn't one of the big boys. It's an F 117. Only about half a dozen major parts, not enough cheat pins so alignment of half-shells was quite challenging and as much detail as the real thing, that is, none. So after putting it together I had this... Whoops... Sorry... That's a kipper... Looks just like a Stealth Fighter, though, eh? Here she is... I made nose art for it but, of course, it doesn't show over the black so until I can figure out how to paint a precise circle of white exactly the right size it only exists on paper... Like my cats, it's black and impossible to photograph... I'd made and already shown off a whiffer. I call it the Handley Page Liverpool, a passenger version of the Halifax dedicated to the wife and her Scouse heritage. After putting it in the cabinet, it occurred to me there were no jetways in the 50s so I needed a set of stairs and a boarding bus. The stairs I whacked together out of plastic card and the bus was an Opel Blitz and I can't remember the brand. I'd have preferred a Leyland or some other British make but it was the only suitable vehicle I could find in 1:72. I do remember it was an absolute pig to put together, though. Thanks for visiting my display cabinet and help yourself to a cup of tea. Milk and sugar are on the shelf above the cups.17 points
-
With Phase Hanger Fuel tank and seat, AOA decals16 points
-
Finished after A bit of repair work after coming home and finding the nose wheel snapped off, but no matter. For your viewing pleasure today I humbly submit Revell's 1/48 F-86D Sabre Dog. 512th FIS,405th FIW Sembach AB Germany 1956. F-86D-NA, 52-10110 Col. M.J. Quirk CO. Corrected historical information thanks to Sabrejet. This was pretty much OOB with the exception of a panel in front of the instruments to add Counter weights to keep from being a tail sitter. AlcladII in various shades for the bare metal effect and an acrylic wash to highlight the panel lines. One noticeable correction I did make, again thanks to sabrejet was to add the fighters crew cheif back on the canopy where it belongs. THe kit supplied decals had the pilots name on both sides. I scanned the decals in and substituted the names then printed out on decal paper. Not a big deal for tying to make it accurate, besides it makes up for using the wrong intakes on the fuselage..OOPS... A face only a Mother could love It's been an enjoyable little romp. I hope you enjoy the pictures. Here's the link to the build. All comments, critiques and observations welcome. So until next time ,stay tuned for more, same bat time, same bat channel.16 points
-
Hello everyone.... Well #3 for the Spitfire single type group build is done. I’d like to present my 1/72 Eduard Mk.VIII Spitfire in the markings of W/C Bobby Gibbes A58-497. This plane sadly crashed while on a test hop after engine maintenance from Sattler strip. At the time was where 457 Sq. was stationed. The engine failed at approximately 100’ ft and gibbes circled and crashed, It burned out and sadly never saw combat. At some point shortly before that Gibbes test flew it with clipped tips to see if the performance was changed. The modification was short lived as upper echelon frowned upon the mod. At which time regular tips were added back. My build represents the plane during the clipped wing test phase. Please feel free to ask questions, post comments, and or add thoughts. Dennis15 points
-
My take on the Airfix 1/72 MBB B0 105C in Swedish Splinter Scheme [url=https://flic.kr/p/2j6PBwB I13 points
-
5th work finished this year. Kit:Zvezda 7013 1/144 IL-62M Accesspries:Extratech IL-62 etching part Liveries Unlimited / Fundekals Air Koryo decal Home made 1/144 pilots(thanks my friend for resin cast copying) Base: Croastal Kits Display Base motion blur effect runway Building period: 26th April - 27th May, 2020 Replace the painting scheme of P-881 in 2013 which she was most seen in PEK. References: Online airliner photo websites: Airliners, Russianplanes, Feeyo & etc. Location of every decal is on the exactly correct place referring to real life photos. Thanks for watching. Yufei Mao13 points
-
Thanks for watch !12 points
-
Another Airfix build out of the box [url=https://flic.kr/p/2j6C7i312 points
-
I've always had a certain fascination with the Horten flying wing ever since playing Secret Weapons of the Luftwaffe as a child on my parents PC wayback when. As you can see a pair featured on the boxart and stood out as a unique design for young me, although I seem to recall I enjoyed flying the P-47 Thunderbolt more in the actual game... Having seen several great builds of Horten aircraft on here I thought I'd have a go at the Revell 1/72 kit. Overall the kit went together OK. I'm not very experienced as a model maker and had some trouble getting the outer wings attached to the fuselage without leaving huge gaps or the wings sitting at funny angles. After plenty of time filing and dry fitting the parts I then managed to create more problems for myself when attempting to fill the gaps that remained so the finish in those areas is far from what it could have been. I also had trouble with a couple of the decals, especially the large red walk way markings decal on the left wing which didn't bed down properly in places despite the gloss surface and this unfortunately stands out in the light. I'd have liked to have a better finish but I think the camo came out as well as I could have hoped and I was just keen to get something finished in the end. I've been looking at some of the Zoukei-Mura Horten kits available now so in a few years if my skill level has improved perhaps I'll have another go at this subject with one of them.11 points
-
Dear Colleagues Although the Korean War was famous as the first jet conflict, the reality was that most sorties were by WWII vintage piston era aircraft. For the USN this meant a return to conflict for the Corsair. This is the Revell F4U-4 Corsair with Eduard PE and decals from Print scale for an aircraft flown by Lt Pullman of VF-193 onboard USS Princeton in August 1952. The decals are terrifyingly thin and fold into themselves as soon as you look at them. The paint is from the new AK range which I found very impressive. The engineering of the kit is a mixed bag, the cockpit isn't correct for the F4U-4 (Eduard to the rescue), the chin air intake needed to be drilled out and the wing layout is only appropriate for an early 6-gun 50 cal aircraft. Nevertheless, the panel lines are perfect for the scale. The deck handler admittedly belongs to a more modern era (Reedoak), but at least you get an impression of the size of the aircraft. The deck and backdrop are from Coastal Kits Hope you like it? Regards Andrew11 points
-
Hello, this is 1/72 AH-1z Viper made by DreamModel. OOB, Everything is included in this kit: folded-wings option, full weapons, PE, and also the trolley for tractor to pull the chopper. 3 scheme options for this helicopter. It's been released on 22 May 2020, modellers can get the kit at their nearest distributors. <removed self-advertising>11 points
-
Hello , Here's my last completed build the old tooling 1/48 Hasegawa Zero A6M5c Type 52, in the marking of 261st Flying Group, in Saipan, 1944. This scheme is a tad original and is documented with 2 photos of these beeing shipped back to the States, on the deck of Aircraft Carrier USS Copahee. Whether it is extreme weathering or field applied overpaint is not sure, I 've been trying to match what I saw on picture .... This is the first tooling of the kit, dating back 1988, with raised panel lines and sparse details. It was scribed, but otherwise, totally out of the box. Used paints are mixes of Gunze and Tamia acryls. Base is IJN dark green, for the darker green (indeed ) and the same color enlightened with 40% Sky. Undersides is Gunze IJN grey. Hope you'll like her. Stef (#6)11 points
-
I've been looking to do a twin seat Hunter for a while but couldn't decide the best route. The Xtrakit offering isn't the easiest build apparently, plus it would need a replacement nosewheel. The PJ / Revell conversion is probably the most accurate and detailed but works out quite expensive, so the only alternative was to have a go at the old Matchbox offering. OK so it's probably not the most accurate and the shape isn't the best in some areas but it was a thoroughly enjoyable build and brought back many happy memories. It is completely OOB, with just the addition of some tape seatbelts and a plasticard nose wheel door to replace one I lost to the carpet monster. I filled the worst of the trench lines and used Xtradecals to show a Royal Navy T8. Unfortunately it's not totally accurate as I couldn't find an arrestor hook. Paints from Vallejo and then Humbrol for the dayglo. It won't win any competitions but I enjoyed the build so much I've picked up another couple! Thanks for looking, comments appreciated.11 points
-
Well, here is My Lancaster ASR III, I tried to take some better images but like a lot of things this year, it hasn't turned out as I expected! Base kit is the Revell Lancaster, with a Freightdog ASR conversion. In addition I used the Extradecal Post War Lancaster set, and Eduard canopy masks, paint was Vallejo air. This was my first group build and the largest Aeroplane kit I have completed since I joined the Army 42 years ago! When my Mojo for 1/35 armour evaporated I returned to 1/72 Aircraft, vowing to steer well clear of the mainstream Spitfires/Lancasters/Mosquitos that appear every day..............there seems to be a theme here about things not going as expected, so far I have built four spitfires, one Lanc, a Mosquito, a Tiffy and two Corsairs and have another eight Spitfires/Seafires, three Lancs, two Mozzies, a Tiffy and a Corsair all sitting awaiting my attention! But thats a horse of a different colour, having built my first Lanc in 42 years I have learned enough about the pitfalls of the Revell kit that my next one will be considerably better than this`un, not that I`m unhappy with it, but I know the areas that are below par, and more importantly, how to overcome them! Next time, I probably wouldn't bother with the Dihedral correction, because, as has already been mentioned on here, a fully fuelled Lancaster sitting on the ground would have an awful lot of weight in those wing tanks and we all know things bend under load! I would shorten the pilots raised deck and move him and his controls closer to the instrument panel, contrary to my expectations the canopy is excellent and a lot is visible, some PE enhancement has already been added to the stash for next time, this also includes the gubbins to sort out the turrets, in their OTB condition they seriously need improvement! I would fully assemble the canopy and attach it in one piece rather than front and rear as I did with this one to avoid the slight step. I would sort out the inboard engines exhausts, they protrude more than the outboard ones because they are intended to be fitted to the merlin engines included in the kit, I didn't use the engines, I just blanked off behind the cowling, My Bad! The kits carb intakes are poor and definitely need replacing, the Freightdog kit includes new intakes and the fuselage intake above the starboard wing, so aftermarket will be required next time, I will try a couple of brands and see what fits, also the kits main wheels are dreadful, the Freightdog ones on this are delightful so a few more pennies required there. I used Vallejo air to paint the kit, I have used this several times now, and I`m still not convinced, I read somewhere that there is a latex compound in it, which allows the paint to stretch which makes unmasking somewhat fraught and I have had some finish issues that I don't tend to get with Tamiya acrylic. Not that I`m about to ditch a pile Vallejo, but I shall be careful where I use it in future! Finally, Eduard Canopy masks, to paraphrase Baz Luhrman "If I could only offer you one tip for the future, Canopy Masks would be it, the long-term benefits of canopy masks have been proved by scientists, where as the rest of my advice has no basis more reliable than my own meandering experience" Ta for lookin` no G Granto11 points
-
Hello guys, here's my most recently completed model, Hobby Boss's Bf 109G-2 in 1:48.10 points
-
Agreed Jamie, I certainly do. That’s very kind of you Joel, I’m really no expert and no secret formula, quite frankly, I’m learning as I go along. That said I have invested in: Some good tweezers Hold & Fold 5 speed bending tool Decent magnification optics (if there’s a secret - this is it) Good lighting Glue has been another learning curve! I’m currently using Loctite 406 Medium CA for bits that need bite, Gators thin blend acrylic glue when something is placed and Johnson’s Klear which is surprisingly useful and clean to flow into joins. Occasionally thin super glue using a needle with the eye half cut off which holds a tiny drop and again flows into a join. I’m getting a feel for what to use when. Incidentally, I found out today that if you over super glue PE parts and want to start again, dunking them in Acetone just melts the glue away. Had the most modelling fun known to man this evening - sticking on my wood decks! Guy10 points
-
Monogram 1/48 AV-8B Harrier II United States Marine Corp used at Edwards AFB for spin recovery testing 1985. Decals; kit + Superscale , paint; Halfords, Lifecolor and Gunze. Thanks for looking. Craig.10 points
-
So far so good, I still have to peel off a couple of tape lengths from the stab:9 points
-
This is the Hobbycraft kit built as a Tomahawk IIB XV-S 'Suzanne' based at Sawbridgeshire, July 1941. Mostly built OOB, I hollowed out the ends of the exhaust stacks, replaced the gun barrels with tubing, added lap belts and shoulder harnesses and replaced the inaccurate detail of the roof of the main landing gear bays with some photoetch pieces that I had in the spares box. There is someone in my life very special to me who happens to be named Suzanne, so when I saw those markings on the decal sheet I knew which one I would pick. I kept weathering to a minimum, some light exhaust stains and paint chipping, my thinking being that they didn't have the chance to get very dirty due to their transitioning to Spitfires rather shortly after they had arrived. The decals went on very well, they are commendably thin, paints used were Model Master for the paint scheme with Gunze Sangyo used for the Sky fuselage band and spinner.9 points
-
Last built this kit about 30 years ago. A year or so back, I had a crack at the KH recon version & that kit is a REAL dog so thought I'd give this a go to restore my faith. Not disappointed - it really is a very nice kit with beautifully detailed cockpits, u/c bays, flap & airbrakes. Raised panel lines of course but none the worse for that, just needs a bit of extra care during assembly in order reduce any sanding/filling to a minumum. The only issue I had was in trying to work out how the internal screen that separates the two cockpits along with the canopy jack are positioned & arranged. Some images from helpful BMers were provided in response to my pleas but I'm not entirely convinced I have them right. I lost the clear cover to the port-side lamp below the cockpits so knocked up a replacement from clear sheet. However I am ABSOLUTELY STEAMING THAT I LOST THE STARBOARD STABILISOR!! I had it painted & all ready to attach & it simply disappeared. I have applied to Revell for a replacement but it seems the kit is OOP & spares are no longer available 😭😭. Anyway, still pleased with how it turned out!8 points
-
Hi Folks, Greetings from sunny Kent. I thought I'd share a few pics with you all of my first attempt at armour. I've made a few aircraft but thought I'd try my hand at something different. Loved it! This is the Tamiya kit. No one here to critique my work so I'm putting it out there for you fine nimble fingered folks.. Be gentle with me!!8 points
-
Greetings, All - this is my debut, so please be gentle! After many years of messing about I decided to get serious and tackle the stash. First up is the Revell 1/32 Stuka which I understand is actually Hasegawa plastic. I used the Eduard Interior & Exterior PE, the Eduard masks, the HGW fabric seat belts and Quickboost resin (exhausts, propellor blades & machine gun barrels). The interior is a mini-project on its own and I discovered that (in this scale), some thicknesses of guitar strings do a very good job of resembling hoses and cables in terms of texture & bendability (new word). The exterior came together reasonably easily, with Vallejo's plastic putty used from time to time to make good my own clumsiness in jointing. I found the seating of the canopy pieces on the fuselage frames quite problematic, and fitting the rear-facing machine guns through the tiny opening while preserving the minute PE gun sights on the ends of the barrels tested the limits of my patience. I have always appreciated the look of the eastern front Luftwaffe aircraft that received field-applied "whitewash" which subsequently wore off. As a tip: this is a great way to ease into model building and painting as you have multiple opportunities to cover your mistakes! These two reference images describe the look I was going for: Because I was going to cover them up anyway, I used some old Xtracrylix paints for the upper surfaces (RLM70 & RLM71) and for the undersides. I find Xtracrylix quite tough to use as it ends up splotchy within 90-odd seconds of use and the only way forward is to regularly remove the airbrush's (Iwata Neo-CN) nozzle cap and clean up. I thinned the paints with Xtracrylix thinners, without which I find the paints unusable. After some hairspray and because I wanted a very fine misted-on mottled whitewash cost on the upper surfaces, I reached for the more reliable Tamiya acrylic flat white which went went on like a dream. Planning ahead saved the day here, as I had done a trial piece before and figured out that I could only do so much of the hairspray/white/wait/scrubbing at a time. The Revell decals scored a solid 3/10 (thick and clunky carrier film) - I will not use these again in a hurry unless there is no alternative. In hindsight, I would self-criticize the build by finding these opportunities for improvement: 1. I should have flattened the tires. 2. I should have got the aerial cable between the canopy and tail on, but I had already weakened the mast part by bending it so wasn't going to risk it. 3. I got the pitch of one the propellor blades wrong, but tried to hide it by orienting the offending blade downwards and therefore making it hopefully less visible. 4. Golden rule for yellow fuselage bands No. 1: never, never, never use the decal, and always paint it on instead, The bigger the decal, the greater the opportunity for disaster. 5. Golden rule for yellow fuselage bands No. 2: never, never, never try to paint yellow over a dark camouflage colour - it won't work unless you do at least 10-15 coats. Instead, pre-spray a white base under the yellow. Simple rules and I broke both of them, then had to take the long road to recover as best I could. The Revell kit is fantastic value for money with lots of detail and it kept me busy for many months. If I had to do it again, I would leave out the Eduard Exterior PE but still use the rest of the after-market goodies I threw at it.8 points
-
This is a very nice resin kit of this a/c. It is nicely cast with few problems and clean up, sometimes a chore with resin kits, was pretty easy, with the exception of cleaning up between the spokes of the wheels which was pretty tedious. The only detail missing I found were the front fender braces, and those were easily done with stretched sprue. Fit was very good with no warpage. The instructions were adequate to the task. It builds up into an interesting little model.8 points
-
Little by little, a touch here and there, the model is coming to life:8 points
-
Kit: Eduard 1:48 Spitfire XVI dual combo boxing Spitfire XVIe RR227 Sqn Ldr Otto Smik DFC Commanding Officer 127 Squadron RAF, Grimbergen Airfield, Belgium, November 1944 Killed in Action 28 Nov 1944 The second of my two Mk XVI Spitfires for the group build. The build thread is here8 points
-
Kit: Eduard 1:48 Spitfire XVI dual combo boxing Spitfire XVIe TD341 443 Squadron RCAF Uetersen airfield, Germany, August 1945 The first of my two Mk XVI Spitfires for the group build. Great kits to build! The build thread is here8 points
-
Another test run needed so that means another chunk but this time in EasyJet orange. I’m sure Stelios would be glad to have a Fairey Large instead of a 737 in the fleet? Looks rather jolly in these colours, almost a shame to prime and paint it in drabber hues. So... ideas for a finish please. Aluminium, Interceptor grey or Grey/Green camo (or the EE Lightning solid green)?8 points
-
SEPECAT Jaguar T.2 31 Squadron RAF Germany, Bruggen, 1976 Italeri kit / Aeroclub seats / Aires resin wheels I built this Italeri kit straight after finishing the Hasegawa Jaguar T.2. It compares quite well and cockpit detail is better. The main shortcomings of the Italeri kit are the wheels (thankfully there are some good resin replacements out there), the seats (ditto) and the drop tanks which are about 7mm too long and mount too far back on their pylons. I didn’t find out about the tanks until final assembly when everything was painted but I seem to have got away with shortening them without needing to repaint. It just means there are now only 3 tressle markings instead of 4! Normally I would have repainted but I had a big dose of just-get-it-finished-itis. I’ve also just noticed that I forgot to replace the fuel dump pipe which disappeared sometime during assembly. Decals are from Modeldecal sheets and various other sources including the old ED Models Jaguar and Tornado codes sheet. I found that there is no aftermarket decal sheet available covering early Jaguar stencil data. Anoyingly, the Modeldecal instructions suggest using kit decals for these which with these old kits are usually unusable or incomplete. The 16 Sqn grey Jaguar is from the Hasegawa kit which I posted on this site earlier. I put Flt Lt Smith in the front seat so as not to have to drop the flaps & slats which seemed to be the default position for static Jaguars. He came from the Hasegawa Jaguar kit so he was already checked out on type. The centreline CBLS came from the CMR resin Buccaneer kit.7 points
-
Hello to all of you I am Alessandro from Norhteastern Italy. I am a 49 years old modeller, well in the past I started building the old Airfix planes, then turned to 1/35 tanks, the first one was a Pz-KpfW II ausf F from Tamiya. My main area of interest is the 2nd World War in my surroundings, the town of Gorizia, on the border with Slovenija,the whole area was called the "OZAK" - Operations Zone Adriatisches Küstenland" a german controlled area but with intense partisan activity. I never stopped modelling but in the last few years I had to make a break as I married and had a child, now he is 5 years old and is much intrested in what I do in my modelling room, this of course causes me some headache sometimes.... but it's fine! I visited Folkestone some times during the past editions of Euro Militaire, I think the last time I was there was in 2001. At the moment I am building a diorama involving a Pz.KpfW. III ausf. N with some german soldiers, I always find an historycal picture for inspiration, then I start modelling. Here are some of my previous works, enjoy! Model Victoria L6/40 Tamiya Sturmgeschütz III ausf.G Tamiya Churchill Mk VII reworked with Resicast turret British Infantry tank Mk IV Churchill (NA75) Italian Carro Veloce L3/33 Cheers! Alessandro7 points
-
F111A, 66-0025, 428th TFS/474th TFW 'Combat Lancer', Takhli RTAFB, Thailand April 1968 The USAF decided to rush a small detachment of F-111As to Southeast Asia under a program known as "Combat Lancer". Six 428th TFS F-111As were allocated to the "Combat Lancer" program, and departed Nellis AFB for Takhli RTAFB on 15 March 1968. By the end of that month, 55 night missions had been flown against targets in North Vietnam, but two aircraft had been lost. 66-0022 had been lost on 28 March, and 66-0017 on 30 March. Replacement aircraft had left Nellis, but the loss of a third F-111A (66-0024) on 22 April halted F-111A combat operations until 1972. 66-0025 was one of the replacement aircraft. The Italeri kit is not too bad a kit to put together - tricky bits were the ill fitting tail area and the forward fuselage. I do have a Hase version up in the loft 🙂 A very decent sized model even in '72. With a re-issue due sometime soon I would well recommend picking one up. Cheers all, Phil7 points
-
7 points
-
As it's been a while I thought we'd have a reminder of where this is supposed to be going and this is where we are at Ok I thought let's get the storage box out.... OMG That's not how I remembered it At 1/200 it's tiny compared with Dunkirk I'm going away to a cold dark place to think Perhaps change direction to this Stay safe and avoid scales below 1/72 Kev7 points
-
I've made an absolute howler in those shots lads - if you at look at the forward extent of the booms top and bottom where they approach the leading edge of the wings, they're a dead giveaway that I've gotten the wings reversed. Ffs! I've only been staring at this aircraft for 5 months solid.... Just dashed out to try and swap them over but the bonds have cured rock hard in the sun. If nothing else I know that cured resin makes a damn strong bond now - pity it's such an embarrassing way to discover it...7 points
-
RCAF Lancaster Mk.10 107 Rescue Unit, Torbay, Newfoundland. 1962. Converted from the 1/96 scale Eastern Express (ex. FROG), B.1 kit. Cheers7 points
-
Brewster F2A-3 flown by 2Lt Charles Kunz, VMF-221, Midway Island, 4 June 1942. Special Hobby 1/72 kit and decals. Hataka Acrylic paints. AW7 points
-
Hi, This is my build of the 1/72 resin kit of the Avro Manchester Mk I, produced by Planet Models a few years ago. I believe that they actually did 2 versions, one with the shorter 28ft span tail as in this build and one with the later 33ft tail which is the same as on the Manchester Mk III aka Lancaster. Planet provide two options - L7284 which is one of the first 20 built and had the ventral FN21 turret, and the slightly later L7427 which had the replacement FN7 dorsal turret. However the latter also had the 33ft span tail according to the majority of sources so cannot actually be built from this kit! I have built L7284 and as it is such a rare sight I have modelled the ventral "dustbin" turret down although that would seldom be seen when on the ground. The aircraft served with 207 Squadron from November 1940 before moving to 61 Squadron the following April and later, in September 1942 it moved to 39 MU, being struck off charge in June 1943. According to @Dave Swindell it suffered a landing accident and was out of action for a while, and his source states that it only flew one operational sortie, which seems a bit strange but he says it was mostly used for conversion training. Anyway, here it is. It has not been the easiest of builds, but it certainly looks better than the one I made 45 years ago based on an article in Airfix Mag - the engines were carved from balsa wood and the rest came from my first of the original Airfix Lancaster mouldings. Thanks for looking. Pete7 points
-
You know that moment when golden throngs of light enter your world from behind you, and you use words like thee, upon, giveth, and resurrection and Pachelbel's Canon in D is playing in your head - well this is your moment Tony!!👌👌6 points
-
Brewster F2A-3 flown by 2Lt Charles Kunz, VMF-221, Midway Island, 4 June 1942. Lt Kunz shot down two D3A1 “Val” dive bombers during the Japanese strike on Midway Atoll and went on to claim 6 more victories in Wildcats, becoming the only American ace to claim on the Buffalo. Special Hobby 1/72 kit and decals. Hataka Acrylic paints. Not the easiest build, with some poor fit and vague instructions, but a pleasing model can be made from it. Built for the In The Navy group build. AW6 points
-
Well kit is here,might need a bigger bench!6 points
-
I had to make a call on the props so went with Tony OTooles suggestion of sticking with the Beaufighter pros. They aren't quite as chunky as Halifax ones but they turn the right way. I took the Lanc blades off the modified one and put the Beau ones back on. It's on the final straight now. Just the nose piece and turrets to finish off and aerial wires. I'm going to glue the wings on as whilst it would save space leaving them off for transporting, trying to put the wings on and off at shows without ripping off an aerial or sticky out bit somewhere will be virtually impossible6 points


Wedge-TailedEaglePortraitRaptorDomains.thumb.jpg.41a306d3445a68f0f2df773e01776ea6.jpg)


This leaderboard is set to London/GMT+01:00