
Leaderboard


Popular Content
Showing content with the highest reputation on 18/05/20 in all areas
-
This my latest finished model, Airfix's Jet Provost. The build is straight from the box, nothing added or changed. Just some screws and the position lights on the wingtips. I made new lights. The kit is quite good, only exception are the decals. The orange ones are very rigid and it is hard to bend over the wing edges and other parts. They crack very easy and need looooot of patience to be placed and fixed. I choosed this variant because of the vibrant orange stripes For future I plan to build the other, white-red version of this cutie. It is very beutifull as well. The pictures are not very good. The model have very smooth satin finish which is not visible on the pictures. Hope you like it! ____________________________________________________ Work in progress: Yakovlev AIR-3 1/32 scratchbuild31 points
-
Hi all. Finally got myself an airbrush and opened up a new exciting world of pain and thinners and mixing paints and trying to wash the paint off the pants, haha. This has been a very random build, because I came across the Tu-134 as a cheapest kit available and I instantly thought I always wanted one. The build was quite an easy one except for the canopy fit, probably. I missed the fact that rudder is put between the two halves of the fuselage, which is an unusual feat. Eventually had to force it in place and do some repairs. The navigator glasshouse does not fit at all (which I was aware of). I tried to keep the two halves of the fuselage unglued forward of the nose gear bay and cockpit windshield, fit the the navigators canopy and fill the gap, but it didn't work quite as expected. Still maybe this is the way around for someone with a rather better skill and patience than me. There is a huge rant over at the russian model community side about the inflight stabilizer angle being -1.5 or something degrees down as a must do. Well I got it slightly nose down and that's about it. Once again, airbrush is a great excitement for me, being a trained painter I know a thing or two about colour mixing. First time tried and oil wash (with the terror and relief!). Didn't bother to glue back an underside antenna because it won't stay. And yeah, right side 'soviet bird' logo somehow slid after applying, don't know when Enjoy I've decided to paint fancy lemon yellow spinners My cat in 1:1 scale25 points
-
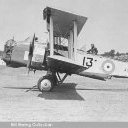
Hawker Hurricane MkI, H22, 2/I/2AÈ (Chardon), Aéronautique Militaire Belge, Schaffen Airfield, Diest, Belgium, May 1940. In my quest to try to model every operational military aircraft in active service in the Western European theatre during 1940, the Hurricane of the Belgian Air Force was an obvious choice. Realising the urgent need for modern aircraft to update their defences, two Belgian officers were despatched to the UK to seek new types. The Hurricane was found to be ideal. Orders were placed for 40 aircraft, plus contracts to let the Belgians licence-build another 80. Fifteen Hurricanes had been delivered by September 1939. Only 11 were fully operational as the events of May 1940 began to unfold. Like most of them, Hurricane H22 was destroyed on the ground by German attacks on 10 May. The ever-useful and informative Belgian Wings site section on the Hurricane. The AZ Model kit originated with Sword back at the turn of the century. The boxing I had came with markings for three RAF aces of the Battle of Britain. With RAF aircraft already in the cabinet, the fact the kit included a two-bladed propeller made me think I could build it into a Belgian plane. The generous provision by a fellow BMer of a set of spare Airfix transfers from their early MkI kit gave me the opportunity. The kit had its foibles, with some very nicely moulded resin parts for the cockpit (no longer visible) and other details. I found most were unsuitable or unusable, and raided the stash for an old 1970s Airfix Hurricane box which came to the rescue for some parts. The vac-form canopy came from Falcon. I brush painted the model with Humbrol and Revell acrylics, plus Humbrol metallic enamel aluminium colours for underneath. The radio masts were made from brass rod for strength. The Work In Progress thread starts here:24 points
-
Hi all, Finally, time has enabled me to get my Skyraider across the line 😊. As you will have seen in the WIP (below) she is one of the former Armee de l’Air (French Air force) machines that were acquired by the Groupment Aerient Presidentiel de Gabon (GAP). Eight aircraft were on GAP strength over time, with four machines, colour-trimmed red, blue, green and yellow, being the longest serving. They flew as part of a broader and varied GAP fleet that included, at the time, other types like the Banderainte, L-100/C-130, Harvard, Fouga Magister and others. These were the last active and armed Skyraiders world-wide, being retired in the 1980s. For those who are interested, TR-KFP “green” is now F-AZDP in France, TR-KMO “blue” is G-RADR in the UK, TR-LQE “yellow” is in France and TR-KMP “red” now resides in The National Museum of Naval Aviation in the US, having been impounded by customs. A sad end for the old girl . Of the others only one was lost – TR-KFR on 14th July 1978 in Lome. They were flown by contracted French pilots, the most well-known of these being Jacques Borne. Jacques was the flight commander and was an ex-Armee de l’Air mechanic (on H-34/HSS-1) and pilot, having amassed more than 6,400 hours on a number of types, including the Fouga Magister, T-6/Harvard, Mirage IIIB/C/E and IVA, and T-33. He maintained a nickname through his career of “Sarcife”. You can see more about him here, albeit in French: http://www.pilotedechasse.org/2017/06/en-vol-avec-sarcife.html and search "sarcife". Google Translate is a great thing! 😊 The subject of this build is Jacques’ machine, TR-KMP “red”. She was an AD-4N. She is built from a Hasegawa A-1H Skyraider kit, supported by some parts from a Sword AD-4W. The latter is a spare ship for this and other builds in the future. For this build I used the side doors, leaving one “ajar” so that it has a little more detail interest, plus the main wing pylons. For the build I have been supported superbly by Jacques’ son, Fred. He provided me with many images of these aircraft, some of which are also available online, and answered questions along the way. Here she is in a shot taken during her Gabonese career: What did I do/use? Well, here goes: a. Inserted the starboard side door section from the AD-5W, cutting the port side door aperture (slightly too low ☹) and used the AD-5W door b. Built the internals for the rear cabin in a generic sense. Used Kristal Klear for the side windows. c. Added different antennae top and bottom of the fuselage. d. Removed the “pitot” and light from the fin tip. e. Used a F-84G wing tank (thanks @Wez) for the belly tank and made the AD-4 shackles from Plastrict rod. f. Built T10 rocket rails and cables with Plastruct rod and wire. Used the AD-5W main wing pylons. g. Used an Aires cockpit set h. Added static wicks with wire i. Re-scribed per AD-4N j. Painted the red trim rather than using decals k. Here and there, as appropriate, I dry brushed with aluminium, black and red. I also left the Flory wash more intense in places to mimic the dirty(ish) conditions of the aircraft. Unusually for Skyraiders she did not have much oil or exhaust staining, as you can see from the above photo. l. Added the foot steps behind the wings, using brass rod. m. Drilled out the cannons and exhausts - Thanks for the prompt Stuart @Courageous 1. Kits – Hasegawa A-1H Skyraider (00780) and Sword AD-4W Skyraider (SW 72126) 2. Decals – Zotz Skyraiders over Africa set (72026) for the national insignia, lion motif and stencilling, Modeldecal French numbering set (No.63) for the “MP” ID letters, Xtradecal black lining and red lining for the walkways, etc. 3. Extra parts – Aside from the side doors – I used a modified F-84 underwing tank to represent the large belly tank used by the French, various antennas and dorsal intake from the spares box, Plastruct rod for the rocket rails, belly aerial poles, belly tanks saw braces, electrical copper wire for the rocket rail charging cables and static wicks, and a few other little bits and pieces. I used an, Aires A-1 resin cockpit. 4. Paints – Humbrol Metalcote Polished Aluminium (27002), Colourcoats Matt Black, Insignia Red, Interior Green, plus various other paints for small details. Humbrol Glosscote and Satincote. 5. Weathering – Flory Dark Dirt and Light (mixes), Tamiya Weathering Powders, Prismacolor Silver pencil (PC949) 6. Colin @Colin @ Freightdog Models kindly donated a couple of Aero tanks but I needed the larger belly tank. I'll keep these, with his agreement, for a later AD-4B build. Thank also to Mike @72modeler for some valuable data. The WIP is here: I hope you like her. Having got this build done I am now working on Jacques’ Fouga Magister and will then add a Harvard/AT-6D to the Gabonese fleet in my display cabinet. 😊. I hope you like her. Martin23 points
-
Trumpeter's 1/32nd scale 109-G2 Tropical. A straight forward kit with no pitfalls. It assembles easily and has lovely surface details. Painted with Tamiya acrylics & Xtracolor enamels. Thanks for looking Angelo22 points
-
Hello, the kit is Tamiya's new tool Spitfire,along with Eduard Big Sin set for cockpit,wheels and exhausts. Codes and serial number came from Xtradecal and painted the markings using vinyl masks from Pmask range. It is a Spitfire MkI K9907,flown by Squadron Leader "Des" Cooke,65 Squadron RAF Kirton In Lindsey May 1940.21 points
-
Another one done. Airfix Blenheim MkIV F. Kind of an irritating kit - the main bulk of it moulded to extremely tight tolerances, so getting it to fit was hard work (horiz. stabs. excepted!), but ultimately successful, but a lot of the silly little ancillaries like aerials are just "glue on where you feel like" - no pins or sockets, even when trying to fit a flat edge to a curved surface. I was a bit sloppy on the masking too in places, but it doesn't look too shabby. Eduard zoom in the cockpit, Quikboost exhausts and intakes to replace the awful kit ones. Meant to have a go at replacing the wingtip lights with clear, but forgot until I was well into painting - doh!21 points
-
Hi All, Here is my attempt at Trumpeter's 1:48 Westland Whirlwind. I modelled it as HE*F 'Bellows Argentina No.2' of 263 Sqn RAF, based at Colerne in Jan 1942 (aircraft pictured at Charmy Down). This aircraft was the Squadron Commander's, who at this time was Sqn Ldr Thomas Pugh DFC, who was later killed in action in 1942 aged 23. Here's a couple of shots of the actual aircraft. (image copyright IWM). I wasn't happy with the accuracy of the Trumpeter kit or the decals, so this was my first serious foray into scratch building. Here's the WIP thread if anyone is interested: A brief summary of improvements and additions as follows: - Scratchbuilt cockpit and IP (the kit cockpit is about 4mm too shallow, and the pilot's seat a park bench) - Addition of rollover brace to pilots seat and reworking of the rear cockpit deck area to allow an open canopy - Relocation of the radiators 2mm inside wing - Addition of wing position lights and antenna mount to transparent components - Removal of incorrect wing fillets - Use of Montex mask set for national markings and insignia (Trumpy decals were incorrect colours) - stencils and Squadron Leader's pennant scrounged from the spares box - Replacement of kit wheels with Barracuda resin (or at least they will be when they arrive!) Anyway, here she is: For all its faults the Trumpeter kit goes together well, and I've enjoyed the experience of scratching the cockpit and the other minor improvements - a big shout out to @bigbadbadge for all of the invaluable reference material (thanks Chris!). Finished in a mixture of Mig, AK Interactive and Tamiya acrylics. I will add some before & after images of the Barracuda wheels in place once the snail mail package eventually arrives from the UK! Anyway, I hope you enjoy - thanks for looking, Roger21 points
-
Austrian Air Force SAAB J35O Draken Hasegawa 72nd scale SAAB Draken Finally finished after being started about 25 years ago as the example I seen during a Leuchars Air Show with the help of @exdraken who kindly provided me the tail badge decals.21 points
-
First model in a while (and there was me saying I was going to speed up my completion time!). An Airfix EE Lightning F6 in 1/72 scale. Being a new tooling, I had high hopes going into this build that this was going to be enjoyable; several months later I can definitely say that I'm happy to see the back of it! The fit around the cockpit was incredibly disappointing, especially having spent a good length of time on the tub using photo-etch from Eduard. Large amounts of flashing on some of the smaller pieces too, particularly the pitot tube, saw me binning that and now having to think of a replacement part. Also had the satin coat (Ammo by MIG) reacting with the Microset/Microsol at the decal stage, and leaving the finish far from perfect. Still; I got through it, and finished it and I guess that is what is important! Airbrushed using Hataka redline paints, Eduard photoetch for the detailing: And a final one of the cockpit since I spent enough time on it!:20 points
-
SAAB S17BS Swedish Reconnaissance Float Plane Kit: Marivox (No.3) Scale: 1/72 Extras: Scratch built cockpit Paints: AK WiP: https://www.britmodeller.com/forums/index.php?/topic/235066773-saab-s17bs-floatplane-finished/ Stuart19 points
-
Finnish Air Force Hurrikaani Airfix 72nd scale Hurricane Mk.I Here's a link to the progress thread but in the meantime thanks for all the support and encouragement on this one throughout the GB gang.18 points
-
Greetings Brits- Now that my modelling skills are improving... I decided to tackle the Eduard Fw-190D-9 in 1/48... This model has alot of detail and some reviews suggesting a tough build. Well, I did have some snags but everything went together fine for me, and even though this is designed as a kit with open gun hatch and wing root cannon hatches open, I followed the instructions and closed them up. It was tougher to do, but the next one I build will have these hatches open just to add variety in my display case. I built from the kit and the only thing I changed or added was the Eagle Strike #48003 decals for Black 1, 5/JG26 (II Gruppe), Wk No 210972 and a scratch built exhaust deflector on the starboard side. I did not put in all the fiddly PE instrument panels in, I used the nicely molded kit instrument panels... The only issue I really had was the drop tank in the kit did not attach to the ETC rack! The instructions say glue it on but the shape of the tank and the ETC rack had no attaching feature or interface of any kind! So I had to leave it off... I wanted to do a Standard Fw190D-9 Scheme from the FW Cottbus Plant, and the Wrk No 210xxx is for November 1944 to December 1944 production with the RLM 75 Grey Violet and RLM 83 Dark Green all over RLM76 (back when they still did paint the FW's in all underside in RLM76!) This ship had the later blown canopy possibly added in the field..., The photo I have of the original plane looks very well maintained and just has exhaust stains. It did have the later 'cigar' drop tank, which I cant find in 1/48 and will have scratch build in the future. The ETC rack is in the dark grey so I painted it like that... I assumed RLM66 for it... Enjoy the pictures! Its freshly finished on the workbench! Thanks for looking!17 points
-
Another finished WEM/Atlantic Models 1/350 resin kit; this one previous to the HMS Mermaid build. An unusual ship for the Royal Navy, a Banff Class sloop - actually an ex-USCG Cutter. Rather nice look I think. I'm not sure about the forward armament of HMS Gorleston (literature on these things is hard to find). Kit was relatively crude in comparison with the Starling model and a midships superstructure had to be replaced as it was set at angle rather than right-angles; also the photo etch was largely unusable being thick and only partly etched in places. At some point I'll replace the heavy HF/DF aerial on top of the foremast. Colours are supposed to be 507A/507C but I've got the contrast too high. I think I used a Polyscale/Aeromaster USN grey for the latter and my first experiment with Schminke inks for the former. Another reference for the camouflage scheme suggest B5/507C which would be attractive and appropriate for the Gibraltar-Freetown run that this ship largely did. Gorleston-on-Sea is just south of Great Yarmouth (Norfolk). Cheer, GrahamB and many thanks for the kind remarks and likes for the HMS Mermaid build.👍17 points
-
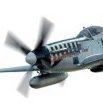
Air Vice Marshal Stanley Flamank Vincent, CB, DFC, AFC, DL (7 April 1897 – 13 March 1976) was a pilot in the Royal Flying Corps (RFC) and later a senior commander in the Royal Air Force (RAF). He was the only RFC/RAF pilot to shoot down enemy aircraft in both world wars. LF363 was his personal aircraft post WW2 and is depicted here c.1947 bearing his rank pennant and Fighter Command's crest. The prop and spinner were replaced with those from an old Mbox kit. as the Heller one had an awkward seam. As the personal mount of an AVM, LF363 was kept very clean. LF363 still flies today as part of the RAF Memorial Flight. David17 points
-
The subject of this build is Gloster Gladiator #433, a uniquely painted aircraft that was one of 12 Gladiators that served with the Norwegian Army Air Service up to the time that Germany invaded Norway on April 9, 1940. All Norwegian Gladiators were painted in a silver colour, presumably aluminum dope. #433 was selected to receive what might have been an experimental camouflage scheme in 1939. Data on the scheme is minimal and it appears that there are only a few known B&W pictures of the plane. A full discussion of the airplane and its scheme can be found here: One such picture can be found on line on Pinterest and is unattributed. I have cropped the picture and included it here: The WIP thread with all its trials and tribulations can be found here: So here are a few of the finished shots. Paints are all Tamiya and sprayed with an Iwata HP-C Plus airbrush. Thanks for looking! Andy16 points
-
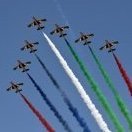
I present: my Very first GB entry: A dual build of Czech Gripens, from the 1:72 Revell kit! Both sport some very colorful special livery from JBR Decals : the JAS-39C no. 9234 in the 100 years of Czech Airforce livery (unfortunately no decal for the drop tank was provided, so I omitted it), and the JAS-39D two seater No 9820 in the "10 years of Gripen in the Czech airforce" livery. Link to the build thread:16 points
-
Getting in, with a 1/72 Special Hobby Gnat F1 not really finished, as I have just lost a Mainwheel14 points
-
Hobbyboss 1/72 Westland Lynx MK90 - Royal Danish Navy (Søværnet) My first group build ever and infact my first kit to finish in something like 35 years (I’m a slow builder 😁). A very nice kit that went together nicely. Decals are bit on the thick side I think, but for a novice it’s likely better that way around. Build thread here, A big thanks to Rich, Col, Enzo and everybody who contributed (we broke the voting “machine” ). Cheers Johnny b14 points
-
Hello everyone - Hope you are all safe wherever you are. Here is my 1/48 IAI Dagger from the Kinetic Mirage IIIE/5 South America boxing. The kit is out of the box with the exception of some cockpit details from various sources, a new seat, mirrors on the canopy and a metal pitot from Master. The kit is pretty good - if a little fiddly here and there. The main problem I had was that the fit of the front canopy was poor. I simply filled and faired in the gaps and accepted that some detail would be lost - pictures show that little in the way of riveting/panel lines can be seen in this area anyway. The other problem was the poor instructions and slightly ambiguous placement of some parts such as the blade aerials on the tail - there are actually no slots for them to fit into and the placement suggested is wrong. (Also the aerials are too long!). I chose the large fuel tanks because I like them and because the supersonic tanks provided in the kit are of the French type and not the extended type used by the Israelis and Argentinians. I modified the markings a little and modelled C-415 shortly after the Falklands conflict with mission markings. C-415 suffered a damaged front canopy early in the conflict and was not available again until near the end or after the end of hostilities. I just didn't want to model the Yellow/Blue campaign markings that everyone else does! Colours were as suggested in the instructions from Mr Hobby Aqueous Hobby Colour. Detailing and weathering was mainly using oils. The surface detailing is extremely fine in places and it was difficult to use a normal wash procedure so in places, individual lines and rivets were picked out. thank you for looking Cheers Malcolm And a (poor) picture of the real thing:13 points
-
Hello Britmodellers, having finished my latest build here pics... My tiny little "Mitten" from brand Zvezda. Very crisp and looks every mm a Yak-130, very good kit.... Cheers, Tom13 points
-
Just completed for the "kit I built as a kid GB" humbrol enamels transposed from Airfix paint numbers but mainly by eye from images from the net. Cluster bomb unit decal from Hannants decal strip, airbrake and undercarriage bays Tamiya XF413 points
-
9K37M1 BUK (SA-11) - Finnish Army Helsinki 2004 Kit: Meng SS-014 (1/35) Paints: Testors MM & Tamiya AM: none Decals: kit Build Thread: https://www.britmodeller.com/forums/index.php?/topic/235068523-finland-9k37m1-buk-sa-11/ First GB completion since last year's spring Blitzbuild.13 points
-
Fairey Fulmar MkI Serial Unknown /6A 806 NAS HMS Illustrious Jan 1941. Lt William Barnes was one of the Top Scoring Royal Navy Fighter Aces of WWII. 806 were the top scoring Naval Air Squadron and the Fairey Fulmar the Top scoring type of the Fleet Air Arm. Unfortunately existing records do not confirm the serial numbers of many of 806s Fulmars often the record stating a pilot was flying ‘Yellow 2’ or in one of Barnes combat report ‘6A’. Barnes flew ‘6A’ to victory on 10.01.41 claiming Ju87 Destroyed, 2xJu87 Damaged, 100m W.Malta. Barnes was accidentally killed 03/02/41 when the vehicle that he was a passenger in didn’t stop at a Check Point, the Maltese soldier shot the fleeting vehicle, the bullet ricocheted hit & killed ‘Bill’ Barnes, he was posthumously awarded the Distinguished Service Cross. Lt William Barnes is buried in Kalkara Cemetery, Malta This is my representation of the aircraft Lt Barnes flew 10.01.1941, Fairey Fulmar MkI (Serial unknown)/6A. I need to thank @iang for his help with how this aircraft would have appeared. The model is the Special Hobby 1/48 Fairey Fulmar MkI (Mediterranean & Indian Ocean) boxing. This kit is a multimedia kit with injection moulding, cast resin and etch, so my model is virtually OOB 🤔. Paint is Xtracrylics, Tamiya, Decals are kit decals with the exception of the A which I hand painted. Thank you to the Mods and thank you to the ‘In the Navy’ admin and other modellers for their support. There are some fabulous models in this gallery that’s what I’m off to study now.... Thanks for looking in..13 points
-
Subject: 441 Sqn. CF-104, s/n.107735; 1 Wing, Lahr, Germany, 1980 Kit: Hasegawa 1/72 F-104G (Canadian Boxing) Aftermarket: CMR resin - cockpit, electronics bay, exhaust The resin VICON photo pod and wing pylons (with CHAFF dispensers) were part of a brief sojourn into resin pertinent to Canadian military aircraft, by the author, Patrick Martin. Decals: Leading Edge CF-104 Starfighter's (variegated cam scheme) Leading Edge generic post-war numbers ('new' style) - OOP There were three Starfighter squadrons that comprised the German-based 1 Canadian Air Group ... 421, 439 and 441. 441 Sqn. was the last to operate the CF-104 (421 and 439 had already stood down in 1985 pending acquisition of the CF-18) meaning it was also the last tasked with flying photo recon missions with the VICON camera pod prior to the type's retirement from the Canadian Forces in 1986.12 points
-
Just finished this over the weekend - was sitting on a shelf for a while begging for my attention - glad that I finally got around to finishing it off. It is nice to have the classic Intruder in my collection again after I sold my diecast one a few years ago. The old Fujimi kit finished in the markings of VA-75, The Sunday Punchers. There are 5 smart marking options in this kit but I went with this one as it has the cheeky Tonkin Gulf Yacht Club badge on the intake - along with an impressive mission tally. Airbrushed using lovely Tamiya acrylics, Flory wash for the weathering and sealed with Xtracrylics varnish. Built completely OOB - only had to drill the airbrakes out for a better look. I did have a nightmare with a bit of primer/paint bleed on the massive canopy which then took an age to try and put right (really hate canopy masking...) Anyway, enough waffle, let's have the photos....!!! Cheers all, Phil12 points
-
Evening All, I hope this finds you well. Here's one I started maybe 2 years ago and I thought I'd quickly finish it while I waited for my next project to be delivered. My next project arrived within a week.....finishing this took about a month. Hmm. The Kit - Airfix's 1/48 Sea Vixen FAW.2, built as XP954 of 893 NAS, HMS Victorious, 1966. I'm no expert on these so it's pretty much out of the box except that I added some brake lines and busied up the seats with some Tamiya tape; I may change them for resin ones in the future. I also didn't paint the coal hole lid as I've seen a couple of pictures with it clear - artistic licence. I left the wings down so as to show the shape of the aircraft, and the flaps and hook are down for maintenance. Main U/C doors, and airbrake are sagging a little. Finish - Painted in Tamiya acrylics and coated with Kleer (stocks are dwindling). After decalling I gave it a light overspray of the base grey (top) or white (bottom), and then gave the top surfaces another going over with a lighter grey, and also added bootmarks, oil stains and stuff. The bottom was streaked with oil stains also.......So subtle it hardly shows in the pictures. Why ? - Memories. There were a couple of these in the hanger at Halton.......massive beasts next to the Gnats and JPs we were working on. One day I was volun-told to get up on one of them with a broom to dust it down before an inspection. I'd initially thought I'd build one of those airframes but I liked these Sqn markings....and it was easier. Here we go......... Seat harnesses by Tamiya. Decals........so many decals !!!! The canopies aren't glued in position; I might need to swap the seats in the future. There's bootmarks there, honestly. I found Humbrol decalfix pretty good with helping prevent silvering. I forgot to make the drop tanks a bit dirtier. Ah well, roll equipment, just been fitted. You can just about make out the engine compressor face. I'm happy with it In the cabinet next to the Bucc. I hope you like it. Comments good bad or indifferent welcome. Cheers. Gaz12 points
-
Hi Guys, Hope all is well, I recently started this kit a gift to me by a very good friend. Almost a year passed I didn't do anything to it. However, this lockdown has given me ample time to do what I love to do, building models The kit has five parts three sprues, one clear part, and one decals sheet, the building was smooth. I use Vallejo and Tamiya for painting as I didn't have an exact color so it was a bit of eyeballing it. The stripe at first I tried to use decals, however, when I applied I realized the decals were too thin and bottom paint became very visible so I masked and painted the stripe, and painted white circle for roundels as well. The decals register well and were quite happy, The kit gives you the option to have folded and fixed-wing but I like both positions so I did half half of it . Weathering was done using simple acrylic and exhaust by highly diluted brown with a pinch of black after the first brown got dried. So without further ado here are the pictures, thank you for looking Cheers12 points
-
……..A slight change in the running order of things today as I couldn't find some stuff I needed for the flying surfaces until this evening. I therefore decided to cut my losses and do some work on the fuselage instead. It all helps illustrate the process so it doesn't really matter that it is slightly out of the order that I had originally intended. Firstly, I felt that the nose looked a bit on the slim side. No big deal. Plastic card is a very forgiving medium and I just added some .30 x.30 'thou plastic strip to the mating edges of the fuselage. this corrected the nose but left the tail end of the fuselage too thick. This is easily dealt with, I will just pop the fuselage back on the vacform board tomorrow then the glue has cured and sand the tail back a bit. This is a simple technique if you find you have sanded a fuselage part away too much. I thought that I would do something to make the fuselage look more like an aeroplane next, I taped the fuselage halves together and marked out the positions of the pilot's and gunner's cockpits. A shout out for @John Aero for pointing out that the pilot's cockpit was offset to starboard I doubt if would have picked up on it or if I did, not until it was too late. The forgiving nature of the plastic makes it a simple matter to chain drill and then carve out the cockpits. Back to the flying surfaces for the next part. Martian 👽12 points
-
Hi All, this a vignette I made +/- 20 years ago in classic Verlinden way. Jeep is from Tamiya as two figures with Verlinden heads. Accessories are a mix Tamiya/Italeri + homemade sandbags. Hope you like. Ciao Filippo11 points
-
Here's my Lincoln, just finished in the Lancaster STGB - build thread is here. This is the Airfix 1/72 Lancaster II converted to a Lincoln using the Blackbird Models resin conversion and converted to the Armstrong-Siddeley Python testbed RF403 using a combination of 3D-printed nacelles and bits from a couple of Trumpeter Wyverns. I say 'testbed' but I don't think it really was - this was the third (I think) Python Lincoln, built for use at Woomera in high-altitude trials of the Blue Danube bomb. It was a fun build - the Blackbird conversion is excellent - just marred by a small SNAFU when a big drop of paint somehow got inside the canopy - hence I've only photographed it from angles where it's barely visible! thanks for looking Julian11 points
-
This is my representation of the Japanese Light Cruiser Kinu. The kit was the Tamiya 1/700 one, and the railings came from the Starling Models Japanese Railing etch set. There is a build log: Thanks for looking, advice and encouragement. Ray11 points
-
Well folks that it!!!! She's all over.... A huge thank you to everyone that joined in and made this a success it was! The response to this GB was totally unbelievable and beyond what I thought it could be when I first proposed the the idea for this GB last year. Whether you completed a build or not I do hope you enjoyed the experience and it was a pleasure to have you join in. I'd especially like to thank our 🇩🇰🇫🇮🇮🇸🇳🇴🇸🇪 friend's who joined in, and to those who provided so much help and advice to everyone.....and cooking tips! I do hope everyone enjoyed the GB, I know I did immensely, it was a lot of fun and I will really miss it..............................................ok I'm over it now! And best of all we broke the gallery!!! Not to sure how we'll be able to setup a poll, however we manage to do it, it will require a bit of work...lucky we have Enzo!!! ...and don't forget to sign up for Ragnar's Return Tour of Europe11 points
-
I'll call this complet also. Next time I'll start with a darker green as I tried a Tamiya Dark Brown Panel Liner wash and that didn't tone it down much. Spent most of the day yesterday cleaning it up with thinner and still too bright. Lesson learned. (I hope)10 points
-
Here's a very quick build from the last few days, as a test using Halford's Fiat Capri Blue, and Halford's Racking Grey. The build is very straightforward. The only modification is to remove the unnecessary flap track fairings on the underside of the wings. The A319, A320, and A321 kits use the same wings, but only the A321 has the extra flap track fairings. Their removal is given in step 3 of the instructions. The blue turned out really well, I was afraid at first that it would be too light. I'm also really impressed with the grey. But this build has given me the confidence to use the Fiat Capri Blue on the Revell British Airways A380, and to use Humbrol Midnight Blue for the Landor 747. I built this A319 as G-EUOG, which brought me home after six years living abroad. The decals are the "old" Chatham livery for British Airways, meaning that there is no crest on the fuselage, and no registration decals for the top of the vertical stabilizer, or above the flight deck windows. In addition, the current Chatham livery does not have shading on the tail cone, as depicted with the decals - the current version is solid red. I found the wrap-around decals for the tail cone difficult to apply, and there are some folds. However, with this A319 now hanging from the ceiling, no-one can tell! One thing that bothers me about this kit is that there are no decal options for the cabin windows, like there were for the A320. And there are no clear parts for the cabin windows. There are silver window frame decals, but this means that the windows are represented only by the very thin decal film. This is actually the third time I have built this kit - the first one was damaged beyond repair during my move, and the second one I had completed, just finished the decals and was fitting the antennas, when I turned it over and realized that I had some cement on my fingers, which had melted through the logo decals and smeared blue and red all over the fuselage. So in the bin immediately it went. Most of the time building this kit was spent on the many decals that it has.10 points
-
This time, quite a difficult model for me. I don't like models of planes that are realy clean, they look like plastic toys to me. That is why my model making is heavily exploited aircraft models. This time I tried to make this model like oryginal, so that it was not too tired, but that it was also not a plastic toy. I hope I managed. F/A-18C VF-131 Academy 1:3210 points
-
Hi This is my Mig 25 RB frpm ICM kit at 1/48th The plane is very large. More than 40 cm when you finished it. There are no major problem for his build. Some step requier attention but it is a very good kit. I use the AK paint for this kit. A global view Another pics in my galery Mig 25 RB10 points
-
This guy only took a couple years to complete, but here it is: It's the 1/72 Eduard kit in TSS, painted with Vallejo - my first success with free hand camo with water based paint. I'm happy with how it turned out, but it may be another case of beginner's luck, as my next attempt went terrible and I don't want to talk about it. 😆 And here it is alongside some BPF stablemates. Thanks for looking.10 points
-
And we are done, and posed with the fleet so far. I know there are plenty of other types used by Belgium in the period. I have a Fairey Fox MkVII to build - the only kit I could find at the moment and it happens to be the sole variant of the type! One day I might stumble across a MkVI, but until then the Kangarou Monofox will have to suffice. The Hurricane RFI is here:10 points
-
Hi all, this is the Special Hobby 1/72 Fairey Barracuda, a striking aircraft that could be described as a little ugly, but I rather like it. It was finished for the ‘in the Navy’ GB currently on. this kit is nice, but has some fit issues and the location points are guess work in a number of places. But if your a better modeller than me it will turn out great I’m sure, the bar I’ve set isn’t high. Anyway, I’ve over weathered her which is what I wanted and what I felt fitted with the scheme which has replacement panels still in their primer. It’s also carrying a bomb load, which it probably never did, but let’s just say they were trying it out? her it is. oh and it’s missing a 374 decal as it melted and I don’t have another. all finished with tamiya and humbrol paints with a brush. here is the build thread. cheers for stopping by! Rob9 points
-
already in progress, earlier build WIP pictures lost to matrix someplace...but new project build pics are here. 1st decals of...about 6 million! moving right along: hours later... That's the majority of the decals, I didn't put in the no smoking and instrument panel decals...seriously, they're included! There's even Dzus fasteners and over center snaps on the cowls (haven't seen that in 1/32 let alone 1/72!) Anyhoo thanks for looking PS the model isn't accurate (the real plane doesn't have the cargo pod nacelles)9 points
-
Hello All, I thought I'd present my attempt at Revell's 1/72 Dambuster: I received this as a birthday present from a pal which although gratefully received, I would have probably bought the Airfix one - would be interested to know if people have built both and whether the latest Airfix one is actually superior? It's an acceptable build although the wheel bays and undercarriage was in my opinion, poorly engineered and not very strong. I also had a significant step on the fuselage halves but corrected them. You can see the fit issues on the wheel bays and undercarriage plus the repairs I had to make after one them completely collapsed! I added some extra detail to the nose area and tried a 'marbling' technique to paint the camo on a black base, rather than my usual grey primer and pre-shading. I actually prefer this approach and am pleased with the effect despite the hand cramps from the extra time with the airbrush! Had some issues with the decals silvering which show up on the black prominently and on the wing stencils. Not sure why as I applied my usual technique... Anyway I hope you like. Cheers, JB.9 points
-
Last superstructure done - aft (minus life boats etc). my PE skills have definitely improved from the last build, hopefully they’ll continue to do so. That said, it’s super macro photography so go easy! 😄 I’ve managed to do the cranes too - which I was dreading, but actually, they’ve turned out ok. So here’s where I’m at (can’t resist ‘playing’ with the model and keep adding the structures to see what they look like!) Thanks for looking in, Guy9 points
-
Ooops forgot...there will (maybe) be 2 more of these built along these lines one is accurate to it's prototype the other, like this one had the cargo pods which were wrong...so I modded an Amodel 1900 wing and the RVHP fuselage (much like Beechcraft did but in reverse) to fit the 1900 wing to the 200 Here's the Amodel wing (the gray plastic wing) fitted out with RVHP engines pictured below an RVHP wing assembled and fitting the Frankenstein assembly to a fuselage: now I'm done...I think? work will continue tomorrow Thanks for looking!9 points
-
Hey all, a bit of a change of pace for me. After building a bunch of models with nice shiny clearcoat, I wanted to try a more weathered and distressed finish. I watched a bunch of YouTube videos on the salt chipping technique and applied them to a Revell 1/25 1968 Dodge Dart GTS. The goal was to create a model that looked a bit sun-baked and rusty but mostly original. This is the first American car I've built in a very long time. The kit was pretty good, I haven't built an American kit in a long time either, but there was lots of parts to work with and some nice engraved detail on door panels and the rear trim in particular. I changed the wheels in the kit to a set of Fireball Modelworks Mopar steelies. I added some engine wiring and exhaust tips made of aluminum tube but that was about it. I'm used to Japanese kits that lock the interior chassis and body together, so the final fit on this was a bit loosey-goosey but came together with a bit of glue and clamping. I painted the front quarter panel to look like it was replaced at some point and drilled out the side marker light and sanded off the emblem. I used some light acrylic washes to add to the weathering but really tried to restrain myself from doing too much. This was also the first time I intentionally sanded through a decal. 😀 The engine was weathered to be a running survivor and not totally derelict. I've started building a large diorama to shoot my models on - the base is the start of the parking area and the backdrop is a printout of a photo of a graffiti covered wall I found online. There's a lot of great demos on YouTube, but my process was a basecoat in Dark Rust, a light speckle coat in light rust, apply water and then sprinkle on coarse salt, let that dry and spray with a grey primer colour, brush off the salt and repeat the salt application and spray with the body colour so you get a 2 layer paint and primer peeling effect. Washes and rust detail was applied over this. A couple more shots: Thanks for looking! Martin.8 points
-
Latest aircraft off the bench today. I resisted buying Trumpeter's version of the Lightning for a long time as it always looked a bit 'out of shape', but now that the Sword F.1/F.3 offerings are becoming harder to come by there is no other game in town really if you want an early mark 'out of the box'. So I bit the bullet and thought I'd see what I can do to improve it. After seeing several builds on here and noticing what people were saying plus using one of my Sword kits as a template I modified two key areas. The Trumpeter versions have always appeared 'front heavy' somehow, but having compared the fuselage shape with the Sword kit it's actually not bad at all. So what else could it be? The main problem seems to be that the undercarriage is too long making the aircraft sit too high. So I cut 3-4mm off all the legs until it matched up with the 'sit' of the sword kit. Next I looked at why there was a 'front heavy' look. Again comparing the two kits it seems that the wings that are set too far forward...which also takes the main undercarriage with it, giving that 'bunched up front heavy' look. So.. with some minor surgery I moved the wings back about 3mm and 'voila'..... it actually looks like a proper lightning now! I didn't have the skill or parts to modify the other problem area.. the exhaust nozzles...but maybe next time. It's far from perfect and I'm sure there are lots of other details that are not correct but with a little bit of work I'm now able to produce some more early mark Lightnings for my collection. Paint was airbrushed Vallejo Metal Color (White Aluminium) , although I can't see it has any advantages over my go-to Model Air Aluminum really. I used some dark grey panel wash to try and highlight some of the panels but really wish I hadn't as it was hard work removing it and also took some of the silver paint with it! Xtradecals were to finish off for one of the most striking of early Lightning schemes...No. 111 squadron at Wattisham early 1960s. Thanks for looking, comments and tips appreciated. Cheers!8 points
-
Continuing my theme of RSAF builds, this is the next one out of the shop. It is the Frog offering (I think it is ex-Academy) with Miliverse designed decals for the RSAF. I know nothing about F-16s so apologies to those who may be offended by colours or weapons fit or anything else. Not my best work, but it's done and in the display case next to the F-15SG.8 points
-
New Quinta Studio cockpit sets for 1/48th Yak-130 "Mitten" Source: https://www.facebook.com/groups/QuintaStudio/permalink/2809887845789058 - ref. QD48007 - BASE: https://www.ebay.com/itm/Quinta-QD48007-BASE-1-48-Yak-130-3D-Printed-coloured-interior-Zvezda-BASE-LVL/164205085027 - ref. QD48007 - PRO: https://www.ebay.com/itm/Quinta-QD48007-PRO-1-48-Yak-130-3D-Printed-coloured-interior-Zvezda-ADV-LVL/164205166816 V.P.8 points
-
Glad to have you along John! I fear photoetch, but I picked up a set for this one. Here's the seat, only one part broke off and it only took three tries to get it together, so improvement over my previous attempts. The seat currently in KD431 has more metal showing than paint, so I'll probably need to scratch it up some more. Added the 'tabs' for the removed fuselage panel. And painted them yellow Zinc Chromate. And a little YZC on the interior while I was at it. Thanks Dennis, I remember almost compulsively buying that set when it first came out, and I remember thinking, "I'll never build a Corsair with folded wings," and skipped it. D'oh! Too late now, wing detached.8 points
-
MiG-15UTI 'Mukelo', Finnish Air Force Kit: MiG-15UTI Midget (#80262) Scale: 1/72 Aftermarket: Kuivalainen Photo Etch Paints: Vallejo Model Color, Model Air & Metal Color Weathering: Flory Models Wash Build thread: Nice little kit from Hobby Boss, very good value for money. Built in a week.8 points


.thumb.jpg.68dbfcb7df45418b1b83fc1e5bd88ea5.jpg)


.thumb.jpg.87669a5ffb8b13672a3d675087a46d42.jpg)


.thumb.jpg.ba34a9f6ddce411193946dbdcc7b5fe8.jpg)


This leaderboard is set to London/GMT+01:00