
Leaderboard


Popular Content
Showing content with the highest reputation on 14/05/20 in all areas
-
Kit: Hasegawa A-4C Scale: 1/48 Paints: MRP Decals: Victory Models33 points
-
My quarantine build is finally finished. The last step was also the longest - small details like antennas and rigging. But it's done and AEOLUS goes straight on the display. This build was really fun. I would like to thank to my friend Pavel for those decals and masks, again. I hope you'll li the result, . . . I do. I am thinking what my next projet will be... That's very satisfying feeling. And a few details: Cheers, Andrew S.28 points
-
For a change of pace from all the usual armour. Had to fold the wings and it still barely fits my display cabinet.26 points
-
Another quick lockdown build, the old (mid 1970s) FROG Maryland, in this case (I believe) its Novoexport guise. Actually it came in a dirty unmarked plastic bag from a vendor at Telford for the grand sum of £2, with no decals and moulded in what looks like brown chocolate. With the exception of the plastic, which was very brittle, but turned to melted chocolate if you even waved glue at it, this was a reasonable build. The split canopy, which I thought would be difficult to complete, only needed a little sanding to complete, although I did use quite a lot of Tippex as filler elsewhere. As is my want, I scratched up a set of inkjet and spares box markings for the Orkney-based RN aircraft that set out in a storm and confirmed the Bismark had sailed from its Norwegian lair, after the RAF cried off their flight because of the weather. I added a minimal amount of detail inside the nose as I thought it might be visible (it isn't). FredT26 points
-
Hi Britmodelers, here is one of my latest ship builds, the delightful WEM/Atlantic Models 1/350 HMS Starling built as HMS Mermaid. I was tempted to do HMS Peacock as my grandfather (Royal Horse Artillery) was sent from Malta to Palestine in 1948 on her for a mission, according to my family, to rescue Mountbatten's polo ponies! The nice colour scheme of HMS Mermaid won out though. The excellent book "Sloops, 1926-1946" by Arnold Hague provides an excellent resource for those interested in this elegant and extensive class of ships. Some modification to the basic kit, apart from the usual updating/upgrading with after-market parts, was required, mainly to the shelter deck supporting B turret and the split Hedgehog mountings. The bulwarks were extended aft as necessary. It still needs to be crewed, but an order from North Star Models (allegedly sent early March) still hasn't arrived here in Kiwiland. As for painting, I used my own mixes from Schminke inks. I had ordered the new range of Sovereign RN paints from Creative Models Australia primarily to use as swatches/matches to make/use acrylics but these took nearly a year to arrive, post this build. Using basic principles I obtained paint matches from my local Resene range, of neutral/neutralish greys with the appropriate reflectance values (all but one spot on, the exception being only 1% out) first by getting the accurate chips from brochures, then sample pots (see below). By iteration I made various mixes of Schminke white, pale grey (actually a bluish-grey, suitable as basis for the 507 series, B6/B15/20), and black (quite neutral) to achieve tones matching the reflectance values. By adding drops of prototypical ultramarine and/or chome oxide green it was possible to get colours that probably would be damned close. In fact, when the Sovereign paints arrived a few weeks ago I was really pleased with my efforts regarding B30, G10, G45 and B55. Cheers, GrahamB Resene paint swatches example of Schminke ink trials24 points
-
This was a shelf-mate of my Boeing 707 and like the 707, it's no longer part of my current collection. However, like the 707, I have it's replacement and all I need to duplicate the original with the addition of Brengun resin (former Attack Squadron) C-130E engines … something that wasn't available at the time. Subject: 436 (T) Sqn. CC-130E; s/n 130325 Kit; 1/72 Italeri C-130E/H Hercules Decals: AeroGraphics: generic low-viz CAF shee and the UN plaque from their UN Dakota sheet; stencilling from Flight Colours C-130E sheet 30" wing 'last three' and the CFB Trenton heraldic crest were DIY via a photocopier with clear decal film taped to a regular sheet of paper (no inkjet in those days!) Paints: Model Master (enamels): FS35118, FS34095 and FS35237 Modifications: - all raised panel lines were scribed (correcting a few along the way, according to Verlinden's C-130 Lock-on) - fuel dump pipes drilled out - main landing gear doors detailed with internal bracing and landing lights; - added: - the GTC exhaust screens by the port main landing gear - the small exhaust screen by the starboad main landing gear - the large ramp 'bumper' - various external spot lamps, replaced/added all navigation and anti-collision beacons - scratched the visible portion of the Crash Location Transmitter on the 'beaver tail' (that bit of orange) - added static discharge wires and wingtip nav light reflectors - 'boxed-in' the engine intakes and improved the engine exhausts - added the retractable landing lights in the wing with MV lenses - corrected sit of the aux. wing tanks (they should sit parallel to the ground, not nose-up as per kit) - added the JATO mounting points on the air deflector doors in front of the paratroop doors - detailed the nose gear doors - added various blade/wire antenna - the complete cockpit received a makeover with the majority being scratched … including side consoles, circuit breakers, a complete galley and an equally complete Radio/Navigator's/crew rest station - vac-formed a new windscreen from a sheet of .030 Butyrate, after making a female mold from the kit part. This gave me a clear and undistorted, yet rigid windscreen - opened the crew door and the roof hatch. (everything was visible, from one angle or another!) - with the opened crew door, the electronics bay beside and behind the ladder to the flight deck. was scratched - thinned and cleaned-up the aforementioned ladder. The kit part was somewhat thick and plain - since it was also possible to glimpse into the forward cargo area, some webbed seats were added to the interior of the forward fuselage - fwd cargo floor detailed with Evergreen strip "U" beams and plastic rod, to simulate the roller system on the floor to handle pallet loads and a scratched containerized load, served as more than sufficient nose weight! It also hid a lot of that empty cargo interior, from direct view when viewed thru the open crew door Scott23 points
-
Hi, Here is a selection of images from my latest completion. An Airfix 1/72 Bf109E starter kit from Lidl forms the bases for this model along with a Yahu YMA7216 instrument panel, Eduard SS582 steel seatbelts, Rob Taurus 72034 E-3 vac-form canopy and Print Scale's 72-021 decal set. The model is completed as a Bf109E-1 flown by 2/JGr 101 in 1939. Photos I found online labelled as being Red 10, suggest at sometime its wing mounted guns were upgraded to the E-3 spec of a MGFF in each wing. As the Airfix kit depicts this armament including the underwing blisters instead of the E-1's MG17 guns I didn't argue with the evidence. The cockpit along with adding the Yahu panel and Eduard belts was embellished with scratch built details made from aluminium tubing, wire and plasticard. Prior to adding the photoetch the enhanced cockpit parts were primed with Ammo One shot black primer then given a coat of Xtracrylix RLM02 from an above angle to give more coverage to the areas that would receive more light and leave the areas in shadow darker. Details were then picked out with a selection of acrylic paints by paintbrush and once protected with gloss varnish an oil wash was used to add tonal variation and contrast to the cockpit. The Eduard belts worked well attached with cyano as was the Yahu panel, although it did require slight adjustment of the kit parts especially the gunsight and the metal part itself to fit correctly. The rest of the model went together easily except the lowered flaps which fowled the underwing radiators. After minimal trimming it went together in the end. I added some more detail to the airframe such as trim tabs on all the control surfaces and a splitter in the oil cooler intake. The underwing radiator intakes were embellished with a splitter made from aluminium tubing slid through a drilled out hole in the radiator housing, which was later filled and smoothed over with a drop of cyano. All four machine guns were replaced with scratch built versions made from Albion Alloys brass tube along with the pitot tube. The same pack of tubing was utilised in making a replacement aerial mast, paired with some plasticard and sanded to shape for installation later in the build. Other improvements I made were relocating the rudder control horns closer to the hinge line to match references and adding thin plasticard discs to the wing leading edge where the older MG17 apertures were. The MGFF barrels protruded slightly outboard compared to the MG17's openings. I carefully cut out the vac-form canopy, which was tricky. Despite the canopy being for the Tamiya kit it did fit the Airfix kit with a little adjustment. The kit supplied canopy was of the later style and the aforementioned photos found online clearly showed this aircraft retaining the early style canopy. This was dipped in AK Interactive Gauzy Glass Coat to improve its clarity. Wire brake lines were added to the main undercarriage legs which had previously been glued to their doors to simplify the construction later on, as they are the same colour. The exhaust ends were drilled out for a better scale appearance. The propeller and spinner were cleaned up and painted then assembled to create a sub assembly to be added at the end. I went with a red tipped spinner despite the decal sheet suggesting it was yellow. Red seemed more appropriate based on references. I primed the main airframe with One shot black primer and marble coated using white to create variation to the subsequent base colours. Before painting the main scheme I glued the already masked canopy windscreen and rear part in place. My usual method being Microscale Crystal Klear. Unfortunately as the vac-form parts were really thin there wasn't enough surface area for Crystal Klear to provide a solid joint so I resorted to using cyano, this took a couple of attempts but in the end I managed to get a satisfactory result. My colours of choice for this build were Mr Hobby H67 RLM65 for the underside and the same manufacturers H65 for the RLM70, the darker of the two upper surface camouflage tones. The lighter tone was provided by Ammo by MIG Jimenez's AMIG0233 RLM71. Each application was later varied with lightened down versions of the base colour to further add interest. The wheel wells and the fuselage mounted gun troughs were painted with the same RLM02 as the cockpit. I used a sandy brown to depict the canvas wheel well linings. The Print Scale decals were added after a couple of coats of Tamiya X-22 gloss. The decals where tricky as they didn't want to leave their paper backing until they had soaked longer than I expected. I had to replace the red wing walkway markings with those from the kit, as the Print Scale ones distorted and twisted when I realised part of the text was supposed to extend on to the flaps, midway through application. The main markings went on well enough but the stencils included on the Print Scale sheet didn't match the labelling on the stencil guide, not a single number matched. I had to consult references including Eduard's 1/48 kit instructions to aid in their placement. Also the stencils that are supposed to go on the underwing radiator flaps were wider than the flap and I think they were misspelt anyway. In the end I trimmed the erroneous letter out of the middle then overlapped what was left to make it fit better. Fortunately its not too noticeable. The decals were aided in their application using Microscale's Micro Set and Sol. After a further gloss coat the model was weathered with a selection of Ammo by MIG Jimenez panel line washes and oil paint including Ammo's Oil Brushers thinned with Enamel thinner. Ammo's matt aluminium acrylic paint also provided some chipping. A coat of Vallejo's Satin varnish was applied to create a key for further weathering with oils and enamels. Tamiya's weathering set A provided some mud for the tyres and undercarriage doors. A black/brown mix of acrylic paint was used to airbrush a recreation of the engine exhaust staining of both sides of the fuselage. Final assembly included attaching the undercarriage and aerial mast. A new technique I tried on this build was to use thin self-adhesive aluminium tape instead of paint for the undercarriage leg oleo struts. This worked well so I may use it again on a future build. The same tape, painted black was used later in the build to create a hinge to hold the canopy in the open position. Once the model was on all three wheels it was given a final Vallejo matt coat, which was allowed to harden for a couple of days. Then the model was completed with a aerial wire made from Uschi van der Rosten "Rig that thing". This was painted with Ammo's matt aluminium. The masking was carefully removed from the canopy sections. Then only finally could the propeller/spinner assembly be added to complete the build. Hope you enjoy! Mark.20 points
-
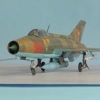
Kit: AMK Kfir C7 Scale: 1/48 Paint: mostly Tamiya colors Extras: Eduard cockpit PE18 points
-
Hi all This is my last finished model, an Albatros from Eduard in 1/48. Beautiful model, with a very good level of detail. But really hard to build, a test for our patience. It's my first 1/48 wwI model, and the first time I do wood textures... Cheers R.15 points
-
Greetings Brits... I had to try a new Photo Hosting site (IMGUR)... Please let me know if this works... Here is my newly completed 1/48 Tamyia P-47 with Kits World decals for Miss Plainfield... Under the Cowl I noticed a 'D' in Black on the original photos of Miss Plainfield... So I went thru my scraps and found some Luftwaffe Letters that were right size and colors... Its Luftwaffe lettering font and not US font... Don't tell anyone! I didn't have US font letters that small! The Paint is Gunsie Mr Color in the OD and Neutral Grey... I really like how these colors look... Only the Grey was lightened a pinch... This kit is legendary fun to build... I was really impressed and proud of the result... Enjoy! -Bob15 points
-
Spending some of my down time decluttering, I rediscovered some photographs of an Aircraft in Miniature (AIM) Avro Manchester I I built many years ago as a present for a former neighbour who had served as a Wireless Operator on Lancasters when he moved into sheltered housing. The kit has been finished as L7453 EA T whilst operated by 49 Squadron from RAF Scampton in June 1942, the aircraft was written off in March 1943 after the pilot was forced to make a wheels up landing after experiencing an engine fire on take off when it was being operated by No 1661 Conversion Unit at RAF Swinderby. 2020-05-14-03 by richard.everett3, on Flickr 2020-05-14-02 by richard.everett3, on Flickr 2020-05-14-04 by richard.everett3, on Flickr Overhead shot taken before the diorama base was finished 2020-05-14-01 by richard.everett3, on Flickr And a couple of in progress pictures, the tail planes were rebuilt using balsa wood ! 2020-05-14-07 by richard.everett3, on Flickr 2020-05-14-08 by richard.everett3, on Flickr 2020-05-14-09 by richard.everett3, on Flickr 2020-05-14-05 by richard.everett3, on Flickr 2020-05-14-06 by richard.everett3, on Flickr The model was finished in Xtracolor paints and the markings were taken from a combination of Xtradecal and Modeldecal decal sheets. Unfortunately the finished model was lost several years ago along with a number of Airfix Lancasters which I had helped my neighbour build after his house was cleared by contractors following his death.15 points
-
Hi There, This was purchased in a well-known Edinburgh model shop over a year ago and Innis picked it, so while I was off work awaiting a Covid-19 test result I thought it was about time it was built. Innis decided it would be wheels up...Yeeeehah... and would be going on his roof in formation with the Lancaster. Painted with Colourcoats Night Bomber Black, Interior Grey Green and RAF Yellow. The underside "aerials" had to be replaced with brass tubing as the got very broken. As always thanks for looking, Cheers, Alistair15 points
-
Posting here to create a public record that I actually finished it. Hasegawa kit which I was going to build OOB as a Firebird example but the decals shattered. Got some alternative decals and now it is an ego Tonka (initials DH). Decals and kit are a rough approximation of a Tornado so I am relaxed about the overall standard. Looks OK in the dark recesses of my display case.15 points
-
Hawker Sea Hurricane Mk Ib, HMS Eagle, 1942. Altough overshadowed by the Spitfire during the Battle of Britain the Hurricane accounted for 60% of total losses by the Luftwaffe during that time. Built by 3 other countries as well as Britain, nearly 14,500 were built and it served till the end of the war in all theatres. This Sea Hurricane was part of 801 sqn, FAA, aboard the aircraft carrier HMS Eagle, part of a convoy which sailed to Malta with supplies. Of the 14 merchant ships that left the UK only 5 made it to Malta and more than 500 Merchant and Royal Navy sailors and airmen lost their lives, HMS Eagle, along with two cruisers and a destroyer were sunk, but it was considered a strategic success because the Tanker SS Ohio delivered much need fuel for the defending air-force there This is my 5th entry into the 'In the Navy' GB. Airfix's new tool Hurricane MK I with an Alleycat Sea Hurricane conversion. Everything went splendidly, the resin parts marrying up to the Plastic very well. Everything except decals were in the resin kit including the Armoured Windscreen. Vallejo ModelAir paint out of the bottle, cobbled together the fuselage markings. I don't know if I got everything accurate but it'll do me. I now apply all my decals with Johnson 'Klear' and it works great, draws the decal nicely down to the surface although sometimes I can't resist 'helping' a little! Just light weathering, I know they get hammered by the sea and salt but I never like to go too far! This is the first Hurri' I've done since I was a kid, I have a fair collection of Hurricane kits to do now somehow! Davey.14 points
-
The completed Scooter. KP again must be thanked for the release of yet another beautiful civil plane. In this case the box offers the chance to build either a Scooter or its descendant the Swallow. Some parts have been provided to cater for each of them, but the wing and a couple more things need a little work to obtain a more accurate Scooter. These mods are well within the skills of an average modeler. It is indeed a colorful, jumpy little fella, much more gracious than its parent the Sopwith Camel. I went for a simple build -only correcting what I mentioned during the building post- but this can be the canvas for a lot of fun, if you decide to go that way. If you are interested and/or already have the kit, I recommend you visit the step-by-step building article to avoid a few pitfalls: Other than that, I am so very happy with this quick and rewarding build of a peppy mount that, besides being the personal plane of Harry Hawker, participated with some success in a number of aviation events later on.14 points
-
A few pictures of my latest model, built as part of the Spitfire/Seafire group build. The kit was a bit of a disappointment in some areas, with chunky sprue gates and a lack of detail in the cockpit. However, the build itself was quite enjoyable and I'm happy with the finished aircraft: As ever, any comments, criticism or praise is welcome!13 points
-
started this one 2 years ago but then gave up on it for a while due to a few errors but finally got round to finishing to something that i like even with its errors 1/48 Su27 Hobby Boss kit using Foxbot mask kit and decals for a Ukrainian Airforce jet PSX_20200513_150108 by Thomas Gotobed, on Flickr PSX_20200513_150126 by Thomas Gotobed, on Flickr PSX_20200513_150019 by Thomas Gotobed, on Flickr PSX_20200513_145859 by Thomas Gotobed, on Flickr PSX_20200513_150031 by Thomas Gotobed, on Flickr PSX_20200513_150159 by Thomas Gotobed, on Flickr13 points
-
I've got tired of Japanese airplanes in the same color schema (dark green/IJN grey) so decided to do something different. This is old kit from the 80s. Kit was ok, panel lines were lightly recessed - should've probably rescribe them but I didn't want to put much accent on it anyway. I thought it would look better in plain orange color. First time I've tried to use pre-shading on a model - I thought it would look nice with orange color. Also first time I painted anything orange. I used black color for pre-shading but probably would have needed to use grey - it took me 6-7 coats of orange paint to make it look ok. And after all of that you can't really see much of pre-shading on the photos - trust me it looks better in real life 🙂 I also think I went too much on exhaust stains.13 points
-
Are these okay Neil? Not too sure which panel you're on about, I'm thinking of the emergency exit in the cockpit above the pilot or the top of the wall behind the pilot. Anyway, I've included what I could find. Dan12 points
-
Honestly, I can't say I've enjoyed this build. Something has gone awry every step of the way. Anyway, she's finished now, and I'm finally fairly happy with the result. Thanks for looking. Nick11 points
-
I'm sorting out a lot of my digital photography ('tis a long process) and am currently editing shots from an organised aviation trip I undertook to Israel in 2008. We took in a number of open days, the IAF Museum, the Latrun armour museum and a base tour at Ramon. Here are a few from the line up on the first day, when we visited Tel Nof (and if the trip had ended there it would have been worth it). 102 McDonnell Douglas Ayit M by Martin Schofield, on Flickr 271 McDonnell Douglas F-15I Ra'am by Martin Schofield, on Flickr 401 Lockheed Martin F-16I Sufa by Martin Schofield, on Flickr 651 Bell Tzefa F by Martin Schofield, on Flickr 674 IAI Tzukit by Martin Schofield, on Flickr 681 McDonnell Douglas F-15A Baz by Martin Schofield, on Flickr 914 Sikorsky Yas'ur 2000 by Martin Schofield, on Flickr Hope you like. I'll put some up from the other events as I sort them.11 points
-
Here is My Spitfire PRXIX, it`s been sitting on my bench or thereabouts since last year, It`s probably got Eduard belts and a Pavla upgrade inside and out but it`s been so long I cant remember, oh and an SAC undercart, and four spoke wheels from an AZ box of bits, and a spinner and resin upgrade prop from a Mk14 along with the exhausts, I think I had issues with just about everything, the more I think about it, it wasn't a very enjoyable build, still it`s done now, and I can park it up and move on! ta for lookin` no G Granto11 points
-
My latest build The Tamiya 1/72 Henschel HS 129 B2. This is a rebox of an Italeri Kit. This is also painted with Tamiya Acrylics, which I used for the first time on the main body. The result is not my best work, in any case here it is. I have done a full video build, which took longer than the kit to make so I hope you guys enjoy it.10 points
-
It's been another long while since I have posted anything here - I guess I have too many home projects! A pair of 1/72 Airfix kits. Neither will see a competition table for sure! The T.F. X is the wrong grey - Ocean Grey (it should be Extra Dark Sea Grey) over Sky (Xatracrylx paints). The T.F. 10 has no crew! (long story but let's just say if you're building 2 at once - make sure the right belly pan goes on the right airplane!) It is EDSG over Sky (Gunze acrylic paints). Fit is pretty good on the kits, details are noce too. I can't judge the accuracy but I like them for sure! Well here they are...9 points
-
Here's another build from a couple of years ago. This is the Airfix Gr.9 kit in 1/72 scale painted with a brush using Humbrol enamels. The kit went together really well with no issues. This kit is built straight from the box using the kit decals supplied. I love a fully loaded Gr.9, really looks like in means business. Hope you enjoy.9 points
-
Thanks to the organisers...it's been fun. 🙂 Dean9 points
-
Finally able to complete the second of my RAF Rescue helicopters after the superb RAFDec decals arrived. XJ409 was delivered to the RAF in 1959, serving in the rescue role as an early HAR2 before conversion to HAR10 standard in the mid-60s. The old Airfix kit dated from even earlier, with 1958 printed on the inside of the ancient Whirlwind HAS22 fuselage. I added a bit of detail in the cockpit and cut the side windows so they could be open, but that was about it. I just wish Airfix would make an HAR10!9 points
-
Thanks Bill I'll have a look at the bubbles later. Thanks Keith. Hard work? I remember that… Thanks Ben Thanks Dennis The tree is gorgeous and a great reminder of nature's grandure… until I have to pick up the sheddings! The Spear & Jackson Razorsharp 24" Bowsaw was a great purchase and really lives up to its name. £16.50 was much cheaper than trying to find a tree surgeon and I had the bough chopped in minutes and we now have a bug house outside the back gate: Molly seems to like it. I must admit I was puffing a bit after all that and, for the first time in ages, got a good night's sleep. Mrs B woke me up at 10am to make sure I was still alive - 10 hours, result! Of course it elicited the comment that I got a good sleep because "I'd had exercise". My view is that my body had to repair the damage… Late night as I finished watching 'Spooks' - 10 series done now, I'll have to find another box set to binge on. 'Tales from the Loop' might be it, seems like my type of things. More Cat later…9 points
-
Following the advice of @72modeler, decals are placed from inside the cowl, the area later to be painted black, thus creating a little more realistic impression. The retractable steps are added:9 points
-
This is quite a big aircraft actually, so I decided to also try incorporate a working wing fold mechanism. This is what I ended up with after a few prototypes. While at it, I also built hinges for the inboard flaps. Once the hinges and flaps were installed, along with a main spar and leading edge spar, the top surface of the wing was added. The top surface is also a 0.5 mm thick sheet, so the entire structure of the wing is effectively a thin walled structure. I made rudimentary intake ducts from a paper-thin plastic sheet. For this I started by drawing the ducts in CAD and plotting out the developments. Then the shapes were cut from the plastic sheet, folded/rolled into shape, and finally installed.9 points
-
Hi Guys, My F-16C Block 30 in the Blue Splinter camo scheme of the 18th Aggressor squadron, Eielson AFB, Alaska.8 points
-
Revell 1/72 chinook HC.3 ,A quick lockdown build ,i used a bit of spare pe grill for the engine cones, and some spare raf centenery decals, the slimmer sponsons were cut out and the bigger ones glued in and some blade antennae, and other bits and bobs were cobbled together, everything else was oob8 points
-
The F-117N was a concept by the Skunk Works to sell a stealth fighter to the US Navy. The Navy however found the concept unsuitable. But when Reading Ben Rich’s autobiography, one has to wonder if it did not have more to do with the Pentagon Politics that resulted in Kelly Johnson's unwritten 15th law. I had this Revel F-117A lying around – the original release of the angled aircraft that was based on an interpretation of the first image released of the Stealth fighter. That kit is woefully inaccurate, basically being a bit “squashed” in the longitudinal direction and a few incorrect details. I was always wondering what I should do with that kit. Turning it into the Have Blue prototype is not realistically feasible, but one day I again stumbled upon the proposed naval version Lockheed proposed… Now there was a grain of an idea, as the different wings would possibly hide the incorrect sweep of the kit and re-working the tail end would also cover most of the other inaccuracies. To see if this idea could work, I took a photo of the kit fuselage and overlaid a “highly accurate” blueprint I got of the internet and found that the conversion is quite feasible – even being reasonably to scale in 1/72. Most of the dominating features were in the correct place, and the rest could be chopped or beaten into place. I am not attempting to make this model completely accurate, as the real thing was never built, there is no direct references available. Only the evolving concept drawings that were released. So a bit of artistic engineering interpretations will be used where appropriate. End of last year, as we were preparing for the December summer holidays (I’m far south of the Sahara), I was contemplating what to build. As we usually spend the holidays on the in-law’s farm, the constraint I had to consider was it needed to be a project I could travel with. The initial stages of the conversion don’t involve fine detail, so it fit the bill. And I was keen for some plastic surgery / butchery. First off marked the areas for trimming or correction. Eventually decided to leave the fuselage leading edge sweep as is. The tail end was cut off and repositioned further aft. While some panels on the top fuselage were corrected. All things white of course indicate modifications. And subsequently the first parts for the main wings and stabs were cut and assembled. Apologies for the quality of the pictures – my work desk on the farm was a patio table that got moved around, depending on the requirements for sun, shelter from the sun, or shelter from thunderstorms.8 points
-
I would like to jump in to this GB with this old kit. I can't remember exactly when I built it but i would be about 12/13 which is when I became more interested in the hobby. Strangely although I built the odd fighter I was more interested in bombers, there just seemed to be more Varity of types to me at the time. I think this was the first i made, although I don't think I painted it at the time. Hopefully I will be useing these decals although I am tempted to try to use the original ones, which although having yellowed a bit are still in good condition, so we shall see later. Thanks for looking. G8 points
-
Another for the IDF collection. A Nagmachon, an Achzarit, 3 Merkavas, Gal Batash 6B, Tiran 4, and a Magach 6B. Need more IDF subjects. A 1/16 scale Merkava 4 would be nice.8 points
-
Furlough = Output! This year, my output is twice last year and we're only in May! Another three over the line with the two spits being built as part of the Spit GB and the hurricane tagged along as wingman! The Hurricane is the Airfix kit which is rather nice. Spit AB264 is the Airfix kit too, although more tricky to build but looks nice when complete. JK792 is the Hasegawa kit, nice 'n simple. Weathering was done using soft pastels and oils. Not much to see in the builds as they are quite simple kits so on with the finished articles... Firstly, Airfix Hurricane Tropical Mk.I W9293 of 73 Sqn, North Africa 1942 using Xtradecals Secondly, Airfix Spitfire Vb Tropical using the kit decals Last but not least, Hasegawa MkVb (possibly a Vc) Trop 40 Sqn SAAF based in Italy in 1944 Thanks for looking Cheers Neil8 points
-
Hello, I just wanted to share with you some photos of our collection. My father decided to make some order in a couple of shelves. This is just the 21% of our collection so far. Cheers Santiago8 points
-
Subject: 437 Sqn. Boeing 707 (officially known as a CC-137, but commonly referred to as simply a '707'); s/n 13704 - fitted with Beech IFR wing pods as it was one of two 707's in the fleet so fitted (s/n 13703 being the other one). Kit: 1/72 Heller Boeing 707-300B Aftermarket: Leading Edge CC-137 decals covering all five 707's that comprised the Canadian Forces fleet along with two resin Beech IFR pods, (long OOP, unfortunately) plus True Details KC-135 resin wheels (the nose wheel hub was suitably modified) Kit Modifications: Nav and Flight Engineer positions on flight deck, scratched (well, I know they're there...) full IFR lighting package using MV lenses added along fuselage The quality of the photography may not be up to par, but there is a reason. These photos were originally taken back in the day before digital cameras, when a 35mm SLR camera actually used something called 'film' that had to be developed before one saw the resulting photo. In addition to the above stated mods to the kit, the fwd cargo door was scribed in (effectively making it a -320C) and the window spacing near the door's edge was adjusted accordingly. If you look closely at the cabin windows, the interval between windows 7/8 and 12/13 is much closer together than all the others. A half of an aux. tank from a 1/144 Dauntless provided the SATNAV dome on the on the fuselage spine (just ahead of the blade antenna) that was fitted to both IFR equipped 707's. Unfortunately, the IFR lighting package is hard to see in the photos, but it's all there. It's comprised of individual spot lamps placed strategically on the fuselage and the outer engine pylon. If anyone is really interested, PM me your email and I'll scan the detail photos of the real 13704 that I took during a photo opportunity at CFB Trenton. Also, with the fitting of the IFR pods, the 'plumbing & electrical in the wingtips had to be modified, resulting in the retractable landing lights normally in the wingtips, relocated alongside the dual landing lights at each wing root. This kit unfortunately, has left my collection. The last I saw it, it was destined for 437 Sqn. via a third party. Good news is, I have it's replacement with everything I need to replicate the original, waiting in the stash. In case anyone is wondering about the size of the model, the top of that base is 28"or 71.12cm, square. Scott8 points
-
All finished now. This was a fairly easy build and I think the end result looks ok, the resin parts were a pleasure to use. The kit undercarriage parts fitted perfectly into their allotted positions and the Alleycat supplied clear parts fitted perfectly as well. The only kit clear part used was main sliding canopy. Krystal Klear was used for the light underneath although a part is supplied. As usual Vallejo ModelAir straight out of the bottle Airbrushed. The 'Klear' polish decal apllying technique was used except for the tiny serial number, these just floated away! Vallejo Matt Varnish to finish and very light weathering even though I know these things suffered out at sea! Thanks for the comments and encouragement, now to try to get the Swordfish done before the end of the GB..... easy 🙄. Can't believe this is the 8th model I have done for a GB since February, strange times indeed! Davey.8 points
-
Cheers Gent's for the kind comments and likes really appreciated. So todays update all the main guns blinged up and while on a roll got the two torpedo launchers done as well one has the armoured cover fitted and the other is just open to the elements. To fit the end covers I left some of the kit part as a joint area the PE instructions would have you take them right back to the edge which does not give you much to get a hold onto. And my order from Name It arrived with the new Name plate and the next ones in line for completion. Stay Safe beefy8 points
-
Cheers folks...and it's finished. I'll stick some photos in the gallery in a minute, but here's the studio shots, followed by some photos in a more appropriate setting... Thanks for letting me join in...it's been fun. 🙂 Now, what's next..? Dean8 points
-
And we strongly support that view, even in court if need be Ciao8 points
-
Getting there.8 points
-
I flapperized the old gal when she wasn't looking: Hopefully I've got this right, as there is not much information in the instructions on how to mount these. I found some information on-line that stated the angle of the flap, relative to the top of the wing, was only 29 degrees at full deployment. So they don't hang down too much. I only have a couple of photos that show the flaps lowered, and there seems to be some "daylight" visible between the wing and the flaps. In any event, it looks cool. If I've screwed this up, please tell me now!! Getting dangerously close to shining her up so we can stick on some stickers. Cheers, Bill8 points
-
Hi all, Having become obsessed with modelling ships, and in particular- Flyhawk kits, I’m now on my 3rd ship! The Flyhawk 1/700 Deluxe Prince of Wales - Battle of the Denmark Strait kit. Hoping to carry on with the learning curve and hopefully, not make the same mistakes I did on the previous two. She came in the post yesterday, and wowzer, what a kit. How Flyhawk squeeze in so much detail in a 1/700 kit, I’ll never know. The detail in the mouldings is quite staggering. This special version comes with brass deck fittings and barrels, resin and 3 sheets of PE. Although, the quality of the kit is such, I’m struggling to see the advantage of the brass and the 6 or so bags of resin are going to be redundant on my effort - 1. These are insanely small vents for the deck and I literally can’t see the difference from the moulded ones on the deck - even using my optivisor and 2. They’d get knocked off at some point. But, the deluxe version is worth it for the PE alone, which will offer some significant improvements. This is a lot of plastic for such a small model! I also ordered the Eduard 1/700 ensigns and signal flags and these are very nice indeed, although the Ensigns look enormous for this scale. See the size of the kit flags as a comparison. I got stuck straight in and have got the hull constructed, great fit, but very fine plastic which is easy to bend out of shape if not careful. I’m building it waterline, but it does come with a full hull option. I've also got the Flyhawk wooden deck. I thought the Artwox one on my previous build was thin, but this is like gold leaf! Despite its delicate nature I took my time with the fitting and it went on beautifully. Drooling over this 😬 Guy7 points
-
Hi guys almost out of the box model ,after building a Karl Morter complete with transporter and loco I wanted one set up ready to fire that meant lowering all the wheels so that the body sat on ground, A bit of a waste of time really as you cant see the difference. hope you like7 points
-
I've added the last few details to this today and given everything a couple of coats of clear matt. I should get things wrapped up once I have detailed the lights tomorrow. by John L, on Flickr by John L, on Flickr7 points
-
Got to have a Canadian something and this is Hobby Boss's latest Leopard.7 points
-
My first attempt for about 10 years after a few weeks of lock down. Om reflection it was a bit ambitious but i decided i wouldn't buy anything just use some kits in the back of the wardrobe so the choice was not huge. It will also be a bit diverse as i have a 1:9 Harley for Italeri in my sights now7 points
-
Been working on the intakes, as I mentioned on a previous post I decided against the resin intakes as it was going to require a lot of resin to be sanded off. I sprayed the trunking MRP white and hand painted the engine faces with Citadel silver. Test fitting showed that the bottom of the intakes were going to sit proud so I cut a slot in the side so the bottom could be pushed in a fraction. Both lower sections of the intakes are part of the lower fuselage half. One of them broke off anyway as I was joining the halfs and i decided this would probably help so cut the other off as well. Joined to the intakes and cleaned up before fitting them. Along with the trunking I decided to paint the intake lips to save on any awkward masking jobs, primed with gloss black and then sprayed Xtreme metals chrome.7 points


This leaderboard is set to London/GMT+01:00