
Leaderboard


Popular Content
Showing content with the highest reputation on 27/04/20 in all areas
-
Well, it's been a rollercoaster for the last 15 months or so. I never said I was quick... Presented for your delectation is HKM's Great Big Lancaster. Build log is here. I decided to do an approximation of R5868 as she is now in Hendon, so that means the groovy two-tone squadron codes, paddle blade propellers (handily, they come as an option with the kit) and some extra radar kit over and above what the version of R5868 the box builds is equipped with. Again, the parts are in the box; I augmented them by removing the moulded antennae and replaced them with wire. Things to note - it is engineered to extremely tight tolerances, such that paint makes a difference. Once the wings go on, certainly the one associated with the transparent fuselage side ain't coming off again, so if you have any ideas about removing them for storage, be warned! I thought I would indulge myself in spiffing it up a bit, supplying copious amounts of entirely fictitious wiring looms and pipes within the fuselage and engine bays. You get 4 engines OOB; they are a bit skinny but hey-ho, I wasn't in the mood to acquire 4 Tamiya Spits or ZM Mustangs just for the engines! Painting the internal framing was an act of insanity, but if you want to do it I recommend *not* masking and then painting the frames - just freehand the frames and polish off the edges with a wooden toothpick or similar, the transparent plastic is surprisingly robust. The front section was done with masking, the rear was free handed and then cleaned up. I experimented with one of the spare opaque fuselage halves with cutting out the panels to leave the framing... I wouldn't do that, if I were you! Paints were Tamiya for the camouflage, a mixture of Tamiya and LifeColor acrylics for the black areas. The codes and insignia were custom masks made for me, I have a few spares if peeps are interested in buying some. The Goering quote proved to be just too spindly, so it, along with the walkway stencil writing, are just about the only decals I used. Camouflage masks were from Top Notch. Right, on with the show... A couple of overviews, left and right sides: Some close ups of various bits: And finally, these two: I think I'll take the summer off, until the Special Hobby Whirlwind finally appears. Although the ICM Gladiator looks like fun... It'll certainly be smaller! Laters, taters! Mike45 points
-
A friend at work is neighbors with a veteran of the Battle of Midway who was a Dauntless rear gunner. I asked if his neighbor would like a model of a Dauntless and said for sure! Hopefully this current crisis will pass in time for me to give to my friend to deliver it to him. The build thread is here, part of the In The Navy Group Build: Thanks for looking.37 points
-
Hi This is my Gloster Meteor NF Mk12 It is a fine kit but the wing contrast with the fuselage. If they have no major problem for the fuselage, the wing requiert amount of test fit, sand and putty The 120 decals give to the model very goods details And some other pics in my album at the address below Album Meteor NF Mk12 1/7227 points
-
Recently completed my 1/72 Sword RF-84F Thunderflash. Went with the RNoAF markings in the kit. The decals in this kit were superb, with loads of miniscule stencil markings. The original engraving was very fine so I re-scribed everything. Added some canopy locking mechanism latches from an Eduard F-16 etched set. Used a little cars lens for the landing light & added the rod actuator for the nose leg. Drilled out the gun ports. Mig acrylics & Vallejo Metal color Aluminium underside with a Mig enamel pin wash. Royal Norwegian Air Force RF-84F 51-17053 AZ-G 717.Esk Sola Norway 1957; RNoAF RF-84F 51-17053 AZ-G 717.Esk Sola Norway 1957 by Martin Laurance, on Flickr RNoAF RF-84F 51-17053 AZ-G 717.Esk Sola Norway 1957 by Martin Laurance, on Flickr RNoAF RF-84F 51-17053 AZ-G 717.Esk Sola Norway 1957 by Martin Laurance, on Flickr RNoAF RF-84F 51-17053 AZ-G 717.Esk Sola Norway 1957 by Martin Laurance, on Flickr RNoAF RF-84F 51-17053 AZ-G 717.Esk Sola Norway 1957 by Martin Laurance, on Flickr RNoAF RF-84F 51-17053 AZ-G 717.Esk Sola Norway 1957 by Martin Laurance, on Flickr Many thanks for looking. Martin22 points
-
Now I honestly had no intention of signing up to this GB, however reading a few 'Chat' posts and seeing a large number of classic kit build nominations has successfully (or is that stupidly) drawn me in! When I recall my early childhood years there are a few trigger points that certainly stand out. Like most of us on here, I credit my father for my devout addiction to plastic kit modelling. Not only did he initiate the start of my kit building, but also had a big influence on most of my male cousins as well. The mid-late 70's was all about flared pants and wild colours, so what better way to spend ones pocket money than on a good old Matchbox kit! Now unbeknown to me at that time, Dad was undergoing a fair bit of medical treatment however he always made the time to take me to the hobby shop, kick a footy in the backyard or spend the evening building the latest plastic kit to add to my growing collection. One day, Dad dusted off an old Kodak Photo box and said, "Here you go son, my father gave me these and now I want you to have them". Inside was hundreds of these small Player's Cigarette cards ranging from old Footballers, Dogs, Cycling to even a set called 'How to prepare for an Air-raid'? My favourite set however was the Royal Air Force collection and here for the first time I read about some sleek (and not so sleek) aircraft of the prewar years. Comparing some of these to the latest Matchbox Catalogue I could match the Hawker Fury, Lysander, Gladiator, Spitfire, Hurricane, Walrus, Swordfish and Wellington. Could you then imagine my excitement when Matchbox came out with such exotic kits such as the Wellesley, Heyford and Stranraer a few years later as here was another three of these Player's cards that I could now model in 1/72 scale! Not long after my 8th birthday I heard my Dad's medical condition had a name, it was called Cancer. A month later at just 44 years of age it all became too much and Dad passed away to end a relatively short but quite fulfilling life. I remember being left with a stash of model kits that he intended to make for me and thought to myself... Christ! how am I going to build all these kits to Dad's standard? Anyway, enough of the soppy stuff!, this is supposed to be a fun GB and I’m making myself sad. OK, trawling through my stash I think this is the only kit that qualifies for 'something that I built as a kid'. I would have been about 13 at the time and do remember the Matchbox Wellesley being a great model that always looked odd with that huge wingspan. Parts of this original kit also seem to surface whenever I delve into the 'spares' box so this is another reason why I want to build this kit for the second time around. I have a set of Pavla's Vac canopies although am not sure I'll use them and may even restore one of the original kit's bomb panniers as something novel to add to this new kit? The choice of scheme is still undecided, however thanks to @tonyot I have a set of the Revell rebox decals so will probably opt for a No. 45 Squadron version. I do have two of these kits so let's see what takes my fancy closer to the painting stage. Apologies for the long and drawn out intro, however it all helps to tell a story and the reasoning behind what lays ahead. Cheers and best of luck to all GB participants.. Dave21 points
-
This is my first post-war build, the Phantom has always been a favourite of mine and when i had the chance to acquire the Tamiya kit at a good price i could not resist. By Tamiya's very high standards i found some of the structural fitment relatively poor; nothing that cannot be cured by filling, sanding and some scribing, but certainly not as good as some of their more recent products in 1/32 scale. Markings are from the kit, paint is Tamiya acrylic, wheels are resin after-market (kit wheels are rubber).21 points
-
Hello, Here's my just finished 1/72 Hasegawa G4M2 Betty. I've had this kit in the stash for many years, but the typical poor Hasegawa decals kept me from building it. Just about any aftermarket sheet is for the G4M1 version, which is quite different. Luckily I found some aftermarket decals, with bonus PE, by Rising Decals for this model earlier this year, so I had to build it. Apart from the decals and the PE radar antennas on the fuselage, it's OOB. I used Mr. Color paints. This "Hamaki" was based at Omura Airfield at Kyushu, Japan in June 1945. Thanks for looking, I hope you like it.20 points
-
Started several years ago and finished during the weekend because of moving the house. Hasegawa B-25J "Foreign Air Force", Bilek photo etch set (designed for Italeri but it fits) and Master barrels. Gunze C paints and Pactra varnishes, different Tamiya weathering sets and panel line accent colors were used. The kit decals were OK, only the Cross of Lorraine and mission symbols had to be added (from the Special Hobby Boston) as well as the "TOUL" name from small white letters.19 points
-
Hi, everyone. It's my next model.18 points
-
This is my "what if" version of a Philippines Air Force F/A - 18 Super Hornet. I know there was some talk a few years back of this or the F-16V replacing the current Philippines Air Force aging fleet. I know they are even to SAAB about purchasing the Gripen. I haven't decided on a stand yet because I am probably going to make a version of the F-16V block 70. The Academy model is very detailed but there was much filling and sanding for the nose section. The decals are old so i had to take particular care. The only thing extra I added were the GBU-10's from a Hasegawa weapons kit. Thanks for looking Phil Air Force F/A-18E by Reginaldo Reyes, on Flickr Phil Air Force F/A-18E by Reginaldo Reyes, on Flickr Phil Air Force F/A-18E by Reginaldo Reyes, on Flickr Phil Air Force F/A-18E by Reginaldo Reyes, on Flickr Phil Air Force F/A-18E by Reginaldo Reyes, on Flickr Phil Air Force F/A-18E by Reginaldo Reyes, on Flickr Phil Air Force F/A-18E by Reginaldo Reyes, on Flickr Phil Air Force F/A-18E by Reginaldo Reyes, on Flickr17 points
-
My picture taking leaves a bit to be desired, anyway I'm happy with how it turned out despite the missing piece.......sigh, build thread can be found here at ww2aircaft.net Arma Hurricane build.16 points
-
Italeri 1/72 Mirage 2000C with Syhart decals To be precise - French Air Force Mirage 2000C 103-LI 2010 Nato Tiger Meet EC 1/12 Cambresis. Had to use the relatively OK Italeri 1/72 kit but its nothing special so it was a slog to build as loads of things need cleaning up on the moulding. Sink marks filled, panel lines on the nose cone needed removing. Other panel lines on the upper wing rescribed, dropped the flaps, used a more accurate ejection seat from the Special Hobby F1 kit That Special Hobby kit is great as a donor for parts for other mirages, comes in handy. Also used a Master brass pitot, drilled out the gun ports & used Albion Alloys tubing to great the gun barrels. For paints I used a paints from a Hataka set & used a pre mixed orange that was color matched for a NTM 2000D that I had built previously. Apart from the Syhart decals that were donated from a member of the Mirage SIG I was also given the oversize supersonic tanks from a Heller Mirage 2000N, for some reason these Italeri 1/72 kits & the Revell 1/72 2000D kits don't supply the extra large area ruled fuel tanks which is annoying. Looking forward to seeing some new mouldings of the 2000's at some point! French Air Force Mirage 2000C 103-LI 2010 Nato Tiger Meet EC 1/12 Cambresis by Martin Laurance, on Flickr French Air Force Mirage 2000C 103-LI 2010 Nato Tiger Meet EC 1/12 Cambresis by Martin Laurance, on Flickr French Air Force Mirage 2000C 103-LI 2010 Nato Tiger Meet EC 1/12 Cambresis by Martin Laurance, on Flickr French Air Force Mirage 2000C 103-LI 2010 Nato Tiger Meet EC 1/12 Cambresis by Martin Laurance, on Flickr French Air Force Mirage 2000C 103-LI 2010 Nato Tiger Meet EC 1/12 Cambresis by Martin Laurance, on Flickr French Air Force Mirage 2000C 103-LI 2010 Nato Tiger Meet EC 1/12 Cambresis by Martin Laurance, on Flickr French Air Force Mirage 2000C 103-LI 2010 Nato Tiger Meet EC 1/12 Cambresis by Martin Laurance, on Flickr French Air Force Mirage 2000C 103-LI 2010 Nato Tiger Meet EC 1/12 Cambresis by Martin Laurance, on Flickr Thanks for looking! Martin16 points
-
Here is my seventh build in exactly one month. At the rate I'm going I'm going to need; A) A bigger house with more display space, and B). Counseling when life returns to normal. Kit is the ProModeler (RevelloGram) 1/48 early F-86D. For the price the kit is amazing. Not QUITE as good as new Tamiya stuff, but not far from it. only filler on the whole build was a tiny dab of gap filling CA on the fuselage spine. Paint was my first attempt at using Vallejo Metallics for anything more than details like exhausts and landing gear. I'm fairly happy with it, and I'm sure I'll improve with practice. Decals are from ScaleMaster and I was surprised at how much MicroSol it took to get them to really settle in. The large fuselage markings never really did settle into the panel lines like I would expect from aftermarket stuff. Still, it looks good on the shelf so I'm happy with it for a four day build.16 points
-
My project to complete all the Hasegawa Skyhawks in my stash is now complete. This is their A-4H with Quickboost resin cannons (although the barrels were replaced by Albion Alloys brass tubing) and Armycast decals. A longer build article is at https://jonbryon.com/hasegawa-1-48-douglas-a-4h-skyhawk/, but the TL;DR is: Built mainly from the box with some small modifications (filled in leading edge slat wells, some parts removed/filled in, fin on leading edge of tail added from plastic card). Paint is mostly Mr Color except for the green, which is MRP. All of the camouflage is free-handed, not with my usual Iwata Custom Micron, but with an H&S Evolution for a softer demarcation. The finish is Tamiya XF-86 that was thinned about 50/50 with Mr Rapid Thinner. There's lots wrong with it - I wish I'd faired in the intake lips properly, the canopy isn't installed very well, and there are the faltering first steps of doing some oil paint rendering - but I'm happy enough with it in the display case. Thanks for looking and comments welcome. Jon15 points
-
Over a few days during the lockdown I brush painted the model, it was quite challenging at times trying to access parts of the model between the struts and wings. After two or three coats of paint I applied a coat of Klear floor polish to the model The 35 year old decals behaved as though they were new, sliding off the backing paper in one piece with no curling after a couple of minutes in warm water, and strong enough to move around without breaking. I paint on an area of Klear floor polish where the decal is to go just before applying the decal, the polish helps adhesion. The red stripe decals around the wheel spats were amazing, they just fitted perfectly. In the box of parts behind can be seen one of the ladders that are supplied in the kit. And then it was time for the job I was not looking forward too ................ the rigging. I use stretched sprue and here I have layed out my weapons of choice. I have been building models for 54 years so I have lots of spare parts and sprue offcuts. I prefer to use the old silver grey sprues from the older Airfix kits, the plastic stretches better and it is the correct colour, silver grey, so does not require painting. Off course we need a source of heat, the candle, to heat up and soften the sprue before stretching it. The dividers were used to measure the length of rigging required on the model, then add a bit, then try it for size with the long-nosed tweezers, curse a lot as it falls off or you cannot seem to get into that awkward place, cut a bit off, try again, cut a bit more off, apply the glue then curse again because it is too short ............... I use white PVA glue to hold the ends of the rigging, a small blob of glue is applied to where each end of the rigging wire is to go, then apply the rigging to the top blob of glue first and use gravity to help you, while the glue holds the top of the rigging you can position the other lower end with the tweezers. The beauty of using white PVA glue is it holds well, is water based so mistakes can be wiped away, and it dries clear. And after a couple of days she was nearing completion. Guns and underwing bomb racks have been applied.15 points
-
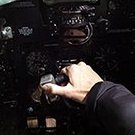
Hey guys. More plastic bending in the upstairs time vortex. Honestly it’s like interstellar in that room. 😆 Although happier with the ip I had an idea whilst cleaning the house to use lead wire wrapped at different sized to give more definition to the dials. yes I know it looks insane but bear with me. I added primer to all the parts and suddenly it all started to come together. Happy with the direction things were headed I finished the house work, made dinner, walked the dog..... and eventually got back to the grotto.😇 pedals built. I have built a rig at the back of the Ip to hold this in place when it’s all painted. I built a new control Columb. The only kit part is the grip. here's the rear. (Ooh er missus) Not perfect but it has a break. the extra bit of floor has gone in and I could really do with those chisels I’ve ordered to hack out some of the internal locating pins. From this pic you can see what I have to play with to extend the well. @Mattlow Is right about the hump, it all kind of linesUp to but the logistics would be too hard for painting, so Once again I’ll have to use smoke and mirrors. 😇 I added another column of buttons to the IP. So many buttons. 🥳 I zoomed in and it looks awful. I’m glad eyes can’t zoom to that level. 🤣 oh and I built the fire wall. Slightly less detailed. well it’s work tomorrow and it’s late so I’m off to the land of nod. Thanks for your help and companionship and as always. Happy Modelling. Johnny.15 points
-
Hansa Brandenburg W.29 - Eastern Express 1/72. Scratchbuilt some cockpit details, exhaust pipes, windscreen and added rigging. Fun build and I love how she looks! Cheers Segan15 points
-
Hi there. I have been a Britmodeller voyeur for years, so I thought I would finally post some pics of my latest completion. This build is my attempt at a Royal New Zealand Airforce P3-K2 Orion, built from a Hasegawa P-3C kit. There are a few things I am not happy with (forgetting nose weight!) but I had loads of fun making it. The more I tried to tinker with it, the more things broke. So I gave up and here it is. From what I understand the K2 is the latest upgrade, however the Orion is soon to be replaced by the P-8 Poseidon. Thanks for looking. Josh from NZ.14 points
-
Eduard 1/72 Profipack Spitfire HF Mk.VIII JF404, 32 Sqn, Italy early 1944 Just finished this in the Spitfire STGB, my first finished model with major use of etch (second that I actually applied the etch to). Got to take the crown of my favourite Spitfire model I have now. Criticism welcome My three favourites of my Spitfires But sometimes AE•A is in there as a favourite And suddenly there were lots of Spitfires! Some of the build here: Most of it here:14 points
-
I finished my B-2 build last night, and to my horror, after I had applied a polishing compound, a dry residue formed that stained the entire surface. I was ready to put it in the bin. I thought I would ask here for suggestions, and @janneman36 kindly saved the build by suggesting another top coat, which I left overnight and it has done the trick. I still don't know what that white residue is. Maybe it's on my other builds too, but they're mostly white so I'm not sure I'd notice it. So, after going from excitement, to devastation, I'm now back to excitement to present my B-2 Spirit in 1:72, my first build by Modelcollect. This one is Spirit of New York. I built the kit out of the box, using the kit's decals. Apart from the large gaps in the wing-to-body joints, there was no issue at all with this kit, and I really enjoyed seeing the unique shape coming together. Although with its large size (there it is next to a Revell A320 in 1:144) and sharp corners, it was quite awkward to move around. The plastic is very thick and solid, and with the extra weight I put inside to prevent tail-sitting, it's pretty heavy. Only one modification - the auxiliary intake hatches do not have any linkages, but I thought it would be too difficult to mount them on the edges of the openings above the primary intakes. I didn't want to risk getting blobs of glue on the outside of the intake and ruin the paint. There are duplicate sprues for things like gear parts, most of which aren't used, so I used the duplicate linkages for the gear doors to use on the auxiliary intake hatches. Here you can see the linkages quite well: One modification that I didn't do was to open up the boundary layer splitter plate in front of the intakes. I think that modification is beyond my skill because it's a very precise incision that needs to be made. I would like to get another one, and build it with everything out. There is a huge amount of detail in this kit. It comes with many bombs, a weapons launcher that turns, perforated airflow baffles, access ladders... - none of which I used. I wanted a clean look, but now I think it would be good to show a bit more detail that was designed into this kit. My sister is a big fan of the B-2, so I might see if she wants this one - then I can free up some space to do another! Thanks for looking.13 points
-
Hello! Apologies for mobile phone photos, best I can do at the moment. My latest model is an Airfix Fw 189, built as it came with a little scratchbuilding in the cockpit which of course can barely be seen through the inchest thick glazing! Quite an old kit, so quite simple but "chunky" with very thick trailing edges despite my sanding, hughe rivets stolen from the Titanic and wierd very thick "bands" around the booms, which I can't find any evidence of in various photos of the 141 so sanded these down much lower. It's brush painted with Humbrol enamels, gloss cote before and after decals and matt cote after weathering with Humbrol enamel washes. These washes aren't much cop, the black in particular seems to have very large pigment particles which start settling in the jar even while I'm using it, and can separate to make a "grainy" appearance if it's put on too thickly. I might experiment with watercolours next time. Anyway, let me know what you think, all feedback gratefully received. Thanks! Basil13 points
-
One way or another not had any time, or inclination, to be at the modelling desk. Picked up the Weekend Edition boxing of Eduard 1:48 Bf108 a few weeks ago, a great relaxing build. Finished as my interpretation of one of the machines seized at the beginning of the war. Brush painted with Tamiya acrylics (for the top camouflage) and Italeri Acrylic for the underside yellow - which was a a bit of a pain to do! Light wash with oils and a a spray with Tamiya flat clear from a rattle can to finish. Decals from the spares box. Thanks for looking!13 points
-
This is AK431, a workhorse from the North Africa campaign, based in Fayid, Egypt in 1943. With its battered, leaky exterior, this P-40 looks like the survivor of a tough environment. The Airfix Tomahawk is a nice kit - easy to build with a nicely detailed interior. I added a Master gunsight and replaced the pilot with the one I didn’t use from the Tamiya P-38, a well sculpted figure that deserved to be reassigned. Apart from an unfortunate Me-109 I mauled as a 10-year-old, this is the first desert scheme I’ve attempted in the second phase of my modeling career. Another first was attempting some riveting, as well as using Mission Model paints, which layer nicely when thinned down considerably. Forgive my amateur Photoshop experiment with getting this thing to fly. Well, under the circumstances, you’ve got to keep yourself entertained. Thanks for looking.12 points
-
This is the P-51D Mustang by Airfix in 48 scale. It was a joy to build this kit. I used Vallejo acrylics (mainly olive drab and neutral grey). The decals came from SuperScale decals (no48-1065). There is a mistake in the decal sheet instructions, since they make 'ol flak joe' walk towards the tail of the aircraft. I had my doubts if that could be corect. Some searching on the internet showed that in fact he was walking in the direction of flight. Hope you like the Mustang. Regards, Gerben12 points
-
been working on these for ever, finally managed to finish them off. the one ended up in sorry state for a while and had to be patched up a bit but I'm happy with the results.12 points
-
Hi. Just completed my first bcomplete build since lockdown kicked off. The kit is basically the Heller one from a Revell boxing, kindly sent to me by Bigbadbadge... Huge thanks to you buddy!! All built within my limited materials and a couple fresh items ordered via Hannants. All brush painted and straight from the box. Despite packing the nose with what I thought was enough weight its still a tail sitter hence the tiny blob of blue tack ( in bright green form). Its finished with a mix of Xtracrylix and Xtracolor enamel for main paintwork and Rowneys acrylic matt varnish brushed on. Markings are for 112 Squadron RAF Germany 1953 ( An addition to my 1953 collection build as a late non entry for the year I was born GB you could say?) Not sure what my next one will be. Just received two 48th Airfix Tiger Moths. But will hold on these until I can get my gear back from storage whenever that will be.... but I do have a couple other kits, also donations to keep me busy....11 points
-
1:72 Trumpeter MiG-29 SMT kit as visually its exactly the same, other than the ELT-568 Advanced Jamming pod on the starboard vertical stabilizer. Its a beautiful kit with loads of details and fantastic fit. I hardly used putty and assembly was a breeze . I scratch built the Jamming pod & FOD covers using polystyrene sheet. Paints were MR.Hobby, I had to mix and match a bit to get the IAF grey, decals from Bright Spark for roundels and fin flash, the black serial numbers were printed on a laser printer.11 points
-
Thanks Giorgio Once I've decided I'll post a link here to the next WiP. Still dithering… Finished! Untitled by Ced Bufton, on Flickr I had to touch up the canopies as the masks pulled off some of the thinner lines. Also had a shaky time with the aerials but the Uschi helped a lot. I thought I had a shot of that but it's focussed on the red nose. RFI later11 points
-
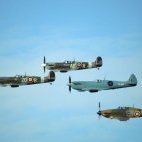
Hiya Folks, The Tunisian campaign has always interested me as it was not as well documented as the battles in the Western Desert, and among the British and American units which took part in Operation Torch and the campaign in North Western Africa was 43 Sqn, a famous RAF unit which deployed from Gibraltar to Maison Blanc airfield in Tunisia and for this they were equipped with long range tanks,...... the unit took off on 8th November 1942 not knowing whether the airfield had been taken by the Allies or not. Luckily for them, the airfield was in friendly hands a they was not enough fuel for a return flight! The CO was Sqn Ldr Rook who was said to be the tallest fighter pilot in the RAF and he is seen here alongside his aircraft at Maison Blanc, note his white bird marking on the rudder and the letter E on the fin,...... I have no idea what these signify!!; And here is the model of Rook`s aircraft. The Arma Model Mk.IIc is a beautiful kit and even better than their Mk.I if that is possible! I added a set of long range tanks from the spares box, the decals are from the kit and the model was brush painted; And with another Arma Hurricane built alongside! Cheers Tony10 points
-
Here is another finished model.I finished it a week ago.The great revell tornado ids.I loved every bit of it.For more info follow the youtube link where you can see the whole building process from start to finish. https://youtu.be/dTpB1JSyPeI10 points
-
Hi guys and girls I'm back again this time with a mustang. I wanted to do one in a British livery and also try out some metallic paint for the first time and opted for the AK xtreme metal range. I used the black base, polished aluminium an aluminium left it about a day and a half. It was dry to the touch so picked it up to carry on and after a few seconds the paint seemed to start to go soft thus ruining the paint job, so rubbed the areas back and tried again. All was well until I tried to mask off panels for the variation and ruined the paint again. After about 4 attempts I have a finish that's ok if you dont get too close haha. I snapped the port side tailplane off twice and the antenna was just a blob of flash and was unsalvagable so was whittled out of a match stick. The aftermarket wheels which stated, they were for Airfix didnt fit as they have small round holes and the kit legs have a block shape which snapped when the wheels went on. To be honest the whole undercarrage part was a struggle for me, I have clubbing off the fingers and it's a challenge I can tell you. Anyway enough with the things that went wrong, fun build, it'll stay in the display cabinet as long as it holds up lol. One word on the Xtradecal X72131, either they are wrong or I have messed up. The roundels on the wings state to have the small ones on top and the large on the bottom. Hopefully I'm right. Here it is..... Thanks for having a look, Stay safe. Dave.10 points
-
Hi all, Here's the completed resin WW1 Macchi M.5 fighter sea plane in 1:32nd scale (HPH Models). As usual a full and detailed build log in PDF format will be available from my web site soon, Mike10 points
-
Hi Folks, I've had a busy few months having recently moved house so unfortunately have neglected putting anything on here for a while, also had some problems with my photo host which hasn't helped. So in an effort to catch up I'm just going to put a couple of pictures of each of my recent builds, nothing remarkable about any of them, all built out of the box, all painted with either Tamiya or Vallejo acrylics. Revell Lancaster, built this one for an elderly relative who in his last days of national service was given a taxiing ride in a Lanc, the build went well until I applied the decals. Very disappointed with the finish. Italeri MH-53E Sea Dragon. Another one where the decals let me down Revell P-47 'Razorback' Revell P-47 Thunderbolt. Apologies to the purists out there, I took some liberties with the colour scheme on this, I was going through my invasion stripe period. You'll see what I mean later. Airfix Sherman Tank. I know its a tank but it will make sense Airfix ME 109. Revell Mk V Spitfire. This is another one where I deviated from the colour scheme, another one from my invasion stripe period. once again apologies to the purists. Remember the Sherman Tank ? Thanks for looking, as usual all comments and critisisms are welcome. Stay safe everyone.10 points
-
Turret. Part 2 As @hendie has suggested I seem to be suffering from a bit of Turret's syndrome lately. So here goes my second post on this particular obsession. As I mentioned before I am going to use balsa more extensively in this build than any of my other projects. It's ironic but the heavier the item - Steam trains and Self Propelled Artillery - the more use I seem to get out of balsa. On my aeroplanes I have not used the stuff at all. Anyhow, Balsa it turns out is a ideal stuff or filling voids. Here is the gap between the front and rear skeletal frames of the turret, a void that is simply filled with lumps of balsa that are easily cut to just a whisker's width over-length and then - due to balsa's soft and compressible nature - slid into place and held in place super-tight with just a small smear of glue. Here's the same technique used on the side of the turret. Those big overhanging blocks make it look quite boxy and 'AS90 ish' at this stage. The PZH 2000 has a distinctive arch shape to the top of the turret. This is for the very good reason that the gun needs to fit through a standard European rail tunnel when mounted on a standard European flat-bed rail wagon. So I can't leave the turret box-shaped. It needs to be correctly faceted into that arch. Most of the shaping can be done by carving the balsa as shown. Balsa, as you probably know, is dead easy to carve, but it's also very soft so any finished surface can be damaged easily. Keep checking against the shape of the structural frame and... Keep carving until the balsa conforms closely to the required shape. Keep your chisels sharp as that makes the job much easier. Finish off the shape with files and sandpaper. Yep - that looks OK. I've put this here beside sunglasses and coffee cup to convey a sense of scale. It's going to be quite a large model. There are still a lot of gaps in the turret though and quite a bit of shaping to go. These bits don't rest between two structural members so have to be glued and clamped firmly into place to ensure they hold and set correctly. After a bit more carving and filing and sanding we have this... which still has some gaps in the rear of the turret and one or two other bits to fill and complete. So let's fill those up... Carve everything to shape... and 'voila'. A turret for a Pzh 2000. Or at least the basic shape thereof... Like I said above though, balsa - although very handy and fun to use is too soft to leave exposed like this. Next time I'm going to have to give the turret some armouring. Steve10 points
-
Alright, I applied a couple more matt varnish coats to the Hellcat - I set up outside and placed a fan on the table just in front of my right shoulder pointed towards the far left corner of the table, and made sure the varnish and model stayed in the slipstream figuring that tiny glass particles would be easily carried far away. Maybe a cough or two, but I call it a success, thanks for your input everyone!10 points
-
So this will hopefully be my second entry in this GB Being lazy the following is largely a copy of what I said in my MC 200 entry so if you have read that you may wish to skip this with the possible exception of the 2nd paragraph! As a teenager in the 1960's it took a while before I became aquainted with Italian aircraft from WWII. In fact I think it is true to say I had no knowledge at all until I started buying the fighter volumes 1-4 from William Green's series "Warplanes" published by Macdonalds starting in 1963 with Vol 3 Japan and Russia. Coincidentally I saw and bought the Frog MC 202 Folgore the same year, closely followed by Revell's Fiat CR 42 in 1965. The MC 200 from Revell and the Fiat G 50 from Airfix arrived I think in 1967, and I still have both somewhere in my roof space. This particular kit is a more recent boxing from around 1990 bought a few years back and I will build it over the next few weeks. It is as I recall a nice little kit though I seem to remember the fit of the wings was somewhat poor and I am not entirely convinced by the totally flat fuselage underside. The cockpit is non - existent as usual with kits of this age, but as with the MC 200 there is only a tiny opening so it will not be visible. I will box in the wheel wells and might do a modest amount on the cockpit but otherwise it will be OOB, and a fairly quick build. I do have some resin wheels and will spend a bit of time on the exterior finish which was pretty rushed on my original build. I now have access to rather more info so it should look a bit better. Like the Japanese, the Italians in the 1930's were used to light open cockpit biplanes such as the Fiat CR32 and were reluctant to move to closed cockpit monoplanes with reduced manoeuvrability. Add to that the problems the Italian Aero Engine industry had producing high powered engines (usually radials) and at the start of the war the Italian Airforce was still basically equipped with CR42 biplanes together with a few of the earlier CR 32, though the MC 200 and G 50 were steadily taking their place. With speeds in the region of 300 mph and light armament of only 2 Mg in the cowling, they were already obsolescent and only their manoeuvrability kept them just about viable. Later, both types would benefit from imported/licence built German inline engines which made them far more of a threat. Italian aircraft and pilots have received a bad press or been ignored but in truth they were generally as brave and skillfull as any allied pilots, let down by a underdeveloped aircraft industry and poor political management. Not sure exactly when I will start this but I should be able to slot it in whilst waiting for glue/paint/decals to dry on some of my other builds. More as and when. Pete9 points
-
Thanks Ben, Marklo, Simon, Giorgio, Adrian, Hendie and Steve The other one was weathered last night. W&N thinned matt brushed on this morning: I forgot to Flory the spinners: Nearly there. I'll have a look at the stash later and choose my next victim9 points
-
Something like this: A small intake and dump seen in photos are made: Little work on the wing: Exhaust:9 points
-
One last entry. Flygfisken - The Flying Fish A Donnet-Leveque flying boat, acquired by the Swedish Navy and heavily used for neutrality patrols during the war, searching for drifting mines or Russian or German warships trying to capture merchants on the wrong side of the border. The Donnet-Leveque was an amphibian, with wheels that could be manually retracted - the navy replaced them with skis wintertime. After the war she was gifted to a museum, and was recently restored from the wear and tear acquired from hanging under the museum ceiling for half a century. The model is scratch-built in 1/72, but the engine is from Small stuff models and the prop boss a PE part. Thread here:9 points
-
Coffee made, Flory off: Untitled by Ced Bufton, on Flickr I like the way it takes the 'factory fresh' edge off and pops the detail: Possibly needs knocking back a bit more when it's full dry. The bottom: I like it. How about you?9 points
-
AZ Model Seafang...the last of a dying breed, a stepping stone between pistons and jets. Described by some as 'too much Spitfire.' Sleek little number. --I think it's time for some Lend/Lease...😉 -John9 points
-
Gidday All, here is my latest completed build of stupendous size, challenging complexity and exquisite detail - the Hobby Boss 1/700 scale USS Gato submarine. While building the kit I did a bit of research into the class (modeling can be so educational) and learned that the original fairwater (conning tower) was quite conspicuous and hence was reduced in size during the war, while the gun outfit was increased. The model appeared to have the later fairwater but original gun outfit, so I decided to alter it to match a photo I found of the boat, dated late November 1944. To do that I have a scratched 5-inch gun on the casing (hull) forward of the fairwater, a kit 20mm on the forward platform, a scratched 40mm on the aft platform and the other kit 20mm on the casing aft of the fairwater. The photo also shows the radar mast moved to behind the periscopes but I decided not to do that. Anyway, here she is USS Gato SS-212, 1944 The 5-inch gun on the casing is completely scratch built. It has ten parts but only eight are visible. The Bofors 40mm on the aft platform is a modification of a simple spare gun from an Airfix 1/600 Narvik class destroyer. I used the gun casing (shortened) and pedestal, and added the barrel, seats and auto loader on the top. They're a bit rough I'm afraid. Thank you for your interest. Regards, Jeff.9 points
-
This is the AFV Club 1/35th Churchill Mk.III. I based it on an image of a Churchill tank and infantry advancing near Medjez-el-Bab, Tunisia, 8 May 1943. The model was built as it comes with the exception of AFV club's individual link workable tracks. I found it quite an enjoyable kit to put together. I did read that some modelers didn't like the way the running gear goes together but I can't say that I found it particularly troublesome. The base colour is MRP's Khaki Green No3 (MRP-333). The stripes are basically Tamiya's Buff which was applied over a layer of hairspray so that it could be chipped and scratched off to give a worn look. The idea was to represent a rapidly applied camouflage where they had used locally sourced materials. I hand painted the outline and then filled in the stripes with the airbrush because I really could't be bothered to mask it all. Weathering was applied using with my usual mix of pigments, thinned paints, graphite and oils to try and give a dirty dusty appearance. This is the photo of the tank that I was trying to represent. I'm not sure which regiment it belonged to as there seems to be conflicting information. Hopefully someone will be able to enlighten me. @Das Abteilung ? After looking at the photo of the actual tank in my original post it was very obvious how under nourished AFV's kit barrel is, so I have replaced it with the RB models one. I had also missed what appears to be a rolled up dust shield on the glacis plate. This is a close-up to show the stowed dust cover. I fabricated it from some photo etch fret and milliput. I'm not sure how accurate it is as my reference photos are limited. The image below still has AFV Club's original barrel for comparison. Any advice and critique is welcomed. Regards Wayne8 points
-
Giddey to all fellow ship modelers! Long before the 1/350 scale models appeared, my favourite scale was 1/400 - and I must admit still is. Here are the Heller Z31 destroyer kits build as Z32 and Z37. As you can see the Heller 1/400 ship models are still nice little kits, and with some aftermarket PE Sets still up to date. The only point I would do better are the chunky masts. Here are the pics, all comments welcome! Hope you like it! Cheers Andreas8 points
-
Dear Britmodeller Colleagues: Inspired by others, here's my first entry into your dangerously addictive little world. I made a whole bunch of changes to the 1968-vintage Dominie kit and suffered many slings and arrows along the way, but I think the final results are worth it. I did a little summary over on the "in progress" side. Please bear with me if the pictures come out wonky as this is my first effort on this board. Best regards, Alex T.8 points
-
Nice, well fitting kit.8 points
-
And onto a track. As I might have mentioned, just doing one at a time, painted prior to fitting as is my preference and to be honest, wasn't as awkward as I'd anticipated. Why do you only ever spot things once its photographed and being posted, I thought the track had gone together too well! Just noticed an "anomaly" in front of the first road wheel where the link has come apart......! Thanks to John "Bullbasket" for his track painting technique I've pinched once again, cheers John. (Grey Halfords primer with Ak trackwash). And t'other side prepared ready for paint. With the side skirt re fitted. Not a perfect fit at rear above idler but it's a compromise between damage to paint requiring repaint, tricky to match up, and a slight misalignment that can be disguised... Isn't stowage handy! Thanks for stopping by to have a look. Atb Darryl8 points
-
Brewster Buffalo, 1/72 Hobby2000 kit (Hasegawa plastic) straight out of the box plus some ignition wires and aerial. Wonderful kit, by the way. Thread: The model depicts the machine of Hans Wind of 1/LeLv 24 at Suulajärvi in spring 1943.8 points
-
Tangmere(ish) Spitfire (Airfix 1:72)8 points
-
I would like to present my MPM 1/48 Faily Fulmar in the markings of Stan Orr, the leading fighter pilot for the FAA during WW11. This represents N1884 - 6K from 806 Squadron, HMS Illustrious, Eastern Mediterranian in late 1940. This is 'modified' from the kit by folding the wings, this is not a standard 'option'. No aftermarket was used, only some brass rod to support the wing folds and plastic card & rod to close in the fuel cells and provide detail. The fold is not difficult and is helped a lot by the FAA museum example having folded wings. Serials were home printed. The wing fold is cut from the kit parts and the sections reassembled in the new locations. Paints by Mr Colour Meanwhile aboard HMS Illustrious, the Navy Brass debate the new 'sand and spinach and spaghetti' leading edge camouflage invented by 806 in theatre. See the build thread and more pictures here Colins 806 Fairly Fulmar Many thanks to Grey Beamer (inc Tony OT and ClaudioN) for the reference thread back in 2016 and for the specific questions during the build. Thanks as well to Rob85 for the original idea and as a Mod. Now I'm off for some more naval fun in the Buccaneer STGB. Colin8 points


.thumb.jpg.0bac681e0da8e4ed7557610e98fda908.jpg)


.thumb.jpg.6a89e05cd459361baad12b5efaa51407.jpg)


.thumb.JPG.3498f40362ff13ebfc4b2e45abbd545e.JPG)
.thumb.jpg.85b0bd1b23acb88e6a79720372668e78.jpg)


This leaderboard is set to London/GMT+01:00