
Leaderboard


Popular Content
Showing content with the highest reputation on 25/04/20 in all areas
-
This is part of a double build for the Spitfire STGB, but more importantly is was a build I wanted to have finished for ANZAC Day here in Aust, 25th April. The model is from Eduard's lovely Aussie Eight Combo, the 1/48th version and actually the first Spitfire I've built in near 50 years of modelling! The model is really nicely done, but there are in my opinion a couple of things that really let it down.....the worst being the decals! These are printed by Cartograf, while looking really nice and perfectly in register, they are super thick and just about refuse to settle down of curves without splitting and literary drowned in strong decal softening solution! Of course the best schemes in this box are the ones with the Sharks Mouth! The build is 100% OOB, with the national markings being painted on. Please enjoy. Model: Eduard 1/48th Aussie Eight Combo Paint: Mr Paint & SMS Lacquers and Tamiya & Mr Hobby Acrylics, Model Master Metalizer Lacquer Extras: none ……….lest we forget. ANZAC Day 202029 points
-
This is the second part of my Spitfire double build for the Spitfire STGB and ANZAC Day. She's from the Eduard Aussie Eight release, this time an RAF aircraft, but flown by an Australian pilot, F/O Larry Cronin, from Canterbury in Victoria. I chose this one because I loved the scheme and the extended wing looks so different, and to me I like it. Again the model actually went together without any real issues, the fit is really nice. But again it was let down with these truly horrible decals! please enjoy. Model: Eduard 1/48th Aussie Eight Combo Paint: Mr Paint & SMS Lacquers and Tamiya & Mr Hobby Acrylics, Model Master Metalizer Lacquer Extras: none ……….lest we forget. ANZAC Day 202027 points
-
Canada and Scotland have strong historic connections and air links between the two countries have existed for almost as long as transatlantic flying itself. In May 2015 Westjet began seasonal flights between Halifax and Glasgow which was their first UK destination. The inaugural flight was by C-GQWJ, an ETOPS 737-7CT, which acquired a unique tartan fin for the occasion. She carried the tartan for about six months before reverting to the standard livery. The Zvezda kit was a straightforward and enjoyable build and I was aware of its few minor issues from my previous build of the 738. The only points worth mentioning are some sink marks mainly on the rudder and stabs and the rather indifferent fit of the engines to the wings. I added an adapted BraZ satcom fairing and a few small details from plastic sheet. Pitots, aerials and a couple of other small items came from a Daco PE set. Paint is Halfords Appliance White and Racking Grey with Revell and Tamiya metallics. One of the drawbacks of a large stash, whether kits, decals, paints or anything else, is that you are liable to buy something without realising you already have it. I’m not sure how i did it but when I started the model I discovered I had both the V1 and 8ADecs decals for this livery. As it turned out that was a good thing because I was able to pick and choose the best bits from both sheets. The fin decal, Canadian flags and registrations are V1 and the rest is 8A. Detail decals came from the spares box. It also yielded replacement “ship numbers” for the nosewheel doors which are oversized on both sheets and the small “700” on the underside of the nose just aft of the radome which both decal makers have missed. Windows are by Authentic Airliners. Thanks for looking and as always constructive criticism is welcome. Dave G25 points
-
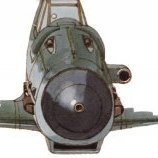
Hi this is my first RFI for a while - I did not get around to doing a WIP - the Kinetic Super Etendard SEM was built mainly from the box with the exception of fitting the Aires resin cockpit set and a couple of small scratch built items. The resin cockpit took a lot of work to get it to fit into the fuselage and involved removing quite a bit of resin from the cockpit sides under a running tap to stop the resin dust. The back of the casting also had to be cut away to fit over the nose wheel bay and the front needed tapering to fit in. As mentioned in other modellers posts the windscreen/canopy are a little narrow and needs some gentle persuasion to ease into position - I also cut along the panel line just below the sills to enable them to be eased in to meet the windscreen and lessen the stress on it - I did ended up with some crazing on the RH side when viewed from a certain angle but not too bad so it needs careful handling. Once the cockpit was in the rest of the build was pretty straight forward & pleasant - the instructions are a bit confusing in places with some misnumbering of parts in the diagrams. I also inserted brass rod/tube on the tailplane hinge as the plastic pins were a bit fragile - The Aires Ejection seat etch is very fiddly with individual buckles to thread onto the belts but makes up into a very nice model - I did make the parachute pack a little bulkier with putty & added some back padding referencing photos of Martin Baker MK6 seats. Intake covers scratch built from card & brass wire Paints used were Mr Hobby aqueous acrylic FS35237 & FS36118 - I mainly used kit decals although the lighter grey numbers and MARINE lettering came from Berna decals BD48-47 sheet - the kit decals don't provide them in the lighter grey - I still need to add the four reinforcing strips to the radome when I get a sheet of Xtradecal silver decal stripes. I wanted to fit some L'Arsenal ALKAN flares launchers but they are still transiting the universe's postal system somewhere Finally parked next to my FM Alize - I know the camouflage schemes are from different eras but they sit nicely together I think. Thanks for looking CJP23 points
-
Hi all This is my most recently completed model. It had been languishing in a painted state for a couple of years, so it feels good to get it out of the way. Like my other Tamiya 109s, I only did the following to the model. Fuselage - kit seat replaced with Ultracast seat - antenna wire made from stretched sprue - upper cowl intake opened - cowl gun barrels replaced with Master brass barrels - engine starter crank opening and lift points drilled out - kit propeller and spinner replaced with Ultracast resin parts - exhaust replaced with Ultracast resin exhaust - ETC50 bomb rack and SC50 bombs added from Eduard Bf 109E Wings - wing gun barrels replaced with Master brass barrels - kit wheels replaced with Ultracast resin wheels - tail planes modified to eliminate the anhedral Paint and Decals - airframe painted with Xtracolor X202 Hellblau RLM 65, X201 RLM 02 Grau , X205 Dunklegrun RLM 71 and X213 Gelb RLM04 - all markings are from Aero Master 48-248 Marauding Emils Part 3 - model is weathered with chalk pastels Cheers Randy19 points
-
Evening folk's,built for the Spitfire GB is an original boxing of Airfix's first attempt at a quarter scale Spitfire.The decal's were shot which is a shame as where possible I like to use them hence the new Identity.Brush painted with Tamiya paints a very enjoyable build all being well I'm going to build another in the box desert scheme.Many thank's for taking a look and yes I may have made a mistake with the layout of the starboard codes so apologies to the RAF fans.17 points
-
Grabbed this kit to practice my airbrushing. Made up markings for a late war 219. Earlier Tamiya mold from the mid-90's...good kit with just a few little areas to watch out for. Fun build of a cool looking aircraft that was before it's time. Cheers Collin15 points
-
Hi There, This was being built in parallel to the Firefox but this one is for the wee man's roof, so wheels up. When I started I thought that the dihedral fix wouldn't make that much of a difference so decided not to bother.....Wrong! Primed with UMP Grey Painted with the magnificent Colourcoats Dark Earth, Dark Green and Night Bomber Black. These are fantastic paints, utterly bombproof and so easy to spray on........ Thanks Jamie. Finished with W&N Galeria Matt varnish Aerials with Uschi Fine Rigging line. Had a bit of a slip with the canopy which decided to move slightly but eagle-eyes here didn't notice until the paint was done as and as it's going on the roof left it rather than ruin the finish. When I was unmasking the various bits of glasswork I managed to knock three of the large Tail-fin Balances off and could only find two. Stretched sprue and a dollop of PVA to the rescue. It's approximate but looks OK from three feet. It'll be heading for Innis' roof on my way to work today. Thanks for looking and did I mention how good Colourcoats are. Cheers, Alistair15 points
-
A long time ago in the fair country behind the iron curtain was country, Poland. A place where I grew up. Plastic modeling hobby was limited to a variety of kits you can buy on the market. One domestic manufacturer has made only 6-7 types of models. They are still made today. The quality of molds was low, decals were even worst. Hobby paint was something you never heard about. WW2 Greman models were forbidden by the state. A great leader knows witch kit is good for you. 😀 Nevertheless, my father was traveling to a decadent and rotten western Europe. He always brought me a nice souvenir, the Matchbox kit. Compare to all kits available in the country, the Matchbox seems to be from a different planet. I cherish those memories from my childhood, that is why I will build one of my Matchbox kits. I hope I didn't bore you with this introduction.13 points
-
I finished this for 'In The Navy GB' so all the build details are there, so just some finished photo's. Its rigged with 0.122mm wire. If anyone has questions I'm more than happy to answer them Stay Safe out there as this virus is a real killer. Cheers Joe M Stick & String Rule O.K. IMG_20200421_221339 by Joseph Moran, on Flickr IMG_20200421_221430 by Joseph Moran, on Flickr IMG_20200421_221323 by Joseph Moran, on Flickr IMG_20200421_221315 by Joseph Moran, on Flickr IMG_20200421_221302 by Joseph Moran, on Flickr IMG_20200421_221249 by Joseph Moran, on Flickr13 points
-
I've been working on this on and off for the last few months and have finished it off this week. I've used the classic Revell 1/48th B-17F kit and coupled it with Koster's vacformed beautiful early Fortress conversion set. This comprises a new rear fuselage with the distinctive 'shark fin', a new early nose and cockpit transparency as well as other various vacformed clear parts, along with some additional air intakes for the early oil cooler set up - all in all a very comprehensive conversion set. You have to undertake other mods to the Revell kit such as shortening the nose (the later Forts had a longer nose due to the heavier rear fuselage needing to be rebalanced), add additional seats to the flightdeck as well as reshaping the later paddle-bladed props to the earlier 'needle' type. The cowl flaps have to go too, as these weren't introduced until the D-model. They say a picture is worth a thousand words so here's a good summary of the work carried out: DSC_0063 by Thomas Probert, on Flickr I started with the Revell F-model kit rather than the Monogram G-model as the nose is far easier to modify - I just needed to blend in the larger cheek windows and then open them up in the shape of the smaller windows seen on the earlier models. Here you can see I have removed the necessary section to shorten the nose, as well as removing the rear fuselage and the Koster rear part is being offered up for size: IMG_E1388 by Thomas Probert, on Flickr I decided to do a later scheme used by the RAF on their Fortress Is which was slate / extra dark sea grey uppers with PRU blue undersides. I used my favourite Xtracolor enamels with generic Xtradecal codes and insignia to cobble together a 90 Squadron machine which was operated out of Polebrook in the Autumn of 1941. DSC_0091 by Thomas Probert, on Flickr DSC_0058 by Thomas Probert, on Flickr DSC_0064 by Thomas Probert, on Flickr DSC_0066 by Thomas Probert, on Flickr DSC_0068 by Thomas Probert, on Flickr DSC_0070 by Thomas Probert, on Flickr DSC_0073 by Thomas Probert, on Flickr DSC_0081 by Thomas Probert, on Flickr DSC_0082 by Thomas Probert, on Flickr DSC_0088 by Thomas Probert, on Flickr The fit of the Koster parts was exceptional - once they were removed from the backing sheet and sanded correctly it was like working with an injection-molded kit. In fact, the Koster parts fitted better than the Revell kit! The only tricky area was the nose transparency - this was a little too large to fit the Revell nose, but some careful trimming and careful blending with Milliput solved the problem. I'm now trying to get hold of the 1/48th Privateer conversion, but now Koster kits are OOP I'll have my work cut out - and they're currently going for silly prices on eBay! Regards to all, Tom12 points
-
Hello everyone! Here is one of my two latest kits, finished last weekend. It's Mark I Models brand new 1:144 Messerschmitt Bf 109K-4 which I started building the day I received it about 4 weeks ago. It represents White 1, W. Nr. 330204, of 9./JG77, Luftwaffe, at Neuruppin airfield, Germany, in November 1944. It was built mostly OOB adding belts from Tamiya tape and the armoured headrest (a bit of a fiasco that) in the cockpit as well as the missing tail mast for the radio wires and the FuG 25a IFF aerial under the fuselage. I opened up the supercharger intake which was moulded solid. The FuG 16ZY aerial under the wing and the pitot were replaced with items made from stretched sprue as they were too thick. I used the kit's loop antenna but thinned it in profile. It's a bit oversized. This kit was nicely moulded but had some sink marks to be dealt with on both sides of the supercharger intake and the oil radiator. Fit of parts wasn't bad but some work was necessary to get the wing to fit well with the fuselage and even then a little work along the roots was necessary. The fit of the canopy also needed some attention. The kit has two nasty flaws. The join of one fuselage side in the tail area leaves a large seam that does NOT match panel lines so they must be filled and the panel lines and rudder restored after sanding. The second concerns the main undercarriage legs, they are too long by 1-1.5mm. I shortened them (after removing them successfully from the kit) and deepened the dimple into which they are inserted. Getting their angles right is by eye as there are no guides. I was so concerned with these problems that I forgot to thin the doors! The propeller tips needed some attention too as they were a bit too wide and rounded. The kit was fully painted (the propeller spiral included) and varnished by brush and the decals went on very well Thank you for looking and all comments are welcome as always Miguel12 points
-
Hi everyone, This is my first post here on the forum, even though I have been a member for a little more than a year now. About two weeks ago, I finished building Hasegawa's P-47D in 1/48. A great kit, which I built OOB, with the exception of the decals: these come from Aztec Models 'Juicy Jugs' decal sheet. The plane depicted here is a P-47D-30 which was used by the Fuerza Aerea Colombiana. I used Vallejo Metal colors in various shades for the main fuselage. The model is far from perfect, but I am quite pleased with the result and I am looking forward to your feedback.12 points
-
….and she/they’re done!!! I actually didn’t have too much to do, just some time consuming final wee things……..no boring photos! At the end of the day I did enjoy building them, they are really nice model, just spoiled by some minor stuff which should never been allowed to happen. I decided in the end to not go too excessive with the weathering, even though photo’s do show these aircraft to be quite weathered. I’ll post all the proper photos in the gallery and RFI. These are just to show sometimes even we get sunny days in Sydney! ….and the boys together for a round or two of 2-up!! ….lest we forget. ANZAC Day 202012 points
-
F-4Es of the 68th Tac Fighter Squadron, 347th Tac Fighter Wing out of Moody AFB participating in the Red Flag 84-2 large-force exercise, Nellis AFB, February 1984. 68-0328 68-0363 68-0367 68-0373 A very blurry 68-0395 68-0495 68-0515 Thanks for looking, Sven11 points
-
Hello, Here is my recently completed model, the HB 1/48 Mirage IIICJ. I started the model about 6 years ago, and managed to complete it today. I hope you will like it. Thanks for watching.11 points
-
Thank you. Coming from such a master, that is praise indeed. Basic brushed aluminium coat everywhere. It’s hard to tell from the two photos of the plane I’m (not quite) building, but the belly tank could be a darker colour. Then again, it may as well be shadows at play, so I’ve gone with aluminium. The wing struts do appear to be a different colour, though, and my interpretation is a blue like the registration code. That reminds me I need to get some clear transfer sheet in so I can have a play at printing my own registration for this model.11 points
-
Cheers chaps! Lego has been deployed. Starboard wing and struts glued - I hope. As you can also see, the port struts didn’t survive extraction. I think there was actually a tiny mould flaw that gave rise to a weakness where it broke. Walking away now to avoid the temptation of fiddling before the glue has set.11 points
-
Slow progress. The instructions section on installing the canopy and undercarriage. Note the requirement to scratch build struts for the main legs? Ten millimetres, eh? Would you be at all surprised to discover that’s a great deal too short? Before I got there, the canopy was fixed in place. Don’t forget, the wings are butt-jointed directly to the glazing, so I hope it stays in place. Oh, and the rather lovely Peewit masks went on, too. Quite apart from not having any plastic rod of small enough diameter, I couldn't help feeling this area was going to need a bit more strength. So, 0.5mm brass wires were made up, 12mm long plus a bit to go in holes I drilled in the fuselage to firmly locate them. The main leg fairings are randomly glued somewhere on the fuselage, with a nice solid butt joint. Well, I compared the destructions' idea of where they go to photos of the real thing. It’s near enough for Short Runland. While I let glue set, I am pondering the best way to fit the wings. The real thing has no dihedral on the wings, so I’m thinking about deploying Lego to make a jig that will let the wings sit aligned with each other while supporting the fuselage upside down. You’ll soon find out if that works!11 points
-
Yesterday the new parts arrived from the 3D-printer. This was done at Shapeways as usual. Lately the parts have been quite well cleaned upon arrival from them, but this time I had to rinse and wash away a fair amount of glop. The parts came out well though. Test fitting the exhausts after some minor adjustments. I have been painting all the parts during the week in what little time I have found. The painting of the centre section of the wheel caps is a bit of compromise as they aren't perfectly accurate in shape, but it will do OK I think. I'm quite pleased the interior and transmission. I have to check the instrument decals supplied in the kit, I may have to draw and print a new revolution counter. A coat of primer sprayed on the 3D-parts. Hopefully they will be good for painting after only some minor sanding.10 points
-
My 3rd work finished in 2020 is this little diorama, a corner of late 80s airport in China. Kit: Daco Skyline 1/144 737-300 Accessories: Extratech 1/144 737-300 photo-etching part Extratech 1/144 airport luggage traitor photo-etching part Preiser 1/144 airport crew Preiser 1/144 bicycles Authentic Airliners 1/144 737 3D window decal Authentic Airliners 1/144 737 vortex generator Mixture of several CAAC decals Thanks for watching. Please stay safe and build models! Yufei Mao10 points
-
I didn’t really get as much done yesterday as I had hoped. The seam along the bottom was filled and sanded. I then spent a while trying to work out the shape of the extended range belly tank. In the end, I guesstimated it, and sanded something from a block cut from 2.5mm thick styrene sheet. From various comments I found on the interwebs, the tanks appear to have been made by Bert in the metalworking shop to fit the plane at the time, so there was some variation and no real series production. There is some evidence of straps or reinforcement that ran longitudinally, so I replicated that from thin masking tape. The filler neck is a bit of bent brass wire. I am risking a butt joint for the stabilisers. I don’t feel my measuring skills are quite up to making and fitting wire pegs. This decision will return to bite me, I’m sure. The exhaust silencer has been bodged from some 1.5mm Evergreen rod and brass wire. I had hoped to include the four exhaust pipes that literally pop out from the cylinders so the silencer was standing away from the nose slightly - both the Cirrus and Gypsy Major engines used in these aircraft were inverted - but my patience levels are low. I’ve simply glued the exhaust directly to the bottom of the nose. Sorry. I think I’m seriously going to have to engineer some jigs to aid fitting the undercarriage and wings so they’re not squiffy. No pegs or blocks or tabs to guide me here.10 points
-
I now have a Silver Spitfire. The AK Xtreme Metal was a delight. I was trying to decide whether to put down "Aluminium" first and then highlight panels with their "Polished Aluminium" and "Flat Aluminium". The LHS made the decision for me as they had no "Aluminium" so I went with Polished first up and I am glad I did. This has given me a nice base to vary texture and colour with some of the panels. I shot it at 20 psi preferring to stand off from the model 6"-8" and get good atomisation and not have drying before it was on the surface. Seemed to work. There seems to be a faint smell of mineral spirits (white spirits, turpentine depending on which part of the planet you're from) so the product does seem primarily an enamel. It was touch dry very quickly. Much more so than the basecoat. AK do recommend 24 hours before masking. I understand it will take a polish so I am interested to see when fully cured whether this effect can work on a couple of panels mainly the top of wing leading edge panel. As is, it looks very nice with no further work and gives a thin, lustrous coat just lacking the panel variation you can achieve with foil. Although, I think you could have a lot of fun with panel preparation to achieve these effects as, like Alclad and foiling, it will show every mark and blemish in the undercoat. For me, the time spent on the surface preparation has now paid off. Very difficult to get a photo that does it justice. If it is more robust than Alclad II, and I see not reason why not, then we're on a winner. My question mark is whether it will take an enamel wash without damage. AK claim so and all their washes are enamel so maybe so. I will be using oils/odourless thinners to achieve some of the panel shading and would prefer to not have to put down a clear protective coat before doing this. Let's put it aside and give it plenty of time to harden before masking some of the detail. I have to say, what a pleasure, for a change, to do a build without masking camouflage. Ray10 points
-
Spitfire Mk.VIII – F/L George Scrimgeour, 457Sqn, Labuan, Borneo June 1945 Model: Eduard 1/48th Aussie Eight Combo Paint: MRP & SMS Lacquers and Tamiya & Mr Hobby Acrylics, Model Master Metalizer Lacquer Extras: none .......lest we forget. ANZAC Day 202010 points
-
I would like to present my MPM 1/48 Faily Fulmar in the markings of Stan Orr, the leading fighter pilot for the FAA during WW11. This represents N1884 - 6K from 806 Squadron, HMS Illustrious, Eastern Mediterranian in late 1940. This is 'modified' from the kit by folding the wings, this is not a standard 'option'. No aftermarket was used, only some brass rod to support the wing folds and plastic card & rod to close in the fuel cells and provide detail. The fold is not difficult and is helped a lot by the FAA museum example having folded wings. Serials were home printed. The wing fold is cut from the kit parts and the sections reassembled in the new locations. Paints by Mr Colour Meanwhile aboard HMS Illustrious, the Navy Brass debate the new 'sand and spinach and spaghetti' leading edge camouflage invented by 806 in theatre. See the build thread and more pictures here Colins 806 Fairly Fulmar Many thanks to Grey Beamer (inc Tony OT and ClaudioN) for the reference thread back in 2016 and for the specific questions during the build. Thanks as well to Rob85 for the original idea and as a Mod. Now I'm off for some more naval fun in the Buccaneer STGB. Colin10 points
-
Hi all and what a great idea for a Group Build! Like so many of us, Airfix and Matchbox kits (and the odd Esci) in the 70s & early 80s were my gateway to the hobby. Built with great enthusiasm at the kitchen table, my choice of kits were inspired by the comics I read and the movies I watched. I also remember 'The World At War' TV documentary, I think on Sunday afternoons. It was probably the first time I saw real footage of WW2 and especially film of the war in the air. So this will be my build, bought on auction a few years back in a moment of mad-nostalgia for those model-building weekend adventures of my youth. Looks like everything is in there.. In all it's rivet-glory. I can't wait to get started. Thanks for looking and enjoy your builds. Dermot9 points
-
It must have been the very late 1960's, probably 1969. I was 9 and my brother 11. For Christmas that year I got a Revell H-110 Phantom, the "Diamond Backs" one with the great Brian Knight artwork. Anyway, my brother "convinced me" that it was far too difficult for me to build properly, so he decided he would be building it as "it would turn out better". You've never seen such a pile of glue-bombed cr*p in your life, and I didn't speak to him for weeks. Fast forward to Christmas 1975, and my brother, now having left school, in a full time job and earning proper money, surprised me with a Phantom kit, not the Revell one but Matchbox. I was quite chuffed with the kit, but I was surprised that it took him 6 years to replace "my" bodged Phantom. Anyway, it was around this time that I was thinking of joining the Royal Navy, and so built my Phantom as the F-4K of 892 NAS version. It turned out really well, although I painted the top side navy blue and not extra dark sea grey, but no matter, it looked the business. Fast forward again, another two and half years, to somewhere in the Mediterranean Sea and a callow youth of 17 standing on the fo'c'sle of a Leander Class frigate in the late evening sunshine, half a mile off the port quarter of HMS Ark Royal, watching the very same F-4K that I had built from the Matchbox kit, roaring overhead and catching the wire on the Ark in the gathering gloom of a Mediterranean sunset. An awesome spectacle. And I was getting paid for doing this! So my kit is the Matchbox Phantom. It'll be a standard 892 NAS F-4K, OOB build but not "013/XV569/R" that comes with the kit, but "001/XT859/R", the aircraft that won the 1969 Daily Mail Transatlantic Air Race for the Royal Navy. I have a set of Almark decals for this aircraft, which will form part of a diorama that I've always wanted to build which includes the Matchbox Wessex that transported the Phantom RIO from Wisley to central London so that he could get to the official finish at the top of the Post Office Tower. That'll be for later, it's just the F-4K for this build.9 points
-
I chose this kit as I remember it was my favourite build as a kid. I bought it in Anerley, south London at my favourite shop. It was only small and mainly sold sweets and boring newspaper - but occasionally would have a Matchbox kit in the window. I always remember the box and have bought a P12E of the same vintage. As a result of the current situation I am living with my girlfriend and her ten year old son. I've got him in to modelling and he likes to build kits quickly. So did I as a kid but remember painting this one properly. My aim is to start and finish this build on the first day - Tomorrow. Watch this space !9 points
-
Hi Guys, due to the lockdown in France, I had to look at the bottom of my stash to find something exotic to build. I had bought the Roden kit of the Rolls-Royce armored car many years ago, but I was always frightened by the number of parts and low quality of the molding of some pieces. I usually build 1/48 scale aicraft, so this was quite a big change for me. I found a build by Andy Moore on this forum of the Meng rendition, which I tried to follow regarding the colors. Since I did not have access to AK real colors because of lockdown, I used custom mixes with Tamiya and Gunze acrylics. I used Mig Ammo premixed washes for the weathering. The small base is done with a sheet of foam board, covered with sand colored tile grout. The rocks and stones are two different grades of cat litter. Just for fun I added a milestone which is most probably incorrect for the place and period, but since this was meant as a relaxing build, I thought I could be forgiven. I hope you will like it, best regards to all, Christian.9 points
-
This was my surprise present form my son last Christmas. Never having made a resin kit before the very thought of it terrified me because it was a present and if I made a mess of it I wasn't just disappointing myself. So, after doing some interneting to get hints, tips and help I stuck my courage to the sticking place two weeks ago and decided to get on with it. No real problems with the build, a fair bit of filler and sanding especially on the bits that had shrunk. The only real problem was that the canopy didn't fit at all. Some hot water later a reasonable fit was managed. (More of this later). Painted with Vallejo Model Air AMT-12 Tamiya Nato Black Acrylic Humbrol Arrow Red Enamel Finished with W&N Satin Varnish. The decals, all six of them, went down with no problems then but when I unmasked the canopy it had gone completely cloudy. Must have reacted with the CA I suppose. I tried to tint it by hand but the damage was still visible, so Nato Black coating with a glossy coat to try and give it the impression of a canopy. Anyway enough waffle and on with the pictures. All in all I'm quite pleased and it looks very sinister in the cabinet. Thanks for looking, Cheers, Alistair9 points
-
I built this Manchester MkI using various sources - the old-tool Airfix Lancaster, Planet Models as well as Paragon Designs. Decals came form the spares box. Regards, Rob9 points
-
Hey. Not loads done today but all progress is good progress right. 😀 The blank side wall got a rough approximation of what is there. Similar fashion with the other side. The smaller wheel was replaced then removed as it stopped the whole thing coming together. the larger wheel was sanded away and will be replaced with a scratch one. I’ll also add a few levers after painting. Here’s the wheel. This will get added after painting too. The IP I have seen done in lots of different ways. Some sand it off completely some add new dials some just paint it. Although it’s not 100% accurate the Revell one comes with decals. I’m going to use them and add some extra detail from plasticard and add extras after painting. Fingers crossed this’ll be good enough. Might add more tomorrow. Searching through the extras box. I found these to use as greeblies. I think I’ll use them to fill space in the pit and under the rear canopy. Here are some extras to fill up the space. The rest of the day was spent ripping out and reinstating the arch (wood) at the top of the French doors. This is an after pic. apparently it’s going to rain tomorrow so we shall see. 🌦🌂🙈 While all that was going on this. Turned up in the post. ❤️ Thanks @corsaircorp for the heads up. Not the next build but this year maybe. 🙌😇 Right that’s it until tomorrow. Thanks for dropping by. Hope you’re all having a sunny funny weekend. Johnny boy. 😇9 points
-
Thanks Simon. Ear fungus? You should get that seen to!! Thanks John, always glad to know I'm not alone and thanks for the tips To be honest I'm blaming the paint. At a few points it went very well… and then the nozzle dried. I think I'll try it again but next time with Colourcoats (or LifeColor). Thanks Giorgio - sausages, got it! There are some things I could do while the paint dried. Cowling insides: Untitled by Ced Bufton, on Flickr Props: Limp and floppy. I know how that feels at the moment. Of course I have a tool for that: PropMasterTM. Great help. Both done now: Now, that camo. I MicroMeshed the worst of the splatters and then went over with the LifeColor, then ripped off the masking. The demarcation sausages worked OK: …and they're now looking fine(ish), especially (as John suggested) photographed from a distance: Gloss coat before the transfers? Maybe9 points
-
Slightly older completion but finally got around to some photography. Zvezda's 1/72 Su-33 out of the box... almost. I cut up the inboard leading edge slats and the horizontal stabilisers to pose them more realistically. I also opened up some holes not mentioned in the instructions and used the spare/optional pylons for the inboard wing stations. These are pretty unrealistic as they are rarely used due to take-off weight considerations, but I'll be damned if it doesn't look imposing with 12 missles hanging off it! This is my largest and most complex aircraft project to date, the decision to have it folded was as much shelf space pragmatism as presentation 🤣 It's a fantastic kit and makes me want to build more Zvezda Flankers, but no idea where I'd put them! All brush painted with AKAN acrylics. These require some beating into submission for brush painting, the lightest blue especially took over half a dozen coats in some places. But I wouldn't have it any other way as their colour fidelity is so perfect, and no alternatives were convincing enough for me.9 points
-
Thanks P. They are indeed, and unfortunately I hadn't finished with them! Corrected. A little closer to final paint after today... Thanks Tony, all done! Cheers Ced! Thanks Keith! Cheers Richie. They are definitely small and fiddly, but well worth spending time on them. Thanks Martian! Thanks Adrian! Unfortunately you have even less chance of getting away with that when you ARE one of the instructors! Sounds interesting. When is it due to be released? Hmmm.... Sorry for the long delay in updating folks, I just couldn't get the mojo to finish off those bloody little cabane struts. I forced myself to do it today and I'm glad I did. It really wasn't too bad after all. As stated earlier my Plan A was a waste of space. The problem was trying to get the correct slope to the rear, have them meet dead centre when viewed from the front, and get the height correct. All at once! I made up a couple of templates to assist in getting the forward pair right. Very simple, but it worked ( @pheonix would be proud!). A couple of pieces of card cut to fit and marked for height. I also did another template with a cutout 19mm deep so I could be sure I got both front and rear struts at the correct height - I simply sat it across the fuselage and ensured that the top of the strut sat nicely under the template. As you can see, the mounting holes for the centre struts need to be in line with the wing struts, so the template also helped there. It was a very slow process as I had to first cut the struts roughly to length, then glue them together and wait until they were dry enough to sand the top down level. After that I could add the mount itself. I made that from a tiny piece of .010" x .040" strip, drilled to accept a piece of .016" brass rod which was CA'd into the hole. I trimmed up the strip, filed the joint surface to ensure it was flat, then glued it to the top of the pair of struts. Front one done and the rear They are not glued to the nacelle yet as I want to remove them for painting. They will be reattached once they and the nacelle are painted. Of course I will only really know if i got it right when I come to attach the upper wing! With that job out of the way I can finish off the prep on the wings. They need, in order: rigging holes and holes for the control cable pulleys drilled, Final coat of CDL, PC10 on the nacelle, wing and tail upper surfaces and wrapped around the edges, (hence finishing the undersides first). Then it's decals on the nacelle and final assembly! Oh, and I need to make the landing gear before painting the PC10 too. Have a good weekend folks! Stay safe and thanks for looking in! Ian9 points
-
Fuselage with the various fixtures and fittings fitted. First coat of Humbrol Dark Slate Grey has been brush painted on. Wings with engines and undercarriage attached. Struts attached only to upper wing at this point with it all just resting on lower wing ................ a tribute to the Matchbox engineering. Had to replace the struts running from the engines to the fuselage with more suitable items from my spares as kit ones are too thin. Note the wing mounted wind-driven generators which were only fitted to the Mark 1. I replaced the tiny propellers with scratchbuilt ones. The Mark II and III had engine-driven generators. Next stage will be the mating of wings to fuselage ..............9 points
-
Spitfire Mk.VIII – F/O Larry Cronin, 81Sqn RAF, Patel, India March 1944 Model: Eduard 1/48th Aussie Eight Combo Paint: Mr Paint Lacquers and Tamiya & Mr Hobby Acrylics, Model Master Metalizer Lacquer Extras: none .....lest we forget. ANZAC Day 20209 points
-
even all the little lead balls are laughing!9 points
-
All finished bar the K69 markings - waiting on masks but they’re taking ages due the crisis I guess so have given up and I’m posting anyway! Great base kit, but it really needs an upgrade pack - I went for the Pontos set which is exemplary. It’s notionally HMCS Heather, but I accept it’s a fairly generic Corvette. My first ship build - I’ve had a go at a couple in the past but never finished as I always had a PE disaster! Anyway, see what you think. Guy8 points
-
1/48 HobbyBoss Mirage III Armee De L air, Dijon-Longivc, 1970. Vallejo acrylics and wash, Testors Gloss coat, aftermarket Neo resin cockpit and MB Mk 4 Seat and Eduard RBFT. A pair of shaky hands and weak eyes!!!!8 points
-
Second completed lockdown build and this one i'm pretty happy with. A nice kit which went together alright although there were a few fit issues with the top of the air intakes. Unfortunately the primer gave it a horrible grainy texture which is accentuated by the light in these pictures but it looks alright in person. I'm not sure if Black Mike ever actually carried armament, let along black drop tanks, after being repainted, but I just thought it looked good.8 points
-
Hi RGL I have a "Cornwall" set on order fro WEM and the "Kent" set designed by Peter Hall will be some time coming. This build is a bit stuck at the moment awaiting deliveries all slowed up by Covid from WEM, Micromaster and Northstar. I had a minor epiphany looking through the Northstar "shop" when i stumbled across this ..... North Star Models - Engraved plate - 1mm Diamond Here's a screen grab showing the very same on Kent in 1939 And lo and behold whilst searching for 1/144 railings (don't ask) I stumbled across this 1mm Checker plate raised diamonds So the plan is NOW to shave ALL the anchor fittings off and cut metal plate to lay over then replace said fittings Here's a reminder... Kev, John and the brethren - any ideas on how I repicate the "lip" of those anchor "drains". I can cut holes so that the sunken bits will fit and I'm pondering how to then "relip" them? I'll try "shaving " them of but that's going to be hit and miss. I have a Huron PE cutters which I'm hoping wil cut the metal sheet?? The great irony is that Trumpeter's Cornwall HAS the Diamond Sheet plating focsle!! And talking of which - I reflected that I seemed to have collected enough PE etch to finish a second Kent Class Cruiser, so I'm seriously thinking of building Cornwall or Berwick alongside So I'm trying to carry on with non hull bits at the moment. The 3 funnels had multiple stays attached which are very prominent. Workign out where they are on the funnels is straightforwards but where they go to on the deck considerably less so, not helped by the absence of a proper deck plan Oh and BTW the Eduard 4" gun steel platings supplied don't match the timbered deck bases on Kent - so the'll need to be filled Order has at least been restored to the universe vis a vis my spelling hiccough And finally I took delivery of this tome as recommended by young Mr Duff. I picked it up for less than£30 and whilst Belfast is really the only Town class ship that appears in easily accessible model form - the pics within are a delight and give me lots of insight into how Cruisers were rigged etc. I'm waiting for Friedman's Cruiser book and I manged to buy a copy of Raven and Roberts "British Cruisers of WW2" on Ebay for a half sensible price which hopefully will wing it's way to me. Rob8 points
-
And now, decals schemes: FM-2 Wildcat Expert Set decals8 points
-
Thanks for kit origin discussion and info PC and Peter. I have to say that this kit already looks way better than my previous hybrid attempts, thanks PC! Alright, elevators drooped. And attached. You may notice the very temporary 4 cannon arrangement. The Sword outboard stubs are terrible, so I used some spare Eduard cannons and will cut down the Sword cannons in to stubs. The belly of the beast. You may also notice that I've invested in some water based MRP paints, but not in any form of storage for them. Outer cannons cut down as promised. I also temporarily added the spinner, @Bedders style. I just used some flattened blu-tac not the laser based system that Bedders obviously uses. Oh, and attached the rudder (from an AZ Joypack) and canopy. Almost ready for priming.8 points
-
It’s only got twelve parts. Well, a few more, but it’s not an Airfix Wellington. For @AdrianMF... I sanded the frame down a little, but the canopy fits quite snugly over it. It fits so well, I could fail to glue it on, only the wings attach to it and the model could fall apart!8 points
-
My latest finished kit is Eduards Mig-21Bis Around The World kit. There's a great choice of schemes in the kit, I've always liked the Croatian scheme with the cheques despite the fact it's another 'grey' jet.7 points
-
Some designs just seem to embody the Golden Age Divine Proportion. I know we all have our favorites, I have many, but the Gamma is one I keep going back to. I have built it first a lot of years ago following the original boxing: But more recently I went for seconds and thirds, incapable of resisting the need to extract more flavorful modeling juice from it, building it in some of its more exciting incarnations: I have now the Arctic Decals/Dekno resin/decals set that was released after my build, to do the Conqueror Cochrane again (you need a particular Azur-FRROM kit for that), but once more I couldn't resist taking the awkwardest path, and decided instead to do the very long nose conversion withe the stripy cowl used by Jackie Cochran, powered by a Pratt & Whitney Twin Wasp Jr. for the 1935 Bendix race. I got a number of photos of it, and the old and venerable Williams Bros kit. Again a lot of surgery will be needed to modify the fuselage top, the nose, and the details on the kit that are not just quite right (rudder, for starters, and cockpit). Since I have done this 2G conversion before, I know what I am in for (sigh...). I am still looking for a plan/drawing of the plane, but it will be very easy to extrapolate from photos to extend that nose and work out the details associated with it's Pinocchio characteristics (Pinocchio, now what that reminds me of? ah! a president!) I have pulled out the kit and started already to separate and clean the useful parts -many will have to be discarded-, but today I don't want to complicate my life with photos and posting them, so the graphic part of this will have to wait for a little while, meanwhile this station will continue with its regular programming (the pending two Ju-86s, Republic Seabee, Vultee V-1D, London Bus, and Supermarine Sea Lion, all the latter just needing decals that are in transit) Aiiiiiiiooooo Silver!!!!!!!!!!!!!!!!!!!! The Lone stRanger7 points
-
Hi Giorgio, excellent progress! Just one small suggestion, if I may, before you attach wings. Since the Sword wings have so little surface to stick to, when I did my T. Mk.5, I inserted two metal rods made from paper clip on one wing and drilled corresponding holes in the other. This allowed me to adjust the dihedral before gluing the wings to the final position, since the paper clip metal can be bent easily. Cheers from Davide7 points
-
Fairly Fulmar now finished and in the gallery. Here are a few more pictures for those interested. Here are a few pictures of the diorama on HMS Illustrious. Many thanks to @Grey Beema for the necessary information on Stan Orr's machine Cheers Colin7 points
-
Thanks Rob We're doing fine around here, and so I hope for you and yours Grazie Massimo, glad you like it Cheers Johnny, much appreciated Thanks Adrian How about an update? Since my last report, I focused on completing the fuselage before fitting the tail planes and the wings. The PE fret provides some antennae and sensors with the corresponding mounting plates, so on I went with them Strips of Oramask tape used here to help with the alignment. PE parts glued with CA; however, as soon as I tried to drill a receiving hole through the two top ones to insert a steel rod acting as antenna (I didn't like the flat bit coming with the PE fret), they came off. So I replaced them (and the side one, which is for a sort of Venturi) with punched out 2mm styrene discs (BTW @CedB : I did check my current yogurt supply, it all comes in PS cups, so I still have that source of provisioning for cheap styrene ) These were from a 0.25mm sheet, so a bit thick for the scale; they looked better after some good sanding down Since they were glued with TET, once cured I had no troubles whatsoever in drilling holes through them; here's a test fit for the still rod I'll be using Now, that sensor/Venturi: it's the PE bit labelled as #5 in next pic which to be honest looked too flat to me; so I discarded it and scratch built a new one using the same steel rod as above, flattened with a hammer, reshaped and with a segment of brass pipe superglued on top I also added CA+flour on its shaft, as you can see, again to avoid that flat look. Once refined, I test fitted it in place Sorry for the blurry pic; I will paint this later and set it aside till the very end of the build Here's another thing for the fuselage: the pitot pipe A very prominent feature on the Lightning, obviously I didn't want to glue it on at this point, because it's sure as hell I'd knock it off multiple times ; still, I didn't want to take the chance of gluing on top of NMF at the end of the build. Plus, I didn't quite like the kit rendition of it, so I decided to scratch build a new one This comes from a 1.1mm brass pipe, tapered towards the tip down to 0.85mm (I reproduced the same diameters of the plastic bit); on the tip, I fitted a segment of thinner brass pipe (I think it was 0.5mm), secured in place with CA. To taper the pipe, I simply put it into my Dremel head and held it against a flat file while spinning, to reach the desired shape and size. I then cut the pitot base and drilled a receiving hole in it so that I could pin the pitot with the usual steel rod and fit it accordingly So I glued the base to the bottom of the fuselage with TET and refined the join with some CA. Here's after the cleanup Last thing for the fuselage: I drilled out the small intake at the base of the tail fin I should have done this earlier on, before fitting the tail fin to the fuselage ... Anyway, I did manage it Before fitting the wings and tail planes, I also wanted to paint the interior of the U/C bays dull aluminium; for this reason, i first airbrushed a coat of primer - my usual Vallejo Grey Primer and Future mix. Masking: Primer on and after airbrushing decanted Tamiya Gloss Aluminium ready for wings now One more little thing done, in the meantime: I glued the turbine faces to the exhaust cans That's it for this progress report, all comments welcome Ciao7 points


.thumb.jpg.0bac681e0da8e4ed7557610e98fda908.jpg)


.thumb.jpg.b4a5069fd2c2dd5708ce1694345c5b11.jpg)


This leaderboard is set to London/GMT+01:00