
Leaderboard


Popular Content
Showing content with the highest reputation on 03/04/20 in all areas
-
Hi all. British Phantoms were always one of my favorite aircraft but never built a kit of one. Finally, I decided the time was right for it. The kit is Revell's rerelease of the Hasegawa FGR.2 kit. For this build I used an Aires resin cokpit and Xtradecal decals to build a 41sqn aircraft. I used AIM-9 Sidewinders from the Meng weapons set and a SUU-23 gunpod from Hasegawa. 41sqn was mainly a recon and ground attck squadron nut, from what I understand, this configuration was used from time to time. I used Gunze Aqueous paints over a black primer from Alclad. Weathering was done with a wash made from Abteilung oilpaints. Thank you for watching.47 points
-
My conversion from Wellington B MK.X to GR MK.XIII based on old Matchbox kit.35 points
-
Hello mates, she took a longer time, my little sweet "Nanette". Starting engines..... Liberator Mk.V, Riders in the Sky 1945, 1946 ,eduard 1:72 Coastal Command heavies: No good sight for any german U-Boot, those extra long range "Seekuh-Jäger". Cheers Tom33 points
-
By John Van Herreweghe Member of Model Club Eeklo Belgium Directly after the end of WW2 in Europe, Berlin had been divided in two halves, one side occupied by Stalin and the other side occupied by the US, Great Britain and France. On the first of April 1948, the Russians decided to block the corridors completely off from the West to Berlin. This restriction was for military and civilian means. In Berlin, 2.1 million Germans tried to survive the hardship in a bombed-out city. Besides that, the garrisons from the US, Great Britain and the France would be cut off from supplies. These circumstances would set off the world’s largest ever air supply operation in the world. It would last from 26 June 1948, until midnight 12th May 1949. It took 266.600 flights, carrying 2,223.000 tons of food, fuel and supplies to keep the city going. At one minute after midnight on 12 May 1949, the blockade was lifted. The recent publication of the book “The Berlin Airlift” by John Grehan (Pen&Sword Books) made me change my diorama setting. It would be dedicated in honor of the Armed Forces that took part in this airlift. The Diorama: Starting point would be the C-54 Skymaster from Revell. Cargo door open, ready to load/unload. Airfix delivered the Autocar Refueller, decorated with Arctic Decals. IBG delivered the Diamond general purpose truck. On the website from Video graphics, I found the Coleman Tow Truck, not quite in the right time frame, but a very powerful model that had to do the job. The figurines came from CMK. The perfectly fitting boarding ladder came from Dan Models, with a Brengun Models toolbox. My base plate was constructed from MDF, sandpaper from the local hardware store made the runway/tarmac. The firm Noch from Germany supplied the grass, to give it some more color. Construction was straight forward. Airbrushing the C-54 was complicated, because of the curves and the large orange frame pieces on the nose, fuselage and tail. The Autocar refueler and the Diamond truck were both a perfect fit. I did not want to go into (dull) olive military colors, but spruced it up with red, yellow (Refueller) and extreme light blue for the USAF Diamond truck. I did not feel qualified enough to paint the figurines, but my fellow club member, from Model Club Eeklo Belgium, Marc De Graeve, was willing to do it for me. So dear readers, you see how important it is, to belong to a model club. You can share your ideas and help each other out. Diorama finished. On the contest table, the base plate is combined with the large engraved text plate “Berlin Air Lift” accompanied by the “Berlin Airlift “ book by the author John Greham. Tags: C-54 Skymaster Revell 04877 New Wave 162 Mask Diamond T968 IBG 72019 Autocar refueller Airfix A6304 Arctic Decals Shell Aviation ARC72-V08 Boarding Ladder Dan Models 72511 Toolbox Brengun BRL 72002 Coleman Tow Truck Video Aviation Coleman MB4 + Tow Bar Xtra Color/Revell enamel paints Onto the next one. I think the HC-130 Hercules from the United States Coast Guard. Also, BIG and colorful. Good health to all of you, Regards, from Belgium John30 points
-
Just a wander through the shelves with De Havilland in mind. All 1/72 except the 1/144 airliners. Airfix Mosquito FB.6 Mosquito B.36 - Matchbox conversion Hornet F.3 - Special Hobby Vampire F.1 CMR resin Vampire F.3 Heller Vampire T.11 CMR Resin Venom NF.3 - Frog Sea Venom conversion Sea Vixen FAW.2 - Frog Heron - Airfix Chipmunk - Airfix Comet 1 - FRsin plastic: Comet 4B - Airfix Trident 2 - Airfix Trident 1C - Airfix Chris30 points
-
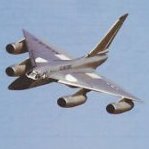
Ladies and Gentlemen, Damen und Herren, Welcome to the unveiling of that monstrosity that has been both a delight and a monumental pain in the backside to me these last 18 monthes. Gawd has it been that long? Time flies when you have beer. But no matter, I have for you today Hph's 1/48 XB-70A. I have dressed it out as it was unveiled in 1964 in Palmdale Ca. I canted to wingtip in the subsonic position detail and corrected the landing gear adding extra bits of piping. and printed better versions of the GE YJ-93 engines. Here the link to the build. I couldn't help but place it next to North Americans Other famous creation a 1/48 P-51D one of the Yoxford boys, Capt. Chuck Yeager. I cut and repositioned the Ailerons on the forward Canards and Cut the tailfeathers at the back so they could be positioned individually. I used a mixture of ground up pastels and a mechanical pencil to highlight the panel lines I had to break up all that white somehow. Also opened up the bypass vents on the bottom. Used very thin rod to simulate the hydraulic hoses. Replaced all the actuators with plastic rod and cut down brads. A mixture of stainless steel highlighted with magnesium for depth. The red Turbine warning markers from thin automotive pinstriping. And of course the 6 YJ-93 engines I 3d printed to get more detail than was offered in the kit. I painted them with a base coat of Model Master Burnt metal, then a light dusting of Alclad II Pale Burnt Metal followed by a highlight coating of Model Master Exhaust. A light buffing with a cloth then a mixture of brown and black pastels ground up and brushed on for aging. The interior of the nacelle was painted with a mixture of Model Master Radome Tan and Light Gull Grey. And there you have it. I hope you will enjoy the completed project and please be kind. Its the first time putting one of these up for all to pick at. As for me, once I find my beer.... where did you go.. There you are my beauty! Once I finish this then its back to that other big Magnesium Overcast soon to be profiled here. Thanks for viewing.26 points
-
A tribute to the pilots and ground crews of the RAF during the Battle of Britain. Depicting 601Sqn pilot P/O Billy FISKE (US) and 602Sqn fighter Ace P/O Osgood Hanbury with sound and movement from Magic Scale Modeling. 2020 is the 80th anniversary where the RAF made its mark as the world’s finest air force having faced overwhelming odds against the Luftwaffe. The history of the bravery of the men and women in the air and ground is well documented. As a founder member of the Tangmere Sector Modellers IPMS who are based at the Tangmere Military Aviation Museum which is located on the site of one of the most famous Battle of Britain RAF bases and squadrons. This diorama is to honour two of those squadrons, one based at Tangmere and the other at RAF Westhampnett (now Goodwood) which was within the Tangmere sector of operations and in particular two pilots one of whom was the first American ‘eagle’ pilot to be killed in the battle. The Hawker Hurricane is from the Airfix Ready for Battle set, along with the figures and equipment. Supplemented by Revell RAF ground personnel set. The Spitfire is the new too Tamiya and the Hangar is from Large Scale Models.26 points
-
Douglas F4D-1 Skyray VF-23, USS Hancock, 1958 I set out to make one of these: From one of these: I came across this old UPC Skyray kit at the Heathrow Aviation Collector’s Fair last year and couldn’t resist it for only £8. I wasn’t really after a Skyray and anyway if I really wanted one in this sort of size I would have bought the Tamiya kit. I usually build in 1/72 and I had already restored an old Airfix Skyray in the smaller scale: Such is the power of nostalgia. I remember UPC kits from the 60s when I had the F-86D and F-104G in 1/50th, both with retracting undercarriages, engines and various working features. Not sure how old this kit was but note that the box top says F-6A rather than F4D-1, which means it must have been after 1962, but probably not long after. My aim in building this was just to knock it together as a nostalgia thing, keeping the working features as well. This one didn’t have retracting wheels, but did have a hinged hatch through which the engine could be viewed! But it doesn’t work like that does it? You know what it’s like – you really can’t put up with big gaps and ill-fitting bits – so I set about it with knife, file, Milliput, wet n dry and scriber and before I knew it I was trying to make it look like a ‘proper’ model. For example, the kit’s nose was of the Skyray prototype, i.e. far too small for a production aircraft, so on went a large dollop of Milliput, etc, etc. I should have known that the kit’s decals would be a joke – and they were, so thankyou Microscale for your 1/48th Skyray decals. The nose gear was scratch built as the kit's item bore no relationship at all to a Skyray. The drop tanks and the pilot (I have to admit the cockpit interior is little more than a black space with a pilot to fill it) came from a Monogram 1/48th AV-8B Harrier kit. This shows the state of it on the workbench when I was fitting final bits and pieces : So here is the result of much filling, sanding and scribing. It’s Light Gull Grey over White US Navy, so what’s not to like?23 points
-
Morning all, Number six for the year is the superb new Bucc from Airfix. Built for the Navy GB, details of which can be found here 1/72 Airfix Blackburn Buccaneer S2C by Shaun Schofield, on Flickr 1/72 Airfix Blackburn Buccaneer S2C by Shaun Schofield, on Flickr 1/72 Airfix Blackburn Buccaneer S2C by Shaun Schofield, on Flickr 1/72 Airfix Blackburn Buccaneer S2C by Shaun Schofield, on Flickr 1/72 Airfix Blackburn Buccaneer S2C by Shaun Schofield, on Flickr Thanks for looking, comments welcomed Shaun22 points
-
Hi Guys, Darn, this kit was very basic and very crude. There were lots of sanding, filling and pin marks however, it was fun tackling them as I had free times due to lockdown. I did some basic riveting to add that subtle details, and for painting, it was bit mix and match and eyeball with the aircraft ref. While building I lost a pair of R-33 if anyone has a spare please do let me know. I did some weathering soft pastel and airbrushing brown over grey. So here it, thank you for looking, cheers Many thanks21 points
-
This was a candidate for a mission that never materialized, built in small numbers by Bell Aircraft before the P-39. The designation was FM for fighter multiplace, but like the Me-110 and others it was too heavy and not maneuverable enough to be useful as a fighter. The Valom kit is not the best for fit, the best part is oddly the clear parts. The basic plastic has finely done surface detail but is soft and uneven in thickness. Glad to have a a YFM-1B in my display case, but I could have spent a couple months instead of a couple of weeks building it. It is one of those kits that you probably should build two of, one to learn how and the second to get the best result. The exhaust was corrected, the kit had identical piping on both sides but it should have had just collectors on the inside with a crossover inside the cowl and an outlet only on the outside. The collectors should be tapered, not constant diameter from front to back. Lots of melted sprue and various fillers were sacrificed to this one. I just noticed I forgot the pitot tubes on each wing tip. I'll fix it with music wire. The Airfix 1/72 Mustang was finished along side it, a nice little kit though the landing gear needed straightening and careful attaching.21 points
-
Hello fellow modellers, this is my third "MF" from Eduard, this time built in Czech / Czechoslovak AF most usual colours. I guess all has been already said about this beautiful kit, so just briefly: built from Royal Class issue with HGW Wet Transfer stencilling and Brassin UB-16 rocket launchers. Cheers and stay all healthy, Libor21 points
-
Hello everyone Here's a few shots of my recently completed Eduard 1/72 F6F-5 Hellcat. It's built out of the box, in the markings of VF-83 on USS ESSEX. Photos of the real thing show it a bit grubbier than this and my weathering is rather too subtle, but I was quite pleased with how it came out. Prop blur was done by flicking it by hand just before the shutter closed! Thanks for looking and best wishes to all at this very difficult time. Ian Don't get too close!20 points
-
This was a quick and painless build, using the markings of the Lt. Bob Goebel of the 308th Ftr Sqdn, 31st Ftr Gp, using Eagle Strike decals which worked just fine. Alclad II ALC 101 Aluminum with Tamiya and Model Master details. The main landing gear struts were a bit warped but straightened OK.18 points
-
This is my third corona build. I am still working hard to reduce my stash substancially, this time its Dragon`s Ju88. Markings are from the kit. I first applied the standard camo pattern of 76/75, then the decals and finally the darker 83 (my assumption, but it could also have been 74), just as the original aircraft would have been painted. I tried to follow the photo that you can find on the web, the a/c took part in Operation Gisela. Thanks for looking Volker16 points
-
Hi all, This is my attempt at this little kit. I had a few problems along the way but persevered with it. The kit went together ok with only minor filling needed, and with that had to redo some of the panel lines across the nose and along the top of the fuselage, which I have not done before and am quite pleased with. Then after that I had an issue where when I was spaying the top coat, for some reason I would see the undercoat come through, even after a few coats and can still be seen mostly on the underside, hence the rubbish paint job. I masked and painted the yellow band around the body as I didnt want to mess about trying to match the paint to the decal for the other yellow parts and still got the shade wrong haha. I did notice that when looking at reference pics of the real plane that airfix have missed a few details out like the probe like things(forgive my ignorance) on the underside of the wings and some ports on the top of the fuselage just behind the canopy. The Nav lights are moulded as well so had to try and paint those on as best I could. Then came the final coat. I wanted it to look like as it does in all the reference pics I've seen, nice and clean with a nice amount of shine. I put final coat of klear on it, thought it was too much so had the bright idea to put a thin coat of w&n galleria matt coat on, with a brush!. Bad move it went dead flat. So I've now put a couple of coats of vallejo satin on and it's the best I think I can do. Still learning and still having fun with it and it'll fit in with the rest of the fleet. Any sugestions and comments welcome and also if anyone knows how to get the marks off of the canopy from the tape I'd love to hear them. The canopy was dipped and dried for 2 days before I maked and painted. Stay safe people!.15 points
-
I completed the Tamiya Swordfish Mk.II last year, kit number 61009. Only aftermarket was their photo-etch set which included the bracing wires. The kit itself is great and allows you to fold the wings. At first I thought of folding both of them but then it is hard to visualize the wingspan so only did one. The photo-etch bracing wires are hard to work with and temperamental, the slightest movement and they come loose so it was a chore getting them in place during the build process. But still an excellent kit, maybe one of their best!15 points
-
First application of camouflage is finished. The paint used is from Colourcoats, Dark Slate Grey and Extra Dark Sea Grey, applied in a free-hand pattern. There is a bit of clean-up still required, and I think I need to make some adjustment to the pattern (as I forgot about the flaps when I was spraying). So this is not the final - I just wanted to put up a post that showed I was doing something! I used my ancient Paasche Model H with the #3 needle, and I'll be going back with the #1 needle to tighten up the edges. Then I'll mask off the bottom and shoot some Sky. I really like these colours - I think they represent DSG/EDSG better than other brands. The aircraft I'm modelling is from 1947, so I wouldn't think it would be weathered much, which is fine with me. Anyway, there she is for now. Off to the Mauler. Cheers, Bill15 points
-
Let the whistle blow on this build - I've been accumulating pieces for some months. There's still not a dedicated etch set though White Ensign Models have heavily hinted. There are however, sets for HMS Cornwall that she shared most characteristics with. This Family of 13 Cruisers were built in the 1920's under the limits of The Washington Naval Treaty 1922, with an upper weight limit of 10,000 tons. HMS Kent was launched in 1926 and spent the pre war years largely on the China Station. She diiffered from others such as HMS Berwick and Cornwall with never having a seaplane hangar built due to weight limitation. A major refi tin 1937/8 saw her fitted with a Walrus capable Catapult and Trumpeter present her largely in this guise with a minor upgrade seeing 6-7 20mm Oerlikons fitted in 1941, being encompassed. 1941/2 saw her operate out of Scapa Flow and largely take part in Arctic convoy duties. She is well represented in photographs from that time period - largely from the Imperial war Musuem Collection, and is portrayed in Camouflage typical of that period. References will include the following - but if anyone can direct me to further - I'd be indebted The kit box features attracive cover art and is suitably voluminous. Aftermarket goodies iclude most of the following with more to come (Sadly Micromaster.co.nz operatiosn are currently suspended due to CV19 Lockdown) Kit instructions are B&W line drawn With an attractive and broadly helpful Colour profile though I'm well aware of Trumpeter's lack of accuracy with suggested colour schemes! There is an excellent on line resource WW2 Cruisers and Battleships with some extremely attractive Colour profiles from Mr Eric Leon. I have permsiion from Mike at the site to share the 1941 profile. Please check the site out for other very interesting schemes including those for HMS Kent before and after 1941. I am very grateful to the site and Mr Leon I'm broadly happy that she is painted in 507c (very light) with MS1 (darkest) mid hull patches that that are themselves surrounded by B5/15 (lightish in some of the original photos). She has unequicovally dark painted decks that I take to be the Sovereign equivalent of NARN 2 The only real issue for me is what colour is portrayed at bow and stern. It's darker than the B15 but lighter than deck or MS1. This leaves MS2, 507A or possibly MS3? Mr Leon opts for MS2 though this has very little contrast with MS1 Any thoughts Jamie or Richard? Here are the original pictures...all gratefully attributed to and with sincere Thanks to the Imperial War Museum Collection And aren't they beautiful pictures! My feeling is that bow and stern is Not MS2 but most likely 507C and possibly MS3 which would give the greatest contrast with the mid hull MS1/B5. So here's what the Hull looks like I applaud the protective wrapping that Trumpeter use And to get an idea of size there's little HMS Anchusa next to it (Still 1/350) The model will be mounted on plinths - and I anticipate no obvious build problems or need to scratch along the way. The Micromaster parts will suitably "pimp" it up. Weathering will be light to moderate. The Hull painting will come first which is why I'm keen to get a paint plan in my mind. As ever thanks for looking Rob13 points
-
Hello all, Here is my recently completed 1/48 Tamiya F-14D Tomcat, in the markings of VF-31 'Tomcatters' during their last cruise with the 'cat in 2005/6. The build thread is here Marked as BuNo 164603, which was the second to last F-14 built, being delivered to VF-124 'Gunfighters' in May 1992. The jet was assigned to VF-2 'Bounty Hunters' in 1993 before being transferred to VF-213 'Black Lions' in 1997. During her tenure with the latter, the jet led the first manned strike missions into Afghanistan during Operation 'Enduring Freedom' on 7th October 2001. The following year, the jet was transferred to VF-101 'Grim Reapers', remaining there until summer 2003 when it was acquired by VF-31 and marked as 'Felix 101', completing a further 2 cruises with the 'Tomcatters.' The jet was the last US Navy F-14 to fly, when on 4th October 2006 it flew from NAS Oceana to Farmingdale, New York before eventually becoming a memorial at the Grumman factory in Bethpage, New York. Extras used included Fightertown decals, Quickboost seat, Eduard canopy mirrors and a Master brass pitot tube. Paints are from MRP and weathered with a mixture of Flory models wash, Mig Ammo oils and dry brushing. The Tamiya kit is an absolute joy to build. I didn't add too much weathering to the wing sweep area as it will be displayed with the wings folded up, but here's a couple with wings forward: On my trusty carrier display base: With my VF-213 jet, also from the last cruise: Thanks for looking. Cheers Dave13 points
-
Good evening mates, I hadn't posted any topic dedicated to the Gannet Ifinished recently in this section yet, thus here I am,so you may have the full picture of the actual statusof my project dedicated to the aircraft onboard Ark Royal during her last deployment. This is the kit. The kit included the resin operators' pit. To the wheel bays I added various details from scratch. By the way the main intervention on this kit was the modification to the wings to represent them folded. Here a few pictures of the process. Now some pictures of the finished model. And finally a couple of pictures with the Buccaneer,part of the same project. For who may be interested, here you can see the wip. Here the topic of the Wessex,part of the same project And here the link to the topic of the Buccaneer Thanks for watching. Stay safe Massimo12 points
-
Hi Guys After being away from for a good few months and not being able to do any modelling I finally started scratch building this F-80C and recently managed to finish it ...what with having more time on my hands, now we are all self isolating in these trying times! I really like the late 40/50s jet era and decided to have a go at scratch building this Shooting Star in 1:48 scale. The P/F-80 was the first operational Jet aircraft used by the United States Air Force in combat...although too late for the Second World War it was used extensively during the Korean War. The markings are of the F-80C that is housed in the National Museum of the United States Air Force in Dayton.Ohio. For anyone who is interested the construction of this model can be seen in WIP on this forum. I made this Shooting Star from a balsa wood construction and card and skinned her with sticky back silver foil. I hope you like the finished model....... I don't normally scratch build jets as I find them difficult to do! ....but I did enjoy the challenge never the less! Thanks a lot for having peep! Stay safe everyone Fozzy12 points
-
This is the very old Airfix kit of the fabulous Battle of Britain fighter, the Hurricane. V6799 was flown by P/O K. Mackenzie from RAF Kenley. In October of 1940 he shot down an Me109 before tipping over another with his wingtip having run out of ammo. He then belly landed the Hurricane in a field! Built oob, with just a tiny bit of scratchbuild in the cockpit and the E-z line wire for the aerial. Huge thanks to @mackem01 for the decals! The old kit ones were cracked and unusable.12 points
-
Here's my attempt at the 1/24 Hellcat by Airfix. Apologies for the photos but as you'd expect this is a big beast so it's very difficult to get the whole thing in shot. It's built out of the box except for a set of HGW seatbelts and some in-wing resin fuel tanks (to avoid seeing empty space inside the wings when looking up through the undercarriage) and a resin engine core, both from Nigel's Modelling Bench. I've built it so that the upper and bottom engine panels are removable so as to see all that lovely detail that Airfix have included. If you're wondering how the unattached panels in front of the cockpit are able to stay in place you can see the complex technical solution I devised in the last photo. I really enjoyed building this kit and the detail that airfix have incorporated is amazing. I didn't use any filler other than to fix a few sink marks in a small number of parts and to smooth the joints on the propeller blades. I did a brief work-in-progress report of the latter stages of the build here: Thanks for looking....stay safe, keep calm....and build models! Next on the bench for me is Trumpeter's 1/32 A-7E Corsair11 points
-
Well, I enjoyed that! In my opinion a lovely little model which is simple to build and certainly (to me ) seems to look the part. Built as per the instructions except for some odd little details like the removal of the wingtip lights, rudder tail light and some wire for the underwing aileron actuators. I also thinned down the rear of the engine panels too. Added extras were some seatbelts from Eduard, control wires using Aeroclub thread and (a must I think) the new SBS set of rigging wires. These are excellent and easy to fit. Just remember to prepare and drill all the holes first, which are actually very finely marked on the model anyway. I've also tried to incorporate Adrians details he mentions in the Warpaint book to represent the original 1932 version as best I can with my limited references (not the Shuttleworth one). This just involved using the tailplane without the anti spin strakes, removing the nav lights, refining the colour scheme and modifying the roundels.( Although I think they're still a little dark.) I couldn't change the size of the serial number as I haven't anything appropriate. I certainly look forward to building another one, this time a 10FTS one out of Yatesbury as per the front cover of Stuart Mackays book. Complete with the blind flying hood (included in the kit BTW) all I need are some decals. Hopefully someone will also do a very delicate cockpit set for it too? Anyway, thanks for looking and go and buy one....or two.... 20200331_191047 20200331_191108 20200331_191131 20200331_191157 20200331_19122011 points
-
Hawker Sea Fury FB.11 VW225/ 117 of 817 Squadron, Royal Canadian Navy, June, 1953.11 points
-
So, where was I? Ah, yes, the Martin Mauler. She's up on her legs, and I've added the carburettor air intake above the cowling. I elected not to use the white metal main gear legs, as they are quite literally softer and more flexible than the resin legs. Now, speaking about the cowling - due to the way the exhausts are installed, I've elected to not add the cowling onto the model until much later. Otherwise, it would be more difficult to mask the exhausts when the overall Dark Sea Blue goes on. Accordingly, I think I've sanded and shaped both the fuselage and cowling so that there should not be any seams that look different than a panel line. Ha! Famous last words. I added the engine face to the cowling, but frankly almost none of it will be visible once the prop and spinner go on. The two round intake screens below the engine will be about all you'll be able to see. The inside of the cowling is painted Zinc Chromate Green in the unlikely event that it can be seen near the exhausts. As I think I mentioned before, the front face is somewhat smaller than the cowling: But, on the eighth day God created putty, and I shall put it to good use. The photos that I have seem to indicate that the inside of the front face is Dark Sea Blue, so I suspect that will need to be painted before I glue it to the cowling. I've decided the armament will be the three large aerial torpedoes, which when painted yellow and red will make a nice contrast with the blue aircraft. Stay safe out there. Peace, love, and the Beatles. Cheers, Bill11 points
-
Tamiya’s Panzer 38(t) in 1/35 scale. Great little enjoyable kit to build. Went together in a couple of night stress free. Normally like to buy some resin figures but liked the pose of the kit supplied one and looked good for a plastic figure. Used Mr Hobby modulation set and weathered with oils and pigments. Thanks for looking.10 points
-
I just finished this Project -4x PZL P.7a from Arma Hobby. Kit is nice, panel lines are a bit to wide and to shallow, so I decided not to use wash. First is Lt. E. Kawnik from 123 Fighter Squadron from 2nd Air Regiment Krakow. September 1939 part of Parsuit Brigade near Warszawa. Kawnig got a confirmed kill. Second is Aircraft of commander of III/4 Fighter Wing from Torun, Capt. Leopold Pamula. Plain had markings of 141 Fighter Squadron 1933. Third is P.7a from 162 Fighter Squadron of 6th Air Regiment Lwow 1938 Fourth and last so far is plane from the Chif Commander of Polish Air Forces Gen.L. Rayski - 1933. Decals Techmod.10 points
-
"Pretty in Pink" (Well I had to get that in - didn't I ) I love colour and this is just suuuch a Funky shade There have been a variety of interpretations of this on the web. Who knows? it must have been pretty barmey at the time - Lord knows what the crew thought the scrubbly bits are where I've gently sanded. And Thank you @Ex-FAAWAFU Crisp And here in Lockdown I thoroughly recommend "One man and 2 Guvnors" screened by the National Theatre on You Tube at 19.00 yesterday but available for the next 6 days. Starring James Corden in his break-through role (after Smithy in G&S) I cried with laughter - Treat yourself - check it out And I see that the Globe are screening past perfromance free from April 6th. Damn these interruptions to the plastic puttering! Rob10 points
-
Thanks Johnny - even nicer now it's finished I hope: I painted up some of the wires with Vellejo Yellow and Tamiya Metallic Bronze - put some more washes down just to tone down some the shininess is places. I'm quite pleased with how this came out - really the quality is in the resin by Aires - It was worth the work to get to this point - hopefully it looks good under that wing I can now turn my attention to the actual kit - work on the cockpit will start shortly... Cheers John10 points
-
1/48 Tamiya F-14D Tomcat BuNo 164603 VF-31 'Tomcatters' Last Cruise 2005-2006 Build thread here Cheers Dave10 points
-
The F-16/79 was designed as a reduced-capability low-cost export-version of the F-16A/B designed for use with the General Electric J79 turbojet engine. Most noticeable is the extended exhaust nozzle for the J79 engine and the redesigned jet intake. I started this model during a modelling weekend in England (I live in Norway) some 4-5 years ago. The kit is basically the Hasegawa F-16B, with various modifications. The exhaust nozzle came from an Aires (I think) engine for the F-104S, while the engine extension was made by sanding down the kit's F100 nozzle. Most time was spent with the jet intake, extending the upper lip and building up a new interior trunk. I used a resin cockpit fir the F-16B (again from Aires) and two Quickboost S-III-S seats designed for the AV-8B. The nose probe came from a Master set for the F-16XL. Two pilots were modified from various Hasegawa and Tamiya pilot parts. Decals are from Vingtor (which I designed myself .....).9 points
-
Hi All, So I was drumming my fingers waiting for the new Airfix Tiger, already done the Albion Refueller for it and knew it would be here shortly so didnt want to do anything too complicated till it arrived (it has now - hurrah!) so I rummaged in the stash and found one of these little airliner kits which were free gifts in Kelloggs Cornflake packets in the 80s - I think they were tooled by Rosebud or Rareplanes, anyway I'd already done the Short Empire and the AW Atalanta so I thought I'd do their TriStar but convert it to an RAF K.1 Tanker. Went together nicely with very delicate undercarriage, fit was as you expect for a push together throwaway toy but some Mr Surfacer and PPP sorted it. I drilled out the engines and painted the engine silver and the insides white then hit it with Humbrol Ocean Grey which isnt too bad scale effect wise. The wings on a TriStar are a nightmare to paint so I compromised by spraying the whole thing silver then handpainting the wings and adding some really really thin black decal strip - actually the only thing I could find small enough were the 'barrier' lines between options on an Airfix Lanc decal sheet! Even the zigzag cheat line is there though you can't see it in the photo...hadnt any RAF titles the right size obviously so I used some scrap decals which amazingly are legible under magnification (I didnt know that til I took the photos) not sure what scale she is - I suspect at least 1/400...maybe smaller Great fun - though this may be a psychiatric cry for help... Safe safe everyone! TT 8F4F266F-2E4D-4EAD-9CC4-02A1C06BFEC6 by Ben Brown, on Flickr A08ECE1F-852E-4C0E-BCFA-6051DDBB9012 by Ben Brown, on Flickr 73580268-21C6-47DF-BB53-61EE13DC138C by Ben Brown, on Flickr 8F143C90-ED3C-40A2-B971-B2EE6CBDA904 by Ben Brown, on Flickr9 points
-
Gallery of the completed Lockheed F-104G Starfighter model from the Matchbox scale 1/72. The model has been thoroughly renovated and rebuilt completely in the new painting of the Vikings aerobatic team of the German Navy MFG-2. The model received a new cabin cover, cockpit made from scratch, hatch of the front chassis and supplemented with on-board installation cables. Welcome to the gallery of the finished model.9 points
-
Thanks John Thanks Phil I'm hoping this is the only troublesome part (see below) Thanks Johnny Well, I got one pair glued in with the flap slightly open to give me something to grip with the tweezers: But when I glued in the exhausts they don't look right: Nice to see other have had the same problem, like Ventsislav in his build and Shellie, who found it extremely fiddly. Bit of a mojo dampener but I will persevere. In other news, MiL is now up and connected on her laptop. Mrs B had to go over again and shut her in the bathroom while we FaceTimed to try and find the issue. It was the hub. It was plugged in, but not turned on. Reminded me of the this Fawlty Towers episode: (If you have time, watch the whole clip - hilarious, and it has Polly!)9 points
-
Happy Birthday Royal Air Force Today is the 102nd Anniversary of the formation of the Royal Air Force. Two years ago - to the day - I started building this model of an Avro 504K. My intention was to mark the centenary of the Royal Air Force's formation by building an example of an important aircraft that had served in the RNAS, RFC, RAF and many of the commonwealth air arms that followed. It's just as well I remembered the commonwealth because it turns out there's a very good chance that in 1918 this particular airframe was actually in service with the AFC (Australian Flying Corps) and not the RAF at all. This, despite my strong attachment to Australia, was not my intention. It seems a dodgy reference book might have let me down there, but that does not matter to me really, I still think that this model of an Avro 504 fits the original purpose. I finished the model yesterday and in doing so completed the project just one day inside a self-imposed deadline of two years. This project is, by far, the most challenging and technically difficult model I have ever attempted. It's 100% scratchbuilt, mostly from wood but with significant amounts of brass and plastic. There are no purchased parts at all (well actually there's one tiny kitset piece scavenged off a Tamiya kettenkraft) so everything you see is hand made. There is no 3D printing used. It's mostly done the old fashioned way of solid model building with the fashioning of all of the large parts starting by running a bit of wood through a bandsaw. I'm an old fashioned kind of dude at heart and gain a certain satisfaction from the belief that I'm keeping some old-time skills alive in this nutty modern world. If you would like to have a look at how this model was put together, please click on this link... The project is not completely finished just yet. Sadly, right now, there's a silver plaque sitting in an engraving shop in Perth reading 'Avro 504K, RNAS, RFC, RAF' but I can't go and get it because that journey into town is not deemed essential. When next I can get into town, I'll pick the plaque up and attach it to the side of the display base's frame and then this project will be wrapped up for good. This build has made me extend my skills in many different areas and I believe I come out of the experience a better modeller; more confident than I was that I can handle technically challenging subjects. I'm not lining up to do a biplane any time soon but I won't rule out doing something like this again some time. For now however, I already have some research into the SS Xantho happening on the maritime pages and if you want to see some more Bandsaw action very soon, keep your eyes peeled in the military section. I've got something starting up in there that's about as far away from a WW1 biplane as can be imagined. Anyway - enough of that. There's not much left to do except thank everyone who commented, suggested or contributed to the Avro 504 WIP thread in any way at all. I fear I'm actually a bit vain and always get a small kick out of scoring a 'like' or a 'happy face' and watching my 'reputation tally' go up. Without the ongoing interest and support of the Britmodeller community I am unsure that I would have bought this to a conclusion. So thank you everyone, including the mods and admins and tech folk who make the site run and keep this a great spot to hang out. Here's some photos - I hope you enjoy them. Best Regards, Bandsaw Steve8 points
-
Hi guys, Heller kit out of the box- a very good one except those horrible rubber tracks. Free French 2nd armored division, 12th Cuirassiers. Gunze paints, Tamiya weathering sets, decals from the box. Thanks for looking.8 points
-
Since picking up the 21 and 23 I wanted to build something a lot more simply as a way to practice again, been a while since I've build an aircraft. So I picked up two kits, the first this MIG-15. I started it with the intention of creating a WIP, but built fairly quickly and forgot! The build was ok, I don't understand why they get you to build the engine as it cannot be seen, so it was built without pain. There were some fit issues, nothing too major. I've made an attempt to 'dirty' as much as I could, didn't apply any scratch effects this time, that might carry on to the rest of the MIG builds. I did think about creating a RFI for all once complete. Next will be the 17, which I've already started. I had to use liquid mask, not a great job, but it will do.8 points
-
Thanks Terry. I've since added some watered down gator Grip to fill in the hollows under some of the PE. It's impossible to bend it exactly to shape, and that should stop the shadows! I barely scraped by Keith! Thanks Ced. I have used Rhino for designing some parts for printing and it's not too dissimilar. As you say, the tutorials are a huge help and they were what enabled me to do what I did. I did find that sometimes the nodes wanted to scoot across to the other side path which made it awkward to fine tune the parallel lines. In the end I did away with the second line and widened the path to print as the thick red line. Much easier! Cheers Stuart! A slow couple of days yesterday and today as far as the amount of work done on this, but progress is being made. Yesterday I fitted the lower wings, using gators Grip to give me time to adjust them. Needless to say that was pretty much it for the day as I wanted to be sure they were properly set before doing any more. This morning PPP was applied over the pins and sanded down. Of course there's only one way to be sure that it doesn't need more work so...back into the paint booth! I gave the wings, ailerons and tail surfaces a coat of Tamiya white. While that was drying I decided to test my eyesight and assemble the engine. It's small! All 9 cylinders were successfully removed from the pour frames, a task not made any easier by the fact that in between the cylinders are the spark plugs (yes, you read right!) and there are only 2 spares! It's almost impossible to get a fine saw in without knocking the plugs off, so I used a number 11 blade and scored either side then they snapped off easily. Phew! Cylinders and spark plugs added Of course it would have been much easier to paint it first... bugger! Anyway, it now has a coat of Tamiya gloss black in preparation for Xtreme metal aluminium/steel tomorrow, then I can fit the rocker arms and puch rods. The rods are also supplied but they are so ridiculously thin that the last one of these I built I didn't manage to get one single push rod off without breaking it. I'll use nickel silver rod! In fact the kit I received has 4 sets of rocker arms/push rods just to provide the 9 push rods needed, the others are missing or broken! Fair play to Small Stuff for that! Well that's it for tonight folks, stay safe and thanks for looking in! Ian8 points
-
Cheers Jes8 points
-
Airfix 1/72 Blackburn Buccaneer S2C. 736 Squadron, RNAS Lossiemouth The build thread can be found here 1/72 Airfix Blackburn Buccaneer S2C by Shaun Schofield, on Flickr 1/72 Airfix Blackburn Buccaneer S2C by Shaun Schofield, on Flickr 1/72 Airfix Blackburn Buccaneer S2C by Shaun Schofield, on Flickr 1/72 Airfix Blackburn Buccaneer S2C by Shaun Schofield, on Flickr 1/72 Airfix Blackburn Buccaneer S2C by Shaun Schofield, on Flickr8 points
-
Fresh news: https://www.facebook.com/EduardCompany/posts/3359105404104383 And : https://www.facebook.com/pg/EduardCompany/photos/?tab=album&album_id=3359104984104425&ref=page_internal V.P.8 points
-
Finished this last night. The Airfix 1/72 Blackburn Buccaneer S.2C with a few mods backdating it to an early production model S.2 . I used the Freightdog wing ECM pods and backdated the airbrake as the kit part depicts a later version with a thicker and larger reinforcing plate. Decals by Xtradecal. Paints used were Tamiya White, Humbrol Acrylic Extra Dark Sea Grey and White Ensign Light Admiralty Grey for the undercarriage bays, legs and hubs. Molotow Liquid Chrome was used for the intake lips and pitot tube. Enjoy.7 points
-
7 points
-
Hi, I'm on a bit of a BoB kick during our lockdown, here in sunny AZ. The whole photo album is here; https://photos.app.goo.gl/pVxL6xq2z6MyBP7g7 The day our LHS, Andy's Hobby Headquarters was forced to close I stopped in for supplies and noticed the ICM He 111H-3 on the shelf. I have the Xtradecal X48087 Battle Of Britain sheet, and have used it on a Bf 109 and in progress a Bf 110 and a Stuka, so I bought the HE 111. That'll get me my money's worth out of the Xtradecal sheet :). Started the kit on Tuesday. It is very nice. good internal detail, to which I added my own scratched seat belts and cushions(!). I have a couple of questions, if anyone could answer, that would be nice. Google images didn't really help me with these. I painted the little balls under the mgs a 'canvas' type colour. would that be about right? were they some type of bag? How did the crew enter the aircraft? There doesn't seem an obvious hatch on the undersides for me to open? The aircraft depicted (A1+BT) has the three bands on the wing and fin, and I've always seen these given as white. Xtradecal has them in pink(!). Can anyone comment on that? Here is where I am so far, about to button up the fuselage.7 points
-
The Snark am experimental triplane using the ill fated ABC Dragonfly engine. Three machines were built this is the third prototype. Side by side with my scratch built Pfalz Dr1, imagine if these two had seen service. With my scratchbuilt Pup, surprisingly big for a triplane. The WIP thread.7 points
-
Another rescue job whilst I'm waiting to move house. I bought it of ebay UK already built but tatty. Body, seats,dash loose and a front wheel/axle end broken off in transit. First a warm soapy wash, take all apart, clean, rebuild, hey presto!7 points
-
Very nice kit from IBG, with PE-Parts. I replaced the glass part against a from ARMAHOBBY P.7a. Kit part is to thick.7 points
-
Hi folks, I am adding some of the running rigging to the sails before attaching the yards to the masts. Some rigging is embossed on the sails and so I have overlaid these with brown 0.2mm fishing line..... Work started by putting some dots of Micro Industries Liquitape onto the sails where the rigging terminates..... This particular rigging is for the martnets that were for gathering up the sail. In those days the yard was lowered to furl the sail, rather than having crew aloft on yard footropes hauling the sail up. Martnets were in use up to 1650 and there was an earlier and later arrangement. The design embossed on the sail has a series of bridles connecting to a hauling rope via a single block and this seems correct for the period. A later arrangement had the bridles connecting to a number of blocks and this is depicted on the Airfix box art. The martnets are on each side of the sail and front and back. The fishing line was cut to length for four bridles at a time: two on one side and two on the other. The ends were poked into the tacky Liquitape to hold it into position. The line was set roughly in the right direction but no Liquitape was used to hold that other end.... The line was fixed in place using acrylic varnish applied by a Microbrush.... It was possible to coax the line to follow the curve of embossed lines. I let these dry before continuing to the next set of four. Once all was done, the hauling part of the line was added in the same way but using a slightly heavier weight of fishing line. Here is a view of the front of the sail (the blocks have yet to be added).... You can also see two lines running down the sail and these are buntlines, again associated with furling of the sail. Their bottom ends have yet to be attached to the sail. That completes the front of the sail but some further additions are needed to the rear. The top gallant sails are complete. Here is a view of the front and again you can see a pair of buntlines running down the middle. However, the sides of the sail have leechlines to gather in the sides of the sail during furling, rather than martnets... Clew lines have been added to the rear of the top gallant sails. These gather up the corners of the sail for furling and on my model are elastic thread coloured using a Magic Marker..... many thanks for reading and your interest, Pat7 points


.thumb.jpg.b4a5069fd2c2dd5708ce1694345c5b11.jpg)


.thumb.JPG.2ce06c4ff2300a5faba93aaeacbdab25.JPG)


.thumb.jpeg.512869d47e412449d69d30d0295c1ae8.jpeg)


This leaderboard is set to London/GMT+01:00