
Leaderboard


Popular Content
Showing content with the highest reputation on 28/03/20 in all areas
-
Hello My newest creation. Effect of quarantine. Enjoy. As the last I guess most iconic British planes form WW2. (Spitfire its Eduard production) Cheers Mike38 points
-
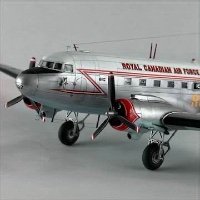
Douglas DC-5 1/144 KLM, Dutch East Indies (now Indonesia), 1940 (Still can't work out how to centralise photos!) I realised a while ago that amongst the stash and completed models I had the potential to do all the Douglas Commercials in 1/144 scale except for that elusive DC-5 (and perhaps the DC-1 but I’m hoping that’s near enough to a DC-2). FRsin do a kit, but my last experience of their resins (a Handley Page Hermes) was such that I don’t want to go there again. However, having bought the Roden DC-3 and realised it was much better than the Minicraft kit that was in the stash, I wondered whether I could use the Minicraft DC-3 as a basis for a DC-5. Initially I thought I would just use the engines and props and scratch the rest, but then I started to look at chopping up the wings and using them, and eventually the fuselage as well. I cut the wing fairings out and filled the huge gaps with strips of sprue covered with Milliput. I drilled a hole through the top of the fuselage and put a wing spar in place from aluminium tubing, then attached the chopped up wings, etc etc. Huge amounts of Milliput and sanding later I had something that was just about usable. The fin and tailplane were from plasticard (it’s a pity nobody does a 1/144 scale A-20 because the back end of the DC-5 looks just like a Havoc) Undercarriage was from aluminium tube and brass wire with wheels from the spares box. My plan was to hand paint the markings but in the end I cheated and used decals from the FRsin kit. In the end it looked something like a DC-5. I think the fuselage should be a bit fatter and it’s all a bit of an approximation in places but it should look OK from a distance between the DC-4 and DC-6 in the line up. Still got the 1,2 and 3 to build before that though. Chris25 points
-
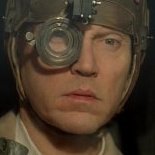
Hi all, here my ne ICM A-26B Invader in 1:48. Nice kit with some fit problems on the nose cone and engines. Add some Eduard PE´s and Master guns. Decals are OOB and have a pretty good quality25 points
-
Hello again, lads, it's time for another offering from Uncle Pete's Emporium of Questionable Plastic Things. I'd found this Revell Halifax in a charity shop for four quid but discovered upon opening the box it had neither instructions nor decals. Instructions in this day and age of the internet are easy to come by but decals, not so much so I thought if I had to make decals anyway, why not be adventurous. My lovely missus is very patient with my hobby and although she's firmly of the opinion it's proof positive I should be carried off to weave baskets instead she puts up with it so I decided to do one in her honour. The Halifax was built round about the year of her birth so it was a suitable base kit. The airline, of course, bears her name and the tail flash of a Liver Bird speaks of her Liverpool roots. That poetic thing in the background has no significance, by the way, it just happened to be in the spot where I could crouch to get the camera angle and still have a reasonable shot at getting up again. (It came with the house). The colour scheme was a no-brainer... Blue and white for Everton. (Don't mention those red scallywags near my Moira and if you do be ready to dial 999). I'd hoped to turn the rear, belly and top turrets into observation seats but couldn't justify, even in Whiffer World, how they would be accessed so I used the optional flat covers for top and belly and the glass of the rear turret with a couple of kilos of filler at the back. The tail number, by the way, is her initials and birthday. This plane carries a crew if four, two pilot/engineer/navigators and two butlers. All pilots are retired RAF officers and all butlers retired RAF sergeants so you know they know their plane. It carries 11 in first class comfort behind the wings, everybody gets a window seat and two more in "Ultra First Class" in Air Mora's unique "Eagle's Eye" private cabin in the nose. ("Liver Bird's Eye" wouldn't have had the same zazz). Access might seem a bit tricky but, fear not, at the touch of a button the seats glide back on their tracks and rotate 90 degrees for your comfort and convenience. The breathtaking panoramic view of the Alps as you fly over will live in your memory for ever. (I gave myself a gold star for remembering to put antimacassars on the seats). I remembered to get a picture before putting the glass on. The underside. I'm ready for my close-up, Mr DeMille... So that's my tribute to my lady. Thanks for looking and I hope you liked the idea even if my execution was as usual slightly... Adjacent..20 points
-
As much as I look forward to building Tamiyas newer 1/48 Mk1 Spitfire, I would contend there’s not a heck of a lot wrong with the legacy kit. Here’s mine painted with a combination of Mr Hobby and Tamiya paints. Chipping courtesy of a really old Berol Silver pencil. I used Uschi fine thread for the aerial wires and threaded the elevator wire through the fuselage courtesy of a cut down acupuncture needle with the thread superglued to it, to guide it through. The cloth machine gun port covers are Tamiya tape painted with Vallejo. The tyres were flatted and the exhausts drilled out. Eduards mask set EX052 made short work of the canopy. I really enjoyed building this and would recommend it to anyone. Rick18 points
-
This is the Revell 1/48 Bf-110G-4 Nice kit overall with good detail. The landing gear was bit fiddly but that was the only bit I struggled with. Finished in Hataka RLM75 over 76. z20200327_235948 by Derek N.Ferguson, on Flickr z20200327_235937 by Derek N.Ferguson, on Flickr z20200327_235930 by Derek N.Ferguson, on Flickr z20200327_235922 by Derek N.Ferguson, on Flickr z20200327_235915 by Derek N.Ferguson, on Flickr z20200327_235907 by Derek N.Ferguson, on Flickr17 points
-
I'm calling this one done before I wreck it by adding more and more 'improvements' I think I managed to do what I started out to accomplish which is to build a good 1/48 scale Churchill AVRE using Temma-san's lovely 3D printable parts designs. I hope you like the results. Someday I'll build a little base for it but I'm already planning a half dozen other projects. Nice to finish something for a change Thanks for looking in. Dan16 points
-
A splash of colour for the cabinet - Llanbedr’s RVMDI trials Meteor U.16 WK800/Z circa 1987. Built using the superb 1/48 Airfix Meteor F.8 'Korean War' kit and Alleycat’s AC48056 resin conversion set. Fairly straight forward conversion with a new nose, wing tips, lots of new lumps, bumps and aerials and a few notable deletions such as the gun ports. I also used Eduard’s cockpit detailing set, new wheels from Barracuda and a pitot tube from Master. The yellow is Mr Color 113 RLM04 and I used Humbrols 174 satin enamel for the red. Never sprayed Humbrol enamels before and in truth I wasn’t looking forward to it. Have to say it sprayed like a dream - might have to use them more often. Thoroughly enjoyed this kit and conversion though it did nearly go in the bin on a couple of occasions. Still have the aerial targeting pod (pic attached) to add but I’ve run into a bit of a brick wall on this one so won’t add it until I can find some more info particularly about the rear aspects. Hope it’s of interest.15 points
-
Hi folk's,well I know the hatches are been battened down worldwide and everyone is reflecting on their countries response and history so let's go back to our own finest hour with two British icon's,the Hurricane and Spitfire or rather Steve been dusting the shelves and was bored so took a few photo's.These builds go back to my 2013 debut on BM which I recall was an airfix RE8 which was bloody awful.So here's more! Airfix Hurricane Mk1 and Spitfire ix. A mix of Airfix and Revell Hurricanes. Airfix,Revell,Heller and my favourite Matchbox FT-A. All Airfix newer tools. And finally four more Airfix newer tools,thanks for looking and look after yourselves and your loved ones.15 points
-
The date is December 1944. The RAF Photo Units have come to the awful conclusion that their latest mount, the Spitfire PR. XIX, cannot outrace or outclimb the latest Spitfire fighter, the F.21. In answer, Supermarine builds 16 Mk. 21 “D” wing sets to be mated with PR. XIX fuselages for service testing. Not to be outdone, Rolls-Royce produces a brand new engine for this aircraft, the RR Griffon 122, a 3 speed, 2 stage contraprop engine with a cabin supercharger ( derived from the Spiteful engine). The war in Europe ends before the new PR. XXI is available, so the aircraft are sent to South East Asia Command, where they replace the Spitfire PR. XI in service. Post war, the RAF has no use for 16 non standard airframes, and they are scrapped in 1947 in Hong Kong. This what they would have looked like. The serial number was taken from the last batch of Spitfire F.21’s LA565-581, cancelled , and never used. This was a combination of the Airfix PR19 with a Seafire 46 wing and Contraprop. All cannon related panels were filled in, and the wing tank booster pump bulges added. SEAC decals came from an Aeromaster sheet. thanks for looking. TW15 points
-
I built this oob from the old 1997 Airfix kit, which I thought despite its age went together pretty well. The famous 'Tigers' of 74 Sqn were the first to fly the mighty Lightning, and the only unit to operate the first F1 version. Flying from Coltishall under the command of Sqn Ldr (later Grp Capt) Peter Botterill, the squadron's aircraft began receiving black fins soon after entering service, and formed the Tigers aerobatic team that displayed at Farnborough and other venues in the early 1960s. This is Sqn Ldr Botterill's aircraft, XM143/A. All comments and suggestions more than welcome. Keep safe out there.15 points
-
Hasegawa kit, Aires cockpit, Eduard PE's, custom paint masks and decals, countless hours and days of masking and painting Thanks for looking, hope you enjoy the result. Best regards from CZ. Andrew14 points
-
Hi folk's,here's Airfix's old Viking which I'm calling done.lost interest for a while then she had a compressor fall on her which cracked the fuselage open but the old girl was repaired and finally finished.Many thanks for looking in.14 points
-
Hello everyone! This is my first post on here, and I'd like to show all of you my second build, and first one with an airbrush. The kit is the newest Eduard P-51D Mustang done in a 308th Fighter Squadron scheme, built with the Eduard gun bays for the P-51. This is as well my first kit with resin parts/detail kit. The paints are all Vallejo, and more specifically the Metal color line with aluminium on the fuselage and dull aluminium on the wings. Im sorry for not having a professional photostudio setup, but I ran out to get some realistic/better lighting just before the sun set behind the mountain. I'm really looking forward to hearing feedback, whether it be negative or positive. I'm very eager to learn and improve on anything I can. I'd also like to thank all of you on here for all the information Ive found, and you seem like a great community overall. Also a big thanks to David (mirageiv) as he's been extremely kind answering all of my questions, and giving me tons of tips. Enjoy! -Leander14 points
-
Hi all, Given the strange times we all live in, I thought I'd go for an unusual build, and push myself a little again. Who can ignore an aircraft nicknamed 'Steam Pigeon', or even better 'Shagbat' 🤣 Here's the beautiful box art: And the obligatory sprue shots: I could only lay my hands on the 'Silver Wings' boxing, whereas I had a hankering to build an RAAF type. I therefore laid my hands on a few extras, as shown below. This will lead me to a couple of major firsts in my modelling journey: Sprayed markings, and rigging a biplane. The plan is to build an aircraft of No. 5 Communication Flight RAAF, based in New Guinea in 1943. Photos of aircraft are relatively sparse, but this is the scheme as presented by Auntie: What could possibly go wrong?! With a degree of trepidation, I bravely started on the easy stuff, removing the multiple ejector pin marks from the fuselage interiors. This is mid way through the process - it did look better in the end I then used multiple drill bits opening up the rigging holes Today I then cracked on with the interior. I also learned a valuable lesson along the way that water-based paints actually thin very well with.... water! I've persisted with using Tamiya thinners for airbrushing, but delayed deliveries due to COVID have forced me to consider alternatives, and the interior green with which I've always struggled settled down beautifully when thinned with good ol' H2O. Here's where I ended up after a good day's self-isolation: Thanks for looking, Roger13 points
-
I was goaded into action to have another go at a half-built model of Walter Beech's fabulous little twin engined beauty. Sitting in the box of rejects was my half baked effort with this tricky Pioneer kit, while I watched in awe as the inestimable Moa charmed the same bunch of styrene into a striking replica of the plane, while doing a Vacform version too. I had to have another go..... Then I picked up a new one - PM have just reissued this in 3 versions - thinking my 2nd effort should be better 😏 And so, I have a double build on my hands! Decor is with reference to the AVA aeroplane, without being a replica. That would require some modifications on the airframe. Done in foil, without recourse to resin or add ons, it has been a character-building process at times, challenging and rewarding. Here are the 2 little rescals.... Airframe no.1, And no. 2, door open, interior seating, better shine and tidier foil, I'll try for a few more pictures when I get a chance 😎13 points
-
Something else I started a long time ago soon after the kit was released. Got about half way through and it all stopped. But with the inspiration coming from the DH Gb I got on with it and finished over the past few weeks. Kit by A Models, 1/48th and kits supplied decals as Polish operated SP-ADY during late 1930s13 points
-
This is SE-CAD, a SAAB 91C Safir in civil colours, as she appeared in a commercial photo session by SAAB in Linköping Sweden, May 1955. The model is built from Tarangus 1/48 scale kit, with Maestro photo etch and decals from a special sheet by IPMS Östergötland. And not least a lot of masking tape was used to create the paintwork... The build thread can be found here. There are only two photos that I have found of SE-CAD in this rather striking livery, one B/W in air and one in colour where she stands in front of two sisters in similar designed but less striking colours. That is the photo that IPMS Östergötland used as base for their decal sheet of the three machines. I actually found that photo soon after Tarangus released the kit and knew right away that I had to build SE-CAD one day, even I would do the decals myself, so the IPMS-sheet appearing some time later was a real bonus. Seeing that commercial photo in 1955 should have made anyone looking for a private business- or sports plane to order a SAAB Safir right away, I think it's that good looking. At least I know I would have ordered one in exactly these colours...12 points
-
Not my usual subject matter but I couldn't resist having a go at one of these. And a very nice model it is too. I might even have a go at the bus next..? Pretty much straight from the box except for all the stowage which came from various sources.Thanks for looking. 20200328_150137 20200328_150128 20200328_150115 20200328_150228 20200328_150210 20200328_15015212 points
-
Come see the WIP thread HERE Feel free to check out my other builds on my Scalemates page HERE12 points
-
I forgot to place some RFI photos from my recent Caudron racer build, but here is the second one. This is the Caudron C.561 built from Renaissance 1/32 scale resin kit. The build thread is found here. Sadly this radical design never flew any races. It was intended for the Coupe Deutch de la Muerthe, but problems prevented it from qualifying.12 points
-
Spent a while practising with the revised buck in the vac-lab Result, one so good I have earmarked it for the Bilvedere One with some webbing (new name and concept for me Adrian, I like it. It is in my vocab now)12 points
-
I want to present report from work on my new project - Tanker from "Always" Steven Spilberg's film. I base on Italeri kit - quite old, but not vintage. I hope it's better base than Airfix kit from '70 Unfortunately plastic used by Italeri wasn't too good and a lot of parts have rounded edges (even in places where you'll expect square ones). I have a decal set for "Tanker 59" from Draw Decal, but I plan to build "Tanker 57" - she had a nicer tank on board. Because tankers are most interesting on the bottoms I started some works on landing gears and their wells. Next I decided to replace "engines" to better ones (ok, only front halves), but I see no sense to try find a space for whole. After that I filed cowlings For now one side is ready for assembly11 points
-
I finally did it! FLOATS + PLANE = FLOATPLANE ! Now it's wait for that slow-set CA glue to dry ...11 points
-
Just completed the Ravell 1:44 Saturn V Rocket, not bad for a beginner though i say so myself. Used Vellejo paints and clear coat, i did get the USA decals the wrong way round but they were dry before i noticed so left them as they were with the bigger one at the top and the smaller ones on the bottom stage but i think i can live with it, even gave my little dudes a hi-vis vest each to comply with H&S lol Thanks for looking.10 points
-
Hello, all - This C virus crises is certainly freeing up much more model time so one plus side to all the doom and gloom at present I suppose ........... Completed in three weeks and built entirely out of box. Brush painted as always and used artist oils to try and simulate the extensive caster oil staining seen in period photographs along fuselage. I have previously built a couple of years ago WNW's EII version of this kit was a complete joy to build and probably one of the easiest (once you figure out the cluttered rigging diagram) kits to put together. This particular version (representing the last and final version of the Eindecker series) is as easy apart from the cowling which is an overly tight fit over the double rotary engine - sadly because of this the engine cannot rotate with the propeller. In addition, I found the fit in area poor (obviously I could have made an error here) requiring some large gaps between cowling and cockpit decking to be filled using small strips styrene sheet to hide these gaps. I also managed to break the elevators on the single plastic tubing holding both together which is very weak point in the kit. I repaired by drilling out the tubing and elevators and adding small metal pins which have now added much greater strength in this area, Another than that, kit still goes together well. Rigged using Uschi elastic thread. Regards Dave10 points
-
Mirage 2000B No.527 / 115-OR, EC2/5 ‘Il-de-France’ Orange – Caritat, Languedoc, southern France, 2018 1/72 Italeri kit (‘Mirage 2000D’ boxing) Resin seats and added cockpit detail All antennas and ECM radomes rebuilt Modified fin shape Xtracolour enamel paints Decals from Revell Mirage 2000C kit and Syhart (badges and numbers) (Annoyingly, the photos seem to have a greenish tinge - it's blueish in real life!) Chris10 points
-
Hello to all, this is one of my few aircraft models. The TA 154 nightfighter (the less succesfull german mosquito) This kit from Revell/Dragon has the flaw "hanging wings". I realised this too late, so I had to fix the wings slightly elevated to the frame to compensate the angle between the engines! But I think it does not look bad! Hope you like it! Cheers Andreas10 points
-
Nice to get this one finished finally: Airfix's 1/72 Spitfire Ia tinkered with to produce K5054. The model depicts the aircraft in early 1937, around the time of its wheels-up landing at Martlesham Heath. By then the Spitfire had the eight brownings fitted and they were experimenting with different kinds of exhaust pipes. The cowling had a strengthening strip above the exhaust stacks, which I created with plastic card. The exhausts here came from the early Airfix Hurricane kit and look similar enough to what's in the photos. The aircraft also had a tailwheel by then, so it was looking very close to what became the Mark I Spitfire. There is no doubt lots wrong with the model: information about the original is incomplete so I didn't go all-out for correctness as I would never be fully sure whether it's really right. Instead I wanted to capure the spirit of it in 1/72. For the colour I made a bright summery mix of Tamiya XF-23 Light Blue, X-3 Royal Blue and X-2 White. I changed a few of the panel lines, some the obvious ones, some less so, to get close enough to the real thing, and to reflect what I know about the prototype (which ain't a huge amount). And I added the daisy-cutter wheel doors as I think they were still fitted at this point in time. The wheels came from the good old Matchbox Mk IX kit, and they look decent enough. Decals are from Xtradecal, and they behaved very well. I should thank them for including a pair of spare fuselage roundels in the set as I made a placement mistake first time around and had to remove them, sand, repaint and reapply. Anyroad enough verbiage, on with the photos: And here's one of the real K5054 having landed wheels-up near Martlesham in spring 1937. Thanks for looking. Justin10 points
-
A kit I bought a few years ago at Telford. Very nice kit, with lots of detail with excellent fit throughout. Finished in Hataka Night Black with the kit decals. z20200327_235849 by Derek N.Ferguson, on Flickr z20200327_235823 by Derek N.Ferguson, on Flickr z20200327_235813 by Derek N.Ferguson, on Flickr z20200327_235802 by Derek N.Ferguson, on Flickr z20200327_235745 by Derek N.Ferguson, on Flickr z20200327_235737 by Derek N.Ferguson, on Flickr10 points
-
Hello everyone, I have just completed this kit after a year of no modelling. It is a brilliant kit very good fit and excellent engineering. No filler required. You can literally just attach 70% of the parts without any cement/glue. regards, salih10 points
-
I said that without my lips moving! (Thanks, Jamie) Time to go back to the Pom-Poms - this time for real (the last one was a test run because I have 2 spares (no port side Pom-Poms fitted for the Bismarck action). I thought I’d have a bit of fun with this and present it as its own sub-WIP. So here are the obligatory “sprue shots”; Each mounting consists of 56 parts - of which 8 are the brass barrels, not in the photo below. I am taking a risk here, because normally there is NO WAY that I’d cut any brass off the runners until I was ready to fold / fit it. But for you lovely people, in a controlled environment... [the numbers are therefore for my benefit, not yours!] Also pictured, the tools I will be using - from top to bottom, a bog standard Swann-Morton No.11, a Tamiya diamond file designed for PE (superb), 2 of my new Pixnor tweezers, one of those excellent chinagraph pencil thingies which are so useful for picking up tiny things, a CA applicator, a glass block for cutting and a hold-‘n’-fold. Missing, I have just realised, are the Tamiya folding pliers, but no doubt you’ll see more of them as this progresses. The above represents c.2 hours’ work, because each piece has had the nubs filed off with the Tamiya diamond file (whose work is now actually complete, therefore). But now it is Beer O’Clock so I’m leaving you on a cliff-hanger. Will the carpet monster gobble the lot? Will Crisp lose his marbles yet further? Tune in for the next exciting episode... [Cabin Fever, moi?] More soon Crisp10 points
-
So Does the Bilvedere look good in this? This is the first of the revamped cockpit bubbles made this morning And Next the Alclad Aqua Gloss (ALC-600-60) and we are ready to fill and close the canopy10 points
-
Hi folk's,Hellers twin seater F-104,not a great kit not a great finish but here she is.10 points
-
Here's how she looks this morning.10 points
-
Well bugger me with a fish fork! that worked perfectly, thank you @bhouse that was a massive help! Thanks as well @Sky Keg tried to my dad proud with this one too. Many a fond memory with the Beverley.10 points
-
Here is the third of my Minicraft 1:144 Martin B-26 Marauders which I built back in 2014. It represents Martin B-26C-45-MO Marauder 42-107812/KS-J "Baby Bumps II", of 557th BS, 387th BG, USAAF, in 1944. I added a Matador Models white metal cockpit, opened up all the windows and thinned the turret guns as much as possible. Despite the white metal cockpit part, I had to add a little extra weight to prevent the kit from tipping on its tail. The gun barrels of the external gun packs were scraped off the fuselage sides and replaced with new ones from either plastic or metal rod (can't remember!). The kit was completely painted and varnished by brush. Thanks for looking and, as usual, all comments are welcome Miguel9 points
-
I forgot to place some RFI photos from my recent Caudron racer build, but here is the first one. This is the Caudron C.450 built from the old Williams Brothers 1/32 scale C.450/460 kit. The build thread is found here. I used the small detail set from Renaissance, but kept the kit canopy, and I rescribed all the kits raised panel lines. The model is built as the Caudron C.450 #6910, as it appeared in the 1934 Coupe Deutch de la Muerthe, flown to victory by Maurice Arnoux with an average speed of 388,97 km/h.9 points
-
It may be a good method, but I need to follow my own instructions! The 54.5mm is the straight line length from the side view. Good job I checked the lengths on the plans! Obviously they don't match the plan for length because they don't take the angle into account, but with the same starting point and the same finishing position re the tailplane, they should have the same ending point, just a little further back - they didn't! The lower boom should be 56mm not 54.5mm! That little escapade took up a while this morning, measuring, re-measuring, trying to find the source of the error. Eventually I ended up with 2 lower booms of the correct length. Putty was applied generously to the tub, sanded, reapplied, re-sanded, etc throughout the day until I got to a point that I'm happy with. The upper part of the nose still needs some final tweeks (don't mention MacBeth! @The Spadgent), and I will add milliput tomorrow to shape the rear fairing behind the pilot's headrest. It's certainly looking a lot more like an FE8 than it did originally! More work was done on the wings but not photographic enough I measured and marked them up and drilled all the strut location holes. That took a considerable amount of time this afternoon as a mistake here will be very obvious. To make sure they all line up, I drew a line along both spars, to which the struts were mounted. The rear spar was marked off after measuring against the plans a few times to ensure it was the correct measurement, and the front was marked relative to that. The rear locations were then drilled out with the smallest drill I had to get a good centre. To ensure the front lines up I laid the wing on it's leading edge, put the drill into the hole in the rear spar and slid an angle up against it. Without moving the two I drilled the front on the previously drawn line and up tight against the angle. Repeat 4 times, then drill out the holes with the correct size drill and the strut locator holes were done. The holes in the lower wing have been drilled all the way through, not necessarily because that was how I'd planned it, but because I had carefully marked and drilled the underside! Doh! Then it was time to bite the bullet and start on the wing struts. They are tiny, 18mm long, with a .5mm gap each end for the locator pin as after looking at pics it is clear that the wooden part of the strut did not touch the wing. They have all been cut to length using .020"x 040" (.5mm x 1mm) strip and the first 2 have been shaped. It doesn't take long, but it is a little tedious so I'll finish that tomorrow. The shaping is done by sanding the rear edge to shape (narrowing the top and bottom slightly leaving it slightly thicker in the middle, the front edge is straight), then sanding it to a sharp edge. The front is rounded by gently scraping the corners off with a scalpel blade. Once they are all shaped I will cut a small slot in each end of each one and add a brass pin as a locator. Stay safe folks, and thanks for looking in! Ian9 points
-
I doubt they were black, but somehow I need to hint at the darkness of night time. I'll be drybrushing the stonework a bit but it will remain rather dark. Ditto the water, it looks a bit tropical at the moment! Err, it's three benches really, there's another on the left, but nobody likes a show off 😄 Tony9 points
-
If ever we needed a bit of warm nostalgia to wallow in, it's now I guess. In that case, have a birthday present to yourself, way back in 1958, and don't forget to write Auntie a thank you note... And if you want extra nostalgia with that, try this one... Tony.9 points
-
Morning Brit Modellers. yesterday we had some bench time. Although we’re all at home work still ploughs ahead at a regular pace. 👾 Hopefully this weekend will see some moves closer to getting everything together. Where were we? 🤩 True Blue! 😇 not yellow. 😔 and 😍 all at the same time. first up, masking and pre shade. Black and white and the bottom. 🥳 And the cowl. The cowl looks like a humbug. 🤣🤣 Humbug 😍😍 Then blue. Would have been a bruised banana had she have not been blue. Pass two. Looking goood to my eye. third times a charm. The cowl and masks off. Lovely. 😇 and the tail in focus. And all the bits. This has now been glossed. I’ll hit the decals today and maybe Flory. 🤔🤔🤔 oh hell, wheels. And rockets. 🤩🤩🥳🥳😛😛 a good chunk left to do. I only have one can of gloss left so I have ordered some. Can’t just pop to the LMS now can I. 😔 more later. Take care kids. Johnny blue.9 points
-
Good morning mates, things aren't so good around, but the only thing they tell us to do is to stay at home and thus... I stay at home and, among other things, I carry on with my project. Last night I painted the doors and this morning I shaded them with a lighter grey and some dry-brushing. One of the things left was the matt black area around the steps at the cockpit's sides, so I went to work. I also did some washes with oil colors , but this time just in small ares at a time,toavoid the mess I didwith the Gannet. I also dry brushed all thePE brackets around the tailand fuselage with a lighter grey and finally I sprayed another layer of satin finish. After the brown wash, the Blue grey has now a warmer look,which I like and the finish isn't matt, but not even too glossy. Next on the list are: 1) cables to the winch, 2) Rotor (I'm still considering folded or spread options for the blades) 3) antenna cables along the fuselage 4) belly winch 5) Exhausts 6) When I removed the masking from the canopy, I had this surprise....the inside of the PE is visible from outside!!! Tho resolve the problemand add a nice touch, I'll add the antiglare blinds. That's it for now! Ciao Massimo9 points
-
Thanks Giorgio! I used Lifecolor in my new Creos 289 (not the 770 this time), and it went well - more on that below. Thanks Adrian! I still need to see the new movie, what did you think? You and your family keep well too Rob! I broke out the Silhouette cutter and made some masks using a Tamiya masking sheet. I think this will make for better masks than vinyl, but they are really tricky to place because once they touch the plastic, that's where they stay! Vallejo light grey sprayed on the underside. Lifecolor USN Blue Grey sprayed on the upper side. If you do a web search for Life Magazine photos of the Duantless, there are lots of nice color pics and they all show significant wear and fading, so I slowly added more and more white the airbrush cup as I went along.9 points
-
Well folks, I remember that this is a T-34/85M, code 3318, from Dragon, plus only the T-34/85 turret from the Ark Models kit 35001 (but with super detail and scratch build parts), Spade Ace metal links. I also added new road wheels, resin fuel tanks, photo etched parts, a Browning .50 with many improvements, two steel cables, antenna and many other small pieces, Star Decals 35-923. Heavy weathering...it looks like a very worn tank. 448 points
-
Hello guys; This is my second model of this year: Junkers Ju 88A-4 (B3+MH), Dübendorf, Switzerland, 1943. You can check this aircraft: https://warbird.ch/wb-events/die-ju-88-mit-dem-schweizerkreuz/ This is a Hasegawa 1/72 mold. This old mold has a lot of fitting problems. Wing tip, fuselage closure, etc and etc. 😫 I used Mr Hobby Aqueous paints, photo etched interior by Eduard. The blue paint was Vallejo RLM 24 mixing black. Cheers!8 points
-
We now have propulsion and steering albeit not fixed yet Stay safe Kev8 points
-
I broke it! I placed a finger in the wrong position and broke off a ventilator which, needless to say, fell to the floor and is lost. I made a new one using 3 sizes of sliding fit brass tube from Albion alloys. It started off over-length so it could be filed and sanded down to size. I drilled a hole in the deck to receive it: The replacement was glued in place (the apparent hole in the top was plugged with medium CA prior to trimming down to size): Once painted, I think it looks ok and I should get away with this.8 points
-
Terry how's about a picture of the set up as used this morning I keep meaning to improve this mark one with a mark two comprising a metal vac-bed and different mouldholes Initially I built this box our of MDF board and in the absence of a predrilled metal bedway bunged dozens of 'oles in a piece of the MDF to let the vacuum in/out As I was considering this device in order to vacform my Sherpa fuselage and wing panels and the canopy for the same I initially, made two sizes of hole and have persisted using these two rather inconvenient holes for the other tasks I gives them If I had another sheet of conveniently snaffled MDF I would be in production as we speak instead of sat here putting it off I don't so I won't, might be some time before we get access to Great Barr Sawmills for another lovely sheet of MDF so I doubt if it'll happen any day soon Now if you look at the sheet of PETg above you can see that I let it all go offside, as the Former Clamp (with drawing pins acting to hold everything in place) drifted off course and dropped far too quickly That seems to have allowed the 'webbing' that Adrian has dubbed, all becase as it lowered I went oops as the buck moved off the quid coin Put it down to lack of concentration (the second circular vac-coin was made on the other coin I didnt use when I tried it out, its money and I always keep it where I can see it) On the vac-bed I taped over many of the holes I was not going to need to use with masking tape, I think it helped improve the vac-suck but I wouldn't bet even my spare quid on it8 points
-
I've been steadily shaping the rear end today - quite pleased with the new look and I think a big improvement over my original effort: S1030208 by Thomas Probert, on Flickr I've also begun making the master mold for the plexiglass tail cone - this will be bulked out and shaped with Milliput in due course: S1030200 by Thomas Probert, on Flickr Good to be making some progress on this again Take care all, Tom8 points


.thumb.JPG.3498f40362ff13ebfc4b2e45abbd545e.JPG)
.thumb.JPG.2ce06c4ff2300a5faba93aaeacbdab25.JPG)


This leaderboard is set to London/GMT+01:00