
Leaderboard


Popular Content
Showing content with the highest reputation on 27/03/20 in all areas
-
Hi folk's,well I know the hatches are been battened down worldwide and everyone is reflecting on their countries response and history so let's go back to our own finest hour with two British icon's,the Hurricane and Spitfire or rather Steve been dusting the shelves and was bored so took a few photo's.These builds go back to my 2013 debut on BM which I recall was an airfix RE8 which was bloody awful.So here's more! Airfix Hurricane Mk1 and Spitfire ix. A mix of Airfix and Revell Hurricanes. Airfix,Revell,Heller and my favourite Matchbox FT-A. All Airfix newer tools. And finally four more Airfix newer tools,thanks for looking and look after yourselves and your loved ones.36 points
-
A splash of colour for the cabinet - Llanbedr’s RVMDI trials Meteor U.16 WK800/Z circa 1987. Built using the superb 1/48 Airfix Meteor F.8 'Korean War' kit and Alleycat’s AC48056 resin conversion set. Fairly straight forward conversion with a new nose, wing tips, lots of new lumps, bumps and aerials and a few notable deletions such as the gun ports. I also used Eduard’s cockpit detailing set, new wheels from Barracuda and a pitot tube from Master. The yellow is Mr Color 113 RLM04 and I used Humbrols 174 satin enamel for the red. Never sprayed Humbrol enamels before and in truth I wasn’t looking forward to it. Have to say it sprayed like a dream - might have to use them more often. Thoroughly enjoyed this kit and conversion though it did nearly go in the bin on a couple of occasions. Still have the aerial targeting pod (pic attached) to add but I’ve run into a bit of a brick wall on this one so won’t add it until I can find some more info particularly about the rear aspects. Hope it’s of interest.32 points
-
This is the Eastern Express 1/144 scale MD-80 finished in the earlier American Airlines livery, as ship #567. N567AM was the last MD-80 delivered brand new to American in 1992 from the factory in Long Beach, California, serving well for 24 years before being retired in 2016. She was stored in ROW before being returned to service in 2017 as a cargo carrier still active and operating south of the border. This model was a first for me in a few areas; my first attempt at an Eastern Express model, use of acrylic paints (I usually use enamels), and first use of Xtreme metal (I usually use Alclad) for the finish. Quite a few challenges for sure, but the model came together well in spite of the issues that the EE kit presents. Painting and finishing challenges were new to me, as I am sure they are old to many, but didn’t prove impossible…just different from what I have done in the past. Good learning experiences and I would most definitely build this kit again. To mix the AA gray I used Tamiya X-1 and X-2 until it “looked about right,” using photos of the actual airplane in sunlight from different angles. Tamiya gray surface primer, then Tamiya TS-14 gloss black as a base coat for the metal finish (I usually use the Alclad base coat, but thought this time I'd try the less expensive Tamiya gloss black...won't do that again!). Xtreme metal airbrushed along with light polishing to achieve the natural metal finish. Flying Colors details; Draw Decals details, cheat lines, and livery markings; Authentic Airliners life like windows; Platz PE parts for the landing gear, antennae, and pitot tubes. Of the pictures below, a few are taken while she was still on the workbench; the rest were taken on a bright sunny day while clouds occasionally passed overhead, giving a shaded look to some of the shots. Hope you enjoy!31 points
-
Hello again, lads, it's time for another offering from Uncle Pete's Emporium of Questionable Plastic Things. I'd found this Revell Halifax in a charity shop for four quid but discovered upon opening the box it had neither instructions nor decals. Instructions in this day and age of the internet are easy to come by but decals, not so much so I thought if I had to make decals anyway, why not be adventurous. My lovely missus is very patient with my hobby and although she's firmly of the opinion it's proof positive I should be carried off to weave baskets instead she puts up with it so I decided to do one in her honour. The Halifax was built round about the year of her birth so it was a suitable base kit. The airline, of course, bears her name and the tail flash of a Liver Bird speaks of her Liverpool roots. That poetic thing in the background has no significance, by the way, it just happened to be in the spot where I could crouch to get the camera angle and still have a reasonable shot at getting up again. (It came with the house). The colour scheme was a no-brainer... Blue and white for Everton. (Don't mention those red scallywags near my Moira and if you do be ready to dial 999). I'd hoped to turn the rear, belly and top turrets into observation seats but couldn't justify, even in Whiffer World, how they would be accessed so I used the optional flat covers for top and belly and the glass of the rear turret with a couple of kilos of filler at the back. The tail number, by the way, is her initials and birthday. This plane carries a crew if four, two pilot/engineer/navigators and two butlers. All pilots are retired RAF officers and all butlers retired RAF sergeants so you know they know their plane. It carries 11 in first class comfort behind the wings, everybody gets a window seat and two more in "Ultra First Class" in Air Mora's unique "Eagle's Eye" private cabin in the nose. ("Liver Bird's Eye" wouldn't have had the same zazz). Access might seem a bit tricky but, fear not, at the touch of a button the seats glide back on their tracks and rotate 90 degrees for your comfort and convenience. The breathtaking panoramic view of the Alps as you fly over will live in your memory for ever. (I gave myself a gold star for remembering to put antimacassars on the seats). I remembered to get a picture before putting the glass on. The underside. I'm ready for my close-up, Mr DeMille... So that's my tribute to my lady. Thanks for looking and I hope you liked the idea even if my execution was as usual slightly... Adjacent..31 points
-
Nice to get this one finished finally: Airfix's 1/72 Spitfire Ia tinkered with to produce K5054. The model depicts the aircraft in early 1937, around the time of its wheels-up landing at Martlesham Heath. By then the Spitfire had the eight brownings fitted and they were experimenting with different kinds of exhaust pipes. The cowling had a strengthening strip above the exhaust stacks, which I created with plastic card. The exhausts here came from the early Airfix Hurricane kit and look similar enough to what's in the photos. The aircraft also had a tailwheel by then, so it was looking very close to what became the Mark I Spitfire. There is no doubt lots wrong with the model: information about the original is incomplete so I didn't go all-out for correctness as I would never be fully sure whether it's really right. Instead I wanted to capure the spirit of it in 1/72. For the colour I made a bright summery mix of Tamiya XF-23 Light Blue, X-3 Royal Blue and X-2 White. I changed a few of the panel lines, some the obvious ones, some less so, to get close enough to the real thing, and to reflect what I know about the prototype (which ain't a huge amount). And I added the daisy-cutter wheel doors as I think they were still fitted at this point in time. The wheels came from the good old Matchbox Mk IX kit, and they look decent enough. Decals are from Xtradecal, and they behaved very well. I should thank them for including a pair of spare fuselage roundels in the set as I made a placement mistake first time around and had to remove them, sand, repaint and reapply. Anyroad enough verbiage, on with the photos: And here's one of the real K5054 having landed wheels-up near Martlesham in spring 1937. Thanks for looking. Justin30 points
-
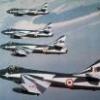
I built this oob from the old 1997 Airfix kit, which I thought despite its age went together pretty well. The famous 'Tigers' of 74 Sqn were the first to fly the mighty Lightning, and the only unit to operate the first F1 version. Flying from Coltishall under the command of Sqn Ldr (later Grp Capt) Peter Botterill, the squadron's aircraft began receiving black fins soon after entering service, and formed the Tigers aerobatic team that displayed at Farnborough and other venues in the early 1960s. This is Sqn Ldr Botterill's aircraft, XM143/A. All comments and suggestions more than welcome. Keep safe out there.30 points
-
Hasegawa kit, Aires cockpit, Eduard PE's, custom paint masks and decals, countless hours and days of masking and painting Thanks for looking, hope you enjoy the result. Best regards from CZ. Andrew25 points
-
Hi all It has been a while since I posted anything, so I thought it time to share my latest finished project. This is an F-51D Mustang, based at Bowen Airfield, Port-au-Prince in the Republic of Haiti, circa 1963. I performed the following minor mods to the kit. Fuselage - perforated cowl vent panels drilled out - antennae wires made from stretched sprue - all lift points and vent holes drilled out - exhaust pipes drilled out - True Details resin cockpit installed - canopy brace and pilot’s headrest removed - tail wheel doors removed - antenna mast replaced with ADF antenna Wings - raised rivets in the area of the landing gear above and below wings removed - landing light replaced with MV Products lens - gun barrel openings faired over - F-86 Sabre drop tanks installed - scratch built pylons and sway braces Landing Gear - oleo torque links drilled out - new tow rings added - wheel hubs drilled out Paint and Decals - airframe painted with Xtracolor X15 BS627 Light Aircraft Grey and X103 FS11136 Insignia Red - all markings are from Xtradecal X48177 North American Bubbletop P-51 Mustang Collection Cheers Randy22 points
-
I'm always very pleased to be gifted kits by kind fellow BMers and this is no exception. This one's a very kind gift from Bill (perdu) - thanks Bill - as a reaction to my new found interest in helicopters. I must say it's a challenging kit and it's tiny (see below). That said, the encouragement I've had here and the help I've received from the custodians of the subject, the Historic Army Air Flight, made me want to try to do a good job. Thanks everyone. The kit is from Aeroclub of course and there are various bits and pieces added as described in the WiP here. Colourcoats paints, of course, in this case brushed - the airbrush would have blown it away. Here she is with her sister Sioux from the HAAF: …and, for some perspective, the Spitfire from 'An Unexpected Journey' with Ida still clinging to the back: Untitled by Ced Bufton, on Flickr18 points
-
Just wrapped this one up. The Miniart Grants are fantastic kits-highly recommended if you’re into the subject matter (or not!).13 points
-
Hobby Boss F-14B VF-103 Jolly Rogers 1/72 Jolly Rogers by Reginaldo Reyes, on Flickr Jolly Rogers by Reginaldo Reyes, on Flickr Jolly Rogers by Reginaldo Reyes, on Flickr Jolly Rogers by Reginaldo Reyes, on Flickr Jolly Rogers by Reginaldo Reyes, on Flickr13 points
-
Well bugger me with a fish fork! that worked perfectly, thank you @bhouse that was a massive help! Thanks as well @Sky Keg tried to my dad proud with this one too. Many a fond memory with the Beverley.11 points
-
So I have got back on this as I’m quarantined and realised I can’t go much further with Belfast as I don’t have the paints and getting them at the mo will be pain, Oh well! So on with the progress! She was left at the point of needing a bit more attention to the glazing and a matte cote so that’s where we shall start. The matte cote has turned out alright, but has anyone got any advice on a good matte varnish? I used humbrol and it’s a bit naff. glazing is still not perfect, but much clearer thanks to the shout to use alcald (cheers again all especially @giemme) it was re painted in places and tidied up. next up was all the little bits, clear parts, aerials, turret and little ladders etc to finish this off. She is to be honest pretty much done other than one very frustrating thing! The inner flaps, they have gone missing since the flood, which is a right pain as they are the only thing stopping this build being finished! anyway, she’s pretty much done, might be a couple of touch ups to be done, and find a way of stopping her tail sitting tendencies. But here she is now with some more detailed picture! And then one just as I thought it looked good in the light. anyway until I can find some flaps I’m leaving it here. cheers! Rob11 points
-
Just finished this Tamiya 1/32 Vought Corsair.10 points
-
The date is December 1944. The RAF Photo Units have come to the awful conclusion that their latest mount, the Spitfire PR. XIX, cannot outrace or outclimb the latest Spitfire fighter, the F.21. In answer, Supermarine builds 16 Mk. 21 “D” wing sets to be mated with PR. XIX fuselages for service testing. Not to be outdone, Rolls-Royce produces a brand new engine for this aircraft, the RR Griffon 122, a 3 speed, 2 stage contraprop engine with a cabin supercharger ( derived from the Spiteful engine). The war in Europe ends before the new PR. XXI is available, so the aircraft are sent to South East Asia Command, where they replace the Spitfire PR. XI in service. Post war, the RAF has no use for 16 non standard airframes, and they are scrapped in 1947 in Hong Kong. This what they would have looked like. The serial number was taken from the last batch of Spitfire F.21’s LA565-581, cancelled , and never used. This was a combination of the Airfix PR19 with a Seafire 46 wing and Contraprop. All cannon related panels were filled in, and the wing tank booster pump bulges added. SEAC decals came from an Aeromaster sheet. thanks for looking. TW10 points
-
Hello! This model was finished on the first half of 2019, and was published on the June issue of Airfix Model World. It`s the Special Hobby offering of the C-212 Aviocar. This build had a special impact in me. These Aircraft saved a lot of lives on the archipelago of Azores (were i live) transporting patients from the smaller islands to the ones with hospital. There are even some Azoreans born aboard the Aviocar! The kit is well detailed and the decals stunning. The presence of putty on the lower surface of the fuselage is mainly due to a mistake of the modeller. I used paints from the Vallejo and Mission Model Paints ranges. Hope you like it! José Pedro10 points
-
😀Carp Diem! Evenin' all. End of another week and time to report in on progress so far. I won't burden/bore you with any detailed discussion of design revisions that have gotten matters to this stage, suffice it to say that there has been much studying of reference photography, followed by undoing and redoing of designs. One of the problems/challenges of this kind of work is that you think you've gotten a section done correctly, only to have to go back and correct the work after adding new sections to it that reveal flaws in your observations! Luckily Fusion has proven a forgiving environment for non-destructively editing your mistakes. Another issue that became apparent was the danger of getting swamped by having too many references at one time - the original Big Mosaic I was working from in Pureref got too unwieldy so I broke the visuals down into a series of separate panels, such as this one that has been helping me on the centre section (apologies in advance to all whose images Iare not credited here but I thank you for the references): I don't tbh think I'd have been able to progress so far as I have on creating accurate cross-section profiles for the fuselage without those workshop images from Navy Wings that show the engine bays opened up as completely as you can see there - certainly I've not seen visuals anywhere else of such detail and quality regarding the Vixen's innards (Most grateful NW ) Aside from comparing multiple views in this way, another useful gambit has been making quick overlay drawings such as this in order to work out alignments and angles: These are just throwaway graphics to help me 'feel' my way around the contours (the digital equivalent of a back-of-the-envelope scribble) - I don't bother keeping them after they've outlived their usefulness as they're just an ephemeral part of learning the aircraft. From the above photos, this is what emerged over a period of days: This is the raw state of the midsection as a drawing - in design terms, everything lateral is a profile, everything longitudinal a rail. from drawing to solid: This is a slightly clearer view of the lateral profiles, seen from the rear: This allows, I think, a decent appraisal of just how damned complicated the interaction of curves are around the midsection of the Vixen. A constant challenge is to simplify simplify simplify so that the solid is composed of as few sections as possible. This run basically accounts for the fuselage immediately behind the canopy, almost as far back as the spectacle beam/exhausts at the rear. Only once you've turned such drawing into a solid can you really gauge whether or not your design is accurate enough in terms of visual appearrance. This version is actually made of four indivisdual lofts - what I want to do is take this down to two lofts to produce a greater smoothness longitudinally. What's stopping me at present (and what you can't see from the drawings above) is that there is an error somewhere in the middle part of the wing root causing a the loft to intersect itself - I'll be returning to this for some detective work over the weekend. This is often the case with Fusion: something as tiny as a line or point slightly misplaced can screw with your geometry and you have to get all Poirot on it's bottom. 🛠️ Another importasnt test is to periodically check current parts against the cumulative total. Here I've temporarily mirrored the midsection to test it against the nose: Am rather pleased with how the wing root integrates as smoothly as it does into the engine tunnel top and bottom. Those central compound curves top and bottom are slowly but surely yielding to attention: a few more adjustments needed - I think in the form of rails in order to smooth out some of the varying curvatures where engine bay flows in to meet central fuselage bulge a - and we could be close to a solution. With wing: Test renders of same reveal a generally pleasing smoothness from nose to rear thus far: Underside too: But we're getting ahead of outrselves here. Back to this over the next day or two for careful scrutiny and (where necessary) revision: That blunt looking cut-off to the front face of the cooling air intake underneath the main intake isn't a mistake btw - the tapering bore of the front of it will be added in a subsequent detailing pass. So that's the state of play now tonight. The long-eared owls that nest just along from the house each year seem to have come back again! As therapy and meditation, Mrs. B and self have been taking twilight walks to commune with them the last few evenings. Here's the trees where they live, in the light of Venus and the crescent Moon: Take care and may your God(s) bless you. Tony10 points
-
This is SE-CAD, a SAAB 91C Safir in civil colours, as she appeared in a commercial photo session by SAAB in Linköping Sweden, May 1955. The model is built from Tarangus 1/48 scale kit, with Maestro photo etch and decals from a special sheet by IPMS Östergötland. And not least a lot of masking tape was used to create the paintwork... The build thread can be found here. There are only two photos that I have found of SE-CAD in this rather striking livery, one B/W in air and one in colour where she stands in front of two sisters in similar designed but less striking colours. That is the photo that IPMS Östergötland used as base for their decal sheet of the three machines. I actually found that photo soon after Tarangus released the kit and knew right away that I had to build SE-CAD one day, even I would do the decals myself, so the IPMS-sheet appearing some time later was a real bonus. Seeing that commercial photo in 1955 should have made anyone looking for a private business- or sports plane to order a SAAB Safir right away, I think it's that good looking. At least I know I would have ordered one in exactly these colours...9 points
-
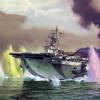
Tried a different vehicle type Picked the kit up cheaply at a show but added White Ensign etch brass barrels and a resin deck. Nice to do something different, inspired by a little friend of mine. Stay safe and and healthy Cheers Keith9 points
-
Hello guys; This is my second model of this year: Junkers Ju 88A-4 (B3+MH), Dübendorf, Switzerland, 1943. You can check this aircraft: https://warbird.ch/wb-events/die-ju-88-mit-dem-schweizerkreuz/ This is a Hasegawa 1/72 mold. This old mold has a lot of fitting problems. Wing tip, fuselage closure, etc and etc. 😫 I used Mr Hobby Aqueous paints, photo etched interior by Eduard. The blue paint was Vallejo RLM 24 mixing black. Cheers!9 points
-
Friends, With plenty of free time, I thought I would try something different. I would like to know of the kits I have posted, which is your favorite of the 25 I listed. Let`s begin........... Hasegawa OA-4M Academy P-38J Lightning Tamiya Fw-190 A-3 Hasegawa F-4D Phantom II Hasegawa B-26C Marauder Airfix P-40B Warhawk Italeri A-10 Warthog Academy P-47D Thunderbolt Fujimi F1M Pete Italeri Su-34 Fullback Tamiya A6M3 Zero Airfix Me-109E Trumpeter Fw-200 Condor Hasegawa F-4G Phantom Trumpeter Su-15 Flagon Special Hobby Mirage F.1 Airfix A-4C Skyhawk Tamiya F4U Corsair Airfix Mig-17 Fresco Airfix B-17G Flying Fortress Hobby Boss P-61 Black Widow Hasegawa E-2C Hawkeye Great Wall Hobby F-15I Ra`am Special Hobby SM2B Super Mystere Airfix P-51D Mustang I look forward to the responses. THANK YOU in advance and with much respect to all, Mike9 points
-
Good day to all, While I find myself between projects, I want to share some other types that I have built in the past but have yet to post. Here is the Hasegawa version of the Ju-88G night fighter. My thoughts, while a bit dated, are as follows............ 1. A very difficult kit to construct, echoed too by my good friend Roman Schilhart 2. I cannot recall exactly which type of paint brand and colors used 3. Added metal barrels for the cannon arrangement. 4. Built primarily out of the box including the decals 5. Eduard pre-cut canopy mask is a MUST HAVE item!!!!! 6. Weathered with pencils, chalk pastels, washes, and paint. I remember that I nearly gave up on this kit on three separate occasions. I`m still not satisfied with the result but at least it`s in the display cabinet and no longer in the box. I only recommend this kit to those who are skilled at lower quality molded kits and that does not include me. Again, it is my expressed hope that all of my colleagues here remain healthy and safe. THANK YOU in advance!!!!!!!! Respectfully submitted, Mike9 points
-
Evening all! Time for today's close of play update. My plans for today were thwarted upon inspection of the nacelle. It hadn't stuck well enough, despite the tabs. So the first job today was to adjust the tape and brush Gators grip into the joints, making sure it went all the way in between the floor and the shell. After that had dried I moved the tape and repeated the process in the areas that were now revealed. I'll leave it now until tomorrow just to be sure it's properly set. That meant I had to find something else to do, so I started on the wings. There were 2 jobs that needed doing (apart from drilling all the holes!) and I was a little wary of the second one.... First though I marked out and removed the ailerons and tidied all those up. That also required filling the moulded aileron lines as they are too thick and in the wrong place anyway, the ailerons are smaller than the kit ones. They were removed by using a micro saw for the ends, then repeated scribing along a metal rule with a no11 blade until I could break them off. That ensured a nice straight, clean, edge The second job? Adding the dihedral. I was hoping that I'd be able to bend the wings and they'd hold the new shape, but was not sure about what would happen to the milliput I'd added earlier. I marked each one up and held them against a metal rule to give a good edge, then carefully applied a little pressure. It worked! The wings were all done in a short time, then each was compared both to the plans and more importantly, to each other. A slight difference from the plans won't be noticeable but if they are different from each other that will definitely show! That will do! There was one slight crack in the milliput but nothing serious and it will be easily dealt with. That leaves pinning the ailerons, and drilling the strut/rigging holes. That should be fun! What other jobs could be done at this stage? Tail feathers! Cut from .020" sheet as usual, there was just one small difference to my normal procedure. To ensure that the tail is as strong as possible and straight, I left the rudder and both fins attached. I carefully measured and marked up the fins, scribed a line, then cut a slot with a small saw blade. I had to widen it very carefully with a no. 11 blade but it now slips over the stabilizer nicely. I simply scribed the rudder joint on and will work with that.The elevators will be separated later. It looks good and I think it will add a bit of rigidity to the assembly. Last job for today was to cut the brass rod for the tail booms. First off I had to figure out the lengths. Normally I'd use the 1:48 plans and scale down but since these are all over the shop and the only ones I'd corrected were the 1:72 ones I had to measure even more carefully than usual! After measuring top and bottom at least 3 times I triangulated to get the true length. For those not too sure, there are 3 simple steps. I first measured the length along the boom itself on the side view. That gave me the long side of a right angled triangle. Then on the plan view I drew a vertical line from the tail mounting towards the nose (This represents the measurement we just took from the side but is not the right length because of the slope, hence why I measured it along the boom from the side, not just the distance between the front and rear ends of the boom!). The distance between this line and the wing mounting gave me the short edge of the triangle. The diagonal is the boom length! Top one is 57mm and the bottom one 54.5mm. I spent quite a while mulling over what size brass rod to use. I couldn't find any reference to what size they actually were so did it by eye, comparing to photos. I first went for .8mm and cut all 4 before deciding they looked too stubby, so I did it again with .6mm and I'm much happier with the look now. I think .8mm scales out to about 2.25" and .6mm to 1.75" (43mm) which is not out of the realms of possibility. The struts between top and bottom are .5mm. So that's where we are tonight. Tomorrow will hopefully see the nacelle cleaned up and shaped correctly, and possibly even the soldering of the tail booms. We'll see how I feel when I get to it... Stay safe, and thanks for looking in! Ian9 points
-
Thanks a lot guys. Yes, I promise I will look into fixing the yellow and camo, but it will have to wait for a while. But they will not be sacrificed without a try. If nothing else I want to find out exactly what happened. It may help someone else prevent the same. It is interesting to note that the fuel tank and luggage net (both being B-versions) seems to have protected the left side of the canopies. During the day I have added the last details to SE-CAD; gear, exhausts, pitots, propeller, lights, antennas etc. It's difficult to see details like the antennas perfectly in the few photos there are, so I had to interpret as best I could. I think I'm done with this one. @flarpen The decals have been a good experience. They are thin and need a little care applying, but thin is what we want. I used a little Micro Set where they were put, when placed to satisfaction this was patted dry and a little Micro Sol was spread to work for a few moments before patted dry again. They look really good even on top of the polished aluminium. I'm surprised how very little the carrier film is visible. I'm very happy with them. I will take some better photos soon.9 points
-
Mojo restoration in the form of two basic Airfix kits without much in the way of frippery from me The starter set Jet Provost in the box scheme. Inititally started in the blitzenbuild GB when I got over confident and tried to fo 2 kits in a day. Needless to say this is the one that didn’t get finished in time. And a DH Chipmunk finished as the AEF plane that I had my first flight in. Made from an elderly Airfix kit with minor mods of a shifted exhaust, added anti spin strakes and a blade aerial.9 points
-
Thanks a lot for you support in difficult circumstances. It means a lot. I suppose there might be, but it would be difficult to not have irreparable scars that should not have been there. But it must wait I think, I can't touch them now. You are absolutely right, I have nothing to loose by trying to remove them or cutting them up. So before I ritually sacrifice them in the fireplace to the unforgiving modelling gods, I will see what happens. Later. One idea might be to open up the two canopies and pose that hatch open. But it will be a difficult cut and I usually prefer my planes with beautiful lines not disturbed by open panels. It will take some getting used to, but well worth considering. Thanks. I'm sure you will have better luck with your 1/72. It is somewhat worse in real life. You're perfectly right, trying to work on the two right now is out of question, it just makes things worse, as it already did on the camo when I already lost patience after the problems and didn't place full care into removing the maskings. They are placed into a safe box and put safely aside for the moment. Sometime later we will see what their ultimate fate will be. Work on SE-CAD has continued and the decals are on. The durability of the polished aluminium is almost zero and I have already had to touch up vulnerable edges using my finest airbrush twice. I have painted so many car parts with this paint over the years, and even if the finish needed care when handling it has never been this delicate. But it will work out somehow, just more care needed.9 points
-
After completing the tiny Skeeter I want something easy(ish) and NOT tiny. When Simon ( @Beard ) kindly sent me some more pilots recently he included an Eduard LA-7 Dual Combo 'for something to put the pilots in'. Another very kind donation and a welcome change from rotary for a bit. Thanks Simon Now then, I don't usually build Soviet aircraft so this is all new to me. I've spent quite a long time trying to find some paint for the schemes I've chosen and even that has proven tricky - the instructions in the kit appear to have been printed on a laser with some low toner: Untitled by Ced Bufton, on Flickr Why those two? Well, obviously the '27' as it's Maj. Ivan Kozhedub's mount and (according to Wiki) "he is regarded as the best Soviet ace of WW2, having a natural gift for deflection shooting. In 330 combat missions he took part in 120 engagements and scored 62 victories including an Me-262." The other because these will be on the ceiling, flying in formation towards my Luftwaffe group, and the '24' looks to be a good wingman. Shows how much I know. The scheme diagram looks nothing like the actual thing as shown on the Wikipedia page for the aircraft (now my desktop picture). The narrative for the photo states "The scheme is popular on both warbirds and museum aircraft, but this is the real thing! While the aircraft itself is original, there has been much debate about the accuracy of the colour scheme." No poo Watson! If you want to join the fun there's a loooong thread about VVS colours here. So, I think I'll use iModelKit and my existing paint stock to get as close as possible and then weather the heck out of them. Maybe. Anyhoo, after all that rambling I want to get on with it so welcome all!8 points
-
Inspired by an all-metal Vampire, I chose to RFI my Spit xvi... I got it from my buddy who, due to moving into a smaller house, had to cut down on his modelling - the cockpit and fuselage as well as the wings were already built. As I already own two spits with the usual camouflage scheme, I decided to keep this one in aluminum/high speed silver (or whatever comes close to my work) I'm still not sure if I want to put markings on it. Little work to detail the prop minus spinner And, of course, the engine. Nice base per the kit, but nowhere near the real thing. I definitely won't claim my engine to be very close to reality, but it certainly looks better than oob. Any hints, proposals for markings and critique are welcome of course.8 points
-
RAF 29 Squadron Eurofighter Typhoon FGR4 1/72 Hasegawa Euro fighter by Reginaldo Reyes, on Flickr Euro fighter by Reginaldo Reyes, on Flickr Euro fighter by Reginaldo Reyes, on Flickr Euro fighter by Reginaldo Reyes, on Flickr8 points
-
Beginning the process of making the original buck good enough to make reasonable canopies from. This was the original version, Milliput all over the shop but scruffy Although this was good enough to produce the practising-on shots there is much to do before I can get a decent deep draw on the moulding Now I have added 0.160" to the back This will allow the plastic to draw smoothly past the 'true shape' and allow a decent finish Here I have filled the creases and crevices at the back of the buck with Humbrol filler which is certain to be stronger in use than PPP Newly resmoothed over ready for the vacformer tomorrow A wee bit fadey grey but the general scheme of things shows how much smoother the vacforms will be Now I am off to do some more cockpit controlly stuff laters folks8 points
-
My most recent completion, Airfix's Me262, an absolute nightmare of a kit... Can't recommend this one I'm afraid. Ok it's not thaaaat bad just very disappointing for a modern kit. This is the same kit I built back in October 2018, the first build I put on this forum. Definitely an improvement.8 points
-
Hi folks Like most of you guys I expect you are keeping busy with the plastic. This is my first Meng build, quite impressed The figures I found in the corner of a drawer Evolution Miniatures No doubt I will have to do more plastic to relieve the pressure of avoiding doing the jobs around the house that have been 'identified'. Stay safe and healthy Cheers Keith7 points
-
Dear all, I trust you're all well. Here's a look at my recently finished RPM T17E2 Staghound in 1:72, in the markings of the 'Brigade Piron' from the liberation of Brussels and Antwerp in 1944. RPM has produced a great little kit with tons of detail, although rather over-engineered in places. The turret for consists of over a dozen parts, which is why I choose to swap it for a (correct for this version) resin one from Modell Trans from Germany, with a brass 37 mm main gun to top it off. As I wanted to show the entrance hatch open, I included the interior from the kit with some extra added details, and also glued the basket under the turret. The equipment came from various sets from Black Dog, the figure is from Tom Taylor Modelworks. For the decals I used the 'Brigade Piron' sheet from Braille Strike, that has several more armoured cars from this unit on it. Weathering was kept rather light, I just added a black brown pin wash and finished it off with a dusting from Tamiya's weathering set A. I hope you like it. Peter7 points
-
Mornin' all! You may have seen floating around the WIP forum, my effort to build one of the more obscure aircraft to enter service into the RAF, but a vital one. "During the Cold War period, the British Royal Air Force (RAF) Transportation Command section required a modern heavy strategic transport. The call was answered by General Aircraft through the GAL.60 "Universal Freighter" Mk 1, an odd-looking, yet highly useful, high-winged, four-engined aircraft. The cargo hold was served by a combination door-and-ramp arrangement and Bristol "Hercules" engines drove conventional propeller units. The cockpit sat over the nose of the deep fuselage and a raised tailboom completed the aircraft. Of particular note was the fixed, wheeled undercarriage which did away with a complex retracting function and lowered maintenance commitments. A first flight was held on June 20th, 1950. Blackburn Aircraft was responsible for manufacture of the series. Total production eventually yielded forty-nine units with 20 of these through a first-batch order. Service introduction came in 1955 and production ended in 1958. At the time of its adoption, the Beverly was the largest aircraft in service with the RAF. " We then move forward to 1965. A fresh faced lad from Gloucestershire completes his boy entrants to the RAF and gets his first proper posting to Royal Air Force M.Hurraq - My dad....Airman A.Wright. You can read and see more on the build on this link. Unfortunately the "Insert image from URL" will not allow me to post individual pictures at this time. Not sure why though? So here is the album on Flickr for you to take a look at instead. Blackburn Beverley Pictures7 points
-
The Christmas break was quite productive for me. Here are the last 2 of my finishes: Hobbyboss Bf109G-2 What can you say? Well, it's cheap, simple and makes a quick finish. Limited detail and probably not the most accurate, but a nice easy desert paint scheme. Hobbyboss P-61 I would not describe this as an easy build. There's sufficient interior detail imho if you keep the lid on tho' the IP decal is a bit garish. Wheel wells are nice and the breakdown of parts is sensible, but the upper fuselage around the cockpit didn't match up well with the bottom and caused me fit issues; ditto with the boom / rear wing joints; ditto again with the glass work. Some careful filling was required here. Lost the will to weather it, lost one of the nose gear doors and haven't been brave enough to fit the aerials each side of the nose. My next one will be better! Regards Martin7 points
-
Well nearly a week building these up now working from home and is just as bad as being in the office the dog is not happy with this one walk a day lark either any how lot more people worse off than me stop whining beefy support the NHS as best you can people I keep telling missus b to remember the 2 meter rule sure she does it on purpose the pompoms and starting on the twin power mounts and got some work done on the base fist coat of silicone and then primer Stay Safe and keep modelling it is the only thing that will keep you sane beefy7 points
-
Thanks Simon, especially for the kind donation! Oooh, loo roll! Thanks Simon Welcome Terry Thanks, interesting - I'll take a look later First, some paint on the internals. I chose Hu64 and, as usual, had trouble getting the lid off. Old bloke's tools required: Untitled by Ced Bufton, on Flickr I've been cleaning the lids out with a spike to try to stop this and I wonder if I've accidentally removed the seal? Should there be a rubber ring at the bottom of this? Some of the PE is coloured (nice): …so I'll touch up the non-painted stuff when it's on. Stuff painted. Can you see? Sort of. Listening to the new series of 'It's a Fair Cop' on Radio 4. Recommended.7 points
-
looks like the Postimg issue is really fixed A question to the house I toned down the white on the direction finding gauge, relatively happy with that, the question is In the AP wot I got the ip and coaming sits of course in the window of the bubble and below it sits a bubble shaped panel which must close it off from below Obviously made of metal it has various devices mounted above it, within the ip and cowling area but no pictures taken inside museums show he panel anywhere Shall I model to the AP or to the museum piece?7 points
-
Man, couldn't wait for this kit to be done, and near the end took off the canopy masks and realized I had leakage and now a good portion of the clear parts look like there is condensation on the inside. After that, I just wanted to get the thing thrown together and off my bench. Made up markings. So here she is.7 points
-
Just completed the Ravell 1:44 Saturn V Rocket, not bad for a beginner though i say so myself. Used Vellejo paints and clear coat, i did get the USA decals the wrong way round but they were dry before i noticed so left them as they were with the bigger one at the top and the smaller ones on the bottom stage but i think i can live with it, even gave my little dudes a hi-vis vest each to comply with H&S lol Thanks for looking.6 points
-
Hi all just stepping away from aircraft models and onto another derelict abandoned car which I love to do. I picked up this cheap AMT kit for $12 as I would be bashing it. Starting with the interior I have a few photos showing various states of decay so I picked one and ran with it. I trialled using liquid mask to mimic hanging old rotten interior fabric. I waited until it was almost dry and then rolled with my finger then let it fully dry and paint it. I took a dremmel to the back of the seats until almost through then picked and cut at it from the front to make the seat tears and added cotton sprayed in a light straw color to replicate the old seat filling. Lastly a hint of green as a moldy, mossy look. Front seats Interior assembled Next its onto the exterior shell I did some test swatches for the rust tone I am pretty happy with. I noticed on most derelict vehicles its a very smoth dissemination between the old paint and the rusty surface. For tht reason I am going to forgo the chipping effect and lean of pure airbrush skills after some hand painting, washes and pigment powder should give the shell the desired look. If your intrested the last car I did like this is6 points
-
6 points
-
The strut the manufacturer missed/Misplaced that connects engine pan and spine is added. The leather headrest is painted, and a missing Pitot is added from a P.E. set:6 points
-
Much too light. Interior were A-14 Steel grey. A dark wash would probably do the trick though. US Neutral Gray would be better. http://massimotessitori.altervista.org/sovietwarplanes/pages/colors/color-table.html scroll down externals. simple, underside AMT-7 blue, uppers AMT-11 and AMT-12. http://massimotessitori.altervista.org/sovietwarplanes/pages/colors/1943-45-fighters/1943-45.html If there is a myth I'd like to kill, it's that VVS colours are "a minefield" Mostly they are very straightforward in the basics, especially in the era you are talking about. standard factory pattern below They often did not last long enough to get really weathered, though it seems the grey scheme was prone to fading. I know you RAF type colours in stock, you would not be horribly wrong to do the uppers in Ocean grey and Extra Dark Sea Grey. the undersides are in the realm of RLM 65. There you go @CedB pretty much all you need to know. HTH6 points
-
Tim's SK Curtiss SB2C-4 Helldiver. VB-3 USS Yorktown, April 1945.6 points
-
Seat booked, paid entrance fee ( 2 toilet rolls ) LOL. Simon.6 points
-
And I forgot to add the following................. Hasegawa G4M2 Betty Bomber with Ohka Airfix Hurricane Mk.II Hasegawa Ju-88G6 points
-
I just had an email from Postimage, the issue has been fixed it says Lets we have a play huh The yaw pedals and the operating structures Very reduced in scope but my name isn't Cedric, miniaturisation is now officially behind me in the depths of time Not chasing it down the road at my age Rest assured there will be dry brushing Later See that white structure? Engine throttles and trim wheels on each end of the throttle pedestal, the engine power gauges are fairly visible in this shot Make the most of them, I fully expect them to vanish when the whole shebang is painted and closed up A view of the throttle controls from the other window (when the windows are on...) Colour me happy, Postimg is back and very easy to use6 points
-
Sorry for a period of silence in last 10 days, but converting a school from normal operations to doing everything remotely via the internet has been a pretty all-consuming experience. Anyway, I have actually been doing a little modelling on the side, but nothing really worthy of an update on here, let alone a photo. Today, however, I have finally finished one of these: You’ve seen one of these 0.5” Vickers Quad machine guns before, but last time I made a right mess of it and declared the Tetra version - though exquisite - almost impossible to build. Having learned from my previous effort, however, I tried again. Even now I would still describe them a very difficult to build, but it can be done. You can see the size from the Swann-Morton next to it - no, it’s not a comedy giant scalpel. And the Vickers has 13 parts as built, with 2 more (control wheels) still to be added. You have to REALLY take your time and be patient - if you wait for one section to cure fully, the next bit becomes much easier; believe it or not, the whole thing is actually quite robust now, but in its early stages if you breathe wrong it flies across your bench. Also - and perhaps not unconnected with my success here - a hat tip to @CedB, who was raving about some Pixnor tweezers (watch-makers, I think?) he’d acquired. Anyone who messes about with tiny bits of brass as much as I do rapidly becomes something of a tweezer obsessive, so I promptly got that nice Mr Amazon to deliver a set (not at all expensive). They are a game-changer; brilliant with tiny things (like Skeeters, not doubt, eh Ced?) More soon Crisp6 points
-
Hallo mates, hope you'reall ok. Last night, before going to bed I sprayed a layer of Future to create an even base for the decals between the two different colors and this morning I got ready for decalling.... I had these three sheets, one of which courtesy of @AntPhillips dedicated to Wessex no 57. on board Ark Royal in 1970. This includes Ark royal crest for the fuselage and the infalable floats' covers fitted to thewheels. Unfortunately my choice is for exemple XP151 ( 47 R) which was on board in 1978, thus I had to find some numbers of various sizes in thespares box. Unfortunately all of them were qhite old and caused some troubles. Consideringthe small amount of decals, it took me a long time to apply them and even those from the kit's box, thus relatively young, tended tpo brake and did't respond to the softening effectsofMicro Set and Micro Sol,expecially theblackrectengles over the back of the fuselage. Anyway at the end I got them all fixed. The XP151 codes atthe rear of the fuselage are still missing as I couldn't find any numbers of the right size. The numbers 047 at the nose sides have some gaps which I'll fill with a touch of white. Some of them will be treated with some more softener,as I preferred to let them set and dry in place first. Here below a few pictures which show the orange colour with natural life. With flash Without flash Ark Royal's crest. The crest's background was light blue, thus I painted a circle of this color before applying the decal. Not a Bright day Today, but I wanted to compare the old color with the new one. Before Now Before Now This is it for now. Stay safe!!! Ciao Massimo6 points

.thumb.jpg.04f42ec97a3b546c5de06bd10d3455fb.jpg)


This leaderboard is set to London/GMT+01:00