
Leaderboard


Popular Content
Showing content with the highest reputation on 13/03/20 in all areas
-
The Mosquito B.IX is finally done. The kit is Tamiya's ubiquitous B.IV in 1/48, converted to a B.IX using my nacelles and some other small changes, namely: filled camera windows on the bomb doors and rear fuselage. re-positioned the downward identification lights scratchbuilt Gee boxes in the cockpit the TI's and Oboe antenna were both designed in TinkerCAD and printed at Shapeways. painted over the nose transparencies - a common feature of Oboe aircraft Camouflage colours were Mr. Color lacquers, and the national markings and codes were masked and painted. Serials were from an Aviaeology sheet, and the stencils were HGW 'wet transfers'. WIP here. This build was originally inspired by coming into possession of the log book of my grandfather's cousin, who served in the RCAF as a navigator with 109 Squadron as part of the Pathfinder Force (PFF). He flew 84 operations in total (including nine on Halifaxes and one in Wellingtons) between 1942 and 1944. I've posted some more details about his wartime career in the build thread here. The aircraft that Flt. Lt. Simpson and his pilot flew most often was Mosquito B.IX serial LR511, hence the subject for the build. The desire to build this particular aircraft was the reason I created my own two-stage nacelles, (and eventually had them cast up in some quantity!). The aircraft is depicted sometime between April and August 1944, during which time she carried the individual aircraft letter 'N'. During this period, according to Simpson’s log book, the squadron flew many operations over northern France in preparation for, and in support of, the Normandy landings. Targets appear to have included gun batteries, rail targets, and ports. It's fairly well known that the Mosquito Pathfinder squadrons made great use of the Oboe navigation system to mark targets for the main force of Bomber Command, (and to bomb point targets directly). What was much harder to pin down was what the external Oboe installation on a B.IX actually looked like. The lack of photographic references is perhaps not so surprising given the secret nature of the system. After a couple of trips to the National Archives at Kew and finding a single grainy image online, I had enough to model the antenna for the Mark II Oboe that the B.IX likely carried. In brief, Oboe Mark I operated on a 1.5m wavelength and the antenna was entirely within the rear fuselage of the Mosquito. The Mark II system operated on a 10cm wavelength, and the antenna was housed under the fuselage in an aerodynamic fairing. When the build was quite far progressed, I found a selection of additional Oboe photos in 'Mosquito Thunder', a history of 105 Squadron. Beyond that, I've also depicted LR511 carrying two 250lb target indicator (TI) bombs. These contained a number of pyrotechnic candles which burnt for several minutes upon hitting the ground. Although long range tanks seem to feature more often on Pathfinder Mosquitos, my (unsupported!) supposition is that TI's may have been carried on the wing stations for shorter range missions, as indeed LR511 was flying in mid-1944. The camouflage is somewhat speculative as I know of no existing photos showing LR511 during her time with the squadron. The upper colours of Dark Green and Ocean Grey are straightforward, but at some point 109 Squadron Mosquitos transitioned from having mainly Night undersurfaces to Medium Sea Grey. Most images of B.IV's show the earlier scheme, and those of B.XVI's the latter. With the B.IX sitting in between I opted for that late scheme, for no other reason than I prefer it. Similarly there is evidence for both narrow and paddle bladed props on B.IX's. Again with the preference. There are eleven mission markings on the nose to represent the number of operations that Simpson flew in this aircraft, although no doubt it flew many more. Any comments very welcome, and if someone comes up with a photo of LR511 - I will hunt you down. 😁 cheers, Jason33 points
-
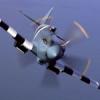
The new Spitfire from Airfix, slightly weak in the box. So I riveted him. Added Barracuda propeller, Eduard PE, metal barrels, decals from Exito and some plastic little parts after the Eduard Mk.9.22 points
-
The story of the TSR2 is well known and a friend bought me this kit on my 50th birthday as representative of British aircraft that flew in the year of my birth, 1964. I'm not sure how to take that! The Airfix kit shows it's age and is pretty appalling. I started this kit, realised what it was like and re-boxed it for a rainy day. Six years later I pulled it out again and have wrestled it into an out-of-the-box representation of XR219. Parts fit is generally horrible and involved lots of tape, clamps and muttering. I've tried to keep filler use to a minimum and, if you don't look very closely, it's vaguely OK. I primed the model, adjusted the worst bits then did a little bit of pre-shading. I sprayed it in the Vallejo aged-white Model-air paint then put a number of coats of tamiya matt white over (not a good finish on large areas and needed some sanding to smooth out the gritty texture). Following varnish I gave it a wash of paynes grey oil paint. I can't say I particularly enjoyed building this kit but I'm pleased I have. It won't be at the front of the shelf! We can only regret that the real plane didn't make it into service and that our government effectively destroyed the British aviation industry when, technically, it was at the top of its game.21 points
-
Jeannin Stahltaube Wingnut Wings 1/32 I`ve used: Taurus Models Camshaft and sparkplugs Gaspatch turnbuckles Steven Robson`s spokes Masks by Krzysztof Tengli propeller outline cut by Michał Jakś Propeller hub by Proper Plane Seatbelts by HGW20 points
-
I hope you're all still in good health and taking appropriate precautions in light of COVID-19 being out and about. Mrs P's school is closed for three weeks (with pay -- she's ecstatic), and I'm working from home for the next two weeks. Thank heavens we moved in before things really began to snowball over here. People are hoarding bog roll and...bottled water? We can walk to the largest source of freshwater in North America, I don't get that at all. I suggested to Mrs P that, silver lining, maybe I'd be able to make it to the UK for the Battle of Britain 80th if the grievous damage being done to the airlines right now lowered fares enough, which displeased her mightily. Sowing the seeds, though! Anyway, my office is pretty unpacked now, though many many many books remain in boxes without shelves to go on, and most of the stash is yet to be unpacked. However, lots of new kit for the grotto's arrived, including a new photo booth, a comfortable wheelie chair, and one of those magnifying lights on an arm. Hopefully we'll see some progress soon.20 points
-
Hot off the press is my latest from the P-51 Mustang STGB. The 40+ year old Frog kit was given to me by the owner of LMS to see what I could do with it. I used the kit to try out some heavy duty correction and scratch building. Improvements made: The kit cockpit was virtually non-existent, so a scratch one was built with the addition of a pilot. The main intake was made deeper. The leading edge extensions were corrected. Chin corrected. Also added some 'tube' guns. Added a landing light. Posed with 'wheels up' and being not a fan of the blurry disc propeller, the blades were discarded. Painted with a mixture of Tamiya and AK with the main scheme using Colourcoats Enamel paints. kit decals were pants, Xtradecal roundels and codes were used and represents an a/c from 2 squadron, RAF, 1944. Build log here: Stuart19 points
-
My latest project is this ICM Invader. Built pretty much straight form the kit with the following exceptions. Eduard cockpit interior and seatbelts, Eduard Brassin wheels and a set of Aerocraft brass undercarrige legs which are really nice and much stronger than the kit ones. My own additions are a pair of Monogram propellers as I think the shape is better, some P-38 drop tanks converted into napalm tanks and some rockets from an Eduard Mustang. I also replaced all the guns in the nose with brass tubing as they were not only solid but totally the wrong configuration according to the photos I have. The top pair are much shorter and the bottom pair are much longer. I also replaced the wing guns using the same method. Even the turret guns didn't escape and these were replaced with some Quickboost B-17 ones. Anyway, an enjoyable build of one of my favourite aircraft and I look forward to glazed nose version. As always, thanks for looking. IMG_0293 IMG_0294 IMG_0295 IMG_0296 IMG_029718 points
-
Hi all, This is my entry to the currently ongoing P-51 STGB . The kit is the ICM 1/48, built out of the box. To say that this one put up a fight is a gross understatement. Whilst the engineering I believe is based on the Tamiya kit, it in no way resembles a Tamiya build experience! Anyway its done, with, I have to admit a very shallow dihedral. It is completed with Tamiya acrylics and Alclad Aqua Gloss sealing the quite appalling kit decals. Weathered with Tamiya powders and an oil paint filter and finally sealed with Winsor and Newton Galleria Acrylic Matt Varnish sprayed un-thinned, BTW an excellent product which I would highly recommend. Thanks for looking, comments always welcome. Cheers, Mark.16 points
-
Damned if we do, damned if we don't. It costs me £13 every paint-containing package we send, and we charge £6.50 with a minimum order of 6 so I just break even. We used to charge £10 and hope people would self-regulate their order size, but I got too many accusations of profiteering written in a manner that frankly the majority of the modelling community could only dream of having the gentleman-parts to say to someone's face, and probably then only with an impressive blade in their hand. So I changed it. Now we just get compared to the postage rates of businesses who post flammable liquids illegally and are risking large fines of caught doing it without anything actually going wrong, or possibly prison time should one of their consignments end up implicated in an air cargo incident (RM uses aircraft for city-to-city hub transfer). Unfortunately I hold a senior management position in a multinational engineering company with a professional reputation and the need to be perceived as a safety culture role-model to uphold and support a wife and two children. My appetite for a criminal record over illegal postage of paints for peoples' pass-times is precisely zero - so in a way the postage and minimum order helps coarse filter customers for me. It seems to work because I like the customers I have14 points
-
RAF Mustang II FR919, 2 Squadron, RAF, June 1944. 1/72 Frog Kit with much scratch work; scratch cockpit with pilot, corrections to main intake, leading edge extensions and chin. Build log here: Thanks for looking, Stuart13 points
-
After a bit of a break I've finally finished the Italeri Tornado! Some of the parts were a pig to fit but I'm fairly ok with the final result considering how the build went. I made it oob and only added the wing sweep covers cut from masking tape as otherwise you could see straight through. The markings were from the Airfix Tornado, though I cut the code letters up to make it into FL instead of FV. I used Flory dirt wash to dull it doen a bit and dirty the jetpipes and tail area. All criticism welcomed so I can improve! Comparison with the Airfix Tornado (ZA407, TWCU):12 points
-
Squeaking in by the deadline - my second addition to the GB! F-82G Twin Mustang in 1/72. Monogram classic kit built as it came with the addition of spinning props (acetate sheet) and inflight stand (Airfix classic). Painted with Alclad, MRP and Zero lacquers and using the kit decals (which were excellent, by the way). Build thread (very short!): Great to see so many brilliant and varied Mustangs, thanks for a great GB and look forward to the Spitfire/Seafire one soon! All the best, Alan12 points
-
N.A. P-51 Mustang Mk.III FB223 of 316 (Polish) Squadron, June 1944. ICM 1/48, Out of the box (including shockingly bad decals!). Tamiya acrylics, Alclad aqua gloss. Tamiya weathering powders plus oil paint filter. Matt coat; airbrushed un-thinned Winsor & Newton Galeria (Excellent, highly recommended) Once again thanks to the hosts and well done to all participants. Cheers, Mark.12 points
-
Recently completed as part of the P-51 Mustang STGB is my interpretation of a Mustang III using the 1/72 KP kit. Built mainly OOB with the addition of some DIY belts and a DIY vac canopy as I like my subjects to have the canopy open. Painted with a mixture Tamiya, AK paints with the main scheme being Colourcoats enamels. Kit decals with the markings of 133 (Polish) Squadron, RAF, Coolham, 1944. Build log here: Stuart11 points
-
Done! Build thread here Tamiya P-51D as RAF KH727 Italy 1946. Out of box with the exception of the decals and Eduard Zoom cockpit set. Decals are mainly Xtradecal with stencils borrowed off another aftermarket sheet as the kit ones were toast. Paint is a mix of Alclad (Aluminium on the wings and rudder), Gunze (Anti glare panel and camo on the tail), Plastikote chrome!?!?!?! on the fuselage (worked out ok after issues with Alclad). Congratulations to all who made the deadline - some fantastic builds!11 points
-
Hi all, Hope you’re all Corona free? At least this a great hobby if you’re having to self isolate! I’m calling the interior finished and she’s ready to close up - with lots of lead of course! Think this one is going to be a real tail sitter. Once again, I’m finding 1/72 really harsh in close up. Looks good until you see the pictures. I guess the answer is not to take photos close up! But this is as good as I can get it. Think 1/32 & even 1/48 are far easier to model despite the ‘simplicity’ of the 1/72 kits. I’ve decided to put the pilots in - something I wouldn’t usually do, but it was either that or make up some seat belts. Incidentally, the pilots didn’t fit too well. It’s worth checking before you paint as I had to do some slimming surgery on their legs... Cheers, Guy11 points
-
The most recent addition to my series of 1/48 WWII Fighter aircraft flown by Polish fighter pilots. This is the RS Models limited run model of the Caudron CR.714 flown by S/Lt Czeslaw Glowczynski whilst with the GC 1/145 "Varsivie" flight in May and June 1940 during the Battle of France. As can be seen in the first picture there were very few parts, no pegs for fuselage halves etc but with a bit of care and patience builds up into a reasonable model. Decals are from the MMP Camouflage & Decals book on 3 aircraft, the Caudron, MS 406 and Curtis Hawk H.75A, an excellent publication with large exploded views of the colour schemes which allowed me to attempt the very complicated camo scheme with an airbrush freehand. Again I used the Hataka French fighters laquers paint set for this model, absolutely love these paints they show up the detail very well. A silver colour pencil was used for the chipping effect. A very complicated and unique colour scheme, every aircraft was painted differently. Thanks for looking. Ian9 points
-
Have you ever noticed that all the instruments searching for intelligent life point away from the earth?9 points
-
9 points
-
Recently completed is this 1/350 HMS Upholder of 1942 where. on her 25th mission, she was lost with all hands. The kit is by EVA that was acquired unusually via FB. As is my 'new' way, The boat was going to be presented on a sea base so being a full hull model, much of it is below the waterline but to me, it's where it should be. Like most submarine kits, it has few parts but went together well. Painted with Tamiya Royal Blue. Build log here: Stuart8 points
-
Ready for inspection is my 1:72 Italeri Wellington Mk.IC. I found this one of my toughest builds, ill fitting pieces, poor moulding and a broken clear sprue all led to a long slow process. However, I do think the aircraft looks pretty smart in its coastal command colour scheme. It is a straight from the box build, painted using Vallejo model air acrylics. Thanks for looking.8 points
-
Just finished8 points
-
Chris, Crisp, Ian, Terry, Giorgio, Michael, Bill, Keith, Benedikt, AW, Alan, Ced, Massimo, Adrian, Serge - you chaps say just the nicest things! In return I just wanted to say a quick to all of you and apologize for not responding indivisually: been a heck of a week at work and with everything in this sector here in Ireland now suspended due to the CV, am in throes of having to convert everything I normally do into virtual online equivalents. Nothing at all of the magnitude that those in areas like healthcare are now facing - God(s) love them - but means my attention is a tad exercised by shepherding 100+ others through current circumstances. Hope to fiddle with some curves at the weekend all being well but just wanted to pass on my appreciation of your comments and to wish you all safe conduct in the meantime. Tony8 points
-
Airfix 1/48 North American P-51D Mustang (A05131) Sneebo MC-T was the aircraft of Captain Sass of the 79FS, who first flew their Mustangs on 24 July 1944. It has reduced D-Day markings and carried pressed paper underwing drop tanks. There were five black stipes on each wing which were probably to assist when aiming in bombing attacks.8 points
-
NORTH AMERICAN P-51D MUSTANG Lt. Colonel John Meyer, 487th Fighter Squadron, 352nd Fighter Group, RAF Bodney Tamiya 1/48th8 points
-
Here is my finished Boeing 777-236(ER) which has been converted using the Revell B777-300(ER) kit. I opted for the British Airways livery and G-VIIB as it was a regular site for me when I used to work at LGW. I have converted this kit, and a full WIP can be found by following the link which is below. This was my first attempt at a conversion and when I had made the cuts and ended up with 3 pieces of fuselage I found it hard to imagine an end result. I followed some excellent advice given to me and persevered with it. The Revell kit is a nice build and goes together really well. The engines are the GE90-94s from BraZ as are the wingtips. The decals are from RichW and they have gone on brilliantly as well as the AA windows. The paints used were Revell 04 White Gloss for the upper fuselage (I opted for this due to an issue with spraying), Halfords Fiat Capri Blue for the lower fuselage and nacelles, Halfords Racking Grey for the wings and Revell 374 for the coroguard. The metals and greys are mix of Revell Aqua colours. This was my first time really masking off a demarcation line, although in principal it seems easy enough, but I’m too set on wanting it perfect. I used Tamiya flex tape for the tapered ends and thicker Tamiya tape for the straight sections. I think it has turned out ok. I studied several photos of BA’s 777 wings and I found they were all particularly dirty, especially the trailing ends and had an unusual light grey contamination on the upper surfaces. I have tried to replicate this effect on this model. The decals were easy to work with, with each one requiring cutting individually. The authentic airlines decals help to bring it to life. I have enjoyed this build, and it has encouraged me to do more conversions. In fact I am planning a B737-700 and B777-200(ER) in United and BA Landor respectively this year. Thank you for looking and as always any comments and feedback are greatly appreciated. Regards, Alistair7 points
-
So my Snowspeeder is done, and it's fair to say I'm very, very happy with this. As happy as I am with anything I've done. The Fine Molds kit is a little cracker (and I mean little). Painted with Artic White from the excellent Hataka "Orange Line" Lacquers and weathered with Flory Wash "grime", Tensocrom "smoke" and a little bit of oils. You know how I said it was small? Here it is on top of a YF-23 in the same scale....7 points
-
I find myself smiling a bit more now after Concept Testing and Methodology Training proceeded I put a few splashes of colour on my new Gazelle bodies and trimmed off a lot of unwanted tube afterwards I do not need the extraneous length of tube on them so I hacked off the excess and tried the rear filter cover in place This is sitting on a casually inserted blob of plasticene and awaiting the newly 'flatted' cover to be trial fitted. I really do not think it needs any extra detail from this though. Let it be known I still like the concept and it is where I will be taking this build For a while, at least I will now be concentrating in the cockpit there are oddball controls to fit and instrument decals to add to the instrument panels. I am still having no luck finding proper instrument dials for a twin turbined helicopter. I need duplicated engine revolutions and oil pressures for a start, doh...7 points
-
Right some progress I decided to try my hand at preshading, I've never tried it before but thought with, thinned white acrylic paint over the top it might look more presentable than my last winterised IL-2 which looking like I had emulsioned it ! Cheers Pat7 points
-
My next build is Airfix's 1:72 Handley Page Victor B.Mk.2 (my Christmas Present😁). Although my favourite aircraft to build are from WW2 era, my passion for real military aircraft comes from the 3 aircraft that made up our fabulous V Bombers. Of the 3 the Vulcan is my ultimate favourite, but the Victor, with its space age, almost alian loom is a close second. I plan to build the kit as it comes out of the box, using Vallejo acrylics in place of the suggested Humbrol. I am building her in the colours of 139 Squadron, Royal Air Force Wittering in the iconic anti flash white. Now down to business, the box is extremely large with beautiful box art. It contains a very detailed instruction booklet, colour and decal chart and a selection of decals. There are 10 very detailed sprues with no flash, and a small clear sprue. I am really looking forward to building this beast and hope i do her justice.6 points
-
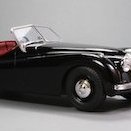
I painted this one three decades ago with Sikkens automotive colour base and clear but didn't get round to building it until more recently. I didn't think much of the kit's wheels and tyres so I used the wires from AMT's 62 T/Bird and their Parts Pack whitewalls. I couldn't be bothered with the motor this time and glued the bonnet shut. I'm a fan of Johan kits, despite their shortcomings.6 points
-
After some weathering I consider this one finished, it was a joy to build and paint. You can find the "making of" in the WIP section right here. Cheers, Ernst6 points
-
Just a little fill in job while waiting for things to dry on the Invader. Basic Hasegawa kit with Draw Decal decals. Fairly good kit but I found some of the more finer details (aerials etc) to be a little on the chunky side so I replaced most of those. Thanks for looking. IMG_0303 IMG_0305 IMG_03046 points
-
With the antenna wire attached the build was complete. I have to say it hasn't been one of my favourite builds, mostly because of the quality of the kit, but it has come together and looks ok. I will post a few more pictures in the ready for inspection forum. Thanks for joining me.6 points
-
And here they are already. They look like crooked teeth but I'm sure I'll be able to straighten them out a little bit. Plus they do look a little better when not zoomed in 🙂6 points
-
I've pretty much finished with the gun pod and blast plate. It's getting close to painting time! a comparison ... … a little shimming and filling left on the plate, but I'm happy with the shape.6 points
-
Or did it produce turnips? Not sure. This is the front of the 'shape' I needed to capture, I thought I had . But adding that shape to this shape. I got this in the rough. Not sure but press on. And a plunge over the top came up with this. This was quickly test pulled off a packet of pants, yes the plastic box a set of gentleman's covering gear was delivered from the shop in gave up some very fine thickness acetate to attempt a quick moulding. I quite like it, not as if I need total transparency in any way is it? OK already I know I should have set up the octopussy camera tripod, but time constraints, etcetera. Laters folks.6 points
-
Built this a couple of years ago. It's AMT's old kit which required a bit of massaging here and there to get a decent result. I mixed Zero acrylics to try and get a factory-correct colour scheme and I think I'm not too far off. I then cleared with Tamiya TS13 which was then finely sanded and polished.5 points
-
Here's the CLK GTR completed. One of the best cars ever, in my opinion. The kit is hard but rewarding in the long run.5 points
-
Hello from a flyspeck in Australia - I'm primarily a wargamer, but recently have been looking at a few model kits I have from when I used to build them...about 25 years ago now...and was thinking that it would be good to start doing it again (although I've never really stopped, I'm just shifting back to models for display purposes rather than models designed for specific games! I also have a small 3d printing business, and noticed a few posts on these forums where people put up the prices they've been quoted for printing, so thought that it may be an area to do some market research, find out what sorts of things model makers are looking for and hopefully be able to provide a service (once I'm happy with my engagement in these forums I'll contact the admins about having a subforum for my business, I would like to do things right by the owners here!) Anyway, based on recommendations from my lurking on these forums I picked up a few kits of aircraft although I'm definitely not at the level of some of you (honestly, amazing work!), I'll try and share my progress...I consider myself as completely new at this again!5 points
-
5 points
-
this may help this attempts to assign some Revell paints to RLM colours You can buy a paint chip chart here (not printed, paint chips) http://www.crecy.co.uk/luftwaffe-colours-1935-1945-paint-chip-chart which is the way forward if you want to check hobby paints and you have good colour vision Not all the photos are B/W, and while there are variations, subsequent research does things like find paint formulas and make paint to that specification. While it does get rather anoraky, there are some answers available that are extremely well researched if you take the time. examples, the JaPo books on the Fw190D mentioned by @Graham Boak, which are jaw dropping, they have pinned down as best as possible what each sub contracted batch (Fw190D were built by Focke Wulf, Arado, Gotha and other companies) were painted in, which was a massive amount of work from looking at photos. Bf109G-6, were built by 3 factories, each with a distinctive style of camouflage pattern application. Once you know what you are looking for, it becomes obvious. see http://theprofilepaintshop.blogspot.com/2013/10/chosing-correct-wingpattern-for-bf109g-6.html later 109 batches have distinctive camo schemes, tied into specfic werk nummers and factories. But this kind of research is ongoing and is not widely known unless you want to buy expensive and very specialist books, that then go out of print and get even harder to get. The other factor is more and more photos surface, ebay Germany has been turning up massive amounts of private photos, which add the the body of knowledge. You can take a short cut and ask here, and get potted versions of the research as answers. Sometimes there is not a neat answer. My final point is this, if members take the time to answer your questions, even if gets a way too detailed answer, say thanks, this forum has an exceptionally good knowledge base, we have a few members who do actually write THE books on the subject, and as such you will be hard pressed to get better responses. HTH5 points
-
Schemes LA-5 & La-5F Source: https://www.facebook.com/kovop/photos/a.182240158636508/1265131360347377/?type=3&theater V.P.5 points
-
Added to the assembled fuselages, the tailfins and high-mounted stabilizers complete the distinctive MiG-15 airframes. These kits are great to work with. Outlines are dead accurate, and the design and fit tolerances of the parts are so consistently tight that, so far, the models have required no filler at all.5 points
-
It's done! RFI over here.5 points
-
Let say - I hope so... Thanks for encouraging! I have change my mind - instead of constructing all frames in one half I cut them by half and start to fill both sides in a mirror symmetry Such kind of work was ok in case of build of mine Boeing Clipper 314 year ago. This is intended to have stiff both halves. Airfix Sunderland has construction with last few milimeters of wings moulded together with fuselage. So I have to cut it out The wings are not glued together. I have to construct side floats and their riging before I will glue top and bottom halves of wings. I have no drawings to engines of Short S30, only to S23. And I am not decided yet which exactly Empire I will build. If anybody can provide drawings of engines (cowlings, inlets and exhausts) for S30 I will appreciate very much. The scheme which I consider now the most probable is thata one Or that one (S30) The patrol bomber is more doubtful - I do not have spare Boulton-Pauld turrets and a lot of details are not sure (no drawings) Regards J-W5 points
-
Hi guys, after some layers of green filter, a couple of satin layer on the kit5 points
-
Hello all, Finally managed to get this one done tonight but only got one picture before the camera battery crapped out! just about typical for this build. I'll get some better images in the gallery as soon as possible: This one was a struggle and no mistake! but I'm glad I got something out of the GB. Many thanks to the host and co-hosts for, well....hosting. Cheers, Mark.5 points
-
Metallic layer ... done ... 🙂5 points
-
Hi folk's,number three finished Hellers little Tunnan.5 points


.thumb.JPG.2ce06c4ff2300a5faba93aaeacbdab25.JPG)


This leaderboard is set to London/GMT+01:00