
Leaderboard


Popular Content
Showing content with the highest reputation on 23/01/20 in all areas
-
I thought it was when I cut up a Vulcan to convert it to a Vulcan B.1a was when I had officially lost it, but wow.... I have built a second 1/72 Victor (much better than my first I think!) and am planning to buy a K.2 next to put on that lovely hemp scheme, after that I'll probably get around to a camouflage aircraft (perhaps by then there'll be a conversion set for the Airfix kit to make a BK.1a!). Not only have I built another of these, I also used Air Graphics' conversion set to convert this to a Victor B.Mk.2 at the very beginning of its service life, this is XM718 which I think was the final Victor built and left the factory with the later drooped leading edges on the outer wing rather than leading flaps. Anyway, my ramblings aside, here is my second Airfix Victor B.Mk.2: I particularly like his image from the front, probably the angle the Victor looks best from. Another great angle to view this aircraft from. The flaps and airbrakes are deployed, which isn't right for a parked aircraft but perhaps they were testing them or showing off the aircraft? Imagination needed there a bit. The awesome airbrake assembly of the Victor. It's one of my favourite parts of the aircraft, I'd love an airbrake door from one on my wall but they're quite big and I imagine quite rare to find. If XH673 is scrapped (I feel very strongly about how that aircraft should be saved!) I might go after one from that.... I imagine they'll sell off all sorts of bits, I can only dream... I'd still rather the full thing to to a good home though! And the underside, I don't think the weathering is that bad on here at all. I will admit, there's one spot I need to work on at the rear of the bomb bay where I'm still repairing the paint after a crack opened up between the fuselage halves. Bomb bay is open, the part at the front is held on my friction only so I can put on the closed bomb bay part if I so wish (and if I could find it!) which is also held on by friction alone, clever engineering from Airfix to be able to do that. And now with my other Victor I've said so much about Now having finished the model I think adding the extra intake vanes was an improvement aesthetically Here's where I used the resin APU intake (less than perfectly blended in) showing the difference between the original B.Mk.2 APU intake (XM718) and the B.Mk.2R (and later) APU intake (XL512) And my three Victors together Some pictures of my other Victors on their own: Mikromir 1/144 Victor B.1, XA940 Through a filter which I think is closer to how the model actually looks And my first Victor, also Airfix's Victor B.Mk.2R (built out the box that time), XL512. I need to replace the IFR probe on this which I snapped a few months ago (part of the motivation for doing the conversion on my second one of the kit was to end up with a spare, aside from the fact that I really really like early Victor B.Mk.2s)27 points
-
Excellent AMK model, it's really a pleasure to work with such a good model.22 points
-
this one took me a little longer than normal but got there in the end Academy kit with Furball Aero design decals PSX_20200119_160033 by Thomas Gotobed, on Flickr PSX_20200119_155839 by Thomas Gotobed, on Flickr PSX_20200119_155915 by Thomas Gotobed, on Flickr PSX_20200119_160106 by Thomas Gotobed, on Flickr PSX_20200119_160116 by Thomas Gotobed, on Flickr PSX_20200119_160135 by Thomas Gotobed, on Flickr20 points
-
Hello everyone I said to myself that I wasn't going to build another Italeri kit for a long time after the last project being more difficult than it needed to be, however here it is the Me410. Italeri didn't let me down, again it was a pain to build in some areas but I soldiered on and here it is. Comments and suggestions welcome and thanks for looking.20 points
-
This is my latest 109 completion, the V-30 prototype. This plane represents the morphing of the F to the G series with the airframe having aspects of both. I have always been intrigued by the configuration and paint scheme on this bird and am glad to have finally finished it. The build can be seen here:16 points
-
Hi to all Finished Messerschmitt in little different livery. Most of the Yugoslav Bf 109G-10/were captured planes at the end of the war, handed over to Bulgaria and finally delivered to Yugoslav Air Force. White 45 was located at Pula airfield on 1950, and was flown on patrol sorties along the Italian frontier during the confrontation between Yugoslavia and Italy over the free zone of Trieste (one of the first cold war confrontation after WW2). This plane is interesting because upper wings patriotic message written by pilot, meaning in rough translation "whoever invades our country will find his death in it". About model in few words, standard AZ, lot of details, and unfortunately hard to put parts together. In few occasions, i stop working on this model, discouraged by lot of fit issues....but at the end.....it very well represent late model of this famous plane. Paints, Humbrol, weathering Tamiya pastels and oil washes...added some details....big issue with canopy, and as i was not able to fix it i decided to cut canopy and display it in open position. I hope you like the model, best regards to all.....and pictures at the end16 points
-
Surprisingly, it didn’t take very long to get this ready for RFI. I didn’t finish everything (never did get around to adding the small piece of houseboat frame), but I’m reasonably happy with it. I made a small base from polyurethane foam and balsa wood and covered it with a surface to resemble something like a hot, dry Italian scene. I added some stones and some tufts of grass before gluing the tank in place. The figure is one of Tim Perry’s 1/48th items, painted with Vallejo acrylics. The WIP for the build can be found here; Thanks to all those who followed the WIP and thanks again for all of the encouraging comments. John.15 points
-
Almost… Out again tonight so that will get some time to dry.15 points
-
I still have to paint the black part behind the exhaust and the cannon.14 points
-
Been a long time since I called in at Britmodeller, but seeing as I've finished this one I thought I'd at least pop on a few pics......................... Sorry it's been a while since I've been around ... real life and all that. .............. Hello to anyone that remembers me, and I hope everyone's been keeping well. Cheers all ... Andi.13 points
-
My only thought would be possibly to ensure sufficient thinness of the trailing edge. Canopy glass is partly on now, and the oil tank is installed. I couldn't help myself, and added a bit of superfluous and undocumented detail in the form of a filler cap on the oil tank. Try not to think about how big that filler cap must be in 1/72. I also dabbed a bit of Tamiya XF-11 chrome silver(? I think) on a torn bit of small sponge to make some chipping on the seat and interior framing, as well as the oil tank. The fuse wires, which added a fair bit of extra effort, are totally invisible. Then it was time to put the gear on. In a perfect world, the two gear legs would be one continuous piece (as on the real aircraft) for reasons of alignment, but we don't live in that world. The instructions suggest gear first, then the lower fuselage plate, but you have to tug them out a bit and jam them back in when you do this or it doesn't work. The gear locating tabs don't fit well, but some Revell liquid glue soon sorted them out.13 points
-
I used the Aires wheel bays, but only for the front wheel.12 points
-
Ok time for another update, I had hoped to have started painting today but I got side tracked on detailing. First up these goodies arrived… …an improvement over the kit supplied ones, though I’ll have to make up new mounts for the twin gun arrangement up front. Least now they’ll have ammo belts feeding them! Before I forget a big thank you to Christer for the link he sent me for another build. That and the one I have for the boat for sale are a huge help with this build. Ok, first up I cleaned up some filler work from the other day, the jet deflectors had some poor join lines same with the ladders. The engine bay……. I mention previously it’s really quite bare and has those 2 open holes for the exhausts with nothing in them, so I needed to add something to at least make it look a little busy. So I added new exhaust system including mufflers or scrubbers ???? (those round cans) with proper outlets at the back. Some photos show flaps over these outlets…not sure about that. Repositioned exhaust on RHS engine. New covers for the inlets, I would have thought they would have draw fresh air form outside, but can’t find photos. These new covers are sort of based of the ones on the boat for sale. A lever setup above the jet assemblies. Now I’m not 100% sure, but to steer these boats they move the jet flow side to side which I suspect these levers do. Added a small tank and large extinguisher bottle in front of the engines. I still have to add a few more “small boxes” around the place and add lines. Thee small changes and painting will make a world of difference to the area. The rear looks much better, no open holes. The deflectors will be mounted in the up position. After reading the other build and looking at more photos I did notice that the cover/entry way into the engine bay was too tall, so I cut 4mm off the bottom. Now it fit the profile in the photos. I forgot to take photos, but above the 3 windows on each side there’s a rectangular opening, for what I don’t know, but it shouldn’t be there. So I’ve filled that with sprue, I have to trim it bad and fill. I’ve also started on the main cabin. I’ve added a small raised strip on each side that runs each side under the edge of the seats. I also need to fill a gap at the front and back of the floor as well. The only major work required here is I need to make a “jump seat” which is attached to RHS of the forward opening. This is for a seat, which can be placed in between the 2 main crew seats, it’s folded away when no in use. This whole thing will need to be scratchbuilt. So far I’m really enjoying this build, now I finally have some decent detailed photos (may not be 100% accurate but better than nothing) it’s making the build a lot easier. I have a long weekend coming up…starting tomorrow, so should have her all closed up by the end of it.12 points
-
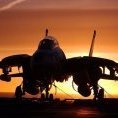
LOCKHEED F-104G, Belgian Air Force, 1971. 'SLIVERS' aerobatic display team. Kit: Italeri Lockheed F-104 Starfighter G/S (2514) Scale: 1/32 Paints: Vallejo Model Air & Vallejo Metal Color Weathering: Flory Models Wash, MIG Streaking Effects, Vallejo Weathering Effects Build thread: One of the last years last models I did. I liked the kit overall - it's good (but not great) in many parts, like the fit was mostly really good. Some things could be bit more sharper and more detailed - so aftermarket stuff can really enhance this kit. But it's not a cheap kit so I built it out of box, with some little DIY details added. I cracked the main canopy, the clear parts are real brittle with this kit. So I masked the canopy a bit with a tarp, if it starts to bother me I'll have to order a replacement part from Italeri later on. Actually I broke the forward canopy too - but mirageiv was awesome to send me a replacement part for that. Anyway, to the kit. Bit of a challenge to photograph, I tried to do it outside as it was nice day today.11 points
-
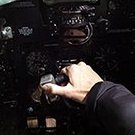
One of the most interesting cold war jets. MiG-23MF with side number 122. Model Trumpeter 1:32 scale, model made straight out of the box + Techmod decals.11 points
-
Almost ready to assemble! Say goodbye to the fan: Probably the last you'll see of that. I really need to stick things into the back of the cabin now to make sure they're in the right place. I'm hoping it'll make this better: A little bit wide at the moment. I also hope it'll help position the intake (is it?): Before I could do that I needed to mask: …and paint: …the cabin. I've also brushed over the side of the boxes. Better let that dry for a bit. The 'Pilot' pen's arrived: Nice, but too late for this build. It'll come in for internals though I'm sure.11 points
-
Thanks Phil (fnaar!) They were normal Scouts (8 to 14 I think) and yes, they all survived, although a couple got pretty close… Ta John I thought about that. Or having one open. But then I thought about masking the internals and thought 'fit them', it's easier. Most of the bits ready for spraying: The kit provides a single box on the back with the shaft running through it (snurf). 131 has two separate boxes. With vents and dents. Right: Some aluminium repair tape dented and poked: I'm hoping they look better painted. We shall see…11 points
-
Monogram 1/72 Twin Mustang F-82 Night fighter "Night Takeoff" OOB build with Print Scale decals.11 points
-
This is MJ966, flown by Denys Boudard of No. 340 Free French Squadron (code GW), 1944. The squadron was moved from England – where it provided covering fire for the Normandy landings – to France, Belgium and back again. Apart from all its wear and tear, another distinguishing feature of this Spit was the 50 gallon drop tank it sported. This is Eduard’s 1/48 tooling of the Mk. IX, and It’s hard to imagine a better spitfire at this scale. Eduard attempt a 1/32 level of detail in a smaller kit, minus the engine. Perhaps some sub-assemblies do seem more complicated than they need to be; the exhaust stubs and wheel wells, for instance. But it seems as though Eduard want you to get involved - to problem solve and build at the same time. The smallness, delicacy and precision of fit makes you slow down and appreciate not only this version of the plane, but the plane itself. The Mk IX is a thing of beauty, and this kit does it justice on both a small and large level, from rivets to elliptical wings. I added an Eduard harness - this being the weekend edition - plus their resin/ PE drop tank, and I used Tamiya paints throughout. The codes and roundels were applied using Montex masks, and the stencils were all another aftermarket addition from Eduard. Thanks for looking!10 points
-
F-15As of the 7th Tac Fighter Squadron, 49th Tac Fighter Wing out of Holloman AFB at Nellis AFB for Red Flag 84-5, August 1984. 77-0101 77-0112 77-0130 77-0133 77-0137 77-0140 77-0148 Thanks for looking, Sven10 points
-
The Revell/Monogram cockpit is more detailed than the Italeri/Testors cockpit. Therefore I decided to adapt Revell cockpit and instrument panel in my project (although it doesn't represent the real A-12 cockpit): First I divided front and rear cockpit parts, then cloned the front part and instrument panel as usual: The result is as follows: And the installed cockpit: The upper and lower halves were primed and the necessary areas were filled with liquid filler: Next step is to glue upper and lower halves together. Serkan10 points
-
Chopper is looking good. Can't believe everyone passed this one up. What kind of Scouts were they shooting and were there any survivors?10 points
-
An other old kit came to life. It had n't decals and everything on it are from spares. Paintbrush.9 points
-
If I’d had a 3D printer I’d only have wasted even more time... Groundhog Day! Last night’s jig failed utterly on first use, so back to Square 1. Though it is frustrating, I need to find a way to get this right, because 15 Swordfish will drive me completely / further [delete to taste] insane unless I find a way to build them securely. So, jig mark 2, this time (since the points of failure were at the joins) fettled from a single piece. The challenges to be fixed - essentially all at the same time, thus requiring about 6 hands - are: - the vertical height of the upper wing above the lower; - the lateral position of the upper wing (not that hard); - the correct angles (fore & aft and sideways, as described yesterday... when I didn’t even mention the inner pairs) of the struts; - holding the upper wing (correctly positioned as per the 3 points above) steady while fitting said struts & allowing glue to cure; and - rigging the bloomin’ thing. So here’s today’s effort, and it’s definitely an improvement: ...and here with the upper wing in position: [At least yesterday evening’s tail spar bodge seems to have worked OK, as you can see]. This is getting there, but still not completely right. I think I’ll probably carve a second one to go over the for’d cowling and under the front of the wing - probably much narrower to allow room to work between wings with the jigs still in place. I also need to adapt the wreckage of the Mk 1 jig to provide a clear indication of strut angles when seen from the side. Eventually I will get to a place where I can fix struts (0.4mm brass rod seems to match the White Ensign PE struts perfectly) to the lower wing with enough confidence that the upper wing will subsequently fit on top - probably by gluing only the bottom of each strut and using the upper wing as an aid to alignment while it cures. Then I can sort the rigging - Plan A Ushi line, Plan B White Ensign brass. And do it all safely enough to repeat the process 15 times without losing my mind. Not very well explained, I fear - but I think I know where I’m going with this, and this evening definitely represents progress. This cannot fail, or I’ll end up with Ark turning into wind... to launch a strike from an empty flight deck! Day off on Friday, so probably no more work until next week. Thanks for sticking with me while I experiment in public! Crisp9 points
-
Well, finally someone listened, Hobby 2000 has just come out with 1/72 Fujimi toolings of the A-4M and OA-4M Scooters! Now how many to order of each??? Hopefully the other variants to follow!8 points
-
Hi Folk,s.Picked up a Humbrol boxing Of this kit for a mere £2:99 on Ebay. As soon as it arrives I.ll pop a few pics Before starting the seller had a photof the contents and the decals look good. Hope to maybe add either an Airfix Draken or Heller Thunderjet later on.8 points
-
I'm going to attempt to make the second of the three of these in my stash as an FG1. The only major issue is those slotted tailplanes, but I'll worry about those later. It might be a case of cutting into them, or just leaving them and pretend slats aren't a thing on FG1s! However, I'll do my best on the rest of it, including these extra decals I bought especially a while ago (before I came on here and learned of those damned slats!). So she'll be camo, and my usual everything hanging out and down or open, regardless of the realities of hydraulics, etc, just because I think they look cooler like that. The box, familiar to millions: Extra decals! I'll need to add the red/blue roundel over the red/white/blue as I'm doing her to represent the early 80s colours. Furniture assembled and painted. Added my usual masking tape straps. I'd forgotten that Revell didn't include cockpit decals. Ok for some of you on here with your fancy painting skills, but I need decals! Did my best with a black biro anyway.8 points
-
Good night fellow modellers, here are some photos of my most recently comopleted model, Tamiya's excellent Me 262A-1a. I used the decals provided by Tamiya, and using the trick of hot water managed to make them thin enough to sink into the panel lines. I also used two brush strokes of Microsol. My next Me 262 from Tamiya will be painted in Major Rudolf Sinner's Green 1. I'll paint it in RLM 70/71.8 points
-
Well the final coat is on, not that it seems to have made much difference, so I am classing my Tunnan as finished. I will wait a day or two to see if I can get any decent pics in natural light as I am not bothered about being first in the Gallery, but here's one to be going on with. I am quite pleased with it. When the Tunnan A model entered service in early 1952 the front line equipment of the RAF was still the Vampire FB5 and the Meteor, with the recently introduced F Mk 8 gradually replacing the old F Mk IV - here is a pic for a laugh. Of course, by the time this improved Model E entered service in late 1955/early 1956 the RAF was begining to catch up as the early versions of the Swift and Hunter were with the Squadrons, but it would be a year or two before all the bugs were worked out, such as engine stall when the guns were fired etc. I have enjoyed this build, but now it is time for the Lansen! Cheers Pete8 points
-
More progress on the Deuce! The topside has been painted Air Defense Command gray, using True North enamel. The more I use the True North paints, the more impressed I am with them! They go on smoothly and cover well. I did forget to add a couple of PE items, but no problem as I still have to paint the underside. Some small panels at the elevon hinge: and an attachment for the landing hook: Speaking of photoetch, I've spent many hours bending tiny bits of metal and stress-testing my elderly eyes! PE details added to the landing gear: Here is the real thing: The nose gear door has a complex arrangement of struts around the landing light: Here it is after painting: For the landing light, I replaced the clear kit part with one of these: That's all for today!8 points
-
I’ve been rude enough about Merit / Trumpeter numerous times during this build - and no doubt will be again! - but credit where credit’s due; these wee Swordfish models are really nicely done. Missing out the oil cooler was an avoidable error, but the bottom line is that they provide the raw material to produce some really nice Stringbags in due course... provided I can sort out how to get the upper wings sorted out! The truly Eagle-eyed will already have noticed that the poor test mule (which is becoming increasingly battered and will definitely not feature in the final 810 / 818 / 820 air group) was once painted in an attempt at the shadow compensating scheme. The final aircraft will not have this scheme - but the amount of handling which this airframe is undergoing at the moment demonstrates yet again that @Jamie @ Sovereign Hobbies’s paints are fabulously hardy, as well as great colours.8 points
-
Too much going on... Glazing masked and frames painted interior green before moving to paint. Has been a while since I've painted D-Day stripes and wondered where to start. So, white is on, bound to have forgotten some part or other. Stuart8 points
-
Paint masks, marking options, decals, images of sprue, instructions can be found here: A-4M https://www.hobbysta.pl/douglas-skyhawk-vma-214-blacksheep-p-76392.html?osCsid=ug3spupc9bpqdqolptl6qkogn0 OA-4M https://www.hobbysta.pl/douglas-skyhawk-p-76393.html7 points
-
Flory wash applied and left to dry overnight.. Then removed carefully with damp cotton buds & paper towel. Pleased thus far.. next stage , weapons & pylons then hopefully a final tidy up and some more weathering. Enjoying this build ... cheers 👍7 points
-
Today I painted a couple of panels behind the wing in dark aluminium for a bit of contrast and the panel around the exhausts in magnesium as this panel is noticeably darker even on very clean machines. Then masks off! Big Beautiful Doll: Nooky Booky: No paint bleeds which is pleasing, just a little touching up due to a bit of inaccuracy with my masking. I must repaint BBD’s exhausts too. AW7 points
-
Update #2 - Progress assembly and correcting the warped fuselage Managed to complete a little bit more on this kit and in the end I just had to resort to some major surgery. Once I glued the horizontal stabs in place the rear fuselage still looked all twisted and warped. I deliberated about it for a while, then decided that I just couldn't live with it looking like this. So out came the razor saw and off came the tail end! The two assemblies where filed at a slight angle to correct the alignment and then glued back in place with CA. Once dried, wet n dry paper of various grades blended in the join and I'm happy to say it looks so much better than it did earlier on. The one piece cockpit tub was inserted in place, however the underside of this parts design doesn't look great when viewed through the open wheel wells. Although not quite accurate, I placed plastic card inside these openings to hide the ghastly appearance that Heller provide. It's all a bit too shallow, however I'll paint it black and try to hide it all that way? Cheers.. Dave7 points
-
Just remembered that a couple of years ago I kitbashed a Vc from their latest MK.I/II, spare AZ bits and the good old spares box. Timescale fits 😆 Trevor7 points
-
Regarding most people who are still refighting conflicts decisively ended hundred years or more ago: Most of them live divorced from reality (at least regarding history) Cheers, Moggy7 points
-
One Japanese ship modeler Dai Sasahara 笹原大 builds awesome and great models in 1/700 scale. His works pushes the limits of the possible This is real nanotechnology in modeling! Everyone who makes models on a scale of 1/700 or 1/350 should get acquainted with his work and learn for yourself a lot of new and useful. And inspire yourself to new projects He wrote this books And I want to share and show his brilliant models for all of you Battleship Mutsu 1933 1/700 P.S. for moderators - If this topic is in wrong subforum, you can move them to the correct subforum.6 points
-
a bit out of my usual modelling comfort zone is this Matchbox Twin Otter flown by the now defunct Costa Rican airline Nature Air. I built this kit about three years ago as my son worked in Costa Rica for a while and flew on one of their aircraft to get to the Pacific coast site he was working at. The model is more or less from the kit, although the windows were blanked off and decals used instead as the modelled aircraft had a different window arrangement to that of the kit. The kit is a bit basic in places and I ended up refining some bits like the nose gear and as it was in the original three colour moulding of white, yellow and black was fun to paint. Decals were I think from Aztec and seemed to work OK, if a little fragile. Hope you like it.6 points
-
Hi all, Imagine a member of the Soviet Mil design bureau defected to France in the early 1960s, and worked with Sud Aviation to create a family of helicopters with an SM ("Sud/Mil" model number prefix...Here's one such machine, a SM.1203 Capybara twin-engined heavylift chopper of the Israeli Defence Force in the early 1980s: Sud Aviation SM.1203 Capybara by Zac Yates, on Flickr Sud Aviation SM.1203 Capybara by Zac Yates, on Flickr Sud Aviation SM.1203 Capybara by Zac Yates, on Flickr Sud Aviation SM.1203 Capybara by Zac Yates, on Flickr Sud Aviation SM.1203 Capybara by Zac Yates, on Flickr This was what I had in mind for the leftovers of my Starfix Nord Noratlas when I came up with the Phenix project. And, like that build, this was loads of fun and very satisfying! The main rotor is Airfix 1/72 Lynx and Sea Lynx blades mounted to a Frog 1/72 Sea Fury prop hub with pitch links and head detail from an Italeri 1/72 Bell 412, the tail rotor is also from an Airfix Sea Lynx (as did the exhausts), and the undercarriage, intake fronts and fuel sponsons came from spares. The decals are from the Italeri 1/72 AH-6 Night Fox. I'm rather chuffed with this. I hope you like it! Sud Aviation SM.1203 Capybara by Zac Yates, on Flickr6 points
-
My first Luft'46 build! This isn't build as per the instructions, I decided to switch out the nose to the fighter version to represent a late prototype of the two seater or perhaps an early production aircraft. They were never built, so imagination as to what the purpose of this aircraft was is required. This was built as part of a group build. With my Do335 from the Christmas Blitzenbuild Here's the model with my Me262 which the proposed P.1099 was based on, the model was actually the first model I put on Britmodeller in October 2018. The kit is Revell's 1/72 kit from the '90s. Overall got to say I'm impressed with it. Bought it on impulse and I'm glad I did.6 points
-
Hello, Here's my just finished 1/72 Italeri SF-5B. I was looking through the stash after my previous build, a grey Harrier GR.7, and thought this would be a nice colourful change. The kit does offer a Spanish version out of the box, but the decals didn't look right to me, so I ordered an aftermarket sheet from Series Españolas. These were much better, and worked very well. I painted the model with Vallejo Metal Color and some Tamiya black. Overall, it was a fun build, with only the canopy actuators being a bit fiddly. Thanks for looking, I hope you like it.6 points
-
Hawker Tempest Mk.5 56 Squadron, Fassberg, Germany, 1945 Heller kit with raised panel lines removed and replaced with scribed detail. Canopy replaced with a Squadron vac form. Painted with Xtracrylix and finished with Xtradecals. I think Heller got the shape of the Tempest 5 just right. This one has been in the stash for more decades than I care to remember – built at last. Chris6 points
-
The big problem with Scout shooting competitions is that the little buggers can still run pretty fast at that age and are rather difficult to hit! Nice paintwork though Ced! Ian6 points
-
6 points
-
20200119_172748 by James Skunk, on Flickr6 points
-
Bummer. I was about to finish the ejection seat on the J29 last night. But I feed the Carpet Monster with one of the PE belts. So I had to put an emergency order to my local dealer. And thankfully a resin seat was avaliable for immediate order. So perhaps I'll have it, and some other goodies, in the mail by friday. /Bosse6 points
-
Dennis, You are quite correct to quote Lewis re- the FE 2B, (his book is extremely interesting and I recommend it to others very highly). The FE 2b still has a lingering reputation in some quarters as being a death trap which is simply unwarranted by the historical record. When it came into service in the summer of 1916 it was more than a match for the Fokker and Pfalz monoplanes which it encountered, as it was heavily armed and slightly faster. It was also more manoeverable than the monoplanes and could absorb much more punishment. It was at least as important as the DH 2 in ending the period of the "Fokker Scourge" in 1916 and helped the RFC gain air superiority for the battle of the Somme. It was not really until the Albatros scouts appeared in late 1916 that the Fee met its match, but then defensive tactics were adopted which made them harder to shoot down. Skilled pilots of the calibre of von Richtofen could them down but usually when they were isolated, not in a group. (von Richtofen was no fool: he did not usually attack the enemy unless he thought that the odds were in his favour). However due to the lack of suitable faster tractor fighters in the early months of 1917, the RFC continued to fly FE 2b's long after they had really become obsolete as front line day fighters/observation aircraft on the Western Front, and then losses began to mount alarmingly. Sadly it was this later period that critics focus on and remember and it was this partial view which distorted the truth for quite a long period of time. The DataFile no 147 quotes the first hand experiences of crews: in one of the examples quoted the crew states how their aircraft was badly damaged yet the pilot was still able to get back to the landing ground. Other examples show that their machines were both liked and valued by their crews, at least until the spring of 1917.6 points
-
Rob: Here is an image of the pipe that I use: I place a sheet of A4 plastic into this tube (it could be another size) and press it against the sides of the tube with a long piece of 1/2 inch (1 cm) dowel. I have to press the plastic a little because it does resist conforming completely to the curvature of the tube. The curvature does not have to be complete - a small amount of mis-fitting does not matter. The plastic sheet looks like this when it has been extracted: You can see that I have marked out a top wing for an Otto Doppeldekker on this sheet. I am indebted to Stevehed for this idea. P5 points


Wedge-TailedEaglePortraitRaptorDomains.thumb.jpg.41a306d3445a68f0f2df773e01776ea6.jpg)


This leaderboard is set to London/GMT+01:00