
Leaderboard


Popular Content
Showing content with the highest reputation on 20/01/20 in all areas
-
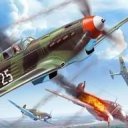
My latest completed kit is the 1980s Airfix 1/72 Lancaster which my dad picked up for me at a car boot sale. She's pretty much built out of the box though I added a bit of detail in the cockpit with plasticard and scribed some extra panel lines on the wings. She goes together really well for a forty year old kit and very little filling or sanding was required so I managed to preserve most of the raised rivets. I decided to model her wheels up - there's not much detail on the undercarriage or wheel wells and I figure it's hard to beat a Lancaster in flight anyway! The stand isn't finished yet, I'll add a proper piece of threaded rod to the wooden base, rather than balancing on the m8 caphead which you'll see in the photos. The stand will screw into a nut glued into the bomb bay doors and the doors are held on the model using two small neodymium magnets at each end of the bomb bay. This allows the Lanc to be easily removed from the stand (without unscrewing anything) and also reveals the bombs. The paints are mostly Tamiya acrylics but I went for the Mr Color version of Dark Earth. The only real problem I had with the kit was trying to use the original decals. I ended up cutting away as much of the yellowed carrier film as possible and had to "glue" some of them on with Future, they also reacted oddly to the decal softener (with and without Future) so aren't settled down particularly well. One good decision I made was to mask and spray the thin black and red lines on the top and bottom of the wing so I didn't need decals for these. Finally, the weathering was a bit of an experiment. I did a mottled pre-shade between the rivet lines to get the tonal variation in the panels and I added to this with brown and black oil paints. The chips are done with Tamiya flat aluminium and a fine brush and the exhaust stains are a combination of sprayed and painted oils. Spraying thinned oil paints works really well and has the advantage of being very easy to clean off if things don't quite go to plan. Thanks to everyone who tagged along for the WIP, your reference photos, tips and encouragement kept this one going right to the end, even when the decals were driving me mad! The WIP is here if you're interested: Enjoy the photos! I hope you like, thanks for looking! Sam33 points
-
Good evening everyone, Time for the latest off the shelf,the Trumpeter 1/48 Sea Vixen.I bought this kit because I have wanted to do the Vixen for quite a while.I then read a review on line and wondered what I had bought as the review was not positive.After building the kit I must say that I had absolutely no problems at all and would even go as far as to say this could be the best kit I have ever done,the construction and fit are great,the details are great and the decals are great. The kit is built straight out of the box and brush painted as always with revell/humbrol enamels.32 points
-
Kit from AMK, added photoetched set from Eduard, wheels from Res Im, flaps from Aires, pitot tubes from Master. Best regards and good modelling, Alex,28 points
-
Hello. This is Czech MiG-23BN from Eduard (ex-Trumpeter). Used photoetched Eduard, weapons, exhaust nozzle, wheel bays, air intakes and wheels from Brassin. I hope you enjoy this new job of mine Alex. Russia.25 points
-
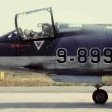
This Tamiya F-84 is a great kit, highly recommended. I had a Verlinden and a CMK resin set and I used one resin part and two PE parts from them, they just weren't that much of an improvement, and next time I do one of these I won't use anything but the Eduard seat belts, and maybe the instrument panel. The PE parts from the CMK set were the instrument panel and the rear view mirror, and the resin part is the detail that fits inside the back of the canopy. Alclad ALC 101 was used for the base color, a few panels were done in Alclad Dark Aluminum, 107, I think. Tamiya acrylics and Model Master enamels were used for the markings and other painted parts. The markings are for the airplane flown by Lt. Jacob Kratt, who shot down two MiG 15's and a Yak piston engine fighter. Not your usual F-84G record in the Korean war as they were tasked with ground attack most of the time, though they were used to escort B-29's early in the war. Jacob Kratt was in the 56th Fighter Group in WW II, and flew the U-2 for the CIA. He was born in 1925 and died in April 2019, a long and eventful life. I had a Cutting Edge decal set and used a few decals from it but it was primarily used a reference for the markings which were mostly painted, except for the stars and bars. A few years ago (August 2008, does time fly or what!) I built an F-86E in Robbie Risner's markings and it's a natural companion to this F-84G so you'll have to look at a few pictures of them together. Robbie Risner also had a long an eventful life, with a long period spent in the Hanoi Hilton, I built the F-86E in 2008. Here's the build log: http://yolo.net/~jeaton/mymodels/f86/1f86e/1f86e.htm21 points
-
Hello, Built basically out of the box, with minimal additions such as HGW seatbelts, thinned IP bezels and a few other fixes. The model is quite nice to build, and I even played the game of building and painting the inside: so mcuh fun ! However, adjustement of the engine cowling is a real pain... same as with its 1/32 brother. Also, it seems that some slight surgery is needed to close the canopy. Decals of my box were out of register and replaced by a reference from EagleCals, despite a slightly over-scaled swastika and colors too flashy to my taste. At the end, a fun build but I dont feel that the 60 Euros tag price is justified... Antoine Green 3, piloted by Josef KEIL19 points
-
Finished a couple of days ago, this is the latest addition to RAF Ouston's Harvards, a Revell 1/72 T-6G Texan kit, converted to an RAF Harvard. The work involves making a longer rear end to the canopy, using an Airfix Canadian Chipmunk canopy, plus using the old Airfix Harvard kit long exhaust, removing the various hard points for the Texan's weapons, and various small detail changes. KF193, 607 Sqdn, Ouston, Sept 1951 (3) w by Philip Pain, on Flickr KF193, 607 Sqdn, Ouston, Sept 1951 (10) w by Philip Pain, on Flickr KF193, 607 Sqdn, Ouston, Sept 1951 (12) w by Philip Pain, on Flickr KF193, 607 Sqdn, Ouston, Sept 1951 (14) w by Philip Pain, on Flickr KF193, 607 Sqdn, Ouston, Sept 1951 (22) w by Philip Pain, on Flickr KF193, 607 Sqdn, Ouston, Sept 1951 (26) w by Philip Pain, on Flickr It is finished as KF193, one of three Harvards used by the Spitfire equipped 607 (County of Durham) Squadron at RAF Ouston, and seen in the colours it wore at the September 1951 RAF Acklington Battle of Britain display. RAF Ouston's Harvards could fill a book, and the following photos show the schemes built so far - 22 SFTS KF314 'FCIT' all yellow in 1946 - KF373 'RAN-A' still in wartime camo, ex-22 SFTS but now 607 Squadron's first aircraft in 1947 - and KF193, also ex-22 SFTS but repainted in modern post-war colours with 607's new code letters 'LA' following transfer from Reserve Command to Fighter Command in 1951. KF193 did not wear the usual post-war yellow 'T' bands on wings and rear fuselage, and the position of its fuselage roundel shows that it never had done. Ouston Harvards (1) w by Philip Pain, on Flickr Ouston Harvards (2) w by Philip Pain, on Flickr Ouston Harvards (4) w by Philip Pain, on Flickr Ouston Harvards (7) w by Philip Pain, on Flickr I've identified two further schemes which will follow in due course - FX280 'RAN-B' all yellow, 'C' type roundels; and wartime camo/yellow 'FCJA' of 22 SFTS, serial nor yet found. I'm also searching for an example in post-war silver/yellow 'T' bands, but no luck with a photo so far. Durham UAS is a likely contender. Any help with photo sources would be greatly appreciated! Thanks for looking.19 points
-
Hello all; I normally stick to Allied air forces but this paint scheme has been a bucket list for a while and I finally had a go at it. The full story of the multiple approaches and repaint can be found on my site. As usual, comment and corrections welcome. Cheers; Mark.19 points
-
Hi everyone, my first completion this year. A nice kit with loads of detail, a few fit issues around the engine nacelles and wing joints but nothing to demanding. I chose the most colourful example on offer, an aircraft from 6/ZG 76 operating in Greece circa 1941. MRP paints used throughout, followed by an oil wash and Alclad clear cotes to finish. Additions I used were resin wheels and exhaust set plus a starboard engine. Thanks for looking, gazza l16 points
-
Just finished another Academy F-8 Crusader. I absolutely love this mould, I would love to shake the designers hand and buy them a pint...! F-8E, VF-162 'The Hunters', USS Oriskany 1966, Task Force 77, Vietnam. Airbrushed with Tamiya acrylics (beautiful to work with), light wash with Flory grime and sealed with Xtracrylix flat varnish. I have used etch for the seat handles as the kit ones are overly thick. Etch for the seat straps too. I love this shot: Cheers gang. Phil14 points
-
Oh no, she's off again! The FrankenDornier build is having one of its periodic stalls at the moment. I don’t feel like trimming out the vac form transparencies just yet, and it’s too cold for spraying paint about. Yet the itch must be scratched, and so I scanned the stash for a suitable build. I was after something that wouldn’t be too taxing, might actually fit together without too much bother, and would fill a gap in the collection currently filled by something I’m not happy with. Let me tell you a story. The Bristol Aeroplane Company had been developing a twin-engined heavy fighter. The Beaufort was filling a need for a torpedo bomber, but the poor old Blenheim was showing its age. The result was the Beaufighter, which was adapted from the Beaufort. You can look the rest up on the web, if you don’t know. Anyway, the Beaufighter was ideal for carrying the rather bulky airborne interception radar sets being developed in the late summer of 1940, and the type began to be delivered to No 25 Squadron, RAF Fighter Command, at the end of September. Back in the dim and distant, I purchased a High Level kit of the Beaufighter MkIC. It was my first proper short run kit, and was a bit of a baptism of fire. Let’s be charitable and say it wasn’t all that bad, but needed some skills I hadn’t quite acquired at the time. It consequently spent a long time on the Shelf of Doom. In the end, in order to actually finish the bl**dy thing, since there weren’t many other MkI kits out there (so I thought at the time), I grafted on the engines and cowlings from the old Airfix Blenheim MkIV. There it is, delivered, factory fresh with the delivery mileage only, still to be given an ID letter. It would do, even though I never got the nose the right shape. A while later I spotted the Hobby 2000 kit. It was the correct mark, had the markings I wanted, and turned out to be a rebox of the Hasegawa kit from the late 1990s. In the stash she went! To cut a long and rambling story short, I’ve volunteered to help out with a Battle of Britain 80th anniversary display later this year. I thought it might be nice to build this kit, first for the display, but also to replace the High Level example in my display cabinet. So, here we are. It's an attractive boxing, clean and unfussy. I confess to never having heard of the brand before. When I first got the box and inspected the contents, I wasn’t expecting too much. The instruction booklet is A4 size, in clear print. This is obviously not a short run kit (I didn’t know the provenance at this stage). Four different sets of markings printed by Cartograf, with clear colour guides, and a masking set. Okay, it’s one of those vinyl things, but it’s included in the box. Would that more manufacturers would include such things. The penny dropped when the "Made in Japan" labelling was clocked. Obviously, this was going to more than a cheap repop. Well, that’s comprehensive. Wait! What’s that? Torpedo and rockets? Alternative noses. It seems this box contains parts for all the other Beau marks as well. Spares box ahoy! It turns out the Hase kit dates from about 1998, and has been reboxed and reissued a number of times before Hobby2000 did it. Despite being over 20 years old, it stands up very well against the stuff appearing from the big boys today. Hopefully, no trauma shall be encountered during this build. I will make a start later, but this build might be a little protracted since paying work has to take priority. Still, I’m looking forward to putting this kit together.13 points
-
Evening everyone, A while back I tackled the Italeri re boxing of the 1/48 Academy Hunter Mk6. It’s a nice kit if a little simple in the cockpit department and with some of the finer details such as the various undercarriage components suffering a quite prominent mould miss match. I replaced some of the smaller details with aluminium tube as well as the pitot. As ever a mixture of Mr Hobby and Tamiya paints with the under-fuselage and wings being primarily AS12 decanted for the airbrush. I always intended to replace the undersized seat with a resin replacement but didn’t realise that this would mean the new seat would foul the top of the Perspex canopy. After much consternation, the only realistic option (because by this point basically everything was done) was to cut away the very bottom of the seat such that pretty much the seat cushion is resting on the cockpit floor. Had I bought the seat when I started the kit ( that would involve planning), I would’ve also opted for a properly sized resin cockpit or removed the floor. The version of seat I bought didn’t have a face blind handle so I made my own with fuse wire which I was pleased with. Bit of a nightmare with the intake trunking so I also fashioned my own blanks for both ends. I chose a scheme from the excellent Xtradecal X48192 to represent a Mk6 Hunter of the Day Fighter Combat School based at RAF Stradishall in 1961. I kept her fairly clean and went with a semi gloss finish. I used Eduards canopy mask on this one to speed up the build. This classic British jet is an attractive bird in any markings. The next one will have to be Airfix, just to compare the difference. Thanks for looking. Rick12 points
-
Thanks Tony, appreciated Oh, sorry Andy (he said in a sarcastic voice), I must be confused Thanks Keith, good tip I can't go to sleep with this on my mind so I tried the high-resolution Canon Inkjet and still no joy. Not surprising, really. So, this is all you're getting: It'll look fine. I just (!!) need to add a few wires and that funny bottle thing (and maybe fans) and we're done on the back.12 points
-
Life after Fly. I have now officially been declared criminally insane by the collective BM Judiciary following my misadventures with Fly's missed opportunity of a Wessex. As punishment I have in my absence been sentenced to complete of all things, a plank wing. Horror!) A species which is way out of my comfort zone, but never being one to turn down a challenge (see aforementioned Wessex as prime example!) I have accepted my punishment as fitting as it may be (I've already been detained in the colonies for many years now) and shall attempt this strange shaped flying machine with what is left of my sanity. This is the object of my punishment. In various corners of t'interweb I have read several reports and reviews of the Classic Airframes Venom and Vampire. It appears that one of them is a little kitten to assemble, and the other is a right pig. Which of those I am starting, I do not know, nor do I wish to know. Hey! I even cleaned up my workbench for the occasion. As always, I started without looking at the instructions. There don't seem to be many parts so I should finish this in a few days, okay then, months. Still way ahead of any of my other builds. First thing up were the rotor blades. Easy enough. Though after looking through all the bits I couldn't find a rotor head anywhere! Better check the instructions then. Wow! No rotor head! How does this thing fly then? Ah, the instructions do make things a little clearer. So, hiding my disappointment I resorted to removing some of the resin parts from their plugs. The hacksaw may seem like overkill, but I've found that it's much easier to remove the major part of the plug with a hacksaw, then go back in with a razor saw to remove smaller sections with the razor saw to get down to the actual part - it also stops me breaking so many razor saw blades. If I followed the instructions I'd be starting with the cockpit so here's one of the tail booms instead. Is this a little bit of a gap I see before me? Undeterred, I forged ahead, reckoning I could sort that problem out later. The wings presented a bit of a head scratcher though. The instructions say to remove the aileron completely from the upper wing half. However, on examining the aileron I see that the upper surface has the end of the aileron just inboard of the outer edge, but this is not shown on the lower surface. So where exactly do I cut? (after spending much energy looking for decent photo's on interweb I just found the shot I'm looking for in the BM walkaround section. After reaching that dead end I went back to the cockpit. CA provide a nice little resin instrument panel, but don't include anything to decorate that darned thing with. My limited transfer collection doesn't offer much in the way of solace either. Most of the Airscale dials are too large and it looks like my best chance lies with trying to re-purpose some 1/48 Wessex transfers So I consoled myself with making a start on the ejection seat. This was a strange new world to me - I've never built anything with an ejection seat before and it offered much confusion and head scratching. What Mk of seat was this? What colors should everything be? Again, resorting to the encyclopedia of Google, I really wasn't that much better off. I had answers ranging from the MkIF to the MkII(insert anything from the alphabet here). Cockpit photo's of the Venom are a bit of a rarity on the internet. They obviously don't have much in the way of porn factor and can only be found in the odd cobwebby corner here and there. The seats that I did find that purported to come from Venoms didn't look much like the part I have here. Well, I had decided that I am probably going to do this as much out of the box as I can and from the reports, you can't really see anything once it's assembled so off I went adding generic colors, starting with dark earth Then decided that was too dark and went for a buff color - but then I got distracted as a new monitor for my work bench turned up and I had rearrange a bunch of things to make a space mount it on the wall. Not a very auspicious or exciting beginning, but boy does it feel good not to be working on that damned Fly kit after all this time. I should have mentioned that I shall be doing this as one of 28 Sqn's Venom's - luckily the kit does include transfers for just such an outcome, which is great as photo's of 28 Sqn's Venoms are about as rare as an accurate Fly Wessex til next time...11 points
-
In December last year I had some fairly major heart surgery done to fix a leaking valve and to bypass some blocked arteries. Glad to report that the operation went well and I am now in recuperation and recovery mode. The bonus of this is that I have 12 weeks off work and an opportunity to sort out and scan some of my photo collection. To begin with I have examined my RAF VC10 archive, and have scanned a number of older slides using my new Plustek scanner. I have combined some of these older air to air slides from my collection with more recent work done digitally, and here's the first instalment. Hope they are of interest, c&c always welcome. VC10 C.1 XV108 of 10 Sqn in the original RAF white/LAG/blue livery seem somewhere off the East Coast of the UK in May 1991. VC10 K.4 ZD242/P of 101 Sqn in the original hemp/LAG scheme worn by the tanker tens as seen in March 1998. VC10 K,2 ZA140 of 101 Sqn in the final all over camouflage grey scheme photographed in May 1996. VC10 K.3 ZA148/G of 101 Sqn. one of the four ex East African Airways Super VC10s, that were converted into 3 point tankers for the RAF, as seen in October 2000 over the North Sea. VC10 K.4 ZD230/K of 101 Sqn in the later overall grey livery. This aircraft was formally registered as G-ASGA - the first Super VC10 built, and is seen here in December 2002. VC10 C.1K XR808 in 10 Sqn markings, seen over ARA 8 in Feb 2008, To mark 40 years of RAF service, VC10 C.1K XV104 was given this commemorative scheme in 2006 and is photographed here in October of that year. 101 Sqn celebrated its 90th anniversary in 2007. To mark the occasion VC10 C1K XV105 was given a black fin and special markings and is seen here near the Bristol Channel in November 2007. VC10 C.1K XR807 in 10 Sqn markings seen in the company of three Tornado F.3s in November 2001. VC10 K.3 ZA147/F of 101 Sqn seen about to tank 2 x Tornado GR.4s in August 2012, the penultimate year of VC10 operations. Another photo of ZA147 from the photoshoot in August 2012, this time formating alongside C.1K XV108/Y of 101 Sqn. VC10 K.3 ZA150J - the last VC10 built, of 1312 Flt at Mount Pleasant Airport, seen overhead the Falklands Islands in the company of a pair of 1435 Flt Typhoon FGR.4s. Thanks for looking. Mark11 points
-
Hi all and here's my first finish of 2020 - Revell's re-boxing of Heller's CL-415 Fire Bomber in Canadian Gov markings. First started for the Flying Boats GB here last year; never got finished for that but now all done! The short build thread is here but to recap: Kit: Revell 04998 CL-415 Build: OOB Paints: Tamiya Pink primer from a rattle can, Revell Aqua Colours with an airbrush. Klear, Flory Models Wash Decals: From the box...they were shocking. 😧 Extras: 30g of lead sinkers in the nose and Metal u/c set from Scale Aircraft Conversions Notes: The extra kit parts for the 415 model (new engines/Aerodynamic bits) don't fit very well. I think the metal u/c set is needed as the kit parts are very skinny and not sure the would take the weight. The decals didn't actually stick and had to be stuck down with multiple coats of Decal setting solution and Klear. Trying to fit her on the table for a photo was a laugh...just managed it! Revell CL-415 Done_1 by Dermot Moriarty, on Flickr Revell CL-415 Done_7 by Dermot Moriarty, on Flickr Revell CL-415 Done_5 by Dermot Moriarty, on Flickr Revell CL-415 Done_8 by Dermot Moriarty, on Flickr Revell CL-415 Done_13 by Dermot Moriarty, on Flickr Revell CL-415 Done_11 by Dermot Moriarty, on Flickr Happy to finish it and something different for a change. Thanks for looking and happy modelling. Cheers, Dermot11 points
-
Thanks Cookie Not calibrated yet; we'll have to wait for the test flight. Thanks Giorgio, appreciated Thanks Bill Liking small choppers (fnaar)? Might be… old ones anyway. Thanks Andy - behave! I/p finished: perdu recommended watercolour pencils and Karisma silver. I very tentatively gave it a sealing coat of satin varnish after that shot - luckily the decals haven't lifted. Phew. Can't really do much until the pens arrive so I've moved elsewhere. The tanks are fairly well represented (they're sort of bladders in a solid bucket) but the edges needed sanding down a bit (before and after): Bit more? Things are being prepared for painting DG: Back to the back of the panel. The battery needs 'a green thing on the side': Painted more than I needed in the event that it pinged when cut. It did. Then I remembered the patent anti-ping device: … and, once I'd dug the tiny bit out of the Tak, it got glued on and touched up: Two of the three white things are due today so I've painted a spoon to practice on: Later.11 points
-
Thanks Keith, Benedikt, John, Ian, Roger and Hendie Wait, wait, it's not finished yet! The MicroSol has done its work nicely: … ready for some colour dabs in the morning. As it was mostly dry I decided I could paint the battery: There it is… no look, just to the right of the battery image. Yes it is SMALL! Nevertheless some of you (you know who you are) want the label too? Right. Might as well do these labels as well: …on the 3mm wide i/p base No, no, I know what high standards you hold me too and I will do my best. Here are the designs in Inkscape: What do you mean you can't read them? Honestly. Here they are before I reduced them to 'actual size': I'll fire up the Canon inkjet in the morning but the laser won't print them - too small. At least I tried… (Only kidding guys, let's see what's possible)11 points
-
Hi all, I finished this early last year, my first and probably last torpedo bait as I only built it to fill in my non-wingy thing RAF mass project for completeness. Austin K6 tug and land trailer are fully scratch built, the Launch is just a detailed up Airfix kit. Thanks for looking ATB Sean10 points
-
hi all, Here are some photos from a recent visit to Kuwait with 4Aviation. They cover the air show and also a visit to the air ambulance and police hangers. The hospitality shown was amazing, even if the show itself was a little small. It was a case of quality not quantity. Andy10 points
-
So we've tentatively accepted an offer on our house. Some details have to be hashed out, and no contract's been signed, but we have a verbal agreement. Looks like I'll be trading Hedgehog Manor for new and more expensive (possibly ruinously so) digs by April-May, depending on when we find something. The goal is to have a home with a bedroom for us, one for the boys, a guest bedroom, and a study (ostensibly for me and Mrs P, but I have more books by a factor of ten and will soon triumph). Side effects: lifelong house-induced poverty, possible membership in a homeowners' association (fascists), and who knows what else. Hopefully, Ced, Bill, and Cookie will be able to visit now, even in the hot summer months, since we're gunning for central air. Yes, the Family Procopius may end up with a house designed within the last seventy years, instead of our crumbling 1921 hovel. We are going to be so poor for so, so long. Now, as for the Lysander, I started test-fitting the clear parts, and, uh, you recall that lovely scratchbuilt oil tank I did? It's gone. It prevented the side panes from fitting properly. I had to veeeeeeeeeeery carefully extract it with my scalpel, cutting in all sorts of unsafe directions, but I got it out okay. The replacement will either be part of a Mk117 bomb from Hasegawa Weapons Set 1 or one of the cigar-shaped Eduard Spitfire droptanks as used over Normandy by some squadrons. I'm leaning towards the former.10 points
-
I had this sitting in my stash for awhile. It was an absolute joy to build - up to the very last stage. I had intended to do the very attractive XP629 of the Macaws display team from the Xtradecal sheet X72291. Here is the only photo I have of the almost complete model (sitting next to my in progress Victor). On spraying a coat of Tamiya Semi-Gloss clear from a rattle can, within seconds I got a nasty crazed look on the paint which starting lifting. Somewhat odd, as I hadn't done anything different that I was aware of from last time I used the rattle can. After much gnashing of teeth I stripped back the paint, and started again. This time I decided to do XN577 from the RAF College at Cranwell in the 1960s. I have a Gnat and a Vampire T11 in the stash Sio I figured it would be good practice for the silver/orange-red colour schemes. Obviously this time round I don't have a complete set of stencils, and I had to bodge up some walkways by cutting up some spare decals. Paints are Tamiya Bare Metal Silver from a rattle can, orange is a home brew of brush painted Tamiya acrylic. I scraped, sanded and polished the frame across the top of the main canopy as I gather this is correct. The lights on the nose are 1 mm little-lenses dropped into small indentations drilled in the appropriate places. A fairly light oil wash, as I guess this aircraft were kept pretty clean. Finished off with a brushed on coat of Tamiya Semi-gloss clear. She looks a bit bashed up, but I am pretty happy with the rescue job. Looks nice in the early evening sun. Have a great weekend everyone! Thanks for looking.9 points
-
F-4Es of the 335th Tac Fighter Squadron ("The Chiefs"), 4th Tac Fighter Wing out of Seymour-Johnson AFB during Red Flag 84-4 exercise at Nellis AFB, June 1984. 72-0128 72-1478 with ALQ-131 ECM pod. 73-1183 73-1189 73-1196 with AGM-65 training rounds 74-1625 74-1640 74-1643 with Long-Chord Wing (LCW) GBU-15 built on a Mk-84 inert warhead. 74-1645 with replacement TISEO fairing. Thanks for looking, Sven9 points
-
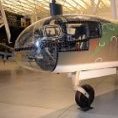
Having been out this morning, I allowed myself an hour before lunch to complete the cockpit work. Masking tape belts. I assumed the observer was only given the luxury of a lap belt, and not the full Sutton style harness. The lumps and bumps in the cockpit look the part, though I fear my compass is on the large size. I contemplated punching out the decal part and dropping it on the top, but chickened out in the end. The various levers on the port side are micro rod, with a dab of colour on the ends. The wheel affair on the port sidewall, apparently, was a fuel transfer cock system between the wing tanks. Photos show it painted red and green, like the throttle controls, presumably matching port and starboard wing light colours as reference. The IP decal is lost in the gloom, and needed a tiny bit of trimming to fit around the extra work I did. I’m not weathering anything. I am assuming this aircraft is absolutely factory fresh from Bristols, with only delivery mileage, and perhaps a little exhaust staining.9 points
-
As promised, a little work. The basic shape is pretty good. I remembered, in the distant past, one of the magazines reviewed the Hasegawa build when it was still new. Apparently, the fuselage is a bit short, but there's nothing I can do about that. I like the fact the kit designers allowed for all kinds of variants, save the MkII with the Merlins. The fin, for example, is made up of parts in the kit, depending on which mark you're building. The reviewers back in the day noted a lack of internal detail, so I needed to do something about that. This kit assumes you are happy to use decals supplied for the IP and side panels. I'm happy with the IP, but the side panels are fairly three-dimensional affairs. Off to check the references... While the references were being consulted, I assembled the cockpit tub and observer's seating. I'm not going to bother with all the internal ribbing. You can't see anything once the fuselage halves are joined up. I did decide to add some greeblies to the side panels, and heater pipework to the starboard side. Seat belts will be made from masking tape in due course. Rough and ready, but many times better than the decals alone. I'll add some levers to the throttle quadrants, and make the compass over on the starboard panel a little less prominent. Otherwise, happy with that half hour or so. Here's my interpretation of the heater pipework. The fact it breaks before reaching the observer in the back doesn't show. I think I will thin the edges of the observer's cupola before gluing things together. Before I even get that far, I need to paint up the tub and apply the IP decal. That will probably do for this session. Paying work tomorrow!9 points
-
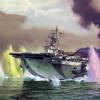
Hi Everybody, That's USS Nimitz 1/350 with WEM PE parts full set and Starfighter decals for planes. Almost a year of work to depict the most famous aircraft carrier. I like the most models presenting models that is why I do not use weathering, rust, or worn out effects, only line effect to get details. I have placed also some pictures of deck vehicles and planes. She must be very impressive in real life... Now it is time for 1/16 car See you soon (hopefuly8 points
-
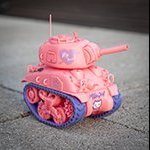
I still have to adjust a couple of things, but I feel my figure painting is coming to a point, that I I am becoming satisfied with the results so far. Just have to keep at it. I think, I may still need to do another wash. The green is not exactly the green for this type of camo but that is what I had on hand. Still have to improve on my color matching a bit more. I am going to get the right color for this camo pattern, soon. Unfortunately my photography skills still need lots of improvement. Oh well. If you have noticed, I used the vehicles from my previous diorama in this vignette. The previous diorama does not exist any more. Thanks for looking.8 points
-
Another started way back last year and finished earlier this week. EB-66 Destroyer, 42nd TEWS, 388th TFW, Korat RTAFB, 1973 Italeri mould, airbrushed freehand with Tamiya acrylics, Flory wash and Xtracrylix flat varnish. Builds into a cracking sized model, was difficult to photograph especially in lousy light (have tried different settings on some frames). Has great presence on the shelf. Size comparison with die-cast 1/72 F-4 Phantom: And with a Trumpy 1/72 F-105G: Cheers gang, Phil8 points
-
This is a grand kit from Tamiya, a lot of details. Everything moves and opens. All signs are color by mask. Regards, Alex.8 points
-
Indeed it does Heather (fnaar!) In this case (ahem) the bit I wanted to chop off (ouch) was less than 1mm - too small for me. Andy thanks for 'fessing up'. You're still forgiven You knew I wouldn't wait didn't you. Share my failures as well as successes. Pencils? Fail. Too crumbly, but (hopefully) they'll be OK for dotting i/ps in the future. Pens? Three sizes, small, medium and large: I used the small one with some H34 thinned with flow improver. Hmmm. Sometimes it flowed, sometimes it didn't. Of course I carried on - the spoon wasn't the right shape for a test, in the end. Not my best work, but with a combination of carful scraping off and dotting the original colours (when the white's dry) I think it'll be fine. Fingers crossed.8 points
-
Thanks everyone. Clear parts are my biggest opportunity for improvement and I did my best here but there are some rather ugly (to me) interfaces. However, here's a shot of the finished canopy complete with scratch built wiper and de-ice tube. Don't look too close......8 points
-
Tony opens his mouth and a series of geometric shapes float out.8 points
-
15 pages without glue or paint, this thread is setting a new record for, I’m not sure what, but I think it’s impressive. We should keep score on how many models @CedB starts and finishes during the Sea Vixen odyssey. AW8 points
-
see what I dug out this afternoon for some reason I could not find the resin canards/ fore planes replacements I should also have somewhere... maybe with the attack version kit? - strange.... hope they will turn themselves in not too soon I plan to do it in full burner take-off configuration just after lift off, as seen personally at Airpower airshow in 2003 at Zeltweg Airbase, Austria... https://i.pinimg.com/originals/af/9b/a0/af9ba06fd189d4dbdd25eb6b39387ede.jpg some reference photos, not mine, but I should have a similar one, of course lower quality and still analouge somwhere as well https://www.airliners.net/photo/Sweden-Air-Force/Saab-JA37D-Viggen/377751/L https://www.airliners.net/photo/Sweden-Air-Force/Saab-JA37D-Viggen/739958/L https://www.airliners.net/photo/Sweden-Air-Force/Saab-JA37D-Viggen/376792/L https://www.airliners.net/photo/Sweden-Air-Force/Saab-JA37D-Viggen/374781/L decals are a bit of a problem for this scheme.... there is a great build in 1/72 here on BM, going to take as much as possible... if you have any idea, how to proceed with decals or custom masks of the belly insignia, would be very much appreciated! not started as of yet, just glanced at the many sprues I am not gonna use all of the above stuff, not sure about the Pilot Replicas seated Viggen Pilot, somehow does not look like a tall, big Swede... 2 sets of tyres---- flaps? RAT! yes pylons?... cheers, Werner7 points
-
After finishing the new Tamiya P-38 I had some more Olive Drab and Neutrale Grey in my airbrush🙂, so I built Tamiya`s P-47D. Add some Eduard PE`s for the Cockpit, Löök instrument panel and Master MG´s. Decals are by Techmod showing off LM-K of the 62nd FS.7 points
-
I killed a lot of rivets when sanding, so I had to replace hundreds of them. After some trials I finally found "3D-decals" from Austria in the correct size and used these: The following steps included a preshading and the first layers of acrylic colours (Vallejo in this case) with a 0.4 airbrush: This is the current state, still some detailing and weathering to be done:7 points
-
My second entry into this group build, a Polar Lights 1/1000 Klingon Bird of Prey as seen in multiple Star Trek movies and series, to try and balance out the myriad of Star Wars kits. WIP and more photos below, always looking for comments and critiques. Thanks!7 points
-
Shame about the oil tank but well done for extracting it without damage. I'm 4000 miles away from my copy of the kit so I don't know, but would it be worth drilling into the centre section spars to add wire stubs to support the wings? it looks a bit butt-jointy to me and I can't tell from online pictures of the instructions how secure the join will be. Please bear in mind that on a UK forum, telling us your house was built in 1921 will most likely evoke "Oooh hark at him - living in something all modern". In all my adult life l have yet to live in a house built after 1900 (or to be warm in winter). Regards, Adrian7 points
-
Ok, dinner eaten I can finish the post. 🙃 I have decided to do this one canopy closed. The three parts do fit well after a bit of sanding so taking a cue from the landing gear I used the fuselage as a jig. Voila! 🤩 that then got masked. I painted the remaining internals. And glued the whole lot on with Gators grip. Inside colour painted. Ready now for a first primer test. 😍 more practice with mottles. This time with the nozzle unscrewed. Still a bit heavy. Next test will be with heavily thinned paint. thanks for dropping by (again) have a great week. JJ7 points
-
Latest build. 'OLD SHAKY' Mark DSCN3544 (2) by mwsfly9, on Flickr DSCN3545 (2) by mwsfly9, on Flickr DSCN3546 (2) by mwsfly9, on Flickr DSCN3548 (2) by mwsfly9, on Flickr DSCN3549 (2) by mwsfly9, on Flickr DSCN3550 (2) by mwsfly9, on Flickr DSCN3551 (2) by mwsfly9, on Flickr DSCN3552 (2) by mwsfly9, on Flickr DSCN3553 (2) by mwsfly9, on Flickr DSCN3554 by mwsfly9, on Flickr6 points
-
All 1/72 scale. http:// http:// http:// http:// http:// http:// http:// http:// http:// http:// http:// http:// http:// http:// http://6 points
-
Tail markings, take 2. The blue is a mix of Humbrol 47 and 48, not quite there but it's as close as I'm getting. Stuart6 points
-
It’s actually turning out to be quite dull. Almost everything fits nicely. Here's the fin insert. No filler required, just a couple of gentle passes with a sanding stick. Sound engineering reasons for the separate part here, because it allows different inserts to cover other marks of Beau. Clever. Another part that allows for alternatives is the rear of the navigator/observer area. One part covers the marks where there was no rear gun fitted, the other part for those with a gun. The part literally clicked into place. I’ve run some liquid cement round it, and smoothed the tiny mismatch in levels. The 'pit, complete with the tiny gunsight fitted. Areas which belie this kit's age are inside the wings. It’s obvious the moulds were developed with an engineer carving out the shapes rather than a machine. The trailing edges are a bit thick, too. The port wing suffered a little from a slight misregistration, which I can’t blame on myself, meaning a little gentle sanding was required. Other areas a bit disappointing were the engine nacelles. Quite a bit of sanding was needed to clear steps between the mating halves, and I’m still not quite happy with it. There are various flashed-over holes in fuselage and wings which the builder is to open up, depending on the mark being built. For the early MkI, no extra holes in the fuselage were required, but the wing machine guns are needed. I nicked the openings with a sharp blade, then gently filed each wing half out with a round needle file. As you can tell, I will need a pass with a drill bit to make them properly circular. The characteristic Beau intakes on the leading edges are made of separate parts, and will be fitted later. I hope they’ll fit nicely and not need too much tidying. Two things here: a tiny amount of sanding and filler required along the fuselage spine; the wing assemblies click in place. What you see here is a dry fit. Impressed with the fit. The fit is almost as good underneath, too. The flat belly is there because, again, alternate parts can be fitted for different marks. One main fuselage covers everything, with alternate bits for nose, belly, fin and so on. Clever. Before we know it, we have most of a Beaufighter on the bench. The belly and nose parts need to be installed, and then I might have a think about whether to get painting under way before anything else. I did warn this build might be a bit dull. No dramas or visits from Captain Cockup and his merry band. If you have the Hasegawa, MPM or Hobby 2000 boxes of this kit, you shouldn’t have any problems with it.6 points
-
Thanks Simon - tiny it is. My poor eyes Ewwwww Good tip Heather, except this stuff is too small for that method! Thanks Hendie I am starting to like them but I think I'll stick to the early ones. I've got a Dragonfly already and have a Sycamore, Belvedere and an autogyro thingy on the wishlist. Any other suggestions? Scout of course but they're rare as rocking hor hens teeth. You're forgiven Andy and apologies Good one Simon Thanks Bill, means a lot that you, as one of my Gurus, likes the work No thanks John but good luck with the cataract ops Thanks Giorgio, very kind I think that might have been your Tak tip eh? Thanks Ian Look at this again: Can you see the fans? Can you? Yes, OK, you can. Rats. And that little glass jar. And some cables coming from the back of the panel. Huh. In the meantime I've sprayed some bits with my new (thanks to Cookie and PC) 'Colourcoats only' airbrush: Newsflash - these have JUST arrived: I might give them a go later.6 points
-
Oh my God. I just spent yet another 200 quid at Hannants. Is there group therapy for this disease? Cheers, Bill6 points
-
Hi All, After finishing up my long winded P51D build I've decided to keep the momentum going and crack on with a new project. Somewhat simpler and more straight forward this time I hope... The subject in question is Tamiya's excellent 1/72 scale Mosquito Mk VI kit, which I'm going to finish in the kit provided markings for the Coastal Command bird 'NEoD'. I think this scheme will give me a nice excuse to weather the paintwork a bit and I was not really keen on masking camo anyway 😄 I'm not going to go into exhaustive step by step detail in this log, just keep updates on major bits of progress. I've started with the cockpit because why break tradition, even though the kit would have you start with the engine / wheel pods for some reason. Here is my completed cockpit and sidewalls before I close up the fuselage. I couldn't help myself and added some more details. Some highlights of the cockpit sections, The front fuselage sections comes separate (for different marks I presume) to the main fuselage bits. They join nicely but have a couple of visible alignment tabs on the inside that needed to be removed and the seam filled. No real drama's here though. There were a few ejector pin marks that needed filling, annoyingly one was located in the nicely molded door detail. I just covered it up partially with a warning sign 😁 Base colour was Tamiya XF-71 'Cockpit Green' and black bits were sprayed in XF-85 'Rubber Black'. Details were brushed with various Vallejo Model colour paints I scratch built the flare rack and fire extinguishers. Some wiring was added to the sidewalls and from the radios. Not particularly accurate but makes things look a bit more busy. The pilot's seat got a cushion made added from thick bit of styrene sheet. The seat cushions were roughed up with a knife and given a wash of extra thin to smooth them out. The belts are all scratch built from champagne bottle wrapping foil (stiffer and easier to pose). I punched the holes using a needle from the back so there would be a raised lip around them. I thought of using some Eduard PE belts but I didn't really want to mess around with PE for a enclosed cabin. I decided to forgo the kit IP decal which was quite simple and painted the instrument dials myself using a sharpened toothpick and and white oil paint. I added the glass with clear epoxy, though it's not visible with the lighting I used. The rear of the radios were hollow so needed to be closed up with thin styrene sheet. The radios didn't fit too nicely, the receiver box ended up obscuring one side of the transmitter box. I solved this somewhat by cutting the mounting tab off the transmitter box so I could position it across slightly...but not too far or the canopy won't fit. Hope you'll follow along, cheers for viewing.6 points
-
Try telling that to Father Ted!6 points
-
Just finished this Tamiya 1/32 P-51D Mustang. (This Tamiya model can be shown as a flying model with wheels removed, undercarriage closed etc. Things are held magnetically, and some parts slide on and off!) Features the 334th Fighter squadron, 4th Fighter Group Mustang. There is a link here to the actual plane http://www.americanairmuseum.com/person/1560296 points
-
I think it should be okay. The wings fit snugly into the clear parts, based on my test-fits, and of course there are also the big v-struts to hopefully anchor them. Also, I'm absolutely crap at drilling into things to add stubs. But stay tuned for my sheepish post where I throw myself into absurd contortions to get the wings to stay on! Yes, well, everything burned down here a while back. (In fact, the town I live in largely grew up around the garrison established after the fire to protect the property of the wealthy folks who lived in the city's northern suburbs.) Also, and I say this with love, the temperature range in the United Kingdom year-round can easily be experienced in toto in a single week, if not a day. Our winters are colder, infinitely colder than yours, and our summers more hellish. However, my home currently is pretty big by UK standards, and I'm conscious of the absurd amount of space Americans take up.6 points
-
Cockpit got some additional colors to liven it up a bit, Also added some chipping to make it stand out little bit better. And cockpit is done! I used decals for the cockpit panel. Belts are from Eduard MiG-21MF and final touch up is with pigment powders to add some dirt and color variation. Also scratch built a small red ball on a stick - apparently there to remind the seater by sticking on the back that the seat is not armed. Thanks @Col. for linking the thread where this info was to be found We shall see what needs to be done next in order to get the fuselage closed. To be continued...6 points


.thumb.jpg.3c5b41eb004e624ff9bdf837868ecbb6.jpg)


Wedge-TailedEaglePortraitRaptorDomains.thumb.jpg.41a306d3445a68f0f2df773e01776ea6.jpg)


This leaderboard is set to London/GMT+01:00