
Leaderboard


.thumb.jpg.3c5b41eb004e624ff9bdf837868ecbb6.jpg)

Popular Content
Showing content with the highest reputation on 19/01/20 in all areas
-
Just finished another Academy F-8 Crusader. I absolutely love this mould, I would love to shake the designers hand and buy them a pint...! F-8E, VF-162 'The Hunters', USS Oriskany 1966, Task Force 77, Vietnam. Airbrushed with Tamiya acrylics (beautiful to work with), light wash with Flory grime and sealed with Xtracrylix flat varnish. I have used etch for the seat handles as the kit ones are overly thick. Etch for the seat straps too. I love this shot: Cheers gang. Phil33 points
-
After finishing the new Tamiya P-38 I had some more Olive Drab and Neutrale Grey in my airbrush🙂, so I built Tamiya`s P-47D. Add some Eduard PE`s for the Cockpit, Löök instrument panel and Master MG´s. Decals are by Techmod showing off LM-K of the 62nd FS.32 points
-
Another started way back last year and finished earlier this week. EB-66 Destroyer, 42nd TEWS, 388th TFW, Korat RTAFB, 1973 Italeri mould, airbrushed freehand with Tamiya acrylics, Flory wash and Xtracrylix flat varnish. Builds into a cracking sized model, was difficult to photograph especially in lousy light (have tried different settings on some frames). Has great presence on the shelf. Size comparison with die-cast 1/72 F-4 Phantom: And with a Trumpy 1/72 F-105G: Cheers gang, Phil31 points
-
Started last year and finished today. The amount of detail that Tamiya have crammed into this kit is superb. Beautiful fine panel lines and rivets. Airbrushed with Tamiya acrylics, splash of Flory wash and sealed with Aqua Gloss. Cheers gang, Phil26 points
-
Evening everyone, A while back I tackled the Italeri re boxing of the 1/48 Academy Hunter Mk6. It’s a nice kit if a little simple in the cockpit department and with some of the finer details such as the various undercarriage components suffering a quite prominent mould miss match. I replaced some of the smaller details with aluminium tube as well as the pitot. As ever a mixture of Mr Hobby and Tamiya paints with the under-fuselage and wings being primarily AS12 decanted for the airbrush. I always intended to replace the undersized seat with a resin replacement but didn’t realise that this would mean the new seat would foul the top of the Perspex canopy. After much consternation, the only realistic option (because by this point basically everything was done) was to cut away the very bottom of the seat such that pretty much the seat cushion is resting on the cockpit floor. Had I bought the seat when I started the kit ( that would involve planning), I would’ve also opted for a properly sized resin cockpit or removed the floor. The version of seat I bought didn’t have a face blind handle so I made my own with fuse wire which I was pleased with. Bit of a nightmare with the intake trunking so I also fashioned my own blanks for both ends. I chose a scheme from the excellent Xtradecal X48192 to represent a Mk6 Hunter of the Day Fighter Combat School based at RAF Stradishall in 1961. I kept her fairly clean and went with a semi gloss finish. I used Eduards canopy mask on this one to speed up the build. This classic British jet is an attractive bird in any markings. The next one will have to be Airfix, just to compare the difference. Thanks for looking. Rick24 points
-
My latest completed kit is the 1980s Airfix 1/72 Lancaster which my dad picked up for me at a car boot sale. She's pretty much built out of the box though I added a bit of detail in the cockpit with plasticard and scribed some extra panel lines on the wings. She goes together really well for a forty year old kit and very little filling or sanding was required so I managed to preserve most of the raised rivets. I decided to model her wheels up - there's not much detail on the undercarriage or wheel wells and I figure it's hard to beat a Lancaster in flight anyway! The stand isn't finished yet, I'll add a proper piece of threaded rod to the wooden base, rather than balancing on the m8 caphead which you'll see in the photos. The stand will screw into a nut glued into the bomb bay doors and the doors are held on the model using two small neodymium magnets at each end of the bomb bay. This allows the Lanc to be easily removed from the stand (without unscrewing anything) and also reveals the bombs. The paints are mostly Tamiya acrylics but I went for the Mr Color version of Dark Earth. The only real problem I had with the kit was trying to use the original decals. I ended up cutting away as much of the yellowed carrier film as possible and had to "glue" some of them on with Future, they also reacted oddly to the decal softener (with and without Future) so aren't settled down particularly well. One good decision I made was to mask and spray the thin black and red lines on the top and bottom of the wing so I didn't need decals for these. Finally, the weathering was a bit of an experiment. I did a mottled pre-shade between the rivet lines to get the tonal variation in the panels and I added to this with brown and black oil paints. The chips are done with Tamiya flat aluminium and a fine brush and the exhaust stains are a combination of sprayed and painted oils. Spraying thinned oil paints works really well and has the advantage of being very easy to clean off if things don't quite go to plan. Thanks to everyone who tagged along for the WIP, your reference photos, tips and encouragement kept this one going right to the end, even when the decals were driving me mad! The WIP is here if you're interested: Enjoy the photos! I hope you like, thanks for looking! Sam22 points
-
Hi All, first of all , all the best for 2020. My last model finished in 2019, an order, my client wanted something realistic even not historicaly speaking perfect. Nothing special to say about the model, painted with Gunze acrilic, most of marking is done with home made stencil. I didn't paint the figure, I'm lucky enough to work with an exellent figure painter. Hope you enjoy. Alain22 points
-
Hi everyone, my first completion this year. A nice kit with loads of detail, a few fit issues around the engine nacelles and wing joints but nothing to demanding. I chose the most colourful example on offer, an aircraft from 6/ZG 76 operating in Greece circa 1941. MRP paints used throughout, followed by an oil wash and Alclad clear cotes to finish. Additions I used were resin wheels and exhaust set plus a starboard engine. Thanks for looking, gazza l19 points
-
Hi Folks, Finished the 1/48 Boulton Paul Defiant I have been working on. Been a fairly quick build having started it on 29th December and completing it yesterday. If anyone is interested the build thread is Here It isn't the greatest build and im not winning any awards, but I tried new techniques and learned loads throughout the build. The kit itself isn't too bad, there are a few heavy ejector pin marks that almost come through the plastic and there is zero rivet detail at all. I bought myself the BP Scale plans and set about with my new rosie riveters. Having never done it before im pleased with the outcome. The markings I made myself using a Cricut and some vinyl masking sheets and im really happy with how they have come out. Only aftermarket used on this was a set of eduard steel seat belts, everything else is OOB. Paints used were a mixture of Mr Hobby Aqueuous and Tamiya, flat coat is Tamiya. Im grateful for any comments whether good, bad or ugly. Hope the photos are of interest.18 points
-
Hi all, As its new broom time on my internet presence and rather than flood the page with individual posts I'd like to present some of the stuff I've done while I've been away from the site. What will quickly become apparent is while I have zip diddle interest in anything to do with flak bait I have more than a passing interest in RAF MT, to include all that used by Penguins and Rock Apes alike. Almost all are 1/72 scale with the exception of the Airfix Albion AM463 cassis cab, and most are fully scratch built unless otherwise stated. First, A full scratch built Austin K6 flat bed made using my chassis/cab master For those that care about what its towing...... And yes the land trailer is fully scratch built too..... Next another full scratch build triptych of a Type 13, Type 14 and 'ready to move' Radar dish set A selection of RVTs (Radio Vehicle Transmitter) Copies of masters I made for MAFVA Models, (I believe you can still obtain these if you are a member) based on the Bedford OX chassis Bedford OXC I mastered as an alternative to the shockingly under scale Airfix offering Master of a Commer Q2 van I made for a short run kit I manufactured, My take on the famous photo of the Monitor half track Another short run kit I manufactured, Beverette MkIII with all turret combinations An IBG Otter with wheels and tyres mastered by me to replace the rubbish IBG thinks is acceptable..... Finally an Attack Models Marmon Herrington Recce Car, converted to an RAF Reg Forward Radio car Thanks for looking ATB Sean16 points
-
Novelty from Dora Wings.16 points
-
I was fossicking around in a cupboard in the back of the garage and found a bit of (my) modelling ancient history. Its the High Planes 1/72 Sea Fury - purchased way back in early 2000's, if not before, when I first started back in the hobby. It was my first experience of a limited run model, and it shows. Abandoned well over 10 years ago, and looking rather sad. I cleaned it up, and did the last few bits to finish it off (heaven knows how I managed to not lose the canopy). Doesn't look too bad. Paint is a patchwork of enamels and acrylics - and laid on rather thicker than I do these days. I had to glue back various bits and bobs that had fallen off, painted on the walkways. I faked up the metal exhausts from some thick foil I had lying around. Finished with a brushed on coat of the last of my jar of Tamiya Semi Gloss Clear, which was also a bit claggy. Completed with the markings from the kit, which I must admit to not knowing the background of. Thanks for looking.16 points
-
OK, let's get on with actually building this baby. For some reason the instructions have you start with the cockpit - crazy, I know. I don't normally follow the instructions but I figured I'd give it a try this time. So here we go. First, the instrument panel. Very nice pre-painted photoetch (with backing) is included with the kit. The fret says Eduard on it, so you get an idea of the quality. I think it looks pretty good. I like how Eduard printed the instrument faces in black, and the panel itself in a dark grey. That works quite nicely, I think, in making the instruments stand out. The overall panel is not flat, having symmetric folds on each side for a minor wraparound effect. CMR cast a lot of detail into the fuselage sides, which can be further detailed with microscopic photoetch. This is 1:72 after all. Those of you who voted black for the cockpit, please avert your vision now. I painted the interior of the fuselage and the cockpit itself with Gunze C364 from their Aircraft Interior Color (sic) Set, which I had to travel all the way to Old Blighty to purchase. I picked out some details with a 3/0 paintbrush, a silver prismatic pencil, and a light Future wash. Everything was then covered with Alclad Flat. Finally, the cockpit itself received photoetch harnesses and headrest support. The armoured panel is resin, and is part of the cockpit casting although it is very thin and delicate. The harnesses go through tiny slots in the headrest support. The rudder pedals and control column are resin - I don't normally add the control column until I'm just about finished as I'm afraid I'll knock it off when masking off the pit. Maybe this time I'll be careful. The seat adjuster controls on the starboard side of the seat are PE, as is the hydraulic hand pump handle (which should be attached to the floor, but the seat was much more convenient). Before closing up the fuselage, I need to make a mount for the compass (there was one as part of the compass, but I broke it off) and also for the gunsight. CMR actually cast the gunsight with its mounting bar, but it also was broken during shipment (I didn't do it this time!). I've built a few CMR resin kits, and this is the first where I've seen this much damage. And there's more to come (flap rails on the wings, for instance). But somewhere on my CV it says I'm a modeller... I've also been spending a LOT of time getting my new telescope ready to go. She's an ultra-light 16" f/4.5 Newtonian/Dobsonian with a sandwich mirror. I'm installing Bluetooth encoders on the azimuth and altitude axes at present. In-between spurts of modelling, of course! Cheers, Bill16 points
-
@Martian Hale @Massimo @CJP @Ex-FAAWAFU @CedB @Hamden @Fritag @heloman1 @limeypilot @Andy350 @perdu @Lord Riot @Andwil @corsaircorp @TheBaron @keefr22 @AdrianMF @Bigdave22014 @Pete in Lincs @Tomoshenko @Navy Bird @phildagreek @Harley John @moaning dolphin @Head in the clouds., Thank you all so much for your comments. I did start trying to respond to each of you individually as per Tony's SOP, but my brain just couldn't cope with the sheer volume of responses from last time around. However - I really appreciate ALL your comments so - thanks! Today's post isn't going to be as long (sigh's of relief from the BM hive), nor as revealing or exciting. (Except for me of course... because IT'S FINISHED!!!) Yes it is, this damned build is finally complete. I think. Though no doubt someone will spot some glaring omission as soon as I have posted. Let's get on with it then... First off was to attack the aerials. Can you see that aerial wire there? No? Neither could I. Getting those wires in place and secured was a bit nerve racking But as usual we got there in the end. The EZ Line was probably a bit fine but it's in there and it's not coming out again Useful tip coming up: Way back when I first painted the rotor head I had some custom paint mix left over so I sucked what I could up with a pipette and stuck a cocktail stick in the end as a seal. Would you believe the paint was still usable? It was. Great - that meant I could touch up the rotor head and repair all the damage I'd done messing about with the blades during the epic blade fold fiasco. Then the final touch for the rotor head was to add the BIM's Which become almost invisible for normal viewing purposes Underneath, the fuel dump hinged bracket got added Sliding windows got fitted. I now realize the stop is fitted too far forward and the window should slide back further than shown here. That's what you get for following Fly's panel lines. The starboard one got fitted but the photo was too blurry to use. After wrestling with my inner modeler I decided just to go ahead and use the kit supplied resin intake cover despite not being too keen on it. I used Tamiya tape cut into thin strips and painted Dark Earth for the straps, adding the obligatory twists. (just to play with @CedB's COD!) Maybe I should have put a tad more glue on that exhaust should I? When viewed from a distance it looks convincing enough. (Stbd window and cabin door now fitted - and exhaust still wonky) port side straps Reasonable enough. Now just a series of shots from various angles ('scuse the background - I think the wife half-inched the blue card I once had for final shots) damn - still need to glue that exhaust There! exhaust now glued in place Ah... the instrument panel. Anyone remember the fun and games we had way back then ? Home brewed photo etch that was! The BIM's do add that nice little finishing touch though, and that rotor head turned out nicely though the color isn't great. It could have done with being a few shades darker and a touch more grey She's a big beast, coming in around 15 inches long with the tailfolded and for my next trick. It's gonna be one of them above. I'm not quite sure which one yet though. I've had a quick fiddle with the Venom and the Vampire but haven't started construction on anything yet. I've read that the Classic Airframes kits can be a bit touchy. One of either the Venom or the Vampire builds up quite easily and the other one is a bitch. So, can I remember which one was which? Of course not. But that's for another day. Anyhoos two plus years of build and it's finally over. She's already in the display cabinet - bottom shelf hiding behind the Lysander. So what did I think of this kit after all this time ? Well, to be honest I was really excited when I first started this build but it quickly became apparent that Fly really messed up with some very poor research and missed probably the best opportunity we'll ever see to have an accurate, decent quality Wessex out there in the market. There really were some "what on earth were they thinking" moments which was a shame as they obviously put some thought and effort into some areas. Some people can go ahead and just build this as it comes, out of the box - and that's great. However, if you are looking for anything approaching accuracy in a Wessex, then avoid this kit like the plague unless you are prepared for a hell of a lot of rework - and there's a lot of things that are just never going to be right. After this experience, I do not seeing me ever buying another Fly kit. Ever!16 points
-
Finished a couple of days ago, this is the latest addition to RAF Ouston's Harvards, a Revell 1/72 T-6G Texan kit, converted to an RAF Harvard. The work involves making a longer rear end to the canopy, using an Airfix Canadian Chipmunk canopy, plus using the old Airfix Harvard kit long exhaust, removing the various hard points for the Texan's weapons, and various small detail changes. KF193, 607 Sqdn, Ouston, Sept 1951 (3) w by Philip Pain, on Flickr KF193, 607 Sqdn, Ouston, Sept 1951 (10) w by Philip Pain, on Flickr KF193, 607 Sqdn, Ouston, Sept 1951 (12) w by Philip Pain, on Flickr KF193, 607 Sqdn, Ouston, Sept 1951 (14) w by Philip Pain, on Flickr KF193, 607 Sqdn, Ouston, Sept 1951 (22) w by Philip Pain, on Flickr KF193, 607 Sqdn, Ouston, Sept 1951 (26) w by Philip Pain, on Flickr It is finished as KF193, one of three Harvards used by the Spitfire equipped 607 (County of Durham) Squadron at RAF Ouston, and seen in the colours it wore at the September 1951 RAF Acklington Battle of Britain display. RAF Ouston's Harvards could fill a book, and the following photos show the schemes built so far - 22 SFTS KF314 'FCIT' all yellow in 1946 - KF373 'RAN-A' still in wartime camo, ex-22 SFTS but now 607 Squadron's first aircraft in 1947 - and KF193, also ex-22 SFTS but repainted in modern post-war colours with 607's new code letters 'LA' following transfer from Reserve Command to Fighter Command in 1951. KF193 did not wear the usual post-war yellow 'T' bands on wings and rear fuselage, and the position of its fuselage roundel shows that it never had done. Ouston Harvards (1) w by Philip Pain, on Flickr Ouston Harvards (2) w by Philip Pain, on Flickr Ouston Harvards (4) w by Philip Pain, on Flickr Ouston Harvards (7) w by Philip Pain, on Flickr I've identified two further schemes which will follow in due course - FX280 'RAN-B' all yellow, 'C' type roundels; and wartime camo/yellow 'FCJA' of 22 SFTS, serial nor yet found. I'm also searching for an example in post-war silver/yellow 'T' bands, but no luck with a photo so far. Durham UAS is a likely contender. Any help with photo sources would be greatly appreciated! Thanks for looking.15 points
-
Here is one of my Sweet 1:144 "BoB Aces" Hawker Hurricane Mk.Is built back in 2009. It represents V6555/DT-A, flown by Sqn Ldr Robert Stanford Tuck, No. 257 Sqn, RAF, from North Weald, October 1940. The kit was fully painted with brush except for the final matt varnish which was airbrushed. Thanks for looking Miguel15 points
-
No. 12 Operational Training Unit, Chipping Warden. While flying night circuits and landings with a Canadian instructor pilot, their aircraft, Wellington BJ622, JP-R, crashed just after half-past midnight, on the night of 11/12th of July. ”12/07/1944: Wellington III, serial no. BJ622 of 12 OTU belly landed at Chipping Warden. Sgt J C Ridley RCAF and crew were unhurt.” This is the Airfix 1959 tool, 1/72 04001 with: Etch – none Additional parts – none Paints – Humbrol, Vallejo Panzer Aces and Vallejo Model Color acrylics by brush Decals – Xtradecal, E. D. Models, Airfix14 points
-
Hello, Built basically out of the box, with minimal additions such as HGW seatbelts, thinned IP bezels and a few other fixes. The model is quite nice to build, and I even played the game of building and painting the inside: so mcuh fun ! However, adjustement of the engine cowling is a real pain... same as with its 1/32 brother. Also, it seems that some slight surgery is needed to close the canopy. Decals of my box were out of register and replaced by a reference from EagleCals, despite a slightly over-scaled swastika and colors too flashy to my taste. At the end, a fun build but I dont feel that the 60 Euros tag price is justified... Antoine Green 3, piloted by Josef KEIL14 points
-
Hello everyone... This is my final entry from the Movie/TV group build. It is the Stearman flown by Walter Matthau in the movie. I used Revell’s 1/72 Stearman kit, with an Resin engine. I scratch built some details also. I built the pesticide Hopper where the forward cockpit would be. I also did a scratch built Venturi crop dusting tray and taller tail wheel strut. Here is a link to the build if you might be interested. Questions, comments, and or thoughts ? Dennis13 points
-
Thanks hendie Actually that's just the Meng black - I hadn't started detailing yet! Thanks Keith - always good to have an option B Mike Grant instrument decals - crikey they're small. No, make that tiny. The instructions warn that the carrier goes across the whole sheet and that you need to punch them out. Fine: 1.7mm punch. Oh my eyes. I did find that the best way to see if it was centred was to look around the bottom of the hole and, if there was any black visible, to adjust until it was hidden. Then THWACK with the little hammer and 'hunt the dial' begins. A tray for the punch set is almost essential IMHO. Use the 'perdu stencil soaking method' - put the transfer in a tray and drop warm water on it with a pipette. Don't let go of the pipette when you do this or it'll suck the transfer up (ask me how I know). Brush some DecalFix ('cos it's a bit sticky) on the i/p dial. Pick up the dial transfer with tweezers (pointy) or the brush and carefully locate it on the dial. Dry out the brush on kitchen towel and brush the transfer down. Don highest magnification visor and poke the dial about a bit. Breathe. Done now and currently soaked in MicroSol: Dobs of colour to be done when that's dry. Breathe.13 points
-
Thanks Simon Tiring day, standing up all day running 'the range'. There has been wine this evening… Quite right AW All I need is something that lets me draw tiny white lines around the seat edges… Maybe a Pilot Metallic Super Colour White Extra Fine (0.5mm Line) Permanent Marker Paint Pen. Or a White Faber-Castell Albrecht Dürer Artists Watercolour Pencil. Or I could use some paint in a Healifty Adjustable ruling pen straight line drawing pen for masking fluid fine lines (Size S/M/L). All ordered and arriving soon - we shall see which works best. Yes, it's all your fault Ah, well, there's 'modelling accuracy' and 'satisfying the crowd' Johnny. I won't let on which influences me the most but I bet you can guess Some extra bits prepared. The joysticks: Luckily my sanding sticks just fit, otherwise I would have needed some micro files (come on Vincent, get 'em in the post!) The pedals: …also need cleaning up and would benefit from some micro files, but I had to use a blade to scrape the flash off They do have some nice detail on the other side. 131 has one collective with a 'loop' and one without: So, most of the kit internals ready: Tomorrow I will review.13 points
-
Hi Everybody, That's USS Nimitz 1/350 with WEM PE parts full set and Starfighter decals for planes. Almost a year of work to depict the most famous aircraft carrier. I like the most models presenting models that is why I do not use weathering, rust, or worn out effects, only line effect to get details. I have placed also some pictures of deck vehicles and planes. She must be very impressive in real life... Now it is time for 1/16 car See you soon (hopefuly12 points
-
Thanks for coming along everybody and for the encouraging comments. I finally decided it was time to try and attach the high back to the Airfix fuselage. I had to chop off the top of the seat and file down the instrument panel to get them to fit in the new hybrid fuselage. Threw a couple shims into the most egregious seams. After a little clean up, it's actually starting to look like a P-51B/C. I tried scribing the Revell/Monogram high back by following the raised panel lines, but my scriber kept jumping from one side of the raised line to the next and they ended up pretty wavy (I miss my INCIDO), so they need to be cleaned up. Also, the seams need a little more filling and sanding. It's not the easiest way to a high back Mustang, but very enjoyable so far.12 points
-
Hi all, I finished this early last year, my first and probably last torpedo bait as I only built it to fill in my non-wingy thing RAF mass project for completeness. Austin K6 tug and land trailer are fully scratch built, the Launch is just a detailed up Airfix kit. Thanks for looking ATB Sean11 points
-
Oh no, she's off again! The FrankenDornier build is having one of its periodic stalls at the moment. I don’t feel like trimming out the vac form transparencies just yet, and it’s too cold for spraying paint about. Yet the itch must be scratched, and so I scanned the stash for a suitable build. I was after something that wouldn’t be too taxing, might actually fit together without too much bother, and would fill a gap in the collection currently filled by something I’m not happy with. Let me tell you a story. The Bristol Aeroplane Company had been developing a twin-engined heavy fighter. The Beaufort was filling a need for a torpedo bomber, but the poor old Blenheim was showing its age. The result was the Beaufighter, which was adapted from the Beaufort. You can look the rest up on the web, if you don’t know. Anyway, the Beaufighter was ideal for carrying the rather bulky airborne interception radar sets being developed in the late summer of 1940, and the type began to be delivered to No 25 Squadron, RAF Fighter Command, at the end of September. Back in the dim and distant, I purchased a High Level kit of the Beaufighter MkIC. It was my first proper short run kit, and was a bit of a baptism of fire. Let’s be charitable and say it wasn’t all that bad, but needed some skills I hadn’t quite acquired at the time. It consequently spent a long time on the Shelf of Doom. In the end, in order to actually finish the bl**dy thing, since there weren’t many other MkI kits out there (so I thought at the time), I grafted on the engines and cowlings from the old Airfix Blenheim MkIV. There it is, delivered, factory fresh with the delivery mileage only, still to be given an ID letter. It would do, even though I never got the nose the right shape. A while later I spotted the Hobby 2000 kit. It was the correct mark, had the markings I wanted, and turned out to be a rebox of the Hasegawa kit from the late 1990s. In the stash she went! To cut a long and rambling story short, I’ve volunteered to help out with a Battle of Britain 80th anniversary display later this year. I thought it might be nice to build this kit, first for the display, but also to replace the High Level example in my display cabinet. So, here we are. It's an attractive boxing, clean and unfussy. I confess to never having heard of the brand before. When I first got the box and inspected the contents, I wasn’t expecting too much. The instruction booklet is A4 size, in clear print. This is obviously not a short run kit (I didn’t know the provenance at this stage). Four different sets of markings printed by Cartograf, with clear colour guides, and a masking set. Okay, it’s one of those vinyl things, but it’s included in the box. Would that more manufacturers would include such things. The penny dropped when the "Made in Japan" labelling was clocked. Obviously, this was going to more than a cheap repop. Well, that’s comprehensive. Wait! What’s that? Torpedo and rockets? Alternative noses. It seems this box contains parts for all the other Beau marks as well. Spares box ahoy! It turns out the Hase kit dates from about 1998, and has been reboxed and reissued a number of times before Hobby2000 did it. Despite being over 20 years old, it stands up very well against the stuff appearing from the big boys today. Hopefully, no trauma shall be encountered during this build. I will make a start later, but this build might be a little protracted since paying work has to take priority. Still, I’m looking forward to putting this kit together.11 points
-
Up at the crack of D with Mrs. B to feed the ducks and chickens this morning, to find nature churning this stuff out across the Eastern sky: Looking in the opposite direction westward to the Atlantic you could see the earthshadow slide away over the edge of the world: The heaviest frost of the year under a bright fingernail of moon. Not 'Fog on the Tyne', but 'Frost on the Sunderland'... Ar tháinig fear an phoist fós? Thanks Giorgio. That was primarily a test of technique which I think will come in handy later for building certain continuous sections in a controllable manner. (Hopefully...) Ta Chris. Takes me time to understand it, but I blunder on nevertheless... S'funny but I've grown to like Korean food of late Serge. A third point of coincidence and this will become a full-blown conspiracy...! With a rider that Neil's on 10% for handling PR and Comms..... Tricky is right Johnny as there are a number of variables to contend with that affect the 'decision-tree' as it were. There's a natural inclination to simply forge on here and 'design the aircraft' - which I've slowly come to realize was a naive inclination of my part - instead of considering how it also needs to be manufactured in order to fit together as a series of sections that include -as you point out - quite a lot of negative spaces within the airframe for internal detailing. No point looking Ok in virtual form is it don't actually print out and work as a material structure. Overlaid on top of this is the need to keep any approaches to design editable so that any number of likely adjustments and corrections can be made later on along the timeline, as and when required. @hendie mentioned this in terms of dependencies a few pages back and he is dead right! I'll outline some of the changes this has made to method down below as I've come to realize that a blend of approaches is the likely outcome for various regions of the airframe. Close enough.... You boys are just getting silly now. I have no business sense of any description! I have played around with that in the past Kushan when doing some filament printing a year or so back. I'm currently using the Chitubox software that comes with the Elegoo printer though, which although imperfect, when used in conjunction with the Photon FileValidator provides a quite efficient and reliable pipeline for hollowing and supporting. I've found that there's a way of plugging Chitubox directly into Fusion360 so that you can trial any prints in advance whilst still in the design environment and make adjustments on the fly, which turns out to be most helpful. Agreed. This is always an option. <Ahem> Would it encourage you to actually finish one? (Haven't you a 1/48 in progress somewhere...? ) Ta Chris - you're most welcome to join the throng! For truly he is a hare amongst the lumbering tortoises such as myself. I haven't posted anything of note over the week for the simple reason that I've been experimenting and learning and tbh it's not great viewing to watch the equivalent of someone scribbling on bits of paper, trying out an idea, swearing, making occasional breakthoughs, taking two steps back for every three forward and generally having a right old fandango. Or is that farrago? Anyhoo; I feel that there has been sufficient understanding garnered by today to provide an update on proceedings... This was - if you recall - the sort of stage I was at in sculpting form: Able now to get accurate outlines in three-dimensions but growing increasingly conscious that such a process in itself was not the answer to interacting with the combination of vertical asymmetry and radically changing horizontal contours that make up the geometry of this beautiful aircraft. As just a single eample of the challenge to be faced (and lest you think I'm neglecting kits altogether), a quick squint at the 'shoulder' of the SV in the High Planes moulding should suffice to bring the problem into focus: This feature is but one example of the subtle contours that are visible in only photographs of the actual aircraft taken in certain light and at certain angles: the final tapering out of the engine tunnel into the leading edge of the intake close up against the fuselage. To my eye HP have caught that pretty much bang on, but it you run your eye in a cross section from wing to shoulder and across the curves of the fuselage you can see even in this single example what a nightmare that would prove to try and sculpt from a single form, then repeat all the way back to the exhaust. So whilst I thing the sculptural approach will work for areas like the air intakes and associated fairings, it's only a partial solution. The wings will I think be best handled in the manner I've already played with (in terms of lofted profiles) though - as @hendie predicted - I've already found a more economical and direct approach using rails instead of the multitude of unnecessary profiles I'd employed previously. I've therefore gone right back to basics as it were for the central 'box' of the airframe and forward cockpit/nose sections - deciding that there's no short cut to the problem of building it up as a detailed 3d drawing involving multiple planes and axes. Here's the starting-point then, with construction lines defining the overall length, wingspan and tailplane width to 1/72 scale, and a horizontal cross section of the central airframe. Note that in the region of the air intakes, I've pulled this outline back away from the leading edge of the wing at an angle so that those fairings/tunnels can be added in as separate sculpted components. The intention here is to draw out as accurately as possible the main profiles in a series of transects from nose to engine exhaust structure. In preparation for this procedure I spent today laying out a series of vertical planes at 90° to the central axis: Each of these planes defines a point where the overall profile of the airframe changes contour significantly in three-dimensions: Each of those planes now gives me a drawing surface on which to begin creating a cross-sectional profile. If it becomes necessary later on in the design process I can step back to this point in time and simply add additional planes as required (though hopefully not too many...): Most importantly, because these will be basically drawings in 3D space, if any profiles need alteration later on in the timeline, I can come back to them here and do so accordingly in embryonic form. That took a lot of time today to organize and lay-out so I'm not going to attempt any further drawing today but feel I pleased that this more detailed, basic approach gives the kind of control and editability that I was seeking. Sun's going down outside now and feels like another frosty night in the offing; hope you're comfortably warm wherever you are tonight. Tony11 points
-
Hi all, Here I present an honour build I did last year. Sadly the person I built this for died a few years ago, that'll teach me to procrastinate!! This is based on the Tamiya 1/48 Humber Armoured Car MkIV with cut outs and a full scratch built interior The vehicle represented here is based on photos I have of my Grandpy's car that he served as driver in while serving in 56th Div, 44 Recce Reg in Italy from 'early '43 until wars end.11 points
-
My first completion of the year. Picked up both kits from an on-line shop during their November clearance sale. The base G-6 went together easily, as expected from most Tamiya kits. The resin nose conversion was designed to attach just like the kits nose section and fit just as seamlessly. My conversion was missing a pair of wing roundel decals, but Csaba from SBS Models sent me the missing decals. Hispano Aviacion HA-1109K.1L Escuadron de Experimentation en Vuelo Torrejon de Ardoz A.B., Madrid, 1951 Cheers, Rich11 points
-
I present my last build from the movie Charlie Varrick, or Kill Charlie Varrick. Varricks Stearman...A Revell 1/72 kit with resin radial engine. Mods include raised tailwheel, faired over front cockpit for pesticide hopper, and scratch built Venturi crop dusting tray. Please direct any questions, comments, and or thoughts to my build Thread. Dennis11 points
-
Hello. This is Czech MiG-23BN from Eduard (ex-Trumpeter). Used photoetched Eduard, weapons, exhaust nozzle, wheel bays, air intakes and wheels from Brassin. I hope you enjoy this new job of mine Alex. Russia.10 points
-
Ok my first update and a sort of large one. In the end I gave up waiting for the official start and opened up all the bags and started to check everything out. I’ve built a Tiger Model kit before and they’re not too bad, just a bit vague in places along with the fit, least they’re not like Trumpeter! The hull is in 2 bits and looked like it’d go together nicely. They also supply 2 lumps of metal (???) I think to add some weight to her, so she won’t be knocked off her stand to easily. One little tab was broken on one of the hull pieces, no issues there. The main deck and interior bulkheads sprue must be one of the biggest I’ve seen! It took up the entire box and weighs a ton, the deck is really thick. There’s a very slight bit of warpage to it but nothing dramatic. There are heaps of holes to be drilled out, but there are 2 different sets, A & S, for this model the S ones need to be opened up. The A sets look to be for a different version that was never released. The S one line up with the Swedish Navy version (as well as the kits ones), the A’s may have been for the Rescue version, they sort of line up with some of the pictures of civilian ones???? Finally they give you nice wee stickers to help identify the sprues….pity they fall off after a couple of minutes! Ok one bit I am going to improve is the .50 cal machine guns, they aren’t the best, so some new resin ones form Live Resin are on the way along with ammo belts and boxes. Plus, I’ve got some Swedish flags on the way as well. Right lets get too it…… The hull first, some tiding up of odd mould marks on the seams was require first, but it went together quite easily. The way it joined together sort of hide the join, bit I added some filler to clean it up properly. The intakes for the jets were fitted, they too needed some filler before the PE grills were fitted. Some filler was needed on the inside bow steps, this area was poorly done. I may add to “non-slip wet & dry” pads to these steps. The interior bulkheads were added along with the weights. The 2 front bulkheads which have the boat crew seat cutout were built up as well. Again, the fit was quite poor and nothing really lined up. Most of this will be hidden but I’ve used filler here as the gaps/fit annoys me! With them sitting there you can see the unusual arrangement for the 2-man crew’s seats with the alley way down the middle for the bow exit. They also sit quite low down to help reduce the boats overall silhouette. Finally, the engine bay, lots of open space and nothing else to go in there! I have found some good pictures of an engine bay in one of these boats (this one is for sale) so I’ll try and add some detail. The worst part is the exhaust openings on the stern, they’re just whole with nothing connected to them! So they are a must fix. So here she is with the deck sitting on. She looks impressive, ignore the wee dude, he's been running around the desk all week! Right the problems…..there are no instructions for painting at all other than the basic overall colour scheme which I not doing anyway. · Engines – Grey or Scania Red, I’ve seen photos of both, being navy I would have thought grey, slightly dark and semi gloss, the bay probably a lighter grey. · Interior – no info, seen photos showing it a creamy colour, plus the crew station white or Lt Grey, again no idea. The forward section (bow exit) no idea, only seen one set of photos and it was bare aluminium, that doesn’t sound right for a service boat. I'd have said a dark grey for that part. · Exterior – still no idea, will have to mix and match some paints and do some test runs. I only know the lower part of the hull is black....going by pictures. I wish there was someone here who knew someone who had served or have been on these boats. I’ve look on other forums and drawn a blank. Actually there’s very little detailed information of photos of them other than the basics which is a shame. Anyway that won’t stop me, so far I’ve really enjoyed this build and are just about ready to paint the interior, will probably use a bit of artistic license and common sense with the colours for it.10 points
-
Simple to build but exquisitely detailed in parts, with fit that's great in some places, not so good in others... It's really not very big... Got quite a little stack more of these little Hellers as light relief between larger scale builds... best, M.9 points
-
This was my entry in last year's Specialist GB. It's the AFV Club 1/48 RF-5E Tigereye with Quickboost seat and WandD metal pitot. Cameras in the nose were scratch built along with some basic details in the cockpit. Decals are from decal-la and painted with Gunze Mr Color lacquers over a black surfacer base. Unfortunately I wasn't able to finish it in time for the GB deadline. Everything had gone well with the build until I brought it for a meet-up with some friends. I ended up sitting on the poor thing and damaged the rear fuselage. It almost went into the bin until I decided to repair and finish the project. Glad I did. aidy9 points
-
This is a grand kit from Tamiya, a lot of details. Everything moves and opens. All signs are color by mask. Regards, Alex.9 points
-
Here she is. J 8 s/n 233 of F 8 tested on skis in winter 1937/38. The build thread is here. I used Eduard PE parts (mainly for the interior) and Eduard cockpit canopy masks. Both were of great help. Moreover, the utilization of the PE parts was almost 100 %. Brush painted with Humbrol, Model Master and Revell enamels. The decals by SBS Model were an absolute delight to work with, including the numerous perfectly readable stencils in Swedish, where e.g. LYFT HÄR looks like adopted directly from a Monty Python’s Vikings’ sketch (no offence meant, my dear Swedish comrades). Without rigging as usual. Some may consider the scheme dull, but I think you cannot deny her certain monochromatic charm. It was the fastest build in years for me. The kit engineering is clever, similar to the old Matchbox biplanes, and I would not hesitate recommending the Airfix Gladiator as the first kit for a biplane novice. Usually, with the type of kits I build, I do not feel like building the same one again soon, especially after the ordeal I had been through (more often than not). Here, I think, I will build another of the little gems soon. I am particularly proud that I managed assembling the tiny s/n below the fin, as I had to combine 231 and 235 into 233, and the numbers are in fact less than 1 mm high. However, the quality of the decals helped a lot. Eventually, compare with the Matchbox Gladiator I built almost exactly 20 years ago as my very first kit after emerging from the Dark Age. The Matchbox does not look bad at all on the shelf, but it shows its age, and the direct comparison reveals evident shape issues, especially around the cockpit, including the cockpit canopy as such. One more reason to build another Airfix soon.9 points
-
Good evening. Multiple sleepovers with my kids this weekend which meant in between cooking breakfast and what not I got some bits done on the 262. 😇 I sanded the jets smooth and attempted a fit. They dry fitted ok so what can go wrong? lots as it happens. 😩 on a dry fit the movement of parts makes a fit a little better as the tolerance can shift. When solid it’s a different story. As you can see above I have fallen fowl off the dreaded wonky jet problem. 😔 dang! The under side wasn’t any better. 😣 Wonderful. 🤩🤪🥰😍 I get to do some modelling. 🤩 You need to scrape and fit allot to find the correct position. I guess all kits must differ a little depending on how you fitted the other parts but here’s what I did. scalpel scraping here. And here. Some sanding here. Fitting all the time to make sure everything is headed in the right direction. Ending with pegs. There is a big Mellon thumb print under there too. 😔 Doh!!!! Nothing a few swipes with a sanding stick won’t fix. Pretty much identical procedure on both sides. All glued and jet ends on. PPP added with a coffee stirrer and a wet bud. Overall not bad after some work. I then decided to have a go at the landing gear. using the jet as a jig I glued the parts but not to the actual well. same with the rear. And all done. 😇 I’ll pop them off for painting. righ oh Gotta dish up dinner. A little more later. 🤩 hope you’re all enjoying the build. It’s great fun from this end. 🤩 Happy Modelling . Johnny9 points
-
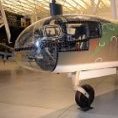
As promised, a little work. The basic shape is pretty good. I remembered, in the distant past, one of the magazines reviewed the Hasegawa build when it was still new. Apparently, the fuselage is a bit short, but there's nothing I can do about that. I like the fact the kit designers allowed for all kinds of variants, save the MkII with the Merlins. The fin, for example, is made up of parts in the kit, depending on which mark you're building. The reviewers back in the day noted a lack of internal detail, so I needed to do something about that. This kit assumes you are happy to use decals supplied for the IP and side panels. I'm happy with the IP, but the side panels are fairly three-dimensional affairs. Off to check the references... While the references were being consulted, I assembled the cockpit tub and observer's seating. I'm not going to bother with all the internal ribbing. You can't see anything once the fuselage halves are joined up. I did decide to add some greeblies to the side panels, and heater pipework to the starboard side. Seat belts will be made from masking tape in due course. Rough and ready, but many times better than the decals alone. I'll add some levers to the throttle quadrants, and make the compass over on the starboard panel a little less prominent. Otherwise, happy with that half hour or so. Here's my interpretation of the heater pipework. The fact it breaks before reaching the observer in the back doesn't show. I think I will thin the edges of the observer's cupola before gluing things together. Before I even get that far, I need to paint up the tub and apply the IP decal. That will probably do for this session. Paying work tomorrow!9 points
-
Thanks AW, it is worth the effort but I can't guarantee the quality! Thanks Bill I noticed that the seat backs were more 'separate' than I had them so they got chopped a bit and repainted: After a gloss coat they'll be ready for the arrival of the white pens. With my magnifiers on and looking at close up photos it's easy to get over-excited. Like with the 'Hawker sealed aircraft battery': That'll do pig. iModelKit tells me the pinky red can be had by mixing H19 and H61 - we shall see later. I mentioned the detail on the pedals: NOW I can see the flash9 points
-
I'd never heard of this particular truck but the moment I laid eyes on this kit I wanted one! I just love the unorthodox looks of this bad boy. The huge front end which houses an equally huge engine, the shape of the cab, the rear end with the fuel tank and toolbox... yep, I love it to bits. This is the kit: Takom did a fine job on this one. Crisply molded, great fit, clear instructions. It was a joy to build. Here's the WIP: I built it OOB, save for the front license plate which I nicked from a MiniArt truck kit, along with the decals. I did use the rear license plate from the Hanomag kit and cut the MiniArt decal to shape. Oh and I made the towing thing on the front bumper. Lastly, I cut off the molded on door handles (that should be illegal on a kit like this) and re-attached them on a bit of rod. Everything else is box stock, without any additional detailing because in this case I was purely interested in the looks of this machine. This is the engine, lots of molded on detail. Funny... I decided to install the fan after painting. Of course, I forgot about the thing until I came across it in the box, after I closed up.... Oh well, one fan for the spare parts box. I mixed up 2 shades of green using Vallejo Model Colour paints, a lighter one for the interior and a darker one for the exterior, in a post-war civilian livery. You can read the exact mixtures in the WIP if you're interested. Mudguards and running boards are black, the roof is a lightened German Grey. I didn't want everything to be the same colour. The whole thing is brush painted. A shot of the interior: Nothing fancy there. When painting the exterior I used some Vallejo masking fluid to create a chipped effect. I drybrushed with gun metal and various shades of brown to create the dirty / dusty effect. Some pigments and Tamiya weathering powder on the tyres. I tried to add a streaking effect with a light grey wash and it seems to have worked, I'd never done that before. The paint chips are treated with Vallejo's Rust Texture, which I applied with a small brush and then wiped with my finger. Time for pics, here goes! It was a really fun build, I hope you like it! Full album here if you're interested. Thanks for looking in.8 points
-
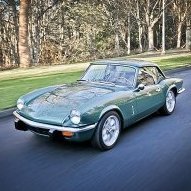
Taking a little break from the F1 cars and building something from my dream garage. This is the Hasegawa 1:24 Lamborghini Miura SV. It's the original red molded kit that I primed and changed to metallic green. I really liked this kit - proportions look great and the wheels are beautifully detailed. Foil transfer emblems also do a great job of enhancing the exterior of the kit. The only issues with the kit were some light sink marks around the headlights that I was able to level with some Tamiya Liquid Primer. Built box stock. The colour is Mr. Color Metallic Green #77 which was then clearcoated with GX100 Super Clear. It has a bit of a pearl in it which changes the colour depending on the light source - it can get very turquoise in some light and very green in natural light. I was trying to match one of the first factory restorations that Lamborghini's Polo Storico did. I think the metallic pigment is a good size for this scale, but my primer base could have been sanded smoother - the roughness of the primer showed up a bit more than I thought it would in the metallic. I stripped the chrome off the wheels and knockoffs, painted the wheels aluminum and used Alclad polished aluminum for the knockoffs. I love the wheel design and Hasegawa did a fantastic job replicating them. Window trim was all done in Bare Metal Foil with a Molotow Liquid Chrome pen for some of the chrome details like washer nozzles and door handles. There's half an engine in the kit, but it's all but invisible once you put the body on - you can just barely see the white air filters through the louvers and the glass at the back of the interior. Here's the interior before it went behind the glass. Interior was painted with Vallejo Air Golden Brown and Sand Beige. I used embossing powder for the carpet which was then painted but I feel it looks a bit too 'sandy' as opposed to fluffy. It looks okay through the glass. Some nice touches from the Hasegawa kit here including the foil transfer for the shift gate. I've been doing the grey background studio style shots for my builds so far but thought I would try some photographic backdrops to see how the model would look on 'location'. I found a few hi-res photo backgrounds online and then went to the 5 storey parkade next to my office and took photos of the pavement and sidewalk from above. I printed them out, mounted them on some foamcore and set them up as ground and background. I'm enjoying the photography as much as the build - I think my favourite part is seeing the reflection of the environment in the gloss of the body. Downtown location: At the parkade: Some back street in France maybe: And a shot of my elaborate outdoor studio: 😉 Thanks for looking, comments, questions and critiques always welcome. Martin.8 points
-
Hello everyone! Here is another of my Sweet 1:144 Messerschmitt Bf 109F-4s which I built in 2008. It represents "Yellow 17" of 1/1 FS, Royal Hungarian Air Force, flown from Kharkov, Russia, in winter 1942-43. This was a Luftwaffe machine transferred to the Hungarians. Due to the pace of the war, it took some time before all Hungarian markings were painted on so for a while these machines flew with German markings and the Hungarian flag on the tail. The kit was built OOB and was fully painted and varnished with brush. Thanks for looking and all comments are welcome Miguel8 points
-
Back to the Future - Delorean - Aoshima - 1:24 Hi mates, here is the fantastic Dr. Emmett Brown car ... If you are interested ... here the [ WIP ]8 points
-
Now then AW, you're teasing, aren't you? Label, maybe, but the pedal details? Do behave Another one! Pedals they are - they move. The kit ones are almost exactly like those in AW picture above - Ah ha! No food at the range Simon (we had to take packed lunch) but the Scouts had been cooking the night before and the smell of bacon lingered… torture! Looked out the Mike Grant instrument decals: …and went through the rest of the decal stash to separate stuff useful for internals. Have you spotted it yet AW? Also found these: Bought them from Mr Hannant himself at SMW a few years ago when I was building the Rapide. Nigel Heath (where is he?) commented that the resolution wasn't very good on the narrow ones, then we realised that was the packaging and the decals were inside If the pens don't work I have a fall back. I've painted the i/p: Like the Meng black. The blue is a reflection, honest. The internals are now all (mostly) painted and ready for assembly: Can I wait for the pens to arrive tomorrow? Possibly.8 points
-
Catching a Cab At the end of the last update we were up to this point. Here we have a model that's starting to look a bit a like a steam locomotive but it's still missing some major structures, most notably its leading wheels and the cab. This post is going to focus mostly on the cab, but some other stuff has been going on as well. For example, the two major structures that make up the tender have been stuck together... and the 'second chimney' as baby bandsaw calls it (I think it's actually a housing for some sort of excess-pressure relief valve) has been added. I'm not going to discuss this in any detail because it's essentially the same story as making the chimney except we made sure it went on straight this time. Anyway, back to the cab. For various reasons this structure has caused me a great deal of concern and confusion and delay. BB and I tried making one out of thin plywood but it was a complete failure and after a significant amount of re-thinking I came to, what I now consider, the obvious solution. Build the thing out of brass. Here BB has cut out a sheet of brass that is the correct profile for the front view and is chain-drilling the driver's windows in preparation for cutting and filing. Here is the result after the filing is partially complete. 20 minutes later the windows both looked quite tidy. For Christmas I got this beautiful, beautiful set of electronic calipers. Beautiful they are! Here I am using them to transfer window measurements from the plans onto the brass side walls. So that they too can be chain drilled, sawed out and... filed to shape. I have decided that I love working with brass. I did this side wall, BB did the other. it was just as good. Here are the various pieces dry-fitted together. Originally my intention was that we would cut a sort of close-fitting arch out of the front of the cab so that firebox would pass continuously through it just as on the original. This however proved to be completely impractical. Here the last 7mm or so of the fire box has been cut off and sanded flat. The front of the cab will now butt join onto the rear of the firebox. This approach is much simpler and will allow a much stronger cab to be built. Here we are setting up the first soldering job. Attaching the side-wall onto the front of the cab. Here are the tools we will use. This is my first time ever using a soldering torch as opposed to an iron. We work outside in a brick and concrete carport and swept the small bits of leaf debris away before lighting up the torch. Australians don't generally approve of folks teaching their daughters to use gas torches around dried leaf litter these days. 🔥 Here's what the set-up looks like in action. Sand the mating surfaces clean, 'paint' on some flux lay the solder in place and apply heat. The amazing thing was how much heat this solder took before it melted. This was some new stuff that I recently bought from Bunnings and it was marketed as 'silver solder' (I think for plumbing purposes) and even with this little blow-torch we could hardly get the stuff to melt at all. The contrast with the stuff my dad gave to me a couple of years ago could not have been greater. I suspect the old stuff has lead in it and was intended for electronics work. In any case it has a very much lower melting point than the new stuff. This high-temperature versus low-temperature contrast is potentially useful as the great Gerald Wingrove emphasised in his books, it allows the early structural work to be done at high temperature and the later details to be added at temperatures way below those that threaten re-melting of the first joints. Anyway - here's what the first round of high-temp soldering looked like once BB finally got the solder to melt. Now we had to add the roof. To get a nice even curve in the thing we decided to anneal the brass using my wife's Crème-brulee burner. This thing generates some serious heat and got the brass sheet to cherry red in about 15 seconds flat! Excellent. Now we could bend the brass around a tin of primer to produce... almost exactly the radius we were after. We then did a high-temp solder onto the front of the cab... and the following day followed up with a dab of low-temp solder to just solidify the connection between the wall and the roof. Here is the low-temp solder floating in flux waiting to go just a few moments before we heated it with an electric soldering iron. This 'weld' was a bit messy but it cleaned up OK in the end. So here's where we are now - the cab is a nice strong unit that sits in the correct spot. No interior detail yet but that's not a big problem. The tricky cab bit is now under control and I'm feeling confident at this point. Next up we have to do something with those front wheels. Best Regards, Bandsaw Steve and Baby Bandsaw..8 points
-
This is the new clipped wing . More images in Gallery8 points
-
Final entry, Curtiss Hawk 81-A-2 in Blue Angels livery. Only thing I'm not happy with is the front of the canopy, made a mess of the (pilots) left strut. But everything else had gone so well up until the point of realising when I removed the masks, so it live as a reminder to check and double check my masking on future canopies. Build thread here:8 points
-
Bandai 1/48 S.H.A.D.O. Interceptor: Cheers, Mark.8 points
-
So far i've built a 144th scale and 2 of the 72nd scale This happens to be my 4th overall build ever...First of 48th Scale ...and am still learning... I went for the #32 French Rafale M instructions from the box Since I have to use locally sourced resources...like student/fabric acrylic colours instead of pro grade airbrush paints, I had to experiment a looooooot right from making DIY thinner to using inks for transparent parts to using clear epoxy glue as glass on GBU sensor tips I also had to learn how to use soft pastels as weathering powder...that was fun 😅 It's mostly OTB, but I call the build custom ...because the reffernce of #32 rafale m was clean and I wanted to throw in as many learning opportunities in this build as I could... that includes some differently coloured panels (which also serve as excuse to cover up scratches i accidentally caused 😜 ) The cockpit has mostly a standard build because I wanted a closed canopy but added some scratch-built details on the Seat like belts and pipes, mirrors on canopy etc (see build log image) Added some wires and stuff to landing gear detail Obviously there are mistakes and errors ..tons of them...some mine...some resource limitations...and some revell's doing (Light on the right is supposed to be green but the instructions said blue...and i was sleepy )... Colours are all mixed from standard Six pack of student acrylic colours so i'll take creative freedom on colour accuracy but tried my best Find my Full Album (45 images) on Flickr Here --->7 points
-
Pros: Great shape, great fit, great moulding. All 4 wheels steer just like the real thing. Comes with PE badges. Not much to clean up. Interior is not a tub - has proper seperate 3D sides. Even the seat-backs do not need filling. It's a very tidy kit. Cons: Curbside. That's it. The rest is perfect. Verdict: Great. I don't know what the Fujimi one is like but I recommend the Aoshima one very highly. Build notes: I wanted to get 2020 off to a quick start with an out of the box build, so the only changes I've made are replacing the yellowed number plate decals with some newer white ones. The kit is so nice, out-of-the-box is enough. Colour is Tamiya TS-38 Gun Metal, clearcoated with Tamiya TS-13.7 points
-
Neither kit will give you an accurate Sabre 4 OOB; the Airfix kit will address that issue correctly.7 points


.thumb.jpg.cfc129272ffec824439b15e6013d5952.jpg)
This leaderboard is set to London/GMT+01:00