
Leaderboard


Popular Content
Showing content with the highest reputation on 15/01/20 in all areas
-
The Spitfire is complete! This is the new tool 1/48 Tamiya Spitfire Mk. I. The first completion for 2020, let's hope I can keep up with this pace! Just over four weeks from start to finish. Some oils, exhaust stain and a few water colour pencil marks. I haven't enjoyed a build like this one in a long time. The weathering was kept to a minimum as N3200 only flew once due to it being shot down and crashing on a beach of which the photos are well known. It flies again nowadays. Hope you like it. Cheers, Mick ...and a moody one.32 points
-
Hi guys, I recently finished the Spitfire VC by Special Hobby, in the boxing devoted to Malta Spitfires. I have read several complaints on the net about this kit, but for my limited Spitfire expertise, it was ok. The only thing I realized a bit too late was that the UC legs are a bit too long (at least compared with Eduard Spits). I started by riveting the kit I choose the markings of BR 112 coded X, one can easily find pics of this plane lying on a beach in Sicily. To represent the famous 'Malta blue', I painted the kit in the Dark Earth, Mid Stone and Azure Blue desert scheme, using Gunze for the upper surfaces and a Tamiya mix for the Azure Blue. On top of that I applied a thin and rather transparent coat of a mix of Gunze H 337 and H 42, leaving the Desert camo slightly visible. There is a patch on the top of the fuselage and also the tail unit who seem not to have been overpainted. The weathering was done with oil washes, India ink pens, and pigments. I hope you will like it, Christian.27 points
-
#1/2020 Let the new season begin! Kinetic kit, needs some filler, a molding issue appeared on the left side of the tail fin in the area of the leading edge. The tip tanks are one piece parts and molded both the same way, to say both for one side and not differently molded for different sides. Some work to make the "wrong" one fit, you may see it on the frontal pic, the tip tanks have a slightly different tilt. Used a resin seat from the Wolfpack edition of the Kinetic kit. Decals for the main markings from Print Scale, not that bad but took a while to losen from the carrier paper and tended to wrap. Stencils were taken from the kit. MRP White and Dark Aluminium used for the NMF. Build thread here https://www.britmodeller.com/forums/index.php?/topic/235062626-persian-thunder148-northrop-f-5a-freedom-fighter-imperial-iranian-airforce/ In the early 60ies Iran looked for an aicraft to replace the aging F-84 and F-86 fleet. They found it in the F-5. The first batch of F-5A and F-5B were delivered on Dec. 6th 1964, the last ones were delivered in 1971, some in NMF and some already in Asia Minor camo. The NMF ones were soon camouflaged too. iran was the first export customer of the F-5. When the IIAF received the newer F-5E/F and F-4D/E, Iran and the USA negotiated, under project Enhance and Enhance-plus, to deliver most of the old Iranian F-5s to other US allies, especially to South Vietnam. Other recipients were Ethiopia, Jordan, Greece, Morocco and Kenya. The model shows an aircraft that was stationed at TFB-3 Shahrokhi. In 1971 it crashed near Vahdati Airbase during an air to ground exercise. DSC_0001 by grimreaper110, auf Flickr DSC_0002 by grimreaper110, auf Flickr DSC_0003 by grimreaper110, auf Flickr DSC_0004 by grimreaper110, auf Flickr DSC_0005 by grimreaper110, auf Flickr DSC_0006 by grimreaper110, auf Flickr DSC_0007 by grimreaper110, auf Flickr DSC_0008 by grimreaper110, auf Flickr DSC_0009 by grimreaper110, auf Flickr DSC_0010 by grimreaper110, auf Flickr DSC_0011 by grimreaper110, auf Flickr DSC_0012 by grimreaper110, auf Flickr DSC_0013 by grimreaper110, auf Flickr DSC_0014 by grimreaper110, auf Flickr DSC_0015 by grimreaper110, auf Flickr DSC_0016 by grimreaper110, auf Flickr DSC_0017 by grimreaper110, auf Flickr DSC_0018 by grimreaper110, auf Flickr DSC_0019 by grimreaper110, auf Flickr DSC_0020 by grimreaper110, auf Flickr21 points
-
-My last built before reverting to Soviet/Russian models - At first glance I thought it should be an easy to built model, but the first trouble came with my idea to built a trainer version instead of the more usual night fighter, it has not been as easy as it seems as the seat is in a new rear cockpit with more room for the instructor which ask for some surgery, then I wanted to close every doors but as the model is conceived to show the well detailed engines and guns compartment, closing the door open the way to issues difficult to cure including the open canopies, and last but not the least an awfull notice in REVELL former style, happily their new notices are excellent.21 points
-
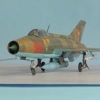
No WiP for this one folks...but I think this is my first finished kit of 2020! Eduard's lovely Mig-21MF from their Dual Combo box. It is the aircraft flown in Angola during 1976 by Cuban General Rafael del Pino. I tell you, I have been putting this off for so long. The thought of this kit scared me. Over a year I balked. Result? It's a wonderful kit, very tight fit tolerances and more stencils than you can shake a stick at. I mean, really, guys...crazy amount of stencilling, but I managed to get 95% of them on and where they should be. All the paints are Vallejo Air or Vallejo Model. OOB completely. I pin washed with black/brown oils and I am happier with this than Flory Wash. Sometimes the Flory just seems too 'dirt-like', know what I mean? I learned a lot about this kit, as a whole, since this is, more or less, just like all the other Mig-21 kits Eduard will make. For me, I will skip the PE and the resin seat in the future. I had a heck of a time getting the cockpit all together with the PE, the resin, etc...and with a closed canopy, you can't see it anyway. Next one will be all plastic and decals. Much easier. In any case, if you haven't built one of these Migs, you must. It's on the same scale of detail and fit as their Spitfire range. Very nice indeed! On a different note, I forget what a small aircraft the Mig-21 really is. Much smaller than the -15/-17...certainly more elegant that the -19. Sleek, a little dart. And compared to the US aircraft? Miniature... Here's some pictures... Here's a bit of a pile of Migs. And it is destined to just get bigger. 2 of the new Airfix Mig-17 kits are coming and a KoPro Mig-19 as well. Next up for me will be the Finnish KoPro Mig-21Bis. Look like a decent kit and the roundels are in register. --Happy modelling and Happy 2020!20 points
-
Hi, Here is a selection of images from my latest completion. This is Revell's 2004 Eurofighter Typhoon in 1/72 (04317), not the new tool. The model is built mainly straight from the box, except I scratch built the intake ducting using plasticard to disguise the opening left by Revell. I also added detail to the kit supplied ejection seat using wine bottle foil and different gauges of wire. I had to create the HUD from scratch as the part including on the clear sprue was crudely moulded. The moulds are showing their age with some flash but once cleaned up most parts look ok. The exception being the engine rear face inside the exhaust pipe as the detail is damaged, fortunately this really cant be seen unless you look closely. The canopy was dipped in AK Interactive Gauzy Agent Glass Coat. I glued the canopy in the closed position before painting so I could fair it in to the fuselage using Deluxe Materials Perfect Putty. The plastic was primed with Stynylrez grey and painted mainly using Mr Hobby Aqueous. Variations of tone were achieved by adding white to the base colours and randomly mottling the surface. I used Vallejo Metal Color Aluminium as a base for the exhausts, varying the tone by adding other metallics or greys to the paint mix. I chose this scheme from the kit as I thought the Spanish roundels added a splash of colour. Before applying the decals I tried to give the model a glossy surface by spraying Ammo by Mig Lucky gloss varnish. Unfortunately I couldn't get a smooth coverage all over as it just dried on adjacent surfaces with a rough texture. In the end I resorted back to Tamiya X-22 which just about saved the day, although the surface wasn't as smooth as I would like resulting in some silvering to the decals. Tamiya X-22 was used once more to seal in the decals. Weathering consisted of various enamel panel line washes from Ammo by Mig and their Starship Filth Oilbrusher. I also replaced the sensors under the nose with triangles of thin aluminium as one of the kit parts pinged from my tweezers. Hope you enjoy! Mark.16 points
-
Thanks Iain Thanks Ian I'm not too bothered about the camo to be honest - my Luftwaffe 'collection' is quite small and in the corner of the ceiling. At least it's consistently wrong! Thanks Heather My colours, or should I say Vallejo's, are nowhere near that to be honest - see below. Thanks Giorgio Thanks Simon Sometime I love them (these went on really well) and sometimes I don't! Matt coat on, dry and then my favourite bit: Nowhere near Heather's but it is quite like the box:12 points
-
Thanks Giorgio - it did help so is definitely part of my process now Thanks Jochen I grew up with Humbrol non-authentic (?) and now use Vallejo so they look fine to me Thanks Graham - useful info Transfers (decals) on. When you're trying to avoid knocking things off you sometimes have to use unusual methods: I'd started on the Tamiya stand but couldn't get the angle. Then I tried holding by hand but several times found my fingers pressing on something fragile. Mind you, one does need to take care where you place the clamps: NOT where the transfers go (port side). All done now: I even applied the stencils. Well, most of them. These: …are just a route to madness!12 points
-
Hello every body, here I want to show you another scale model from my "production" Its the eduard (ex hasegawa) Typhoon Mk.Ib in 1:48 Hope you like it!10 points
-
Happy New Year, everyone! 🥳 I've been able to spend more time on this build, but unfortunately haven't got a lot to show for it. It seems the smaller the parts, the more time it takes. I been focusing my time on adding a few details to the main superstructure and the bridge. The superstructure details included little things like drip rails over the door openings, window frames/mouldings, trim around the bridge opening, and the most time consuming part - the spray/wind deflector around the large superstructure opening, as shown below. All these parts were made using white Evergreen plastic sheet or strip. Next, the bridge. I want to air brush as much of the bridge as possible. So, I decided to make a separate bridge enclosure that could be assembled in the superstructure after the bridge is detailed and painted. The four bridge bulkheads & deck were assembled using tape to allow detailing & dry fitting of the bridge sub-assemblies, and then allow disassembly for painting. I've built the main control panel & the helm (using the Perkasa model's ship's wheel), the bulkhead separating the bridge into two parts, the storage lockers that are located along the aft bridge bulkhead, and three doors, all using white Evergreen plastic sheets of various thicknesses. I've also drawn & printed off decals for the main control panel, My plan is to use the decals, augmented by bits of plastic, to give the panel a 3D appearance once the panel is painted. There's still lots of work to do on the bridge, e.g. locker latches, compasses, torpedo & gun sights, Captain's chair, etc., plus painting. The subassemblies dry fitted in the bridge enclosure ... And finally, the enclosure was dry fitted in the superstructure. Next up, continue adding more details to the bridge and superstructure. 🥴 Thanks for following along. John10 points
-
Hi mates, Last year I made a pledge to build more models than 2018 (when I only finished four kits). Yet again I was unable to deliver on my promise, and I actually built fewer models! Just three lousy models left Chateau Oiseau de la Marine in 2019. Is it my age that is preventing me from building more? Too many grandkids? Losing time by traipsing across Old Blighty with @CedB, @Procopius, and @Cookenbacher? Losing more time by singing in the rain with Wifey in Scotland? Maybe it was working part time for my old employer on top secret special projects. In any event, I failed. But I will again boldly predict that in 2020, I will build more models! Can I do it? Or is this again just the wistful wanderings of a wrinkled old man? Here is the pitiful output from 2019: 1:32 Supermarine Spitfire Mk.IXc (completed July 2019) Tamiya During the height (depth?) of my chemotherapy back in 2015, a very fine gentleman from Australia sent me the fantastic 1:32 scale kit from Tamiya of the Supermarine Spitfire Mk.IXc. The generosity of this man was unbelievable and at the same time a beautiful gesture to someone going through a difficult time. I will forever be grateful to him. It took me a long time to start and finish the model, but at last she was finished. Although the Tamiya kit is amazing right out of the box, old Navy Bird never misses an opportunity to spend some of his children's inheritance on aftermarket goodies. These are detailed in RFI post below. Click here for the RFI post with complete details of improvements and modifications. I was fortunate to have the model win the Best Aircraft and Best In Show award at ROCON 2019 in September. 1:72 Hawker Sea Fury FB.11 (completed April 2019) Aki Products In the midst of my build of the Tamiya 1:32 Spitfire, I decided to tackle a small side project, and one I've been wanting to do for some time. This is the 1:72 resin kit from Aki Products in Japan of the Hawker Sea Fury FB.11. There are a few articles and reviews on-line about this kit, and I can say one thing - believe what you read. This is an outstanding kit, and the best replica of the Sea Fury that can be had in 1:72 scale as of this writing. In fact, this kit surpasses many injection moulded kits in detail, quality, and fit. It's that good. Unfortunately, I don't think this kit is still in production, so the price (when you can find it) is a bit crazy. OK, a lot crazy. But I'm stupid, so I bought it. I chose the Royal Australian Navy display aircraft circa 1961 for the markings, and I made sure to go by actual period photographs and not from the restored warbirds that have worn this scheme at one time or another. The overall Oxford Blue scheme was too hard to pass up. As you look at the photos, you may notice that the flaps are down in some, up in others. This is because the flaps are hinged on the model, and can be posed where you like. The metal rods used as the axle of the flap hinges are actually cast into the resin - a clever bit of engineering and some nice quality control to pull it off. Special thanks to @NAVY870 and @Paul Bradley for their help in this build. Without their sage advice, old Navy Bird would have been naughty and done something silly on more than one occasion. Click here for the RFI post with complete details of improvements and modifications. 1:72 Gloseter Javelin T.3 (completed December 2019) Heller Like most of you 1:72 folks, I've been waiting for Airfix to scale their beautiful 1:48 Gloster Javelin kit down to the gentleman's scale. Waiting...a long time. As it seems Airfix is busy with other projects, I decided to force the issue by building the OLD Heller 1:72 Javelin, and along the way to try and make it a wee bit more modern, starting with a complete re-scribing and converting the kit to pose the airbrakes open. Surely this will cause the gears of fate to start meshing, and Airfix will get the idea. So you can thank me then! Since I have little common sense, I also thought it would be a good idea to build two of these old kits, one a T.3 (the Heller offering) and the other an FAW.9 (the Airfix re-tool). I also played with the idea of using either the ZTS Plastyk or Frog kits for the FAW.9, but upon inspection I donated those instead to my 3-year old grandson so he could practice using an entire tube of glue to add the seats to the pit. The T.3 is finished, and I duly present it here. The FAW.9 will appear sometime in 2020, unless those gears of fate turn too quickly and thermally disintegrate. Click here for the RFI post with complete details of improvements and modifications. Well, I told you it was a pathetic output. Perhaps I should make a resolution to build fewer models in 2020 - since the opposite of my pledges always seem to come true! Cheers, Bill9 points
-
Mach 2 kit - not a shake and bake, but good enough and looks very different rent9 points
-
Thanks AW No worries, I'm just 'following orders': As a 'kit basher' I'm not often known to vary from the kit scheme. Final 'that'll get knocked off bits' attached before gloss coat. Pitot and top aerial: Bay doors and (snigger) bottom aerial: The bay doors were tricky. In 'that video' (q.v.) the front bits sort of hang over the opening: Bomb Doors Open by Ced Bufton, on Flickr I jammed the backs up against the bay and dotted some TET on the front: Gloss later.9 points
-
Been working on something that will be seen...well kind of if you can get down that low! The bomb bay. It's just going to be a general representation but is better than the kit part. Still working my way down to the front, every single bit has been individually cut. Those awkward shaped ribs were a pain to do! The end pieces will be backfilled with P38 and sanded flush9 points
-
Hi Chaps, With great enthusiasm i plan to join this Saab Viggen STGB masquerading as the Scandinavian group build under the New Nordic title. Although i have an Airfix Viggen at the bottom of the stash, I shall endeavour to turn the Special Hobby Viggen into something approaching trickyrich's efforts in the Specialist GB last year. I bought this from Hannants in 2017 so was able able to compare it to the Tarangus kit which was significantly more expensive. Lucky I did because it is the same kit! Another great reason to support your local hobby shop. My last Special Hobby kit was the truly shocking R4 helicopter which hit the bin mid last year. Hoping for slightly better from this one. Since i live here on the outer rim, this will be a resin free build using only a set of 2 Bob's decals bought many years ago, some plans and Milliput. Oh and 200 pictures i took of the one in the Newark air museum. Scheme will be the splinter one. You know what the sprues look like by now. Colin8 points
-
One I don't think I have shown here before. ICM kit to 1/48th. Decals a nix of generic adn emblems,codes serial from the Airfix MkIX from sometime in the last decade or older. I built this around the same time frame. Showing it here as its one earmarked for sale as part of my downsizing of my build collection. Any comments welcome.8 points
-
Dear all. I'd like to present my recent adventures with the character-full old Airfix kit of 'Faithful Annie'. I made a lot of changes - as you might have anticipated for a kit this old - but belly aside, I was impressed by how accurate Airfix caught the proportions and outline of both fuselage and wings. There was much scratch-building from brass & plastic, which I won't bore you by listing again as the cumulative list of tasks and rationales can be found over here: The aircraft is the one that famously discovered the Knickebein beams being used to guide the Luftwaffe to targets over Britain in 1940 - a list of historical refs. are given over on the build thread. Aside from the Hallicrafters set used to detect the beams and the need to alter the electricity supply of the aircraft in order to power it, any further detail regarding the installation of any different aerials &etc. seems now lost in historical mists. Not surprising given the jeopardy of that period in the war. I was lucky however to be in correspondence with the son of the pilot - Flight Lt. (as he then was) H. E. Bufton - who generously sent me copies of the pages from his father's log book for that night, confirming both the serial number of the aircraft and timings of the flight. Aside from log book entries, I was able to cross reference with a copy of BAT&DU (later 109 Sqn) Operations Record Book (AIR 27/852), obtained from the National Archives. I hope that Hal Bufton's son is pleased at how his father's aircraft has turned out. All camouflage and national marking are painted with Tamiya acrylics: detailed discussion over colour schemes and why there are no squadron codes on the fuselage are contained in the latter part of the WIP so I don't propose repeating these at length again here. Main technical reference for buildings and alterations (aside from contemporary IWM photographs) of the aircraft was the Anson parts & maintenance AP.1525A,D,E&F. A general walkaround first then: Some closer-ins.... The insides had a makeover too: I hope you like the results. It was a lovely kit to be working on and I was blessed - as always - with a kind and knowledgable bunch of companions on the 18 months it took. Tony8 points
-
Thanks Steve, helpful I need some flat brack too it seems… Gloosy enough?8 points
-
Looking good by & large Ced, however, I can see where your colour conundum has come from, you thought you were following the kit instructions & painted it "black green'" silly fellow, the instructions tell you to use "brack green" dig around & find some of that, you'll soon spot the difference. Steve8 points
-
Hi folks, Just a quick build I completed of this Airfix kit. Bought as a gift from a friend, it was a very simple build but took a lot longer to paint. I did struggle with the dappled effect on the sides (need some more free-hand practice!) but thankfully the transfers cover a lot of it. Also the yellow (intake?) bits on the top of the fuselage which weren't well defined on the model, so I left out that bit. Then just added some minimal weathering with some powders. Any C&C appreciated!7 points
-
Hi All, Here is a kit I completed about 8 months ago - Airfix' 1:72 Wellington MkIA, completed as N2980 of 20OTU, RAF Lossiemouth December 1940. Completed OOB just with the addition of Eduard masks and addition of Tamiya tape seatbelts. This was my first successful foray with an airbrush - painted with AK Interactives Dark Earth, Tamiya Dark Green (both acrylics) and Tamiya NATO Black (rattle can). I chose this variant for 2 reasons - I felt that the wavy camo demarcation added interest, and the glazed side windows would offer the best view of the diligently completed interior (hmmm, now I see why Airfix tell you that these components will be invisible!). Loved the kit, and I'm now keen to try the GR MkVIII version, prob'ly in Coastal Command livery. Comments welcome,7 points
-
A few bits and pieces yet to add, touch up the Instant Invasion Stripes here and there, repaint yellow panels in the leading edge, paint the nose and spinner pieces yellow... ...paint the marker and nav lights etc... ...and have fun with an excellent kit as long as it lasts! V-P7 points
-
A minor (but key) milestone has been passed in this build: I have completed the funnel! This is not a small challenge with the added Tetra detail; you have to fit together an intricate jigsaw of VERY delicate brass and then fix it into position... and if that weren’t bad enough, the (somewhat generic / fictional - see discussion several weeks ago) galleries & walkways inside the funnel interfere with the underneath of the funnel cover support frame (that scaffolding frame thingy that sits on top of the funnel). Many were the occasions that I blessed Gator’s Grip, with its extra wiggle room and (in emergency) ability to undo without major damage before it cures fully. Quite how the PE wizards who work for companies like Eduard and Tetra manage to produce the immaculate unpainted things we see in demos & instructions is beyond me - not a single bent piece or blob of solder / CA / Gator. In the end I actually had to cut away part of the underside of the funnel cover frame. I had obviously fitted the walkways a fraction too high at one end, so the handrails were fouling the frame. I decided that trying to fix it would almost certainly result in irreparable damage to something or other, and that it still looks busy enough as is - particularly when you think that the inside of the funnel will be a sooty black. Those two pipes (the galley chimneys in real life) that stick up from the front are (gasp!) kit parts; Tetra have an ingenious system of brass brackets down in the funnel onto which these fit. What I said about Tetra’s demonstrator modellers also applies to their designers; the fit between Tetra brass and Merit styrene is superb - definitely not always the case with after-market PE. Photos of unpainted brass can be pretty unforgiving, with every misalignment and/or glue bodge showing up all too clearly. So I am pretty happy with reaching this point! More soon Crisp P.S. I lied; fake noos. There is still one more thin pipe to be fitted on the inside, which sticks up almost in the centre of the funnel. Somehow typical of Merit that they simplify so many areas, yet this tiny pipe is in the kit (though mine will be brass tube, obvs!). It can’t be fitted until the funnel is finally glued to the island, and we’re still some time from that.7 points
-
A mini update this morning - the underside registration letters are now on: I'll let it rest for a while, but I think I would regard myself as 'rounding the final bend' on this one!7 points
-
Thanks Ian Temporarily this morning - see below. Thanks Andy - someone gave them to us for Xmas, honest! "nobbly spheriod" - never heard of 'em While I was scraping flash off the 410 aerials this morning I thought 'Ah, I could do that on the Sioux tail boom'. Madness. After 'some time' my eyes are now completely crossed but the parts are cleaner: Can't wait for my micro files, in both senses of the phrase. Vincent's a one-man band and has his tools made in batches. Hopefully I'll get lucky but I need to be prepared for a wait of up to eight weeks7 points
-
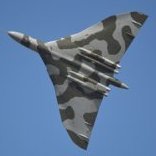
Hello all , I've finally got around to posting some of my efforts from the last year ish .... I wanted to try some unusual kits this year. this was to include etch , resin and a mix of old and new kits so here goes. Magna Resin Supermarine Scimitar F1. Straight in at the deep end then , this it was literally all i could find of the type for sale at the time and without paying mega cash for the xtrakit effort i decided to opt for this offering. This Kit took me some time and fought me all the way to the end but nevertheless this is it. Added P.E from Airwaves. Decals from Model Alliance "Royal Navy Aerobatic Teams" High Planes De Havilland Faw-1 Personally i think this is the most accurate representation of the vixen . the kit provides resin seats , gears and exhausts . Modeldecal Decals, Resin "buddy buddy pack", airwaves external P.E A tricky short run kit which had its issues but makes a fine example of the type. Note. Wing fences still to be added. Sword Gannet AEW3 For me the gannet has always been an interesting type and with the release of the AEW version i had to have one. A fantastic kit buy all accounts . i decided to use the airwaves wingfold set for the frog kit and adapt to the sword one. also a scratch built Ladder. Otherwise the kit is OOB. Airfix New Tool Buccaneer S2 This kit was also a must for the FAA line up , I awaited the kit as soon as the prototype was aired. I went to town on this kit and retrofitted the neomega cockpit tub for the old kit, also added p.e from airwaves for the wing fold and decals from Xtradecal. An S1 conversion will be done on another kit from the whirlybirds conversion. Finally ... Sword Lightning T5, Just like the gannet a kit that is fantastic for little money and with some nice P.E and Resin seats. Build OOB Some FAA doubles ... Thanks For Looking ! Regards , Steve7 points
-
Thanks Bill I think we've had this before; in fact the bottle has 'NO' written against the RLM70 but I couldn't find out where that was resolved. Ho hum. It might look better below? Too late - masking off! We had a short break after dinner so I couldn't resist doing my favourite bit: Counterweights still there! Bomb bay still clean: I don't know why I painted the exhausts - oh right, following orders: Tricky bits around the intakes worked though. How's this Bill? Pleased with the demarcation here, especially the tricky bit on the root under the barbette: Not this side though: Sorry, angry shake (not really). There's a tiny bit of touch up to do there. Bendy bit masks worked well: Happy bunny7 points
-
Cockpit back wall, first time I’ve ever worked with fibre optics, rather pleased with how it looks.7 points
-
Hi. These two Pilot Replicas J21 and J29 will be my contribution in this GB. 156 by Bosse Persson, on Flickr 097 by Bosse Persson, on Flickr I plan to build them side by side and they will be straight OOB. The J21 will be "Röd Martin" (Red Mike) from wing F12 in Kalmar. One of the few ones that had roundels on top of the wings. And the J29 will be "Gul Johan" (Yellow John) from wing F15 in Söderhamn Just because I'm a sucker for dayglo markings. And since I'm going to participate in some other GB's I'll give myself 4-6 week to have these two at the paint stage. That way I got time to start building my entry for "In the Navy" when that starts. To be continued..... /Bosse6 points
-
Placeholder for my build, yet to decide on the Esci or Airfix kits for the build.6 points
-
This is a result of perfectly constructed model kit from the Dan Taylor Modelwork. The kit, even it is in the small scale, is absolutely stunning and full of details. Totally worth it! The build was without any dead end or instruction misunderstanding, just a quick lovely build. This scheme is the Indepedent Czechoslowak Armoured Brigade which is in the box (Wow!) and the only extras are the mirrors and antenna ring (which is also from the Dan Taylor pe-sets). I hope you´ll like it! Cheers, Andrew S.6 points
-
More from the 65th FWS (pre-1983) and 65th Aggressor Squadron (1983 and after) S/n 74-1529, April 1982. Looks like I missed this one looking for blue bort numbers, so this is a second one appearing at this time. 74-1530, April 1981. Old Lizard scheme. 74-1530, June 1983. I think this is supposed to be the Sand pattern. The fuselage matches well, but the vertical tail not so much. 74-1536, April 1981. Old Ghost scheme. 74-1538, April 1981. Old Ghost scheme. 74-1538, May 1981. Grey 2 scheme. 74-1546, April 1981. Silver scheme. 74-1565, May 1981. Old Blue scheme. 74-1569 February 1981. Old Blue scheme. 74-1569, November 1981. Still in the Old Blue scheme, but the bort number changed to a very dark blue (for contrast with the background color?). Believe it or not, this is 74-1569 again, April 1981. At this time the 57FWW was providing aircraft for the production of a TV movie, "RED FLAG: The Ultimate Game". A terrible movie, pitting an F-4 pilot agains an F-5 pilot with the Red Flag exercise as the backdrop. As I remember, the F-4 guy was trying to come up with the maneuver to defeat the F-5. All very hokey - sort of like putting out the boards and having the guy at your six squirt out in front of you. Yeah, nothing like losing all your energy in the middle of a knife-fight. Anyway, they were using two F-4Es and two F-5Es with duplicated markings so they could film aerial and ground sequences simultaneously. So '1569 got to be the stand-in for 74-1557. 74-1571, February 1981. Grape scheme, with some touch-ups. Thanks for looking Sven6 points
-
Dear friends here is the superb kit from Gaspatch Models of the iconic Henschel 123 . The build was straight OOB with no after market items . Painted with the Chinese air force colors and markings , Hope you like it !!! Have a happy and creative new year .6 points
-
Thanks Bill, I was trying to think of a way to say that diplomatically. No need to bother now! 🤣 K6 points
-
Thanks Heather! Cheers Roger, kind of you Thanks Giorgio I use Winsor & Newton Galeria acrylic varnishes for all my final coats, thinned about 50/50. Great stuff IMHO. Thanks Ben - useful info I think I've used H91 for the green on bombs and props in the past. Thanks Mike You know I wanted to show the bombs dropping from the bay, just like on the box? Out with the bits: I'm using 'invisible thread' - very strong and, er, invisible, which makes it hard to work with. Four lengths CA'd in to the rack: … keeping the thread as upright as possible. Then cut to length and affix the bombs. Did it work?: That's a no then. The thread is stronger than I thought and the bombs aren't heavy enough to straighten it out. Rats. Back to the drawing board… If I can't think of a solution I'll just glue the bombs in the bay, hiding all that nice detail6 points
-
Amazingly, despite his substantial career in politics, this gentleman https://en.m.wikipedia.org/wiki/Samuel_Danks_Waddy never introduced a private member’s bill to parliament to outlaw spoonerisms as a source of puerile humour6 points
-
At the risk of muddying the colour conundrum further... I painted this Italeri Ju88 with Xtracrylix RLM 70 and 71. I am assured the lack of contrast between the shades is pretty accurate. I found the same contrast using Humbrol 241 and 242.6 points
-
Paint from below as well as above (airbrush); the whole funnel is still loose. Merit. Bless them. Inspired by my previous post I dry-fitted their funnel pipe, and here it is in all its glory: The trouble is... it’s not long enough (that barely even reaches the cover frame)... and it’s too far aft (not my fault; there is a mounting hole and everything). No matter, but why did they bother? This extract from the builders’ drawings shows you where we’re heading with this. I note that there are also further pipes that emanate from the three holes at the back end, too.6 points
-
Thanks Giorgio - the gloss helped, I'm sure Thanks Tony - only the best for fellow BMers Thanks Simon - they will be sorted Thanks Ben Thanks Bill I found the post where I queried the colours here on my Stuka. Not really resolved but it seems the black green is similar to the Humbrol equivalent? Anyway, done now, at least it matches the Stuka Thanks Roger Missed my chance! Thanks Rob - I am! Thanks Keith I can't get a better shot, sadly. Ho hum. Gloss coat then transfers. Tomorrow.6 points
-
On Big Planes Kit's facebook page - a Boeing 777-300ER in 1/72nd scale to be released some time during 2020... Link to their main page: http://bigplaneskits.com/777-300er-1-72/ Cannot wait for this! Tom5 points
-
Evening all, Thought it’s was time for something with the red and white roundel on it, so this will be my humble contribution to the Nordic GB 🙂 It’s the HobbyBoss 87240 1/72 Westland Lynx, which I will be doing OBB. The kit provides for the options of either doing a Portuguese Mk.95 or a Danish Mk.90, obviously I’ll be doing the marine blue Danish Mk.90. The box art is showing S-256 flying away from the icebreaker ship “Thorbjørn”, which was one of three sister ships (Danbjørn, Isbjørn and Thorbjørn) once operated by the Royal Danish Navy. Though Thorbjørn didn’t have a Heli pad on it, I guess it’s not unrealistic that they would have met in the icy waters surrounding the kingdom of Denmark. And a nice illustration anyway. More history on the Lynx in RDN service later, for now some pictures of box content. I really don’t have much experience from other kits yet, but all parts appear to be of good quality and the level of detail is fine. The instructions seem to be ok as well, one thing I did notice however, is that they got the colour references a bit off on the marking and painting sheet. We shall see how it comes together? Not only this will be my first GB, it’s also only my second overall build, after I picked up on the hobby again. Very much looking forward to it and hoping to get some good advice from you experienced guys as I go along. Happy building too your all, will be interesting to follow everyone’s WIP and to enjoy the final results! Cheers Johnny b5 points
-
Well you do what you like, but 71.111 looks more like the seat plastic to me Less saturated IMO Tamiya Blue is lovely but not for this Ced I know I have been horrible about your fag paper fix but I would suggest cutting the shape out of Tamiya type tape and sticking it on with its own glue and cutting out a second piece to be the smaller inner panel Never know, it might show on a piece of plastic about an inch across...5 points
-
Rubbish Utter rubbish Redo from star...5 points
-
Hope the fag-paper's not for preparing a portion of wacky baccy to be inhaled in the search for inspiration!5 points
-
Hi Colin Heres some detail shots - I hope this helps answer your question. The canards are posable actually i hadnt noticed until now you can see the tail differences here too. looks like a RAT is included too i think? [/url] [/url] And a bunch of exciting goodies arrived today from the fine people at rebell hobby in sweden including the elusive JA belly canon and fuselage extension sprue 🤗🥳5 points
-
5 points
-
Some examples - 1/72 with 1/76 vehicles 81288398_10156855024235976_6320532627946209280_o by Ben Brown, on Flickr 25586836_10155119858355976_2137417151022351214_o by Ben Brown, on Flickr 11147023_10153045183085976_8375089697319075520_o by Ben Brown, on Flickr 10991555_10152628938370976_2982966484854794969_o by Ben Brown, on Flickr 75594299_10156664347900976_8061474565995364352_o by Ben Brown, on Flickr 41872913_10155760371795976_2319689429725216768_o by Ben Brown, on Flickr 1/48 with 1/43 vehicle (note this was to denote it was the BOB Movie!) 12747974_10153326251925976_89420073086534765_o by Ben Brown, on Flickr ATB TT5 points
-
If you had Humbrol Authentics, the original ones in the sets, there'd be no problems with the colour matching. Otherwise avoid Humbrol for Luftwaffe in favour of Colourcoats, Xtracolour, Phoenix Precision, or maybe a few others. I made my Matchbox 410 in 70/71, and it appears everywhere in profiles, but I agree that there seems to be no actual evidence for it. Someone knew that bombers were in 70/71 and everyone else has blindly copied him. Just in case you were thinking of a Dornier 217 next, they were in 72/73.5 points
-
I finished the Airfix 1/72 bomber support set a while back, here it is with the Airfix C-47 (modeled as a C-53 glider tug), a Hasegawa GMC dump truck, and an Academy 6X6.5 points
-
Both engine nacelles have been fitted and blended in. As expected, the second one was much easier to fit. I should have paid attention to the instructions, they do suggest using a micro saw I just got lazy I made a few additions to the cockpit as well before that got primed and given a coat of interior grey/green. Sean5 points


.thumb.JPG.3498f40362ff13ebfc4b2e45abbd545e.JPG)


.thumb.jpg.76f12b87ce9ca9929c9aabdcf8f9d2dd.jpg)


.thumb.jpeg.512869d47e412449d69d30d0295c1ae8.jpeg)


This leaderboard is set to London/GMT+01:00