
Leaderboard


Popular Content
Showing content with the highest reputation on 13/01/20 in all areas
-
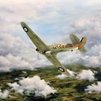
Hello every body, here I want to show you another scale model from my "production" Its the eduard (ex hasegawa) Typhoon Mk.Ib in 1:48 Hope you like it!45 points
-
Hi All, Here is a build I finished approximately 4 months ago, Airfix' excellent Blenheim MkIF, finished as YP@Q of 23 Sqn, RAF Wittering February 1940. OOB with the exception of Eduard interior set and masks (most necessary for that glazing!) Finished with AK Interactives (Dark Earth), Tamiya (Dark Green) and Vallejo Model Air (NATO Black) - all acrylics. I started to experiment with colour modulation this time, most noticeably with the night underside, which may be a little overcooked. The glazing assembly was kinder to me than many others, and the only real errors were my own, the most glaring being the camo inversion on the port nacelle Anyway, it's a lovely execution by Airfix, and I'm relatively pleased with my hamfisted treatment! Comments welcome...30 points
-
As the title notes. I haven't finished a kit in awhile. No excuses really, just too busy for my model therapy🤪 The AMK kit is fantastic, I can't give it enough praises. I meant to make this a quick OOB build, but it was building up so well, I bought the ResKit wheels, Aires bang seat, and ended up using different decals - probably the only gripe with the kit, as they are overly thick, and won't lay down. I ended up using a mix of Kinetic decals (same airframe ironically), Superscale insignia, and a couple stencils I made using my new cricut maker. The cut stencils were the new technique I tried. If you've seen any of my other posts in the last 18-24mo., I try to use something new on each kit. I'm attempting, in my own ham-fisted way, to expand my skills, getting back into modeling after a too long absence. Enough Rambling, on to the model; Hope you enjoy. As always, comments, critiques and questions are always encouraged. Mark27 points
-
Hi All, Now that I've sorted out linking images, here's a build I finished about 5 months ago. It is Airfix' new tool Tomahawk MkII, finished as an aircraft of 112 SQN RAF, Libya 1941. Finished mostly OOB, with the addition of Eduard interior set and masks. Painted with a mixture of AK Interactive (Azure & Mid-Stone) and Vallejo Model Air (Dark Earth). This was before I properly got to grips with colour modulation, so the end result is a little 'flat' to my eye. In addition my weathering skills are not up to what I'm sure would have been a much more heavily used aircraft. Despite this I'm relatively pleased with the result - feedback welcome! Cheers, Roger26 points
-
As I had my hanger dio out for a recent photo shoot, I had a play with it go at using it for it's original purpose – as a photo prop rather than a dio. In a pitiful attempt to try and replicate old photos I've done them in glorious monocolour (don't even think of telling me they're in the wrong shade of grey!). Through the medium of Gimp (Photoshop for those people to tight to buy Photoshop) I've bullied several thousand pixels into pretending to be a background, as it gives the game away slightly if there is an enormous Revell Contacta on the horizon. It's the first time I've tried this so if you laugh enough to cause yourself an injury, I really don't need to know about it. The pedantic observant amongst you may note that the background isn't entirely consistent with the background in some of the other photos. This is because this is a top secret revolving aerodrome which the nazis would almost certainly been developing (but probably only if they were drinking the same stuff as I am). Some of the models have been seen here before, but I'm counting on you having a memory as bad as mine. What the hell was I talking about? 1/48 Italeri Hs 123. In an exclusive poll consisting of all the modellers in my house called Gorby, this was voted 'kit most deserving of a punch in the face'. 1/48 Italeri Ju 87G. Featuring - 'Messerschmitt maintenance made easy', "aarrrrrr, that's where the sticky-out things go". When they were told they were being sent a pointer, they hoped for something a lot cuter. Getting ready to go off and annoy the neighbours. Eduard Bf 109. Modelling is so much easier getting these bods to build and paint them for me. Eduard Fw 190. (Subtitled: How I butchered the butcher bird) Hobbywhatsit Bv 141. What was that designer smoking? Perhaps if we look at it longer, it might make sense. Tamiya He 219. That bloke with his hand in his pockets is a lazy git. I've not seen him doing any work. I had to glue three of those toasting forks back on before it was ready for it's time in the limelight, and I'll look forward to many years of gluing the bloody things back on. Oh the embarrassment! A stylish airfield shouldn't be seen wearing spot and stripes at the same time. Tamiya Do 335. This is the first model that I decided was good enough to post back in deepest darkest 2016. What a lucky world. Then someone complained that it was the wrong colour. Tamiya Me 262 & Kettenkrad. My first 'returnee' build which is why it's hiding in the shed. The shame. I think we need to push it back in - those damn Britishers will laugh at it. What fool put that stripey thing on the drinks trolley? Dragon Me 163. The pilots wondering why he's glued to a ladder. (On the left) Tamiya Fi 103 V1 converted to piloted version in a what-the-hell what-if scheme AM Tech Ta 183 (you're not supposed to know there's an easier way for the pilot to get in on the other side.) Dragon Ba 349 Natter - relaxing with it's trousers off. Trumpy Me 509. We need to give the ground crew a round of applause for their dedication spending the entire war pretending to work. It reminds me of my own career. Luft-46 overdose. Thanks for havin a gander.21 points
-
Dammit, there's always a spot where the belt goes into the seat back on these things, isn't there? And it's never on the kit part. Never! I (v e r y carefully) put a piece of thick plasticard with a spare set of Airfix instructions as a cushioner in the space between the seatback and the framing, and got out my trusty micro-chisel, and managed to, despite some profoundly alarming wobbles, chisel out a little hole for the seatbelt. Then it was just a matter of guiding the belt into the hole with a barrage of obscenities and painting the exposed silver side a light brown colour. The things I do for you people.20 points
-
Kit - Tamiya. Paint - Mig acrylics (OD Modulation set), Tamiya acrylics & enamels, Humbrol enamels. Decals - Star 35-C-1048 M4A3E8's, 6th Armoured Division Extras - Legend 'Fury' stowage, Verlinden M4 Stowage, various Tamiya, Historex & Italeri pieces. M4A3E8 Sherman 68th Tank Bt. 6th Armd Div. Near Leipzig, Germany. May 1945 Started in September 2018 after a good friend realised he just wouldn't be able to 'do it justice', he also included the Legend resin stowage set - which is vast, I put it to one side in early 2019 to start another project and then lost the enthusiasm. So after spending most of last year on the 'Shelf of Forgetfulness' I brought it back to the bench in November, and have grabbed a few sessions here and there since then. This was the first time I'd used Mig acrylics - the full OD modulation set, also included by my friend - not surprisingly I was VERY nervous about this entirely new (to me) way of painting an AFV, but by watching a number of excellent YT tutorials and having a new bottle of 'brave pills' to hand I simply tried it and... well I think I got lucky, first time out. After the decalling I simply weathered and faded the model in the usual way with a pin wash, overall washes, oil-dot filter and finally pigments (ughhhh). Used another 'new' product for the final matt coat - Migs' Ultra Matt 'Lucky' Varnish (A.Mig 2050). Really scary when I tested it on the underside, as it immediately went-on 'milky', but after ten mins it dried so matt, that light simply falls into it - nil reflectivity, bl**dy marvelous stuff but only apply in VERY light mist coats. One of Tamiya's very best and an utter joy to build. Won't be to everyones' taste and definitely will upset some Shermaholics I'm sure. No matter please feel free to ask any questions, make any comments or pass-along any criticisms. Best from NZ. Ian.19 points
-
REPUBLIC F-84G THUNDERJET, Royal Norwegian Air Force, 1956. 51-11113, EOS. Personal aircraft of Fighter Wing Rygge's Commander Eigil O. Stigseth. Kit: Tamiya Republic F-84G Thunderjet (60745) Scale: 1/72 Aftermarket: Vingtor decals (72-119) Paints: Vallejo Model Air & Vallejo Metal Color Weathering: Flory Models Wash, MIG Streaking Effects, Vallejo Weathering Effects Build thread: Delightful kit all around. Aftermarket decals gave me bit of a struggle but came out OK in the end. Hope you like it - comments & feedback welcomed.17 points
-
Thanks Simon, especially for running the bar Drink responsibly you lot - we don't want any spills… Thanks very much Bill, those are really helpful I'm trying to find out where XT131 is at the moment - I have quite a few views of her 'full frame' but no close ups; if she's at Middle Wallop I'll take a trip. Thanks Michael Well, that sent me on a browsing chase - in March 2018 'Attack Squadron' was sold and split up apparently; kits to Arma Hobby and AM to Brengun (as you thought). I signed up for news anyway and received an automated email with a discount code for the Arma Hobby internet shop. Pity I've already bought my Hurricanes. No sign of the tail boom on the Brengun site though (or the discontinued Eduard PE) so I'll have to make do with the kit parts. I think they'll be OK with a clean up. Me too Pete Nice story, thanks. Thanks CC - I bet that's another strong one isn't it! Thanks Bill - my needs are met, thanks again! Thanks Rob - glad to have you along Tail boom, got it, thanks Keith Hi Dennis - no darts in the wallpaper now Bill's kind photos allowed me to finish most of the engine: … apart from the exhausts which will need some clean up: … along with the other framey bits. Looks like I'm in for a session with the 'molding flash sanders'.13 points
-
Hello all , I've finally got around to posting some of my efforts from the last year ish .... I wanted to try some unusual kits this year. this was to include etch , resin and a mix of old and new kits so here goes. Magna Resin Supermarine Scimitar F1. Straight in at the deep end then , this it was literally all i could find of the type for sale at the time and without paying mega cash for the xtrakit effort i decided to opt for this offering. This Kit took me some time and fought me all the way to the end but nevertheless this is it. Added P.E from Airwaves. Decals from Model Alliance "Royal Navy Aerobatic Teams" High Planes De Havilland Faw-1 Personally i think this is the most accurate representation of the vixen . the kit provides resin seats , gears and exhausts . Modeldecal Decals, Resin "buddy buddy pack", airwaves external P.E A tricky short run kit which had its issues but makes a fine example of the type. Note. Wing fences still to be added. Sword Gannet AEW3 For me the gannet has always been an interesting type and with the release of the AEW version i had to have one. A fantastic kit buy all accounts . i decided to use the airwaves wingfold set for the frog kit and adapt to the sword one. also a scratch built Ladder. Otherwise the kit is OOB. Airfix New Tool Buccaneer S2 This kit was also a must for the FAA line up , I awaited the kit as soon as the prototype was aired. I went to town on this kit and retrofitted the neomega cockpit tub for the old kit, also added p.e from airwaves for the wing fold and decals from Xtradecal. An S1 conversion will be done on another kit from the whirlybirds conversion. Finally ... Sword Lightning T5, Just like the gannet a kit that is fantastic for little money and with some nice P.E and Resin seats. Build OOB Some FAA doubles ... Thanks For Looking ! Regards , Steve12 points
-
Afternoon all, Fresh off the bench is the superb 1/72 Hasegawa Su-33. Built completely OOB, painted with Hataka Orange Line lacquers and Alclad for the metallic areas. Weathering was kept fairly light with a simple application of MIG Prouction's neutral wash before a final coat of Xtracolor satin varnish. A great kit of one of the best looking modern fighters around. 1/72 Hasegawa Sukhoi Su-33 Flanker by Shaun Schofield, on Flickr 1/72 Hasegawa Sukhoi Su-33 Flanker by Shaun Schofield, on Flickr 1/72 Hasegawa Sukhoi Su-33 Flanker by Shaun Schofield, on Flickr 1/72 Hasegawa Sukhoi Su-33 Flanker by Shaun Schofield, on Flickr 1/72 Hasegawa Sukhoi Su-33 Flanker by Shaun Schofield, on Flickr Thanks for looking, comments welcomed Shaun11 points
-
Here’s the first one completed for 2020. This is one of three that I started about 2 and a half years ago but stalled when I had issues with masking the camouflage. You can still see evidence of the issues on parts of the dark slate grey, but it looks just fine sat on the shelf The panel line wash for the underside is probably too stark, but I’m just glad it’s done now. Sean10 points
-
I don't usually check the group builds section, but when the call for "vehicle builders wanted" came, down the street in the vehicle section, I thought why not? I have a WIP going for a Scania T143 but it's way past 25% so I had to find something else. There was nothing in the stash that qualified, soooo that's always a good reason for a nice shopping session isn't it 🙂 I've been doing some smaller (1/35) scale trucks lately and I rather like the size of those trucks. Not too big but still a lot of detail. So I went for this Volvo F12-20 with the logging trailer in 1/32. I do like a nice '80's truck! It doesn't have that many parts but there's room for some detailing of engine and chassis which I intend to do. Should be enough time in this GB for that. I haven't decided on the colour yet but I actually like the yellow so I might just go for that. Something I had to laugh about when I opened the box was this: The kit comes with 1/32 scale logs! Some nice branches were selected, dried and cut by some poor intern I guess... Then, while I was going through the box, another chuckle... Sadly there's no decal for a box of tissues... Anyway, this will be my first GB so I'm looking forward to it!9 points
-
Here is the completed diorama of the Reaper Miniatures Bones 25mm Great Kraken and the very expensive and hard to find original (i.e. not a resin knock-off copy) WAVE Models 1/700 models Nautilus as depicted in the film 'The League of Extraordinary Gentlemen' I added some 5mm glass reptile eyes to the Giant Kraken to bring it to life. Thanks for looking in. The Nautilus box art (WAVE Models) The Reaper Bones box art And now the completed Diorama badged 'Nemo's Nautilus and The Great Kraken' Thanks for dropping in for a look John9 points
-
I just put the finishing touches to this one this afternoon. The nav lights need a bit of attention, I only noticed after I'd taken the photos. The canopy is a personal triumph. This is the first time I've been happy with what has faced me when the masking was removed and all it took was a bit of patience. 😃 Thank you to everyone who commented and/or gave it a like during the build. Roger.9 points
-
Hello everyone! Here is my Sweet 1:144 Messerschmitt Bf 109F-1 which I built in 2008. It represents the machine flown by Geschwaderkommodore Major Werner Mölders, Stab./JG51, Luftwaffe, from Mardyck, France, in April 1941. The Sweet kit is essentailly an F-4 so I had to make some modifications to make an F-1 (the F-2 is identical - the differences being internal). The changes involved adding a small intake on the starboard side of the engine cover, slightly reducing the diameter of the supercharger intake, filling in a panel line on top of each wing and squaring the oter ends of the main undercarriage bays. A final difference was leaving the bottom forward starboard corner of the (unarmoured) canopy unpainted. The kit was fully painted and varnished with brush. Thanks for looking Miguel9 points
-
Getting over a lack of mojo. A small update but then again updates on this build a small. Wheels and undercarriage done to an approximation of what would've been there. The PE doors look a little awkward to do but I'll get there. And just for a laugh, here is the sliding canopy and I've still got to mask it! Stuart9 points
-
Hi All, Here is the 1/48 scale Britten Norman Islander released by Valom in 2018. This is the original boxing finished in the markings of Mount Cook Airlines in New Zealand in 1988. Since the kit and scale were new there were no aftermarket decals so the Mount Cook Flight Seeing decals were home made. WIP thread here in Islander Colin W9 points
-
Because that market is more important to them than the market represented by the handful of customers who post on places like this. And is also far more important to _us_ than is generally appreciated. The first model cars and aeroplanes I ever made at the age of six or seven were Lego, and that was when everything had to be made out blocks and slabs. If there are no seven year olds getting interested in starting to make things then there is zero future for Airfix or any company like it - and these models are brilliant for getting kids interested when they have far more alternatives than we ever had in earlier decades. I've given several from this range away to kids amongst friends and family and they get made and create interest in the whole idea of making things. These, and the new simple beginner kits from Airfix as a next step, are absolutely needed.9 points
-
Gents, Thanks for the feedback, particularly to dnl42 for the Postimage tip. I hope these links now work, otherwise I will fax some pics 😉9 points
-
Well here's a turn up for the book, it hasn't got a jet engine ! Feeling that Finland was in danger of being underrepresented in this GB, I will be building this. Can't remember the last time I built a kit with ski's, should be good. cheers Pat8 points
-
Time to go viking. Cheers, Rich8 points
-
The Avro Shackleton Maritime Patrol aircraft is fairly well known and there have been recent kits of the MR2, AEW2 and MR3 in 1/72nd. alley Cat have filled the gaps with resin conversion kits of the MR1 and T.4 to cater for the blunt nose and tail of the earlier mark. My model represents VP262 of 120 Sqn in the early 1950s and is finished in the post war Medium Sea Grey and White Coastal command scheme. Build details are given here https://www.britmodeller.com/forums/index.php?/topic/235062731-avro-shackelton-mr1-airfix-kit-and-alley-cat-conversion-17nd-scale/ Briefly, the main elements of the conversion are removing the MR2 nose and tail and replacing them with resin parts. The nose is cast in clear resin and was the only difficult bit as it was not a good fit being too narrow. This was remedied by the some extra fine Miliput to fair in the nose. The model is painted with Gunze Sangyo Medium, Sea Grey and White, both being from the Aqueous Hobby Color range. Decals are from the kit and the conversion. My main disappointment with the model was an issue when removing the masking which did not come away cleanly and so the transparencies had a couple of extra coats of Klear which has lessened the impact. Hope you like it. My next models are a bit smaller, including an MPM Hudson that is the sole occupant of my Shelf of Doom .8 points
-
This vignette was completed using the MastrBox Austin Armored Car Kit and the Emhar figure of WWI British Soldier (the sitting one is from Revell set). It´s one of my first attempts making a vignette and I am quite happy with it. I hope you´ll like it and feel free to comment the idea. Cheers, Andrew S.8 points
-
Hello all! Over the past year or so I have been tootling away with trying to create something from this massively expensive (£4.95) kit. Before I started, I had had a conversation on another forum with Jeff ( @ArnoldAmbrose) who very kindly gave me some pointers as to how to improve it. At first I thought this kit appeared to be the Airfix HMS Cossack. The parts breakdown was the same, but the runner layout was different. It was supplied with the original stand rather that Airfix’s current style, and I suspect it was a copy. Some of the parts supplied were beyond belief, and I cannot remember them being like that when I built the original Airfix Cossack only 9 years ago. The kit needed some help! · Propeller shaft supports were lengthened (shafts were not angled downwards) · Replaced propellers (from the Manxman – the kit parts were ‘dodgy’) · Portholes (scuttles) were sanded down and drilled out (they protruded on the hull!) · Fore breakwater was replaced with thin card · All deck splinter-shields were replaced with thin card · Added ammo boxes, storage lockers and watertight doors to superstructure · Added vertical and inclined ladders · Replaced masts with soldered brass rod, with plastic rod supports · Replaced the ‘crow’s nest’ · Scratch-built a new torpedo tube assembly · Replaced plastic ship’s boats and Carley floats with Shapeways 3D-printed items · Added plenty of photo-etch detailing The model was painted to represent HMS Eskimo as during 1941-43 when she was painted in RN White and Western Approaches Blue (as per Sovereign Hobbies website) using AKAN acrylic paint, and rigged with .02mm Rigging Line by AmmoMIG. I have deliberately kept the pennant number off, as it is probably a hodge-podge of Tribal Class destroyers, but it was an ideal excuse to use up some of my left-over White Ensign photo-etch. I had a huge bundle of fun building this, it certainly was better than my experiences with MisterCrafts 1/500 HMS Harvester. As you may have noticed, drilling scuttles in a straight line is not my strong point! I also think my white balance on the camera has been fooled, the Western Approaches Blue is not that grey on the model. Although I thought the Akan paint was okay, the more I used it the less I liked it. It was brush-painted, but is probably better sprayed. I want to do another kit with a similar scheme then I can try the ColourCoats versions that I have in stock. Finally, to show you the quality of the Shapeways ship's boats, here they are (please remember they are under huge magnification!). The whaler's thwarts were hollow underneath, and the cabin was hollow on the cutter. Absolutely incredible, but, oh boy! they were expensive. I also got the Shapeways Carley floats, and they were great too, but there were a LOT of them on the frame so they will come in handy for other projects. That is it for now, thanks for looking, Ray8 points
-
Howdy everyone, now the silly season and the first Shifts of the year are out of the way I managed to finish my latest effort: Freedom Models 1/48 scale Curtiss Hawk III kit Finished in the markings of 25 Sqn, RoCAF, based at Yangchow Airfield, China 1937 and flown by Pilot Mu Fei Chang. The script on the fwd fuselage ( which also appears under the wings ) reads Ningpo Special according to what I found on the web. As usual mostly from the kit contents, I did replace some of the etched stuff with bits of wire but managed to use the interplane rigging and engine harness Kit went together quite well apart from the cabane struts, which I partly replaced with plastic strip as the moulded parts didn`t match the locating holes in the wing The decals are the kits and were impervious to everything I tried except a very hot hair dryer and stiff brush Really glad to have one in the collection at last. Hope you enjoy the pic`s, thanks for looking Cheers Russ8 points
-
A Cedicopter and it’s taken me until page 3 to even get to the door. In my defence I was working on Saturday, M’Lud. The Sioux was on my “love to fly one” bucket list for some reason, along with the Huey. I managed the latter (an RNZAF one in Singapore - I have a Kitty Hawk 1/48 UH-1 in my stash for that reason), but not the former, alas. Nice start. But since you’ve found all those strip down detailed shots, there’s little excuse for not breaking out the brass for some detail...8 points
-
First GB of the year/decade and it looks to be a big one for me. I’ve been pretty quiet of the Xmas/NY period having a break from serious building getting ready for this year as I have some seriously big builds planned. So first off the rank………I had originally planned to build a 1/48th Hasegawa Draken but this wee beasty caught my eye and I just couldn’t resist. It’s a reasonably big model and looks to be nicely detailed….so far I’ve resisted the urge to take the parts out of the plastic bags…..it’s been hard not too! Tiger Model was meant to have released the Swedish Navy version around 2 years ago, but it looks like they’ll only this one in Greek and Malaysian Navy schemes. These versions appear to be just export versions of the original Swedish Navy version. There are some very minor differences which aren’t noticeable unless you’re an expert on them. (If anyone could help in that regard I'd be very grateful...plus with the camouflage details as well). Neither of which did the Malaysian or Greek versions really interest me…..however, this one does for obvious reasons!! This scheme is awesome and should be relatively simple one to duplicate. The one issue I do have though is I have no idea what the colours are? I have been searching everywhere for info and asking on various forums but no luck. I should be able to colour match reasonably well so I’m not too worried, but again if anyone has info? She’ll be an OOB so it should be a fairly simple and quick build to start the year off....... and I can't wait!7 points
-
The first idea of this vignette came from the original photo from testing the Tadpole over some soil excavation or testing trench. I just liked the idea making it and also I wanted to try to imitate the snow for the first time. Adding a figure with it´s hands in pockets seemed to be appropriate too. I hope you´ll like my attempt to try new things. Cheers, Andrew S.7 points
-
This is a result of perfectly constructed model kit from the Dan Taylor Modelwork. The kit, even it is in the small scale, is absolutely stunning and full of details. Totally worth it! The build was without any dead end or instruction misunderstanding, just a quick lovely build. This scheme is the Indepedent Czechoslowak Armoured Brigade which is in the box (Wow!) and the only extras are the mirrors and antenna ring (which is also from the Dan Taylor pe-sets). I hope you´ll like it! Cheers, Andrew S.7 points
-
Hello my friends This is my first publication. I present to you my t-62 from tamiya, a very old production from this manufacturer in an unknown scale. I finished it at the beginning of this month was inspired in my work by a brittmodeller’s member : https://www.britmodeller.com/forums/index.php?/topic/234996574-tamiya-t-62-in-135-or-is-it-132/#top . Honestly it wasn’t easy to put details and corrections on this model. I’m working now on a Su-100 by Dragon in 1/35 scale. I will open a topic about my work on it very soon Have a nice day !7 points
-
Thanks Bill Plenty of pictures on the historic site! Thanks Giorgio To quote a famous magician 'Not a lot'. Ah, there you are Glad you survived the weekend. 'Some detail'? Exactly, thanks Giorgio Precisely Andy, thanks Thanks Brian - I think 'half built' might be an exaggeration! Historic Army Aircraft Flight (HAAF) shows the fan is creamy yellow so that was done and the Nuln Oil splashed on: Definitely finished with the engine now. Time to start on the tail boom with the flash sanders: Before shot. It'll need more when removed so my plan to paint on the sprue is foiled…7 points
-
all 1/32: Revell 1/32 Miniart 1/35 William boss 1/32 Tamiya 1/32 Hobbyboss 1/32 Hasegawa 1/32 Azur1/32 Hasegawa 1/32 Tumpeter1/32 Spécial hobby 1/32 Hasegawa 1/32 Spécial hobby 1/32 Hasegawa 1/32 Hasegawa 1/32 Hasegawa 1/32 Spécial hobby 1/32 Spécial hobby 1/32 Hasegawa 1/32 Azur 1/32 trumpeter 1/32 trumpeter1/327 points
-
Despite not posting for a while, progress is still happening- it's just the more boring bits. About 90% of the superstructure has either been built or test fitted. Aside from the larger life boats, railings, some AA guns and little vents & things, it's all ready for priming. The instructions on the little life rafts were very confusing, and I spent way too long trying to decipher them, and in the end I took the faster option and placed the PE boards on top of the plastic in the centre of the raft. The instructions call for you to remove the centre part but without a dremel tool and a couple of months to spare, it was an easy decision to make in the end.7 points
-
Found the armor plate but didn't like it. Made a new one with the offset like seen in the Allison Mustangs Walkaround. Fuselage all sealed up, just needs to to be cleaned up.7 points
-
Hello, This time I would like to build something less usual but with very class hull lines - a Royal Navy Type 12 Frigate. I have chosen the old Frog 1:500 scale offering reissued in the former Soviet Union under the Огонёк brand. Last September I have found it on sale for the whopping amount of 2 EUR while visiting excellent Berlin Gatow model show. Among many good-looking Type 12 vessels I have picked HMS Rhyl during her Malta holiday between 1966 and 1967 - the final stage of the first configuration. Here is the original boxart: The scale is a bit unusual as for today's standards but the interesting subject tempted a few companies to prepare the aftermarket updates: first PE from (Atlantic Models)... ... and 3D-printed parts from Bogeys Bits (via Shapeways). Also, I am going to add self made decals, PE (decks and some superstructures) plus some odd bits and pieces from my workshop reserves. OK, the first cut(s). After the dust has settled the clean lines became to be visible (basically this is nearly all the plastic from the original kit I am going to use): The styrene is quite soft but highly workable. I have downsized the hawser boxes a little to make it closer to the original ones. Tamyia Extra Thin glue made the plastic to settle down a little... ...but some CA glue came to the rescue: The portholes were drilled and filled with brass tubing of two diameters: 0.5 mm and 0.3 mm - the bigger and the smaller ones respectively. The bridge deck has been just glued on and the funnel dry-fitted for the photo. The funnel - Bogeys Bits offer the raked funnel used in the later guises of Type 12. The resin is very hard and a bit brittle but I managed to clean nearly all the grain from 3D printer as well as to drill the top openings. The confused alien has just been born. One last glance at the hull lines... ... and on the small decal sheet I prepared for my model. TBC. Best regards, Marek6 points
-
Hi All, The Draken is in my opinion the best looking fighter from my favourite era of jet aviation. I'm going to do an Austrian one - just to be different. ... and here's some sprues. ... and some PE and resin. Dave.6 points
-
Hello, I have just finished building the Artesania Latina revenue cutter Dallas, 1815. During the early 19th century, the American Revenue Marine (Coast Guard) was engaged in a variety of roles, from enforcement of revenue laws to the suppression of slave trading and piracy. The Dallas is typical of those cutters employed by the Revenue Marine at that time. This is my second wooden scale model ship (my first was the Artesania Latina schooner Rhoda Mary, also posted on this website). The stem-piece, keel, stern-post and rudder were of different shades of walnut wood, so I stained them to make them all look the same. I continued this theme by staining the bulwark and added a second strip of stained walnut to the wale. In addition I planked the transom using stained walnut strips, and stained the masts and spars. The eagle, stars and lettering on the transom are after market items, as are the barrel, buckets, and stand. Thank you to Cornwall Model Boats and Blue Jacket Ships for supplying these parts. The instructions in this kit were much better than those provided in the first model ship I built. This was a great model for a novice like myself to build. I would like to thank Bart Gradecki for posting photos of his build, also on this site, as they helped me tremendously, and to all who left comments and encouragement in the work in progress section. Thanks! As always, comments and suggestions are most welcome. Thanks, Iain White6 points
-
Hi all! I've gotten back into the hobby as an adult in my late 20's. Built this guy up as my second armour model completed. Old, I know... but I enjoyed it! I have some experience as a miniatures painter but I will say... the internet is a great resource! I'm really enjoying working with oils and the weathering process. Representing a vehicle of the 24th Panzer, summer 1942 before the division was basically destroyed at Stalingrad. Thanks for looking! Critiques are welcome!6 points
-
I'm not comfortable with the amateur sleuthing going on after the deaths of a substantial number of people due to what seems to be an error (time will tell). It is starting to become a political discussion due to the nature of the circumstances, and although everyone seems to be getting along fairly well so far, I'm going to close it. Thank you all for your restraint during the thread, and my personal condolences to everyone affected.6 points
-
Thanks Bill Of course on 'the real thing' there's a shaft from the gearbox to the top pulley and the belt drives the fan. I'm assuming Italeri know what they're doing and left it out 'cos it can't be seen? We'll see later… Out with the Molding Flash Sanders: Pipes cleaned, glued on and given a base coat of 'burnt iron': Drilled out (of course) and painted with thinned tyre black (for the big one) and flat black for the tiddlers: Calling this done: Although it'll probably need some touch ups once it's in.6 points
-
That´s why it takes yet four months before you can deliver my new TwE - you crash test every vehicle you finish, and send only those that pass unscratched! Like the poor guy responsible for quality control at a match factory - he only passed forward those that had lit...6 points
-
Volvo off course (since that's where I work!) This is how we do full size testing at our company6 points
-
AND WE ARE ENTERTAINED.6 points
-
I wonder what they were looking at ... tsk... Thanks Crisp! Thank Stix, way too kind Happy New Year to you and Mrs. Stix! Right, some modelling done. The canopy received some touch ups and the handle bars were glued in, using Gator's grip I then completed the panel line wash for the upper side, using a dark grey oil wash; before and after The idea was to keep it subtle, as the aircraft was almost pristine in 2006 and you really needed to get up close to see the panel lines. Once the wash had dried, I sprayed a couple of flat coats: I used Italeri Flat Clear, which is not dead flat; I feel it is more appropriated for this kind of aircraft and scale. I also somehow managed to fix the canards, by brushing on an Aqua gloss coat and respraying the flat one I also did some prepping job for the undecarriages - time consuming, but nothing worth a pic, yet. All comments welcome Ciao6 points
-
Both good questions Heather and ones I don't know the answer to at present on both counts. I'm fascinated by the ability to create forms in the software but the two fundamental limitations here are clearly going to be: the minimal understanding of the CAD process I have compared to actual professionals in the area, such as @hendie and @Christer A. limits to understanding shape and detail of the actual aircraft based upon resolution and variety of available references. In a way this is a big experiment for me personally in terms of looking at the various ways of building the likes of model aircraft nowadays - I don't seem myself ever tiring of the wonders of brass for example, but equally I don't want to always just be modifying a manufacturer's kit. In this respect it will make for an interesting process to have both scratched and kit versions of the same aircraft alongside each other, seeing which parts of the process produce enough excitement and satisfaction. I think that's all any of us can ask for in this obsession of ours really, finding a route that pleases us individually without it ever seeming a repudiation of what gives others satisfaction in their spheres. Thanks for that Heather. I'm trying to show as much about the process of putting stuff together virtually here so that others can see what's really involved - including my mistakes and false starts - I've said it before and will continue to repeat that if a lunk like me can pick stuff like this up, anyone can. Of course a sensible person would have picked something simpler like a Mig-15 to start off on and and gotten away with just modelling a barrel and some triangles... Thanks James. As a teenager there used to be an architectural supplies shop up the road from us by the A3: I never tired of gazing in through the window at the intimidating array of articulated rulers and French curves and fondly remember saving a month's pocket money to finally be able to go in and buy my first Rotring pen! XN708. With the wingfold and innards opened up I think this makes sense in terms of detailing, whereas with the High Planes kit as XJ481 I want to preserve the striking paint scheme by having no wingfold or opened panels, just a clean appearance. It will involved filing the Microcell bulges off of the HP kit with the latter being a preproduction model but I'm not anticipating doing too much in terms of surgery otherwise, beyond the obvious nose amendment and wave guide addition. Hurrah! My maskirovka has worked Benedikt! 😁 Thanks you two. Plenty of room for error and angst of course but we're committed now. If modelling was easy, they'd have called it fishing.... You were just being parametric Alan! Already discovered this yesterday with a combination of open forms and bridging operations. Think I've a workaround to avoid it happening next time on the 'real' version but am finding it useful to do such test-processes as side projects along the way, without actually rupturing progress on the main design. Know that feeling - plus am walking round the house mentally rehearsing modelling routines when away from the laptop.... 🦴 Kind of you AW. Hopefully it'll give people a sense of possibility about having an idea and the processes which can be used to accomplish it. Given the quality of what you're up to in flying-boat territory Adrian I can see no reason why you'd need to change. Thanks for the technical data Alistair. My first attempt at 3D printing was a Dornier gun mounting a couple of builds back using the filament printer at work and I don't recall paint issues between it and the original kit parts. Your presence here is welcome enough dear fellow. No worries. 😀 From a professional I take that as a great compliment Christer. Thanks for brightening my day. After yesterday's exertions I needed a day off from the 'exact' work of matching designs to references, but still wanted to get something positive done to keep the ball rolling. This involved playing around with various sculpting processes in order to try and learn how to express the continuity of inner and outer surfaces that are a feature of this aircraft in areas like the engine intakes - and which are much more demanding to produce as a result. This montage is just a dog-rough attempt this morning at producing a generic wing fairing and intake tunnel as a single continuous surface. (Believe it or not it started off as a single line): It raises a number of obvious problems of course in terms of how to integrate such forms into the surrounding parts of the aircraft structure along with reconciling it for 3d printing - both of which I've yet to resolve - but does gives me confidence (that I didn't have yesterday) that there is a common-sense approach to these kinds of formal problems thrown up by the aircraft. I'm beginning to suspect that Fusion is actually a way of writing poetry in the forms of contour.... Final image (another one I can't recall the origin of so if it's yours and I'm out of order posting it please give me a shout and I'll remove it post-haste) that is one of the nicest SV shots I've found to give a sense of the drama involved in flinging one of these beasts into the sea air: Tony6 points
-
Here I go again .... another bl**dy locomotive. I promised myself after spending many years (off and on) with my Flying Scotsman that I'd never make that mistake again. The road to Hell is paved with good intentions they say. Growing up as a wee lad in Fife Scotland in the 40's through to 1951 when we emigrated to Canada I was enamoured with steam engines ... the bigger the better. I saw and travelled behind many an A3 and A4 and on my trainspotting days my favourite place to be was on an embankment across from the local station. Frequently engines would arrive, detach from their train and shunt down a siding right below me to take on water from the stand. I've never forgotten the feeling of being there marvelling at these wonderful, machines, feeling the radiant heat, hearing the panting of the air pump and smelling the smoke and steam. Ah, the glory days. Of the LNER big Gresleys most I saw were of the A1 through A3 classes but then one day I saw the most wonderful looking machine imaginable to a young lad. Union of South Africa passed our home where we lived on the 3rd floor and I heard that unique chime whistle as she arrived in Dunfermline fresh from Edinburgh and the Forth Bridge. 60009 always had a special place in my memories no matter how many other A4's I saw and, as an Edinburgh (Haymarket) engine, I saw her often. Fast forward 70 years and here I am, still enthralled with 60009 and watching every YouTube video of her. Only recently I've read that she is about to be retired and that she will be coming home to Fife to reside in a purpose built museum ... I hope I can see her one more time. So, after waxing all poetic about A4's, there's only one logical step I can take and that's to have a go at scratch building one ... Makes sense don't you think? Should be a piece of cake. I've selected a set of A4 drawings off the web, scanned them, enlarged them to my scale*, printed them off then glued them to various cardboard and plastic backings. I'm using my usual Renshape composite material to shape the body. The tender, when I get to it, will mostly be made up from Arborite or Formica sample panels and the motion will be aluminium salvaged from various electronics, computers, cameras and whatever. Off we go .... * It's just going to be an ornament on a shelf. 22" buffer to buffer, same as my Flying Scotsman. Get over it! Here's my rough bandsawed block of Renshape. It's a start. Lots of power tools gets it soon down to a recognizable shape ... and that iconic swoopy footplate is cut out and attached. Body filler applied and sanded out ... Kylchap double exhaust roughed out, shaped and filler applied. I mounted the model on a board so that it's at the correct height so I can check the shape with a plastic cutout template. It really helps to have the model sitting at the correct height and attitude. Next I rough out the cab. The sides are fabricated from Arborite/Formica sample panels which I like as they are so flat and strong. The roof is cut from a sheet of steel salvaged from stereo equipment. Bent it slowly to shape over a block that I shaped into a template. Lots of cutouts and small sliders, vents etc added to it. Gradually I make more external fittings, pipework, handrails, and give it a rough coat of paint to see how she looks. OK, now onto the wheels. As with the Scotsman I made a master driving wheel and one bogie/cab/tender wheel from Renshape. Using my Dremel in a drill stand I ream out the spaces between the spokes. Once the master is finished and sanded I fastened it into a container and poured silicon over it to make a mold. I want to use machined aluminium as the wheel rim so I set that into the mold first then pour a 2 part urethane casting material into the mold. This bonds and hardens to the metal rim to make a usable wheel after some filing and sanding . Here's the small set of wheel rims and one with spokes. They will be cast in a similar method. Next I want to fabricate the fairly large spring sets that are under the cab. Since there's only one on each side I decide to fabricate both (rather than cast a pair). I made them both from scrap aluminium. There are ribbed gussets (?) on either side of the axle boxes and I found a perfect sized heat sink from a computer that let me cut out suitable gussets. Lots of hacking and hewing later I have a decent pair of springs. Mounted on a temporary backing here. So here's an "in progress" shot with her older brother the Flying Scotsman whose tender she's pinched. They don't look like it here but they ARE in the same scale. Next comes the fun part. ... fabricating all the metalwork/motion that goes with the wheels. I didn't take many pictures of making each piece as that gets boring. I have an aluminium strap that is 1" wide by 1/8th thick and almost every piece is hacksawed, filed and polished from that. The driving and connecting rods have a recess cut into their faces (a "U" shape) and I hog them out using cutting wheels on a Dremel. Lots of filing follows. It all gets bolted together using tiny bolts that I recently purchased. If I drill the hole in the aluminium slightly smaller than the bolt then I can slowly screw the bolt in such that it cuts threads and can be removed and replaced easily after that. Here's a work-in-progress shot. The Phillips bolt heads will eventually be filed flat and six-sided to look appropriate. The "body" has had the paint stripped and some fairing has been applied. Thanks for looking in. More to come. Frank5 points
-
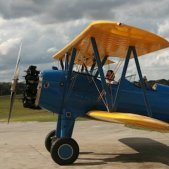
Good evening and greetings to my fellow Nordic GB participants. This post will be a placeholder until I finish off my Hunter in the KUTA GB and maybe a quick 1/72 Mustang too 🤪 Onto the kit and myself! This will be my first foray into 1/32 scale and also my first into any Scandinavian subject, which fills me with double the excitement! I’ve always liked the odd looking Buffalo, but reading the stories of the miracles that the brave Finnish pilots achieved in these machines has given me a new found awe regarding them. This is the Special Hobby Limited run, multimedia kit. It is mostly plastic (as you’d expect) with some added details in Photoetch and Resin. This should be a great challenge for me! So any advice or wisdom would be greatly appreciated. I intend on doing the scheme pictured below. (There is something quite amusing and relatable about Eino Luukkanen recording his kills on the tail In the form of beer bottles 😂). Cheers! Ash5 points
-
Hi there! I already had a plan for this GB - but I think I will deviate from my original plan right away. I had a long & hard look on the scandinavian planes on my stash - and the Gnat got my attention. Firstly - it's one of those types that are overshadowed by other types. Such as the Hawker Hunter, which for example RAF chose instead of the Gnat. Secondly - it was purchased at a difficult time and it had a difficult career in the Finnish Air Force, but still managed to serve from 1958 until 1972, despite the purchase of MiG-21's in the early '60's. And thirdly - most importantly - it was one of the first kits I bought when I came back to the hobby last year. I was visiting Finnish Air Force Museum at Tikkakoski and saw the plane there and bought the kit! So I thought it's time for a Gnat to shine too! Here's a Gnat at Finnish Air Force Museum (ilmavoimamuseo.fi/). Livery is 'Kreivi von Rosen' which means 'Count von Rosen'. Count Eric von Rosen was an important person for Finnish Air Force - as he donated the first plane to our air force and as such helped to create it in the first place. This is also the origin of the Finnish Swastika. Count von Rosen's lucky symbol - a blue swastika - was painted on the wings of the Thulin Type D he donated. And here is the kit. Like I mentioned earlier - UK never acquired the fighter version of this type - and Gnat F.1 was actually only used by the Finns, Yugoslavians and the Indians. Finland had total of 11 planes (not including 2 recce variants), Yugoslavia 2 and India 40. India used the type quite a lot and went to license produce it as HAL Ajeet. Back of the box and colour scheme options. What's in the box. Sharp looking decals, very good looking sprues and full colour instruction sheets. Special Hobby kit's I've encountered so far (Gnat & Vampire) look splendid! Main bits. The name Gnat is fitting - the plane is TINY! It looks like a miniature of itself. Couple of nose options, for the recce & trainer variants I believe. Some of the weapon options. That we are not using - just the fuel tanks. Clear parts. Gnat had a particularly strange canopy - the windshield stayed in place and the canopy sealed around it, rather than have separate front part of the canopy as normal. Maybe to improve visibility to have less framing? Not sure. In any case there is both options included in the kit - to display the canopy either closed or open. Closer look at the fuselage, it really looks really nice this kit. And this is the colour scheme we will be doing, 'Kreivi von Rosen'. Colours were basic RAF colours at the time, olive green & grey upper surfaces and high speed silver undersurfaces. Questions, comments? Feel free to join the fun5 points
-
Hiya Folks, After seeing photos of ex 451 Sqn RAAF Spitfire XIV`s in service with 443 Sqn RCAF in Germany I have wanted to build one,...... as the Canadian`s retained the Kangeroo marking of the Aussies and then added their own Wasp marking and codes with many having nose art too. Thankfully Exito Decals came to the rescue with an excellent decal sheet and I`ve used it here with the fairly recent Airfix Spitfire XIV kit. My only gripe with the decals was that the spiral for the spinner is back to front and therefore I had to turn it around, add the yellow part facing downwards and then brush paint yellow onto the white underside of the decal after it had been applied..... apart from that the decals are superb and the instructions include artwork which can be framed and also photos of the real aircraft,..... all in all a quality item,..... as is the Airfix Spit! Here is a 451 Sqn RAAF Spit in Germany, complete with Kangeroo marking; And here are some after transfer to 443 Sqn, including the subject aircraft; Here are the Exito Decals; Here is the model; And here it is with a little brother which was built alongside it,.....using a Sword kit,... told you I liked this scheme!; 1/72nd Sword; As usual both models were brush painted, Cheers, Tony Tony5 points


.thumb.jpg.ba34a9f6ddce411193946dbdcc7b5fe8.jpg)
.thumb.jpg.d17ff607fc7e89ed057e63fcb6f2a888.jpg)


This leaderboard is set to London/GMT+01:00