
Leaderboard


Popular Content
Showing content with the highest reputation on 11/01/20 in all areas
-
Greetings! In January 1942, Sonderkommando Blaich under the command of Hauptmann Theo Blaich, conducted a daring long range raid against the Free French forces at Lake Chad. The raid was a success, but on the return flight the HE-111 ran out of fuel and was forced to make an emergency landing deep in the desert. Several days later, an Italian search plane located the stranded HE-111 and a JU-52 flew in with supplies and fuel. The stranded aircraft was subsequently refueled and returned to base. Although the actual aircraft used in the raid was a HE111, I wanted to twist history a bit and depict the aircraft in the Lake Chad raid as a HE-177. Starting with the ancient Airfix kit I added Falcon vacuum formed canopies, a Hasegawa Kubelwagen, various decals from the spares bin (including the Sonderkommando Blaich unit badge), figures from Preiser and a desert landscape made from a textured ceiling light panel. The figures were posed to depict the crew gathered for a group photo in front of their aircraft. I had great fun with this build and while it is not historically accurate, I am pleased with the result. No attempt was made to remedy the faults with the Airfix kit except for the vacuum formed canopies and some details added to the cockpit. Almost all of the raised surface details was left in place. Many thanks for having a look, questions and comments always welcome! Cheers, Bill38 points
-
This is an airplane that participated in the sinking of the Repulse on December 10, 1941. Haruki Iki the pilot, was a Lieutenant commanding the 3rd Chutai of the Kanoya Kokutai, based near Saigon. Doing research for this build I came across an excerpt from a book on the Java Sea campaign, and it looked good so I bought it the book and read it. Rising Sun, Falling Skies, by Jeffrey Cox. It had a very detailed account of the attack on the Repulse and Prince of Wales. There was not much good news on the Allied side during that phase of the Pacific War! It might have been better if we had been as successful acquiring the Long Lance torpedo as we were later on finding the Zero in the Aleutians. Although Iki's airplane is one of the subjects of the decals in the Tamiya 1/48 kit, the number in that set is K-310, and apparently that has been found to be in error, the correct number being K-331. I painted all the markings and made a stencil for the numbers using a vinyl cutter. I did some weathering on this one, some oils and a silver Prismacolor pencil, along with rubbed in aluminum powder in places. The whole thing got rubbed down with a Q-tip followed by damp paper towels, all in the direction of airflow That subdued the white some because the rubbings from the dark green and red brown carried across them. I like that. There are no clear coats on this model, as there are no decals. I had on hand some of the Uschi thread and I used the super fine on the antenna above the cockpit. It's probably just about scale thickness, and therefore its also almost invisible. I can only see it against the blue background in the photos, and I don't think anyone will be able to see it in the display case. I think I will build a stand or a trolley for the torpedo, as no one will see it tucked up in the bomb bay. Anyone know what that should look like? Needs a Kurogane and some figures, too, I think. Shudder, figures do not come easy in my workshop. I noticed in one of the pictures that a mask was left on the tail gunner's transparency. Well, missing one of about 100 isn't too bad I guess. Eduard masks were used, along with others made at home to cover the windows on the inside while painting the interior of the fuselage. The eyebrow windows on the cockpit were a poor fit so I replaced those and one or two others but for the most part they were very good.29 points
-
Hello Here is my last build of 2019. This is the 1/72 Modelcollect Boeing B-52G in guise of El Lobo II which took part in the first strike of Desert Storm with the CALCM, called Secret Squirrel. As my kit was one of the first boxes I had to scratch build some parts which were not correct for this very aircraft. It took me many hours but here is the result. Comments are welcome but I will not modify the kit now.😄 The original tail of the kit Now with the modified radar and the 40" extension of Avionic Defense Systems Phase VI The modified leading edge Karman for the ALCM carrying B-52G I took from an old Italeri kit. When added on the kit before a long sanding operation. Patrick27 points
-
This is the first finish of 2020, a Revell 1/72 Tornado GR1 finished in 1998 17 Sqn colours from Bruggen. Built OOB except for the ubiquitous PJ Productions resin crew mates. Painted with Hataka modern RAF paints. The decals are the stock ones and didn't want to sit very well even on a very glossy surface and with lashings of microsol/microset. However not too displeased with the finished result Base is made from a beechwood kitchen draw front.21 points
-
Hi, my last finished model. This is 1/72 scale Su-24 from Trumpeter. I haven't made a 1/72 scale model for a long time. Very no problem, nice build. Model was painted with MRP, Gunze, Vellejo and Tamiya paints. Weathering I made oil paints for artists. Few pictures below.21 points
-
This s the AZ model with Resin . Nice Surface detail. Some really bad flash that was just more than extra plastic. I used UHU tack materials for Camo worms to accomplish the scheme. All done with Vallejo Air Paints from their Israeli Box set. Kit decals were really good and settle down perfect using Solvaset (my go to solution). I used Future as my gloss for the decals and decanted Mr Hobby Rattle can Matt and Semi-Gloss mixed together for final flat finish. Mostly clean colors but added some lightening here and there for modulation and used som Tamiya weathers sets for wear & Tear. F.O.D covers from Milliput and red Door trim with marker. Thanks for Looking Comments are always Welcome Bill D20 points
-
The Avro Shackleton Maritime Patrol aircraft is fairly well known and there have been recent kits of the MR2, AEW2 and MR3 in 1/72nd. alley Cat have filled the gaps with resin conversion kits of the MR1 and T.4 to cater for the blunt nose and tail of the earlier mark. My model represents VP262 of 120 Sqn in the early 1950s and is finished in the post war Medium Sea Grey and White Coastal command scheme. Build details are given here https://www.britmodeller.com/forums/index.php?/topic/235062731-avro-shackelton-mr1-airfix-kit-and-alley-cat-conversion-17nd-scale/ Briefly, the main elements of the conversion are removing the MR2 nose and tail and replacing them with resin parts. The nose is cast in clear resin and was the only difficult bit as it was not a good fit being too narrow. This was remedied by the some extra fine Miliput to fair in the nose. The model is painted with Gunze Sangyo Medium, Sea Grey and White, both being from the Aqueous Hobby Color range. Decals are from the kit and the conversion. My main disappointment with the model was an issue when removing the masking which did not come away cleanly and so the transparencies had a couple of extra coats of Klear which has lessened the impact. Hope you like it. My next models are a bit smaller, including an MPM Hudson that is the sole occupant of my Shelf of Doom .19 points
-
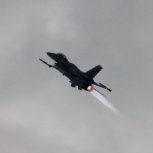
February 16, 1945 marked the combat initiation of yet another Hellcat formation in the air war over Japan. USS Randolph had joined Task Force 58 with VF-12 and VBF-12 on board. Sixteen F6F-5s, led by VBF-12 CO Lt Cdr Pawka, attacked Chōshi Airfield. When they entered hostile airspace the approaching Hellcats were awaited... (read the opposition's account here). I first built this 1963 Monogram kit in the nineties more or less OOB with a few scratch upgrades. It is one of those toy-like Monogram creations that had a number of workable parts but lacked accuracy and detail. In 2015 it returned to the bench for a complete overhaul. The general dimensions are OK and the raised rivet detail looks more realistic than on later products - so why not try it? The most substantial modification is a Quickboost replacement cowling of which I used only the nose ring and the lower half to trim the width to the fuselage. Inside works a Verlinden P&W R-2800-10W that I had in storage. The propeller is a surplus Corsair unit the origin of which I forgot, and the gun barrels are from Quickboost again. Another area of major improvement is the undercarriage assembly. A wheel bay consisting of Aires resin and Eduard PE parts was inserted into the big Monogram emptiness after the outer wings had been removed. The undercarriage legs and tailwheel are white metal parts from Scale Aircraft Conversions, completed with wheels from CMK. The bomb racks are scratch-built. After reassembly of the wing I re-scribed the folding joint, the landing flaps and the gun access doors because Monogram's panel lines were 'a bit' off. The decals except stars-and-bars are home-made. The external tank was provided once more by Quickboost, and the 5 in. HVARs were taken from the Accurate Miniatures 9900 Armament Set. The cockpit, finally, is embellished with parts from an early Reheat PE set, which was one of the first I ever used when I built the original model in 1994, and is topped with a new Squadron vacuform canopy. The gunsight - you guessed it! - comes from Quickboost. Well, I suspect I used aftermarket parts of nearly all suppliers in the modelling universe to bring this model up to date. I hope my venture was not in vain. To finish the story, VBF-12 returned to their carrier also recording a success when LT Lou Menard destroyed a Ki-61 'Tony' which crashed in the water after he had fired a rocket at it. Thanks for your interest, Michael REFERENCES GRUMMAN F6F HELLCAT, FAMOUS AIRCRAFT OF THE WORLD NO.22, TOKYO, 1972 F6F HELLCAT, AIRCRAFT IN ACTION NO.36, JIM SULLIVAN, CARROLLTON, 1979 HELLCAT, DAVID A. ANDERTON, JANE'S, LONDON, 1981 U.S.NAVY CARRIER FIGHTERS OF WORLD WAR II, AERODATA INTERNATIONAL, CARROLLTON, 1987 F6F HELLCAT WALK AROUND, RICHARD DANN, CARROLLTON, 1996 HELLCAT ACES OF WORLD WAR 2, OSPREY AIRCRAFT OF THE ACES 10, BARRETT TILLMAN, LONDON, 1996 F6F HELLCAT AT WAR, CORY GRAFT, MINNEAPOLIS, 2009 GRUMMAN F6F HELLCAT, NAVAL FIGHTERS NO.92, CORWIN MEYER / STEVE GINTER, SIMI VALLEY, 2012 GRUMMAN F6F HELLCAT, WARPAINT SERIES NO.84, CHARLES STAFRACE, DENBIGH EAST More naval fighters? Visit my Corsair here18 points
-
I've always liked the Javelin, possibly my favourite post-war fighter. One of the most interesting versions was the FAW8 with its short nose and offset radome. Only two squadrons flew this version, no.. 41 sqn at Wattisham and 85 sqn at West Raynham, before they were withdrawn in 1964. For this model I used the Mistercraft 'FAW7' with a Freightdog FAW8 resin nose and decals from an old modelling magazine that were for sale on ebay. Here is the WIP: Any comments or advice always welcome!15 points
-
Hello everyone Its finished I think, I'd like to spend a little more time on this but for now I'm calling it finished. This build took too much out of me. Starting with the kit by Italeri which I have to say is just average, with quite a few accuracy issues and build quality assembly harder than it needed to be. I did like the detail that was present though. This is my 3rd 109 and I've been buying kits from different manufacturers to see how they compare and this has been my least favourite, so I won't be buying another Italeri for a while, although I did buy a Me410 from Italeri before starting this one. Needless to say I won't looking at building that one for a little while I think. Apart from the ridiculous time needed for this build mainly due to fit issues, I had so much sanding and trimming to get things to go togethor as well as look right. Painting came up pretty nice (in my opinion) for my novice hands at air brushing and given I was getting extremely frustrated with this build I decided to use it as a test platform to test some airbrushing techniques, so it wasn't a total loss I was pleased with that. Then cam the final coat of matt clear. What else could go wrong! well when the clear dried it came up frosty. Now a little more sanding and respraying fixed that but I'm not going to do another coat of clear, too exhausted. Maybe another time when I've regained some sanity. 😖 The original plane pics are here as part of a colour discussion. Anyway here is my version of the test plane used to test the Fug217 radar system this eventually being used on 30 or so 109's and FW190's any various configurations. I only had to source photo's to go by and they weren't very good quality but none the less I did want to give it a similar apearance, although probably grittier than in real life but that was ok because I did like the look of the plane in those photo's.15 points
-
Morning guys. A little more on this lovely kit. Thankyou by the way for all the comments. It’s almost like a different forum over here I swear, 🙌❤️ right any way the fit issues. I’m going to do a dry fit before I clean out the hens. Fuselage together and wings on. Not bad as all at the root. And the dihedral looks good too. The underside also looks like nothing a dab of ppp wouldn’t put right. There are seams but I need to check references to see which ones to get rid of. Nothing too crazy at the rear. (Trust me i’ve had worse) the front isn’t miles off either. Sure there’s a step but after the suit thing I’m looking forward to fixing it. 🤣🤪 both on and dry fitted it’s not quite the horror show I thought. And close up. Mearly a flesh wound. 🤺 I’ll put my mind to work while I sport the hens. We’re out tonight but I have this afternoon free so you know what that means. 😀 On a more somber note I was devastated to learn of the passing of Neil peart. In my opinion one of the finest drummers and lyricists the world had known. A tear was shed and much Rush shall be listened to. I will dedicate this build to him and the rest of his family. May they all Rest In Peace. 😔 Take care ya’ll. see you later and as always. happy modelling. Johnny. 🤩14 points
-
Working on some wing spars. 10x1mm/40 thou in front of and behind the relevant bulkheads: And a test fit fit of the wings, with spacers and slots for the spars. There is enough play in the slots and spars for me to adjust the incidence and dihedral later on: This is going to be big! I need to work on that gap at the wing root...14 points
-
For the annual competition in the German "Flugzeugforum", I tried to build one of the 9 Kestrel FGA.1 from various Airfix parts. This is the Harrier predecessor, which flew in the TES (Tripartite Evaluation Squadron). In 1961, the United Kingdom, the United States and West Germany jointly agreed to purchase nine aircraft developed from the P.1127 to evaluate the potential of V/STOL aircraft. These aircraft were designated the Kestrel FGA.1 It was purely a test aircraft, but was slightly more advanced than its continental competitors such as the Mirage "Balzac" or VFW VAK191. The Tripartite Evaluation Squadron consisted of ten pilots; four each from Great Britain and the USA, and two from West Germany (Colonel Gerhard Barkhorn and Lieutenant V. Suhr). The Kestrel made its maiden flight on 7 March 1964. A total of 960 missions were performed, including 1,366 takeoffs and landings by the end of the test in November 1965. One aircraft was lost in an accident, six were subsequently transferred to the United States, received the U.S. designation XV-6A Kestrel and were tested there by the Air Force and Navy. The two Kestrels remaining in the United Kingdom went to RAE Bedford for further tests and experiments, and then to museums. The experience gained was so positive throughout that the Harrier Force was launched. The first three GR.1s also looked quite similar to the Kestrels, but were later modified. But of course there is no kit of them (except a long out of stock and a bit clumsy resin block from a manufacturer unknown to me, Aardvark Aviation), but there are plenty of Harrier kits of later versions and one of an early P.1127, the first plane with Pegasus engine. This P.1127 kit is from 1963, but was reissued by Airfix in 2000. Nice retro box, bad contents. The GR.1, the first operational Harrier, was re-released by Airfix in 2013, and this seemed to be a Harrier kit that could have been a lot of fun... If I hadn't cut them both up to make a Kestrel that doesn't have much to do with either the Harrier or the P.1127. Actually, I was building a prototype of an original test model here, Airfix only supplied the skeletons. The whole construction misery is documented here in English and here in German. Don't misunderstand me here, I'm not posting this to advertise the voting. That's only possible anyway if one has been an active member of FlugzeugForum for a longer time. I just think that the Kestrel was a very important part of British aviation history after all, and I think that it actually deserves its own model. And that my realization here is bound to please some people, or maybe motivate them to do it better.12 points
-
Hi, My second for 2020, the Focke Wulf FW 44 Stieglitz by Huma in 1/72/ Buiild is almost OOB, I added only some structure inside. I was inspired by recent show in RFI of FW 44 in 1/32 by @galgos (thanks ) and started build right in New Year day. I realized that from few years I have already chosen the scheme and I have everything to go on with it. The scheme followas one given by Kora in a decal set, however I hav used decals from drawer. It is FW 44 of Finnish AF during spring 1944. Her she is: As you can see there was a disaster of decay of "11" on bottom of wing, one day I will correct it.... Comments welcome Regards J-W12 points
-
Greetings all - As you may or may not be aware, I'm a huge comics fan - and that love started many years ago (70's and 80's) with the old British war comics such as Victor, Warlord and best of all - Battle! Each issue featured serialised stories from different characters in different theaters of war - and in Battle there were 2 of note - Charlie's War and of course... Johnny Red I'm not going to go too deep into the Johnny Red story - suffice to say, this isn't the first Johnny Red build on Britmodeler - however, mine will be a little different in terms of the source material. A few years ago, a very well known comic book writer, Garth Ennis (creator of 'Preacher' and 'The Boys' - both of which have been turned into successful TV shows) did a "reboot" of Johnny Red - aimed at a much older audience - here's a wee snippet: If you haven't picked up on the basic story - A British Pilot from a cam ship ends up in Russia with his Hurricane fighting the Germans with his adopted Squadron, the Falcons - and of course he's so amazing, they make him their leader - high adventure follows. If you were a Johnny Red fan, I couldn't recommend this book any higher - the story is great - a little more brutal than the original (but even the original was quite brutal) Most of the main characters are there - and the art by Keith Burns is just... gorgeous. The version of Johnny's Hurricane I'll be doing will be something like this: As you can see, it's a mk 1 painted with basic RAF brown green scheme - Garth Ennis posted about his book here on this site where he states: "(most casual readers won't worry too much about a Hurricat ending up re-engined as a Hurricane II, or a DSG/EDSG paint job becoming DE/DG, but we did)." So that's what I'm doing This is a project I've been gearing towards since my return to the hobby so I'm very excited to be actually getting started. The kit: Arma Hobby - Hurricane Mk1 - lovely little kit and maybe the best out there at this scale. I designed up some decals and got a fella in the US to print them - these are wet transfer - so the transfer film is removable once they have dried onto the model: As you can see - I have enough here for a full squadron - I did a bunch of different sizes so I can use them of different aircraft and at different scales - shout out to Johnny Red mega fan @Gazontipede for helping me out on the design for these - the decal sheet includes the serial numbers for Johnny's plane - plus falcon insignia for the old Battle comic version too - which looks quite different. I can email the PDF of this sheet to anyone who wants it - it will be up to you to get it printed - happy to pass on my printer guys details too if you don't want to print them yourself. PM me if with your email address and I'll fire it over to you. Gazontipede - I have your decal sheet here - I just need to pop it into the post for you! I started this build earlier this week but I'll leave it there for the moment - next up - starting the build If anyone wondered where I got my avatar from - look no further See you soon Chums! John11 points
-
The high back P-51 was my first foray into 1/72 'plastic surgery', and it may be time for another. I came across an old Revell/Monogram P-51B kit at a semi-LHS last weekend for 3.99 USD, and a similarly low priced Airfix P-51D, and decided I should attempt a hybrid suggested by @Bedders in his own Hasegawa/KP hybrid P-51B thread. You may be wondering what's wrong with just building a P-51B from the Monogram kit itself, and the answer is: nothing at all - one of the best builds I've ever seen was from the Monogram kit. The main reason for this attempt is that I think it will be fun, and correct a few shape issues with the Revell/Monogram fuselage along the way.11 points
-
Hi all well I'm calling this done, I intended to leave the woodwork showing and obviously never intend to fly it so i see no point in buying a prop for it. Now it's done I have no idea what I'm going to do with it as it is huge so it will probably end its days in the shed hanging from the roof.11 points
-
Yes, I know, it's a helicopter! I've not had much love for these spinny-winged things in the past, especially after my pathetic attempt to actually fly one of the smaller ones some years ago. Recently, after spending time with some BMers here on BM and in real life (you know who you are), I've grown to like them. A bit. Well, early ones anyway. I mentioned my growing, er, love in a post recently and posted that I would really like to model one of those bubble nosed ones, you know like the one in Whirlybirds: I remember watching the TV show as a kid. Ahhh, the memories. Within minutes (or so) @TheBaron had PM'd me and offered me this: What a kind and generous man he is. Thanks Tony, it's a real pleasure to know you matey The parcel duly arrived and Tony had included a photocopy of the Radio Times from 1959: 5:15, just after Blue Peter. I would have been five or six then. Bless. Tony also enclosed these: Unicorn sanding sticks! Aha, have we finally found the secret of his marvellous modelling skills? The kit had two part trees: …with some very nice detail: …and of course the bubble: I'd like to model her as a UK version, obviously, and found that the Historic Army Aircraft Flight Trust has one, XT131, still flying. There's a video of her displaying at Dunsfold in 2016 here. I've also found some photos and PM'd one of our members in the hope I can get some more. Strangely excited to get this started. Even if it doesn't have wings. No, despite Tony's kindness, I won't be re-building the 'fuselage' in brass, sorry.11 points
-
I've finished my Aoshima airwolf. Masking was hell for a newbie modelbuilder. I'm satisfied with the result. Best copter ever! Hopefully you like it11 points
-
Last of my three recent finished models is this F-16 aggressor of the US Navy from the Eduard (Kinetic) kit. Difficult kit to build but looks the part when finished! Paint job was fun to mask too! I used AK paints for this build. Thanks for looking! Chris11 points
-
With the arrival in the stash of the new Airfix Spitfire XIV I decided to dispose of my old and bloated Academy kit. Since I had a spare Airfix Mk.22 fuselage I decided to bash the two together and come up with this! While it has a couple of shape discrepancies (mainly around the tail) it at least looks a bit more like a Griffon Spit should!!! Thanks for looking, Chris11 points
-
Sorry for the prolonged absence, folks, I've been pretty worn out and depressed this week, and so I called in sick to work today and slept until 11:30. I'm still depressed, but I've had a lot of sleep. I think, in a way, going to the UK was almost bad for me, because I had it to look forward to for so long that it sustained me, and then when I was actually there, everyone was so nice and went out of their way for me. The taste of the good life is almost always worse than nothing at all, at least for me. When I was extremely poor, I had the opportunity to house-sit for a wealthy family for a week, and it made returning to my condemned (literally) apartment two hours by train and bus from my awful job even worse. Right now, life seems pretty drab and colourless (not helped by the usual bleakness of Illinois in winter, although it's at least a comparatively mild one this year), and it seems likely that the run of current events for the foreseeable future will be profoundly adverse. I wish the good guys always won, but as Yeats says: But that's always the way, isn't it? Anyway, I can't exert even an iota of control over the things in this world that matters to me -- I'm quite insignificant -- and so I'll settle for building my model. "Greater men than me have gone to their graves having made equally meaningless differences in the world." After much sanding down of the sides of the frames and gouging out of the mounting troughs in the fuselage with my micro-chisel, the cockpit framework more or less clicks into place. Ukraine is truly the land of subcomponents whose parts are greater than the internal volume available to the whole. I added the little triangular parts to the oil tank with pieces of thick plasticard: Then sprayed it: The kit comes with PE seatbelts (that's good!) but they look way too huge (that's bad!), so I dug out some Eduard ones. Only one of those can possibly be right. The Eduard lap belts are in and look good. I've been burned one too many times by using Gator Grip glue and having everything wobble away from me over and over again, so I sued CA glue and accelerant to attach them to the seat. For the shoulder belts, does anyone have a photo of how they should go on the seat? I don't know and I don't want to put them on and THEN have some Clever Dick show me a photo showing I've done it wrong. That would make me cross.11 points
-
Hi everyone. This year's been relatively quiet, model wise as I've been a tad busy with other projects, including different magazine articles, (including the AMW Real Space Special) and learning resin casting, 3D printing and CAD design has taken up most of my time, (especially at my age!) and consequently the few models finished this year were all of which were destined for Airfix Model World magazine. Have a very happy and prosperous New Year everyone. Cheers Melchie First out of the traps was Eduard's 1/72nd MiG-21MF finished as a Polish machine. Next, 1/72nd Airfix's A-4B remodeled as an Argentinian A-4C operating from San Julian in 1982. Something a bit unusual in the form of Freightdog's lovely little 1/72nd Supermarine Type 427 'Shrew'. Back to my favorite scale and subject, Soviet heavy metal, Bobcat's 1/48th Yak-28P Firebar. Test-shot of the lovely new Airfix Buccaneer S.2C, very much looking forward to the S.2B... Finally, I spent a lot of time working on six space vehicles, including these on the cover, for the recently published AMW 'Real Space' special...a lot of fun, time-consuming, but fun. For anyone interested, images to follow in the Space and Sci-fi section soon.10 points
-
Finished this one in the winter scheme last autumn only just got round to taking pictures; I wanted to weather the white fairly heavily so did put a full summer camouflage underneath. Overall I think it works though using the salt chipping technique to allow the camouflage to show through did result in some rather uniform wear & tear, and I realise now that I did not do enough to weather the underside blue, although to be fair the white was a temporary paint that wore off much quicker. I am going to give ICM a lot of credit for this kit; although work was required on the joints between the inner and outer wing section to remove a step on what should be a perfectly smooth plywood surface, most of the kit goes together very nicely as long as you dry-fit religiously and clean up the parts where necessary. The decals conform very nicely, albeit they are thin and fragile (or I am clumsy, take your pick), and the carrier film just vanishes10 points
-
And in comparison with a SHAR: Find the differences... there are plenty of them 😉 Thank you for your courteous interest...10 points
-
And wing root skinning completed: Hopefully they will blend into the rest of the wing surface when I sand everything down.10 points
-
Thanks Martian, Bill, Pete and Ian - stay safe Martian You're welcome Simon Not as bad as I thought and certainly not as embarrassing as my Biology teacher trying to explain it! Finally got the masking done: That's not a 'designed for the 410' mask in the background, sadly, I'm just using up Oramask. Canopy glued on: Formula 560 says 3 hours to handling, 24 hours to fully cured… hmmm. We're out to lunch today so perhaps I should put this aside until tomorrow. I need to burnish down the mask and I think I'll try Giorgio's 'gloss around the mask' to see if it helps me. I think I will start my next build - excited about it!10 points
-
Way back in 2006/7 I built my interpretation of the BAE Tempest II in 1/72 scale based on an old AVPRO FOAS artwork. This was the finished result. The model survived very well over the years with no breakages but over time the varnish started to go a bit funky and last year stated to go brown. I decided that a repaint was in order as the model itself was still in very good condition and could easily last another 13 years or so. The scheme has now been changed to fit in with current trends, Enjoy.9 points
-
T-54 in syrian markings from the yom Kippur , which is the mig-ammo 1/72 kit and the 72nd maz 537 transporter by takom , both built oob and really nice kits that build up totally trouble free,built in the T-55 stgb thats just about to end at the weekend, Glynn9 points
-
That would be a really good idea Bob, and now I'm tempted dang it, but the intention is for a high-back P-51B/C. The two kits match up very nicely, but I'll have to fabricate the wheel well roof as it is part of the fuselage on the Monogram kit. This pic also shows how much further forward the P-51D wing leading edges meet the fuselage. First, to remove the fin fillet, thanks to @theplasticsurgeon himself, for documenting his technique. The Airfix flaps even fit nicely on the Monogram wing. The P-51D windshield and coaming are angled forward, while those on the B/C sit perpendicular to the fuselage, so I included the coaming with the high back section to be added to the Airfix fuselage. I really wish I had @Bedders laser fingers right now, even if they do make it difficult to eat a sandwich.9 points
-
I cut some spars with dihedral from some fresh 1mm sheet, 5mm rise in 10 cm: Looks about right:9 points
-
Airfix 1/72 Vickers Valiant BK.Mk.1 XD857 Built OOB, more atmospheric shots (and more V Bombers!) at the end: Stressful picture to take! The stand barely held the model add it didn't fit at all properly! In fact you can see one of the rods is just under the model. I did promise the complete V Bomber trio (sorry I don't have a Sperin to make the four... yet!). No nice backdrop on these images though, perhaps I'll take some more at some point... Here's the WIP thread ^^9 points
-
Hi Bill Well, sorry to let you down old chap but I have next to nothing on this beast, for what it's worth, given the time frame I'd go with all black too. The following photos are the sum total of my info, I guess they've all been seen before, any road here they are. John9 points
-
bloomin 'eck and we're off again help me someone please help9 points
-
Thanks Andy - oooh, Blue Eagles, weren't they a display team? Going to be XT131 as a ) she's early UK and b ) there are decals in the kit for the tiny serials! Thanks Tony, couldn't have happened without your kind kit donation Nah, the Radio Times shows it was Christopher Trace and Leila Williams in those days - I don't remember them 'cheating'! Thanks Bill Your help will, as always, be appreciated. Hi CC and welcome! I did look for the PE (including the tail) but no luck Thanks Andy Now then, there's a line up. I said I couldn't wait to start: It's not very clear from the instructions but I think the little cooler goes like this: I'm not glueing that belt anywhere until I'm sure where it goes. Now, I know this lot is going to be mostly hidden but I want to make a nice job of it so I'll try and find some pictures: The instructions say silver and black. Boring.9 points
-
Sorry to hear you've had a visit from the black dog Edward. We have one of those, fortunately a four legged, furry version who keeps us entertained/busy/frustrated (delete as appropriate). Thankfully visits from the other, malevolent version are no longer happening - possibly I've just learned to accept life as I've gotten older (50 this year, gulp). I listened to a podcast recently (by David Millar, ex pro cyclist) which talked about us all needing a 'third space' in this ever busier world. He was referring to the importance of self, having some quality time just for you. The other spaces being work/career/school and family. This really resonated with me as I found time on the bike, usually riding alone, or running allowed me to put the rest of the world on hold and let my thoughts go wherever, without any concious steering. Now I'm not for one second suggesting we all take up exercise or whatever, merely that keeping some time aside for ourselves is essential. Maybe that's our modelling space? There'll be no monument to mark my passing. No great building or work of art that my family can look on to remember me by. Instead, my kids are my legacy and the times and adventures we share during their childhood is my memory. I grew up in a largely loveless household, with very little support or tenderness which has left its own mark on me & it's one I don't intend leaving on my kids. We try to have time together when we can (at least one meal per day) as well as holidays etc, but always allowing space for us to do our own thing (even if mum & dad are supervising). Keep your chin up chap and the happier times will return. Edge9 points
-
This is the last group of Beaufort pictures that have just been sent to me a few minutes ago, by Carl. He also includes a little intel on the camo on these aircraft: " For what it is worth, I seem to recall noting in an RCAF document that of the first 12 Beauforts delivered to Canada, six were in temperate land and six in temperate sea colour schemes. " Thanks, Carl and Elizabeth! Chris9 points
-
29th infantry Division landing on Omaha Beach. The dio was too big for my lightbox so photos arent upto usual standards but hey.8 points
-
Hi, I finally was able to finish this kit. Do not buy it... it has many issues and the biggest one is that is not 1/48 scale as advertised but 1/50 scale! I am surprised no review picked this up or any of the other things that gave away the scale problems... I did the math and I came out on 1/50scale. Later I found a 1/50 scale plan on the web and the parts fit on it. It is clear they used that plan but it says clearly 1/50 scale and not 1/48 scale. The reason I started to measure was that the pilot seat seemed very small. So I took out a couple of 1/72 scale seats and compared them. The left seat is the 1/72 Heller Dewoitine D510. Second is my scratch build seat using the thinnest materials I could find to make it as big as I could. Third one is the kit seat and last is the Tamiya 1/72 Seiran seat. As you can see the 1/48 scale Pc.7 seat is smaller than the 1/72 scale seats. Oh and the Pe seatbelts can be thrown away to. The buckles are not centered on the belt. I some made some from scratch. The radiator on the wings and nose are bad to, sometimes the lines stop in the middle and go on a bit further. I repaired some but some were impossible to repair. If you insist on building the kit you should probably make your own lines. They might have repaired tis flaw in later boxings but the first ones all suffered from this. The wing to fuselage join is bad and I had to thin it to paper thickness to get it to line up and then had to use a lot of miliput to smooth it out. I will leave it at that but I can say each day I wanted to throw it away. That is not to say I did not make errors.. I botched up the maint job. For one reason or another the Tamiya paint with levelling thinner would not dry. It took 2 months before it was dry enough to carry on. I had to polish everything out with Tamiya compound. Several times.. and that left it with a very shiny surface. Oh and the canopy is a blob of unclear plastic but I had no more energy to scratch one… But this is what I got, not my best work and not exactly the quality I was looking for but I wanted to let people know what kind of a kit it was. Then again it is only the second kit I did after coming back to the hobby so I need to get back into it... The stands were scratch build as wel since the kit does not provide them.8 points
-
Both good questions Heather and ones I don't know the answer to at present on both counts. I'm fascinated by the ability to create forms in the software but the two fundamental limitations here are clearly going to be: the minimal understanding of the CAD process I have compared to actual professionals in the area, such as @hendie and @Christer A. limits to understanding shape and detail of the actual aircraft based upon resolution and variety of available references. In a way this is a big experiment for me personally in terms of looking at the various ways of building the likes of model aircraft nowadays - I don't seem myself ever tiring of the wonders of brass for example, but equally I don't want to always just be modifying a manufacturer's kit. In this respect it will make for an interesting process to have both scratched and kit versions of the same aircraft alongside each other, seeing which parts of the process produce enough excitement and satisfaction. I think that's all any of us can ask for in this obsession of ours really, finding a route that pleases us individually without it ever seeming a repudiation of what gives others satisfaction in their spheres. Thanks for that Heather. I'm trying to show as much about the process of putting stuff together virtually here so that others can see what's really involved - including my mistakes and false starts - I've said it before and will continue to repeat that if a lunk like me can pick stuff like this up, anyone can. Of course a sensible person would have picked something simpler like a Mig-15 to start off on and and gotten away with just modelling a barrel and some triangles... Thanks James. As a teenager there used to be an architectural supplies shop up the road from us by the A3: I never tired of gazing in through the window at the intimidating array of articulated rulers and French curves and fondly remember saving a month's pocket money to finally be able to go in and buy my first Rotring pen! XN708. With the wingfold and innards opened up I think this makes sense in terms of detailing, whereas with the High Planes kit as XJ481 I want to preserve the striking paint scheme by having no wingfold or opened panels, just a clean appearance. It will involved filing the Microcell bulges off of the HP kit with the latter being a preproduction model but I'm not anticipating doing too much in terms of surgery otherwise, beyond the obvious nose amendment and wave guide addition. Hurrah! My maskirovka has worked Benedikt! 😁 Thanks you two. Plenty of room for error and angst of course but we're committed now. If modelling was easy, they'd have called it fishing.... You were just being parametric Alan! Already discovered this yesterday with a combination of open forms and bridging operations. Think I've a workaround to avoid it happening next time on the 'real' version but am finding it useful to do such test-processes as side projects along the way, without actually rupturing progress on the main design. Know that feeling - plus am walking round the house mentally rehearsing modelling routines when away from the laptop.... 🦴 Kind of you AW. Hopefully it'll give people a sense of possibility about having an idea and the processes which can be used to accomplish it. Given the quality of what you're up to in flying-boat territory Adrian I can see no reason why you'd need to change. Thanks for the technical data Alistair. My first attempt at 3D printing was a Dornier gun mounting a couple of builds back using the filament printer at work and I don't recall paint issues between it and the original kit parts. Your presence here is welcome enough dear fellow. No worries. 😀 From a professional I take that as a great compliment Christer. Thanks for brightening my day. After yesterday's exertions I needed a day off from the 'exact' work of matching designs to references, but still wanted to get something positive done to keep the ball rolling. This involved playing around with various sculpting processes in order to try and learn how to express the continuity of inner and outer surfaces that are a feature of this aircraft in areas like the engine intakes - and which are much more demanding to produce as a result. This montage is just a dog-rough attempt this morning at producing a generic wing fairing and intake tunnel as a single continuous surface. (Believe it or not it started off as a single line): It raises a number of obvious problems of course in terms of how to integrate such forms into the surrounding parts of the aircraft structure along with reconciling it for 3d printing - both of which I've yet to resolve - but does gives me confidence (that I didn't have yesterday) that there is a common-sense approach to these kinds of formal problems thrown up by the aircraft. I'm beginning to suspect that Fusion is actually a way of writing poetry in the forms of contour.... Final image (another one I can't recall the origin of so if it's yours and I'm out of order posting it please give me a shout and I'll remove it post-haste) that is one of the nicest SV shots I've found to give a sense of the drama involved in flinging one of these beasts into the sea air: Tony8 points
-
If Ced does a pretty red one, perhaps he and Perdu might be persuaded to do a joint display?8 points
-
Looking forwards to this episode of 'Watch With Ced'. 😁8 points
-
Would this in 1/24 be welcome?8 points
-
Masking of the orange to airbrush the black: Black airbrushed: Masks off, with a sigh of relief, seen that the most sensitive bits, the fuselage and door battens, came out ok: Some little touch-ups will be needed, but the airbrushing sessions seems to have worked:8 points
-
Sorry to hear of your winter woes. As I'm not of the most intellectual of human grouping, I don't really understand the depression that some people feel. I can easily distract myself by ...... Squirrel! Did you see it? Anyway, your winter could be worse. We're in a cold spell with colder on the way. This morning at 9:00 am, it was -26C, which is -15F. We're expecting -40C soon, which is -40F. That, my friend, is thumb-sucking cold! Also, you are fairly close to some other large civilization groupings. Think what there is in a 2 hour driving radius of your house. I'm up here in the middle of the vast aboreal forest. The only direction to go to a larger civilized place is south and a 2 hour drive put me at the very first small farming community. It's still another 2.5 to 3 hour drive to the first hobby shop. So, chin up and carry on! I need to see more of that Lysander. Chris8 points
-
As finished in the 1/72 "Lift Here" Models Piper Enforcer build, here are the final pics: Thanks for looking. Ed8 points
-
I’ve decided to take a break from the Schneider Cup racers and build a kit.. When I enlisted in BM back in July ‘15, my first WiP was this tiny Revell Camel. I did quite a lot of work on the kit, took a lot of photos (no lost in the PhotoBucket debacles) and received some very flattering replies. And then I broke the bottom wing in half. That totally destroyed my Camel mojo and I moved on to another build, a U-2;in fact While working on the little camel I collected a stack of reference material and Revell’s much bigger, 1/28th, kit. And it will be the subject of this WiP. The only work I did on the kit was to start a laminated veneer replacement prop. I had carved about half of it and then set it aside to work on another project. So the first thing to do on this build is to finish carving the prop and see if I could match it up with the half I’d already done. I was not sure I could as my eyesight has gone downhill quite a bit since 2015 but it looks okay and I managed it with carving up my fingers in the process. I’ve done a few other things on the kit and I’ll be posting photos, etc., over the weekend. Thanks for dropping in. All hints, suggestions and criticisms welcome. Dennis7 points
-
With never ending discussions on the best 109's available, what becomes of the old ones in the stash that don't quite make the cut anymore with today's requirements? Simply a bit of fun and, well, maybe just a little bit of upgrading.. So, I wanted to see what I could make from Academy's 109G. Fin and rudder came as spares from an AZ Models kit, and the spinner came from the ancient Airfix plane, as did the yellow 4. Luckily, yellowing wasn't an issue here. Cheers, Luka7 points
-
It's a Beaufort man! It'll be Tea, NAAFI, extra strong, Airman for the drinking of!7 points
-
The images below have been sent to me by noted Canadian aviation author Carl Vincent. He wanted me to post them on the forum. Some of these were copied by his wife, Elizabeth, from film negatives. Most of these I have never seen before. They are pictures of the 15 examples acquired by the RCAF and operated by 32 OTU and, later, 149 Squadron from Patricia Bay. Enjoy! And a small bit of RCAF history: More to come! Chris7 points


.thumb.jpg.158e2e086d45b8f96b7d93b8bee8dc21.jpg)


This leaderboard is set to London/GMT+01:00