
Leaderboard


Popular Content
Showing content with the highest reputation on 10/01/20 in all areas
-
A number of firsts for me: 1) First Academy kit - VERY impressed 2) First helicopter 3) First time weathering with oils - need more attempts to feel confident 4) First completion of 2020 5) First RFI post here I really enjoyed this build. The kit is excellent and falls together. Nice surface details and other details. The only thing I added was some foil seatbelts (which you can't see). I have the Eduard cockpit set but I don't think I will use it for the next one (apart from belts). A good dry brush and the kit details really pop. Which you can't see. This was a test run for the next AH-64D with will be in Singapore colours. Part of my RSAF series of builds. I broke the aerial off at the back so made a new one from wire. I haven't added the white strips around the windows. Not sure I will bother. I have not figured out a way of showing the optics on the front of the imaging beachballs at the front. Will add that when I have a good solution. Anyway, hope you enjoy the photos. It's a brutal looking beast, isn't it!20 points
-
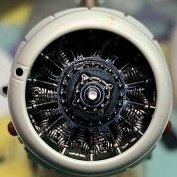
HISTORY Under the MDAP (Mutual Defence Assistance Program) the Royal Navy received , from 1951 onwards, a total of fifty Douglas Skyraiders AD-4W. The Royal Navy changed their designation into AEW. Mk1. (Air Early Warning mark one.) Tasking was mainly providing over the horizon radar coverage to protect the British fleet from attack. By doing so they became the first dedicated frontline AEW system. The AN-APS 20 radar was placed in the dome and weighed about one ton. If working properly, it had a range of more than 100 nautical miles. Although , they provided sterling service, they actually saw only combat service during the Suez Crisis in 1956. Normally a "flight" of four Skyraiders were assigned to one carrier. Crew: Pilot, in the Back Office radio/radar assistant and the LT. Observer. THE KIT AND CONSTRUCTION The Esci model (1979) is very basic. I chose the option to build the Royal Navy version in the Suez Crisis paint scheme. Furthermore ; I decided on folded wings and the port (left) side of the Wright Cyclone motor clearly visible. I started with separating the wings on the folding line with a dental instrument (probe). This task is taking a long time, but the outcome is promising. By using a diamond saw , you will lose too much plastic detail. With Evergreen plastics, I filled the four ends of the separated wings. The Waldron punch and die set provided the nuts and bolts. This job done , I focused on the cockpit. Mainly adding 3D vision with the help of Waldron switches and clear plastic covers for the clock instruments. The sides went together quite well. The AN-APS dome was a real problem. There was no alignment of the two parts, so I placed a strut broad-wise, just to make a sturdy contact with the main frame. Glued in place and hardened out , I welded a rod from Evergreen with micro weld into place. This made the whole connection extremely smooth and sealed all the gaps at the same time. The same finishing touch was given to the bulge on the upper deck. All parts were sprayed separately in silver (Revell 90). This gave me the chance to see any mishaps in alignment. Continued with Xtra colour number 121 (Gloss Sea Blue). With the help of Tamiya Tape (6mm), I sprayed on the yellow and black Suez recognition stripes. Decals in the box are good enough to be used. They took set and sol from Microscale The simple engine in the box was updated with wire and Evergreen bits and pieces.. Exhaust pipes were connected to the cylinder system. I added the “firewall and connected the engine to the firewall. The Wright Cyclone in place I turned my attention to the “open hood”.. The plating surrounding the engine was divided on the centreline. The starboard side was glued in place and the port side was opened with a thin metal hinge. Finally, I added the landing gear. Factory fresh build, with no weathering. ready to be delivered to the Fleet Air Arm. During the Suez Crisis the A Flight was stationed aboard HMS Eagle. The flightdeck of the carrier was marked with the identification "J" as from Juliett. The Skyraider did sterling service, but was replaced by the Fairey Gannet after a very short career in the Royal Navy. Specialists on this forum are maybe willing to answer the following question: What was better- The Skyraider or the very complicated Gannet. Regards, Orion / The Netherlands.18 points
-
Good Evening All Well I have mananged to complete a model in what seems like years, so may I present my interpretation on the P-Dirty 8 (I realise this probably isn't the place to show her off but I did the wip in the aircraft section so ill finish off in the ready for inspection aircraft section) Any I hope you enjoy first up the picture that started it all Screenshot_20190726-155141 by Tim Dyson, on Flickr And here she is IMG_20200109_221704520 by Tim Dyson, on Flickr IMG_20200109_221645311 by Tim Dyson, on Flickr IMG_20200109_221714745 by Tim Dyson, on Flickr IMG_20200109_221725838 by Tim Dyson, on Flickr IMG_20200109_221747807 by Tim Dyson, on Flickr IMG_20200109_221920109 by Tim Dyson, on Flickr IMG_20200109_221943455 by Tim Dyson, on Flickr IMG_20200109_222000224 by Tim Dyson, on Flickr IMG_20200109_222012938 by Tim Dyson, on Flickr IMG_20200109_222026478 by Tim Dyson, on Flickr IMG_20200109_222033590 by Tim Dyson, on Flickr IMG_20200109_222045466 by Tim Dyson, on Flickr IMG_20200109_222105104 by Tim Dyson, on Flickr IMG_20200109_222112562 by Tim Dyson, on Flickr IMG_20200109_222120361 by Tim Dyson, on Flickr IMG_20200109_222134510 by Tim Dyson, on Flickr IMG_20200109_222148043 by Tim Dyson, on Flickr IMG_20200109_222310695_MP by Tim Dyson, on Flickr IMG_20200109_222320382 by Tim Dyson, on Flickr IMG_20200109_223705317 by Tim Dyson, on Flickr IMG_20200109_223714355 by Tim Dyson, on Flickr IMG_20200109_223723090 by Tim Dyson, on Flickr IMG_20200109_223740674 by Tim Dyson, on Flickr IMG_20200109_222420418 by Tim Dyson, on Flickr I had an absolute blast making the dirty and I even learned a few things...…... thank you to everyone for the encouragement Comments and criticisms welcome as always Cheers Tim18 points
-
With the arrival in the stash of the new Airfix Spitfire XIV I decided to dispose of my old and bloated Academy kit. Since I had a spare Airfix Mk.22 fuselage I decided to bash the two together and come up with this! While it has a couple of shape discrepancies (mainly around the tail) it at least looks a bit more like a Griffon Spit should!!! Thanks for looking, Chris18 points
-
all 1/32: Revell 1/32 Miniart 1/35 William boss 1/32 Tamiya 1/32 Hobbyboss 1/32 Hasegawa 1/32 Azur1/32 Hasegawa 1/32 Tumpeter1/32 Spécial hobby 1/32 Hasegawa 1/32 Spécial hobby 1/32 Hasegawa 1/32 Hasegawa 1/32 Hasegawa 1/32 Spécial hobby 1/32 Spécial hobby 1/32 Hasegawa 1/32 Azur 1/32 trumpeter 1/32 trumpeter1/3217 points
-
Last of my three recent finished models is this F-16 aggressor of the US Navy from the Eduard (Kinetic) kit. Difficult kit to build but looks the part when finished! Paint job was fun to mask too! I used AK paints for this build. Thanks for looking! Chris17 points
-
Good evening all, as a long term resident of the UAE I thought it would be appropriate to build a ‘local interest’ subject. Here is my Hawker Hunter FGA.76 from Sharjah Air Base in the 1970s. It’s the Academy kit with replacement resin cockpit and wheels, Aeroclub jet pipe and aftermarket decals. Paints were mixed by eye to match photos. Hope you like it! Chris12 points
-
With most of the Air Forces which used Stukas represented in the STGB, I decided to build one aircraft of a user still missing. It is the well documented Ju-87B-2 from the Yugoslav Air Force. Of interest is the fact that this aging B-2 was the last Stuka used in anger during WWII. Follow information is from the book "Guerrilla Nightmare - Luftwaffe Stukas at war against Tito's Partisans in Yugoslavia 1941-1945" published by Kagero. A Ju 87B-2 from NSGr.10 with code 5B+ER landed by mistake on a Partisan held airstrip on 12 February 1945 at Sanski Most in Bosnia due to a navigation error. The crew took of from Butmir arfield in Sarajevo to transfer to Zagreb under the control of Oberfeldwebel (Ofw) August Pautz as the pilot and Ofw Hermann Kübel as gunner and both were taken prisoner of war after their mistaken landing. The Stuka, with hastily applied Partisan markings, was soon used against German positions on several occasions. During one of the mission, the aircraft suffered a flak hit into the rear part of the cockpit , loosing the whole rear sliding canopy with the installed MG 15 without insuring the crew. The aircraft received a replacement rear canopy but flew from then on without the rear MG. Until 25th May 1945, the Stuka flew 34 combat sorties in the hands of the Yugoslav Partisan Army of a total duration of 33 hours and 15 minutes. During that period 16 50kg bombs and 88 12kg bombs had been dropped onto enemy positions. Some sources say that this aircraft was used for the last time on 28 May 1945 attacking German forces refusing to surrender, making it the last combat sortie of a Ju 87! The Stuka was used by the new Yugoslav Air Force for a short time before it was given to the Faculty of Mechanical Engineering in Belgrade. Substantial parts of this aircraft sill exist and are in storage at the Yugoslav Aviation Museum in Belgrade. Up to the event when it lost the rear canopy, the aircraft flew still with the Luftwaffe code and yellow theater markings in place as can be seen on these pictures. Later on, the Lutwaffe code and yellow fuselage band got overpainted and when part of the Yugoslav Air Force, the temporary markings got replaced with the standard Air Force roundels. Note the rear canopy replacement without the MG. I intend to build the aircraft before the Luftwaffe code was overpainted and before the rear canopy was shot off. For this build I will use the new tool Airfix kit building it mostly out of the box. Cheers, Peter12 points
-
Hi all. Next out of the gate after the Raiden is the ubiquitous Spitfire. This one will be a Mk.I built as N3200 from the new Tamiya kit; I couldn't go past the black and white wing undersides. The photos of this one are well know as it crash landed on a beach in Dunkirk on its first mission while on Operation Dynamo. I get to keep the weathering to a minimum on this one as it didn't last too long! Always with the box art. And of course the marking options Previously I'd remove one part at a time when assembling the kit, now I've switched to removing a whole bunch of parts for sub-assemblies. I find that it's a lot faster when it comes to cleanup (minimum with this model), paint and assembly. Who'd a thought? Cockpit first. There's no need for aftermarket here as it's amazing straight from the cardboard. Pics are a bit out of order but you get the idea. My F-35 pilot reckons he'd give it a go. The fit is ridiculously amazing. I've been a bit dubious about the supplied masks from Tamiya. Never fear, a fresh #11 scalpel blade and they fit really well. The A3 camo plans have a good use. Cut them out and you can mark the camo scheme with a water colour pencil over the base colour. Here it's Mr Color Dark Earth. Second colour applied after using Blu-tac sausages to make the camo pattern lines. The green is Mr Color Dark Green and the no walk lines were sprayed and masked before putting colours down. As wasn't happy with the colours so I mixed a 50:50 mix of the earth and green and then dusted it over the topside. The first photo below shows it applied only to the left side and the following photos show the final effect. Gloss coat and then stickers. This is the state it's in at the moment. MIGHT... finish it over the weekend. Hope you like it. Mick12 points
-
This s the AZ model with Resin . Nice Surface detail. Some really bad flash that was just more than extra plastic. I used UHU tack materials for Camo worms to accomplish the scheme. All done with Vallejo Air Paints from their Israeli Box set. Kit decals were really good and settle down perfect using Solvaset (my go to solution). I used Future as my gloss for the decals and decanted Mr Hobby Rattle can Matt and Semi-Gloss mixed together for final flat finish. Mostly clean colors but added some lightening here and there for modulation and used som Tamiya weathers sets for wear & Tear. F.O.D covers from Milliput and red Door trim with marker. Thanks for Looking Comments are always Welcome Bill D12 points
-
Airfix 1/72 Vickers Valiant BK.Mk.1 XD857 Built OOB, more atmospheric shots (and more V Bombers!) at the end: Stressful picture to take! The stand barely held the model add it didn't fit at all properly! In fact you can see one of the rods is just under the model. I did promise the complete V Bomber trio (sorry I don't have a Sperin to make the four... yet!). No nice backdrop on these images though, perhaps I'll take some more at some point... Here's the WIP thread ^^11 points
-
You've got that right Bill. Definitive. Thick ankles on a Vixen are just not a pretty si-<sounds of low growls and thrashing on the floor>- Help! I'm turning into: There are some sick people where I work.... Hail Splineticus! 😁 In a world of biros, truly you are a prince among nibs Serge. He's right you know. I must have paged through several thousand errr pages of the manual by now and a couple of items like this are the closest to plan views of any other details I've found: Useful of course, but partially so... *Suddenly realizes that Thunderbirds was a series of puppet-based lectures on ecological catastrophe and the perils of unlimited capitalism... Since the last update it occurred to me quite strongly that there are limits to how far you can reliably work in isolation upon one region of the airframe without referencing it to adjoining sections; in the case of the wing, judgements about how successful (or not!) the design is coming along will have to be made in comparison to how and where they join the central 'box' of the fuselage - surrounded as it is by all of those positive and negative curvatures. Close study of photographs from various angles have convinced me that there are some subtly deceptive things doing on the the central fuselage and cockpit section that could not be matched by simply sweeping an outline round to form a profile symmetrical in all three axes, so elected to begin sculpting it out as a form which can be extended and adjusted: This is the 'form-in-progress' put up against a rather nice IWM view, which due to the camera angle can be relied upon to give a good representation of outline from nose to about 2/3 of the canopy length (i.e., the further to the right beyond this, the more inaccurate that perspective will begin to make matters). I haven't forgotten the added bulges for both airbrake and Microcell regions btw - this is a 'clean' first pass to get the overall outlines and profiles correct before any subsequent structural detailing gets done. Two related issues only slightly apparent in the above view are the flattened frontal profile of the top of the fuselage (to allow for the side-by-side crew) in contrast to the sweeping curve of the underbelly, which I think I've managed to capture the top oblateness in this view here (though there's still some minor work to possibly do on the exact profile of the fuselage sides as they drawl level with the cockpit area): Where of course many manufacturers and individuals have been caught out in the past is not just the length of the nose itself, but the fact that the radome itself is only symmetrical circular for part of it's length. Roughly speaking only about halfway back from the tip does it remain entirely circular in cross-section, whereupon it subtly begins to blend into the pronounced oblate top profile where the rear lip of the radome meets the fuselage: Some of the excellent views James sent me of the FAW.1 simulator give good clarity to this oblateness behind all the radar gear too, which this will help enormously with decisions on final shaping. With the front/centre roughed out, I then needed to begin a similar exploratory process in the opposite direction, from the Avon exhausts forward all the way to the intakes. Space Shuttle tank and SRB anyone? 😁 I never realized before how powerful parametric modelling was in the manner that it allows you to hop back and forwards along the design timeline to revisit and amend as required any earlier decisions. I stress the 'exploratory' part particularly strongly in this what I'm up to here - many of these processes are new to me in a CAD context so at present it is very much a case of staring at photographs of the aircraft and trialling various tools/processes to see what gets you in the proximity of where you want to be. Also keeping the shapes simple at this stage in the knowledge they'll need constant refinement as new sections are added. Kind of happy at this point with the way the rear of the exhaust tunnel is shaping up here: The further forward it goes though, the more complex will be the sculpting and editing processes required for accuracy of form, not just for the engine tunnel and front intake itself but in the manner that these elements blend into both central fuselage and wing on either side of them. <gulps in nervous anticipation> To get a sense of how some of this blending of contours might be achieved accurately, I test-mirrored a copy of the port design to produce a starboard counterpart and thence began playing around with bridging structures between tunnels and fuselage in a way that might begin to match those of the aircraft: Still very much a case of learning on the job but these efforts are beginning to bear fruit in that the level of surface divisions has not so far become cumbersome. Still a lot of refinement necessary to the length of the engine tunnels and the way that these cylindrical curves flare out into the wing/panel structures along the intersection between them, but looking hopeful against reference shots: In the shot below, that central section where the rear apex 'tail' of the central fuselage submerges into the structure between the two engine tunnels looks pleasing enough so far, but I'm aware it's giving me a number of issues with overlapping vertices internally that I've yet to resolve: As to the front intakes: - I'm simply pretending that this diagram doesn't exist for the present I can't see you diagram: Don't be fooled into thinking that (at least by relative standards on this build ) this is forging ahead now: these are just the first 'primitive' outlines to define the aircraft that now need to be more closely refined and expanded upon over coming sessions. Friday. Hope you've all had good weeks and if not, then a good weekend to follow. More next time. Tony11 points
-
Gentlemen, for those interested, here are a few photos that have been sent to me by author Carl Vincent, to be posted here. There are 13 images in the first lot he sent with more on the way. I will post a few here with all of the posted later in a separate posting elsewhere on the forum. Some of the photos were copied from negatives by Carl's wife, Elizabeth and may not have ever been seen before. These are photos of the 15 examples acquired by the RCAF and operated by 32 OTU and, later, 149 Squadron from Patricia Bay. Chris11 points
-
For once it's not! If you have some 1mm Aizu tape, it's also just about right for the apparently 3 inch wide tips to RAF blades... Oh yes it was! (Panto season not quite over yet…) I tried with thin tape (although not the Aizu) and it slipped off then end. I tried with Tape for Curves and it wouldn't stick. In the end I blobbed some masking fluid on from the Molotow: …then spun the ends in a punch: …and cut / scraped any excess away with a scalpel. Into the spray booth: When that's dry I'll rub the ends and the perfect, yellow noses will be revealed! Or am I dreaming again…10 points
-
Goodmorning and thanks for the kind comments! LastnightI used some CAglue to fill some gaps in the junction between the wings and the fuselage and sanded them off. This morning Icheckedthe panellines and junctions with Tamiya panelaccent black liquid and tis is what she lookslike. Somemore CA glue here and there, but it'squite right.Soon Rosie the riveter willbe needed for the wings. Here a couple of pictures. Ciao Massimo10 points
-
Hi, I finally was able to finish this kit. Do not buy it... it has many issues and the biggest one is that is not 1/48 scale as advertised but 1/50 scale! I am surprised no review picked this up or any of the other things that gave away the scale problems... I did the math and I came out on 1/50scale. Later I found a 1/50 scale plan on the web and the parts fit on it. It is clear they used that plan but it says clearly 1/50 scale and not 1/48 scale. The reason I started to measure was that the pilot seat seemed very small. So I took out a couple of 1/72 scale seats and compared them. The left seat is the 1/72 Heller Dewoitine D510. Second is my scratch build seat using the thinnest materials I could find to make it as big as I could. Third one is the kit seat and last is the Tamiya 1/72 Seiran seat. As you can see the 1/48 scale Pc.7 seat is smaller than the 1/72 scale seats. Oh and the Pe seatbelts can be thrown away to. The buckles are not centered on the belt. I some made some from scratch. The radiator on the wings and nose are bad to, sometimes the lines stop in the middle and go on a bit further. I repaired some but some were impossible to repair. If you insist on building the kit you should probably make your own lines. They might have repaired tis flaw in later boxings but the first ones all suffered from this. The wing to fuselage join is bad and I had to thin it to paper thickness to get it to line up and then had to use a lot of miliput to smooth it out. I will leave it at that but I can say each day I wanted to throw it away. That is not to say I did not make errors.. I botched up the maint job. For one reason or another the Tamiya paint with levelling thinner would not dry. It took 2 months before it was dry enough to carry on. I had to polish everything out with Tamiya compound. Several times.. and that left it with a very shiny surface. Oh and the canopy is a blob of unclear plastic but I had no more energy to scratch one… But this is what I got, not my best work and not exactly the quality I was looking for but I wanted to let people know what kind of a kit it was. Then again it is only the second kit I did after coming back to the hobby so I need to get back into it... The stands were scratch build as wel since the kit does not provide them.9 points
-
Hi, I built this one for the current 'Film' GB. Please go easy on me. I know there will be a lot of Titanic aficionados curling up their toes but it was built as a bit of fun and not as a scale replica Hope you like her !!9 points
-
Of course the yellow rubbed off with the mask. Dotted some more on. Not perfect, but good enough for the ceiling.9 points
-
Window openings now filled with clear polystyrene. The “crack” in the long window is deliberate because the orientation of the windows has to change because of the curvature of the fuselage: After years of sticking bottle-bottom moulded portholes into fuselages I’m pleasantly surprised how transparent this all is. I’m hoping it will stay that way...9 points
-
T-54 in syrian markings from the yom Kippur , which is the mig-ammo 1/72 kit and the 72nd maz 537 transporter by takom , both built oob and really nice kits that build up totally trouble free,built in the T-55 stgb thats just about to end at the weekend, Glynn8 points
-
Nice kit of a rare vehicle, but lots of clean up of flash, seams and rough surfaces. 3 pdr. detail is a bit mushy, but I can live with that. Fit overall is pretty good, although you do need to test fit everything to make sure. i added a few little things to make some aspects more logical or complete.8 points
-
Here the finished Delta WRC 1991 season. The livery is of Italian Rallye of Sanremo Building diary of Delta8 points
-
About twenty seven years ago I modified a 1/48 scale Testors Lysander to the turreted Wendover. Our club, IPMS Mid-Sussex has a special competition theme 'restored examples' so I thought I'd spruce the model up a bit and show you. Potted history of the 'Wendover': In 1940 Westland did various investigations with their Lysander to add a turret. Turrets to were quite fashionable at the time, a prime example being the Boulton Paul Defiant. Even the Naval plane the Blackburn Skua had a four gun dorsal turret added and became the Roc. A Lysander fuselage had a BP dorsal turret added but it seems this moved the centre of gravity too far back and was unuseable in this configuration. According to James' Putnam Westland book, Westland technical director W Petter and their test pilot Harald Penrose visited France in early 1940. Here they both inspected and flew the Delanne T20 which was a sort of biplane with the lower wing mounted low down at the rear of the aircraft. This configuration solved the centre of gravity problems for the Lysander and they were then able to progress a large rear turret. Initially the aircraft flew with just a mock up rear turret but Penrose still managed to loop it on its first test flight in July 1940! According to some references this was as far as the modification progressed. However, work continued and by the end of 1941 a Frazer Nash FN20 (same as used on a Lanc) was fitted. According to my references no firing trial documentation has survived. ............................................................. My starting kit was the Testors 1/48 Lysander. To this I added lights in the wheel spats by pull moulding clear acetate over them, then cut away the front and added a clear 'glass' over a rudimentary light. Milliput was added in the front of the Townend ring to make it less hollow. The main modification required sawing the fuselage in half. An i-beam was glued to the front section and to this three formers were added. I skinned the empennage with thin plasticard on which I had drawn parallel lines with a fine point biro. Once turned inside out this provided a reasonable ribbing effect. The fitting of the first sheet crumpled as I used too much glue. My only option was to repeat the process over the top of the first skin. The end of the fuselage was formed using solid Milliput. The same material was used to make a basic turret shape over which I pull moulded more clear acetate. The rear flying surfaces were carved from solid plastic and I even tried to show the contoured surface on the rudders. Once completed I found I had made the rear section far too short, which gives the whole thing a rather stubby appearance. I used a general arrangement drawing from a publication and this was my downfall. As John, elsewhere on this website has pointed out - 'some publications distort the dimensions of drawings' ! I'll know better next time. Below are some views of my model IMG_0303 by arhills, on Flickr IMG_0302 by arhills, on Flickr IMG_0300 by arhills, on Flickr IMG_0304 by arhills, on Flickr IMG_0239 by arhills, on Flickr8 points
-
Ok very nearly done, just the Antenna and Pitot tube to go back on otherwise I am calling it done! The fuseage was a bit warped and as this was for a friends kid to build I took it on an gave him something simplier and Of course I did not read the instructions and had to split the wings post cementing to insert the cannons and the blanking piece for the outer wing!! All done with Humbrol enamels and Alclad II Matt on top. 604_0464 by Georgeconna32, on Flickr 604_0465 by Georgeconna32, on Flickr 604_0467 by Georgeconna32, on Flickr 604_0468 by Georgeconna32, on Flickr8 points
-
Made my mind up I am offended because I was not allowed to be offended if I wanted to Very... Grrrrr8 points
-
I can live with penguin. I love penguins. Anyway, all colour blobs now painted. Next week reinstate the grey dividing lines (basically, some dry brushing) and a bit of folding action and we’ll be in business. Have a great weekend, everyone.8 points
-
As can be seen in the photos on the previous page, it's the lower edge of the fuselage halves where the casting block was attached. CMR have removed the block for you, so you just need to clean up the edge. This requires some care, as you need to keep the edge straight and in line with the upper edge. Resin sands a LOT quicker than styrene, and it's easy to overdo it. If you sand too much, the width of the bottom of the fuselage will be too small. Luckily, the one-piece wing has a portion of the fuselage cast into it, and we can measure to see what the width needs to be at that point. Like so: This is at the trailing edge of the wing. Now when we clean up the lower edge of the fuselage, we can dry fit and measure to make sure the fuselage ends up the same width as shown here. It's also a good idea to measure to make sure the dimension at the leading edge of the wing. You can see in the following picture the areas of the lower edge of the fuselage that I've sanded. I did this by taping a sanding stick to my workbench to immobilize (immobilise?) it. That made it easier for me to sand just the edge in question and make sure I kept everything flat and square. The front required only a little clean-up to match the wing. After test fitting, I think things look good. Before I start painting though, does anyone have an answer for the cockpit colour? Black or Interior Grey-Green? CMR say the latter for these early Firebrands. However, now the cockpit is a bit too wide. Shades of Aires! Ah well, no problem as I'm well versed in the never ending saga of fitting Aires resin cockpits, so I should have the skills to tackle this. Onward! Cheers, Bill8 points
-
This will be the beginning of my WW II Bomber Collection. I usually build 48 scale but 48 scale bombers are just to unwieldy for me It's been a long time since I built 72 scale but this kit is quite detailed for the scale. I chose to use all the bits despite the fact that many won't be seen as a felt like some painting practice. I will be doing the aircraft flown by Kiwi VC recipient James Ward. AS an aside I lived in Ward Block, which was named after him, when I was posted to RNZAF Wigram A few hours work and we have some sub assemblies. Most things went together well but the engine nacelles took a bit pressure to get lined up. Thankfully Tamiya Fast setting extra thin and the Airfix Plastic bond fast and well All the details painted using Vallejo Acrylics, the base coat is Tamiya AS 12. I followed the colour call outs in the instructions. Other builds I've looked at have different colours for the airframe inside structure including black, interior green. The wash is AK dark grime and the instrument panel is decal. I used some strips of painted Tamiya tape for seat belts The blue is vinyl cut out on my cutter to cover up some sink marks in the bomb bay from a file I got online. I also tried the vinyl to replace the circle I lost when getting rid of the fuselage seams. This didn't work as well as I'd hoped so I removed the bits from the bomb bay and used a chisel to remove the sink marks. I used the cutter to cut a new circle from 0.005 " thou card to restore the circle detail . The worst bit of this kit are the fuselage inserts for the waist gun positions that are not used on this variant. They don't fit well with large gaps. As the fuselage in this area is fabric you have to restore the fabric detail . That's all for now7 points
-
That's what Mrs Martian used to say about me: right up to the minute I fell through it! Progressing well BTW. Martian 👽7 points
-
Working on some wing spars. 10x1mm/40 thou in front of and behind the relevant bulkheads: And a test fit fit of the wings, with spacers and slots for the spars. There is enough play in the slots and spars for me to adjust the incidence and dihedral later on: This is going to be big! I need to work on that gap at the wing root...7 points
-
Hello again Hope everyone had a great Christmas, and wishing everyone a Happy New Year! Back for another quick update. Nearly eight months in to the build (!) and it's sort of starting to come together at last... I'm just ticking things off the 'to-do' list at the moment, so first up as the towing bridle. Italeri's version is okay-ish, but seems to be a later version and is a little basic in some aspects. So the horse-shoe bridle itself needs a little bit of amending, with the central towing eye replaced, and some of the other bits and bobs could do with refining. Here are the various parts: There's a fabric sleeve that covers the release mechanism (to the right of the bridle itself in the photo above), and it connects from the towing bridle centre to the underside of the fuselage. Air Publications AP 1660C/D has a great drawing of it. There's also a connector on the bridle itself (the white bit by the round centre part), to which I think communication line attaches. I also made a slimmer version of the kit's stablising strut. Here it all is in place for a test-fit: and properly fitted and painted, together with the rear undercarriage and wheel doors, plus the rear turret fairing: The tails wheels are okay, stability-wise - a bit of a weakness in the Italeri kit. One is rock steady, while the other is just a little wobbly - hopefully one solid one will suffice...! I've also finished off the canvas seat in the nose for the Observer: as well as his footrest: Still plenty to do on the checklist, and I'll post another update once a few more bits have been ticked off it... Cheers Simon7 points
-
Hi She flew in Italy in April 45. New Eduard's mustang is really a good model. From Royal Class box (Marking M) but done with "Firewall scheme" and ANA colors (Gunze). Cheers Pierre7 points
-
Here are the cured mold halves of upper and lower front nose parts: The below image explains the mold in detail: The molds are ready to produce test parts. Serkan7 points
-
For once it's not! If you have some 1mm Aizu tape, it's also just about right for the apparently 3 inch wide tips to RAF blades... Hangover gone yet ??!!7 points
-
Thanks Cookie and Giorgio - others seem to think not. Hmmm Thanks Ian, Keith and John Assuming this is not a 'that-fiddly-job-will-drive-him-mad' tease I'll try it, especially as… Science that is… thanks hendie, good point Thanks Simon and Ben. Then it got wicked, fnaar fnaar… Thanks Tony and ?hendie? Quite right Bill - a missed opportunity for a good tut… maybe even a tsssk and a head shake. Who knows now? Thanks Johnny, AW (titter) and Giorgio As G said, recommended by Bill and good stuff - a small drop poking out of the nozzle 'offered up' to the canopy join and it seems to apply itself in a nice thin layer. Dries clear, clean up with water. Love it. iMac is back with its new SSD. Wow! Here are some comparative load times: Safari browser was 11.5s now 3.2 Mail was 11.75s now 1.5 Numbers spreadsheet was 18.43s now 3.3 Very happy bunny! Back to the masking later, stick on the canopy then priming. Pub last night so a bit slow this morning…7 points
-
More Progress on the Wellington. I first experimented with some dark earth options I ended up going with a Tamiya Mix suggested by Spencer Pollard (and a few others online) , it is considerably lighter than the other options I had. Those being Mr Color, SMS and Tamiya AS22. FYI - SMS = Scale Modellers Supply and are an Australian paint manufacturer who do a large range of Lacquers aimed a the modeller, they started of with car colours but have expanded into armour and aircraft. . I quite like their gloss and flat coats. Some of their other colours are interesting as well. I think the lighter shade looks good in this smaller scale, I applied some mottles with various stencils. Next I up-scaled the instructions, printed them on self adhesive label paper, printed them and cut them out then stuck them to the model and painted the Dark green. I used SMS green ( they mark it as FS34097 although the FS paint standard is post war) from their RAF bomber set. This looked a little to green straight from the bottle so I added about 1 ml of black (they had a camo black bottle in the same set) I liked the look of this so on it went.7 points
-
Hi Friends, Happy new year for everyone. I start my Britmodeller this year with my last build (finished some months ago). The old mould but totally accurate to the todays standards of modelling manufacturers F4 Corsair in 1/48th by Tamiya. All is very well engineered as usual by Tamiya, the fit is superb. I added some rivets with my Trumpeter's riveting tool and also the Eduard Photo Etched extra parts to upgrade the bird. I added some extra scratch build to the cowling to simulate the mechanism to open or close the vent doors. It's a nice plane, and very cool for weathering. Also this kit from Tamiya has a very well detailed OOB cockpit. I hope you like it, Cheers Ricardo7 points
-
It’s like formula 1 but much slower AW7 points
-
Not sure where this is to go, but as it did not go into space.... After World War 2 many of the German technologies ended up in the USA, including Werner von Braun and his V2. The US started testing of the V2 on US soil at White Sands and they also tried them on the USS Midway. Onto the kit, it is the Revell boxing of the Special Hobby kit and decals is from the US IPMS 2008 convention decal sheet. Regards Robert6 points
-
Hi All, This is my entry. I purchased it last year (complete with some aftermarket goodies) as I had always wanted to build one. I couldn't believe my luck when I saw the STGB in the calendar!!6 points
-
Hiya Folks, These models and most of my research have recently appeared in Scale Aircraft Modelling but the model pics don`t show up all that well so I thought that I`d put a few on here in case anybody is interested,; Here is the Valom Marauder Mk.I, built as FK375/D which was refinished from the desert scheme into Temperate Sea Scheme after the intended role of light bomber was changed during work up training to maritime recce/strike. The original Middle Stone can still be seen behind the scroll under the cockpit containing the name `Dominion Revenge', which was applied by famous modeller and historian Dick Ward during his RAF service; 32 by Tony OToole, on Flickr 31 by Tony OToole, on Flickr 30n finished by Tony OToole, on Flickr 34 by Tony OToole, on Flickr 30e finished by Tony OToole, on Flickr 38 by Tony OToole, on Flickr And here is the Monogram snap tite kit (with engines and interior added from a scrapped Airfix kit!) built as 41-17978 `Flak Eater' which was one of the ex USAAF B-26B handed over `in theatre' by the 320 BG to 14 Sqn mainly for the in house training flight although some were also used for operations; b20 FINISHED by Tony OToole, on Flickr b27 by Tony OToole, on Flickr b28 by Tony OToole, on Flickr b22 by Tony OToole, on Flickr Both models are based on photographs which appear in my article and although the paintwork on the Mk.I appears quite stark in the pics, in reality the grey and green really merge into each other. The B-26B has the two toned Olive Drab seen on many Marauder`s but whether this was caused by different paint which has weathed differently or the thickness of the metal causing this effect,..I don`t know! Cheers Tony Edit- I cannot post any reference photos here but many of them appear on the excellent 14 Sqn Association website, follow this link; http://www.14sqn-association.org.uk/14_Squadron_Association/Marauder.html Edit,...edit,.... I have re posted the photos here after they went missing following the Photobucket disaster! I have also added some pics of my 1/48th Marauder Mk.I, converted from the Monogram kit using the Lone Star conversion set, lots of filler and tennis elbow!! DSCF9349 by Tony OToole, on Flickr DSCF9357 by Tony OToole, on Flickr and here are the 1/72nd and 1/48th scale Marauder Mk.I models together; DSCF9363 by Tony OToole, on Flickr6 points
-
Weasels of the 39th Tac Fighter Squadron, 35th Tac Fighter Wing out of George AFB. Red Flag 81-1, Nellis AFB, November 1980. 69-7235 69-7251 69-7254 69-7257 69-7289 Thanks for looking, Sven6 points
-
The images below have been sent to me by noted Canadian aviation author Carl Vincent. He wanted me to post them on the forum. Some of these were copied by his wife, Elizabeth, from film negatives. Most of these I have never seen before. They are pictures of the 15 examples acquired by the RCAF and operated by 32 OTU and, later, 149 Squadron from Patricia Bay. Enjoy! And a small bit of RCAF history: More to come! Chris6 points
-
Not much progress this week. Fettling the surfaces is largely complete now although the rear wheel bay still needs sorting. Next up will be detailing the bomb bay... The upper frame behind the pilots seat has armoured? windows in it so bits of perspex were cut out and stuck in. It's a bit rough and ready but the canopy framing will make it less noticeable once in place and painted. The rear framework still needs to be added This is the turret from the Airfix Defiant, a nice fit now that the ring has been skimmed to open it up a bit. The side windows will get done once the bomb bay has been detailed. These invariably get dust on the insides so trying to avoid (well actually procrastinating!!) fitting them until later.6 points
-
Hello, this is my 1/32 Tamiya Spitfire, converted from MkIXc to MkIXe; markings are from Isradecal, the figure comes from the Blackdog range...6 points
-
Since I only had 2 weeks left until the deadline, I used every free minute for the collection of parts here. But it slowly remotely reminds me of the model. As free minutes are unfortunately sparse, there are only the attached hats and numerous corrections to report, as well as re-engraved panel lines, all covered by another layer of Alclad's microfiller. Here to see in my high-tech paint box 😉 Attaching and sanding the scoops was especially in the starboard side very tricky. Since the material underneath is only paper-thin in places, any too firm pressure during sanding causes further annoying rework. Once again I give myself to the illusion of being one step closer to the finished model... until the first layer of Alclad duraluminium is applied. But one has to endure it.6 points
-
Registrations on wings, fuselage sides and tail are on a white background, so those areas are painted. You can see now more clearly the result of the work of eliminating the despicable kit's ribs and create the new ones as described somewhere above:6 points
-
I must say I agree with Alan's meniscus caution Ced - not sure that dipping your tip is the short cut that it sounds. As for: It'll likely cut off your circulation and the end will turn blue...6 points
-
Well, he was just testing Ced's new anti gravity clamps.5 points
-
I snuck a sneaky day off today before I start travelling next week. Got all my big window cutouts made, ready for the inserts from the polystyrene chocolate tray: The window openings are parallel to the floor and parallel to the ones on the other side of the fuselage, I’m glad to say! The portholes will be drilled and filled with Clearfix later on, and I have some doors to cut out. Regards, Adrian5 points


.thumb.jpg.76f12b87ce9ca9929c9aabdcf8f9d2dd.jpg)

Wedge-TailedEaglePortraitRaptorDomains.thumb.jpg.41a306d3445a68f0f2df773e01776ea6.jpg)


This leaderboard is set to London/GMT+01:00