
Leaderboard


Popular Content
Showing content with the highest reputation on 06/01/20 in all areas
-
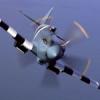
Good evening. Below some photos of a forgotten MIG-21. I fully realize that there is no shortage of derelict MIG-21's to be found, in model-, photographic- and actual forms, as well I know excessive weathering is not everyone cuppa. But I find the topic fascinating, and a derelict MIG-21 had to be included in my collection at some point, along with the spitfire, swordfish and other "must haves" that we all have on our lists. Thanks for looking. CF82 points
-
The Hurricane MK 1 - 1/24 by Airfix RFI Hello and a happy new year to you all. I'd like to start the new year with the RFI of my last actual completed build of 2019. She has been built for a month or so but I didn't find the right moment to do the RFI. You must excuse the sheer amount of pics once again but I do like to indulge myself sometimes. I couldn't fit her in my little photo tent thing so I took her outside and took a few shots while the sky was bright and fell in love all over again. The WIP can be found HERE and If you followed along you know how much effort I have put in to attempt to get her right, she might not be 100% but I hope that she will be useful to those wishing to build this lovely vintage kit. I used. Airfix Hurricane 1/24 Tamiya acrylics Tamiya weather powders Flory washes. Ezy line I think that was it. Without further ado Ladies and gent I give you a Massive Hurricane Mk1. Inside first I think. Phew!!!!! 🤠 Now get a fresh brew maybe a biscuit and enjoy the outside shots. and the parting shot.... That's your lot.....😍 Thankyou so much for indulging but /she is such a joy to photograph. I hope you enjoyed the build if you followed along and if not I hope you enjoyed these shots, If not I can't help you . 🤪 I should now be up to date with my RFIs. I have added my meng tank and the Torino today too. I have my current Gundam kit to complete then I'll be back to Aeroplanes. ( it's a bit lonely over in sci-fi land to be fair. ) All the best and as always happy modelling. Johnny.😎35 points
-
All finished. In summary, the Airfix kit was great, the Catapult from NeOmega was very nicely done. Quite pleased with the result, as long as you don’t look too closely! Build thread here: And this is how she turned out: Guy35 points
-
Morning all, I made a pink Skyvan: I've always been fascinated by Barra Airport in the Western Isles, and the whole landing on the beach at low tide scenario. This photo provided the inspiration, and a nice excuse for a vignette: Two Six Decals had the exact right stickers needed. The pink was 50/50 mix of Humbrol 200 and Cherry Paints First Group "Barbie" pink - who knew there was an enamel paint manufacturer specialising in authentic bus colours! The Airfix Skyvan needed a little bit of window adjustment and 4 blade props to become a Skyliner, but no big sweat. There is an interior in there including some passengers and some rather loud seat upholstery, but you'll have to take my word for it I'm afraid! The kit builds well for its age, although as the fuselage has four sides there are issues with symmetry and general fit. I also seem to have an issue with bowed wing struts as they were slightly warped, but hey ho. I'd love to know a bit more history of Interstol but haven't found it. I don't know if they briefly took the Barra route over from Loganair in the 1970s? And thank goodness for the model railway industry, otherwise where would one find OO gauge sheep? 🤗 All best, Harry31 points
-
Her's my Tomcat. Nice easy build in a scheme I've always wanted on my shelf.30 points
-
My first model completed in 2020. Recently I presented on the LSP F-14A forum, this time the younger brother of F-14B "Jolly Rogers" Set from Trumpeter 1:32 scale + decals that are not included in the set.25 points
-
When I returned to modelling after a loooong break a couple of years ago, it was figure modelling that attracted me back. Then I found this in a cheap box at the Darlington show and my head was turned to the dark side This was the first aircraft model I made in 40+ years and really started my obsession, sorry hobby..... Can't remember who the kit manufacturer was but painted in Tamiya and Revell acrylics.22 points
-
Hi all, my first built in 2020 is the new Tamiya P-38F/G in 1:48. Add Eduard PE´s, Master MG´s and Decals by Sky Model for a well worn P-38 of the 1st FG.18 points
-
Hi all I say special, but they are all special. This a model of BL676, the third Spitfire Mk.Vb to be fitted with an Arrestor Hook gear for deck landing trials on HMS Illustrious. It was nicknamed Bondowoso which in modern Indonesian translation I believe, means challenge of Gargantuan proportions. This was a Presentaion aircraft purchased by the Dutch East indies Spitfire Fund, before the Dutch Colony fell Victim to the Japanese attack. The model is the Freightdog boxing purchased last year and uses the new KP model Spitfire VB with some lovely resin additions and Decals to convert into the Hooked Spitfire. The Model builds very nicely and the resin bits re very easy to use thanks @Colin @ Freightdog Models for producing it. This was a very enjoyable model. From photographs the airframe appears to be quite clean so weathering was kept to a minimum with chipping and paint worn away on the port wing route . The only other additions are the Sling points, Aerial and IFF wires, Eduard Seat belts an underwing pole aerial, fuselage position light from a never to be built Italeri MkIX along with the cockpit mirror (this was the third one as the carpet monster ate the other two). The model was brush painted as usual using Humbrol enamel paints. Decals used are the kit supplied ones and went on very nicely indeed using the watered down Klear method. Hope you enjoy Sorry about the focus on this one. Thanks for looking in. All the best and Happy new Year everyone Chris18 points
-
Finally finished today. Out of "two" box build. Utilized some Tamiya F-14D parts to make this particular aircraft as she was doing initial GBU-16 testing at Pax River ~Feb 1994. Tamiya kit, not much to say but fantastic kit OOB. Fightertown decals sheet #48012, perfect. In-progress section shows the painting process. Final pic is Salty Dog 202 along with Salty Dog 535 (Kinetic Prowler) I built for my display down in Pax River....their new home. Cheers Collin18 points
-
Hi, Let call it mine first completed build for 2020, I started it in Summer 2018, right after my Spanish Vildebeest, and finished it now. I made some modification, namely a bit smaller ( reduced to 5.6 cm diameter) propeller, lowered a bit struts over fuselage to make constant distance between wings, Fairey type support of gunner's MG (like in Swordfish - ot was in all Mk III and as was discussed on BM Forum - it was not noticed by SH) and instead of torpedo I gave two 500 lb bombs (the testimony says that the airplanes of 36 and 100 Sqs in Endau raid were fitted with 250 and 500 lb bombs, but I think the maximum payload was 1000 lb, so two 500 or four 250 were possible). The colours are as were discussed here recently (and what made my build so slow): I replaced most of PE detail (not all) by scratch build ones (like ledder &, gun sight for example) Here she is: and BW if you like: Comments welcome Regards J-W Edit: After posting I realized that it is Azur-Frrom kit, not the Special Hobby, but I belive they are same in fact...17 points
-
Hi to all Finished very old Airfix model, in SAAF colors. Build OOB only added resin ejection seat I vas tempted how to weather this plane not becouse raised panel lines but becouse SAAF Mirages looks always like new and fresh painted in excellent condition.....so at the end it stayed clean .... Finished with Humbrol enamels brush painted. I hope you like it Best regards to all.... And one of reference pictures17 points
-
Any of us could fill a dozen pages with a list of everything Airfix hasn't announced for 2020, and do exactly the same for every other manufacturer, whether European, American or Asia-Pacific. Anyone can do that. What's the point of this constant complaint supposed to be?16 points
-
After sanding down, initial test-fit: It will still need a great deal of work, but I think we're on the right track.15 points
-
Used the last day of my chrismas holidays to complete these 2 planes, I have use decals from Super Scale, otherwise build out of box, and it is nice set fit is good goes nicely together. Cheers Jes14 points
-
Thanks Jason - of course I did spout some Anglo-Saxon, grabbed parts out of the pool and wiped them a bit before reaching for the camera! Thanks G Thanks Craig, glad to know I'm not alone! It…was…NOT… MY PANTS! it was on my… oh, give up, let him have his fun! Tin lid. Great tip, thanks Simon Ah there you are - welcome Ian Cockpit assembly completed (with the tricky gun mechanism): Exhausts and radiators painted: I think the nacelles and the rest of the wings are ready:13 points
-
Revell 76 Ford Torino 1/24 RFI at last! 😍 Hutch “Starsky it’s red.” Starsky “It’s not red, it’s Candy Apple red.” Hey guys. It's been a long time coming. I built this in March and finished in May before embarking on my Massive 1/245 Hurricane build. The WIP can be found HERE it was a really fun build with a huge connection to my childhood. I'm definitely going to do another car at some point, maybe a Plymouth Fury ( you know which one ) This kit was the Revell 76 Ford Torino 1/24 Tamiya acrylics. Tamiya oil wash. Tamiya weathering packs. Flory washes. I think that was about it. Hope you enjoy the much over due RFI. And there she is. Hope you like her and have yourselves a wonderful 2020 y'hear. Johnny12 points
-
Very nervous about posting this one its taken me about 4 weeks to get the nerve together, I have knocked together a little stand out of some scrap Perspex sheet mounted onto a 3mm thick Cork base. My first aircraft model in about 30+ years its a 1/72 resin kit by Freight Dog Models. A whatif of the almost finished but scrapped SR-177A a mixed power rocket and jet high altitude interceptor designed to be almost a manned rocket to shoot down Soviet Bombers before they could get to the UK. SR-177 It would have been a hell of a ride for the pilot but Ballistic Missiles killed its role. I have imagined if the RAF bought the 177 but took out the rocket and converted its rocket fuel tanks into jet fuel tanks and turned it into a pure jet fighter armed with twin ADENS and Sidewinder AIM 9J missiles. IMG_20200106_162116472_HDR by Stuart, on Flickr IMG_20200106_162338420 by Stuart, on Flickr IMG_20200106_162406544 by Stuart, on Flickr IMG_20200106_162153277 by Stuart, on Flickr12 points
-
Thanks Simon - I'll look out for one like that, looks just the job Engines. There's a nice method of mounting the radiator covers: Just make sure the nacelle halves are aligned - mine were, phew. The exhausts fit nicely too: …and leave some unusual, interesting 'that'll come in' gates: Wings glued on and now drying, taped 'up' to close the gap in the roots:12 points
-
Airfix P51D pretty much straight out of the box but with a new scheme and some aftermarket decals.12 points
-
Hi folks My latest build is a model of a legendary fighter aircraft, McDonnell Douglas F-4E Phantom II in Iran Air Force color. Been flying for more than 40 years in my country, a hero of 8 years war with Iraq and still going strong! This model represents the early days of conflict when these Phantoms used to bomb Iraq with british made BL755 CBUs. The Hasegawa phantom is a straight forward kit to build. What else I used are: -Master pitot tube -Hataka and Gunze colors -Print scale (Mr.Khosravi) decals -Eduard stencils -WINGMAN BL755 cluster bomb units Sorry for non professional and low quality pictures. Hope you enjoy seeing this model. Regards Barzin With his mates...🙂 The real LOVE❤️10 points
-
I'm consistently impressed Ced that your reaction in these situations is to reach for the camera, rather than, for example, the hammer. A showman at heart! J.10 points
-
I don't disagree, but my copy of Hugh Verity's We Landed By Moonlight arrived today, and he mentions the oil tank resting behind the pilot, so... ¯\_(ツ)_/¯ (Incidentally, he mentions Noor's flight; she wore a green oilskin, apparently.) To some extent I do (I have a subscription to Britbox), but while I don't begrudge anyone who enjoys the revived Doctor Who, for me it ended in 1989 with "Survival". I'm glad Noor is back in the public consciousness; I hope their portrayal of her was respectful. In any case, I figured I might as well get started on throwing something together to go in that spot, oil tank or fuel tank or whatever. I cut a piece of thick plasticard to size: Then cut two more pieces like it, plus my right index finger. (It turns out that it can make a great deal of difference whether or not you're holding the scalpel upside down.) I also cut a delta out of plasticard, after some not-terribly-scientific but serviceable measuring. That will be used, or lost and replaced and the replacement will then be used, later. Then I used a spare Spitfire chin from an Eduard sprue I had left over, hacked it up, and glued it atop the three pieces of plasticard. Then I added thinner pieces fore and aft to close it up. Then I went over it with Mr Surfacer 500. Once it dries, I'll sand it down more or less. I may use my punch and die to add the filler cap up top and the drain ports or whatever on either side. Normally I absolutely would not entertain this level of effort, but Noor died for me and since this is somehow for her, I can't justify not doing it.10 points
-
Thanks John True. Luckily I have some more 'thin' See above. Time to buy some more! I think it 'goes off' as well so I buy the little triple tube packs of 'normal'. I wonder if they do the same for thin and gel? Anyway, I wanted to close up so I scraped off most of the CA with my 'dread to think what it's used for in real life but great for levelling' #9 blade, went over it with MicroMesh and stuck the fuselage halves together. While I was in a glueing mood I also joined the wings: Nice join with very few seams, but I'll need to fit the little gaps in the cockpit: Nice detail inside the wheel wells: Which of course won't be seen as I'm going my usual wheels up so I need to fit the doors: Where is part #13? Rats. I'll need to search for that. In the morning. That said the doors fit well: So well in fact that there's very little opportunity to glue them in. I'll need some support. If I can find the other one… (Tension. I like tension. Or do I?)10 points
-
In 2020 Airfix is to release a new tool 1/72nd Bristol Beaufort Mk.1 kit - ref. A04021 https://uk.airfix.com/products/bristol-beaufort-mk1-a04021 3D render V.P.9 points
-
Hi mates, Taking a breather from my Javelin mania, and what better way to recover than a resin kit from CMR? This will be my fifth CMR kit after two Buccaneers, a Scimitar, and a Sea Venom. Hmm...all FAA subjects, including this new one. What does this mean? The CMR kit comes in its typical heavy duty cardboard box which, even when empty, could crush any of those flimsy end-opening, gotta save money, boxes. However, even though the box is in great shape, some of the more delicate resin pieces suffered some damage (more on that in a moment). This is the "early" scheme boxing, and as such has some late-40s Temperate Sea Scheme markings. Interesting indeed. The wing is cast in one piece, and the undercart and flap bays are very cleverly engineered. Plus, there is some nice detail on the cockpit sidewalls. The cockpit and engine details are also very nice. The vanes on the engine fan are incredibly thin and realistic - something that is difficult to accomplish with injection moulding. Accordingly, they are also extremely delicate (and most likely a bit of fun to remove from the casting block) and I have some damage on my sample. This is, no doubt, due to CMR packing all of the remaining parts into two plastic bags, allowing the parts to bounce into one other on their way from the Czech Republic to my workbench. I wish they would change this style of packaging - but I have to admit that most resin kits I've built, regardless of manufacturer, use this same method. There has got to be a better way. The remaining parts include some ridiculously tiny greeblies - I had to put on my magnifiers to see some of them. The black parts are the landing gear, and are cast in a much stronger resin to resist sagging over time. I guess - I've never had any of my resin landing gear sag or splay in spite of what type of resin was used. Maybe I'm just lucky, but I work in 1:72 scale and the models aren't very heavy. The bodies for the rockets were almost entirely detached from their casting blocks, and some were broken as well. Nothing that can't be fixed, but it shouldn't be this way. The fins for the rockets are supplied in photoetch. The instruction sheets, as usual for CMR, are photocopied A4 sheets - and there are 22 pages. No worries though, the build itself is only 6 pages, the rest including a parts map, ordinance loading instructions, decal placement for stencils, and markings for 10(!) different schemes. CMR provide two PE sheets, the one that's not in the photo includes pre-painted instruments. To assist in positioning the fins on the rocket bodies, the PE sheet shown includes an alignment jig. I have to say that I'm not yet demented enough to want to try that. The windscreen and canopy are vacuform, and as is typical of CMR, two copies are provided. If my past history holds true, I will need them both. Oddly, though, there are no canopy masks with this kit. All of my other CMR kits have included them. So that's what we're starting with. As you can see from the above photo, a couple of fellow Britmodellers contributed research for this kit. Mr. White graciously provided me with some help already, and I'm hoping that @tonyot will be along to keep me on the straight and narrow as the build progresses. I will need the help, I assure you! Cheers, Bill9 points
-
Hi All, I've dug out the 1/48 Airfix Stuka from the stash for this GB. This will actually be the first Stuka I've built - so good to be adding it to the collection. Dave.9 points
-
Finished today. The model depicts Hans Ulrich Rudel's Ju 87G 494193.9 points
-
Considered perhaps - but stumbling to a practicable solution is another matter entirely; one of those aspects of the job that has thus far been mentally filed away under 'get around to taking a decision on when you're a bit more familiar with some of the procedures in Fusion'. This is of course the kind of vacillation that masquerades as mental triage..... Agreed. I forsee in fact several steps along with way that will require some prototyping here before committing to a particular path. I'm reluctant to think about extruding rearwards for the wing for two reasons - one is the prominent curve where the trailing edge arcs back to join the rear of the fuselage, the second being the complications along the trailing edge involving the flaps - you can see both of these issues in this splendid Damien Burke shot from the Thunder & Lightnings walkaround: Image credit: Damien Burke Trying to refine an extruded edge backwards whilst keeping it sharp and regular would I feat be beyond my skill and patience at this scale in such a regard but am currently considering adding a narrow sacrificial strip of about 0.2-0.3mm depth (like this area outlined in blue) along the trailing edge geometry that matches the outline but can be sanded back to approaching a scale thickness: The idea is that this would provide both sufficient strength during printing and be clear enough that muggins here won't sand back too far into the outline... That's kind Alan: am conscious though that I'm strictly in the 'feeling around in the dark' mode of operations here in terms of matching formal problems to their correct resolution with software processes. Whilst there are a lot of helpful CAD tutorial materials around on the web, none of them - disgracefully - are on Fleet Air Arm subjects. I feel a letter in green ink to The Daily Telegraph coming on... This seems unlikely on the face of it... <Ahem> 'At most terrestrial men fancied there might be other men upon Mars, perhaps inferior to themselves and ready to welcome a missionary enterprise. Yet across the gulf of space, minds that are to our minds as ours are to those of the beasts that perish, intellects vast and cool and unsympathetic,' Thanks Johnny. There are a few drawing published for RC aircraft and the like but from what I've seen, unlikely to be accurate enough for scale and detail. Some flight sims seem to have Vixen models as well but without provenance of where they modelled from in terms of sources, such matters are likely to turn into a cul-de-sac of simply comparing flaws in non-primary sources. What I really need to do is get Ced to break into the the de Havilland archive (wherever it's stored these days 🙄) using his tool collection in order to liberate the engineering drawings. Whilst it is tough for a CAD-illiterate like me, I am perversely enjoying learning how to analyze the primary visuals and turn them into a working 3d representation alongside data in the maintenance manuals. Always good to be picking up new skills - especially at my stage of life. Plus, the pages in the manuals have the word 'RESTRICTED' printed on them so I can pretend to be Jason Bourne... I think I'm now at the stage where the main shape of the wing is in place: I've added some temporary guidelines in blue for the missing parts of the wing and aileron/boom outlines just to help you visualize this section in relation to the rest of the aircraft. Having to create this has given me a whole new level of respect for people who design wings for a living - I had no idea how many variables have to be juggled in three-dimensions of changing outline from root to tip! I have simplified my earlier approach of leaving out the wingfold at rib for for now and concentrating on getting the overall outline and curvatures corrected first, running outboard from ribs 3 to 13 with a dog leg at ribs 8-9 for the wing fence. Previously I'd started working outboard from rib 2 but I now realize this would have caused problems with the inboard curve of the trailing edge between ribs 1 & 2, so this section will be modelled a separately to make it easier to handle that arc, for reasons quite similar to dealing with the wingtip section. Once I'm satisfied the overall outline and camber/chord details look ok with the wing as a large sections, then we can come back in and start slicing out ailerons, flaps, wheel wells & etc. Sorry this is such slow stuff at present but I tend to be a slow learner. Tony9 points
-
Well, if the movie makers can release a a barely updated version of the 80s original with the same old parts just looking a bit the worse for wear, why shouldn’t Airfix do the same? best, M.9 points
-
Good evening everyone, This is Tamiya’s superb IL2. I had previously built Eduards kit and really enjoyed that, to the extent that I didn’t really see how it could be improved . However having heard good things about this particular kit, I decided to give it a go. What a blast. People have said that it’s a well engineered kit. No kidding. As ever, everything fell together, tolerances were precise and everything just clicked into place. Amendments to the kit included putting flat spots on the tyres, replacing the wing cannon and machine guns with hollow tube and aerial wire from Uschi. The paints are a mixture of Mr Hobby and Tamiya, with fine details picked out with Vallejo. There is some shading and chipping on. Tamiya supply a set of masks for the windows that you need to cut yourself. They worked really well and I was more than satisfied. They also provide a decal for the seat harness but I went with an Eduard belt for a more 3D look. Nothing beats Eduards buckles for setting of a cockpit. The decals were a mixture of out of the box and the remainder of the Cartograph sheet from the Eduard boxing. Fair to say that I was pleased with this. Thanks for looking. Rick9 points
-
Boggy? How about a bog diving school? Or you could hold a Bog Snorkelling competition? Google it - no reason why I should be the only one to have wasted ten minutes of my life No worries Rob, sorted it will be Yep, the figure stand is the one I bought at Telford and a nice chat with the Sphere chaps. I think you'll like the stand you bought, once you get back to something single engined! Thanks Giorgio Rats, I forgot the trick - sticking a bit of Tak inside the bay and gently pushing it into place - that was it wasn't it? Cockpit seam trimmed with Swann-Morton fine blades (it was a step) and filled with Vallejo: Now cleaned up. I'll re-paint when the other bits are fitted. Note that I've got the same weird step on the bit over the bulkhead - I think we agreed it was a 'feature'. Couldn't find the missing door despite a search around and in the bin. Regular readers will remember I had to rescue a spinner from a bag in the bin during my Lysander build so I now make sure that any bags are empty before I throw them away. I guess it must have dropped off during packing or something. Oh well, spilt milk and all that… I put some Plasticard in the gap for the missing door: The hole was for a piece of wire to hold it up while glueing. Don't do this, use Giorgio's BluTak method (if you remember!) Some bits of scrap around the other: Carefully trimmed those so that the kit door sits nicely. That was then glued in. Mix up some Milliput and blob it in: … then scraped off the excess and shaped it with a wet spatula: I've forgotten how good this stuff is, really nice to work with. I'll let that all dry and come back later.9 points
-
HI all, so the first completed kit for 2020 is a bit of a thrown together 1/72nd Airfix S2C Buccaneer. I started it just before Christmas, and it was wheeled over the finish line yesterday. The kit fits well, but one needs to take care cleaning up sprue removal nubs in some areas to ensure a good fit. It is also possible to modify the rear jet nozzle fairings so the exhausts can be added after painting too. The bombs and pylons are meant to go on the inner hard points where the tanks are, but it's easy to snip of the back location pin and use them outboard. Markings are for a 700B squadron machine in 1965, in the early colour scheme (which, I think, is also the nicest!). Back dating involved removing the raised fairings at the fuselage to intake mouth junction and reshaping the wing mounted threat warning antenna to the early pointy circular ones. I decided not to remove the airbrake strengthening plates (because I forgot). Paints used were Tamiya's newish lacquer white and their standard acrylics for a homebrew Extra Dark Sea grey. Most decals are from the kit, but the squadron markings and serials are from a 1980 Modeldecal sheet. The glue had gone lumpy on these so each was soaked off the backing sheet, flipped over onto my finger and a wet brush was used to remove the perished adhesive. Mr Mark Setter was then used as a new adhesive to apply the decals. Final finish is a mix of Mr Colour GX flat and gloss varnish thinned with Mr Colour rapid thinner. All comments are welcome as ever. Happy new year! Jonners8 points
-
Time to put my choice on show for rest of you. I have decided to build Italeri's 1/48 Ju-87D which I have had in the stash for a while which looks like a nice kit in the box with a good amount of detail in the cockpit and nicely moulded parts with no flash and recessed panel lines and even has a small etched fret included which has seatbelts and a few other cockpit and airframe details, the decal sheet looks to be to Italeri's usual hign standard and has markings for a few aircraft in a variety of schemes ranging from the standard RLM 70/71/65 to a winter wash and a nice squiggly one used for night raids over Italy towards the end of the war. I have chosen to build an aircraft operated by the Royal Hungarian Air force on the Eastern Front and whilst it is in the standard 70/71/65 scheme it does have nice colourful markings. Here is the usual selecion of pics of the box, what is inside it and some references, starting with the box top; The contents, Some references I will be using, And what it should hopefully look like, Hope to be able to make a sneaky pre-paint of the cockpit area soon. Thanks for looking in. Craig.8 points
-
MENG Soviet Heavy tank KV-2 RFI (at last)😍 Hello everyone, I built this a while ago now, the WIP can be found HERE it was a test for weathering and mud techniques. It was a fun build and I have bought a few more of these kits. It was a quick build that went wrong in places but ended up rather pleasing. I also built a little hill out of Oasis to stand it on. Meng kit Tamiya acrylic paints AK heavy muddy weathering set. extreme weathered vehicles (squared) I didn't get around to an RFI so while I was tying up last years loose ends I decided to roll her out for one final hurrah. Hope you like it. Johnny. 😀 So There you go. Hope you like it. Happy new year you lot. Johnny.8 points
-
Airfix website verrrrrrrrry slooooooooow... loading. I wonder why that can be....🤔 Strange, considering there is nothing to see here as there are no cats left in the Airfix 2020 bag... how soon before we get the first... It's not what I wanted, its the wrong scale, there's nothing for me here.... always really interesting to know these things Rich8 points
-
Martin Blundell very kindly gifted me 2 extra decal sets - and for this I'm extremely grateful I know he's not been well and I do hope he's making a speedy recovery. I was alarmed when the site went down and Coastal Craft boat models and accessories have all but disapeared froom suppliers I'm grateful to Al Gunthwaire for his update... https://www.britmodeller.com/forums/index.php?/topic/235065462-coastal-craft-models-website/ I do hope they continue in business - were they not to, it would be a huge loss to Coastal Forces and WW2 1/72 WW2 boat modellers Here's hoping!!! An early Christmas present!! And so onwards Some deck weathering... And the engine exhaust outlets The wiindscreen vents were fixed using "Klear" varnish. All went well until the last middle which "pinged" off the forcep tweezers teeth and despite a 2 hour forensic search remained absent I searched through my old "used" etch sets band eventually found a simialr sized "ring" from the White ensign models" PE set for the S-100. I'm now working a clear desk and surround policy - no wool sweaters and trying to work with etch pieces within a plastic tray However - the end resul tis pleasing and Coastal Craft really got this right I stumbled across these while searching for 1/700 "Master" masts... I think they are new and designed for an AA 1/72 Crusader. Game on - they provide the ultimate solution to the CC barrels that need replacing due to bending And lastly if - the worry about the longevity of Coastal Craft Models wasn't a reminder as to how fragile this hobby can be in terems of supply, this is not currenlty available!!! This has been the one single thing that has made Photo- etch manageable! I'm sorry folks - I had the last bottle that I could find on the web that came from Italy. I'm conscious that supplies in the past have been a bit hit and miss. Let me know if you think this is just a temporary Blip. I've had this arrive to try as an alternative if that's the end of "thin Gators Grip" Final straight now - Thanks for looking Rob8 points
-
Well, having dug this project up for its annual outing on the shelf of shame, I had another look at the wings this morning. The primer underneath the wing is still bubbling up, so I dug it all up right back to the balsa wood in the affected areas and filled with Milliput, followed by a good sanding: Finally, I think I've got a sound surface. And the topside of wing is looking solid still: Thanks for looking, Adrian8 points
-
Hi all, Joining with this...7 points
-
Hi mates, this is my first model completed in 2020. I starded the kit in June last year, but it went sleep due to some sanding issues. But now, after few days, it´s completed. The kit is absolutely wrong, but for the 1992 czech kit it´s still quite good. So please don´t compare it with the photos of the reality because it´s completely out. But still I hope you´ll like it. Thanks. Cheers, Andrew. S7 points
-
Hi mates, Like most of you 1:72 folks, I've been waiting for Airfix to scale their beautiful 1:48 Gloster Javelin kit down to the gentleman's scale. Waiting...a long time. As it seems Airfix is busy with other projects, I decided to force the issue by building the OLD Airfix/Heller 1:72 Javelin, and along the way to try and make it a wee bit more modern. Surely this will cause the gears of fate to start meshing, and Airfix will get the idea. So you can thank me then! Since I have little common sense, I also thought it would be a good idea to build two of these old kits, one a T.3 (the Heller offering) and the other an FAW.9 (the Airfix re-tool). I also played with the idea of using either the ZTS Plastyk or Frog kits for the FAW.9, but upon inspection I donated those instead to my 3-year old grandson so he could practice using an entire tube of glue to add the seats to the pit. The T.3 is finished, and I duly present it here. The FAW.9 will appear sometime in 2020 2021 2022 2023 2024, unless those gears of fate turn too quickly and thermally disintegrate. Project: 1:72 Heller Gloster Javelin T.3 Kit: Heller (kit no. 346) Scale: 1:72 (back home again after that big Spitfire) Decals: Print Scale Sheet 72-371, representing XH436, No. 151 Squadron, RAF Leuchars, 1960 (please consult the WIP for the sordid details); roundels, stencils and walkway stripes from the Island of Misfit Stickers Photoetch: Airwaves AC72135 interior and exterior detail set; Airwaves AC72133 airbrake set Resin: Pavla Martin Baker Mk.3 ejection seats S72079; Armory weighted wheels AW72047 Turned metal: Master AM-72-079 wing pitot tube Scratchbuilt: Interior of the airbrake bays; interior exhausts tubes; front and rear engine faces (I cheated on those) Paint: Gunze H73 Dark Green, H75 Dark Sea Grey, H11 Flat White, H12 Flat Black, H77 Tyre Black, H18 Steel; Tamiya XF-16 Flat Aluminum; Floquil 10100 Old Silver, 110015 Flat Finish. Camouflage pattern was done freehand. Weathering: None, because at one time or another, this aircraft was fresh out of the shop. Plus, photos of it look clean, baby. Improvements/Corrections All raised panel lines removed and re-scribed Scratch built airbrake bays and noodled old pieces of PE for the actuators Detailed the cockpit Positioned the tailplanes and elevators in typical parked position Added antennae Build thread: Link Pictures! Before the canopy (and paint) went on: Stay tuned for Part 2: The FAW.9. It will be red and white, hint, hint. Cheers, Bill7 points
-
New boxing in Summer 2020 - ref. A05123A - Folland Gnat T.1 https://www.airfix.com/uk-en/shop/new-for-2020/folland-gnat-t-1.html Box art V.P.7 points
-
New boxing in Autumn 2020 - ref. A05139 - Supermarine Spitfire MkXIV Race Schemes Source: https://www.airfix.com/uk-en/shop/new-for-2020/supermarine-spitfire-mkxiv-race-schemes.html Provisionnal schemes V.P.7 points
-
New boxing/variant announced for Autumn 2020 - ref. A06022 - Blackburn Buccaneer S.Mk.2B RAF https://www.airfix.com/uk-en/shop/new-for-2020/blackburn-buccaneer-s-mk-2-raf.html V.P.7 points
-
Small update:7 points
-
Welcome in 2020 gentlemen... We have started again today. La-5 line - work on moulds started, if everything goes well, February. Mohawk - the same situation. Together with Mohawk we will make Sopwith Swallow for WWI lovers. Work on Cessnas are near the end, stay tuned. What else we can expect? One more 109 project, Mig-19P and PM and if there will be time one US fighter in 1/72. I wish to you all prosperous year 2020.7 points
-
That’s Ok Alan; I’ll keep the flame alive ‘till your past the loathing. It can lodge ‘till then on my fav. list. I shall miss this thread. It’s been a reliable provider of much enjoyment; not least from the hendie grumbling about perceived non-perfection (which I have come to believe is a purely subjective condition not readily apparent to the objective observer ). It’s also been jolly informative. And if I had any retentive brain cells left I’d be hanging onto new (to me) concepts such as SACRUs and BIMs. P’raps we ought to have a test in a year’s time......7 points
-
New boxing in Autuumn 2020 - ref. A04019A - Bristol Beaufighter TF.X Source: https://www.airfix.com/uk-en/shop/new-for-2020/bristol-beaufighter-tf-x.html Provisionnal schemes V.P.6 points
-
I thought that too, but I'd be surprised if I got any takers. I was kind of ok with the Sword kit, though call me old fashioned, but I do quite like having locating lugs on my wings and tailplanes. Then I saw the U/C, and the lack of any idea where it all went, and put the thing back in the box. So Arma Hobby are my new best friends at the moment 🙂 Steve6 points
-
Hi mates, a small update about the wings. First of all some better pics of the flaps. Yesterday I decided to deal with the Revell kit first, as I want to depict it during take off, which means the flaps will have to be just partially out, as shown in the picture below (copyright M. Vaeremans) Not sure about the precise angle… any better info about this from the well informed will be welcomed! For this reason I had to file here and there to reduce the flaps’ thickness and mach their housings at the trailing edge of the wings. Once happy with the flaps’ fit, last night I started working on the slats’s by filing the hinges’ housings on the wings’ front edge I then glued some styrene strips to the bottom of the slats to replicate the hinges. I used the wings’ housings as a template toposition them correctly. As for the slats, I made them for both kits. This morning, once they were dry, I filed them and sanded them to match with the wings. Now all the wings’ moving parts are nearly there. This is how they look dry fitted to the kit. Some pictures asthe one here below, (copyright T.Woof) show sometimes on take-offs the airbrakes at the wings’ top were slightly lifted. Maybe @Freitag can tell me if this was normal or it was only happening on pull-ups…. anyway I’m giving it a thought…. That’s it for now. Thanks for watching! Ciao Massimo6 points


.thumb.jpg.b4a5069fd2c2dd5708ce1694345c5b11.jpg)


This leaderboard is set to London/GMT+01:00