
Leaderboard


Popular Content
Showing content with the highest reputation on 01/01/20 in all areas
-
Happy New Year everyone. So far it has been a good morning. First, breakfast in the morning sun. Then I finished my first kit of the year 🙂 I started this back in April last year, was going great guns and then stopped....before picking it up again late last week. So ultimately actually quite a quick build (if you take out the intervening months). I finished her straight out of the box in the markings of "Nulli Secundus" EV-W of 180 Squadron RAF. Brush painted with Tamiya Acrylics, XF-62 Olive Drab with a touch of XF-51 Khaki for the OD and XF-53 Neutral Grey with some XF-19 Sky Grey to lighten it up a bit (thanks @Rabbit Leader for the advice). I also added a "collar" around the upper turret with some paint (thanks for the heads-up @dogsbody). Made her grimy with some oils and used graphite dust from a pencil scrubbed on after the final matt coat (Tamiya Flat Clear from a rattle can) the exhaust staining. Some how managed to stuff in enough weight for her not to be a tail sitter. Also made use of a canopy mask set from Eduard (CX507). A few minor issues, mostly of my own making, but basically a fun build. Build thread can be found here. Some more photos in the morning sun below. Thanks for looking.39 points
-
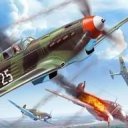
Model of modern Russian multifunctional aircraft Su-30SM. Kit from Zvezda, Microdesign photoetched , Elf wheels, Pitot tube Master, Advanced Modelling and Eduard Brassin weapons. Regards, Alex.28 points
-
Another of 2019's builds which has helped fill my top shelf with Spitfires as good liqueur should. 9 of 12 using Airfix 1/72 Mk. I/II/Va kit, Others are Hasegawa's Mk.VIII & IX kits. Additions include PE seat belts and 3D Kits Spitfire Mk.II conversion kit. This provided new seat, control coulomb, coffman starter bulge and Rotol spinner/propeller. Painted with Mr Surfacer 1000 and Mr Color lacquers for all else. Decals are a mix of kit insignia, 3D Kits nose insignia, name and serial number. I replaced the sky lettering with Micro Decals, these are my go to for code letters. Also used same makers dull red decals for gun port covers. They're super thin, had super adherence and don't bleed through the underlying colours. Panel wash with acrylic Windsor and Newton, streaks using AK interactive streaking mediums. Chipping using Tamiya silver lacquer with sponge. Thanks for looking.28 points
-
I know what I have to do. One day I'll be awarded a medal for this. It's already gleaming deep inside me. -- Timothée de Fombelle, Captain Rosalie (trans. Sam Gordon) Noor-un-nisa, your Father’s pride, Modest, gentle and qualified. Graceful in manner, fair of face, Worthiest daughter by Allah’s grace. -- Pirani Ameena Begum, "Graduation Day", c. 1927 "Oh beautiful one," he exclaimed, "what has brought you to this stone of pain? Did you not know I ordered you must never be killed?" -- Noor Inayat Khan (1 January 1914 - 13 September 1943), Twenty Jataka Tales, "Banyan" I. Within the occupied territories, the adequate punishment for offences committed against the German State or the occupying power which endanger their security or a state of readiness is on principle the death penalty. II. The offences listed in paragraph I as a rule are to be dealt with in the occupied countries only if it is probable that sentence of death will be passed upon the offender, at least the principal offender, and if the trial and the execution can be completed in a very short time. Otherwise the offenders, at least the principal offenders, are to be taken to Germany. III. Prisoners taken to Germany are subjected to military procedure only if particular military interests require this. In case German or foreign authorities inquire about such prisoners, they are to be told that they were arrested, but that the proceedings do not allow any further information. IV. The Commanders in the occupied territories and the Court authorities within the framework of their jurisdiction, are personally responsible for the observance of this decree. -- Adolf Hitler, 7 December 1941 (The "Nacht und Nebel" decree) "L’homme n’est qu’un roseau, le plus faible de la nature; mais c’est un roseau pensant. Il ne faut pas que l’univers entier s’arme pour l’écraser: une vapeur, une goutte d’eau suffit pour le tuer. Mais quand l’univers l’écraserait, l’homme serait encore plus noble que ce qui le tue, parce qu’il sait qu’il meurt, et l’avantage que l’univers a sur lui, l’univers n’en sait rien." [Man is but a reed, the most feeble thing in nature; but he is a thinking reed. The entire universe need not arm itself to crush him. A vapour, a drop of water suffices to kill him. But, if the universe were to crush him, man would still be more noble than that which killed him, because he knows that he dies and the advantage which the universe has over him; the universe knows nothing of this.] -- Blaise Pascal, Pensées, 345 When I was perhaps eleven or twelve -- this would have been the early 1990s -- I received a copy of William Stevenson's highly-sensationalized biography of Sir William Stephenson MC DFC (no relation), A Man Called Intrepid, written in 1976 and sold in such prodigious quantities that it can still be found at used booksales practically ten for a penny. Most of the book left little impression, and that was a good thing, as its accuracy is open to question. But it left a mark on me, as history can sometimes do to us, nonetheless. One of the photoplates was of a young woman named Noor Inayat Khan, Agent MADELEINE. She looked, to my eyes, impossibly beautiful, but also tired, as if she knew what was coming, what would happen, and how, and when. I once found a cat with a sparrow; the bird knew it was going to die, it had no hope of escape, and it remained very still, with a quiet dignity in the face of its own annihilation that was more unsettling than any throes of agony could be. Noor came a long way to die. She was born in Moscow in 1914 to Pirani Ameena Begum, latterly Ms Ora Ray Baker of Albequerque, New Mexico, and the Sufi Muslim mystic Inayat Khan. In an era when interracial marriages were vanishingly rare, when not illegal, in the United States (interracial marriage was only legalized nationwide in the USA in 1967), her parents would have been highly noteworthy. No doubt they probably were as accepted in Bloomsbury, to where they moved shortly before the outbreak of the Great War, as they would've been anywhere. In 1920, they moved to France, where Inayat Khan pere died in 1927, leaving thirteen-year-old Noor to help her mother raise her three younger siblings. By the time war came again in 1939, the twenty-five-year-old Inayat Khan was a published author, having written a collection of folk tales under the name of Noor Inayat. When France fell in 1940, she escaped to the United Kingdom with her mother and her siblings. In 1943, wanting to contribute more to the war effort, she volunteered for the SOE. Her identity photograph from that year shows a gentle-looking but otherwise unremarkable young woman. But photographs can lie. As an SOE operative, Noor was evaluated as something of a curate's egg; a talented harpist, she also proved an exceptionally fast and accurate W/T signaller, and she spoke fluent French. But she was also gentle, dangerously honest, and, of course, not white, not exactly, at a time when such things were painfully conspicuous to European eyes. Other trainees expressed doubts about her abilities to perform her duties operationally. But occupied Europe was a great maw, sucking up agents and digesting them as fast as they could be replaced. She was willing; she was sent. On the night of 16 June, Noor became MADELEINE, an agent of the PROSPER network in France. She was flown in by Lysander III V9353/MA-G, along with two other agents: Diana Rowden and Cecily Lefort. None of them would survive the war. PROSPER was betrayed under circumstances that remain murky to this day; possibly Henri Dericourt, a member of the network, was a German double agent, or possibly a triple agent in service to SOE's bitter rival MI6, and he gave up his colleagues either out of avarice or as part of a complicated deception plan to obscure the target of Operation OVERLORD; possibly, and more stupidly, Noor and much of the network were betrayed to the Germans out of spite in an affair of the heart. It is fair to say that SOE's level of professionalism and operational security were disastrously bad, whether by design, as some have suggested, or merely the fact that it was composed largely of enthusiastic but poorly-trained amateurs taking on the ruthless and ruthlessly professional security apparatus of a totalitarian state, or both. Regardless of what it was, her network destroyed, her colleagues captured or dead, Noor stayed on the run for three months, and continued to transmit until she herself was captured on 13 October 1943. She had eleven months left to live. Despite concerns about her ability to withstand interrogation, Inayat Khan told the Germans nothing about her work. Unfortunately, she had failed to absorb a basic precept of her training, and kept detailed notes on the messages she sent and received. Additionally, she had discussed her family with her interrogators. These two pieces of information allowed the Germans to imitate her style effectively enough that SOE believed Noor remained active, and several more agents were sent to France, and their deaths, as a result. After a failed escape attempt, Noor was classified as Nacht und Nebel -- Rückkehr Unerwünscht: Night and Fog -- Return Not Required. She was kept chained hand and foot in solitary confinement, until she was transferred to Dachau with three other SOE agents in September of 1944. (At least one person has tried to argue, on what seems to me to be largely circumstantial evidence and guesswork, that she died at Pforzheim prison of starvation. I do not subscribe to this view.) At dawn on 13 September 1944, Noor Inayat Khan, Yolande Beekman, Madeleine Damerment and Eliane Plewman were shot. Depending on the version of the story you choose to believe, she may or may not have been beaten beforehand, her jewelry may have been taken by an SS officer (a detail which, to me, at least, rings painfully true), that the women held hands, that they wept, that three died instantly and one did not. Everyone able to tell the story afterwards had good reason to lie. Noor, who I have always thought of by her codename, Madeleine, was doomed from the moment she stepped out of the Lysander and into France. Her failures were those of inexperience, but her personal conduct was beyond reproach: she never answered any questions of an operational nature, she attempted escape, and she endured degrading solitary confinement with dignity. It was her great misfortune to be one of the easily-extinguished shafts of light sent to pierce the unending night of occupied Europe, but, in the words of Pericles, she passed from the scene, not of her fear, but of her glory. I've been eager to build the new Dora Wings Lysander since I first heard word of it, since I have a photo of the machine which carried Madeleine to her fate (which I sadly was specifically enjoined from sharing) and when I discovered the new DK Decals sheet has those markings on it, I knew what I had to do. The decals are currently winging their way to me from Hannants, and the kit itself is cleaned and on the bench. Of course it's ludicrous to pretend that building a model airplane is any sort of meaningful tribute to a woman who gave everything she had to give and more in the service of the greatest cause of the twentieth century, but I have loved her with the pure love that can only come in childhood since I first knew who she was. She was a real human being, who made real mistakes, who liked to sing, who told stories and wrote a book for children, who loved her mother, and who, ultimately, made a choice, knowing the risks, that meant that everything she ever was would come to be defined by the last year of her life. Any chance of not being a heroine, of being ordinary, of having babies or a happy marriage, or a failed marriage, or a dog, or buying groceries, or any of the million mundane things we take for granted ended for her early on the morning of 13 September, 1944. All that remains to us is her name, and what we choose to associate it with. Today would have been Noor's 106th birthday. May her name liveth forevermore.27 points
-
Done, with thirty minutes to spare.26 points
-
The well known and loved by all Special Hobby's kit is well worth the manufacturer's brand. Special in every aspect: quality of the molds, fit, level of details, accuracy. And isn't our hobby (inter alia) a struggle against the efforts of producers, how to do something wrong, if it could be good. So everything is all right. If you are interested in details and have strong nerves, please look for the workshop thread. The construction process was marked by numerous problems, caused by myself. First the fuselage broke twice where it was connected to the engine cowling, then after assembling the airframe and painting, I dropped it on the desk and the instrument panel inside fell off ... reinstalling it perfectly did not succeed, poor access, but I didn't want to make such a large step back and brake the fuselage into halves. Decals were too transparent, had to overpaint them. I broke one leg of the landing gear, lost one gear leg cover (the one in the front of the gear nacelle, finally I made them both of an aluminium sheet obtained from a tin of Felix peanuts), I lost the fuel filler cap too, replaced with a scratch-built one. At the end I unfortunately grabbed it with dirty fingers and the marks had to be removed ... But finally, here it is. Here it is and it proves that even with medium abilities and skills in the use of putty and file, this model can be put together. And this is probably the most important thing. Few things added: rivets, missing panel lines, modification of armament in the wings, antenna mountings on the wings, vertical stabilizer and fuselage, 0.2 mm Uschi van der Rosten antenna cables with insulators made of hygienic stick stretched over fire (does anyone use them for any other purpose, btw?), wheel well covers from CMK resin, barrels from Master. The rest - straight from the box. Painted with MRP Paints. Colors according to the AJ-Press monograph: old leaves - early US Olive Drab, young leaves - early US Medium Green, underside of wings and horizontal fins painted silver, with upper surface color over the leading edge. In combination with the orange markings (Dutch Decals DDS003 R.Netherlands East Indies Air Force) - it looks very nice and different, I think. Hope you like it :). Best regards and Happy New Year! Hubert22 points
-
This is rare model of the Soviet helicopter by the brilliant designer Nikolai Kamov. Resin and vacu parts. Decal developed independently Regards, Alex21 points
-
Well as it's New Year's Eve still in the UK, no doubt many BMers are planning for their night of excess and partying but somebody has to keep the ship afloat eh? So instead of nipping down to Tescos for a dozen tinnies of IPA and a couple of packs of Rennies, I've been finishing off my oft-stalled Airfix Defiant build for your delectation. Well somebody had to take one for the team didn't they!!? Now this build started off as L7009, the "Cock o' the North" from 141 Sqn, except like the "cock o' the south-east" that I can be at times I applied the wrong camouflage pattern, (it's a 50/50 choice so there's a 90% chance of stuffing it up as we all know!). Needing a victim that was wearing a Scheme 'A' outfit to the party, I consulted my many references and found a picture of the machine I wanted to replicate. It was a 264 Sqn machine, L7005 PS-X. OK OK, despite all my good intentions I managed to find conflicting evidence for this kite's serial number, with the majority of my books giving it a serial of L7006, so that's what I initially marked it up as. @AndyL, like a knight in shining armour, rode to the rescue pointing out that the Sqn ORB gave PS-X as L7005 so I waxed off the 6's and put some 5's in their place. Anyways if you want the peruse the WIP it's here, but if not then it's straight onto the piccies for those with those "ooh shiny shiny" afflictions!!!!! So here's to wishing you all a happy, healthy and prosperous 2020. Stay safe out there. Chris18 points
-
First one for a while as work has meant little time at the model desk. Trumpeter English Electric F1 of the Air Fighting Development Squadron, RAF Coltishall, 1961. AFDS was the first Lightning unit and was used to understand how to use the Lightning in RAF service.17 points
-
Hi all. Number six for the year and the final one for 2019. The 1/48 Hasegawa J2M3 Raiden. I started this one almost two years ago however a disaster at the painting stage shelved it for almost 18 months. I picked it up about three weeks ago and finished it this evening. (10pm AEST, 31/12/19). I chopped open the canopy, added ResinArt wheels and exhausts, painted the roundels and used Aeromaster decals for stencils and ancillary markings. I really enjoyed the dinged up green on this one. There's so much scope for weathering with Japanese WW2 era subjects and this is a great subject to apply it to. Happy New Year and safe 2020 to all. Mick17 points
-
ICM/Tamiya 109E, three Arma Hurricane Is of 501 Squadron, an Airfix Lancaster, and two Airfix Spitfire Is of 234 Squadron. A mere handful of builds this year, with the last two finished at 11:30 PM on New Year's Eve. I lost a lot of time to depression and mojo-death, and of course the thrill of being a parent (I don't recommend it); the Lancaster took something like six months to do.17 points
-
Just under three hours left in the year.17 points
-
Hi all Just two little jets to slip in under the wire for 2019. Bit late as I had a bit of an issue with Flickr, but all good now - my finger trouble! Doh! Both models are the lovely little 737-300 kits from Daco under their Skyline range. The decals are also Daco, These are numbers 3 & 4 in my production line of WestPac LogoJets, Western Pacific was a Colorado based airline that operated in the mid 90s for 4~5 years and became well known for turning their jets over to advertisers. Normally it was a Colorado based sponsor, in this case the Crested Butte winter resort and the rather upmarket Broadmoor Hotel. For the fuselage colours I used Daco's own paints (produced by Xtracolor), purple for the Crested Butte and Peach and Maroon for the Broadmoor machine. Build was exactly as per the previous 2, but with the advantage of lessons learned, as they do have a couple of quirks. They will now join my Simpson's and Colorado Springs jets from last year. Two more in the programme for next year! Comments and critique welcome in equal measure! Hope you enjoy them as much as I do! Thanks for looking! IMG_4911 by Rick Smith, on Flickr IMG_4913 by Rick Smith, on Flickr IMG_4916 by Rick Smith, on Flickr IMG_4915 by Rick Smith, on Flickr IMG_4930 by Rick Smith, on Flickr IMG_4927 by Rick Smith, on Flickr IMG_4928 by Rick Smith, on Flickr IMG_4929 by Rick Smith, on Flickr Happy New Year all! ATB Rick13 points
-
Ninety minutes to go!13 points
-
I Made this 1/32 italian Air Force F-104s maintenance diorama starting from the Italeri model, I added a lot of detail using commercial add-ons but also a lot of scratchbuilt ones, expecially inside the plane. All was made using real pictures and books as reference. You will find the RAT, and the fuel pipes on the back of the plane and many other all around the plane you can find in the detail pic. I've made new carts and ladders and other details around the diorama. The scenery was made using photo-paint and printer.12 points
-
As 2019 draws to a close, I thought I'd better get a Yearbook done. The cunning plan was to increase my build rate but guess what, it didn't happen. The first to appear in 2019 is a... 1/350 K-Class Submarine RFI here and WIP here. 1/72 DH Vampire F.3 RFI here. WIP here. 1/350 Typhoon Class Submarine RFI here and WIP here. 1/72 CA-27 Avon Sabre Mk.30 RFI here and WIP here. 1/72 Fairey Seafox, HMS Arethusa, 1939 RFI here and WIP here. 1/72 Fairey Seafox, HMS Asturias, 1942 RFI here. 1/72 Shavrov SH-2 Amphibian RFI here and here. 1/72 RAF Air Sea Rescue Launch, 1944 RFI here and WIP here. 1/72 Saunders-Roe SR-A1 from the Flying Boats and Floatplanes GB II RFI here and WIP here. And the last to be completed in 2019 is this... 1/72 F-86F-30 Sabre, 67th FBS, 18th FBG, Korea RFI here and WIP here. I end the year with 4 builds in progress, 3 of which will hopefully be completed in January. I'd like to take this opportunity to thank all those who have helped and commented in all my builds throughout the year. All the best for 2020. Stuart12 points
-
First, i wish you all the best in New 2020, good health, happiness and enough time to enjoy in our beautiful hobby. First model finished in this year, not very colorful one, HobbyBoss A-10 N/AW prototype. Good model, easy to build, good fit, but i think with little deep panel lines so i tried to make it not so much pronounced with careful panel wash. Added resin ejection seats and details in cockpit. Collors Gunze and slightly weathering with pastels. I hope you will like it, Best regards And images at the end:12 points
-
She's now complete and decorated! quite pleased with this one! . . . . The cannons and snout guns worked out well; the decals were rather iffy though! Some of these cheaper kits can have poor quality decals and this was no exception, the yellow bands were decals but i decided to paint them on instead of faffing about with decals there; the 'Betty Jean' decal on the other side was rather problematic, in fact once i had it in place i noticed a small tear but managed to get the problem sorted smartish! The aircraft serial numbers in yellow were an issue because one of them came off the paper and wrinkled up too much to be of any use so i cut the remaining one in half because on the plan page the number is obscured halfway through by the star and bars, cutting this decal in half and using each half accordingly, solved the problem. All in, i persevered with it and got it finished and ready to go into the cabinet! Note the Stars & Bars on the tail! made to look like its wrapped around the leading edge of the rudder! I'm nearly finished building an Academy P-51B/C in 1:72; its been a lovely kit to build, every part clearly marked and set in the sprue nicely; normally the little tang on the top of the P-51 landing gear as part of the u/c door is part of the sprue and ends up being lost because the sprue aren't too clever, but on this kit there was plenty of thought into how things were moulded in the sprues! Really getting the hang of this modelling lark now! When i do a wheel i just paint the whole thing black and then use a tiny amount of silver on a brush, the brush is almost dry, this tends to highlight the wheel rather than make a clogged mass of silver in the centre! Just one of my tricks, i assembled the bombs and rockets for this kit and then put them into my box of spares! As always i will put a picture on this group when she's done!12 points
-
After picking up some spare engines from the Dora Wings stand at IMPS 2019, I spotted this little beauty. I've always loved the lines and the dumpiness of the GeeBee's air frame. So as a birthday treat to myself, I purchased it. The full build log can be found here if you would like to look? GeeBee Build Log A great little kit, with some fitment issues. The photo etch parts, and especially the wing strengthening struts were particularly tricky and bent far too easily, Hopefully I managed to make them look at least half decent? Anyways....on with the pics....'cause I know that's why your here Just a little bit of weathering from the engine exhausts and cowling cover. Unfortunately the panel pin wash didnt quite work as well as I wanted it to. Will need to keep practicing that method. So, there we go! Hope you enjoyed the pics and the build log for the GeeBee? Any comments and tips for improvements I could make, please let me know. And with that, I shall leave you with this gem.....Buffy the baffoon of a kitten.....11 points
-
Evening all, Have been finishing up some long standing projects. This one came about by accident - was given the Revell Dambuster Lancaster, and had the Hasegawa F-35B, so it made sense to combine the two! The Revell Lancaster went together very well - all OOB, with Xtracrylix and Tamiya paints. I also used Windsor Galleria varnish, which is the best matt I've come across. The Hasegawa F-35B went together perfectly - the cockpit and canopy are click fits, and I used Hataka Have Glass paint, which again is the most convincing version of this 'stealth' coating I've come across. The 'other' gray on F-35s is again a bit difficult to nail down; I used Tamiya XF-75 which to my eye works well. I did originally plan to use the new F-35B decals from Xtradecal presented as a bonus on their recent C-130 sheet; what they are not is 1/72, and inaccurate to boot. I used the decals from Italeri's new F-35B which while not as good as Hasegawas will make a pretty fine model in its own right - but that's another project! Anyway, here they are!11 points
-
Hawker Siddeley Trident 2E, Airfix 1:144 Cyprus Airways decals from classic-airliners.com My last RFI of the year, in fact of the decade. It is the venerable old Airfix Trident, dating from around 1966 with some of its faults corrected. Yes Authentic Airliners do a Trident that is almost perfect, and yes Eastern Express are due to release a new range of Tridents next year. But this was in my stash and the sticker on the box tells me It only cost me £3.50 some 25 years ago, and what is a stash for, but building from! I stumbled across this decal sheet at Telford, and thought it made for a different looking Trident. It is actually the second Trident I started, as I also have a -1E on the workbench that will be finished in the BKS scheme. It was often known as the 'Ground Gripper' , or just 'Gripper' because of its tendency to use a lot of runway on take off, it was also said the it was only due to the curvature earth that it was able to get airborne at all. This was partly due to its swept wing design that enabled it to be one of the fastest airliners in service, once it was in the air. This particular aircraft 5B-DAC still exists. It had earlier served in BEA as G-AVFB in the red square scheme, and is preserved at Duxford today. After service with Cyprus Airways it returned to British Airways in 1977. An early 1970's ramp at Heathrow! The kit has several inaccuracies, and thanks to Dave 'Skodadriver' and Chris 'Stringbag' who both kindly supplied me with valuable information about where corrections are needed, and photos. I did not correct everything, the main thing I left out was reshaping the wing to get the leading edge 'kink' in it. It was a bit of fun, and I enjoy doing a bit of old fashioned modelling to try and make improvements. Airfix never kitted a Trident Two but all you need to do is fill in the windows and extend each wing tip . The rest of the changes are applicable to the Trident One (and the extended wings tips for the 1E). (Edit - Forgot to point out some reshaping of 'hole' in the center intake. There is a limit to what you can do, it is better but not perfect. Perhaps it needs building up with more plasticard and filler, and some serious reshaping.). These are the main improvements: The decals were laser printed and do not contain any white coloured print, which means that you have to mask an accurate demarcation between the grey and the white. I used a photocopy of the blue cheatline taped to the fuselage in order to apply the masking tape accurately, ending up with this: The decals had a 'Gotcha' which fortunately I noticed before putting them in water. The 'Antelope' figure in all references I have seen, id always heading to the right, as on the side views in the decal instructions. Strangely the port side decal for the option I chose, had him heading the other way. Simple to fix. I just cut him out and substituted one from the other tail decal that I wasn't going to use. Odd that the 'Trident Sun Jet' option was wrong but the other was was fine. Thanks for looking, John10 points
-
And a Happy New Year to you all. May this year bring you all that you wish, and lang may yer lums reek Thanks folks. She's finally getting towards the builds end How did you know Ced? I stopped wearing shorts at the beginning of November when it got a bit nippy Ah... fuel dump pipes. I remember having the perfect rubber tubes for those. Now, where was that safe place again... I'm pleased you're pleased I'm pleased Steve. Aerodynamic bits? Did I do it wrong? and a small snifter to boot If there's one thing that ensures you've done things right it's the Perdu seal of Approval Test passed Bill. You have approval to proceed! let me see... Stop then land. Hover. Turn sharp left Turn sharp right Go backwards / forwards / sideways Go straight up Go straight down Stop to pick up the messages Carry things from here to there So just what is it those pointy whooshy things do again that a helichopter can't? any excuse... If they don't stop I'll put some more sharp objects within their reach Thanks Ian. Ta Chris So where was we? Oh, now into the fourth year and second decade of this build. Tempus Fugit and all that. The tail the tail I must finish the tail. Well the starting point wasn't great. It used to be but not now. I had added attachment points for mounting the tail but over the years and my less than careful handling practices, those attachment points had all broken off. Nothing for it but to start all over again. Find plastic tube of appropriate diameter, take 4 slices and add to back end of Wessex. Use scrap rod to ensure sort of proper alignment. These are actually sitting just a tad too far back, but at this point accuracy has taken a back seat to "getting the damn thing done!" The kit parts for the ratchet handle didn't quite meet with my approval so some brass bits were worried into shape and if all goes well, they should end up here or thereabouts Notice how I conveniently managed to completely obscure the "Do Not Overtighten" stencil. Oh well, the liney will see it when he releases the handle so all's well. But while I was in the vicinity I spotted another missing greeblie ... one of these. Wotzit I hear you ask ? Why it's the Nitrogen valve - if you can actually see it. and it goes right there, right next to the Nitrogen stencil. Things are fairly rolling along now aren't they? I've been avoiding doing this job for so long but in order to get this thing finished it's time to man up A small hole was drilled adjacent to the spring loaded catch on the tail pylon and a length of brass rod inserted Then, carefully positioning the tail I pushed hard onto a section of masking tape in the hope that the brass pin would leave a mark. Success! Still a bit apprehensive about the whole operation, I held the tail in position and used some of the dreaded superglue to tack things in place It's sort of looking like it should (I think) but still needs a few more greeblies. First up was the bellcrank lever which wasn't really much of a bellcrank but the priority here was not to break the tail pylon off and hopefully add a little bit of strength to the assembly regardless of how little that strength was. It needs all the help it can get. I also added some electrickery cable supported as if by magic At that point I couldn't resist a dry fit of the tail rotor to see how things looked. I'm not sure if the rotor is sitting too far out from the pylon but we're moving on... Bill - did you notice what I added here? I forgot that I made one of these way back when I was making the brass etchings After the tense tail fitting operation, gluing the winch in place and gluing the oleo's was a bit of an anti-climax. as was fitting the pylon lights and the U-Bolts on top of the oleo's and the torque link on the rotor head swash plates I was about to fit the aerial just to the rear of the beetleback but noticed that Fly provide only the aerial and no mounting base. That meant just a very small footprint to hold things in place. No! So I printed one of my own. It's a bit difficult to see here but the mounting base is there and has allowed me to drill and ad a pin to help secure things in place after it's been to the paint shop. I also printed a couple of the aerial mounts shown adjacent to my index finger here. The cable mounting points were tiny so I increased their diameter on my version. I think I can call the tail fold complete now - a few more greeblies added along with some black paint to mark out the steps, along with another cable and a couple of tiny electronics bits from a scrap phone Next up.... who knows?10 points
-
Good evening Today I placed the propeller , the landing gear and the undewing tanks .. Patrice10 points
-
Ready to Rock "Not sure you can put off the fitting of the upper wing any longer" wrote Redshift above. He was wrong. There were two sets of preparatory jobs that I can justify as necessary to do before the upper wing attachment rather than as outright procrastination. Here's the first lot. Drill some holes for the rigging. I have thought long and hard about the rigging and have decided to complete this task the simplest way I know, which is also by coincidence the only way that I have ever rigged a biplane. It was a 1/48, Roden, Gloster Gladiator if anyone's interested. Anyway, the method involves threading stretchy line through a network of carefully positioned pre-drilled holes, you'll see more of it soon. For now I just have to drill the holes. This is a 0.5 mm drill bit in the Dremel drill-press drilling a series of holes around each of the interplane strut slots. Here's what the result looks like close-up. A bit rough looking at this stage but I think this will come right once the entire job is complete and the holes and slots are filled, sanded and repainted. See, lots and lots of holes. The more the better because each positive locating point for the rigging will save time later on. And now for finishing the interplane struts prior to use. Initially I was just going to varnish these and leave the wood grain visible but there were two issues with that. Firstly, in this case the varnished wood was going to be too dark. Restored Avro 504s wooden parts are a medium to light shade of wood whereas these, when varnished, are almost mahogany coloured. Secondly, since the cabane struts on my model are not made of wood, if I just varnished the wood I would never get the colours between the two different types of struts to match. So I decided to paint all of the struts to look like wood. Here's how I did that. First - stick some undercoat on any exposed wood. The white is the first bit of undercoat on an interplane strut. And here's all eight of them undercoated and lined up like little soldiers. I think Tamiya dark yellow is one of the most versatile colours available. I always have some of this on hand. Here I've sprayed all of the interplane struts dark yellow and sanded them back smooth. They got their second coats a few moments later. Once the final layer of dark yellow is on we can do a bit of magic with some Burnt Sienna oil paint. Irregularly blotch some oil paint onto the struts, as you can see on fourth and fifth ones from the left. Then use an old bristly brush to spread the oil paint along the strut until they look a bit like numbers six, seven and eight in this photo. The irregular blotching is intended to give a slightly irregular distribution of colour - just like real wood - and the use of a coarse old brush gives a suggestion of wood grain. The exact technique is up to the individual but I think the main thing is to use an oil paint. Oil paints impart a translucent shine and lustre to the finish that, to my mind, makes for a convincing representation of varnished wood. Here is the same technique applied to the cabane struts. The ones on the left of the photo are straightforward Tamiya dark yellow; the ones on the right have had the oil paint treatment. So now here we are... All the preparation's done. There's no putting things off any longer. The upper wing goes on tonight. For better or worse - we are ready to rock. 😧 Yours Fearfully, Bandsaw Steve10 points
-
Check it out, it's 2020 now in NZ 🥳 Another of 2019's builds and another bucket list nostalgia build. Hasegawa's (originally Bandai) Ki-51 Sonia is a neat kit and still a solid choice. Outclassed by the new Clear Prop Ki-51 now. Bare cockpit sides so added some ribbing, throttle controls and a radio box in the rear cockpit, as well as a few 'approximate' boxy items. Seat belts added from Eduard Japanese set. Black based with Tamiya lacquer then Mr Color Mitsubishi Cockpit Green. Dry brushed black items with light grey. Instrument panel dry brushed silver to pick out dials, adding colour to dials/knobs/switches. Also replaced pilots head cushion and wing gun barrels with plastic rod with the end drilled out (very finicky). Rear gun from spares with round magazine punched out from some plastic sheet. Bombs and their mounts came from a Hasegawa G3M2 Nell I'm yet to build. I chose not to cut out the clear windows on the fuselage & below cockpit for my own ease. Rescribing done as necessary on seams or where they'd faded due to the age of the molding. Kit fitted real well with putty only needed to touch up divots. Primed with Mr Surfacer 1500 & painted with Mr Color IJN Grey, I like this light tone & didn't have IJA grey on hand. Preshaded with dark grey around panels & white marbling before overall light grey applied in light coats. Propeller & hub painted with silver then Japanese propeller brown, yellow strips painted. Chipping done with shark No.11 blade on the propeller/blades/fuselage. Canopy treated to Future bath & masked using Eduard set. National Insignia & fuselage stripe from Rising Decals (120% recommended), tail markings from a spare Dragon Ki-61 sheet. What...It's cool. I wanted a more unique unit insignia vs what I had to hand. I place this aircraft in China, circa 1941, maybe Rubaul circa 1943. Panel wash was AK Dark was for yellow vehicles. Dusted up the wheels for depth and sprayed Mr Color Tyre Black for exhaust stains as is a good tone. Photo's using my Samsung cellphone camera on my desk with two lamps for lighting. Enjoy9 points
-
Hi, images from the Italian military aviation museum on the shore of Lake Bracchiano, north of Rome. Although in the region of the village of Vigna di Valle, it is located on the lake shore and is equidistant in the opposite direction to the town of Bracchiano. This site is quite historic and was one of the first landing grounds in Italy, for airships and balloons, becoming a seaplane base as well, where, during WW2 this enormous crane was used to hoist flying boats and floatplanes out of the lake. Grumman Albatri were based here for SAR duties. HU-16 Crane The waterfront flying boat park and jetty, with watch tower. Lago di Bracchiano Barchina Idroplano hydrofoil driven by an aircraft engine. Barchina Idroplano Captured Austro-Hungarian Lohner flying boat, with SPAD VII, Macchi-Hanriot HD.1 and Ansaldo SVA behind. Lohner front Caproni Ca.36. Caproni Ca.36 Schneider Trophy winning Macchi M.39. M.39 World Speed Record holding Macchi MC.72. MC.72 The MC.72's Fiat AS.6 V-24 engine. Fiat AS.6 IMAM Ro.37 found in Afghanistan and rerstored. Ro.37 rear Fiat CR.42. CR.42 front Caproni Campini CC.2 hydrid jet. Its compressor, seen below it was driven by a piston engine. Caproni Campini CC.2 There are three of Mario Castoldi's fighter designs on display in the museum; Macchi MC.202. C.202 nose Macchi MC.200. MC.200 side Savoia Marchetti SM.79 Sparviero. SM.79 CANT Z.506 Airone. These were kept in this very hangar during WW2 after being lifted out of the lake by the crane outside. Z.506 nose Fiat G-91Y. G-91Y Licence built F-104S, with F-86, AMX, Tornado F.3 and Frecce Tricolori G-91PAN. F-104S First Italian aircraft to exceed the speed of sound, the Aerfer Sagittario II. Sagittario II Frecce Tricolori MB.339. MB.339 More images here: https://www.flickr.com/photos/147661871@N04/albums/72157712453495152/with/49307751233/ For those of you wanting to make the trip there, and I would highly recommend it, a few tips. Conventional wisdom says to catch a train to Vigna di Valle and attempt to catch a taxi from the cafe. Don't get off at Vigna di Valle, as the taxis often refuse to go out there from Bracciano, which is where they come from. Go straight to Bracchiano; there are almost always taxis at the train station and they will charge only 15 Euro to go to the museum. You can also organise a return trip with the same driver. Trains to Bracchiano are also more frequent from Rome. There is a bus from Bracchiano, but, don't be tight, it's only a 30 Euro round trip and the museum is free. Thanks for looking.9 points
-
Happy New Year to one and all. Here's my years builds... 1/48 Academy/Eduard boxing of the F4. 1/35 Skycrane. Airfix 1/48 Merlin with Belcher Bits conversion. Academy 1/35 M1151 with Live Resin turret, DEF model wheels, Legend Mine Roller and Rhino. Astrokit, 1/48 Jet Ranger. The best kit of the decade for me, Tamiya 1/48 F-14A Tamiya F-14D with Steel Beach B conversion. Resicast 1/35 Sherman DD with Dragon figures and FoG base. Academy 1/48 Sea Knight I've been working on this for a local attraction, they wanted a scene replicating from the embarkation of the 29th Infantry Div, June 4 1944. It was finished for display in May 2019. Please excuse the background 'clutter', it was so big I had to finish it off in my garage;)9 points
-
Hi all this is my last model of 2019 and my biggest 1/72 model I have completed.It was painted with Humbrol acrylics and a big brush,I used two pots of grey paint on the beastie and had to build it on the floor because my bench was not big enough.The instructions call for H32 for the Grey but I could not find that in acrylic so used H27 instead.I know this will upset a lot of real modellers but like I said in my last post,I am not all that hung up on accuracy.Its not going to win any prizes but I am pretty happy with the way it turned out and I had fun building it.Please feel free to criticize/praise.I want to take this chance to wish all of you a happy new year. mohawk9 points
-
Happy New Year folks Just finished this Mirage 3 an oldie by Heller. Out of the box except for the seat belts added a little detailing to the seat and the instruments, as lacking in this respect. Hairy stick job.. Anyone know the squadron this is from?9 points
-
Thanks Ian, here's hoping! Thanks Cookie I do feel light setting it alight! Thanks Bill Yep, I've had that before, but sadly this time it was a blocked nozzle - harder to rectify but OK now. Can I ask where you got your H&S spares from please? Thanks Johnny - plucked it will be Thanks John - I wonder if it's the IPA I've been cleaning the brush with Cheers Keith, will do Even though what little love I had for this is waning, I painted the yellow bits: Masked, of course. So my experiment with white mottling has not been too successful: Oh well, educational I guess - certainly taught me a lesson. Unmasked: Micromeshed and gloss coated (blah blah blah): Transfers tomorrow.9 points
-
I fell hard for the gorgeous Zotz 'Nordic Tiger' decals the first time I saw them. I used what I had on hand -- Academy's old 1/48 Fighting Falcon release -- and grafted on the more-accurate F-16AM fin (with parachute housing) from the equally-elderly Esci/Ertl 'Dogfighter' kit. I used an Eduard color 'Zoom' p-e set in the cockpit, and scratchbuilt the actual braking chute and the characteristic ECM pylon on the stbd. intake. The Norwegian Air Force's F-16AM sn 80-3671 (a.k.a. '#671') was equivalent to the USAF's F-16A/Block 15 as built, and was updated ca. 2000 to Block 20MLU standard. The 338 'Tigers' Skvadron dramatic Nordic Tiger scheme was a special one created for a 2004 Air Show at Payerne AB in Switzerland; it seems to have been retained through at least 2010.9 points
-
Happy New Year, everyone. The adventure continues with the new Dora Wings Lysander in The Night Believes it is Endless.9 points
-
F-16D 83-1176 of the F-16 Combined Test Force, 6516th Test Squadron, 6510th Test Wing, Air Force Flight Test Center, Edwards AFB. August 1989. Name on the canopy is MAJ C THUESON. February 1990 December 1992 with AGM-65 Maverick missile training round. "My" jet... I think I only crewed her once or twice. John "Starman" Armor was the squadron Deputy for Operations and I was the Deputy for Engineering. The orange gear in the ammo drum bay is part of the MARS magnetic tape recording system for the aircraft instrumentation - all replaced with digital solid-state recorders 15-20 years ago. Thanks for looking and Happy New Year, Sven8 points
-
Hello! These are models of the classic construction and road equipment of USSR of 1950-1980 years. Models production AVD Models, scale 1/43, resin material. Road Roller MK-5 Road Roller DU-63 Road Roller D-455 Excavator E-255 Thanks for attention! Alexander, Russia8 points
-
W. Nr. 2187, flown by Ofw. Fritz Hartmann, 9./JG 2, Poix, France, Fall 1942 Eduard Weekend Edition OOB, Painted with Mr Color Laquer paints, Weathered with oils and pigments. Overall pretty happy with it, but a bit miffed that the W&N Galleria matt varnish has 'spotted' a bit, and a few of the stencil decals have silvered a little. Varnish is probably my fault. Peter8 points
-
Still blending joins and scribing panel lines back in. Last post of the year contained these 2 goodies A very good wealth of diagrams and information. While ive been rescribing the usual panel lines back across the centre line ive also been putting the cowling fasteners back in that been sanded away. The Merlin engined Mustangs upper cowl has a split along the centre so Ive tried to recreate this but need to get 30 or so screws all lined up neatly. So heres the plan..... First some measuring up to make a template guide. Both Acadamy and Airfix kits match up for size in this area so just need one template. Next is to decide where the screws will be and do a bit of drawing. The long horizontal line represents the centre line of the cowl. The other two lines represent the line of screws on either side. The vertical lines mark where each screw will be. With me? No? Read on then. From this i printed four of the templates onto some clear inkjet decal film and made a decal in the normal way. While thats drying I scribed the centre line onto the Airfix Guinea pig with 3M tape as a guide. Next is apply the decaled template guide You see the plan coming together now? Ive removed the centre black line from the decal as made things too cluttered and I can use the scribed line to line the two remaining black lines centrally either side. Next was to go along with a sewing machine needle in a pin vice pushing a mark in plastic for each screw. Once each screw is marked I removed the decal to reveal the fastening screws I could call things complete at this stage but i decided go a stage further and deepen each one with a 0.25mm drill bit. In this pic I'm partway through so you can see the difference between the indentations and the drilled ones. And this one complete One down two to go. CT8 points
-
no instructions? John.8 points
-
With 7Sqn RAF being the dedicated SF Sqn and the loss of the SAR Sqns, the RAF decided to set up a new CSAR Sqn away from prying eyes. MOD Boscombe Down was chosen to base the new Sqn (being the UK equivalent of Area 51) using some of the many HAS’s no longer in use. 16Sqn was reactivated and charged with bringing the new aircraft into service and trialing camouflage. Everything looks cool in a camo wrap. Camo side wrap with a splinter top.8 points
-
B-wing prototype. Bandai’s fab kit and LED lights for the engines. Painted with Halfords and Tamiya rattle cans and some hairy stick stuff too8 points
-
Scooters have been a bit of a theme for me over the last few months and this is what I've been building over Xmas - two more Skyhawks to add to my collection: Douglas A-4M Skyhawk II VMAT-102 “Skyhawks” - USMC Aviation, MCAS Yuma, Arizona, 1980s. Italeri 1/72 with markings from Hasegawa and spares box. This kit came without any markings, but provided an excellent excuse to use the very colourful spare set from my Hasegawa A-4E build from October (the kit-supplied ones would have been very "grey" in any event!!!!. Douglas OA-4M Skyhawk H&MS-12 “Outlaws” USMC Aviation, MCAS Yuma, Arizona, 1988. Italeri 1/72 OOB. I struggled with the blended grey on this one - brush painting doesn't always work! Interesting to see how much the double canopy changes the look of the Skyhawk. and finally - here is the full set as it currently stands. there are at least 3 more in the stash, so watch this space!!!8 points
-
F-4E s/n 66-0329 was an ex-Thunderbird aircraft. She served as a test support aircraft at Edwards AFB from 1978 through 1991. Operated by the 6512th Test Squadron, throughout the early 1980s is was part of the Air Launched Cruise Missile (ALCM) chase flight, hence the white upper wings with the camouflage schemes. The N prefix indicating a permanent flight test modification was installed in/on the airframe. July 1984 - Over the Boron mine On the downwind for Runway 22 March 1985 May 1985 January 1989 October 1991 - Text on the cannon fairing reads "THE LOVE MACHINE" Thanks for looking, Sven7 points
-
Here's my just-completed 1/48 OA-4M - last one for 2019! I needed a mojo restorer and this fitted the bill very nicely - it's taken just over a week. Apologies to anyone who might have been following my all too brief WIP, I got carried away and stopped taking photos as I went! This is the Hasegawa 1/48 TA-4J converted to an OA-4M using a resin conversion set from Phase Hangar. The conversion set was very nice indeed, it included everything needed for the conversion (on the outside anyway), including a nice pair of seamless intakes, and everything was a pretty good fit. One thing to watch out for if you do the conversion - the instructions call for you to add the brake parachute - don't, it wasn't fitted to the OA-4M. Decals are from Furball Aero Design and worked very well. Perhaps not quite as much contrast between some of the decals and the dark ghost grey though. Just one thing missing which I'll always notice, and was missed in my haste as I got carried away. Can anyone spot it? On to the photos: thanks for looking and happy new year Julian7 points
-
Well, well...the masks are all off now... And this is what we have...the top... And beneath...some minor touching up on both counts. Decals tomorrow. I want the paint to be really dry before I hit it with MicroSol, etc...It's not like I have nothing else to do! Looking very snazzy indeed, if I do say so myself! --John7 points
-
Just a quick update. Nearly finished the Mk21 and ready for a coat of varnish. More soon Happy New Year to all Dick7 points
-
Thanks for the kind comments guys. Hopefully not too far away now Cees, just need to check everything over before I do. Pretty much there now. All that hard work hidden! Happy New Year gents. Thanks for following and hopefully 2020 will be a more productive year. I only finished two builds this year so it can't get much worse 😂 Cheers, Neil signing out for this decade7 points
-
Build completed as part of the Film, Fictional and Speculative GB: Here we have the old Matchbox Skyraider built as an aircraft of the Fleet Air Arm during the Suez crisis. I rescribed the whole thing and brush painted it with Xtracrylix. Decals used were the Berna Decals set for a Westland Wyvern. Markings are from an aircraft of 827 NAS based aboard HMS Eagle. Please see WIP for more back story and build details: Cheers, Ash6 points
-
Good Morning Folks, Firstly, happy new year and best wishes! I've been suffering with a severe case (if I don't say so myself) of man flu for the past few days so NYE was a bit of a wash out. However, every cloud and all that, it means that ive had to indulge in some medicinal work on the Defiant and have cracked on with the riveting across the wings and the fuselage. As ive said previously ive never done this before so its not perfect by any stretch of the imagination and im aware that there are errors all across the work ive done but it looks much better than what was there before. I have yet completed the upper and lower parts of the fuselage where they join and this will be completed once the fuselage halves have come together. So this is where we are: I haven't done the tailplanes as yet, these will be done once they have been built up along with other parts of the airframe, scoops and rudder etc6 points
-
And done! First one for the New Year. A few frustrations, but ultimately happy with the final result. Not a tail sitter 🙂 More photos in RFI shortly. Thanks for following.6 points
-
AK panel line wash (deep dark grey) over a base of Future, then a shot of MM acrylic semi-gloss to seal that in. Next step will be some oil weathering...then all the small bits that seem to take forever. Cheers and HNY Collin6 points
-
Revell-Matchbox 1/48 Douglas Skyraider A-1E (Cockatrice S.1) Here we have the old Matchbox Skyraider built as an aircraft of the Fleet Air Arm during the Suez crisis. I rescribed the whole thing and brush painted it with Xtracrylix. Decals used were the Berna Decals set for a Westland Wyvern. Markings are from an aircraft of 827 NAS based aboard HMS Eagle. Please see WIP for more back story and build details: Without further ado, here are some pictures of the beast! Thanks for an entertaining GB. Ash6 points


This leaderboard is set to London/GMT+01:00