
Leaderboard


Popular Content
Showing content with the highest reputation on 28/12/19 in all areas
-
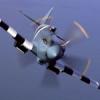
Dear comrades... My last project of this decade 😄 In this case I want to share with you the awesome F-14 Tomcat kit made by Tamiya, with the Jolly Rogers markings. I've added some Eduard aftermarkets (resin cockpit, resin wheels and engine exhausts). Here you can see the entire album; https://flic.kr/s/aHsmKioNgU37 points
-
Good evening everyone, This is Tamiya’s superb IL2. I had previously built Eduards kit and really enjoyed that, to the extent that I didn’t really see how it could be improved . However having heard good things about this particular kit, I decided to give it a go. What a blast. People have said that it’s a well engineered kit. No kidding. As ever, everything fell together, tolerances were precise and everything just clicked into place. Amendments to the kit included putting flat spots on the tyres, replacing the wing cannon and machine guns with hollow tube and aerial wire from Uschi. The paints are a mixture of Mr Hobby and Tamiya, with fine details picked out with Vallejo. There is some shading and chipping on. Tamiya supply a set of masks for the windows that you need to cut yourself. They worked really well and I was more than satisfied. They also provide a decal for the seat harness but I went with an Eduard belt for a more 3D look. Nothing beats Eduards buckles for setting of a cockpit. The decals were a mixture of out of the box and the remainder of the Cartograph sheet from the Eduard boxing. Fair to say that I was pleased with this. Thanks for looking. Rick28 points
-
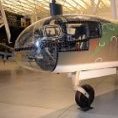
The Old Academy model was on the shelf with a set of Aires add-ons .... yes I know there is Tamiya .... but I had it all at home and found that I would put it together. I still have old Hasegawa on the shelf with additions .... I'll also put it together when the time comes. In this model I managed to stuff: - resin cockpit (Aires) - resin main gear interiors (Aires) - resin main gear covers (Aires) - resin engine (Aires) - resin guns in wings (Quickboost) - Quickboost resin propeller - engine cover from the Hasegawa model - Pavla resin bombs - bazookas from the Tamiya model - Rob Taurus windshield (vacu) - inside of the tail wheel and an additional fuel tank from the P-47 N SWORD model - scraped air intake in the engine cover and a few other small things. If anyone is interested then he can see the construction thread here: The model presents a plane from 318 fighter group, 19 squadron. Saipan 1944.27 points
-
Armstrong Whitworth Whitley MkV – N1428 GE•B, No 58 Squadron, Linton-on-Ouse, Yorkshire, April 1940. Currently the largest model in my display cabinet, I was very happy when Airfix announced a new tool of this Bomber Command stalwart of the early World War Two period. The kit went together fairly well, aside from issues fitting the nacelles. The aftermarket decals also had slight misregistration, which I may pluck up the courage to correct in time. The diorama base was cooked up over Christmas 2019, and the vehicles come from Airfix and Flightpath. The build thread has been posted, and can be found here:21 points
-
Here’s my attempt at a high back Spitfire XIV using the Eduard Mk VIII and the Airfix FR Mk XIV. The Eduard kit which I used as a base is astonishing in its accuracy of moulding and finesse of surface detail. The parts used from the Airfix kit were the fin and rudder, the nose as far back as the wing leading edge and the radiators. The decals were put together from the spares box. Hope you like it.20 points
-
I present my Av8 Plus model of the Italian Navy, the Model is a Hasegawa to which I added Cockpit and Trolley compartments from Aires, Pod from Eduard Brassin, I hope you like it ...18 points
-
I started this model as a part of the recent P-40 group build but in rushing to finish it to meet the deadline I managed to snap one of the undercarriage legs and ruin the wheels. The retraction jack from the broken leg pinged off and in disgust I threw the model in the bin. A couple of weeks later I managed to find the retraction jack and remove the other leg - along with the remnant of the broken one. With a paid of new undercarriage legs from SAC (at great expenses) I fished the model out of the bin and started to re-finish it. So, around 6-weeks after the group build finished we now have a Hasegawa P-40E in the markings of 'Texas Longhorn' of 1st Lt John D Landers from the 49th Fighter Group, 9th Fighter Squadron from New Guinea in 1942. The original build log is here: I'm actually pretty pleased with the way this has been rescued - although I still need to glue the canopy on. Still some work needed on the photography I think. I've got a new light-box studio to work with but need some practice.16 points
-
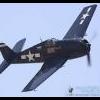
Last one for the year HB Wildcat out of box16 points
-
Model made to order. This is an F-14A with an interesting story, you'll probably know which one. Model Trumpeter scale 1:32 made straight from the box. Model Trumpeter w skali 1:32 wykonany prosto z pudełka. I think this is the last model this year and I hope that next year will be equally successful for me.15 points
-
The year started with a FROG Beaufighter, which had swapped a bunch of parts with an Airfix one as part of a Beaufort build: Then I finished my FROG(ish) Beaufort after ten months, on and off: In the Trainers GB I did a Novo Magister: A Novo Oxford: and a Pegasus Master I: Next up, the FROG Squad GB, in which I did a Novo Proctor: A FROG Wyvern: A Novo Master III: A FROG Mustang II converted to a Mustang I: And a Novo Master III converted to a Master II: Although I have a fairly random approach to subjects, these group builds gave me some themes. Miles Masters: And trainers: In the August Blitzbuild GB I did the third production Spitfire from the Airfix kit: And in the Year I Was Born GB I did the Revell X-15: In the Flying Boats and Floatplanes GB I spectacularly failed to finish an Empire but learned a lot about vac forming big things: I am treating this as two builds: "Learn to vacform big stuff" and "Build an Empire from a dodgy vac fuselage and Airfix Sunderland flying surfaces". So build #1 I am calling done and build #2 will be coming to a WIP forum in the new year. Tomorrow I hope to add a second Blitzbuild to my tally for the year: [edit] And I did: And the shelf of shame continues to haunt me (same photo as last year!), although some progress has been made on the Fairey Long Range Monoplane since: And I promised to revive a Rareplanes Breda65 for Pat in the KUTA: So that's 13 finished-finished for the year, more than I expected. I have been driven by some really interesting Group Builds this year, and hope to do some more in 2020. Thanks for looking, Adrian15 points
-
Dear fellow Britmodellers, here's my last entry for this year, the 1/72 Arma Hobby Yak-1B, built out of the "Expert Kit" with the addition of Rob Taurus Vacu and steel wire pitot tube. The model represents the aircraft of Patryk O'Brien, 2. Squadron, 1. Polish Fighter Aviation Regiment, operating in the Berlin area, in 1945. Arma Hobby's markings lack the fuel indicators on the wings, which were sourced from a Zvezda Yak-3 decal sheet. Painted with Gunze/Mr.Hobby acrylics. Weathering with Windsor & Newton artist's oils. All photographs by Wolfgang Rabel. I built both the Brengun and Arma Hobby kit of the Yak-1B, and would give Arma Hobby a slight advantage in terms of ease of assembly. The Brengun kit, on the other hand, may be more accurate in shape and dimensions. Both kits have very fine surface structures and good detail throughout. Thank you for your interest. Best greetings from Vienna! Roman15 points
-
The aircraft flown by Le Hai, 932nd Fighter Regiment, Vietnam People’s Air Force, Tho Xuan, August 1969.15 points
-
This is my rendition of Pickards Mosquito as it might have looked on the Amien raid Operation Jericho. The kit goes together without fuss and it was a very enjoyable build.14 points
-
Hello friends, My apologies for the long period between postings. As you all are well aware of, life tends to get in the way of our hobby. Here is my latest project, the F-15I Ra`am from Great Wall Hobby in 72nd scale. Here are my thoughts of the kit......... 1. Built entirely out of the box. 2. Used acrylic paints for the airframe and weapons. 3. Used AK Interactive Extreme metal paints for the exhaust and natural metal sections. 4. Weapons ( GBU-31 JDAM, GBU-38 GPS guided, GBU-12 laser guided, AIM-120, & Python air-to-air missiles used from the kit ) 5. Tamiya tape for the seat belts. 6. Weathered using chalk pastels, washes, and paint. 7. The fit was very good apart from some serious issues with the front windscreen. Perfect Plastic Putty was used extensively to help correct the misaligned part. 8. The kit supplied decals were thick and I experienced some of the dreaded “silvering”. Much time was spent correcting the mishap. 9. Mold seam on the center of the both sections of the windscreen needed to be eliminated. 10. “F-15I Ra`am in IAF Service” ( IsraDecal Publications / Ra`anan Weiss ) used as reference. Hopefully my time between postings and visiting this excellent website will not be as long. Thank you in advance for all of your comments. Respectfully submitted, Mike12 points
-
Junkers Ju88 G Mistel + Gaz M415 (1:48). Diorama scratch built. Finished the GAZ recently and re-did the diorama. https://i.imgur.com/bbEIpRt.jpg[/img] Enjoy Brian12 points
-
@Stew Dapple said an important thing over on his Raiden 'Jack' thread earlier: This describes really rather well the reasons for me making a major change to the initial premise of the build. I feel such an utter cad and bounder now Bill for putting the Froggy little thing back in the pond where the (de Havilland) Heron might get it... Have you seen 'Succession' yet? I've only binge-watched the first season and most everyone in it is a complete <expletive deleted> but Brian Cox is a brilliant Murdoch-esque central character. Explanation Time I've been staring at so many photographs of late in both photographic and drawn form -then looking back at the Frog kit and wondering why bother? The SH looks broadly fine with some adjustments, a number of which are necessitated anyway by turning her into XJ481.The Anson previously made for a great retrofit project because (barring the flat belly) Airfix caught the overall shape and proportion of the aircraft really quite handsomely in a way that Frog patently didn't manage to achieve here in a number of instances with the SeaVee. Old kit/I knew the problems/no complaints, but time and techniques march on: I've no real interest in the Frankenstein route of cutting and shunting parts together (which is what the Frog will end up being with so much to replace) so in this photograph, everything in the box on the left is now being returned to the wild: and alongside XJ481, we'll build XN708 entirely from scratch. Or at least - as Mr. 50 Cent has opined under other circumstances - 'die tryin' This means a lot more staring at a lot of photos: but this would have been necessary anyway in order to get things right, not least of which involves building a mental visual map of the aircraft reduced to its most essential forms as a series of streamlined compound curves (not to scale or proportion here): To actually make the thing I think I'll rely primarily upon brass (because I'm familiar with it) for structural detailing, and CAD because I'm a rank amateur who'll be learning (no doubt, through a succession of ridiculous mistakes) on the job in terms of 3D printing major components. In preparation for said hubristic exercise I've been getting some tips from my favourite Laurel & Hardy film: As a way of learning new skills this should then stretch me (to breaking point probs.) in terms of: 1. A better understanding of the aircraft structure, necessary in order to replicate them from scratch. 2. Acquiring the design skills to realize such structures with the software. 3. Gain a feel for the material processes of 3D printing. 4. An unforeseen and unexpected factor that no-one saw coming. Having selected a number of characteristic views of the aircraft I've been playing around with Fusion to get a feel for the various form and profile tools: Once we get on to things like intakes and swooping boom profiles it'll be another story.... I did get as far as outputting a test of the inboard wing section a couple of days back - again to get a feel of how details will look in physical form: At 0.3mm wall thickness it's actually too thin to be of sufficient strength but good information to have for large planar parts of this nature. It was actually playing around with this design that made me realize that the deviation in chord length and shape of the Frog wing wasn't going to be tenable for me - this printed part matched the scaled dimensions of the actual aircraft in those regions, but not those of the kit. You could either design an individual part (incorrectly) in order to blend in with the kit inaccuracies, (taking both time and leaving you ultimately unsatisfied) or else do the whole thing right from scratch. Know which I'd prefer. I've a few days off still until work resumes so intend continuing for a few days to develop a better familiarity with software processes before beginning any design work in earnest. Not all doom and gloom yesterday. If you're ever in Galway, Charlie Byrne's bookshop should be a mandatory feature of your visit (along with the Ard Bia restaurant down on the quay) A collection of rooms housing a glorious mixture of new and secondhand volumes: you don't always find something you're after but when you do, like meteors they tend to come in showers: No help with the Vixen but at least I'll be able to conceal the Skoda in the drive from reconnaissance aircraft... Hope you all have a good weekend, whatever you're doing and whoever you're doing it to/for/with. Tony12 points
-
Hi guys, After not posting much for a little while I thought i'd share my christmas project with you all. I had been building some pretty poor kits in my stash that either had major fit issues or I was not taking my time, making a mistake and losing interest. So I decided to re work my modelling room for a fresh start; switch out the kits I had lost interest in for Airfix new tooling or Tamiya kits and try and start from scratch with better fitting and more straight forward kits. I started with a Tamiya Bf109 e-3 in 1/48th and loved the build process so decided to set a small challenge for myself and build a kit for my dad for christmas. As you can see by the title, I chose the Airfix 1/48 P51- D5 'Louis IV' after spotting it in a Hornby store a week prior. I have always enjoyed building the natural metal style warbird as they can be a bit of a challenge to shade and weather but I always love the look of them at the end (currently have a B24J 'Dragon and his tail' half built so that will really test my metallic skills), but also wanted a kit that would stand out from your usual P51's as it will be on his desk at work. The kit is post D- Day and was stationed in the UK which led to its interesting design of RAF Dark green, olive drab invasion stripe cover up, a bright yellow cowling and nose with the usual metal and lower invasion stripes. The kit went together amazingly, I only used a small amount of acrylic putty to hide seam lines, other than that the kit fell together. The real time went into the painting, more specifically the Invasion stipes as I always seem to struggle with lining them up on the sides but am quite pleased with them overall. The base was made with a lot of colour mixing and a stand I picked up off Amazon which I beleive was actually a tea caddy and was chosen due to the industrial look of it. I added a few spent bullets to the base for a bit more variation, sadly these are not .50 cal as they're not that easy to get hold of and im not quite sure how much of the roundel would have been left by the end. 😅 The support to hold it up is temporary, I have not found a piece of clear acrylic the right size yet; but for now am happy with the support. Although not getting it done bang on christmas, it was finished on 27th and overall its a kit im quite pleased with, despite maybe overdoing it on the exhaust stains which I decided not to mess with anymore as it was making the result worse. I dont usually post photos of my finished builds as I still cant get my photos to come out anywhere near what the kit looks like and im a bit meticulous when it comes to things like that. I tried to find the best spot for lighting and change a few settings on my phone but they still never look right. Anyway, this kit has really got me back into the swing of things so I may try and tackle the B24J im stuck with. Hope you all enjoy! 👍 Ryan11 points
-
I'm back home on leave now and back in the world of internet that actually works so I can show you one of the projects that was completed while I was away. The kit built up beautifully (which was just as well as it was built in some pretty trying conditions 🤢) with no fit issues and was painted with Mr Hobby and Mr Color paints. Weathering was done with AK and Mig enamel weathering products.11 points
-
Hello friends, Here is the Hasegawa G4M2E “Betty” bomber with Ohka Kamikaze. I had completed this kit earlier in the year but now I finally got around to posting the pictures. My observations of this kit are as follows........... 1. Used “Hair Spray” technique to weather the subject. A. Mission Models IJN Deep green on the upper surface B. Tamiya Flat Black for the undersurface C. Alclad paint for the base silver / metal D. Used a moistened cloth rag to “peel” the paint. The Mission Model green came off easily but the Tamiya flat black took more of an effort. 2. Built straight from the box. 3. Used Eduard canopy masks for the clear parts 4. Model Master IJN Grady for the Ohka. 5. Used Uschi bobbin thread for antenna wire. 6. Used contrasting colors to replicate replacement propeller ( starboard / right side ), slightly darker green for a replacement panel on starboard wing, masked off a panel on the lower starboard wing, and lighter green on the fabric control surfaces. 7. Other weathering by using pastels, washes, and paint. 8. Tamiya tape for cockpit seat belts. References indicated that Japanese maintenance crews were required as a source of pride to keep all national markings and squadron insignia in a clean or pristine state. I tried to reflect this with this kit. I found the kit straightforward and simple. Masking the many sections of the clear parts was very time consuming but the results are worthwhile. I would recommend this kit to all. Thank you in advance for all of your comments. Respectfully submitted, Mike11 points
-
Bandai 1/72 X-wing Jek Perkins Red 610 points
-
ouch. I just quoted 13 posts. Ominous. Thanks Chris though sometimes there can be one just hurdle too many on some days Thanks Steve - I'll take that. You know I only take photo's of my soldering after about 3 hours worth of clean up and polishing don't you? I tried the hot water and ice dip today with no luck so far. Tomorrows another day they say. Northumberland eh? I'm with you on that. Well, not with you in the biblical sense but you know what I mean. I've been off work now for 7 days so far and today is the first day I have actually had all to myself. Thanks Roger - I've got some expletives I can share. I learned a few new ones this week. It did Ced, thanks. That Vince guy needs a good slap - he sounds like one of our HR stormtroopers Dunno about romping and even less sure about positive but we do what we can don't we? I was quite pleased with yesterdays brass-eventing but less pleased with todays efforts. Enjoy the duvet! Hot water tried and failed. Tomorrows attempt may involve one of these I assume the outer cover is woven with only the finest horse hair? Thanks Timski, glad you are enjoying it. Wish I was 😉 Fly really made the worst of a great opportunity here. This should have been, and could easily have been a world beating kit. Instead, it's a poor facsimile of something sort of resembling a Wessex in some areas, if you get the angle right. Thanks Woody. It won't beat me - I've given too much of my life to this one to let it get away now. Thanks for the offer but I'm just ploughing ahead with what's at hand. Necessity being a mother and all that. You could cuddle up with Tony in that new duvet of his if you're short of a comforter. One of the great things about the forum is that you get to see different techniques and ideas in action (not from Icky though as Eric M would have said). Sometimes they work and sometimes they don't, but it's always good to try new things, particularly if it's pushing your skill limits. Thanks Bill. I have to say though, that I'd take the italeri Wessex over this one any day. Most of the fixes on that were straightforward and I really enjoyed that build. I can't say I'm enjoying this one much at the moment though the mojo seems to be making a reappearance as the end is nigh'ish Happy Hogmanay Ian and to everyone else n'aw Now on to today's (mis)adventures. A little bit more upbeat this time. I had a late start today and first on the bench was the blade fold thingies. After some exhaustive research, i.e. looking at the meager handful of photos I have amassed for a few minutes I realized that there were a few bits and greeblies missing from the contraption. I added some pins on the lower section and started trying to work out the geometry of the gangley bits. To no avail. The instructions were less than clear, merely suggesting lengths of rod - which could be adjusted for a better fit! It slowly dawned on me that I really needed the blades to help in figuring out the structure. That led me on an hours detour trying to straighten the blades. Didn't work. After about 4 hours or so messing about I put all the blade fold stuff in the safe place until I have the blades ready to fit. I found another two or three stickers to slap on and determined that it was time to call it a day on that sort of action. Out came the airbrush and I gloss coated everything to seal in the transfers. Stopped for a coffee and then hit everything with Alclad semi matt clear. Or was it semi gloss clear? Who knows. It was clear. Close enough. Tail pylon starboard: Tail pylon port: Fuselage starboard: I did find yet another issue, though I'm not entirely sure I can lay this one at Fly's feet. The high voltage aerial front mounting bracket should go directly beneath the drain/vent thingy coming out of the beetleback - right where the L in Royal is located. My choice now is to plonk the bracket where it should be, obscuring the lower part of the L, or mount it slightly forward between the L and A which means the Royal Air Force will remain intact, but aerial position wrong. My gut instinct at this point is to mount it slightly forward and be damned. Fuselage port: The yellow stickers seem to have toned down just a touch which is welcomed. As I cleaned the airbrush I suddenly thought - hey! I can unmask the beast now. (even though the clear coat wasn't strictly cured) Very, very carefully, I started removing the masking from the front windows with my sharpest tweezers - the only way I could get the masking to lift was by poking a sharp end under and edge of tape. Tease shot... I guess the masking has probably been on here for the best part of a year and I'm surprised it came off as cleanly as it did. In the past I've found that the masking has been on for so long and the paint has gone rock hard that the demarcation edge always cracks and leaves a rough edge. But this one refused to budge. Tweezers made no impact and that front rectangle was so solid that the tweezers slipped a couple of times. In the end I had to resort to using a scalpel to slice under a corner of the masking to get something to grip. In the end - very pleased with how the masking behaved. The only rough edges were at the bottom of two windows, but not too shoddy at all. If you look at the 1:1 you will often see a white seal/gunge/gasket around the edge between the frame and the glass. I'm calling this weathering. I do like how the rivets have turned out on the window framing though. It's such a distinctive feature of the Wessex. One of those things that no-one ever really pays much attention to but you'd notice something wrong if they weren't there. I'm glad I spent the time on those. I had forgotten just how cruddy the interior of the windows were. I remember making a note of this on my to-do list and it's going to be a pig of a job. Don't you just hate those folks who manage to get beautifully clear canopies on a build? Mine always look like they've been in the Water of Leith for a few months. There are a few small touch ups to be done - I had to tape the cockpit blanks to the fuselage to ensure I didn't end up painting the interior by mistake, so a small brush of green should take care of that. With the main windows unmasked I put this to the side for the evening to let the clear coat cure overnight. I'll tackle the cabin windows tomorrow. I'm sure I scratched on at some point so that will need polishing out. One small step for man...10 points
-
Hi all. My latest build is the Special Hobby 1/48 T-2E Buckeye. I choose the Greek Air Force camouflaged version. Especially the red and white striped rudder and tip tanks look very good in combination with the camouflage colors imo. Lots of rivets and panel lines were added. The model was painted with Gunze Aqueous paints over Alclad black primer. Thank you for watching. René9 points
-
Brave or fool You always do something brave or stupid in front of the girl you like. 1/35 Tamiya M51 Super Sherman \ THANK YOU9 points
-
Hello, It's been quite a long time I didn't complete something, so here is my last 2019 buod : Tamiya 1/48 MiG 15 Bis. Metal is Tamiya AS12 Spray can, with AK extreme Metal touch up, while the red is also Tamiya, airbrushed this time .... Hope you'll like her,9 points
-
Here is my 1/72 Phantom FGR.2 XV423 "D", 23. Squadron RAF, RAF Stanley, Falkland Islands 1983/84. Old Fujimi kit made "out of the box", except resin ejection seats (Pavla) and Sidewinders (Eduard). Decals are based on Print Scale`s 72-285 set. Thanks for watching! 😊8 points
-
Hi, gentlemen, "Zvezda" has issued the most impressive model of the MiG-29 Fulcrum C in 1/72. It was powered by Aires resin (nozzles, cockpit) Eduard resin wheels, Part photoetched and Pavla canopy. And of course some details are from scretch. The main challenge is how to build in the Aires resin parts, which have been produced for the old Italery model. So, it is possible and for the Zvezda kit as well. With regards,8 points
-
Thanks Jan - useful, I think you're right that the panel is black so could be brush painted (to replicate exhaust stains) and then everything masked. I think I'll do that Thanks PC - warning noted! The air is blue in the 'Man Cave' this morning but I think/hope that's the end of the fiddly PE… 'Top i/p' with the gunsight inserted: Crikey, that was fiddly. The new tweezers helped wiggle the sight into the gap in the PE bits but oh, the tension! Seatbelts. Oh good grief. The lap belts are supposed to fit over the side of the seat that now is tightly fitted so I drilled 'some slots': Probably not 'accurate' but they're in: So is the wheel thingy: The Gator's Grip Thin is still drying and will, hopefully, provide some 'weathering' when dry. That's my excuse. I did clean up with a wet brush but I didn't want to dislodge the thing. Engine backplate done with AK Steel paste and cylinders with my favourite Mr Metal Iron. I painted the spinner too as it fell off the tree: Getting close to closing up?8 points
-
Thank you gents Perhaps, but I can't wait to get it closed up and looking like an aeroplane However closing it up takes a back seat for the next assembly stage, which is building the main wing: I did deviate from my original plan (PAINT EVERYTHING!!!) since I don't intend to leave the gunbays open. Also, if modelling is also a learning process, I may have learned two things so far, one being that I am lazy and two being that if I don't get a kit finished within a certain amount of time I get to the point where I just want to get it finished, and if I go past that point there is a risk that I will lose interest altogether. I'm not at the first stage yet, let alone the second, but I am itching to make some actual progress. I fitted the wing main spar, centre section spars and wing fuel tanks: ... and the gun-bay and ammunition tray area ribs: Next was fitting the guns and the ammunition feed trays: The Raiden has two different cannons, a longer model inboard and a shorter one outboard, which are nicely reproduced as single parts: ... and the associated ammo feed trays, and landing gear bay walls and (I think) the oil cooler intake: Finally, fitment of the top wing - I have done this but haven't photgraphed it yet. The instructions indicate not to cement the gun bay covers so that the gun bays remain accessible, however pretty much all you will be able to see is the ammo feed trays and a section of the gun breeches so it's up to you, personally I prefer to look at the aircraft itself rather than its components and I feel leaving hatches open, engine hanging out etc. is interesting from a technical point of view but draws your attention to parts of the aircraft, so I have glued mine. Closing up the wing I did find I needed to clamp the starboard wing by the gun bays, I presume, given that everything else in the kit has clicked into place like LegoTM that I misplaced some interior part, but no harm done. Next it is on to the rear fuselage, then joining the fuselage halves, I hope to make some progress over the weekend... Cheers, Stew8 points
-
And the fuselage roundels. A little touch up needed around the strengthening strake, but hopefully that's the trickiest masking job out of the way.8 points
-
Hi Guys, I have never had the intention to build this kit as the IAF Mig-21 15 squadron the lancer with Polka dots over the yellow, these markings were for early aggressor training. I bought this kit for the decals which had a sexy one and I had some Eduard kits for it, however, after seeing the kit i thought why not I do a quick build, the parts were simple and some parts oversimplified but I have no complaint you can't beat the price and also expect good quality it. So, I thought why not build the kit as well, so I end with these big polka dots mig-21, masking the black was simple well there is trick to it and rather very simple one hehe. I will tell if one anyone is interested. So here it is Mig-21 15 squadron the lancer, 1992 Jodhpur. Thank you for looking, and this being my last build for the year. Happy New Year 2020. Cheers everyone7 points
-
Not quite a Blitzbuild, this is a kit I got for Christmas from Mrs Oz. I've been looking forward to getting it started, as it will make go nicely with the tram I'm currently building. The kit so far has been a really smooth build, the kit comes with a nicely detailed engine. Though I'd do a WIP as only seen one of these built so far.7 points
-
I wanted to bring something back from Telford this Year and this kit looked really cool. This was not a Hard kit but there were a few curves tossed here and there. Dry-fitting and Sanding were the word of the day. I added some details to the landing gear such as retractors and braces, using Albion alloys real small tubbing. Kit decals were used and the were mostly very good except the red forward sections on the nose, I used some Vallejo red for touch up. Checking steady-ness of my hands. This was a Beautiful aircraft and I am quite happy with the small version I have. PS the Paint is much smoother than the Magnified photos reflect. Thanks for taking a look and Comments welcome Happy New Year Bill7 points
-
I finished this one a few weeks ago and finally got around to taking some photos. This is my attempt at 1Lt. Robert Whiting’s F4U-1A of VMF-321 on Guam, August 1944. Thanks for looking and again Merry Christmas!7 points
-
I didn't initially have plans to do a WIP as virtually on the day that Revell released their Iron Maiden boxing of their MkII Spit, my good buddy Mark told me that Iron Maiden bassist Steve Harris was playing a gig in Colchester with his side project British Lion. Now the gig was on December 19th and as Mark is very good buddies with Steve I knew I'd be invited along for a meet up and a chat. Last time British Lion toured Colchester I organised a trip down to Merville Barracks for Steve where he was well hosted and entertained by 2 PARA's Corporal's Mess before the gig, but with 19/12 being after stand down and the start of Christmas block leave I had to come up with another idea to help him remember Colchester and hopefully come back again in the next couple of years. The catch, well I had about 3 weeks to complete this if I was going to be able to present it at the gig. There was a very brief WIP once I realised that I was on course to complete this on time....... Anyways without further ado I present you with the Aces High Spitfire, ably piloted by no other than Eddie!!! You may notice a tiny speck of brass on the armoured windscreen frame, this is my nod to the spent cartridge case embedded there on the original cover of the Aces High Single and for our Sea-Hat friends following is not "the golden rivet"!!!! https://encrypted-tbn0.gstatic.com/images?q=tbn:ANd9GcTDrm9AsqCcSq2xTtRFHa7YkV6v8_73XEoApLvl__REjeDaARhH&s Anyways, here's the good home that the model went off to.....7 points
-
Quick update, the sheer strakes went in OK and the deck is now on But I managed to loose the alignment slightly on the opening, which is a bit of a (expletive replaced) shame Cleaned up now, the curves look OK (hard to sort) and I can sort the hole with the deck house. The hole in the forecastle is for the 20mm Oelikon mounting which sits below the deck level, thanks to G Stone for that detail, not shown on the other two drawings and I'd have missed it otherwise, you cannot have too many drawings.... I love the 3 dimensional curvature of a deck, its a really interesting hull form, sweeping up from a shallow stern to a raised bow, cool7 points
-
"The fallen Madonna with the big boobies " Simon.7 points
-
Cheers lads,...... still plodding away on the Lib; I`ve tried adding some different shaded panels using brushed on Humbrol Metalcote and polishing them up,..... but I`ve ended up rubbing more paint off!! I shall endeavour to continue,..... although I`m probably making things worse! I have also painted the cross markings on the rudder using pale blue and started on the glazing and turrets,....... the seam lines of the turrets are a total eyesore and I`m contemplating adding a cover over them, as per the reference photos...... we`ll see. Here is the progress so far,.....uncercarriage is on and engines ready to fit once the decals are on the propellers,...oh and the real aircraft had a taller late style Martin mid upper turret,.... so I`ve used a spare left over from a Hasegawa kit and sanded it down shorter from the bottom; Cheers Tony7 points
-
Thanks Simon More fiddly PE: I'll collect other bits for RLM02 and spray next.7 points
-
After first having to diagnose the fault with the recent cooker oven, it was time for a little time in the cave. Wings on but starboard wing needed a little shim to bring it level with the wing root fairings, port side is good. Some tidying up to do underneath, nothing too strenuous. Their was something bugging me about this view. I believe that the main doors are the wrong shape, shouldn't the front edges curve backwards as they move towards the centre? Stuart7 points
-
Hello, Also a recent completion, the Academy 1/48 P-47 Thunderbolt. Began its life as 56th FG USAAF, but paint was stripped and it became a plane of the french air force in the 1945 markings ... Metal is done with AK extreme metal colors, a nice range, although one need a gloss balck undercoat and even thoroughfully cured, the finish is quite fragile. Hope you'll like her as well ...7 points
-
Finally paint is on the exterior. I have no idea of the exact colour shades used, so I have had to take an (un)educated guess at what some of them should be, and used Enamels as I generally do: Gloss White (Humbrol 22) for the upper fuselage, Gloss Black (Humbrol 21) for the fin/rudder and prop hubs, Gloss Pale Grey (Humbrol 40) for fuselage underside, tailplanes, wings, nacelles, prop blades. Looking at photo's, the elevators, ailerons and flaps are in a Dark Grey, and I had a tin of Xtracolour Enamel, X130 Gunship Grey, to hand which looked a close match, so used that. As usual, all enamels were thinned with Cellulose for airbrushing purposes. The prop blade tips were brush painted Gloss Yellow (Humbrol 69). I will leave things to dry off for a day or so, and then the wing and tailplane leading edges, along with part of the prop blade leading edges, can be painted Black, and the upper parts of the fin/rudder will be sprayed in Alclad ALC 108 Pale Gold, to match pics of the real aircraft. The Gold section on the right of the pic is a piece of clear decal film sprayed with the Alclad 108 Pale Gold, this will be sliced into thin strips and laid above the fuselage windows to create the Gold fuselage stripes, rather than spraying the Gold straight onto the fuselage itself. There is also a single Red line to go below the fuselage windows too, but I already have some Red decal stripes which can be used for that. The small sections of the decal-backed raised resin panel lines, from Archer Fine Transfers, that I used to replicate the ribs on the elevators/ailerons have worked a treat, very pleased with how they turned out. They have created some nicely restrained, fine raised lines and will look really good once the final coat of Matt or Dull Satin varnish is sprayed onto the elevators/ailerons. Pic below shows the elevators a little closer, obviously still in Gloss paint at the moment though. Getting quite eager to remove those canopy and fuselage window masks now too!7 points
-
Hi all, With a few days off i was looking for something relaxing to build that wouldn't put up to much of a fight. So i dug the fairly recent Airfix R.A.F be2c out of my stash. Having just sorted out the old printer to produce some custom Christmas cards, i made some Belgian markings for it, based on profiles and pictures. Most Belgian machines where re engined and the pilot and gunner swapped position however they initially served in the configuration that is present in the kit so i wasn't going to look for trouble, although i might pick up another box sometime to try some converting when i feel more adventurous. The markings where designed in Inkscape, a free vector image programme that's quite usefull for this sort of thing and printed with an inkjet printer on clear decal film. While painting wood textures can be great fun, i figured the grains around the cockpit area where going to be very fine in this scale so when looking on line for references it hit me i could just print the wood texture along with the markings as a decal so that's what i did. i'm tempted to try it even on the struts and the prop but we'll see how things go. To get everything the right size i scanned the kit decals so i could use the roundels as a reference. Also the chequered decals (that where very temping) allowed me to get the shape for the wood sections right. i have yet to overcoat the decals with a liquid decal film of sorts but i've seem to have misplaced my bottle of microscale liquid decal film somehow... it worked great in the past but i've never dared to run it trough an airbrush... i might have to look for something in a spray can. the one thing i don't like about Airfix is their instance on using black and white decals for their instrument panels. on one hand they have come a long way in representing very fine surface detail in their kits so i don't see why they wouldn't be capable of representing a simple instrument panel. However a decal can look very convincing in this scale so it would be nice to see a bit more detail and finesse if that's the route they choose. anyway, not looking to make things complicated i googled some pictures of the real thing and added it to the sheet.... we'll see how it turns out on the model. And of course, a festive end of the year and best wishes for 2020!6 points
-
A frankly shocking admission from a man of your gravitas and urbane wit Ian. In my defence I should say that I also bray like a horse when reading Viz comic as well... Aye lad. In good time we shall do A Stroudley quite proudly. If by that Ced you mean: Extravagant Prone to folly Idiotically optimistic Conscientiously irresponsible - then you may have a point. Thankfully I'm being supervised by adults here...no, wait.... Glad you approve Giorgio. Have you read his ? Truly rare and haunting. Himself and Calvino would be two of my favourite Italian writers from the last century. You weren't doing anything for the next 24 months anyway were you? 😉 Not a Sea-V of course, but I love this shot in all its misty oceanic grandeur: Plus a reminder that one of Bill's bonny Paloustes (Perdouste? )will feature in events along the way...6 points
-
Yes I've seen you driving your Mars Rover at Telford. Just as well they don't have breathalyzers . . . . Cheque is in the post Mixed bagged today For some strange reason I decided to use a one piece mold and it bit me on the bottom The good news is the skin is 0.5mm thick it could perhaps play a role in the up and coming dio. To tie in with I must admit I had a large whiskey before taking the Dremel to a perfectly good hull. Needs tidying, edges perhaps to suit the planking Thanks for stopping by Kev6 points
-
I hope everyone had a good Xmas. I'm sharing one of my builds from 2019 with you all. This is the Eduard Hawker Tempest MK.V Series 2 kit in 1/48 Scale. Kit was painted using Tamiya acrylics and featured in an issue of SAMI magazine, photography is not one of my strengths and still learning6 points
-
Good progress on the gun pack over the last day or two, the major construction part is done, still a lot of details to add but it's starting to look a lot more like, like a container ship that is! John6 points
-
Coming up to the end of my participation in this really fun GB...4 from me... First, the FloryWash... And, having removed the Flory Gunk and attached an EZLine radio wire, I can now display for your perusal, all four of my 'Tintin' aircraft--the Khemedi Spitfire, the Bordurian Bf-109, San Theodoran Mi-1M and one of Bab El Ehr's Mosquitoes, flown by mercenary pilot Piotr Skut. The other images of the Mossie are in the gallery...Thundering typhoons! What a Group Build! Many thanks to the most excellent and esteemed moderators and hosts! --John6 points
-
Hi guys. The RFI didn’t happen yet as there were some bits that needed polishing off first. Then I started the Gundam which seems to have been on a go slow for a while. Not sure why but I need some wing action in my life. 😍 so I decided to finish off the hurri at the same time while choosing an aeroplane for next years first build. Any ideas? Any Road the last bits that I’d missed were the unpainted wing panels and the darned clips that hold them in place. those ones there look. 🤩 so I used plasticard measured out and drilled holes. These were them painted. To be fair I should have left the painting until they were fitted as I painted them again anyway. 🤪 Here they are fitted. If you are building this and plan on adding these little clips I would advise adding them before you glue the wings as they are really fiddly to fit. here is the other side. And both together. They need a wash now. the panels themselves got primed. And painted. I’ll need to weather these too. had a lot of fun doing this. Can’t wait to get back to wings. 🤩 I’ll get this done before the new year. Take care you lot. As always. Happy Modelling. Johnny. 🥳6 points
-
Started unknown. Dragon 1/4 ton 4x4 truck with mg34. I didn't know wheeled things could be built till I opened this. 23 hours 54 minutes, single sitting Thanks to the hosts for organising. Lemur out.6 points
-
My MIG 21 is as done as it's going to be. All kinds of compromises were made to fit into the 24 hour slot but it got there with an hour to spare! It won't stand too close a scrutiny, so two pictures will have to do. I've made them a bit festive to compensate. 🎅 It's the first time I've finished a kit this quickly since I was in primary school! Thanks are due to the organisers for putting on the show, I've certainly enjoyed taking part. Tony.6 points


.thumb.jpg.158e2e086d45b8f96b7d93b8bee8dc21.jpg)


This leaderboard is set to London/GMT+01:00