
Leaderboard


Popular Content
Showing content with the highest reputation on 16/12/19 in all areas
-
Morning all! Here is my latest roll out. She is the third (of ten, currently) in the line of F-51s that I have either partially built, painted or planned. Apparent to everyone is that she is not a regular operational machine. She formed part of the “Los Cofres” display and demonstration team of the Fuerza Aerea Guatemalteca (Guatemalan Air Force) that flew from La Aurora Airfield in the mid-1950s. She was acquired in 1954 and history seems to record that she was lost at some point in Costa Rica. The build is based around the Tamiya kit, offering me relatively easy builds so that I can get the volume through the paint shop. It is, though, a great kit and although it has some errors it is a pleasure to build. Like the previous Bolivian I dropped the flaps by using spare Airfix flaps. The challenge here was really the masking of the nose area. The contours clearly demand more than simple straight strips of tape. My method was to cut and apply each “square” separately. The colours are probably not entirely accurate. I have, however, researched as best as I can, including support from a couple of the South American/Central American aviation and modelling forums and produced what is probably a compromise. There are some things that I know to be correct – the overall natural metal (rather than the white shown in a couple of retouched photos), the lack of "dark" underside to the rear fuselage (applies the "306" at least _ have a photo, the larger version of the “FAG” lettering (see below) and the layout of the red striping and chevrons (also see below). The recent ArmyCast release for a “Los Cofres” machine (number “342”) shows differences. However, Youtube clips and various images show a different layout from theirs. I’m happy with my decision, right or wrong. See that she also had white prop tips – or at least it looks like that in the YouTube clip. You can see the larger “FAG, and the red chevrons in these shots: What did I use? Kit – Tamiya F-51D (54) Decals – Home printed serial, “FAG” and unit/team badge (thanks @timmas for drawing this). ArmyCast set for the mainwheel door lightning bolts and “squiggles”. Paints – Humbrol Hetalcote Polished Aluminium (27002), Matt blue (25), Insignia Red (153), Matt White (34), Matt Black (33), Blue (89)+(104) mix for the rudder stripes, Interior Green (226) and others. The final coat is Humbrol Satincote. Eduard canopy paint mask. Weathering/Panels – Flory Dirt, Tamiya Weathering Powders and Prismacolor Silver pencil. Here she is: I hope you like her. Martin22 points
-
Right, I'm a novice builder slowly getting back into the hobby, so all my models are learning experiences. I tried a few new things on this build, with varying success. First time making a mask for the cockpit. I was happy with how this went. Very fiddly in 1/72, but I pinched a template online, printed it out at the correct scale and cut through it to some masking tape underneath on glass. Preshading - yet again this all got lost under the top colour! While I'm practicing new skills I am using the little Airfix kit acrylic pots, so not ideal obviously. (I've got some Tamiya paints on my Christmas list) I thin the Airfix stuff down with Ultimate thinner, and homemade flow improver. It's OK ... Thinned oil paint wash on top of a gloss coat (Galeria acrylic) to bring out the panel details - this was rubbish. I couldn't remove the oil wash properly with turps, and it even started going through the varnish and into the paint below. I'm guessing using turps instead of thinner isn't a good idea. All advice gratefully received! This was a Lidl £5 special, so a good base for me to practice on. I've got a couple of 1/48 kits in the pipeline, but I want to build up some skills first before I tackle them. I'm using my ancient Aerograph Super 63 currently. Airfix Mitsubishi Zero by Mike, on Flickr Airfix Mitsubishi Zero by Mike, on Flickr Airfix Mitsubishi Zero by Mike, on Flickr Airfix Mitsubishi Zero by Mike, on Flickr Airfix Mitsubishi Zero by Mike, on Flickr First time masking a canopy, couldn't wait to remove it to see if it actually worked ... Airfix Mitsubishi Zero by Mike, on Flickr Mask, and clunky preshading, that got lost under the paint anyway.18 points
-
This is a Christmas present for my dad - he doesn't build himself, but the Lightning is his favourite fast jet. Apparently we used to go to the local air show when I was a kid to watch them do their vertical climb, but I was too young to remember. I've been doing this build on and off since late November, so I didn't keep up with work-in-progress pictures I'm afraid. I've built the 1:72 F6 kit from Airfix (also given away as a present), and this kit appears to be identical in the way it fits together, just scaled up. Having said that, the 1:72 (F6 version) offers optional refuelling boom, and overwing tanks - for which you need to drill holes in the wing halves before you assemble the wings if you choose to fit these parts. This 1:48 version does not offer the overwing tanks (this is the F1/F1A version), but it does include the refuelling boom. The underside of the port wing has moulded holes to fit the boom, so you don't have to drill them, but the instructions do not tell you to fit it... I haven't done a fighter jet for a long time, and I haven't done camouflage paint schemes for even longer - I started, and was questioning myself, and nearly sanded it all back to do an all-metal scheme. I'm glad I stuck with it, I do like the look of it!16 points
-
This time "Iron" in grays. MiG-21MF Polish Air Force Made as always straight from the box from the Trumpeter set, which should have a new improved version long ago. The model is very weak, but I make models straight out of the box as they are. I try to focus on painting and weathering.15 points
-
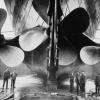
History: Launched in 1900 at the Vickers yard in Barrow-in-Furness, the battleship Mikasa was a pre-Dreadnought built for the Imperial Japanese Navy. Similar in design to the Royal Navy's Formidable Class her layout was typical of the penultimate pre-dreadnought classes, with main armament consisting of two twin-turrets located fore and aft, and secondary guns housed in main deck box batteries. Mikasa served as Vice-Admiral Togo's flagship and had an eventful career, seeing action in the battles of Port Arthur, Yellow Sea and the decisive Battle of Tsushima. A magazine explosion caused her to sink at anchor, but was eventually re-floated and returned to service as a coastal defence ship. Her eventual fate was to be preserved as a museum ship - the only surviving ship of her class, and can be visited at Yokosuka in Japan. The Model: The 1/350 scale Hasegawa kit builds up into a nicely detailed model, and the special edition comes with two metal figures (of a different scale) of Heihachiro Togo and Akiyama Saneyuki, but I've yet to assemble and paint these. I added a PE set by Lion Roar which includes brass barrels and a more finely detailed stern-walk platform among other things. A wooden deck was also added, and climbers utility cord was used to represent the anti-torpedo netting. Although the model depicts the ship in her 1905 'Battle of Japan Sea' configuration I couldn't resist painting her in her earlier black and white scheme instead of grey as she would have appeared int he battle, so the two fighting tops are absent from the masts and other minor details may be off. Thanks for looking in, Ross.13 points
-
After a nearly 3 years build with some large breakes in between, finally my Kinetic AMX Ghibli model is finished! here you can find the WIP (still a bit photobucket infested... that long ago!!) Kinetic kit incl. decals Kinteic GBU-12 converted to a ELBIT Lizard LGB as used by the AMX in recent operations (they sport a bigger seeker head, esepcially the stabilization cone is of way bigger diameter... does that give a bigger engagement envelope? ) Eduard Brassin Lightning pod AMK Sidewinders thanks for your interest and any comments! /Werner13 points
-
A little more progress to update you on this evening... I've been busy making the individual ribs for the wings - each one has been made from plastic card and then glued to the inner wing surfaces. Making each one identical was tedious to say the least, but the effect is what I was after. I've also been adding some Evergreen stiffeners too, and I'll now need to make the stringers that sit between the ribs and add those. Plenty to keep me busy over the next few sessions! IMG_1702 by Thomas Probert, on Flickr IMG_1699 by Thomas Probert, on Flickr Until next time, Tom12 points
-
Wingnut Wings Fokker E.II Eindecker. This particular machine was flown by Ernst Udet, and belonged to KeK Habsheim in 1916. The model is painted using Tamiya and Vallejo colors. Best regards Rune, Norway11 points
-
Hi all, here my latest build: Eduard`s Bf 109 G-10 in 1:48. Built it OOB with included JG 51 markings. Only the pitot is by Brassin.11 points
-
#30/2019 Most probably the last new one by my dad for 2019. Started with an ICM kit but switched to a Hasegawa kit with decals from AML, superfabric seatbelts from Eduard, painted with Gunze H306 FS36270 for the underside and Tamiya XF-82 RAF Ocean Gray 2 and XF-81 RAF Dark Green 2. Used darker shades of these colours to simulate freshly overpainted RAF roundels on the wings. Build thread here https://www.britmodeller.com/forums/index.php?/topic/235061874-lend-lease148-supermarine-spitfire-lfixe-soviet-airforcepvo/page/2/ The model shows an aircraft of 26 GIAP PVO, Leningrad 1944-45. DSC_0001 by grimreaper110, auf Flickr DSC_0002 by grimreaper110, auf Flickr DSC_0003 by grimreaper110, auf Flickr DSC_0004 by grimreaper110, auf Flickr DSC_0005 by grimreaper110, auf Flickr DSC_0006 by grimreaper110, auf Flickr DSC_0007 by grimreaper110, auf Flickr DSC_0008 by grimreaper110, auf Flickr DSC_0009 by grimreaper110, auf Flickr DSC_0010 by grimreaper110, auf Flickr DSC_0011 by grimreaper110, auf Flickr DSC_0013 by grimreaper110, auf Flickr DSC_0014 by grimreaper110, auf Flickr DSC_0015 by grimreaper110, auf Flickr DSC_0016 by grimreaper110, auf Flickr DSC_0017 by grimreaper110, auf Flickr DSC_0018 by grimreaper110, auf Flickr10 points
-
Thanks Giorgio I think you're right - some weathering, especially on the bottom (fnaar!) is probably the way to go. Thanks Simon I think she looks better with the 'Aged White' partially removed and some dings here and there: …and I can do the same on the wings, with care: I keep looking at this: (Thanks to http://www.adf-serials.com.au) Maybe not that weathered, but gives me some ideas.10 points
-
Adding booze to expresso is an old tradition here....🙄 But I did'nt suscribe to it... Look what I received last week from a colleague (A dinky and corgi toys collector) she's a Mk I for sure, but the scale.... Ho or tinier... Sincerely. CC10 points
-
Thanks Cookie Decals job completed, see below OK, I shall never build a Japanese Phantom As I said, I eventually completed the decals job: Most of the stencils are almost invisible, but believe me they're there! I actually still need to put a few stencils on the canopy, whenever I paint it, and on the ordnance - but that was enough for the WE. In between stickers, I added more framing to the canopy, gluing in styrene strips with Gator's grip That's it for the day, all comments welcome Ciao10 points
-
9 points
-
Up in the early morning darkness about 5.30am - couldn't sleep. Eldest son back from hospital (emergency appendix Saturday morning - all well) and Mrs. B now down with a dose of flu so off work giving it the full Carry on Doctor for a few days. Bone-cold frost and lambent moonlight through the branches; couldn't resists a couple of shaky handheld exposures through the kitchen window: That hallucinatory not-yet-fully-conscious light that makes you think you've awoken on a different planet. I think Richard Bach wrote something like that in one of his flying memoirs - something about finding oneself in particular lights and skies and thinking 'This is not my planet.' ? Right. 6.15am and second cup of tea - what's the postman brought in? Having compared the two the only real disagreement is in boom length - WP giving a longer value than the 'fix boys. Knowing the actual overall length of the aircraft this discrepancy can be reconciled during building. Kind of you James. And yes, there is another drawing to follow! 😁 Thanks Jason. I believe that 'Attempting the Vixen' is now the new rite of manhood, replacing that of trying to put a pair of Speedos on a lion. One must be firm but fair with these recalcitrant divils Keith. A handsome portrait! May I similarly offer this fetching study of -what appears to be - a FAW.2 over the Isle of Wight? Image credit: (Can't recall where I pilfered this from so if anyone reading this is the owner, I'll happily remove it) Something odd about the clarity of the ground in shot that make me wonder was it shot in IR? A twin-boom-Jason-Bill-double-build is hard to say but pleasant to contemplate! John - those are very useful: my thanks to you as always in these matters. I do have a number of those drawings in digital copies of the maintenance manuals but you've saved me a lot of labour digging through to find those exact prints. This: - along with the Flight drawing will definitely help me to break down the build into a series of stages, focussing on different sections. I've also been converting some of the reference date to metric and scaling down to 1/72 measurements - more on that below. Sounds like a right bloody nightmare - how anyone can derive satisfaction from looking at a kit and not wanting to saw it into bits beats me. PS. A while back Crisp we were talking about the way the Microcell installation was turned into something else in later Mks? I found an engineering drawing in the manual last night that refers to this later development as the 'Pure Air Bay' Was cockpit flatulence a significant issue for naval aviation? Bloody non-masochist not cutting-up his non-correct non-Vixens.... Careful now Crisp - James has already seen fit to upbraid our previous statements on this matter in the past. 😁 (Though I defiantly agree to the point that the SV FAW.1 is one of my favourite aircraft shapes of all time...) Thanks Benedikt. The modeller's equivalent of 'Asking for a friend' - we've got your number pal. Or is that 'scale'? I bet when NASA's Viking probes first landed on Mars, many of your fellows thought that Earth people were just very small and wondered why wouldn't they come out of their spaceship... >>>Pauses to go away and light stove, wake up youngest son for school, notice the pre-dawn light coming up: Mr.Lambess - how weird is this? I spend ages yesterday trying to find your Sea Vixen build online that somebody had recommended and here you appear! 😁 I think we're essentially saying the same thing about the photo tbh - you in aeronautical terms and me in imaging terms. Whilst the ground plane and camera sensor may have been parallel to each other (hence yielding a broadly planar/plan view of the scene) , the posture and structural elements of the aircraft are - as you rightly indicate - not, resulting in those problems of linear perspective within the frame that I mentioned. Richard's superb photograph is however the only high-res shot I've seen taken of a FAW.1 from directly overhead; this makes it great for identifying all the relevant panel and latch details &etc., but not for shape/proportion/location. There should indeed be an app for it Steve. iCut? i'MDaft? 😁 That is a really really good suggestion and I'm going to do just exactly that (once I work out exactly what needs to go and where). Shouldn't be too much of a problem topsides on XN708/Frog as most of the fuselage centre will be cut off away order to build the engine bays. Yes - and of course technically, it still involves resin! 😃 Always open to such knowledge and experience on here so suggest away ad infinitum!. I merely sit at a bench and make models whereas you actually used to annoy the sky from a sitting position. 😉 Have a good day at the office! >>Interlude: drops youngest heir off to school in the dawn: Agreed. On a superficial examination anyway, the panel lines of the High Planes/XJ481 look promisingly subtle, so I'm hopeful that there may not be too much scribing needed there: we'll see what a more prolonged examination reveals later on. There's going to be considerable internal surgery on XN708/Frog however - some of which means the top of the central fuselage will be much more delicate than the original single piece - so an early scribe is an excellent idea. Sheesh CC! I thought for a moment that was some kind of bonkers Belgian machine for adding booze to espressos. Talk about aviation fuel! You're welcome here - as always - mate. As mentioned above, I spent some time yesterday converting Imperial measurements from the reference data John sent me into millimteric 1/72nd data - to a failed CSE mathematician like myself, a true test of resolve,stamina and no doubt, hubris. I'm posting this graphic in a slightly bigger size than normal so that you'll be able to enlarge it and critique any of my resultant mistakes/calculation: The Imperial dimensions are all taken verbatim from the official documentation in the manual: I initially had a quandary about identifying the radome itself at 6'9" (interestingly the height and width of it differ, indicating a slightly oblate profile where it meets the fuselage) and wondered was the 6 a misprinted 5 in the manual as this seemed a bit long. I've since zoomed in on my own digital copy and it does indeed appear to be a clear 6. With the wing extension, the orientation of those extents outlined by the red lines was the only one that matched the scaled down dimensions on both kits - please correct me if this interpretation of 'Width' for an angled wing is wrong in this instance: Boom length I calculated using the station method James taught me back over on the original research thread: - it goes without saying that the teacher is not responsible for the mistakes of the pupil.... A lot of time has simply gone into trying to methodically organize all the reference materials specifically around the detailing the individual sections on the aircraft: I took a whole load more manual screnshots last night that I've still to add in there... Tony9 points
-
G'day people, Today's progress... Once the PE radio equipment and instrument panel parts are used, the remainder of the interior PE set is made up of cockpit levers and data placards which are absolutely tiny and difficult to remove from the fret, apply and they are still overscale (it would have been far better if some of the space on the PE fret was dedicated to providing seat belts instead, but I digress...) and Airfix provides some great stencils and data placards fort the cockpit which greatly add to the realism. Also, as these are decals, they are far easier to use and position and look better to boot. I added some additional decal placards from my decal gash spares to add to the 'busyness' The air intake/exhaust radiators were painted, as was the tail wheel bay, The exterior PE set includes replacement mesh faces for the the two large radiators and oval shaped internal radiator, again I thought it pointless removing perfectly adequate detail just for the sake of adding PE, so I painted the stock kit parts instead. The more of this kit I build, the less convinced I am that the PE is worth the asking price, cheers, Pappy9 points
-
Isn't it always the way? I have a couple non-puttied winged Mustangs on my shelf as well - nobody's noticed. Thanks for the kind comment Craig. If, after you have a couple more builds behind you, you set your detailing sights higher than the effort above, I'll take no offence! Thanks for the encouraging comments everyone. I got a little bit more done today: sanded the filled panel lines in the wing and painted the wheel wells - it's Vallejo Metal Color and it brushed nicely over a matt acrylic base coat. I left the main spar in Yellow Zinc Chromate, apparently Airfix is the only 1/72 manufacturer to get the spar location correct. I'm not too worried about the injector pin marks on the lower wing as they'll be in the dark as soon as it's closed up. However I had to fill the ones on the upper wing bays. Wings attached - I have to say that even with all the good things I've heard about this kit, it has exceeded expectations. I'd compare it to the 1/72 Airfix Spitfire 22 for elegance and ease of build. Oh, and added some masking tape seat harnesses. Main gear bays with YZC spar.9 points
-
Here's my Airfix 1/48 Spitfire FR XIVe, completed as a 402 Squadron (RCAF) machine, March, 1945. As I understand it, 402 was one of two Squadron's to operate the "bubbletop" before the end of the war in Europe. I found the Airfix kit to be good, but required careful assembly and a fair amount of shimming. The paints I used are Tamiya acrylic, weathering with Humbrol enamels and pastels, and the decals are a mix of XtraDecal codes, Aviaeology serials, and Barracuda stencils. I'm quite happy with the result, and I hope you like, Colin Link to my accompanying "Highback" build - https://www.britmodeller.com/forums/index.php?/topic/235064455-148-spitfire-f-xive-highback-402-squadron-rcaf-march-1945/8 points
-
Newest addition to my collection of finished models - one of pre-production Fw 190A-0s I've started work on this kit early in 2019, and thought it will be straightforward build, as there is only one sprue, camouflage is RLM 02 overall ... but... AZ kits are typical shortruns, and I didn't think of that detail... So, most of the work went on modelling engine area, and thinning down of parts of wings to try to incorporate resin wheelbay. Finally, hard labour delivered satisfying result - at least I am satisfied with final look. Painting is done with Gunze acrylics, wash with artistic oils, and weathering/dusting with MIG pigments. Boarding ladder is scratchbuilt from sprue and thin styrene, antena beetween canopy and tail is fishing nylon, while pitot tube and guns in wings are made from medical needles. Thanks for watching, and please do critique/suggest/comment. Cheers, S. Closeups... Posing with my reference object - USB Kingston ...8 points
-
The case comes up in two months so time will tell... Oooh how lovely. Are you going to do any restoration CC or just leave them in 'vintage' condition? Not strictly a drawing but a quick visualization after taping the kits together earlier and measuring the major axes: The dimensions of the actual aircraft (converted from the reference data in the manual) seems to place it directly between the two kits. The HP offering appears longer than it by about 13mm (under half of which seems to be accounted for by overlong boom-tail lengths), the Frog offering shorter than the actual by just over 4mm, the boom-tail length coming up about 6.6mm short. High Planes scores well on wingspan* *as does Frog - my initial measurement was clumsy so graphic above has been edited to reflect the correct value. In terms of the Frog booms, as I'm using (what I think is) The 'Final Touch' FAW.1 conversion set ,I need to dig that out of storage and check those dimensions tomorrow. I know all this might seem a but pedantic to some but a) not being in anyway proficient in aircraft engineering and technical criteria I'll always be a plodder trying to work things out like this, and b) I don't obviously want to start altering existing structurse and making new bits until I've got a decent mental picture regarding sizes and proportions for the main side and plan profiles. Once those main data points are settled we can get to work in a serious vein; I've got the next fortnight off so hope to make a bit of progress to the point of commencing surgery. Gonna need to find a bigger box to keep all the kits parts in as scrabbling around in the kit boxes is getting tedious - at least the plastic of each is differently coloured so we're not going to end up creating a monstrous hybrid by accident.... Tony8 points
-
Errr, is that legal? @corsaircorp I don't think that one bottle (not even a very big one) is going to last the whole build. Not sure why, I just have this gut feeling.... As for all that talk of "saving work" by buying a better kit.....it's not work, it's modelling! That's what crappy kits are for! 😁 Ian8 points
-
Hello everybody, here you are my latest build... The LATECOERE 298 DE prototype reco version who flight in 1940.This is the Azur special kit with resin part for this version. You can see more détails on my FB page here https://www.facebook.com/pg/aviapassionmaquette/photos/?tab=album&album_id=2195667470725915 I hope you will like it. Thanks Cheers Thierry7 points
-
This build is dedicated to @Giorgio N's Stranger In Town GB, which didn't get through the bunfight for 2020. This is definitely a stranger in town. The RAF had previously used P-40s, but the P-51 Mustang was a completely different kettle of fish. It was big, strong and ultra modern. Unfortunately the Allison-engined Mustangs have had a lot of bad press. People will tell you that they were slow and pretty much useless. It wasn't until the Merlin engine was fitted that the Mustang became a useful fighter. Nothing could be further from the truth. Admittedly, the supercharger on the Allison V-1710 engine had only a single stage, limiting the aircraft's performance above 15,000ft. But below that altitude it was a world beater. It was very fast indeed and had an exceptionally long range. In October 1942 RAF Mustang Is escorted Wellington bombers on a daylight raid over Germany. It's important to remember that Mk Is did not carry drop tanks so it was all done on internal fuel! Due to the lack of high altitude performance, Mk Is were mostly used for ground attack and fighter recce missions, where they excelled. About thirty years ago I gained access to No IV Squadron's wartime record books. The pilots were very pleased indeed with thir mounts and praised the fact that they could easily outpace anything sent up to intercept them. This meant that the Luftwaffe had to lay ambushes for Mustangs as they couldn't keep up in a tail chase. Even so, the Mustang pilots were confident that they could simply walk away from any fight - a very important option for a recce aircraft. So, this will be my build for this STGB. A Mustang Mk I of No IV Sqn. Photos of IV Sqn aircraft are hard to find but I have found this one. https://www.worldwarphotos.info/gallery/usa/aircrafts-2-3/p51-raf/mustang-mk-i-ap247-4-sqn-raf-2/ I feel it is in Dark Earth/Dark Green/Sky. I know that's how the aircraft were delivered to IV Sqn and this one doesn't look too worn, so that's what I'm going to go with.6 points
-
Over the years, I've collected various Sherman conversion parts, to help me build a collection of British & Commonwealth Shermans, some of these parts have become superfluous as firstly Dragon and then Tasca/Asuka have widened the range of mainstream Sherman variants available. One of the sets I acquired along the way was a Tank Workshop large hatch Sherman M4A2 upper hull, but as my knowledge of British Shermans increased I realised that in fact very few large hatch version were used by British & Commonwealth units, only the M4A1 with 76mm gun and the 105mm howitzer version which was based solely on the M4 hull in B&C service. Dragon have released an M4 (105mm) kit but it's fairly hard to find and quite expensive too, as it happens I recently picked up a secondhand Tamiya M4 Sherman 1 that the previous owner had swapped out the 75 mm turret for a 105mm turret from the Tamiya M4A3 howitzer kit, trouble is the Tamiya M4 hull has small hatches and is thus incorrect for the howitzer version, so I got to wondering if I could combine the front half of the Tank Workshop conversion hull with the rear half and engine deck from the Tamiya M4, to produce a fair representation of a large hatch M4, so after a bit of research and comparing parts I decided it was feasible and would be close enough for me. It helps that Tank Workshop designed their kit for use with the Tamiya M4A3 kit and that kit & the Tamiya M4 share many common parts. So here's a couple of pics of the work done so far: As you can probably see, I've still go a little bit of work to do, as there's a slight mismatch on the height of the 2 hulls at the joint but it nothing a small strip of plastic a little filler and and a sanding stick won't cure. I've got a set of decals for a New Zealand unit in the Italian campaign or as most markings are generic I might go for a British unit as I know that 9th Lancers also used them in Italy and I believe 4th/7th Dragoon Guards operated them in Holland too.6 points
-
Ferrgoddssake don't youse guys ever listen I don't do that any more, hence offering the tickets to Ced... Still if Tom wants them. 😱6 points
-
Now I need some bleach for my mind's eye Cheers, Stew6 points
-
Motherwell show last weekend and Tolv went one better, best in class (male kitten), lost out on best in breed to a very cute little girl. Took another first and two second places in his side classes too. Proud dad again Andy6 points
-
cart before the horse..... model companies quote colours of paint brands available, and what is closest from what is available (or give a mix) Her's in anorak world.... we find out what the real paint colours are and try to match them! Flippancy aside, detail of US Navy colors (and many others) have advanced since Matchbox were doing their instructions, as the Tri-color scheme was actually 4 color.... with a 4 color Helldiver on page 2... see scheme diagram AFAIK, the only company offering the full range of US NAvy blues is Colourcoats https://www.sovereignhobbies.co.uk/collections/colourcoats-air/american see points about model colour.... I note you are new here, so the colour bunfights maybe new too you, so I hope not too off putting, but the linked information above is not widely known, many model paint companies still quote the WW2 USN ANA 627 Gloss Sea Blue as being the same as the post 1947 GSB, FS15042.... They are not.... One final point, the chap referred to in the thread, Dana Bell, has been research US colors now for over 40 years...I had one of his book as teen in 1981, and is a member here, we do have the people who write the book posting here, not that you will get sneered at for not knowing something or other, just to show that you will get answers here from experts in their field, Enjoy the site, it's a great resource. cheers T6 points
-
Thanks Simon Thanks Giorgio Gloss coats between colours? Crikey, that's the famous Giorgio patience coming out again Thanks Terry and Benedikt Cheers hendie Always nice to be reminded that I'm not alone. Thanks Cookie and Bill - practice eh? OK I'll give it a try Ah, the famous Keefr modesty! Thanks Roger Interest in unremitting perfection Steve? Have you seen how many follow your builds? Ta Crisp I was cleaning up the tape residue on the front when this happened: Not unexpected of course but I quite like the look… I wasn't really happy with the 'Aged White' and this has made me think… what would it be like with a bit of a white wash? I still need to touch up the DSG demarcation but what do we think? Of course the problem is going to be doing the same to the wings with all that rigging…6 points
-
Because I feel like showing off Revels BV 194 is a pretty nice kit, the only bugaboo is the wheel well walls split in the middle and don't line up that well, but I just used tape to mimic canvas, and my way of opening the bomb bay isn't what the instruction suggest6 points
-
Hi Joel I apologise - I've only just seen your thread. You are seeking to build HMS Dianella and as Jamie has indicated there are some super pics of her. You are mistaken re kits being inappropriate. You have a choice depending on what scale you are contemplating 1/350 MIRAGE hobby - HMS Pennywort will build to this IF you are happy repositioning the mast 1/144 Revell HMCS Snowberry - check out my build as a rough guide in many ways this is your best choice in terms of size cost and convenience. We'll come back to this 1/72 Matchbox/Revell HMCS snowberry - venerable, large and needs a lot of (expensive) aftermarket bits to reach a standard Right - details The ONLY book you really need is this one unless you are really going to town - https://www.pen-and-sword.co.uk/ShipCraft-Special-Flower-Class-Corvettes-Paperback/p/2903 HMS Dianella as portrayed in these excellent IWM pics will build VERY easily from the Revell 1/144. In no particular order - you can add the Eduard Aftermarket PE sets or one from Starling models https://starling-models.co.uk/en/search?controller=search&orderby=position&orderway=desc&search_query=Corvette&submit_search= ...they also have a replacement f'wd wood deck For 4 inch gun and other deck fittings you'll benefit from L'Arsenal pieces that are just lovely http://www.larsenal.com/1-144-c102x2500029 The 273 Radar "lantern" you can obtain from Shapeways https://www.shapeways.com/product/YZLSAY24K/radar-271-round-housing-1-144?optionId=60339441&li=shops She had a 3 section bridge support "lattice" which is included in the Starling etch. She has 4 aft 20mm Oerlikon bins which is a little unusual for an "Atlantic" scheme boat and they are available from Nial Orr who I'm also reminded does the lantern and the Curved gun shield (which Dianthus has https://www.shapeways.com/product/MN72N7C9A/144-aft-oerkilon-tub-pair?optionId=65003286 She has "High" aft Depth charge rails which are a little problematic but I have a solution As Jamie says the colour choice is relatively straight forwards. make life easy and invest immediately in his Colourcoat paints - that spray and brush wonderfully - you won't be disappointed. The hull is white - the decks are non slip grey and the hull colour is likely Western Approaches blue but COULD also be B55 - no one is going to argue either way The Hull pennant numbers are a little problematic - IF you decide they are white then they are available from Coastal Craft Models, if you decide they are grey (a possibility) then you'll need Maketar masks https://shop.maketar.com/ You can detail this kit to whatever degree you want and If you are slightly bonkers you could go for the full English with the Pontos set http://pontosmodel.com/ Should you choose 1/72 then Great Little ships as has been mentioned above is your special friend https://www.djparkins.com/home.php?cat=264, and there's a plethora of parts on Shapeways. I Hope that's a help - PM me if you need any further help I'm going to be building HMCS eyebright in the New Year in 1/144 Cheers Rob6 points
-
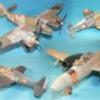
So hopefully this is allowed (seems the twin-Mustangs are allowed judging by the comments in the chat thread)... It's going to be an 'out of the box' build, with the exception of some extra decals and I'm going to build the night-fighter version with the huge radar pod because I have a thing for odd looking birds (!?!) The history of the aircraft is very much a tale of 'necessity is the mother of invention', needing a long range escort fighter to keep up with the bombers the idea of strapping two Mustangs together seemed like solution (plus having two pilots allowed them to take shifts at the controls), though it was never completed in time for active service during WWII. The radar equipped version needed the radome pod to extend beyond the propellers to stop interference, hence the extra goofy looks. The F-82 was also the last piston driven fighter ordered into production by the USAF. Back to the kit... As can be seen it's of an old vintage, complete with raised panel lines, not too many pieces, some interesting moulded in part numbers and what looks to be some silk screening on the main wing section. There's some nice detail on the guns, which can be seen if you model the access panel open, though rather a lot of flash in places - like round the pilot and co-pilot! All the parts are supplied in a single poly bag, though the clear parts are in a separate internal bag. The supplied decals seem OK (for the age of the kit) but I really didn't fancy the large tail decals (too much chance of me mucking up) so bought some after-market ones (though they also have a similar option). The instructions are in typical style: 2 A3 sheets, printed in black and white, folding together, though very large scale, easy to follow instructions.5 points
-
Dear all. I'd like to present my recent adventures with the character-full old Airfix kit of 'Faithful Annie'. I made a lot of changes - as you might have anticipated for a kit this old - but belly aside, I was impressed by how accurate Airfix caught the proportions and outline of both fuselage and wings. There was much scratch-building from brass & plastic, which I won't bore you by listing again as the cumulative list of tasks and rationales can be found over here: The aircraft is the one that famously discovered the Knickebein beams being used to guide the Luftwaffe to targets over Britain in 1940 - a list of historical refs. are given over on the build thread. Aside from the Hallicrafters set used to detect the beams and the need to alter the electricity supply of the aircraft in order to power it, any further detail regarding the installation of any different aerials &etc. seems now lost in historical mists. Not surprising given the jeopardy of that period in the war. I was lucky however to be in correspondence with the son of the pilot - Flight Lt. (as he then was) H. E. Bufton - who generously sent me copies of the pages from his father's log book for that night, confirming both the serial number of the aircraft and timings of the flight. Aside from log book entries, I was able to cross reference with a copy of BAT&DU (later 109 Sqn) Operations Record Book (AIR 27/852), obtained from the National Archives. I hope that Hal Bufton's son is pleased at how his father's aircraft has turned out. All camouflage and national marking are painted with Tamiya acrylics: detailed discussion over colour schemes and why there are no squadron codes on the fuselage are contained in the latter part of the WIP so I don't propose repeating these at length again here. Main technical reference for buildings and alterations (aside from contemporary IWM photographs) of the aircraft was the Anson parts & maintenance AP.1525A,D,E&F. A general walkaround first then: Some closer-ins.... The insides had a makeover too: I hope you like the results. It was a lovely kit to be working on and I was blessed - as always - with a kind and knowledgable bunch of companions on the 18 months it took. Tony5 points
-
5 points
-
Hi all, Following my last build, I decided to try something a little bit different. There’s a bit of a story behind this one too… I started learning to fly when I was 13 years old, first fying Grob Tutors with the Air Training Corps, before taking up gliding and, eventually moving on to powered flying – gaining my PPL in 2017. Unfortunately, I haven’t flown much since then (powered flying is WAY too expensive) so I’ve decided I’m going to try gliding again – I’ve never flown a glider solo! I bought a 1/32 Revell Ls8, however, the all-white colour scheme and lack of interesting decals haven’t enthused me to build it – glass fibre/composite gliders also aren’t so interesting to model (though way better performance!). This led me to turn my hand to scratch building a glider out of balsa. The glider in question, the Schleicher K8b, in the colours of my local gliding club – and quite possibly the aircraft I’ll end up soloing in once I get back to gliding. I found plans online for a 2m wingspan K8b which someone had already turned into a .dxf file, I used CATIA to scale these plans to 1/32. I constructed the airframe by creating a spine from the side elevation then added ribs and stringers, before covering with balsa. The wing was created by making the upper and lower skins, gluing the wing ribs to the lower skin before attaching the upper. The cockpit was a challenge, particularly the copy which I plunge molded some clear plastic packaging (from some new baubles) over a balsa mould. The pilot is a slot car figure from immense miniatures, with some major surgery to cram him into the cockpit – the internal fuselage structure visible in the cockpit sidewalls is made from 0.5mm pencil lead. Painted with a mixture of halfords rattle can white and humbrol acrylic red, the decals were home printed and are a little thick, but overall, they look the part. I’m really happy with how this has turned out given that I’ve never made a balsa model before and never made a model from scratch. There are a few inaccuracies, I’m aware of, such as the fuselage lacking a protruding “spine” over the centre of the wings, but I think it looks the part, let me know what you think! Schleicher K8b, G-CFTN, Mendip Gliding Club Hopefully I'll get some pictures of it "flying" when it's less windy outside so I can suspend it. Thanks for looking! Ben5 points
-
Dear fellow Britmodellers, here's my latest, the 1/72 KORA Fw-190 F9 Panzerblitz. This version was the last variant of the famous "Butcher Bird", armed with unguided anti-tank aerial rockets. These rockets were similar to the R4M Orkan air-to-air rocket used by the Messerschmitt Me 262. The kit contains the well-known Eduard sprues (for the A-8 version), some resin and photo-etch add-ons plus a decal sheet for 4 marking options. I painted with Gunze/Mr.Hobby acrylics, according to instructions, as I could not find an original photograph of this particular aircraft. The pitot tube is a metal item from Master. All photographs by Wolfgang Rabel. Thank you for your interest and comments, best greetings from Vienna Roman5 points
-
Hello happy folks, Among all my 'serious' builts, I decided to have a bit of fun and do a quick built of a what-if plane. The story is quite staight forward. In the early years of the 21st century, the Canadian Armed Forces were looking for a replacement to their ageing CF-188 Hornet. Due to budget restriction and higher reliability of modern engines, it was decided to select a single engine aircraft. So the Dassault Rafale, Boeing F-18E and Eurofighter Typhon were out of the game. That left Saab with its Super Gripen, Lockheed Martin with its X-35 and Boeing with the X-32. Considering previous experience with Boeing field support, the airframer guarantee that it fighter would enter service before the competition and a good discount (from non-official sources), the CAF opted for the newly named Boeing CF-189. Thanks to the fact that Canada was the sole launch customer, the development process was quite quick and the first squadron was declared operational in 2017. Fifteen years later, the CF-189, nick-named the "blue whale" thanks to its big-open-month-like-inlet is still the main fighter for the CAF and has demonstrated high reliability and operational flexibility. It is not rare to see them in various airshows all around the word under special livery schemes like the one designed for the 2032 International Air Tatoo. The basis is Italeri Boeing X-32 in 1/72. Decals are from Belcher Bits. Colours are 'inspired' by Canadian CF-5 grape scheme. The built is basically OOB with only the ejection seat harness added and some brake pipes. Lot of masking tape was used.... Hope you like the result despite the poor quality of the pictures (it is difficult to get good natural light this period of the year) Cheers, Antoine5 points
-
This kit was first issued 1956, the year of my birth. My dad worked for Mettoy, and they distributed Aurora kits in this country. I was lucky enough to get some of them to build, though I can't recall which ones in particular. So the name Aurora brings back fond memories, hence my purchase of this kit - a scale and subject I rarely venture into. Thanks for looking. The WIP is here:5 points
-
Keep plugging away Ced. It has survived the attack by the blob and other mishaps. My main worry though is the thought of you and Bill in your birthday suits dancing around Stonehenge on the Solstice. NO!5 points
-
Sprue Brothers has the Special Hobby 1/72 AJ-37/SK-37 double kit on sale today. One jumped into my cart and forced me to buy it. Cheers, Rich5 points
-
Hello again! Well, having bit the bullet on the wings, there's nothing to do but seal up the join lines. For those not used to building resin kits, or those just curious, here's the way I go about it. I started doing it this way after building a few NMF aircraft, where the joins have to be perfect, or else. Since this model has an all-paint, and sort of dark colored finish, it would probably not normally need as much mothering -- but, that's my habit now. First a little masking tape to protect adjacent surfaces, then some Bondo Glazing and Spot Putty: This is sanded down with the judicious use of a tiny rat-tail file (above right) and some rubber sanding blocks of various shapes: These are three sets that I've collected over the years. You just wrap sandpaper around the shape needed, and away you go. These are available from wood worker type stores and on-line, not from most Big Box stores. Note that on the lower row, the thin edges are shaped differently from one another, such as square edge, pointed, rounded, slanted, etc. Highly recommended, if you can find any! Next a coat of Mr Surfacer 500 (thick primer) atop the spot putty: And when that's sanded down, we're finally getting somewhere. You will note that the horizontal stabilizers and the wing tip tanks have been added, and that I have chosen to black off the turbo exhaust fro the inside, as opposed to using the entire exhaust piece as provided, which did not fit really well to the inside contour of the fuselage. Well, that's it for now. More anon. Ed5 points
-
If they come out alright, I'll run a few more copies off. I've filled the former now so next step is some high build primer to allow me to polish out any imperfections. Before I do that. I'm thinking of drilling a hole where the dome goes, partly for vacuum and partly to act as a centre for when I cut the hole out5 points
-
Looks like there was a need for this Mustang STGB, regardless of this being the fourth one. There are so many build threads I just gave up trying to browse through them... otherwise I wouldn´t find time for my own build at all . So just to save precious time, here´s a collective "WELL DONE" to everyone participating . V-P5 points
-
I’m with him. I’m so rubbish at airbrushing that the idea of freehanding camo ain’t even on my ‘must have a go sometime soon’ list. Anyways. How can the brave hero of our story achieve true glory unless there’s a set back here and there to triumphantly overcome? Where’s the human interest in unremitting perfection.......5 points
-
I’m rather intrigued as to how much (our little) of the original kits are going to end up being incorporated into the build Tony......There ought to be some way of keeping track of it..... I dunno what the plastic on either of these kits is like to work with; but I guess you’ll be re-doing more or less all the surface detail from scratch. Looking at how the fuselages are split horizontally it occurs to me it may be easier to re-scribe the panel lines earlier rather than later in the build and before sticking the fuselage halves together; at least that way you’ll have a flatish base whilst you scribe. I guess it depends on how much/when fuselage reshaping is required...... As a veteran (in duration if not numbers ) of dual builds, I’ve found that resin casting has been the way to go to produce identical multiple bits (I was thinking boom shapes ?). But I guess there’s a more hi-tech 3D printing option in play here Now. Instead of musing on a master-modellers’ build as who needs no suggestions from the likes of me, I ought to get some real work done............5 points
-
As usual, I got a little sidetracked, only this time it was a pretty big snow storm. We got 4 feet of snow starting the night before Thanksgiving for 48 hours straight. That, put a real crimp in my style and it really wore me out. The weather has been pretty dark, wet and gloomy every weekend since so, not conducive to doing too much. Anyway, I have been working on and off on the pipes from the turbos and exhaust. Since I made the decision to eliminate the muffler and go with the straight LM exhaust it's been a bit of a challenge to get them right. So, what follows is a lot of cutting and reassembly to try and get something that resembles the picture that Pascal supplied above. First things first. I had to cut the turbo pipes to get the pipes to go straight back as opposed to angling outward towards each side of the muffler. So, the first thing was a cut to get the new angle. Things are going in the right direction Added a weld seam to cover the cuts in the pipes Both sides looking generally correct. Playing around with some tubing pieces to see if I can get the shape of the pipe bends but, the tubing is too big The turbo pipes are too far to the right Painted the pipes with the weld seams I was pretty happy with the way the seams look Here is where things started getting weird. Notice the direction the pipes are going. Time for more surgery to try and correct the angle Sorta OK but, not quite right, especially the right one Really not happy with this and this was done before the storm so, I had time to sit on it and think about it I dug out the rear frame and body panel so that, I could put the engine in there and see how it all looked in relationship to the exhaust opening in the rear panel Kinda going in the right direction I thought that I could make these pipes work so, I started filling the seams The left one is iffy but, the right one is too far to the right but, like I said this was all before the storm and Pascal's pictures and I was going to probably settle It didn't look tooo bad but.... I could almost settle for it, almost but... It even started to look OK from a distance , LOL Needless to say, after thinking about this and looking at the crooked misaligned pipes for a few weeks, I knew that, I had to fix this. My next post will be the fix and a lot more surgery on the turbo muffler pipes. Good thing that I had two mufflers and two sets of pipes to make most of the exhaust system. I really could have used one more muffler to make it all out of the same size plastic but, the part from the back of the transaxle out the rear will have to be made from aluminum rod and brass tubing.5 points
-
Hi all, Here’s where I’m at currently. Everything is going pretty well and there’s been no real disasters on this first leg. With the exception of the paint being a complete PITA I just cant seem to get it to mix well. I tried numerous different thinners in different ratios, i tried water too. But this stuff is just so difficult for me to use. It clogs the airbrush too. I really dislike it. I have a few bits to do then i can join the fuselage halves on creamer’s dream and repeat all the interior process with rovin’ rhoda. I think it should be pretty fast to repeat this stage. The IP and pedals etc quite novelly slip in later in the build. I took this interior to completion stage to see if there were any pitfalls, rather than simultaeneously making the same build error on both aircraft. I think I will continue in this manner i feel comfortable doing that, repeating each little stage. The eduard kit has been great so far it has some amazing details but lacks a few locating points for the odd part and theres been an incorrect paint # call-out in the instructions but thats just a tiny tiny niggle, generally its fabulous to my untrained eye. The cockpit has been given a wash and i dusted over it with light powder as well a little bit of pencil chipping and scratching. The floor i wore-down where the pilots feet reside. I chose not to use all the photoetch but i brought out a few bits and bobs with a dab of paint here and there. the Löök IP i have given a wash and dust. From the factory that didnt match the photoetch parts black / finish. But now they’ll gel nicely i think. Wow- There’s some awesome build topics in this GB and three pages of them already!! Patrice @TEMPESTMK5 you are gonna have your hands full! Thanks for reading.5 points
-
totally agreed ! One true scale for big stubby fingers (like mines) and mole related sight (idem) is.. Hum ! 1/48 !! Well Dear Baron ! The Vixen is on her way !! I'll seat at the counter sipping this one... And looking closely at your next brass extravaganza !! Impossible to behave CC4 points
-
Yes, that .... and the fact that I have a regular daytime job that allows for proper curing time of the clear coats Call it super-weathering? Seriously, this thing used to hang around into salty water, you may want to attempt some serious weathering .... just saying ... Ciao4 points
-
G'day Bruce, I would have to agree with you, so far the kit seems to be vice free. To be honest, the filler pipe is buried in a dark corner under the overhang of the fuselage side and unless you know what to look for it's not that visible unless you go looking for it and could easily omitted. G'day people, Well a big day of painting. I have painted up the cockpit/wheel well/air duct assembly. This has to be done before the whole assembly is sandwiched between the fuselage sides. Airfix provide sidewall details on separate side panels which does make for an easy painting exercise, however I attached these to the fuselage first. The details look neat and subtle but have enough relief to make painting them a joy. The left side pedestal with the rudder/aileron and rudder trim wheels looks a little shallow but I can live with as it will be buried deep inside the cockpit and there is enough depth to hold a wash. The PE instructions would have you remove the trim tab wheels as well as a good proportion of the molded detail but frankly, I thought the molded kit detail was superior and left these untouched. There were some ejector pin marks that required filling however the large ones to the rear cannot be seen once installed into the fuselage so I did not spend any effort to eliminate these ones. The oxygen hose, elevator trim wheel and throttle quadrant were added separately. I also added some throttle linkages to the throttle quadrant using some short lengths of stretched sprue. The floor sub-assembly was also painted at the same time though the pre-painted belts were added after all the other painting was complete. Which brings me to my soap-box moment. Having paid a small fortune for an interior details PE set, I discovered that seat belts are NOT included as part of that set and have to be purchased separately. Now, I can understand offering the seat belts as a separate set for those who are otherwise happy with the level of kit detail but not including these in an interior detail set is pure gouging IMO and although it makes excellent economic sense I feel it is an underhand strategy - rant over The kit instrument panel also has lovely raised detail and would most likely come up very well with some careful painting and application of the kit instrument panel decal. I opted to sand off the raised detail to prepare it for the addition of the pre-painted PE comprising of several laminated pre-painted PE parts to build up the relief. Thanks for looking, cheers, Pappy4 points


.thumb.jpg.b4a5069fd2c2dd5708ce1694345c5b11.jpg)


This leaderboard is set to London/GMT+01:00