
Leaderboard


Popular Content
Showing content with the highest reputation on 05/12/19 in all areas
-
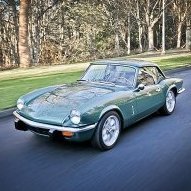
The Avro Vulcan is my favourite aircraft without a doubt. Although the only one I ever had the chance to see in flight was the Vulcan B.2 XH558 from 2007-15, my favourite Vulcans are the B.2's less famous predecessors, the Vulcan B.1 and Vulcan B.1a. The first B.1s retained the pure delta of the prototypes, although after the fifth aircraft they were fitted with the first iteration of the Vulcan's distinctive kinked delta. The Vulcan B.1a was a stop-gap measure while the B.2s were coming into service, they were given the full set of ECM gear of the early B.2s with a few other less notable modifications. They were retired in the late 60s to early 70s, and although one B.1 lingered on at Cosford for many years, they were all gone by 1986. Today the only surviving physical evidence of their existence are a handful of cockpit sections that to most would look no different from that of a Vulcan B.2, however the aircraft in reality were as different as two derivatives of the same basic airframe could possibly be. I never got the chance to see a Vulcan B.1 in person unfortunately, as I have said the last one was scrapped in 1986, and I was born 17 years later in 2003. So here is my model of my favourite aircraft, the Vulcan B1.a, this one is XH500. The model is based on the 1/144 GWH Vulcan K.2 kit, and heavily modded to build the earlier variant. This is probably my favourite angle to view a B.1/1a from. Here you capture the look of the 'sporty Vulcan' as it was often called. The Vulcan B.1/1a's pitot tubes are on the wingtips, whereas the B.2's are on the sides of the nose. As can be seen here, the Vulcan B1's intakes are narrower than those of the B.2. They were powered by the Olympus 100 series of engines which were less powerful than the B.2's 201s or 301s. The GWH kit's intakes are already too small for a B.2, so very little modification was needed, although I would go even thinner when I do another B.1/1a (it's inevitable) And here you can see the smaller jetpipes of the Olympus 100 engines. Another one of my favourtite angles, seeing the whole aircraft from below the nose shows off just how much smaller the B.1/1a was than the later B.2s. I trawled through photographs of the underside of the aircraft to get a good approximation of the weathering on the B.1, which was significantly different to how dirt accumulated on the B.2 And here's the WIP thread for anyone who wants to read that. Huge thanks to @robvulcan for the conversions he's done that inspired this, without his builds and advice I could not have done this30 points
-
Hi all, here are some pics of two 1/48 scale Eduard kits I completed lately. Originally I got my hands on the Reichsverteidigung special boxing, which allows to build one FW 190 A8-R2 and one Bf 109 G14, with plenty of nice marking options. After building one FW 190, I really wanted to make another with the extra glass armor plates on the side of the canopy, so I purchased an extra Overtree kit. The build went very easily (much easier than the earlier FW190 A8 release, which was tricky to assemble). As usual I painted the kits with Gunze Aqueous Hobby colors. I used H 317 and H 68 for the RLM 76 and RLM 74. To add variety I used the recommended H 69 for the Grauviolet RLM 75 on one kit and H 305 on the other. The H 305 has a less violet and more gray shade. The weathering was done with oil washes, acrylic ink pencils, pigments, and chipping done with foam. have a nice day, Christian.23 points
-
Hey guys, First post here, long time lurker but only first time geting round to posting! Im pretty well established on the Facebook pages and Instagram (@jonesy.models) but never branched out to BM yet! I thought id share a recent completion of mine here, Airfix's venerable offering of the Hawker Siddeley Nimrod... The kit itself is really quite remarkable, and offers the oppurtunity to build the MR1, MR2 and R1. I went with the MR1 at the request of recipient, who further detailed that he wanted XV230 in her handover days to the RAF. So i decided to represent her as she was at Hawker Siddley Aviation Woodford in 1969. Just in her standard scheme and markings, lacking the squadron details et al. I used a pick of markings from the Xtradecal X72080 'Grey and White Nimrods in RAF Service' sheet which provided all i needed for the final livery. The build itself wasnt without its difficulties. The main being when it came to affixing the wing. The lower wing section was fitted, and then when the upper halves were to be attached, it wouldnt go correctly, forcing an unnatural and unrealistic dihedral to the wings. As a result, it took a few good goes, and finally a bit of filler to get it correct. Otherwise, the build was uneventful and generally pleasent. Which is good, as i have two more of these beasts to build in the near future! The basic shots above show the completed model, and what a mighty looking aircraft the Nimrod is! I am a Volunteer at the Avro Heritage Museum, on the former Woodford Aerodrome, and here you see the mode in 'flight' over a model of the airfield at it once was in its heyday. Now, it has been demolished and is being turned to houses. A shame for the home of Avro, and birthplace of some of my favourite aircraft, namely the Vulcan, Nimrod and HS748. Finally, a shot of the model in profile with our Nimrod nose section, XV235, which holds many stories in its own right! Thank you for reading my post, my first here but i dont doubt therell be many more to come! Rhys Jones-Ager21 points
-
My latest build is de BAC1-11-300 in KLM colours. KLM leased this aircraft from Eagle Airways for a few months in the 60's, while waiting for their DC-9's to arrive. KLM flew this aircraft in full KLM colours, but only a few pictures exist online. This build is part of the "100 years KLM group build" over at the Dutch Modelbrouwer forums. The kit is by Authentic Airliners and is excellent as per usual. The decals were by F-decal, but the fit wasn't too great (the vertical stabilizer decal for example was way too large). The window and flightdeck decals by Authentic Airliner decals were great too. I made the wire antennas too short, but fixing that would cause more damage than it would solve, so I decided to let them be (and also they are not tight enough, which tends to happen over time. I'm going to experiment with different methods of applying them to prevent this from happening again). I am happy with the way the engines turned out. I used a different paint on a recommendation from my buddy Vintage Jet (Inspire Chrome) and that works really great! It's expensive but it gives a clear shining metal result. At any rate the pictures: My next build will be the Zvezda 767-300, in the latest KLM livery this aircraft has flown in. Thanks for looking and see you next time!18 points
-
Here's my 1/48 Spitfire Mk XIVe highback completed as 'Blackie' MacConnell's mount at the end of the war. I believe he was flying this aircraft when he downed an Arado AR-234 in April, 1945. It started life as an Airfix PR XIX, and was modified extensively to become a Mk XIVe. Decals are from XtraDecal, and Aviaeology stencils. Paints are Tamiya acrylic's, with weathering using Humbrol enamels and pastel chalk. Hope you like, Colin Build log -15 points
-
Once bitten, twice shy, if my memory works… I wanted to make sure that the exhaust stubs were in the right place, which meant bending some PE for the hedgehog supports: I'm never sure whether to bend with the slot on the inside or outside - help anyone? This seems to be right: …so i'll use that as a 'master' when bending the others. The engine masks weren't big enough when bent over the gearbox: …so I cut some bigger ones: Better. Mojo tank on empty again. What is wrong with me? Don't answer that…15 points
-
Here's a few more photos I took with other models Two Mk.1 V Bombers together, a Victor B.1, XA940, and Vulcan B.1a, XH500. My Vulcan B.1a alongside a smaller diecast Vulcan B2 (Corgi XH558). Shows just how different they really were. Avro sisters, the Vulcan B.1a, Vulcan B2. and a Lancaster B.iii Special (also Corgi diecast)15 points
-
I've always wanted to make such a model. wood and metal.14 points
-
I'm continuing my history of F1 in 1/20th scale but I skipped the 80's and went right to 1992. After the Tyrrell 003, which I don't think is the most beautiful F1 car, to what is my favourite F1 design of all time, the McLaren MP4/7. The overall shape is so pure - no extra winglets or aerodynamic furniture and one of the most iconic liveries of all time. This was built right out of the box with the exception of the tobacco decals which were the "Museum Collection" set that I ordered from Hobby Link Japan. The Marlboro part of the decals were fine, but the orange parts of the decals were way too light in my opinion. The Tamiya decals had the McLaren logo in the orange/red, so I ended up cutting down the McLaren chevron into the Marlboro flag shape to use alongside the cockpit. The kit went together pretty well for the most part, and I built this as a curbside as I won't be displaying it with the engine cover removed (see below). The engine is in there, but all in semi-gloss black. Issues I did have were mostly related to the side vents. Tamiya molded them as separate pieces, but I found it difficult to glue them in and get a consistent panel line all the way around, especially since you have to fill the edges along the bottom. I ended up pretty much filling the whole thing until the panel line was just visible, but when I cleared over the paint and the decals, it completely disappeared - it looks like one continuous piece instead of the changeable size vent insert that I believe they used that year. I used Tamiya masking tape for curves to paint the red sections and it worked pretty well, although there's a little bit of bleed in the pointy parts where the tape overlapped. Overall, Im happy with the result - just a few nitpicks that I hope I'll improve on with the next model - I'm jumping right up to 2017 with the Tamiya SF70H. I'll go back and fill in a few blanks like the 80's and 2000's after that one. I just got the Tamiya 1986 Williams FW11 that will look good next to this one. The paint is Tamiya white and a custom mix for the orange. After looking at 100 photos online that all looked different, I ended up just trying to match the colour of the original Tamiya decals. Clearcoat was again using Mr. Color GX100 with the levelling thinner although this time I thinned it to 1 part clear to 3 parts thinner. It flowed very nicely, but with the weather being quite cold, it took a while to fully cure. I ended up leaving some of the parts for 10 days before sanding and polishing. I also thought I'd share how I'm displaying the models so far. I've been building shadow boxes out of poplar and then mounting the cars vertically in the frame. I created some graphic panels to sit behind the model with a large year displayed. At the bottom, a technical panel has the manufacturer logo, driver name, car dimensions, engine type and output etc. I thought it was a cool way to see the visual differences in the cars from decade to decade, and to see the changing overall sizes and engine output over time as well. I also like the way they feel like scientific specimens preserved for future generations to learn about. Thanks for looking, comments and critiques always welcome. Martin.13 points
-
Here's my build of the Fw190 A7/R11 Fug 217 Night Fighter flown by Fritz Krause. I used the Airfix kit, decals from Peddinghaus and scratch built the antenna. Thoughts comments welcome. Sorry for the background I need to make myself something that will make the photography look better.13 points
-
Can't swing it AND draw fast, I need both hands to… Oh, the Crikey, got it Thanks Giorgio 'tis 'Copydex' Stuart, great for this sort of job. Holds well enough and, when you pull the part off, you get to peel the latex off; almost as good as bubble wrap Thanks AW - it transpires that there is a reason for having the rear view - see below Thanks Adam - mishaps continuing! We've got the puppy here this week and she's not helping my modelling at all, having decided this is the best place for a snooze: I say 'puppy' but she's almost a year old now - still slightly potty though. So, puppy down and engines up. Let's look more closely at that picture of the rear of the engine: Notice anything? The arrow helps. There's a slot in the back of the engine that fits a lug on the mount like this: Fortunately I'd put that engine in the right way up. Unfortunately: …that's the only one. Rats. No problem, chop off the lugs: …clean up the mount and the engines and cowlings go on fine: I've let those dry a bit while I post this. Time to put on the front bits and exhausts.12 points
-
Swing it! and draw fast!12 points
-
Thanks chaps Perhaps I should start a 'guess the shadow competition? Might keep you busy while my mojo's low? Hendie I can't produce a squadron - the shadow's from the light bulb. Pity. Thanks Giorgio - Stynylrez is my friend It will indeed Greg - as per perdu's request, in formation with the Nimrod Thanks Rob Yes, I don't no what came over me, very David Bailey. Cripes! You're right! Thanks Will, but I won't be testing my seams like that! Some mojo before bed so I made use of it. I have no idea why Italeri decided that they needed to emphasise 20o twice in the instructions: Maybe it's because the square location dots for the intakes aren't actually on the model? Oops. Anyway, all the bits were assembled: …and, because I don't need the props to spin on the ceiling but I do need to mask the engines I decided to glue in the shafts: My idea of glueing the cowlings on with latex worked OK but I realised the the back of the cowlings doesn't touch the nacelle so there's a risk they'd be wobbly. With all four assembled: (No protractors now chaps - I'm not that accurate) …all I needed to do was to cut some masks out from some 'that'll come in' packaging with the circle cutter: They've been painted so I'll put them together next and stick 'em on the wings.12 points
-
Hi, Beriev MBR-2 was one of the most numberous small flying boat of WW2 and the basic such machine in Soviet Union. This type apeared in 1930. initially with open canopies and M-17 engine, later (as MBR-2 bis) with pilot cockpit closed, a closed turret, added flaps and redesigned tail as well as M 34 engine The Avia/Eastern Express kit of Beriev MBR-2 bis looks in box very promising. However after careful look and comparison with drawing and photos some flaws became obvious. Among them the most important are too deep and unrealistic parts of wings and tail covered by fabric and too sophisticated shape of hull. Building earlier variant with M 17 requires introduction of all changies between those two variants. So, constructing this model I did following main changies: 1. change of shape of bottom of hull 2. filling up deep holes between ribs (i used Tamiya resin putty to avoid future deformation of wings) and reconstruct all ribs on wing and tailplane and remove flaps. 3. reforming rear part of fuselage and fin 4. Build new engine cover. 5. Replaement of 2 blade metal prop by 4 blades wood one 6,Removing of cockpit fairings 7. Additional detailing of MGs and 200 kg depth charges Model presents VV-183 captured by Finns on 31 July 1941. Machine was renovated and started service on 23 July 1942 but on 8th September the same year the plane made emergency landing near Norrksar due to engine failure and later sunk while in tow... (reference: Martime Aircraft by K.Keskinen, K.Stenman, K.Niska, 1995, p. 89 ). Since she was in use for about one and half month I did not do serious weathering or a lot of exploitation signs. Thi is first of mine planned series of WWII Berievs. I am building now also MBR-2 bis, Be-2 (KOR-1) and Be-4 (KOR-2) the two last in flying boats and floatplanes GB II. The MBR-2s I started prior launching of GB. Comments welcome Regards Jerzy-Wojtek11 points
-
Hi to all One more from series of prototype aircraft finished. Again old Italeri model, some 20 years waiting in my stash to be completed, now done. Good basic model, added details in cockpit to make it more busy, quite artistic approach with taking some reference images in consideration, as there was no place to make something more realistic, italeri acrylics, minimal weathering with artistic oil paints....and that is all. Images, hope you will like them and i hope that i am not bothering all of you with those prototypes....it is just a phase Best regards11 points
-
It seems I'm stuck with props. I liked it much better this time, though. Masking and painting the underside was a bit exhausting but it came out better than I expected... Famous (or notorious?) Dora here, in 32nd scale from Hasegawa. The kit needs no introduction but the aircraft does I think. The entire squadron JV44 have their aircraft painted red with white stripes underside, and it is really amazing to have spared the time and effort for that in 1944-45. This is Red 1 flown by Leutnant Heinz "Heino" Sachsenberg in 1945. "Verkauft's mei Gwand, I fahr in Himmel" reads on the fuselage, which is a part of lyrics wrtitten to a Johann Strauss melody. All-black Luftwaffe crosses underside are also of note... Thanks for looking. I will return to my jets now10 points
-
Getting the next project ready for travelling Dunkirk is renowned for the myriad of Little Ships that went to the rescue of our troops. https://en.wikipedia.org/wiki/Dunkirk_evacuation All to many didn't return, this will hopefully be a tribute to those that didn't come back The boat I shall be modelling will be prototypical and based on one of the 31ft 6" (9.6m) Silverette class of boats (the smallest was Tamzine at 14 ft /4.6m) The Silverette was offered with or without wheelhouse. Single or twin screw. Some of the class are still afloat today No hull lines were available, I'm grateful to Mo (ex boatbuilder) for casting his eye over my efforts to replicate the hull form I wont go into too much detail as to how I formed the Fibreglass hull as it's all been done before. The plug is like me, rough around the edges but just about up to the task I hope you will join me for the one way voyage Kev10 points
-
If you like the Spitfire and have not read Jeffrey Quill's book "Spitfire", do so. This is my Spitfire Griffon Prototype in the form it was when "raced" against the FW190 and Hawker Typhoon July 22, 1942 at Farnborough. It's not in Quills book, but I read somewhere that Supermarine had put a pair of A-wings on DP845 for the occasion, so this is how I made it. Its the 1/72 Tamiya Spitfire I with a XII nose grafted on. I rather like the look of it with the pointed spinner. Hasegawa IX canopy, Xtracolour enamels, decals from the spares box and DP845 done on inkjet printer paper. /Finn Bonus: Here's the FW190. Tamiya 1/72 FW190A3.10 points
-
9 points
-
Hi folk's,this is the first of a half dozen Airfix kit's I wanted to re-visit from builds I remember back around 1975-78,I was a big fan of carrier based aircraft of the U.S. Navy and first built them as many were being released by Airfix.No weathering or effects just OOB in a clean finish reflecting Airfix's box tops of the Palitoy era which after the superb artwork that adorned the boxes till then were less than inspiring,where possible I'm using original decals so a big thank you to Pete in Linc's and Alex Gordon for the sheets that made this one possible.I've got the rest of the kits now so to come will be the Tomcat,Skyray,Corsair,Viking,Vigilante and Sea King.Thanks for taking the time to look. https://www.britmodeller.com/forums/index.php?/topic/235062397-airfix-nostalgia-builds/8 points
-
Thanks P! The Donnet-Leveque was built a couple of years ago. I've been quiet because of a. the trip to Telford and b. My brother has been here for the last 2 weeks for the F1 GP. Shouldn't have clicked "play" then, I didn't! Thanks for the little piece of trivia though! Just had a fantastic couple of weeks attending every day of the Abu Dhabi F1 GP with my brother, then spending 2 "spare" days at the end of his visit about 240km West of here visiting the Sir Bani Yas Island reserve (Sir is pronounced "seer", it means desert, Bani Yas was the tribe who lived there up until the late 19th century, so literally "the Bani Yas' desert"). The Royal family owned it and the late Shiekh Zayed bin Sultan Al Nahyan made it one of his pet projects and decided he should plant as many trees as possible. Then, realising that the native Arabian Oryx was getting endangered, he introduced them to the island and it eventually turned into a huge wildlife reserve. It now has giraffe, cheetahs, many different types of gazelle and wild sheep, hyenas, peacocks, turkeys, grouse and all sorts of other animals. They are all totally wild, the cheetahs and hyenas feed themselves on the the gazelle "buffet". Well worth a visit! Anyway, now that's all over with, I can get back to the Battle. Not much has been done as yet, but I have got the "skin" on one side finished, I added a strip of .020" x .030" over the top of the rib between the two bomb cells and brushed on some Mr Dissolved Putty around all the edges to ensure no gaps. The other side has been cut out and is being fettled to fit! Thanks for looking in! Ian8 points
-
This build thread describes the construction of a 1/350 scale model of HMS Prince of Wales (R09) which was displayed by Airfix at SMW 2019, Telford where I am shown with Darrell Burge, Hornby Brand Manager: Background to this build In April 2014, the Royal Navy contacted Airfix to commission a model of HMS Queen Elizabeth (R08) that was under construction in Rosyth Dockyard. Airfix asked me to scratch-build a 1/350 model which was subsequently displayed at the naming ceremony of HMS Queen Elizabeth in Rosyth on 4th July 2019. Thereafter it’s permanent home was the Wardroom of HMS Queen Elizabeth: Pic 001: In April 2019, I was again commissioned by Airfix, this time to scratch-build a 1/350 model of HMS Prince of Wales, the second of the Queen Elizabeth Class aircraft carriers. It would be shown at SMW 2019, Telford and thereafter it’s permanent home would be the Hornby Hobbies Visitor Centre in Margate. I hope that you enjoy following this build which may seem a bit unconventional in some parts. There were some problems to overcome but the worst difficulty was having to cope with severe concussion that I suffered five weeks before Telford. It was touch and go as to whether I would complete it in time but I only managed it by leaving off photo-etch and some other small details. To use an old Chinese proverb “a journey of a thousand miles starts with a single step”. This is the first of many sheets of plastic card used in the build: Pic 002: Although this build would be constructed mainly of plastic card, I would be using a Tamiya 1/350 USS Enterprise hull to give it some inner strength. The hull was shortened in length, all sponsons removed and keel removed and openings blanked off with plastic card. Plastic card was used to fill in the missing parts of the sides and clamped. Note that I have used the cut out section of hull to brace the new join of the midships and aft sections of hull: Pic 003: Forward section (bow excluded) glued in place: Pic 004: Putting aside the hull to dry, I cut out the Flight Deck. Being 80cm long, it would be a right handful in the confines of my modelling den: Pic 005: This situation was made worse by the fact that I was building two at once (a waterline version for myself) Pic 006: Once the hull had dried, I drilled four holes which were fitted with four 80mm M6 bolts epoxied in place. The model was then secured to a temporary chipboard base that would be used until the final day of the build (the Flight Deck hasn’t been glued in place yet): Pic 007: The most complicated part of this build is the construction of the Forward (Ship Control) and Aft (Flyco) Islands. Because of this, I decided to build the islands for both ships at the same time. Here are the Aft Islands: Pic 008: The plastic card is rather thin (0.20mm) and requires plenty of framing to prevent "dishing" of the panels: Pic 009: Pic 010: Here the two islands have been placed on the Flight Decks of the two builds. You can see the full-hull version to the rear: Pic 011: Bit more work: Pic 012: I do like using lots of filler: Pic 013: Sanding of filler was completed and then I moved onto the assembly of the Flying Control Rooms: Pic 014: I did consider having acetate glazing but after some experimentation I decided that it would not be easy to do a good job: Pic 015: Another view showing the multiple facets of the Aft Island: Pic 016: View from ahead: Pic 017: Having applied filler to the Aft Islands again, I started construction of the Forward Islands (Ship Control): Pic 018: I just can’t leave the Aft Islands alone. The filler around the Flying Control Rooms (FCRs) has been sanded and I have been adding some of the many platforms: Pic 019: Filler applied and sanded again. You can see that I have also added window wiper boxes above where the FCR windows will go: Pic 020: I then cut some "T" section plastic strip to go around plastic card discs to represent the platform for the Type 997 Artisan 3D Radar. Hopefully, when painted the ends of the "T" will look like thin rods like on the original: Pic 021: They were then glued in place and I started on the platform on the starboard side of the Aft Island: Pic 022: Once the platform had been sanded I started on the overhang of the Bridge on the starboard side. As you can see, I have glued strips of plastic card to the bulkhead first and built the overhang around them: Pic 023: One of the islands once the overhang has been completed: Pic 024: Green blobs on the Aft Island denote the locations of watertight doors: Pic 025: WEM watertight doors have been glued in place on the Aft and Forward Islands. Note that the watertight doors do not sit flush with the bottom of the bulkheads but are raised slightly: Pic 026: Taking a break from the island activity, I turned to the stern. The transoms for both versions were fabricated and the various openings cut and drilled: Pic 027: Turning to the hull briefly, I screwed hardwood dowelling inside the hull to give it some rigidity, a necessity as the plastic card is more flexible than the original dark grey plastic. The silver fitting at the stern is only temporary and supports the stern ensuring that the top of the hull remains horizontal. It will be removed once the ship is bolted to a temporary base: Pic 028: The full-hull version will be permanently mounted on a base 800mm long and here I am drilling the locating holes for the 80mm M6 bolts. The base won’t be fitted until the very end of the build: Pic 029: I have started to apply mahogany stain. So far I have applied three coats but I will need another two coats. Once finished the base was stored safely until needed: Pic 030: Now the base has been fitted I turned my attention to the Flight Deck and here I have marked the outline of the hull: Pic 031: I glued pieces of plastic card to the underside of the Flight Deck which ensure that the hull will be correctly aligned: Pic 032: First piece of Flight Deck glued in place. Note the plastic card "tab" glued to the front of the Flight Deck that will support the midships section of Flight Deck: Pic 033: The midships piece of Flight Deck glued to the hull and clamped. I couldn't resist putting the Islands on: Pic 034: Bow section of the Flight Deck has been glued in place: Pic 035: That's all for now. Dave7 points
-
Tomcats of VF-211 at Nellis AFB for Green Flag, March 1981. 159462 159620 159626 159631 160915 Thanks for looking, Sven7 points
-
This misty morning at Lelystad Airport, G-IRTY, the Silver Spitfire started her final leg on the tour around the world. Luckily, at around noon the fog cleared and a soft winter sun came through. After final checks were completed, engine start for the last leg. The escort on the way out of Dutch airspace was provided by Trusty Rusty, a P-51D twoseater. Heading out to the runway Take-off run And a well-appreciated farewell fly-by.7 points
-
Dear Modellers, I like to show you another of the many two-seaters, which flew in the Great War. There is not much information so I turned to Wikipedia for some: The C.V was Albatros Flugzeugwerke's first revision of their B- and C-type reconnaissance aircraft since Ernst Heinkel left the firm for Hansa-Brandenburg. While retaining the same basic layout as the Heinkel-designed aircraft, the C.V featured considerably refined streamlining. The forward fuselage was skinned in sheet metal and a neat, rounded spinner covered the propeller boss. Power was provided by the new Mercedes D.IV, a geared eight-cylinder engine. The initial production version, designated C.V/16, suffered from heavy control forces and inadequate engine cooling. Albatros therefore produced the C.V/17 with a new lower wing, as well as balanced ailerons and elevators. The fuselage-mounted radiators were replaced by a single flush radiator in the upper wing. These changes improved both handling qualities and engine cooling, but the downfall of the C.V was the unreliable Mercedes D.IV engine, which suffered from chronic crankshaft failures. The C.V was therefore replaced in production by the Albatros C.VII. I build this model from scratch the same way like my other models; I carved the engine part from a piece of solid wood, for the other parts I used plastic sheet of different thickness. The rigging is stretched sprue. There are some more types I hope to build only to find the time..:-) So enjoy this photographs ! With regards, JohnHaa l7 points
-
Thanks Heather, appreciated Er, thanks Ian Thanks Tony - she is a cutie. Going back tomorrow Thanks Giorgio, well spotted. Now sorted with a few swipes of the trusty SIHRSC. I must have been distracted by something to have missed that. Oh yes, the TRENCHES! Thanks Keith Thanks John Nice one Adam! Is it a Siberian Hamster? Please don't say you haven't seen that episode of Fawlty Towers Gulp. Pet wars! Thanks Chris - useful. I obviously need to do some more research! Hmmm. Exhausts diverted? Just when I got the four supports bent: I did try to start sticking them to the model but they're springing all over the place. I'm off to the pub.7 points
-
Hiya Folks,.... another update,....... I`ve expended copious amounts of elbow grease while sanding the fuselage!!! The wings are now fitted too but need the seams along the roots filling and sanding yet. The resin engine nacelles have been dry fitted and slot superbly into place,...... the inboard left engine nacelle section of the wing has been sanded back to make the engines level,... while the right hand nacelle has been left untouched for now just to show how the engine incorrectly sits forward; Cheers for now, Tony7 points
-
Hiya Folks,..... it has been a while and I think this model gave me modellers block,........ but I finally bit the bullet and got some coarse grit sanding sticks and blocks out to tackle the fuselage seams,........ which took quite a bit of elbow grease and filler!!! With that done the wings were fitted and again the fit was poor,...... with the wing roots being deeper than the wings themselves with quite large gaps despite the sanding to make them flatter. The tail surfaces were also attached and then the filler came out gain; Cheers for now, Tony7 points
-
This is Zvezda's T-34/85 in 72 scale. Figures are from Preiser. I hope you like.7 points
-
This is a Hasegawa 1:72 EA-18G Growler of VAQ-135 Black Ravens NAS Whidbey Island 2011 Kit is made OOB apart from the decals which are from Authentic Decals6 points
-
I developed this technique as a result of trying to build pusher biplanes and have used the method since with success. Here are some examples of my method from earlier builds: This was an FE 2b conversion: the photo shows clearly the outer struts only were put into place because the upper boom was supposed to rest on the rudder: what happened was that the expoxy holding the booms to the upper wing failed and the boom dropped off! However the top wing stayed in place because the struts were secure and I was able to re-attach the boom. The cabane and remaining interplane struts were added afterwards. Another conversion - this time the DH 1A and I used the same method of attaching the outer interplane struts and used the rudder as the third support. Adding the cabane and remaining interplane struts was very straightforward. In both of the above cases the assembly was strong enough to be handled easily and gave no indication that it would fall apart while extra struts were added. This is a scratch built Ago which had twin booms joined by a single tail unit so I had to assemble the wings first. Here I did put in the cabanes with the outer interplane struts because the structure would have been too weak without them. Jigging this was easy as the struts are vertical so a simple jig kept everything in line while the cement hardened: The method can also be applied to kits where necessary, but always give the cement plenty of time to harden and use at least 4 attachment points so that when you want to handle the model it has sufficient rigidity to be lifted and turned at high angles. These are examples of where I only used the cabanes as fixing points: Avro type D biplane (1912). Maurice Farman Longhorn: note that the tail struts help this structure but only the cabanes hold the wings. All of the above are multi-bay types. Hope this helps. P6 points
-
Here's another model I finished today, one of my many Spitfires. Looks like this one fell into the wrong hands, that or the paintshop guys are the world's worst (or perhaps best) spies6 points
-
Your Mum made potato chinooks and they were green? Scots cuisine at its very best; I assume they were deep fried at some stage? Perhaps two or three times like those “twice-cooked soufflés” and “triple-cooked chips” you get in poncey gastrojoints.6 points
-
Thanks! It's a simple adjustment but it makes a big difference. I'm currently awaiting some Tamiya Light Ghost Gray. I tried Model Master, but I slammed my own toe with the first spray into the intakes. Too much thinner. I then tried it without any thinner and it sprayed a lot better, but still had some drying before it hit the model, giving me little nodules to clear off. I knew there was a reason why I stopped using MM... And of I didn't find that Tamiya does make light ghost gray in a bottle until after I ordered the spray can which I will have to decant into a jar.🙄 That should be here on Friday (maybe Thur if I'm lucky so I can finally get the fuselage together!) But, while waiting for that, I applied some placards (Mike Grant's) to the gear, so those are finally finished off. Except for the tires. And moved onto the cockpit. The main color is Tamiya Sky Gray and a mix of green for the seats. The seat belts are Eduard and some seat PE was added to the kit parts to dress them up. I'll hit that with a dull coat and then set it aside for later. And that's all for now folks! Model on! Thom6 points
-
Except it seems in some parts of Yorkshire.6 points
-
Hi all Pipes on the heads of the cylinders. Regular formatting of the 18 pipes with an improvised folding machine. Set up the wire. Push the counter-piece And here are 18 regular pipes Setting up the cylinders. The admission pipes are too short. I want to leave the engine hoods open and the pipes are too short which bothers me. I've extended the intake pipes. For the masking of pipes, I use Teflon, used in sanitary to waterproof the fittings. There you go. I foresee the same problem with the exhaust pipes. See you soon, Sweety (Google Translate)6 points
-
Leaving the hull to dry, I turned to the hull openings in the sponsons for the ship's boats. There are five openings, two smaller ones for Pacific 24 Mark 4 Ribs and three larger ones for Wave Transfer Personnel Transfer Boats. There is one Rib inside each sponson but the PTBs are all stowed inside the port sponson. When I built the QE I omitted these due to time constraints but this time round I am fitting the openings. Here I have cut out panels which will be used to make five boxes: Pic 036: Here I have assembled the boxes, bracing the corners with some angled Evergreen. They have been built higher than necessary to allow them to be trimmed down to the correct level. The largest bulkheads have not been glued in place yet as I need to detail the openings. In retrospect this was a huge waste of time and effort and there was an easier way. Live and learn….: Pic 037: Here I have marked the locations of the WTBs (Water Tight Bulkheads) as shown on my plans. These marks are solely to help with the correct positioning of the various components such as lifts, sponsons, openings for boats etc. Unfortunately, in subsequent days, I discovered an error on the plans which showed the WTBs in a slightly different position in profile view to that in the plan view. Consequently, there is a difference of about 6mm which meant I have had to re-jig things slightly. Pic 038: To ensure that the measurements are uniform across both builds, I have taken all measurements from the stern and worked forward and will "lose" the extra 6mm ahead of the sponsons. Here I have cut out and glued supports for the rear section of sponson. This sponson has a raised section at the aft end and has different size supports to the rest: Pic 039: Before I can glue the rest of the sponson supports, I had to mark the locations of the openings for the boats and lifts: Pic 040: Supports have been glued in place on the Port side, double-checking that they didn't interfere with the openings: Pic 041: View of the Starboard side: Pic 042: Plating in of the sponsons has started: Pic 043: View of the Starboard side: Pic 044: Right way up: Pic 045: Port side: Pic 046: Latest update on possible shortages of the world's supplies of plastic card.... I turned my attention to the hull where I needed to reduce the depth of the hull so that it would meet the transom. After removing the original hull section I glued some plastic card framing to support the new section: Pic 047: The hull is too narrow at the stern and will need to be built out to meet the sponson supports: Pic 048: I have cut out a bulkhead to the outline of the transom and glued that in place. The transom will be glued to this bulkhead later on: Pic 049: Here are the transoms for both versions undergoing more work: Pic 050: Checking the transom for fit. It was necessary to cut a slot into the bulkhead behind so that the lower "box" did not stop the transom sitting snugly: Pic 051: The transom was then glued in place and the hull covered in plastic card. Eventually it will be filled and sanded: Pic 052: Progress has been steady with a lot of time being spent on the sponsons: Pic 053: Although it looks like there are raised lifts, these sections will be cut out and new lifts cut from plastic card. This will allow me to add the underside detail to the lifts much more easily. It also allows the option of lowered lifts. Apertures for the hangar doors still need to be cut out: Pic 054: Next, I turned my attention to the hangar openings and doors. The top edges of the outboard openings will need to be trimmed down by the thickness of the flight deck. This differs between the two builds as the flight decks are constructed from different thicknesses of plastic card: Pic 056: Plastic card has been glued to the rear of the outboard openings. The inner faces will be trimmed and detailed they are glued in place: Pic 057: Doors have been cut out and will be scribed and glued in place later: Pic 058: Plastic card has been removed for one of the lifts and the area to be cut out for the associated hangar opening but I won't be cutting the opening just yet. Eventually, the hangar opening sub-assemblies "should" slide into the holes and the edges of the gaps will be overlapped by the edges of the outer opening: Pic 059: Sections of the Enterprise bow have been glued to the underside of the flight deck. This has been done mainly for strength as the bow section will get a pounding when it gets shaped: Pic 060: Today I managed to get some sanding done on the hulls of both builds. Here is the aft section of the full-hull build. Once all sanded, filled and sanded again, I will make and fit the keel. Rudders, props, bilge keel and stabilisers will be made and fitted towards the end of the build: Pic 061: When I made the HMS Queen Elizabeth, I fitted the bulbous bow before I had shaped the stem and had problems getting it to the correct slim profile. As a result it ended up with a stem that was too rounded. This time I will be shaping the stem first and fitting the bulbous bow afterwards: Pic 062: I can't do too much each day due to the effect the vibration from the sanders has on my hands so the sanding will take many sessions. Here are both builds after the first sanding session. The progress on the full-hull build is more advanced than the waterline version with the latter having a lot of plastic still standing proud of the hull where the cutaway begins: Pic 063: I had another long sanding session today and apart from the bow of the full-hull version, it is almost ready for filling over a large proportion of the hull. Here is the aft section which will probably be filled first so that I can complete construction of the sponsons, insert the hangar openings and clean up the of the flight deck in readiness for the walkways: Pic 064: Last night I managed to get most of 05 Deck installed on the Forward islands of each build. The front bulkheads haven't been fitted yet as they are not straightforward (not that anything seems to be straightforward with these islands): Pic 065: I have done a little more sanding on the hulls but I am not happy with the waterline version. I have ringed a problem area where the cutaway is too angular on both sides. I will need to get the razor saw and cut a chunk out and construct a more rounded profile. I am much happier with the full-hull version though: Pic 066: That is all for now. Dave5 points
-
Finished off a few 28mm WarLord Roman figures I had along with some Gaul Warriors,First time I saw the War Elephant I knew how I wanted to place it,I cheated with the Roman Coliseum Pillars I bought them from a pet shop,I guess you use it in a fish pond,I just added some more steps and ground work. I guess this will be my last for the year,have not seen the Sun for many weeks due to the bushfires,some days can not see the end of the street,So hope you enjoy these offerings,All enjoy a Happy Christmas. Cheers Jim.5 points
-
I don't know if you have this photo, Ced, but I'll put it here for others to see. While doing some looking at IWM, I found this photo. It shows the exhaust of the port inside engine entering the wing leading edge. Cockpit or leading edge heating? Another: Chris5 points
-
Almost finished this. A sneaky peak to keep you interested5 points
-
Hasegawa 1:72 Northrop F-20 Tigershark Humbrol enamels HU126, 127, 145, 147 Alclad on the Jet exhaust Flory wash Clear coat is Humbrol Satin cote Stores:- Sidewinders & drop tanks from the kit and AGM 65 Mavericks & Mk83 bomb from Hasegawa weapons sets. Enjoy & thanks for looking CT5 points
-
Hi Rockpop (Brian) I took these for you - I numbered up the tentacles to the best matching peg on the Kraken's gaping mouth area using the box art as best I could to replicate which tentacle was supposed to go where. My pictures don't show it, but the backbone is a whole separate piece, and there is a large beak piece that fits inside the mouth aperture. The kit is made of a soft vinyl type similar to that used by Pegasus Hobbies on their Squid and Great White Shark kits which I am guessing can be heated and altered however the snared curves at both ends of the Kraken tentacles arms are quite rigid. I hope this helps with your own ideas. The squares on my cutting mat are in cm and I have left a scraping tool in the pictures to give you an idea of what 25mm scale comes out at; its a bit of a whopper and at only £28 delivered, very much a good value kit.5 points
-
Awwww I too have a bit of a distraction from modelling, although she won't quite come and sit on me when I'm trying to build something 😂5 points
-
gaining shape DSC_0006 by grimreaper110, auf Flickr as usual plastic rods for the brake lines DSC_0002 by grimreaper110, auf Flickr5 points
-
My mum used to make potato ones. Very nice. Come to think of it, there is a slight resemblance. 😉5 points
-
All the main markings were applied and the model joined my Avro shelf (kicking off a MiG that was sitting there for some reason) until I to around to stencils, varnish and final weathering. And that is exactly what I did today. Stencils, satin varnish and final weathering. The model is now complete. Here is the under wing weathering I did, I had to look at a number of photos to approximate how dirt collected on these aircraft This image (https://en.wikipedia.org/wiki/1956_London_Heathrow_Avro_Vulcan_crash#/media/File:Vulcan.delta.arp.jpg) shows where most of the dirt is found. A further wash was applied to the top of the model after I applied a satin varnish, following the advice in the Fundekals guide I didn't go with a gloss finish to avoid a model that looks like a toy. Overall the Fundekals sheet is pretty good, I would certainly recommend it. The decals perform well, although sometimes you will need to separate decals because the decal film can sometimes cover multiple decals. RFI will be up soon.5 points
-
Few hours ago Jan Polc has announced (in parallel plot at BM) some other boxings to follow: "...MiG-19S - a Warsaw Pact boxing - Poland*, Bulgaria, East Germany and Soviet Union. Shenyang F-6C late (with parachute below the rudder) - Egyptian, Syrian and Somalian a/c Shenyang F-6A (without parachute) - Pakistani aircraft again. Chinese box is also coming. All that in the first quarter of the 2020 I hope P and PM - are in the pipeline, together with Chinese trainer..." The asterisk * is my addition - there was never any MiG-19S flown by the Polish Air Force. So this boxing looks like some kind of "what-if" :( Cheers Michael5 points
-
My Spitfire XIVe highback is complete, still finishing the bubbletop. Here's a few photo's of the highback (as a teaser), I'll post more photo's 'ready for inspection' when I get a chance, and photo's of the bubbletop when complete. Hope you like, Colin5 points
-
Thank you Thanks The mossie is nice, certainly one of the best, but nothing can beat a Vulcan for me. Early spits though, I just can't stop building them! Lovely aircraft those... Thank you the Vulcan is the iconic aircraft for me, one which seems to be one of the three that captured the public imagination here in Britain, the Vulcan, Spitfire and Concorde. I've been up to Sunderland more times that I can count, I have family up there. I only realised the N.E.L.S.A.M. existed in 2018 despite regularly staying at the Premier Inn just off the A19 around the corner. I've been twice to the museum, and got a good look around 319 last time. Certainly one of my favourite surviving Vulcans, so much character in the worn look of the aircraft, although she looks very good now with the fresh coat of paint. Here's a few photos from my first visit in October 2018 And of course the damage from 2010 when she tried to 'take off' in the snow. Really hope that can be fixed... Even with plastic replica parts or something4 points
-
Hi Darryl - as to colour - you are on the right lines - I'm sure I'm right in thinking these were Canadian built so SCC2 and SCC15 with several examples displaying "light Mud" and "Tarmac" from the Italian campaign. The only other source of Light mud that I'm aware of is https://www.sovereignhobbies.co.uk/ whose naval range are unsurpassed though I've yet to use any armour colours. Be warned you have to buy a minimum of 6 tins and it's definitely worth using their thinners Even though they are enamels - they don't really smell or behave like them (In a nice way!!!) if you use their thinners I can't recall any particular problems with construction though switched wheels for Panzer Art replacements that interestingly were significantly bigger. Here's mine DSCF7155 by Rob Matthews, on Flickr Keep it coming - it really is a nice kit rob4 points


(510x640)-Copy(95x120).thumb.jpg.33073138e01aa81779639a845926753e.jpg)


.thumb.jpg.b4a5069fd2c2dd5708ce1694345c5b11.jpg)
This leaderboard is set to London/GMT+01:00