
Leaderboard


Popular Content
Showing content with the highest reputation on 01/12/19 in all areas
-
I'll be straight up and say while I really like the final product getting there wasn't easy. I was so excited to get this model and this scheme was a must, but as is so often with Trumpeter models it was a bit of a letdown!! Plus it needs and requires lots of extras to take it from being quite "toy" like. The scheme I love and those that know me know I couldn't resist it.......even if it took 6 hours to mask up using masks. Would I do it again, I probably would, but I would need to have the resin cockpit and cargo bay bits first. Please enjoy Model: Trumpeter 1/32nd Mil Mi-24V Hind E Paint: Tamiya & Mr Hobby Acrylics, Model Master Metalizer Lacquers, Mr. Paint Clear lacquers Extras: Eduard - BigEd set DN Models – Tiger camouflage Mask set Master Model – Gun Barrel & DUAS set Profimodeller – Wheels & Tow Bar set Profimodeller – Side Flare Dispenser set PART – Cockpit PE set PART – Cargo Interior set PART – Exterior set Reskit – BD3-57KRV Pylons Reskit – B8V20-A Rocket Launcher Plus she took out 1st place in her class at the end of year comp.31 points
-
Hello again, after my last F-2 in 2013 I wanted to build one again, this time the version F-4 from eduard in the colors of III/JG3, piloted by Leutnant Heinrich Graf von Einsiedel. The Kit was fantastic to built, I used no aftermarkt products and also took the Kit parts to create that nice model. I love eastern front colors! MY next post here will show that again 😊27 points
-
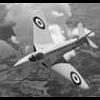
Good evening, ladies and gentlemen. I present you my next model. It's typical "shortrun" without any navigation and headlights.22 points
-
Well, the bunfight is over for the year. It was pretty brutal! A lot of people put a great deal of effort into proposing and promoting the various groupbuilds but sadly half of all the groupbuilds in the poll did not make the cut. As GB moderator, I see the effort that people put in and I'm very aware of the disappointment when a favourite GB doesn't make the grade. If I could, I would give 'em all a slot! I always recommend that everyone find a way to honour the also-rans in their builds throughout the year and that still stands. However this year, I'm going to try something new. In the GB forum, there will be a sub-forum called They Also Serve. This will not be a regular GB. It will simply be an area where people can show the builds that they had planned for the also-rans. The forum will open on 1 Jan and close on 31 Dec. Yes, you could use the oridinary WIP forums for these builds, but I thought it might be nice to keep all the GB related stuff in one place. One thing to beware of. When I was a kid, my parents would tell me not to eat sweets before a meal as it would spoil my appetite. Same thing applies here. The also-rans have a bye into the bunfight for 2021, so try not to build so musch stuff that it spoils your enthusiam should some of these GBs make it through to 2021.21 points
-
21 points
-
Hello all, Here is my recently completed Hobbyboss 1/48 Su-27 Flanker, marked as an SM1 of the Ukrainian Air Force. Given serial number 36911014104, this jet was originally marked as '45 Red' before being stored at Mirgorod AB in 2009. In 2013 the jet was refurbished and marked as '45 Blue' with the then new digital camouflage. Extras used included Foxbot paint masks and decals, Quickboost K-36 ejection seat, New Ware masks, Master pitot tube and Quickboost F-14 FOD covers (modified to fit). The paints are all Mr Paint. Build thread is here A few photos as I quite like this one! Coastal kits base, patch from the Ukrainian AF team at RIAT this year. Thanks for looking. Dave20 points
-
Here's my third completed build from the excellent Flying Boats and Floatplanes II group build (if you haven't looked you should check it out - there are some excellent builds there) - this is the Eastern Express 1/144 Beriev Be-200 Altair. Build thread is here. Apologies for duplicated photos - can't seem to stop it! thanks for looking Julian19 points
-
Revells 1/72 Handley Page Halifax built as S-Sugar of 35. sqn. Shot down during an attack on Tirpitz over Norway. The aircraft force landed on Lake Hoklingen,and the crew survivied. All but one escaped to Sweden. The plane is now resting in Hendon museum. Read more here: http://www.archieraf.co.uk/archie/1048tls.html . Freightdog correction set for wheels, radiators and propellers used. The model was painted with Tamiya and Gunze colors. Best regards Rune Haugen18 points
-
Today Winston had his first solo in Il-2; he picked a P-47: The little chap managed to do a fairly creditable job of keeping it in the air and when he finally crashed, it was a graceful wheels-up landing. Anyway, managed to make it downstairs tonight after catching a few episodes of Silicon Valley with Mrs P (whose favourite show it currently is). The big news is that one Spit just needs sanding to be ready for primer: And the other is coming along: So one issue I've long had with Airfix Spitfire Is is the fuselage fuel cap, or rather its absence in an area that's hard to sand: Fortunately, I have a hugely-expensive highly specialized tool of very limited utility for just such eventualities! The second-largest punch, a 1.4(mm?) one, worked perfectly. *Fanfare*18 points
-
Hi folk's,this is the first of a half dozen Airfix kit's I wanted to re-visit from builds I remember back around 1975-78,I was a big fan of carrier based aircraft of the U.S. Navy and first built them as many were being released by Airfix.No weathering or effects just OOB in a clean finish reflecting Airfix's box tops of the Palitoy era which after the superb artwork that adorned the boxes till then were less than inspiring,where possible I'm using original decals so a big thank you to Pete in Linc's and Alex Gordon for the sheets that made this one possible.I've got the rest of the kits now so to come will be the Tomcat,Skyray,Corsair,Viking,Vigilante and Sea King.Thanks for taking the time to look. https://www.britmodeller.com/forums/index.php?/topic/235062397-airfix-nostalgia-builds/17 points
-
Here is the official Groupbuild calendar for 2020. I have included the final GB of this year as most of it runs through into 2020.12 points
-
This is another stash clearer, I have a GWH F-15c and knew if I built it I would have a hard time going back to the Hasegawa F-15A in the pile. I wanted to do the early blue scheme with the reddish canopy frame and unique insignia, it reminded me of seeing the first 1/72 scale Monogram kits in the department stores as a child. I had a couple bottles of Air Superiority Blue saved for it, replaced kit items with an older ESCAPAC seat and different wheels then added the air brake stiffener. Mixed my own metallic green for the cockpit rear. Decals were mostly Superscale stencils and some Caracal for unit and insignia. The blue scheme is sort of unique in that it is glossy underneath and matt on top. I used Hataka Air Superiority Blue overall and on the matt areas I added thin coats of Lifecolor Air Superiority Blue (which has slightly purple hue to Hataka’s slightly greenish hue of blue) on the top and sides. I found referencing the old blue more difficult than expected, luckily I had an old Aeroseries 28 book. It had everything needed for early eagles. I finished it in a sort of Langley QRF load out.11 points
-
Took a break from a couple larger projects. Thought this would be a nice simple build/finish, and it was. Just replaced the molded in hand rails. Cute little thing. As usual, with close up photos, I've noticed a couple things yet to tend to.11 points
-
#27/2019 After a long pause my father finally build a new WW1 model. This is Eduard´s latest boxing of the Schuckert D.III, used EZ Line for the rigging and for the first time some Gaspatch PE turnbuckles. All the large lozenge decals were a PITA to apply, didn´t turn out perfect. My father is no pro WW1 builder but the model looks ok. Build thread here https://www.britmodeller.com/forums/index.php?/topic/235058174-knights-in-the-sky148-siemens-schuckert-werke-diii-deutsche-luftstreitkräfte/ The model shows the aircraft of Vizefeldwebel Reimann, Kest 4b in September 1918. DSC_0001 by grimreaper110, auf Flickr DSC_0002 by grimreaper110, auf Flickr DSC_0003 by grimreaper110, auf Flickr DSC_0004 by grimreaper110, auf Flickr DSC_0005 by grimreaper110, auf Flickr DSC_0006 by grimreaper110, auf Flickr DSC_0007 by grimreaper110, auf Flickr DSC_0008 by grimreaper110, auf Flickr DSC_0009 by grimreaper110, auf Flickr DSC_0010 by grimreaper110, auf Flickr DSC_0011 by grimreaper110, auf Flickr DSC_0013 by grimreaper110, auf Flickr DSC_0014 by grimreaper110, auf Flickr DSC_0015 by grimreaper110, auf Flickr DSC_0016 by grimreaper110, auf Flickr DSC_0017 by grimreaper110, auf Flickr DSC_0018 by grimreaper110, auf Flickr DSC_0019 by grimreaper110, auf Flickr DSC_0020 by grimreaper110, auf Flickr11 points
-
The suspense is over chaps! Hadn't expected quite frankly to be in a position to post another update tonight, due to thinking that I'd need to sit down and look at all the things that went wrong with my methodology and explain to you why. As it turns out the Elegoo exceeded my expectations on an fresh-out-of-the-box print: that says a lot about the tool rather than the abilities of the operator. One thing that is always bothersome about looking at video guides and tutorials for this printer is that the overwhelming majority of them show big massy lumpy figures or architectural structures being produced. I don't as it happens regard such examples as a particularly reliable our useful source of information for the kind of work that we do, hence the reason for this fantasy shape having: 1.multiple types of curvature, 2. overlapping parts close together 3. thin and thick parts in order to to test to destruction at small scale. Enough blather. Here's tonight's result, fresh out of the chamber: Diameters of those shapes from L-R: 28mm, 14mm, 6mm respectively. The holes in you see are drains to let the excess resin out of the hollow core shape. I was - to say the least - pretty knocked out by performance on the first go. As you can see below, the only places in which the print failed on the largest part was where I failed to support one of the vanes adequately when creating the support structure: The actual thickness of those vanes is 0.19mm at their thinnest point - essentially just under double the thickness of a sheet of A4 paper. On the middle 14mm diameter version of this shape, the vanes went down to is an astonishing 0.13mm in thickness - which seems to be the threshold at which the resolution of the printer fails. Amazing. Trimmed out of the supports: I've still a lot to learn about the best orientation to print particular shapes- next time I might be tempted to print this flat against the surface to see if it reduces the number of contact points with the support structure between vanes. You can see a few of the stumps above where you cut that structure away - Elegoo provide a nice pair of sharp precision snips to clip the piece out, any residuals like those seen there are easily removed with a swish of the scalpel. I didn't bother cleaning the part up any further at this point to be honest as it's just a sacrificial foray to test the envelope. Conclusions? 1. I'm unlikely to need to print parts as thin as those vanes thin on a regular basis so more than content that this tool is now 'required on voyage' for future projects. Quite simply it will let me be more ambitious in the kinds of structures that can be built, as a companion to existing brass and vacforming methods. 2. For the price, the resolution is outstanding. 3. Being able to pour unused resin back in to the bottle means you only use what you need. 4. It's not a replacement for traditional approaches, but provides a valuable extension of and enhancement to them. 5. You can print your own false teeth now. I had mine down at 4, so it's all the more surprising the results were as good as seen here. One thing I did do on parts this small was to take the diameter of the contact points for the supports down from the default value of of 0.3mm to 0.12, plus reducing the depth of the contact point so it wouldn't stick out through the other side of the thin vanes. That seemed to work fine here. Indeed I did! Use to get an RM on the 65 route from Hook to Kingston to go to school in the late 70s/early 80s. One extravagantly moustachioed driver must have been ex-Strike Command because he always took the bend into Surbiton high street at such a lick that you were convinced we were heading broadside in through the door of Sainsbury's... I'm sure he will Stuart - it becomes an addictive process finding where the limit lies. What d'you say your name was: Yeah yeah yeah! 😁 Night all. Tony PS. A lot of the online 'how-tos' - being American - only mention US cleaning products for tidying everything up afterwards. I used an initial bath of 95% IPA, followed by a swirl in this stuff: and a final rinse in water seemed to do the trick with both the parts themselves, and the resin tray &etc.11 points
-
Thanks your, Your Loudness. (Did any photos survive from the era Simon?) About 5pm Zulu time it reckons the test print should be out of the vat... Had a lot of fun this morning playing around with support settings and getting the printer head set up and such like: hopefully the room temp. is warm enough for the resin to do it's thing. I give a discount for bulk you know. The language of him. Younger modellers may be listening! 😁 To misquote the Red Riding Trilogy: 'This is Britmodeller: we justify what we want.' Looking forwards to getting stuck in myself CJ tbh! 😃 I'm so flipping clairvoyant it's frightening sometimes Keith. (But only about clothes, never racehorses...) As I mentioned to Simon above, please feel free to share any photos of you in your vintage sartorial splendour! To take both parts of that question in turn Rob: 1. Yes I do hope to be printing parts on a regular basis where handmade methods aren't sufficient/practicable in my case. 2. I can be bought with resin. Kind of your as always Roger: thanks. I bet they've both already got one Steve but the shame burns so deeply that they don't know how to tell us. It's possible Ced's even got two by this stage.... ....what Giorgio is getting for Christmas? 😁 Very sensible Terry. 😀 Was that a filament-based printer then Stuart? Most gracious Chris. Steve may be able to help your refine a few persuasive legal arguments Bill? Don't hold your breath Benedikt! 😁 (Besides I yield the floor to hendie when it comes to expertise in moulds and prints). If only part of the first print comes out I'll be happy as although it seems a relatively straightforward process to set up the object at a practical angle and have the required supports, I'm conscious that some of the smaller versions of the object may defeat the resolution of the machine. That's partly what I'm testing today to see what point it fails at, so time will tell. Ok. The Elegoo's going to be chugging away all afternoon and there's only so long you can stare at the touchscreen on front of it before the excitement of watching the display refresh starts to pall a little. In and around this excitement I've been sticking bits on to Annie as were really at that stage where there's no reason not to crack on and make a bid for the finish line. The oil coolers are now in place under either nacelle: For all the afternoon's additions, Gator's Grip has been the glue of choice as I've come to trust its strength and flexibility no end over the course of this build. Ailerons added on either wing as well: Brutal way to clamp a turret into place whilst the glue sets but at least I know the undercarriage is strong enough! Close up of the bomb aimer's window with masking removed: View of the ailerons from above: Still the lever/mass balance assembly to put into that vacant slot beside the middle hinge of course ( as well as straighten those bent ends on the hinges themselves where my clumsy fingers have mauled them over the weeks: tribute tto GG that despite rough handling , the hinges have stayed in place so well). Not putting the rudder on until after the engine and props are fitted as too easy to bust off the aerial spike: Speaking of props: Those and the spare Quickboost Brownings all got painted last night. (nicking just one of those barrels for Annie obvs...). The props were done in Alclad primer, Tamiya acrylic for the tips, and then sealed with Aqua Gloss: I've never used the latter before and although I'd been warned by others about its temperamental nature, have to say it went on smoothly and dried to a nice finish here. Ok, I have to leave the studio now as the tension is becoming unbearable watching the printer. Or is the resin fumes? Either way I'll post up results of today's test over lunch tomorrow and analyze any mistakes that I think I may have made in the setup. Pip, pip! Tony PS. Beautiful sunny winter afternoon here: one of the strays we feed - 'Chocolate' - is up on the kitchen windowsill giving it full Zen sunlight absorption:11 points
-
How do I have been hard at my P51 and a few years ago a good family friend who I grew up with in Singapore when my father was in Transport Command with her husband had asked me if I would make a model for him. Of all the aircraft he had flown, he had all but a Transmeridian Air Cargo CL44 Freighter. My dad and he both flew them after RAF service in a divergent list of airliners, exec jets & freighters. At the time I researched it and found Welsh Models make a 1/144 kit and 26 decals did the markings so I got hold of them both.. ..then it sat in a cupboard until this weekend - as I am waiting for masks for my P51 I was at a loose end, ans as it was due to be a Christmas present, I thought why not - surely it can't take long to make a simple desktop model.. ..here's the box.. ..and one-piece resin wings & a bag of other goodeies with the decals.. ..the fuselage is vacformed, so this was marked & cut out.. ..assembled, filled and with a mounting spigot being added for the wings.. ..it needed a fair bit of priming & sorting - partly due to my cavalier assembly, and partly due to raised doors and trench panel lines.. - the hinge blisters were also added.. ..I later added brass tubes for the exhaust pipes to the wings... ..main assembly complete.. it needed LOTS of filler to blend the flying & control surfaces.. ..a final prime of mr surfacer.. ..a coat of alclad chrome.. ..masking for the darker metal areas of the engine nacelles.. ..the nose tip was masked & painted, and the tips of the nacelles dipped in a lid of paint.. ..props painted and decal strips added for de-icers.. ..that was Saturday, this morning I added the decals and glosscoated the fuselage... ..and thats it - a model in a weekend and I also get to surprise some folks very close to me TTFN Peter10 points
-
I'd probably have been quicker building a 1:1 from scratch based on this endeavor - and at least there would be a chance that (some) things actually fitted Thanks muchly guys plastic addiction huh ? There should be a forum for that. I had been googling Wessex Nitesun - without much success. Just after posting I googled for "Nitesun searchlight" - and found wads of useful pictures. Thanks for looking on my behalf though - these will come in handy. Osram indeed Ta's to Tony & Tony and to Keith But grey she is no longer. However, my own greyness appears to be increasing Now where were we? Forgetful. That's where we were I think. I had forgotten to add the 28 SQN Demi-Pegasus to the tail hadn't I? Well, that was easily sorted - simply add the white backing disc to the tail. (The Phoenix transfers are actually pretty good to work with - they separate easily from the backing and lay down well... too well in fact..) Then apply the Demi-Pegasus on top of the white disc... to quote a Ced phrase... RATS WTF??? The white disc is too large! Dammit! How did that happen? Well, I can't go forward from here, so what was left of the transfer was transferred (sic) back to the backing sheet just in case of emergencies. After mulling and mulling, I decided the easiest approach was to spray some yellow on the disc to match the yellow/gold of the emblem so out came the circle cutter. Which couldn't cut a disc small enough in diameter. The smallest diameter I could get with the cutter was Ø10mm and I needed about Ø8.75mm or thereabouts. What to do? Well, if I added a small styrene spacer on one side of the blade I could reduce the diameter slightly. Another idea in action folks. After several attempts I ended up with this - perfect. Then I remembered I would have to mask the inside as well and spray a gold ring, otherwise the white Pegasus would end up looking a bit jaundiced. More faffing about and I got two outer discs and two inner discs which were about as perfect as I was going to get. All in all, that took about two hours - including thinking time mind you! So the tail was all masked up (forgot to take photo's) and I looked to find the transfer so I could start matching the color of yellow/gold ring... and found these... RATS! The correctly sized white discs. It was turning out to be one of those days. Okay, All I have to do is remove the previously applied white discs and replace with these and bob's an uncle somewhere. Now I keep reading about how decals keep ripping off when folks are removing masking 10 minutes later with tamiya masking tape, painters masking tape, and other really sticky masking tape and this was all I could get. Those discs weren't for moving. Frustrated I then soaked the offending disc in MicroS2 stuff and started sanding and it all went sideways. Clear gloss lifted, paint lifted and it was a mess. Put down the pylon and walk away sir! Well, at least hold on until we have it at a place that's worth working from - that meant some judicious sanding and yet more masking and yet more spraying. Set aside to cure and we'll gloss coat that (again!) later. So I picked up the Nitesun again. This seemed easy enough. Drill out the Osram and replace with something that looks roughly like what should actually be there. At this point I noticed that the reflector was pretty shallow. Mmmnnnnnnnnn, I wonder what the transparency is like? Bugger! Rats! Bugger Rats! Okay, that was put to one side for the moment and I'll come back to that later. - I'm starting to think that if the blades are folded, then more than likely the Nitesun cover will be on the searchlight, so do I really need to go this far into replacing lightbulbs? Don't answer! Another day, another color. In a vague effort to progress with this build I opted to bring out the airbrush and start coloring in - after spending about half a day masking. As I mentioned before, the camo pattern on these birds seems to have been more of a suggestion than anything so trying to figure out the exact pattern took a lot more effort than I anticipated. This time around I am doing "Alpha" and true to form, there are very few photo's of Alpha kicking around the internet. I think I got there in the end though this paint job probably covers several periods of Alpha's existence. Close up examination showed that I had gotten rid of most of the anti-slip finish on the fuselage though a few small spots remained. I'm not going to go much further here as this area will be covered by the winch so that rough spot will never be seen. Shoddy workmanship I know, but there you are. Then as you do, I spotted something. Or rather, I didn't spot something. Something I should have spotted and there was no spot. Any takers ? I bet our Bill will spot the spotless thing. Anyways, while you are all pondering what to spot, let's carry on with the strip show. Oh lookey -green and grey! n'some yellow 'n some more green. Okay, I'm just teasing you now, but we're getting there. I'm trying to build the suspense you see. Did anyone remember we had some white bits under there too ? I'm quite pleased with the way the "panel" under the windscreen has turned out. Considering it's not actually there, the paint does a decent job of suggesting it does actually exist. More white bits. They're always the best. It was all going so well. Some very slight paint bleed here and there but nothing to worry about then this happened. Yes, this. The blu-tack lifted the paint off - along with the Alclad black primer, right down to the bare plastic. More Rats. So, let it be known that I am not a fan of Alclads black primer. I've never had this happen when using their grey primer (which I love), but on this build, I have had several areas where the Alclad black primer has lifted clean off in several chunks. Kinda sucks as I have an almost full bottle of the stuff. I think it will be relegated to riming the non important stuff from now on, and I'll revert to the grey. Okay folks. You've all had time to ponder, so, did you spot the spotless thing? (put your hand down BIll) Yes, folks. The cabin door track. In my rush to color this thing in, I had forgotten to add the door track. More rodents. Well, Fly thoughtfully provide some PE bits for the door upper and lower tracks. However, those of a nervous disposition may want to look away now - this is what they provide. Sorry my Calliphora vomitori friends but that just doesn't cut it for me. Those tracks might work well on the side of a barn, but on the sleek form that is a Wessex? Nope!. Sorry, just not going to happen. Digging around in my brass bits drawer I happened across this length of brass angle. Looks promising, or more promising than the kit parts at least. A few swipes with the razor saw, and some micro drilling later, we're ready to plug in some rivets. I can't stress how handy these little rivets have proved to be over the last few years. I bought a bunch of assorted rivets for the train build and have found uses for them all over the place. This time around - gluing brass onto painted plastic is a recipe for disaster, so a few well placed (and glued) rivets will help secure the track to the fuselage and prevent many tears later. Upper track and front top fitted. Now I just need to figure out the bottom track. The bottom track should be a small top hat section, but the smallest square section I had was too large, but at this scale, who's to know I used a length of round rod? Dammit, now you all know! To secure the bottom track, I bend the rod at right angles on each end, then drilled receiving holes in the fuselage. The rod ends were superglued in place, then I ran a small bead of superglue along the length of the rod to secure it in place. Now that looks way better then Fly's attempt. (btw, Fly do not include the front edging strips at all). Hey look! I used a piece of Fly's PE !!! (after I had shortened it, and filed a bit off here and there) But does it fit ? Then a quick (still wet) coat of assorted colors to hide the brass and here we go. It's amazing how a lick of paint makes that brass just become part of the airframe instead of looking humongously out of place. It's almost as if it was meant to be. Well spotted folks. I congratulate thee all Here endeth todays episode of Fly swatting. Still plenty to do on this beast but with the coloring in and sticking bits on, I have a feeling that progress of a sort has been made. Now I've just got the rest of the progress to catch up on. 再見 !10 points
-
Lockheed-Martin F-35A Lightning II 421st Fighter Squadron ‘Black Widows’, 388th Fighter Wing Hill AFB, Utah, present day ORIGINALLY POSTED THIS SOME MONTHS AGO BUT JUST MADE USE OF THE SPRING SUNSHINE AND GOT SOME BETTER PHOTOS (Doesn't make it a better looking aircraft though, and you still can't see the Have Glass glitter, but it's there - honest) Brown tone = new photo. Blue tone = old photo. Don't ask me why! Like many other people, I regarded the F-35 as being too ugly to model. But things change! I was tempted to buy a 1/72 Academy kit at a reasonable price (£20 I think it was) at Yeovilton Air Day this year, and it just went in the stash. Meanwhile out of interest I did a bit of research on what shade of grey to use, etc, and at the same time a friend of mine sent some photos of a 421st FS aircraft at an airshow in Greece. One of the major things that removed my barrier to building one of these was the fact that production aircraft no longer have those RAM panels painted in a lighter grey, so none of that awkward masking, though there are still some subtle shades of grey on various panels. I also then discovered Mr Paints acrylic lacquer airbrush paints, and found that they do FS 36170 ‘Camouflage Grey’ and ‘Have Glass’ special matt varnish to give that metallic sparkle, so the fire was lit and off I went to build one of these: A pleasurable wander through Wolfpack Decals resulted in me buying sheet 72-125 which includes a 421st F-35A (it also includes a VFA-147 F-35C which got me looking forward to a 1/72 F-35C kit which surely can’t be too far away). Building this model made me realise how different the F-35 is from any other modern jet (except perhaps the F-22) with those weapon bays, facetted construction, sensors everywhere, lack of HUD, strange paint, etc and it was a great pleasure in the end to build it.9 points
-
I share this new Spook: Zukei Mura kit F-4C - Zukei Mura cockpit interior - Hypersonic correction set - TwoBobs decals - Aires Exhaust pipes - Eduard Accessories AMG Shrike Missile - GT ALQ - GT Wild weasel conversion - Brassin ejection seat Cons: The fall of the profile of the back of the fuselage, I tell you that it is very difficult to put the Hypersonic correction. It can be solved only by sanding the original plastic to give the correct profile or better yet, accept as is to a big bottom Phantom. The homogeneity in the depth of the panels varies in certain places. Nothing to worry about. The Slatas, by the complicated molding, are a little crooked (barely noticeable) and you have to stick by segments. Pros: Everything in its place. Assembly from 1 to 10 is 9.2 The best in detail. To make the EF-4C you have to make several modifications: -ALR-53 Homing Antennas -Camera on the right gondola for AIM-7 -ALQ-87 -ALR-53 Directing Finding Antenna -AGM-45 Shrike Anti-radiation Missiles I hope you like it.9 points
-
I'm so, so glad I didn't get to see this while I was over.9 points
-
I've had a rethink about the ejector marks on the wooden bed & I've decided to try and fill them... Now with the Abu Dhabi Grand Prix about to start - it's time for a break with tea and toast. Thanks for all the encouragement so far - ABU DHABI DO - as Fred Flintstone might say8 points
-
And the last few pictures of the deck houses The model is just under 2 feet long Steve8 points
-
Ladies and Gents, if you are going to quote a post in order to provide reference for the reply, please take the time to delete the pointlessly and I repeat- POINTLESSLY- repeated photos. It is a pain in the backside to scroll through repeated photos on a PC, never mind a tablet or phone, and is very poor netiquette. Likewise if you are quoting a post and it has that picture in it that 1/2 a dozen other members have also quoted. Guess what - It’s POINTLESS! We are close to the point where members will have their ears bent for their lack of netiquette. After the ear bending, well there won’t be an ability to quote posts for a while....7 points
-
As we all know, there is a dark side to model-making. I am talking about the modeling horror stories that adult modelers tell their kids or small relatives in those dark and stormy nights in front of the fireplace, about kits that are evil, produced by manufacturers in damp and cold dungeons or scary-looking towers with bats whirling around. We know the dreaded names, and I would add just one: Mach 2. I am still traumatized by the vision of the pair of their kits that I had the misfortune to look at close by. I can't describe the moment but as a crime scene, with the opened boxes and the parts lying around, like misshapen model guts surrounded by flash. But, in spite of that somewhere else in BM I promised to myself no more Merlin or old Dujin kits, it seems that Mordor is attempting to cast a shadow on my modeling again, in the form of what is reputedly one of Mach 2's better kits, the Republic Seabee. I saw it on a dusty pile in a hobby store in the Palm Springs desert; apparently harmless, lying still, quiet. I cautiously approached, which was a mistake. It bit me and will not let go. I had to carry it home. Mind you, I even had to pay for it! Yes, I wasn't bribed or paid a big sum to take it -as it should be with this kind of kits-, I paid! Anyway. Gathering all the courage I had laying around -in the form of a pithy liquid made in Isla contained in a bottle-, I muttered the Expecto Patronum spell and opened the box. To my surprise, no dark cloud of evil came forth. Just a couple of sprues, that, if not obviously cursed or badly mutated, still had some flash, no locating devices, and what looked like not perfectly molded parts. But nothing, so far, that screamed hasty retreat, or calling for the help of @Martian Hale. Accompanying the sprues was a dubious transparency, like the fogged eye of a monster, thick, milky, hissing. A one-side instruction sheet (that to my surprise was not scrawled on parchment) containing some (never better said) guidance and a small decal sheet. I believe the caldron and iron tongs have to be purchased separately. In any case, who else would make a Seabee, you may rhetorically ask yourself. Well, there is a Glencoe 1/48 (excuse my language) kit of it, and what seems even more ancient versions of it. I have spotted what looks like a resin CMR kit box (72-183 and CMR1083), but no more info on that anywhere I looked. So I guess we should thank Mach 2? We will see. The plastic has fair engraved panel lines and some detail, the flying surfaces have nice corrugations, but the plastic is a bit grainy. Some of the relief is overstated (especially the stiffeners on the hull). The detail is what you would expect from a kit of this nature. An interior is provided with cockpit pan and bulkhead, seats, a separate instrument panel, console, control wheel and a little stick. The only part that so far calls for an exorcist is the propeller, that deserves its own paragraph. It's poorly defined, which is something you expect, but both blades are pitching more or less toward the same side, one more than the other. To be clear: if you look at a prop from blade tip to blade tip, you should see an X. Here you see (exaggerating) just /. Of course the blades can be cut off and re-positioned, no big deal...but: The pitch has to be reversed, as it is wrong as molded on the prop. Looking from behind, the prop should turn clockwise (actually anti-clockwise, thanks Wlad for the correction). I guess the prop is better replaced. So far no terrible things, just a very poor transparency (vacuum-form a replacement may be?) and a discardable prop.7 points
-
1/32 Tamiya f-16 Zeus The F-16 demonstration team «ZEUS» displays HAF’s airpower to the public and acts as ambassador for Greece, demonstrating the professionalism and the skills of all pilots in the Hellenic Air Force. The team’s goals is to Provide morale within the Air Force, sister services and to the Greek community, to Inspire and recruit Greece’s best to join the service, Strengthen and grow public trust and confidence in the Hellenic Air Force and Retain the quality force we currently have. Team’s callsign during the Demo Flights is «Zeus», representing the father of the Olympian Gods of the Ancient Greek Mythology. The aircraft used for the performance of air shows is an F-16C Block 52+ . This is an OTB build with the exception of the converted tail I used model maker masks for the patterns, so 80% is painted. And I used Reedoak figures enjoy Mike7 points
-
- To end the serie of POLIKARPOV products , here is the I-15 photos taken under an unexpected downpour. Waterdrops can been seen on the upper surfaces of the wings, no photoshop here with immaculate white background and models looking too perfect to be credible... - - Autumn rainbow over Vladivos..Tulle ( my town)7 points
-
Well that's one half of the bonnet in place, just in time for lunch 😉 Took a while, most of that time spent on dry fitting, adjusting and figuring out the right moves to get it in position. I'll scribe the panel line between the two halves a little bit. And everything needs touching up because of the handling so that's on the list right after placing the remaining strut. Then drybrushing of the forward part of the cab, so I can get the windshield in, before the opened other half of the bonnet goes on. Should be easier than the closed part. This is what remains visible of the engine, you can just see the left side strut. What I'm guessing is the air intake/ filter is now also mounted so the engine itself is complete.7 points
-
Having realised that Ced is the only one spelling ‘Creme’ Egg properly I am now inclined to believe that he does indeed eat the bl**dy things; which surprises me given that I had previously thought him to be a healthy eating, athletic fine figure of a man I think it’s all of a one with him hiding this guilty secret from PC et al.during their visit..... Anyways the secret is out now and I can’t unlearn it.......... I have in fact done exactly that. And now I feel like I’ve somehow let the side down.7 points
-
PC, Chris, Crisp; don't worry, Mrs B does NOT approve of such pleasures so I only ever eat Creme Eggs while sitting on my own somewhere quiet in the car. The only problem is the occasional strange lady banging lustfully on the window - but I don't share with anyone! I must choose my sites more carefully7 points
-
Phew I'm glad that's over The bad jokes, I mean, not the poll Also: Cheers, Stew7 points
-
Second of my three Berievs, and third flying boat in this GB, completed - the Be-200. WIP is here thanks for looking Julian7 points
-
I can see it now...7 points
-
Pictures The bow has a very fine entry Man touching up the paint on the stern, adds scale Close-up of the deck at the stern showing the rivet detail and the steering quadrant7 points
-
Hello all, I have been rather busy working of late but I have found time between working with real aircraft to finish my F-4D. Im sure many are aware that the Tamiya kit is a dream to build and goes together very well, I used Mr Colour paint which I believe are the best on the market at the moment, the colours I used were 303 (FS34102), 310 ((FS 30219) and 320 (Dark Green)……….and black for the bottom 🙂 Sadly the decals were in a poor state and fragmented as soon as they hit the water, so I purchased the Warbirds Decals set (32009) which were superb and set well on the aircraft and into any details very well and recommended. I didn't like the fit of the intakes to the ducting, so I thought it a far better idea to use the Quickboost (QB 32089) set of intake covers. The seats are aftermarket, but I cant tell you who made them as they came free with the kit (from a certain auction site) All the weapon pylons are removable, this is done using small earth magnets in the wings and pylon locations. I hope you like it, it is certainly my best build so far. All comments are welcome, thanks for looking6 points
-
Here is another model from my Falklands War collection - 1/72 Douglas A-4P Skyhawk C-212 of V Brigada Aerea Fuerza Aerea Argentina, Rio Gallegos AB, May 1982. Airfix` kit, which needs a lot of work to look like A-4B. Built at the same time as my A-4Q - report here: https://www.pwm.org.pl/viewtopic.php?f=851&t=87504 I think that it`s the last Skyhawk I`ve ever built. Now I have 3 in my collection: A-4C, A-4Q and A-4P: The other 2 models were also presented in this forum: A-4C Skyhawk 1/72 Fujimi A-4Q Skyhawk 1/72 Airfix Thank you for your attention!6 points
-
I do like these Revell Kits (Other than the Wing sections). These are the Kit markings but I used Barracuda resin for the small wheel bumps and the spinner & props. Gunze Paints and GX100 Clear for Decals. Mr Hobby Matt for Final Seal. USchi Line for Antennas and Kit decals for Markings...These were really Good.(Spares box for Tail marking) HGW Cloth Seatbelts are really nice..My photos don't show well Thanks for Looking Comments Always welcome Cheers Bill6 points
-
That is … pretty impressive. I’ve had some experience of the final output of various 3D print technologies, and I have to say the finish you got there, Tony, is up there. Five years ago it would have been out of the reach of mere mortals like us. I know I could use this technology for all kinds of things. Sadly, my braincell almost totally rejects learning new software these days, so it’s the creation of the initial CAD that will prevent me wanting to invest. I shall continue to rely on others who are happy to take commissions and my money.6 points
-
nineteen thousand, nine hundred and ninety nine bananas nineteen thousand, nine hundred and ninety eight bananas nineteen thousand, nine hundred and ninety seven bananas nineteen.... as a matter of interest, what value did you use for the anti-aliasing ? I used 8 on the rotor head which looking back, I think was a touch heavy. I may have got sharper detail using only 2 or 4 looks like you're on the last lap with the Annie Tony. I love the subtle variations of form and color on the undersides. Sheesh - you even fatigue test your models? That photo reminded me of my time designing buses at Alexanders nightmare in Falkirk. They used to tilt test the buses when the design changed. The seats were loaded up with lead weights to simulate a passenger load, and there was a tilting floor - I think the only one of its kind in the UK at that time (?). Over the space of a few minutes the double decker was tilted to ensure the center of gravity was acceptable. If I remember correctly the ALX series could get to somewhere around 42° - 45° without tipping over Found a tilt test video on yewchoob (apologies for thread drift, but thought you may find it interesting) it was quite a sight to watch. Your brain would be telling you one thing and your eyes were telling you something else!6 points
-
Won't be long now. My first build for this GB is the following: I'll build the single-seater as an SH-37 maritime strike aircraft in the classic splinter camouflage with two of those humungous RB04 missiles under the wings. The SK37 will be saved for later. Second build:6 points
-
Who'd have thought it, chocolate dogging on Britmodeller...........Dirty boy. Every day's an education.6 points
-
I think he charges extra for that one6 points
-
I've started work on the bonnet. The side pieces are molded with open louvres, which might please some people on this forum 🙂 ... A PE handle is attached, the one on the left was number two so it's looking slightly better but these handles were probably bent out of shape some on the real thing as well. I'm now busy mounting the struts. As you can see I've sort of fixed the steering column issue. This side will not be visible because the bonnet is closed here, the other side will be opened. In order to get in the struts I need a top piece of the bonnet to push the radiator in its correct position. There's quite a bit of strain and the struts themselves will certainly not be able to handle it on their own. So I'm dry fitting a bonnet piece and glueing in the opposite strut. I can now paint this strut and the left side of the bonnet, which I then have to glue in before removing the right side piece and putting in the strut on that side. After that I'll be able to paint and mount the opening side. I have nothing else planned for today so I'm hoping for a finished bonnet at close of business.6 points
-
A very big thank you to trickyrich for his easy to read spreadsheet charts I've copied and saved nearly all the bad jokes. I'm going to share them with the ladies in the local Knit & Natter group at the Christmas party. I'll also use them to really annoy my family over the coming period.6 points
-
We made it folks!!!! Thanks to everyone who voted, it was a little close for a while but we made it nicely in the end. Now the bad news, I grab first GB off the block for next year!!! Least this way you can start the year off fresh and not have to finish another build before hand. So you better start digging out those builds or writing a very nice letter to Santa (or SWMBO)!! Plus winter and Scandinavia just go together!6 points
-
Hello Col ! Cheers !! Thank you for the tip !! She will be stuffed with resin and white metal, reinforcement will be mandatory !! Culham codes, CH if I remember, if you have a pic, I'll be on !! That mean a fourth Sea fury !! Good plan !! Now it's been a while since I posted some food porn... I tried a new recipe today... Pepperonies stuffed with a specially prepared meat loaf, spices, dried grapes and so on ! Here's the thing ready to enter the oven, I like to put the spots in the oven too It was taaasty and SWMBO was delighted !! More extra points for Telford 2021 !! Now back at the ladies...Here's what can be called a "completely unuseful gubbin" Great idea Mr Trumpy, an open engine cowling... But there is no engine at all, So doors opened on the astronomical void... Knowing that the Trumpeter undercarriage is not the best one, I've got this... Here's what Hobbycraft used to call a Bristol Centaurus... Aaand, as my kit is an Elite serie one... I have a PE fret !! We finally are pretty lucky... See how much our favourite hobby has evolved in 30 years or so... Well... For the cockpit tub, it's another story... It is the return of the pilot with arms on his hips... from left to right, Oh sorry from Port to Starboard.. Zobbycraft, Flightpath, Trumpeter and Airfix.. The trumpy one is really done for the pilot with arms on his hips.. Clearly not shallow enough... I'll need some work... Or some bucks... More to come soon !! Thanks for the support !! Sincerely. CC6 points
-
so that's it the joke fest has finished......time to start saving them up for next years. Prior to Enzo the Greats official results announcement here are the results!6 points
-
OK - cab shots... The steering gear is in... even at 1/35 it makes me wonder why we get all that steering rod - that will never be seen... The base of the cab is quite nice with the pedals and gear shift. I've left the seats out for now - but put the back of the cab in place... The seats are only in 'for effect' at present - but it's all looking OK at the moment. More in the morning I guess. Thanks for looking in - Steve6 points
-
Yes! I like to bite the top off, lick out the yolk, nibble the edges and then pop the rest in my mouth. How do you eat yours?6 points
-
Slight change of plans. After having a good look at the Print Scale decals for 151 Squadron it seems likely that the blue in the St Andrews Cross is too dark. In fact, it's printed with the same ink as the roundel blue and it's hard to distinguish the black border. According to online references, the "official" blue for the saltire is Pantone 300, which is quite a bit lighter than roundel blue. In the grey scale photo of XH436, the blue, to my eye, does indeed look lighter than the roundel blue, and the black border is very obvious. So, in typical Navy Bird fashion, I'm going to switch schemes at the last minute to XH438, 72 Squadron at RAF Leconfield in 1960. I found a colour photo at Air Britain of XA754, 72 Squadron, and the colours of the squadron markings look pretty close to the decal sheet. Quite a few mistakes in that Print Scale sheet - painting instructions were wrong (Medium Sea Grey instead of the correct Dark Sea Grey, Light Aircraft Grey instead of High Speed Silver, and the camo pattern is missing the Dark Sea Grey area on top of the port wing). The tail stripes for 60 Squadron are black & white instead of black & silver. The blue is too dark in the saltire for 151 Squadron, plus the sheet doesn't include the XH438 codes for under the wing (I can get these elsewhere though). The last item is odd, as the decal instructions clearly show XH438 on the underside. Someone needs to checks things a bit more closely methinks. Onward. Cheers, Bill6 points


copy.thumb.jpg.d8f94c146f5d2da12880c4799901d6dc.jpg)


This leaderboard is set to London/GMT+01:00