
Leaderboard


Popular Content
Showing content with the highest reputation on 30/11/19 in all areas
-
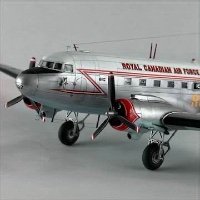
Revells 1/72 Handley Page Halifax built as S-Sugar of 35. sqn. Shot down during an attack on Tirpitz over Norway. The aircraft force landed on Lake Hoklingen,and the crew survivied. All but one escaped to Sweden. The plane is now resting in Hendon museum. Read more here: http://www.archieraf.co.uk/archie/1048tls.html . Freightdog correction set for wheels, radiators and propellers used. The model was painted with Tamiya and Gunze colors. Best regards Rune Haugen45 points
-
** WARNING ** DO NOT INSPECT TOO CLOSELY!! 😁 Finished after a huge struggle, lots of filler and a mask set that didn't really work very well.. It's the only game in town which is why I got it in the first place. 70 grams of weight in the nose to stop it being a tail sitter. Only recommended for the experienced modeller. Cheers Warren28 points
-
Good evening, ladies and gentlemen. I present you my next model. It's typical "shortrun" without any navigation and headlights.26 points
-
This is another stash clearer, I have a GWH F-15c and knew if I built it I would have a hard time going back to the Hasegawa F-15A in the pile. I wanted to do the early blue scheme with the reddish canopy frame and unique insignia, it reminded me of seeing the first 1/72 scale Monogram kits in the department stores as a child. I had a couple bottles of Air Superiority Blue saved for it, replaced kit items with an older ESCAPAC seat and different wheels then added the air brake stiffener. Mixed my own metallic green for the cockpit rear. Decals were mostly Superscale stencils and some Caracal for unit and insignia. The blue scheme is sort of unique in that it is glossy underneath and matt on top. I used Hataka Air Superiority Blue overall and on the matt areas I added thin coats of Lifecolor Air Superiority Blue (which has slightly purple hue to Hataka’s slightly greenish hue of blue) on the top and sides. I found referencing the old blue more difficult than expected, luckily I had an old Aeroseries 28 book. It had everything needed for early eagles. I finished it in a sort of Langley QRF load out.22 points
-
No worries, fellas! We had a surprisingly pleasant Thanksgiving, all things considered. Winston slept over with his grandma and grandpa, because both his good and bad qualities remind his grandmother of little Edward about 32 years ago, and I passed out while reading to Grant, so that Mrs P discovered us both out cold when she came up to see if everyone was okay at about 9 PM. Win also got to hold his new cousin, Rosemary: This morning we all walked over to my parents' and reclaimed Winston, then played in a park and walked home, where Winston threw a paper airplane directly into his mother's eye, because that's who he is, and then things proceeded more or less as they normally do in such matters, until everyone was exhausted and we all took naps: Grant in his crib in our room, Mrs P on the sofa in the TV room, and me (and latterly Winston) on the futon in what's called the middle room but was intended as the dining room when the house was built in 1921. That seemed to sort us all out, and we had pierogis (after the Polish Air Force in exile, possibly Poland's greatest contribution to a better world) for dinner and after reading about a million stories we got the kids in bed annnnnd it was grotto time! I've read reports that if care isn't taken, the Airfix Spitfire I is a little lacking in dihedral, so I thought I'd try and be a little strategic about things; I attached the lower wing first, yes, but when I glued the upper surfaces on, I did so gradually, starting at the root, and it seems to have worked. It wouldn't be a Procopius build without a big, gluey fingerprint, however, and I managed to furnish one: Idiot. Hopefully some Mr Surfacer will sort it out: So here we are now: Next steps are close up the cockpits and get to sanding seams and so forth. Puttering along!17 points
-
Morning guys, Finished this one up the other day. A really nice kit that flew together, other than the fact that Tamiya don't seem to want you to build it wheels up, so some scratch building was required to close up the gear wells. The decals were also a little thick, I've not built many planes yet so I'm quite pleased with how this came out.16 points
-
Here is another model from my Falklands War collection - 1/72 Douglas A-4P Skyhawk C-212 of V Brigada Aerea Fuerza Aerea Argentina, Rio Gallegos AB, May 1982. Airfix` kit, which needs a lot of work to look like A-4B. Built at the same time as my A-4Q - report here: https://www.pwm.org.pl/viewtopic.php?f=851&t=87504 I think that it`s the last Skyhawk I`ve ever built. Now I have 3 in my collection: A-4C, A-4Q and A-4P: The other 2 models were also presented in this forum: A-4C Skyhawk 1/72 Fujimi A-4Q Skyhawk 1/72 Airfix Thank you for your attention!15 points
-
And the last few pictures of the deck houses The model is just under 2 feet long Steve14 points
-
Today I want to present last of my finished previously small helis - Mil Mi-2 from Lotnicze Pogotowie Ratunkowe (Air Rescue Service). Mi-2 were for years "workhorses" in Poland. Nowadays all are retired and replaced by EC135. As usually with civilian versions a lot of scratch (especially inside) has to be done Sorry if I've added too many photos, but... I just like this model If anyone is interested in a report "WiP" is available on the Polish forum13 points
-
- To end the serie of POLIKARPOV products , here is the I-15 photos taken under an unexpected downpour. Waterdrops can been seen on the upper surfaces of the wings, no photoshop here with immaculate white background and models looking too perfect to be credible... - - Autumn rainbow over Vladivos..Tulle ( my town)13 points
-
#27/2019 After a long pause my father finally build a new WW1 model. This is Eduard´s latest boxing of the Schuckert D.III, used EZ Line for the rigging and for the first time some Gaspatch PE turnbuckles. All the large lozenge decals were a PITA to apply, didn´t turn out perfect. My father is no pro WW1 builder but the model looks ok. Build thread here https://www.britmodeller.com/forums/index.php?/topic/235058174-knights-in-the-sky148-siemens-schuckert-werke-diii-deutsche-luftstreitkräfte/ The model shows the aircraft of Vizefeldwebel Reimann, Kest 4b in September 1918. DSC_0001 by grimreaper110, auf Flickr DSC_0002 by grimreaper110, auf Flickr DSC_0003 by grimreaper110, auf Flickr DSC_0004 by grimreaper110, auf Flickr DSC_0005 by grimreaper110, auf Flickr DSC_0006 by grimreaper110, auf Flickr DSC_0007 by grimreaper110, auf Flickr DSC_0008 by grimreaper110, auf Flickr DSC_0009 by grimreaper110, auf Flickr DSC_0010 by grimreaper110, auf Flickr DSC_0011 by grimreaper110, auf Flickr DSC_0013 by grimreaper110, auf Flickr DSC_0014 by grimreaper110, auf Flickr DSC_0015 by grimreaper110, auf Flickr DSC_0016 by grimreaper110, auf Flickr DSC_0017 by grimreaper110, auf Flickr DSC_0018 by grimreaper110, auf Flickr DSC_0019 by grimreaper110, auf Flickr DSC_0020 by grimreaper110, auf Flickr12 points
-
Everything was a band in the 60s & 70s.... I daren't ask about the shirt I guess Simon... Interesting bit of social history Pete: thanks. It's not media headlines but these shifting patterns of social detail that affect the lives of so many of us. Kind of you Tomo. Ancient Egyptian bread & honey must be the headiest of high teas I reckon. Wonder do you become a god afterwards? I'm seeing somebody leaning against a Ford Anglia with a can of Watneys and tabbing away on a Player's No.6 Keith. 😁 Am I right? Yeesh. Another week of busyness. Would rather have been sipping nectar with Neferti on a perfumed Nile barge but there you go - only another decade until retirement. Little time on Annie until midweek when I thinned down the depth top and bottom of the runners for the window frames, which were then epoxied into place and left to cure on the stove for 24hrs: It was quite a tricky job due to the thinness of the pieces and trying not to mangle them out of shape whilst simultaneously running a file across them but eventually, proved worth the effort though in that theyno longer look as clunky as their raw state. This has unfortunately proven a more time consuming stage than I'd hoped it to be; knowing what I know now it would have been much easier to perhaps to Photoetch these and several other parts that I've had to make by hand. Oh well. Price of Experience, as Bill Blake once said (either to his Missus, or an angel on the staircase). Taking all those bindings off this morning revealed a nasty dribble of epoxy had gotten onto the starboard window: Too thin a piece of transparency and too big a surface area of glue to be able to sand and polish successfully. Thankfully there are channels in those frames like on the real thing so I was just able to trim out a replacement and by bowing it out, pop it back into place. I wouldn't use anything else except smartphone screen protector for such work these days: fiddly to work with but at 1/72 a good compromise between strength and scale. The AW turret. was also unearthed from the parts collection and impaled upon the Raving Droid: Before getting down to painting the turret and cockpit framing there was a small masking job needed doing to spray the lip along the front of the windshield, which is a noticeable bit of visual on the real thing: Then two liberal coats of the brown and green brushed on roughly around the framing and left to dry: Easier to ensure getting paint into all the nooks and crannies this way and then take the excess off with a toothpick and sewing machine needle afterwards. Scrape, scrape. Scrape, scrape. Scrape, scrape. An obsessive hour later and the main outlines restored: Been busting to take the nose masking off for ages now so couldn't wait any longer. The front window turned out a nice smooth job in the end. Painted, the new side window frames blend back in to the main structure less alarming than the raw metal looked: Visuals of the turret actually exceeded my expectations to be quite honest: (It's just tucked in here for a dry fit so don't be alarmed that it's positioned up too high in the photograph.) I'd spent so long looking at the rather ugly bare foil on that bulb but actually rubbing all over with the cocktail stick (not just in the parts where the excess paint was) polished it up very nicely indeed! I read somewhere that you can polish Cordoban leather shoes to a mirror finish with a piece of antler, so an analogue here perhaps. Either way must remember these results for future use. Those few hours of concentration have depleted the mental faculties now I'm afraid so after a bacon butty and pint of strong tea I'm off for an afternoon kip; hopefully this will prove restorative enough for me to stick some more bits on to cure overnight. Before going I may as well admit to having bought a 3D printer during the week- having seen @hendies divine rotor hub thingy that he produced for the Wessex I realized that there was an Elegoo shaped void in my life that no amount of prayer and contemplation could ever fill. I spent some time last night fiddling around with Fusion to come up with a test part that would be complicated enough to act as gauge as to how fine a detail it would let me produce at 1/72, so all being well, will have a first go and try and print out a family of these tomorrow at varying sizes: That's not intended to be an actual part from anything: just me fannying around experimenting with the various modelling routines in Fusion (which I like more at each sitting). The idea with those blades and cone is simply to test how thin a cross section it'll print and how smooth it will treat variously curved surfaces. Theory anyway. Hope your weekends are off to a good start at whatever pace is appropriate. Tony12 points
-
Afternoon all, Here is a build from a few months back. Knowing the importance of recycling, particularly of hens teeth old Matchbox kits, I had a lot of fun dismantling and renovating this HS 125. I thought this was a funky scheme, and I liked the idea of 1970s JCB execs flying off to Schipol in the morning, selling a few diggers, and celebrating with G&Ts on the flight home... This started with a £3 ebay purchase and arrived covered in lashings of Humbrol with no discernable undercarriage, looking something like this: I've yet to master the art of the perfect finish following heavy duty sandpapering, but I learnt a lot along the way, and it did help tone down those Matchbox trenches. Apologies to the ebay seller if I desecrated a family heirloom! All best, Harry11 points
-
Last of the "carp" as I show. This is another Wessex UH.5 Italieri 1:48 model As before, the model was made straight from the box. . family picture11 points
-
Pictures The bow has a very fine entry Man touching up the paint on the stern, adds scale Close-up of the deck at the stern showing the rivet detail and the steering quadrant11 points
-
Hi All, I had been Building this in the Flying Boats Group Build II, but life has come in between, and I won't get this finished in the next three weeks (December 22), and give it the attention I want to give it Below is a link to my build , which includes a Kit Review I plan to build this here and post as I build. I have as yet to fully decide which of the RNZAF "Boats" I want to do (Code wise) I have some of these photos from my Dads collection to think about I hope you might want to join the journey, and feel free to ask questions/comment as we progress Post more soon Regards Alan10 points
-
Hey Guys, Here's my Tamiya P-51B, finished in the markings of Lt. Col. Everett W. Stewart during's time as part of the 355th Fighter Group when it was based at RAF Steeple Morden in Cambridgeshire. The kit went together beautifully as per all Tamiya kits, and it was painted using a mix of Mr. Colour and Tamiya Acrylic. The decals are from AMDG Decal's 'Yankee Merlin Roars!!! Part III' set and were of good quality, they went on well and were incredibly thin, requring only a slight helping hand with decal softner around some more complex shapes. Weathering was along the lines of 'used but not so abused'. I wanted to show a machine that was well used and that had picked up a few dings and dents but not too excessive. I achieved this with a mix of pre and post-shading, thinned oil paints for the panel lines and a metallic watercolour pencil for any chipping. I finished the model with some airbrush weathering effects before sealing with Xtracolour's Enamel Matte Coat. Rounding off for me however was having the ability to take this out to the actual former RAF Steeple Morden. Luckily I live across the border in Bedfordshire, and the base is a quick 20 minute drive away. At Steeple Morden not much of the original base survives, only a few nissen huts and the occasional segment of perimeter track that the farmer's found useful, luckily however an impressive memorial has been erected nearby where some of the technical and administrative buildings originally were, so I was very privelaged to be able to take some pictures of my model on the base of which its real-life counterpart would've served. Many Thanks for looking guys! Sam10 points
-
I think I must be working up to the speed of light as I get older Cheers, Stew10 points
-
Hi, these are basically the same kits with different decals. Both build oob (with some changes to the decals) without real problems ... As always: thanks for looking!9 points
-
Wires taken care of. Only have to fix the steering column now. One more part needs to be added on top of that mount on the left, air intake maybe (I don't know a whole lot about engines, becomes apparent now 😉).... Then, two struts between the firewall and the radiator and after that the bonnet sides. You have the option of keeping them open which of course I'm going to do, no point in doing all the engine work and then hiding it.9 points
-
Hi Here is my latest build done for the "In the Years I was born GB" 1975 - Operation Frequent Wind - First F-14 Cruise Grumman F-14A Tomcat Hasegawa 1/72nd with Verlinden cockpit8 points
-
This time in my opinion ofcourse, one of the most beautiful combat aircraft in the world. I mean only aesthetic values especially during the flight. MiG-29A with the side number 111 of the Polish Air Force. Model is Trumpeter 1:32 scale made straight from the box. I must admit that the Trumpeter model is quite well made and doesn't cause problems. Decals are made to order ModelMaker, I add that the position and aplikation of the wheel requires a lot of patience. I hope you enjoy watching this model.8 points
-
Thanks Keith. It was working, sort of, but (like the Mr Surfacer) only slowly. Perdu's idea of the Mr Dissolved Putty has worked much better (see below) Thanks Tomo PPP and keep it clean - got it! The Mr Dissolved Putty has worked well with little shrinkage and has been sanded: Along with the fuselage seam: Note the hole around the front top window? I was thinking 'Huh, that'll have to be filled' then I noticed that there's a dome to go over the top. Phew. As that more or less completes the sanding so I started to look at assembling the other bits and pieces. That's when it all started going wrong Spot the (not) deliberate mistake: And why doesn't this sit nicely? Because I cleaned up the flash inside the coming that's not, er, flash: …it's a support ring. Rats. I've glued that in pre-painting: At least I can't mess up the cowlings (or can I?) so they've been glued with latex glue: I'll rub off the excess and stick them on (with latex again) prior to a shot of primer. Mojo squashed, again8 points
-
'ere, I've had another idea how I can combine some GBs. I'll scratch build a figure of one of my late uncles. He was born in Norway, escaped there and joined the Free Norwegian Navy in WW2. Later he transferred to the US Navy. After WW2 he became a naturalised US citizen. He learnt to fly and delivered ex-USAAF P-51s to a South American country and flew one of them for a couple of years in one of their scuffles. He re-enlisted for the Korean War and was still active in the US Navy in the early years of the US involvement in Vietnam. He was made to retire from the USN in about 1978, then he became one of those Wildcat Roughnecks working in the oil fields of Oklahoma, Texas and Alaska. He used to taunt a Swedish neighbour with: 'At the Battle of Co-pen-hay-gan ten thousand Swedes Chased by one Nor-vey-gan!' They were good friends tho8 points
-
Apparently the Flat Earth Society has members all around the globe.8 points
-
Thanks Bill I'm with you matey - I know a lot of people like this stuff but for me it never does the job and I can't see what I'm doing wrong? As usual, when the stuff dried, it hadn't filled the gaps - but had left lumps around the edges: Then when you sand that off you realise it didn't go into the trenches / holes: What am I doing wrong? I might give the Dissolved Putty a go tomorrow. Thanks John and Keith I know! I'm going to build a FW190 next so I can try out mottling with the special knobs and controls on the new one. What could go wrong eh?8 points
-
Built to represent a Firefly of Glory's Korean War air wing in 1951. Despite its age, this was a nice kit to build and the decals took really well. I made it oob except for a slight change of serial number and codes and a bit of extra cockpit detailing. Colours are my usual FAA EDSG gloss spray and Humbrol 90 'beige green' matt spray (I can't find it in gloss!) which I then painted over with clear gloss, followed by a few strokes of dirt wash. As usual, all comments and constructive criticisms welcome and probably needed!7 points
-
7 points
-
Thanks for looking in Fellas and for all the comments Thanks Stuart - Familiar with that video and have my Water colour "Rough" paper that Jim Baumann suggests - foam and balsa to come As to Kris and Mike - Yes definitely and they've been the inspiration here It's taken from Raven - Interested as ever to see what you and your group think Janie Ithurial Raven by Rob Matthews, on Flickr Here's the IWM pic HMS_Ithuriel_1942_IWM_FL_22375 by Rob Matthews, on Flickr I'm starting with some trial bases - Michael - I'll probably skip the oats method that Chris Flodberg states he's dropped - I'm taken by the Rough Water colour paper and foam base though cast resin bases of Kostas Katseas are what really caught my eye I've been riffing with some colours... DSCF8863 by Rob Matthews, on Flickr and messed around with card onto some Daler bases... DSCF8864 by Rob Matthews, on Flickr I bought some Tamiya Z-class Zerstorers cheap to "practice" on, but started on HMS Ithuriel which was supposed to come last! I've been trying layering using Liquitex "Gloss medium and Varnish", which I read about and have lost the link - so apologies to whose ever idea it originally was DSCF8872 by Rob Matthews, on Flickr I originally tried with a flat brush which was much too small and ended up with an abomination that I shan't share. it's possible that this wider brush will be more successful? DSCF8873 by Rob Matthews, on Flickr For me - this sort of appearance from Kostas Katseas is just awe-inspiring... 29244298_1627191144066065_8499225402399522816_o by Rob Matthews, on Flickr More soon Rob7 points
-
Thanks elger - trouble is, too much sanding afterwards and I'm very lazy! Thanks Martian I'll try to remember to clean before AND after… Thanks Adrian - good tip and I might use that later if there are any obviously 'trench' areas left But this morning I thought I'd try perdu's suggestions of the Mr Dissolved Putty: Brushing across the trenches seemed to achieve the desired result: Now, IF it doesn't shrink to nothing we have a winner. Smells a bit though…7 points
-
But the trouble is that the web also gives access to all the world's stupidity...7 points
-
The fit of the lower wing is bad, which is strange, since the width of both components is given by the kit parts. In any case, shaving of both, exterior side of fuselage sides and interior sides of root ribs was necessary to make the wing able to slide in. We all know this is a very old Airfix kit, a sort of highlight for its time, and should not be judged by today's standards...unless Airfix keeps selling it, which it did until very recently, in spite that it's now completely déclassé. I completely love Airfix's new releases (of which I have bought and built many) but some of the old ones...7 points
-
oh goody, the Doctor 'jokes' Doctor, I keep wanting to be a big supermarket How long have you felt this way? Ever since I was Lidl That ASDA be the worst joke you've ever heard7 points
-
evening boys & girls the time finally arrived to add paint... I am not a fan of the process and find it difficult (which is why I like NMF birds..), but I can't get away with it anymore so after getting the custom masks from Radu I thought I would try the MRP paint range (I used enamels on the Spit). I did some test runs to see how the paint adapts to going on unprimed aluminium and the results with the black for the tail was positive - it goes on really smooth and taked wire wooling without a problem so a start was made.. ..not too many in progress pics, but here is one of the insignia on the wings... ..I put a different black on the lower tail as there are painted over serials here that can still be made out, the idea being I put one black down, then mask the numbers and then the main black for the tail so there is a subtle difference in colour - also set out the rear stripe by setting down equal bits of tape to follow the line with more flexible tamiya white tape.. ..the MRP 'super matt black' is a wonderful colour and I am really happy with how it turned out - bit of a problem where some paintv lifted when lifting the serial masks, but I think I might leave it.. ..wire wooling the surface gives a really realistic sheen and naturally fills panel lines & rivets with lighter dust which makes for a nice weathered effect.. ..the rest are just glamour shots - the fuselage insignia had to be stripped off as the white lifted when I removed the masks, so Radu is doing me another set and I will do these with enamels - I also scaled the nose art name incorrectly so that is being done again too stuff like the prop, the gear and the 'sit' are not right as it's just jerry rigged for the photo's, but the finish line is edging closer... TTFN Peter7 points
-
Cheers Cookie! It sounds like the Testors stuff is certainly better, I must try and find some and give it a go. The Gunze metal looks really fantastic when polished up, I think better than Alclad, but has literally zero ability for handling and masking. Any protective clear over the top greatly reduced the shine and metallic lustre in my tests so I went with good old Alclad in the end. Cheers Hairtrigger, I didn't plan on making this build so involved (after all I will build the IIIS in larger scales) but the kit does give a level of detail in places that rivals the large scales so I found myself doing bit more than planned. I've built a few Heller 1/72 Mirages before, a nice kit for it's age but this Modelsvit kit is from a different planet by comparison tbh! Since I began this build back in August (yikes its almost 2020 now!) I've been doing little tests of Alclad here and there in order to home in to what I think would give the best metal appearance. To make it clear here I think I should say IMHO nothing beats a well done foil job (well it is metal after all) as it has not only a great shine but also the graining and texture. I've never foiled a kit before but the surface details and small scale of the Modelsvit kit ruled that out for me, it would have been a steep learning curve on this one. So, after trying other metal paints I went with Alclad and was sure from the start I would use the 'High Shine Polished Aluminium' for some of it. Again referencing this pic, You can see the fuselage and vertical fin are much more reflective than the wings, annoyingly for us modellers whilst being shiney it also shows wear and scuffs. It isn't a mirror but it is shiner than what you get with standard metallic Alclads, sort of an awkward in between. The Alclad Polished Aluminium (PA) is not lacquer based like the non high shine Alclads, but Alcohol based, semi-transparent and should be applied over an enamel primer. The base primer has a huge impact on the final hue of the PA as you can at some acute angles 'see through' the PA to the underlying base primer due to the transparency of the paint. With this in mind I experimented with using reflective silvers as a base to then apply the more metallic and reflective PA over the top, so you only see metallic paint from whatever angle you view the model. Doing this, you won't get a super reflective mirror surface like an enamel gloss black base but it gives you a chance to pre-shade and vary the silver tones under the PA to make it appear more weathered, whilst also not seeing the gloss black base at certain angles when viewing the model. I did some testing and it looked pretty darn good but I was conscious the Mr.Color paints I used were not enamel as instructed by Alclad. I was ok with this as after testing with Humbrol gloss black I thought it was too shiney, an amazing finish if you want a mirror but too reflective for this Mirage. So I sprayed a base coat of Mr.Color 8 and 159 silver, then masked off and sprayed some darker more chrome-ish panels a darker base colour. After this I then used various mixtures of super thin gloss black and silver to vary the tones of the surface just like a did in my tests which worked out well to vary the appearance of the Alclad PA going on top. In my prior tests I then sprayed Alclad PA over this silver mottle to get quite a nice varied and shiney polished finish. However this time for some flipping reason on the model itself I decided to spray over a few wet layers of GX-122 UV gloss to really make the surface shine before the Alclad PA, assuming it would be ok because they were all Mr. Color Lacquers so no problemo. I was wrong! I applied two very light layers of Alclad PA over this and then stopped and thought something wasn't right, the model had next to no metallic hue like I knew Alclad PA should have, instead it was like a super bright silver, Damn it, the GX gloss really didn't get on with the Alclad PA. No crazing or bad reactions, very smooth and shiney in fact but most of the metallic lustre Alclad PA has just wasn't there, it had killed the 'metalness' which completely defeats the point of using Alclad. So lesson one learnt, you can over lay Alclad PA over Mr.Color silvers no problem, but not the GX gloss series. I then thought maybe I could just spray over the Alclad with Mr.Color silver again and repeat the process but without the GX gloss, however as the Alclad PA is delicate and alcohol based I wasn't so confident in putting strong Mr.Color Lacquers over the top of it, I seriously didn't want to strip this model given all the time and masking I'd put into it incase things went tits up. So I just began winging it. A dark gloss enamel is what the instructions say you should do, so I then kept it simple and followed with a very very thin few layers of a very dark gloss blue, specifically Xtracolor Frecce blue with Humbrol gloss black mixed in. I had again done some testing of dark blue bases under the Alclad PA before and liked the result, it gives the Alclad PA a slight hue as if the reflective metal is under a blue sky, it is very easy to overdo it however so I went conservative and made a mix pretty close to black. With hindsight whilst typing this I should have made it a bit more blue as the hue is very discrete on my painted model. Lesson two, use a dark blue enamel base but not too dark! Sorry for the crappy pic. I only applied two very thin layers just to put an enamel base for the Alclad PA, so the previous metal layers still came through somewhat, a dark metallic blue now! I had by now suspected Alclads instructions of an enamel base for the high shine paint isn't just for a dark shiney surface, but something chemically in the Alclad paint bonds and shines so much better with the enamel base, much much more than any of the umpteen acrylic or lacquer bases I had tested. I think the prior tests with Mr.Color 8 silver as a base only worked because that paint in itself was rather metallic already and reflected though the semi-transparent Alclad PA. After a few days drying I then masked off the darker base areas and applied two thin layers of Alclad PA, leaving about 20 mins between layers, very gradually building up the shine. As the paint is transparent and works on reflectivity of the underlying base, the more you put on the more standard and less high shine aluminium it becomes. However look at the difference in metallic lustre, it was huge! This proved it for me, it doesn't matter how shiney or dark your base is, if you don't use an enamel base you will not get the full metallic nature of this paint. Darker masks off, Then I applied another thin layer of Alclad PA. After this I then checked if the contrast between the small masked off fuselage panels (previously sprayed in non high shine Alclad Aluminium) was ok, It was too stark so all the little masks came off, Then two more layers of Alclad PA were sprayed over the fuselage to blend everything in a bit more, finally stopping at the shine I was happy with. It isn't a mirror as that would be too much for the subject, but it is quite reflective. All the masks were then removed to see what is what. It is a guessing game at this stage, I will clear the model so trying to preempt the final shine after the clear is guesswork for me atm. The contrast between the darker panels wasn't quite as much as I'd hoped but overall I'm happy indeed! The finish is difficult to photo depending on numerous factors. For example compare the above images to the more darker reflective fuselage below, in reality it looks quite different in differing lighting and angles. I need to do a little more painting on the undersides, namely making those dark panels lighter and brush painting the air scoops and small circular panels a more matt aluminium but maybe after the clear to allow handling. The folding nose needs a little detail painting on the bolt/hoist areas too, too small to mask and paint! I'm waiting until the Alclad PA cures for a few days first however. The enamel gloss surface could have been better if I'd just gone for an enamel base at first, prior metallic layers and Mr.Color among others have slightly taken the edge off a super smooth surface but I'll chalk all this up to experience and at least now I know the order I'll use to paint NMF builds. To further highlight my opinions on the difference between an enamel base vs other for this paint check the pic below. The fuel tank was primed with Mr. Color GX lacquer gloss black + levelling thinner then with neat levelling thinner misted over to make it as reflective as I could, it was just as shiney as Humbrol gloss black. I then spayed some very light layers of Alclad PA over, whilst shiney it is miles away from the metallic lustre on the Mirage model itself, I swear it is something chemical wise in the paint doing this. I know in the future if I use the Alclad high shine paint I will only use an enamel base, maybe someone reading here has different findings on using Lacquer bases, if so I'd be interested. The saviour, a very used looking tin of X374! I will let the Alclad PA cure for a bit. I'm unsure weather to clear coat it before and after the decals or just after. I've tested the Matterhorn decals and they are very thin, I don't even think a clear coat is needed for the decal film but to protect the paint it will need it. It is a very delicate paint and will inevitably loose some metallic properties with clear. I've tested the following ones below, For me Tamyia X-22 + levelling thinner was the best by far, it really keeps most of the metallic nature of the paint and provides a great acrylic barrier for some oil washes. The GX is too aggressive, Aqua gloss was ok but not amazing imho, maybe I couldn't spray it right but I didn't waste anymore time testing after X-22 it was that good. The MRP varnishes are new to me, fantastic stuff! The MRP gloss doesn't dull the shine much either but it is so thin it is pointless to use it on order to hide decal film, it's just too thin, amazing stuff for glossing up various smaller sub assemblies though quickly. I plan using these to vary some of the panels to make the surface sheen non uniform again after the X-22 clear. The final decision now is whether to dry brush the Alclad slightly with Humbrol Metalcotes to bring bit of texture to the panels, I have tested it a few times like my first go below, (btw the tank on the right was Mr Color gloss black base, the left used Humbrol enamel, again a big difference in appearance before the dry brushing.) Sometimes it looks very convincing if done lightly and really brings to life the Alclad, other times it looks exactly like what is is, dry brushed silver over Alclad, in testing I've found it hard to keep it a consistent good finish. I'm unsure yet but I guess the model is looking a bit too pristine as it is now, hmm decisions. Thanks for looking! David7 points
-
Well the base work continues got the base shape done and painted then started to set the ship in place using the making Waves beefy7 points
-
Hello Dears, I treachreously use the Pre New year to stab the contract.... One month before the promises of good behaviour.... However I cleaned up a bit my waiting room for kits, I need something NEW !! So, here I start a new thread.... Aaaaand Yes, promise broken here !! for the ones that are not used to my lunacy, Yes, I'm mad !! I bought that one back in the '90s Then I bought this one in the 2000's And last year the third musketeer has landed at CC castle !! I love this trick, 3 kits of the same aircraft in 3 differents brands !! Comparison but not totally rivet counting here... Because.... And I prefer a good laugh !! Now... Goodies.... The Flightpath kit was expensive at the time... And still is, But It's a great deal of researches I will use it as a template mainly... I'm now addicted to our Dear alien's way to deal with detailling... Aka white plastic stuff ! Well now, there will be a FAA Sea Fury to go in my Korean War serie, I have right what I need... HMS Glory cruise with Sammy the storck !! Then A blue Sea Fury !! Aussies this one will be for you !! And finally, a more exotic one !! Tiger stripped Sea fury from the Cuban air force !! Now Ladies and Gents... Some comparisons... Wheels ??? The white metal ones from Flightpath look right ! and will be used as such... Now, Roy's ones look pretty good too !!! Fuel tanks ??? Yes !! Have a good laugh... But spinners are even more fun !! For the fuselage, Jobbycraft is fairly good ! Airfix is faring far better... And side by side... Go away, there's nothing interesting to see... Above pic is Airfix versus Hobbycraft... And then Hobbycraft and Trumpeter .... My great bet will be that no hen will recognize his chick when they will be finished and painted... Let's say one CC'ity... Then, I'll surely start another thread with a greater lunacy... shared with the @Martian Hale..... I'll post pics of the real thing soon... Feel free to share any experiences with these kits !! It's always helpfull !! Thread drift is allowed if not encouraged here Bantering is mandatory !! Take a seat at the Bar, have a Belgian beer and enjoy !! Sincerely. CC6 points
-
Hello all, I have been rather busy working of late but I have found time between working with real aircraft to finish my F-4D. Im sure many are aware that the Tamiya kit is a dream to build and goes together very well, I used Mr Colour paint which I believe are the best on the market at the moment, the colours I used were 303 (FS34102), 310 ((FS 30219) and 320 (Dark Green)……….and black for the bottom 🙂 Sadly the decals were in a poor state and fragmented as soon as they hit the water, so I purchased the Warbirds Decals set (32009) which were superb and set well on the aircraft and into any details very well and recommended. I didn't like the fit of the intakes to the ducting, so I thought it a far better idea to use the Quickboost (QB 32089) set of intake covers. The seats are aftermarket, but I cant tell you who made them as they came free with the kit (from a certain auction site) All the weapon pylons are removable, this is done using small earth magnets in the wings and pylon locations. I hope you like it, it is certainly my best build so far. All comments are welcome, thanks for looking6 points
-
Exactly as I say; I'm not getting fatter, I am merely closer to achieving maximum density.6 points
-
We will all complain vociferously in the RFI about the inauthentic looking glint coming from the gunsights if you don't.6 points
-
... 999. I'm so sick of all the things made overseas these days.. last week I bought a new TV and on the side of the box it says ‘Built in Antenna’... now where the hell is that!6 points
-
While I continue my research and drawings on the SGB I'm about to build, I thought I'd share some information on Turbinia, a model I completed ~6 years ago and entered into the 2014 Model Engineering Exhibition where it won a bronze metal and a cup for the best dispplayed ship model Below are the complete judging notes I prepared for the show: Ship details Turbinia was built by Charles Parsons in 1894 as a demonstration steam yacht to prove the feasibility of using stream turbines to power ships. When she was launched, she was the fastest vessel ever built, eventually achieving almost 35 knots, an amazing speed for a vessel only 100 feet long. Most famously, she gate crashed the 1897 Spithead review where the entire home fleet was drawn up for the Queen’s inspection. Sailing between the lines of battleships, she comfortably outpaced the torpedo boat chasers used as guard ships. I believe that from that point on, all new British warships were fitted with turbines, the propulsion unit that paved the way for the Dreadnought revolution. Her statistics are: Length: 103’ 9” Beam: 9’ Draught: 3’ Turbinia is preserved today in a museum in Newcastle. The model shows the yacht after a funnel rebuild as she was around 1900, generally as she is preserved. Sources The model was built using three plans: A John Haynes plan @ 1:48 scale: contains a number inaccuracies on the lines and the deck-house locations but useful for some details A model Shipwright plan set by Charles Sells @ 1:24 scale: much better, the lines are based on this plan A small plan reproduced in a booklet produced by Ken Smith in 1996, reproduced below, seems to be from original drawings and so taken as very accurate, albeit small Many current photographs of the preserved ship in the Newcastle museum and various contemporary pictures found on-line As with all plan sets drawn by others, once you get into the detail, discrepancies arise. However, the basics start with the frame centres. In Turbinia is was simple to work out that the frames are at 18 inch centres. The enables the deck houses to be positioned exactly as their ends have to rest on frames. It also positions the stanchions (also on frames) and a good guess at the longitudinal breaks in the shell plating. After a lot of thought, as no shell expansion drawing was available, it was decided to use 5 plates at the mid-ships point, giving a maximum plate width just less that 4’. As the keel strake has to be an inner, the bilge strake is an outer and the sheer strake an inner again. This seems to agree with the pictures of her in dry dock following a collision that nearly sunk her. I’m guessing that rivet lines are weaknesses and flush riveting expensive so minimising rivet lines makes sense. The shell plates all meet between frames (often forgotten that they cannot be joined on a frame line) and no two joins are in the same frame space. It may not be exactly as she was built, but it makes sense to construct it in the way. The bilge strake runs smoothly into the top of the flared stern, this can be seen clearly on one of the dry dock pictures. The deck plating is interesting. Three strakes were used as can be seen from the pictures, with a mixture of flush and raised riveting. I’ve followed this pattern from the photographs. The raised riveting makes sense where the jolly boat is as it provides more purchase when handling the boat. I’m not sure why they went to the trouble of flush rivets elsewhere though. Hull construction The basic hull is solid wood constructed around 1/16” ply frames as shown in the drawing below: The frames were drawn on a CAD package with keel slots, printed and stuck to ply with spray mount before cutting out. The keel, also from 1/16” ply was held straight with 2 x ¼” timber sections. After this was sanded to the downward curve of the rear deck, the whole frame was locked together with a flat deck plate from 1/32” ply. The forward deck house was originally designed to be visible and so this section of the hull was planked. In the event, so little could be seen through the desk house windows that extra interior detail here as omitted. Obeche blocks were cut to slide between the frames, glued and then sanded back to the ply frames. This made a very strong and straight hull with the fine stern deck slope correctly featured. The hull was then painted in a clear liquid epoxy to harden it, allowing for further shape refinement and to act as a firm base for the Aluminium hull plating. The cambered deck was added as a superimposed additional 1/32” ply section on top of a central strip of wood sanded fore and aft to simulate the complex compound curve of the deck. The superimposed deck section contained cut-outs for the funnel and deck houses, allowing them to have flat bases. The three propeller shaft tubes (in brass) were set into the frames before the blocks were added. The hull plating lines were marked out on the hull, with the plate butt lines marked to ensure stagger. Each plate was then cut from Aluminium sheet (4 thou for inner strakes, 8 thou for outer) and bonded to the hull with contact adhesive. With the exception of the stern, all plates are single curvature. The stern plates were heated and beaten to shape. The deck plates were similarly marked and cut out, however, on the deck, the frame lines had been drawn so that the rivet detail could be worked out where non-flush riveting is used. The rivets here are made with a wheel from the back of the plate, again remembering that deck plates do not join on frame lines. Deck houses and fittings The deck houses are made in wood and then plated in Aluminium with rivet detail marked out on the reverse as with the deck plating. The wheel house is made from sheet Copper over a wooden buck, silver-soldered as are the wheel house sliding doors. The funnel is made from sheet brass (for strength) and mounted on a wooden Aluminium lined buck. I included the two smoke stacks inside the funnel casing, the boiler is double ended and I assumed two stacks were used. The fittings are built up from custom etched parts (produced by 4D Model Suppliers) from my artwork (shown below) This contains: Deckhouse rivet flanges & rivet strips Steering quadrant pieces Window frames (2 parts each) Stanchion bases Hatches Deck lights Coal scuttles Wheelhouse portholes Propeller blades The 9 left and right hand propellers are a key feature on the vessel. They were made by turning the hubs in brass and then silver-soldering the blades on in a jig. The outer circle holds the blades, which have been turned through 45 deg, for soldering. After which it is cut away. The window frames were soldered together over an Aluminium jig which held them centred. The Perspex glazing was then snapped in. Using relief etching provides the opportunity for including all rivet detail, quite distinctive on some of the hatches and of course the deck-house flanges. The sheet illustrated was etched in 22 thou brass and produced ~300 pieces from an A5 sheet. The colour code means; Red is half etch from face and; Cyan is half etch from rear. The 10’ ships boat was made with tissue paper and dilute PVA over a wooden buck containing the planking lines. This was then lined on the outside in card when dry and then fitted out in the normal manner. The mast and flag yard are scratch made in brass as are the other minor fittings. I’ve fitted her with an Admiralty pattern anchor, not the Hall’s anchor she has today. This type of anchor is shown on some contemporary photographs and looked interesting to me. I’m guessing she could have carried either. Studying the photographs, the life rings were stored on the outside of the handrails, which seems unusual practice, but is probably due to the limited width on deck. Colours and display The colours follow the pattern of the preserved vessel with the exception of the hull below the water line. This has now been painted black, but contemporary references talk about dark green. Early models also show the hull in green and this colour was used on the vessel before it was moved to Newcastle. This illustration shows a model from the Science Museum. The hull is dark green below the water-line (which is set too low on this model, see contemporary pictures showing a much higher water line). I decided to use this colour for the model, there is plenty of evidence of a green hull and it lifts the model as it would have the actual vessel. The name on her side was a custom water slide made based on a drawing of the ship as preserved. Display is always a difficult problem. For this model, I decided to display it in a simulated dry dock to set it off and add scale to the model. Turbinia is a strange model to scale in your mind as there are no natural scale clues that really help. Adding the dry dock and the figure touching up the paint anchors the scale well. I took some hints from pictures of her in dry dock after a collision but the actual dry dock is not a true model, more a complex stand. She is shown finished and ready to re-float with all her paintwork bright, though age on the deck houses show she is not new. The bright paintwork is set-off by the dull grey dock. No flags are flown as she is not yet floating. The next post shows the completed model5 points
-
Have any of you daft buggers ever tried eating one of those foul ovoids? Well done for chucking away the eggloid Steve 👏👏👏👏👏👏👏👏👏👏👏5 points
-
Desert Pink? Evil child! The only schemes for Buccaneers involve Extra Dark Sea Grey or Squirrel Grey at a pinch and have Royal Navy written on them. I shall consider your penance. Martian the Just 👽5 points
-
Some visible progress..... And a bit of work behind the scenes. - fuselage halves have been thinned out - particularly in the cockpit area. Around half the kit resin has been removed using (wait for it) - an angle grinder! Carefully wielded and with appropriate safety gear of course! - weight added to nose, plenty of it, including some lead under the seat. Don't want a tail sitter here. - fuselage superglued together and cleaned up - cockpit bulkhead and floor added - happy with the way this has turned out. - wings joined on with the aid of 2 x brass tube spars - should ensure it stays put. the lego is now my standard process for squaring up fuse vs wings. Essential with this sort of kit to make sure the basic alignment is correct... Next steps are blending in the wing joins - and adding tailplane. And pick up some decals from NZ - Oldmodeldecals is the source for that!! Actually pleased with the way this is coming together - yes it requires some modelling skill, but it is not causing any angst?5 points
-
Ah, the old E = mc2 stuff eh? If that's true, even in theory, then as my mass increases shouldn't I have more energy? Not working for me…5 points
-
If the electrics are by Lucas, the headlights go out ...5 points
-
There is a little more to it than that. The faster you go the more time slows down for you relative to a stationary observer. Your length also shrinks, and your mass increases.5 points
-
it lives.... sorta 50620939 by losethekibble, on Flickr Some of the removed plastic visible, and some 109 bits in the background. 50620940 by losethekibble, on Flickr over the 'plan' 50620941 by losethekibble, on Flickr After this I was then trying to get things to align, realised the wing was too far forward, making it the wrong angle, then it was trying to get the front and rear fuselage sections to join. Eventually I realised that the rear part was too narrow at the front, and too wide near the tail, and more fun was had trying to trim, shim, bend and jiggle parts. I think I have a working solution, but it's now late, and don't want to start gluing, and was finding the now reshaped rear part to be getting springy trying to align with gaffa tape and a shim, and I was getting tired and irritated with bits slipping and and not wanting to stay in place... , No pics as would require another hand at least to do them.... hmm, I do have a mini tripod somewhere. I'm quietly pleased, and it hasn't gone horribly wrong. Yet. And been good bit modelling practice and theory, by this I have been thinking through problems, and methods for their solution when having a lie down or while going off too sleep.... which I now need to do. cheers T5 points
-
Ok you rotten blighters. So I was buying a newspaper yesterday morning and saw some sort of Cadbury cream egg wrapped in purple foil........and before I could stop myself I’d spent my pocket money.....(chucked the egg away - can’t stand em....) Seeing as I had a spare gun sight (not having lost any to the carpet monster) I thought it was worth having a play - if only to give you rotters a laugh.......It’s not like I’m in a hurry or owt. So I punched out a few discs of the de-egged purple foil of various sizes 0.8mm to 1.2mm And decided it was easiest to stick the the largest one to the back of the gun sight using Klear. And then I filled the hole from the top with Krystal Klear. Actually my little old bottle of Krystal Klear had partially dried out and as I had to thin a sticky lump of Krystal Klear with tap water to get it to flow I wasn’t at all sure how it would dry. Anyways it dried pretty clear and glossy, with just a hint of purple to be seen. So I suppose it sort of worked Of course I have no idea if your right Kirk that there’s a sort of purple/green glint to the lens - I wouldn’t put it past you........ And anyways I couldn’t find a purple/green wrapped cream egg so just purple it was...... And also of course it’s a complete waste of time cos the lens is only 0.8mm in diameter and you can’t see the purple glint from any sensible model viewing distance. You need a camera close up under a bright light for that But see what you made me do? Now I’ve got to decide whether to do it to the 2 guns sights I’m gonna actually fit to the TWU Hawk.5 points

copy.thumb.jpg.d8f94c146f5d2da12880c4799901d6dc.jpg)


.thumb.jpg.ad2b820bfdebfdb8541e9255a05f38c7.jpg)


.thumb.jpg.b4a5069fd2c2dd5708ce1694345c5b11.jpg)


This leaderboard is set to London/GMT+01:00